Asus WL-160W User manual

Quick Start Guide
Wireless Local Area Network Adapter
WL-160W
(For 802.11n draft, 80211g & 80211b Networks)
®
QE2920/ Nov. 2006

2 ASUS WLAN Adapter
English
Quick Start Guide
Installation Procedures
Important: Install the WLAN Adapter utilities before inserting the WLAN
Adapter into your computer.
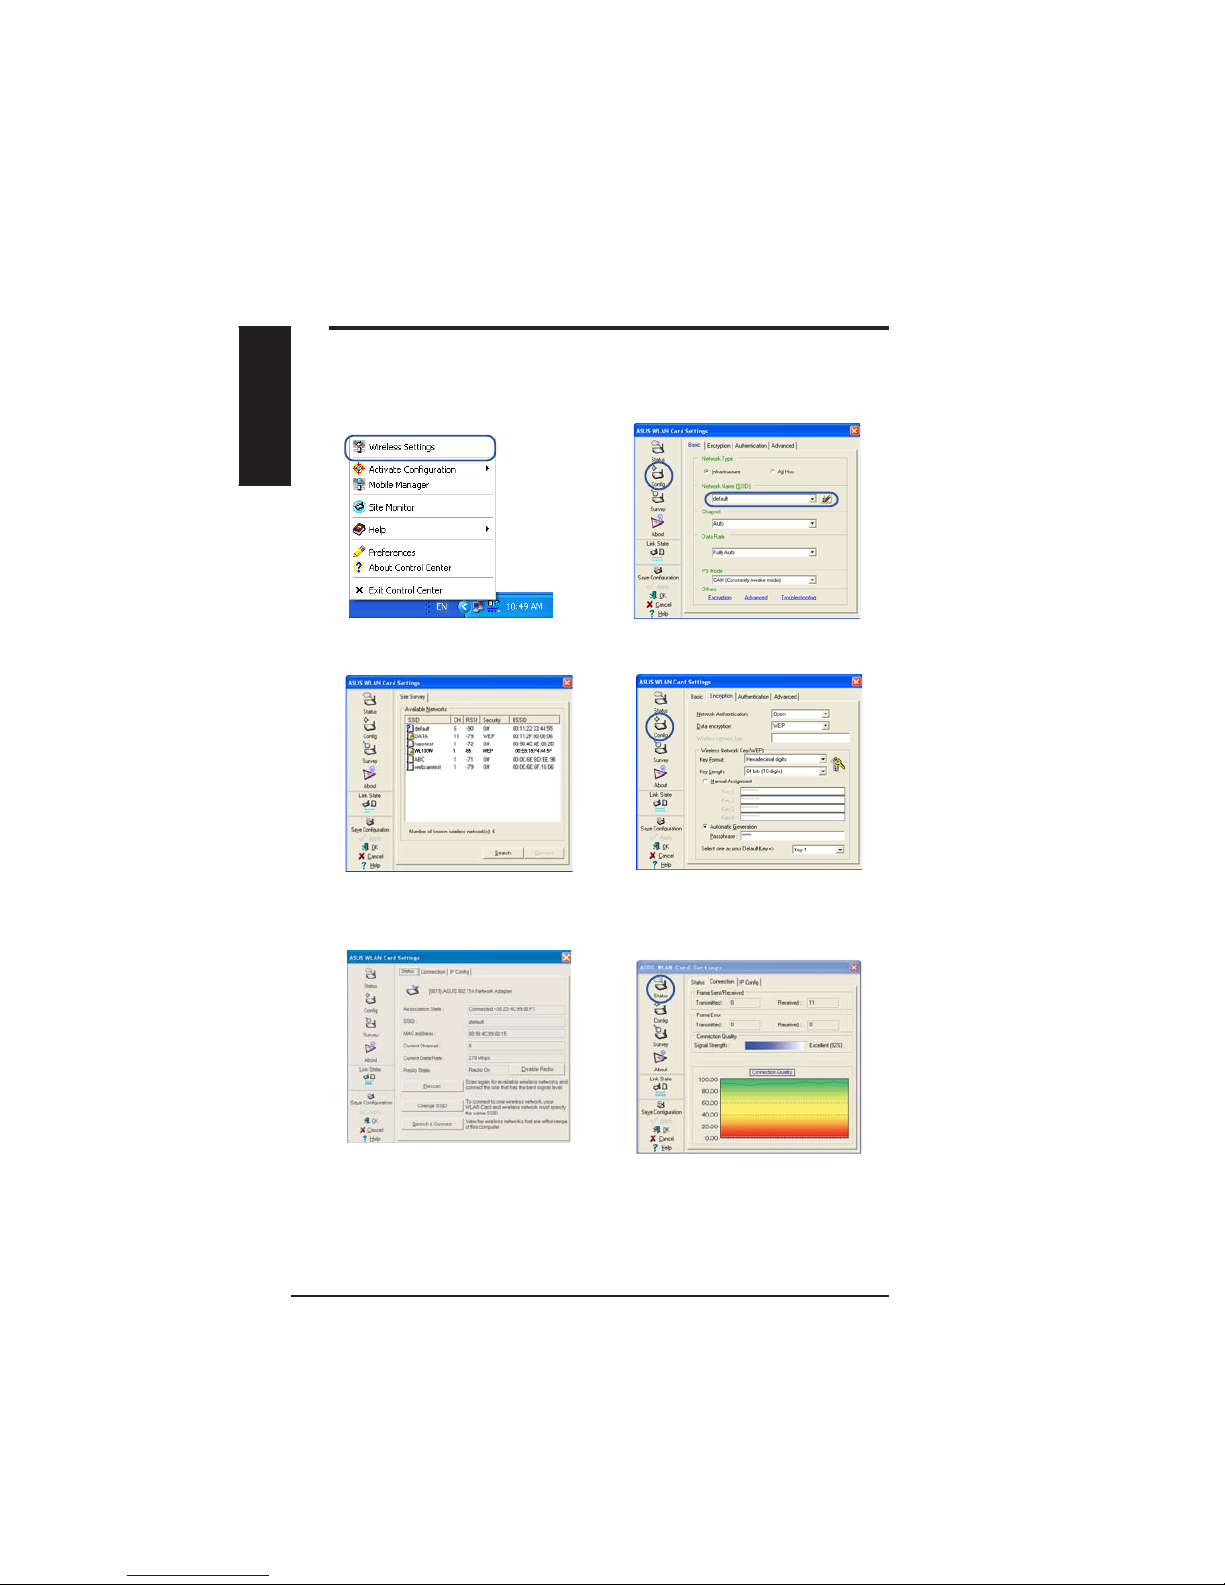
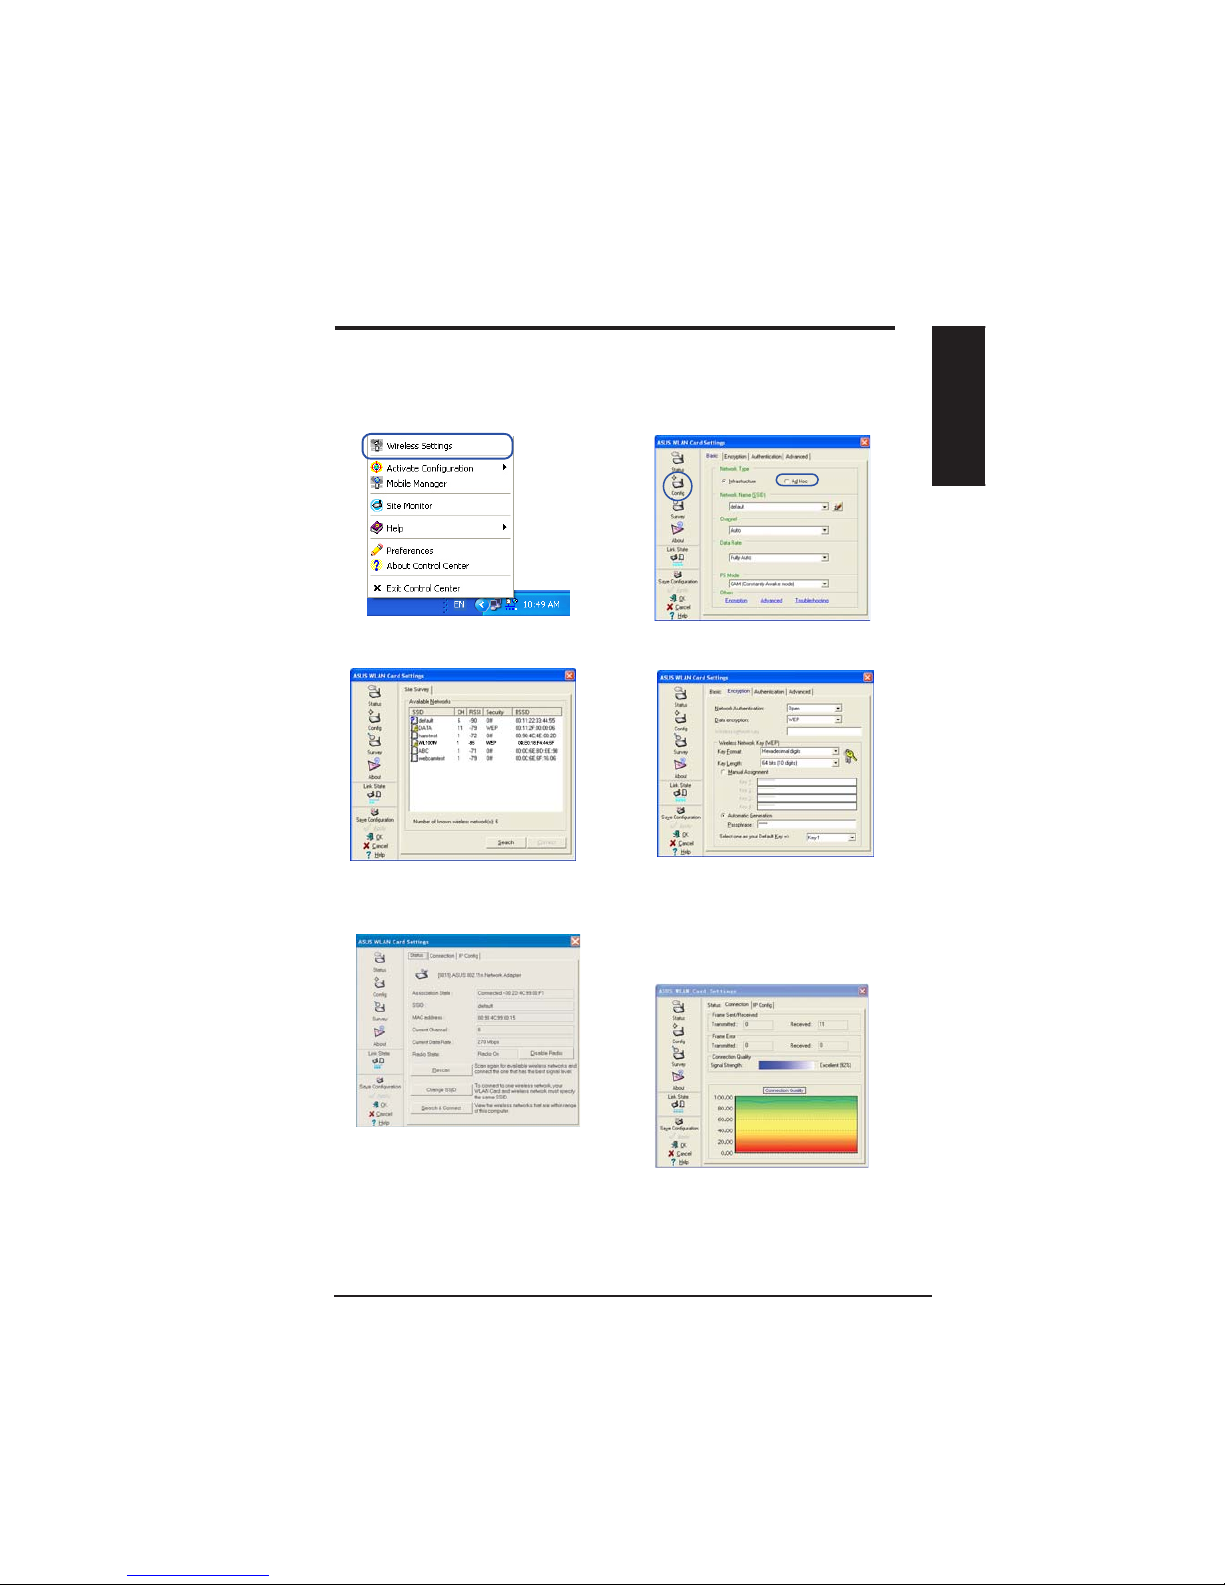
Installing the WLAN utilities and driver
Follow these instructions to install the
WLAN Adapter utilities and driver. Insert
the support CD into your optical drive.
If autorun is enabled in your computer,
the CD automatically displays the utilitymatically displays the utility
menu. Click Install ASUS WLAN
Adapter Utilities/Driver. If autorun is
disabled, double-click SETUP.EXE in the
root directory of the CD.
Carefully insert the WLAN Adapter into
your computer’s PCMCIA slot. Windows
ZLOO DXWRPDWLFDOO\ GHWHFW DQG FRQÀJXUH WKH
:/$1$GDSWHUXVLQJWKHXWLOLWLHVDQGGULYHUV
installed in the previous steps.
:LQGRZV;3 XVHUV :KHQ WKH SURJUDP LV
ODXQFKHGIRUWKHÀUVWWLPHGXULQJ:LQGRZV
restart), you are asked to choose one utility
WRFRQILJXUHWKH:/$1$GDSWHU6HOHFW
"Only use our WLAN utilities and disable
Windows wireless function".
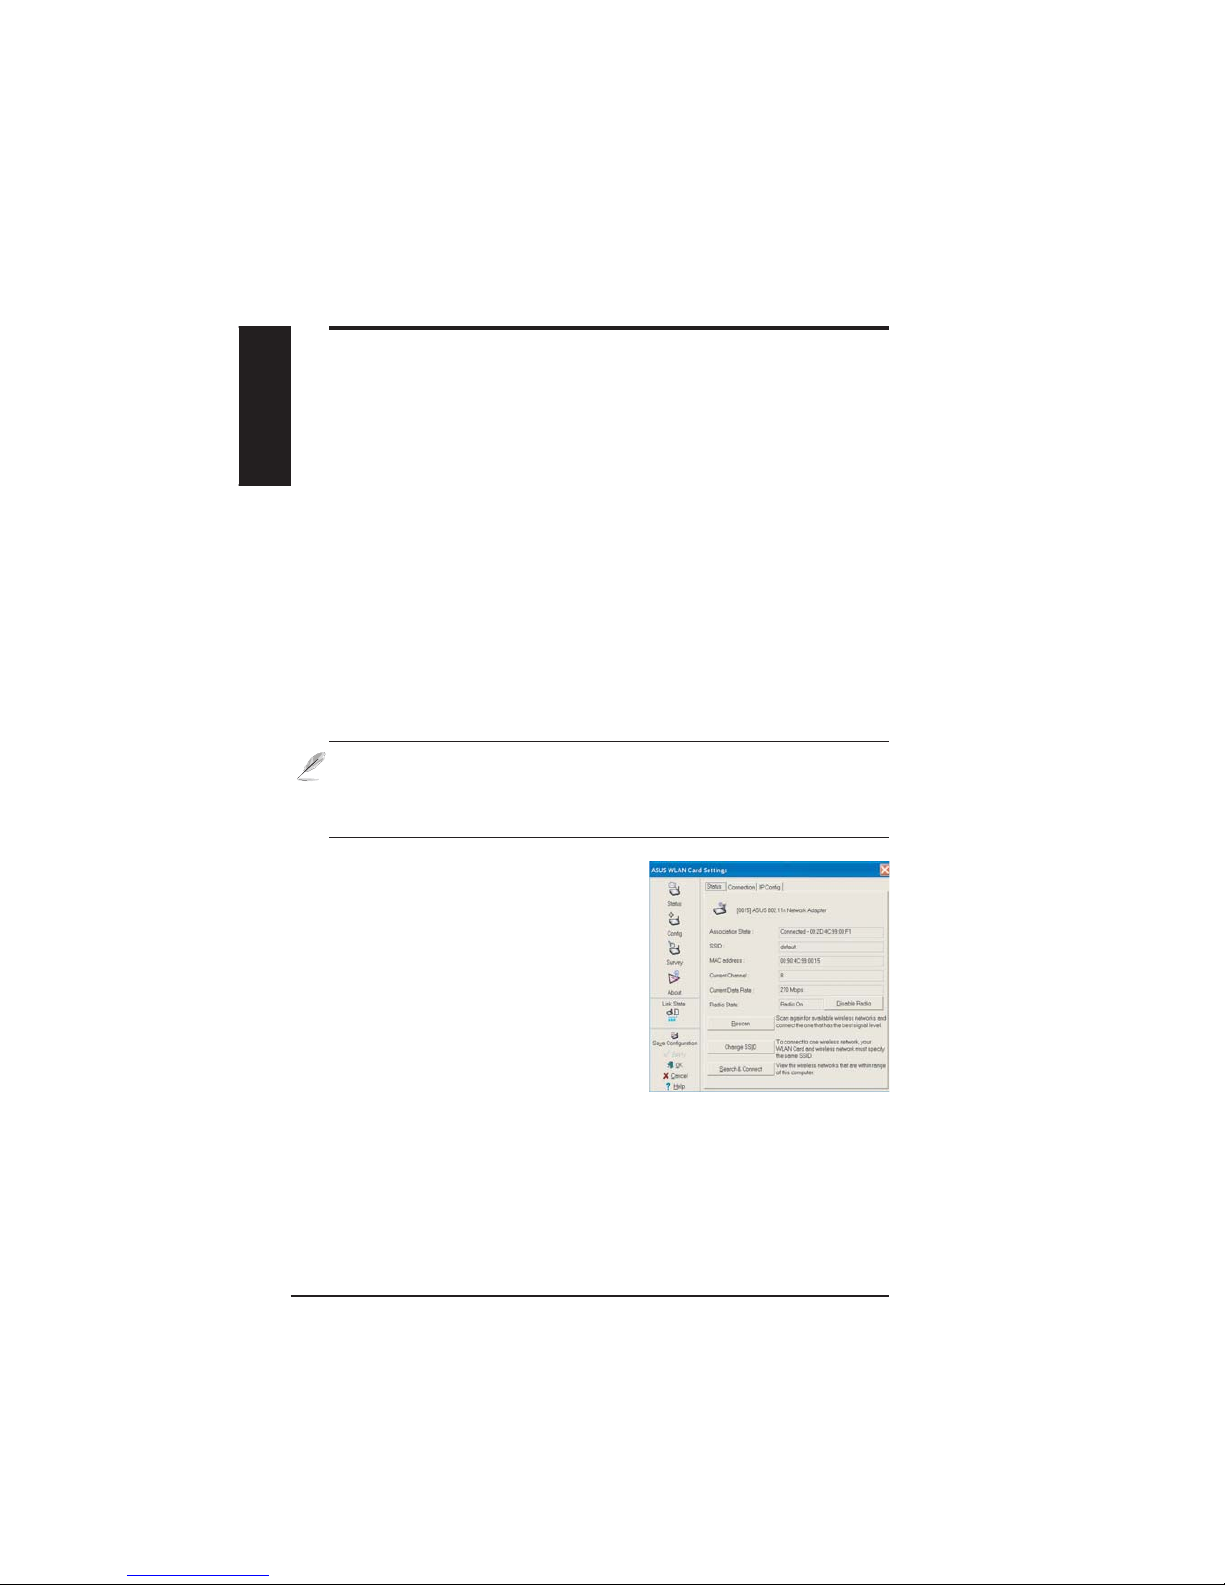
Reading the WLAN status indicators
The device comes with two LEDs that indicate the status of the WLAN
Adapter.
ACT LED
Blinking:7UDQVPLWWLQJGDWDWKHEOLQNLQJ
speed indicates the link speed.
OFF: Radio off or Adapter is disabled.
LINK LED
ON: Connected to wireless device.
OFF: No wireless connection.
LINK
ACT

ASUS WLAN Adapter 3
English
Quick Start Guide
One Touch Wizard
8VH 2QH 7RXFK :L]DUG WR VHWXS \RXU ZLUHOHVV FRQQHFWLRQ ZLWK DQ H[LVWLQJ
wireless LAN.
1. Launch One Touch Wizard from Start
menu and click Next to set up your
wireless network.
2. Select an AP from the Available Networks
then click Next.
3. Connection is complete. Click Next
to setup the IP address for the WLAN
Adapter.
4. Choose to obtain an IP address or to
DVVLJQVWDWLFDGGUHVVPDQXDOO\IRU\RXU
:/$1$GDSWHU:KHQ,3VHWWLQJLV
complete, click Finish to exit the One
Touch Wizard.
Note: If the access point you want to connect has set up encryption
SROLFLHV\RXPXVWFRQÀJXUHWKHVDPHHQFU\SWLRQRQ\RXU:/$1$GDSWHU
Select "Configure your wireless LAN settings" radio button in step 2
and make the settings accordingly. When the encryption settings are
complete, you can launch the One Touch Wizard once again from the Start
menu to set up the connection with your AP.

4 ASUS WLAN Adapter
English
Quick Start Guide
&RQÀJXULQJZLWKWKH:/$1XWLOLW\,QIUDVWUXFWXUH
8VH$686:/$1XWLOLW\WRJHWFRQQHFWHGZLWKDQH[LVWLQJZLUHOHVVQHWZRUN
6. Check the Connection tab to see the
VLJQDOVWUHQJWK&OLFNOK to exit the utility.
5. Check the StatusSDJHWRVHHWKH
association state. If connection is
established, the box shows “Connected -
xx:xx:xx:xx:xx:xx”.
3. Use Site Survey if you don’t know the
66,'RI\RXUDFFHVVSRLQWV
(QFU\SWLRQVHWWLQJVPXVWPDWFK WKRVH
at the access point. Ask your network
DGPLQLVWUDWRUDERXWVHWWLQJVLIQHFHVVDU\
Click Apply WRDFWLYDWHWKHVHWWLQJV
5LJKWFOLFN WKH ZLUHOHVV FRQQHFWLRQ LFRQ
and select Wireless Settings.
2. Check the ConfigSDJHWRVHWWKHSSID
QHWZRUNQDPHWRWKDWRI\RXUZLUHOHVV$3

ASUS WLAN Adapter 5
English
Quick Start Guide
&RQÀJXULQJZLWKWKH:/$1XWLOLW\$G+RF
The WLAN adapter supports Ad Hoc mode which allows communication
between wireless stations without an AP.
&OLFNWKH&RQILJEXWWRQDQGVHWWKH
WLAN Card to $G+RFconnection mode.
3. Click the Survey button to scan for Ad
Hoc nodes. Select the node you want to
communicate with and press Connect.
,IWKHHQFU\SWLRQVHWWLQJVRI\RXU:/$1
Adapter are different from those of the
other Ad Hoc nodes, you are prompted
to make the encryption of the two nodes
identical. Click Apply to activate the
VHWWLQJV
5LJKWFOLFN WKH ZLUHOHVV FRQQHFWLRQ LFRQ
and select Wireless Settings.
5. Check the StatusSDJHWRVHHWKHDVVRFLDWLRQ
state. If connection is established, the box
shows “Connected - xx:xx:xx:xx:xx:xx”.
6. Check the Connection tab to see the
VLJQDOVWUHQJWK&OLFNOK to exit the utility.

6 ASUS WLAN Adapter
English
Quick Start Guide
Using the Control Center
7KH&RQWURO&HQWHUWDVNEDULFRQGLVSOD\VWKHIROORZLQJLQIRUPDWLRQ
/LQN TXDOLW\ RI WKH :/$1$GDSWHU ([FHOOHQW *RRG )DLU 3RRU 1RW
Linked)
:KHWKHUWKH:/$1$GDSWHULVFRQQHFWHGWRDQHWZRUN%OXH
&RQQHFWHG*UD\1RW&RQQHFWHG
Taskbar Icon and Status
Wireless Status Icons (on the taskbar)
Excellent link quality and connected to Internet ,QIUDVWUXFWXUH
Good link quality and connected to Internet ,QIUDVWUXFWXUH
Fair link quality and connected to Internet ,QIUDVWUXFWXUH
Poor link quality and connected to Internet ,QIUDVWUXFWXUH
Not linked but connected to Internet ,QIUDVWUXFWXUH
Excellent link quality but not connected to Internet ,QIUDVWUXFWXUH
Good link quality but not connected to Internet ,QIUDVWUXFWXUH
Fair link quality but not connected to Internet ,QIUDVWUXFWXUH
Poor link quality but not connected to Internet ,QIUDVWUXFWXUH
Not linked and not connected to Internet ,QIUDVWUXFWXUH
ASUS WLAN Control Center
ASUS WLAN Control Center is an application which makes it easier to launch
:/$1DSSOLFDWLRQVDQGDFWLYDWHQHWZRUNORFDWLRQVHWWLQJV7KH:/$1&RQWURO
Center starts automatically when system boots. When WLAN Control Center is
UXQQLQJ\RXFDQVHHD&RQWURO&HQWHULFRQRQWKH:LQGRZVWDVNEDU
Starting the Control Center
• Select ASUS WLAN Control Center in Windows Start
menu, or
• Double-click the ASUS WLAN Control Center icon on the desktop.

ASUS WLAN Adapter 7
English
Quick Start Guide
Taskbar icon - Left-click menu
Left-click the taskbar icon to show the
IROORZLQJPHQXLWHPV
•Wireless Radio On – Turns the
wireless radio ON.
•Wireless Radio Off – Turns the
wireless radio OFF.
•Search & Connect – View the
properties of available access points.
•Wireless Option :LQGRZV®XP only) – Choose Windows®Wireless
=HUR &RQÀJXUDWLRQ :=& VHUYLFH RU$686 XWLOLWLHV WR FRQÀJXUH \RXU
WLAN Adapter.
Taskbar Icon - Launch Wireless Settings
'RXEOHFOLFNWKHWDVNEDULFRQ WR ODXQFK WKH :LUHOHVV 6HWWLQJV XWLOLW\WRODXQFKWKH:LUHOHVV6HWWLQJVXWLOLW\
Taskbar icon - Right-click menu
5LJKWFOLFNWKHWDVNEDULFRQWRVKRZWKHIROORZLQJPHQXLWHPV
•Wireless Settings²/DXQFKHV:LUHOHVV6HWWLQJVDSSOLFDWLRQ
•$FWLYDWH&RQÀJXUDWLRQ²$OORZV\RXWRFKRRVHDSUHVHWSURÀOH
•Mobile Manager²/DXQFKHV0RELOH0DQDJHUDSSOLFDWLRQ
•Site Monitor – Launches the Site Monitor application.
•Preferences ² &XVWRPL]HV WKH &RQWURO &HQWHU SURJUDP<RX FDQ
create a Control Center shortcut on the desktop and decide whether to
start Control Center when system boots.
•About Control Center-Shows the version of Control Center.
•Exit ²&ORVHVWKH&RQWURO&HQWHUSURJUDP
Taskbar Left-Click Menu

8 ASUS WLAN Adapter
English
Quick Start Guide
Status - Status
<RXFDQYLHZWKHLQIRUPDWLRQDERXWWKH
WLAN Adapter from the Status menu.
The status fields are blank if the WLAN
$GDSWHULVQRWLQVWDOOHG<RXFDQWXUQ
RIIWKH:/$1$GDSWHUE\FOLFNLQJWKH
“Disable Radio” button.
Association State
Displays the connection status as follows:
Connected - The adapter is now associated with one wireless LAN device.
:KHQRSHUDWLQJLQ ,QIUDVWUXFWXUHPRGHWKLV ILHOGVKRZVWKH0$&DGGUHVV
RI WKH DFFHVV SRLQW ZLWK ZKLFK WKH :/$1$GDSWHU LV FRPPXQLFDWLQJ :KHQ
RSHUDWLQJLQ$G+RF PRGH WKLV ÀHOGVKRZVWKH YLUWXDO0$&DGGUHVVXVHG E\
FRPSXWHUVSDUWLFLSDWLQJLQWKH$G+RF network.
ASUS Wireless Settings Utility
:LUHOHVV6HWWLQJVLVDQDSSOLFDWLRQIRUPDQDJLQJWKH:/$1$GDSWHU8VH:LUHOHVV
6HWWLQJVWRYLHZRUPRGLI\WKHFRQÀJXUDWLRQVHWWLQJVRUWRPRQLWRUWKHRSHUDWLRQDO
VWDWXVRI\RXU:/$1$GDSWHU:KHQ:LUHOHVV6HWWLQJV LVODXQFKHG\RXFDQ
VHHWKHWDEEHGSURSHUW\VKHHWVZKLFKFDWHJRUL]HWKH FRQÀJXUDWLRQRSWLRQVLQWR
JURXSV
Starting Wireless Settings
• Open the Windows Control Panel, then double-click the ASUS WLAN
Adapter Settings icon.
or
• Click the Windows Start button, select Programs | ASUS Utility |
WLAN Adapter | Wireless Settings.
or
5LJKWFOLFNWKHControl Center icon on the Windows taskbar and
select Wireless Settings.
NOTE: If you have more than one ASUS WLAN device installed on your
computer, you may see a device selection window when you launch the “
Wireless Settings” utility. Select the device you want when such situation
occurs.

ASUS WLAN Adapter 9
English
Quick Start Guide
Scanning... :7KHVWDWLRQLVWU\LQJWRDXWKHQWLFDWHDQGDVVRFLDWHZLWKDQDFFHVV
point or Ad Hoc node.
Disconnected - The WLAN Adapter is installed to the system, but not yet
connected to a wireless device.
SSID:
'LVSOD\VWKH6HUYLFH6HW,GHQWLÀHU66,'RIWKHGHYLFHWKDWWKHDGDSWHU
LVHLWKHUDVVRFLDWHGRULQWHQGLQJWRMRLQ
MAC address:
Shows the hardware address of the WLAN Adapter. MAC
DGGUHVVLVDXQLTXHLGHQWLÀHUIRUQHWZRUNLQJGHYLFHVW\SLFDOO\ZULWWHQDVWZHOYH
KH[DGHFLPDOGLJLWVIURPWKURXJKDQG$WKURXJK)VHSDUDWHGE\FRORQVLH
()&
Current Channel:
Displays the radio channel to which the adapter
LVFXUUHQWO\WXQHG7KLVQXPEHUFKDQJHVDV WKHUDGLRVFDQV WKHDYDLODEOH
channels.
Current Data Rate:
'LVSOD\VWKHFXUUHQWGDWDUDWHLQPHJDELWVSHUVHFRQG
0ESV
Radio State:
Shows the wireless radio status: ON or OFF.
Radio On::KHQWKHZLUHOHVVUDGLRLVWXUQHG21WKHLFRQRQWKHULJKW
DSSHDUVLQWKHXSSHUOHIWRIWKH6WDWXVSDJH
Radio Off- :KHQWKHZLUHOHVVUDGLRLVWXUQHG2))WKHLFRQRQWKHULJKW
DSSHDUVLQWKHXSSHUOHIWRIWKH6WDWXVSDJH
Buttons
Rescan – Make the WLAN Adapter rescan all available devices. If the current
OLQNTXDOLW\RUVLJQDOVWUHQJWKLVSRRUUHVFDQQLQJFDQEHXVHGWRSXVKWKHUDGLR
off a weak access point and search for a better link with another access point.
This function usually takes several seconds.
Change SSID – Click this button to set the SSID to that of the AP you want to
connect.
Search & Connect – Click this button to connect to an available wireless AP.
127()RUQSHUIRUPDQFHVHOHFW0+]EDQGZLGWKLQZLUHOHVV
router. Channel option will depend on the bandwidth that you select.

10 ASUS WLAN Adapter
English
Quick Start Guide
6DYH&RQÀJXUDWLRQ
:KHQ\RXPDNHVHWWLQJVIRUD
FHUWDLQ ZRUNLQJHQYLURQPHQW\RX
PD\QHHGWRVDYH\RXUVHWWLQJVWRD
SURÀOHVRWKDW\RXFDQHDVLO\VZLWFK
WRWKHVHWWLQJVZLWKRXWUHSHDWLQJWKH
FRQILJXUDWLRQV)RUH[DPSOH\RX
FDQVHW SURÀOHVIRUZRUNKRPHDQG
RWKHUVLWXDWLRQV:KHQ\RXWUDYHOIRUPKRPHWRZRUNFKRRVHWKHRIÀFHSURÀOH
WKDWFRQWDLQVDOO \RXUVHWWLQJVIRURIILFH XVH:KHQ\RX WUDYHOEDFNKRPH
FKRRVHWKH´KRPHµSURÀOH
$FWLYDWH&RQÀJXUDWLRQ
$XWRURDPLQJLVHQDEOHGE\GHIDXOWDQG
makes the Adapter automatically switch to
$3V RI EHWWHU VLJQDO<RX FDQ XQFKHFN LW LI
\RXZDQWWRFRQQHFWWRDVSHFLÀHG$3XVLQJ
DSDUWLFXODUSURÀOH
Status - Connection
<RXFDQYLHZWKHFXUUHQWOLQNVWDWLVWLFVDERXW
the WLAN Adapter. These statistics are
updated once per second and are valid if the
WLAN Adapter is correctly installed.
Frame Sent/Received
Transmitted - The number of frames that
were transmitted.
Received - The number of frames that were received.
Frame Error
Transmitted - The number of frames that were not successfully transmitted.
Received - The number of frames that were not successfully received.
Connection Quality
Signal Strength - Shows the link quality of the access point or Ad Hoc node
WKH :/$1$GDSWHU LV FXUUHQWO\ FRQQHFWHG WR 5DWLQJV DUH ([FHOOHQW *RRG
Fair, and Poor.
Overall Connection Quality
7KH RYHUDOO FRQQHFWLRQ TXDOLW\ LV GHULYHG IURP WKH FXUUHQW VLJQDO VWUHQJWK$
JUDSKLFFKDUWXVHVSHUFHQWDJHWRVKRZVLJQDOTXDOLW\
Other manuals for WL-160W
1
Table of contents
Other Asus Network Card manuals

Asus
Asus WL-100W User manual

Asus
Asus WL-120g V2A User manual

Asus
Asus WL-107G User manual

Asus
Asus PL-X31 - Bridge User manual

Asus
Asus WL-120g User manual

Asus
Asus USB-N66 User manual

Asus
Asus PCI-G31 User manual

Asus
Asus P5Q3 Deluxe WiFi-AP n User manual

Asus
Asus WL-103g User manual

Asus
Asus PCE-AC66 User manual


