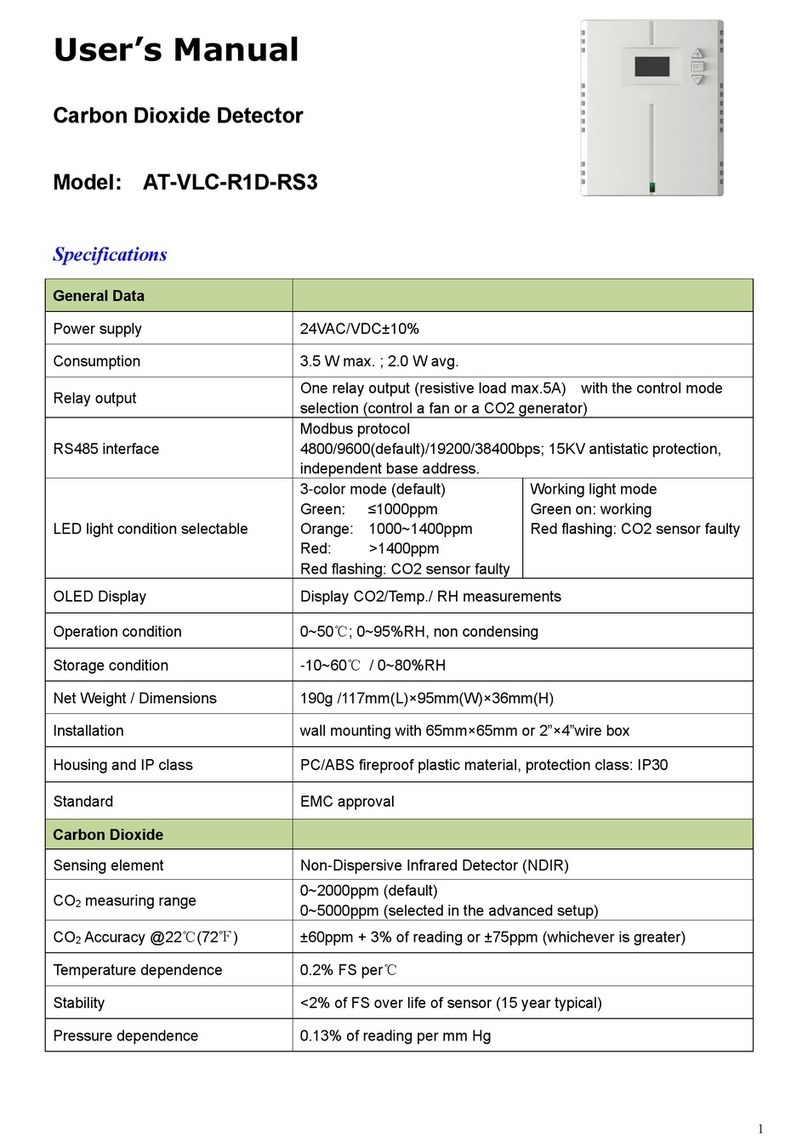
Atal AT-VLC-A2-RS-VAV User manual

1
User’s Manual
Carbon Dioxide Detector
Model: AT-VLC-A2-RS-VAV
Specifications
General Data
Power supply
24VAC/VDC±10%
Consumption
3.5 W max. ; 2.0 W avg.
Analog outputs
Two 0~10V outputs, PID or linear
RS485 interface
Modbus protocol 4800/9600(default)/19200/38400bps;
15KV antistatic protection, independent base address.
LED light condition selectable
3-color mode (default)
Green: ≤1000ppm
Orange: 1000~1400ppm
Red: >1400ppm
Red flashing: CO2 sensor faulty
Working light mode
Green on: working
Red flashing: CO2 sensor faulty
OLED Display
Display CO2 or CO2/temp. or CO2/Temp./ RH measurements
Operation condition
0~50℃; 0~95%RH, non condensing
Storage condition
-10~60℃ / 0~80%RH
Net Weight / Dimensions
190g /117mm(L)×95mm(W)×36mm(H)
Installation
wall mounting with 65mm×65mm or 2”×4”wire box
Housing and IP class
PC/ABS fireproof plastic material, protection class: IP30
Standard
EMC approval
Carbon Dioxide
Sensing element
Non-Dispersive Infrared Detector (NDIR)
CO2 measuring range
0~2000ppm (default)
0~5000ppm (selected in the advanced setup)
CO2 Accuracy @22℃(72℉)
±60ppm + 3% of reading or ±75ppm (whichever is greater)
Temperature dependence
0.2% FS per℃
Stability
<2% of FS over life of sensor (15 year typical)
Pressure dependence
0.13% of reading per mm Hg
Calibration
ABC Logic Self Calibration Algorithm
Response time
<2 minutes for 90% step change typical

2
Dimension and Mounting
◆Please note the power supply is 24VAC/VDC±10%. Don’t install the detector with over the voltage.
◆First of all, please prepare a flat head screwdriver and gently put it deep inside of the hole on the bottom
of the detector housing. Then slant the screwdriver and open the cover gently. Do not mount it near
diffuser or any steam source, in direct sunlight.
◆Mount the wall plate. Place the detector against the wall at desired location; make sure wires can be
passed through the notch on the wall plate.
◆Connect wires to terminal strips. Make sure wiring connection correct and secure.
◆Finally close the cover gently.
Wiring Diagram
Signal update
Every 2 seconds
Display resolution
1ppm
Warm-up time
2 hours (first time) / 2 minutes (normal operation)
Temperature and RH (option)
Temperature sensor (selectable)
Digital integrated temperature and humidity sensor or
NTC thermistor
Measuring range
-20~60℃/-4~140F 0~100%RH relative humidity
Accuracy
Temp.: <±0.5℃@25℃RH: <±3.0%RH (20%~80%RH)
Figure 1

3
Instruction
1. Please always cut off the power before open or clean the detector.
2. As powered on, the indicating light is red through the middle bottom of the front cover. It indicates the
transmitter working on. The number on OLED screen displays counts down from 10 seconds to 0, and
then it starts displaying measured CO2, temperature and relative humidity values. CO2 value starts from
2000ppm and it get stable in half of an hour for the first time powered on.
3. The LED displays green when CO2 <1000ppm, displays yellow when 1000ppm≤CO2<1400ppm, and
display red when CO2≥1400ppm.
4. The OLED screen shows CO2 measured value or CO2 / Temp measured values or CO2 / Temp / RH
measured values. As shown in figure 1.
Operation
1. After turn on the power, all parameters settings can be switched by SET key. The ▼ or ▲ key is used to
increase or decrease the parameter setting values.
2. For temperature output, three modes can be selected by Advanced Setup or Modbus. Mode 1 is PID
output, when pressing SET once, the temp. PID setpoint can be adjusted. Mode 2 is linear output, when
pressing SET once, temp. min. value can be adjusted for 0V, when pressing SET once again, temp. max.
value can be adjusted for 10V. Mode 3 is for temp. adjusted value, -3, -2, -1, 0, +1, +2, +3 are
corresponding to 0V, 1.66V, 3.32V, 4.98V, 6.64V, 8.3V, 9.96V respectively. When pressing SET once,
the values can be adjusted by ▼ or ▲ key.
3. For CO2 output, two modes can be selected by Advanced Setup or Modbus. Mode 1 is PID output,
when pressing SET twice, the CO2 PID setpoint can be adjusted. Mode 2 is linear output, when
pressing SET twice, CO2 min. value can be adjusted for 0V, when pressing SET twice again, CO2 max.
value can be adjusted for 10V.
4. Please note, do not power off within 6 seconds after any settings, or the new settings will not be saved.
Analog output selection
Open the cover, five black blocks can be find on the central of PCB. Connect bottom two pins of S1-S4, the
analog will be voltage output, connect top two pins of S1-S4, it will be current output. Connect bottom two
pins of J1, the analog will be 0~10V or 0~20mA, connect top two pins of J1, it will be 2~10V or 4~20mA. See
below diagram.

4
Advanced Setup
Cut off the power and open the cover, there are four DIP switches on the middle right side of circuit board.
DIP1=OFF Normal use, DIP1=ON Set advanced parameter Default: OFF
DIP2=OFF Centigrade DIP2=ON Fahrenheit Default: OFF
DIP3 – un-effective Default: OFF
DIP4 – un-effective Default: OFF
When DIP1=ON, all advanced parameters can be set. The ▼ or ▲ key is used to set or change the
corresponding set points. The digital flash indicates in the process of setting. After the digital isn’t flash, the
modified digital is saved. Press SET key can switch each parameter. As shown in figure 2.
Note: DIP switches and button will effect when countdown of starting up is completed.
LCD
Parameter
Range of setup
Default
1
CO2 mode
1- PID output; 2-linear output
1
2
Temp. mode
1- PID output; 2-linear output; 3- adjusted value
1
3
Modbus address
1~247
1
4
Modbus baud rate
4800/9600/14400/19200/38400bps
9600
5
Modbus Parity bits and Stop bits
1- None parity, 1 stop bit.
2- None parity, 2 stop bit.
3- Odd parity, 1 stop bit.
4- Even parity, 1 stop bit.
2
6
Temperature calibration
±5.0℃/41F
0.0
7
Humidity calibration
±10%RH
0.0
8
CO2 calibration
±300ppm
0
9
CO2 control logic
0- Increase CO2 1- Decrease CO2
1
10
Temp. control logic
0- heating 1- cooling
0
11
Warm up time
1~600s
10
12
Max range of CO2
measurement & set value
400~10,000ppm
2000
13
LED work mode
0- Three color (indicate changes of CO2 level)
1- Two color (Work indicating lights)
2- Un-effective
0
14
Green to Yellow critical point
400~5000ppm
1000
15
Yellow to Red critical point
400~5000ppm
1400
16
Ineffective
Please do not change it.
0
Figure 2

5
Modbus Register
Mode: RTU (MSB First)
Baud Rate: 1-4800 2-9600 3-14400 4-19200 5-38400 bps default: 2-9600bps
Start Bits: 1
Data Bits: 8
Stop Bits: 1 / 2 default : 2
Parity: None / Odd / Even default: None
Modbus Address: 1~247 default: 1
Register Map
Support Function: 3 4 6 16
Starting
Register
Decimal
Data Description
Function
Read/
Write
Length
Format
Valid Response
0
CO2 Measurement
4
R
2
Float inverse
0~5000 ppm
2
Temperature Measurement
4
R
2
Float inverse
0.0~50.0 ℃
4
Humidity Measurement
4
R
2
Float inverse
0.1~100.0 %RH
Starting
Register
Decimal
Data Description
Function
Read/
Write
Length
Format
Selection
Default
0
Set co2 mode
3/6
R/W
1
INT16
1-PID output
2-linear output
1
1
Set temperature mode
3/6
R/W
1
INT16
1-PID output
2-linear output
3-adjusted value
1
2
CO2 PID setpoint
3/6
R/W
1
INT16
400~2000
800
3
CO2 low setpoint
3/6
R/W
1
INT16
0~2000ppm
0
4
CO2 high setpoint
3/6
R/W
1
INT16
0~2000ppm
2000
5
Temperature adjust value
3/6
R/W
1
INT16
-3~3℃
0℃
6
Temperature PID setpoint
3/16
R/W
2
Float inverse
-20~60℃
20.0℃
8
Temp low setpoint
3/16
R/W
2
Float inverse
-20~60℃
-20.0℃
10
Temp high setpoint
3/16
R/W
2
Float inverse
-20~60℃
60.0℃
12
Modbus Address
3/6
R/W
1
INT16
1~247
1
13
Modbus rate
3/6
R/W
1
INT16
1-4800bps
2-9600bps
3-14400bps
4-19200bps
5-38400bps
2

6
14
Modbus Stop Bit
3/6
R/W
1
INT16
1-None 1Stop Bit;
2-None 2Stop Bit;
3-Odd 1Stop Bit;
4-Even 1Stop Bit
2
15
CO2 Correction for
Measurement
3/6
R/W
1
INT16
-300~300ppm
0
16
Temp. Correction for
Measurement
3/16
R/W
2
Float inverse
-5.0~5.0 ℃
0.0
18
Humi Correction for
Measurement
3/16
R/W
2
Float inverse
-10~10 %RH
0.0
20
Logic of co2 Control
3/6
R/W
1
INT16
0-increase CO2
1-decrease CO2
1
21
Logic of temperature Control
3/6
R/W
1
INT16
0-heating
1-cooling
1
22
Warm-up Time
3/6
R/W
1
INT16
1~600 Seconds
10
23
CO2 Max. Measurement
3/6
R/W
1
INT16
400~10,000 ppm
2000
24
LED work mode
3/6
R/W
1
INT16
0-3-color mode;
1-2-color mode
2-no light
0
25
LED switch point from green to
yellow
3/6
R/W
1
INT16
400~5,000ppm
1000
26
LED Switch point from yellow to
red
3/6
R/W
1
INT16
400~5,000ppm
1400
Note:Scan Rate>=4000ms
Table of contents
Other Atal Gas Detector manuals