AT&T TL7601 User manual

User’s manual
TL7601
DECT 6.0 remote dial pad
for use with AT&T models
TL7610/TL7611/
TL7650/TL7651

Congratulations
on your purchase
of this AT&T product.
Before using this AT&T product, please read the
Important safety information
on pages 26-29 of this manual. Please thoroughly
read the user’s manual for all the feature operations
and troubleshooting information necessary to install
and operate your new AT&T product. You can also
visit our website at www.telephones.att.com
or call 1 (800) 222-3111.
In Canada, dial 1 (866) 288-4268.
Model #: TL7601
Type: Remote dial pad
Serial #:
(found in the battery compartment)
Purchase date:
Place of purchase:
© 2008 Advanced American Telephones. All rights reserved.
AT&T and the AT&T logo are trademarks of AT&T Intellectual Property II, L.P. d/b/a
AT&T Intellectual Property licensed to Advanced American Telephones.
Printed in China.
Save your sales receipt and original packaging in case it is necessary
to return your remote dial pad for warranty service.

User's manual Dial pad
Battery for dial pad
Charger for dial pad with
power adapter installed
Battery compartment cover Belt clip for dial pad
Parts checklist
Check to make sure the remote dial pad package includes the
following items:
User’s manual
TL7601
DECT 6.0 remote dial pad
for use with AT&T models
TL7610/TL7611/
TL7650/TL7651

User’s manual
TL7601
DECT 6.0 remote dial pad
for use with AT&T models
TL7610/TL7611/
TL7650/TL7651
Getting started
Quick reference guide.................................................................................1
Installation preparation ..............................................................................2
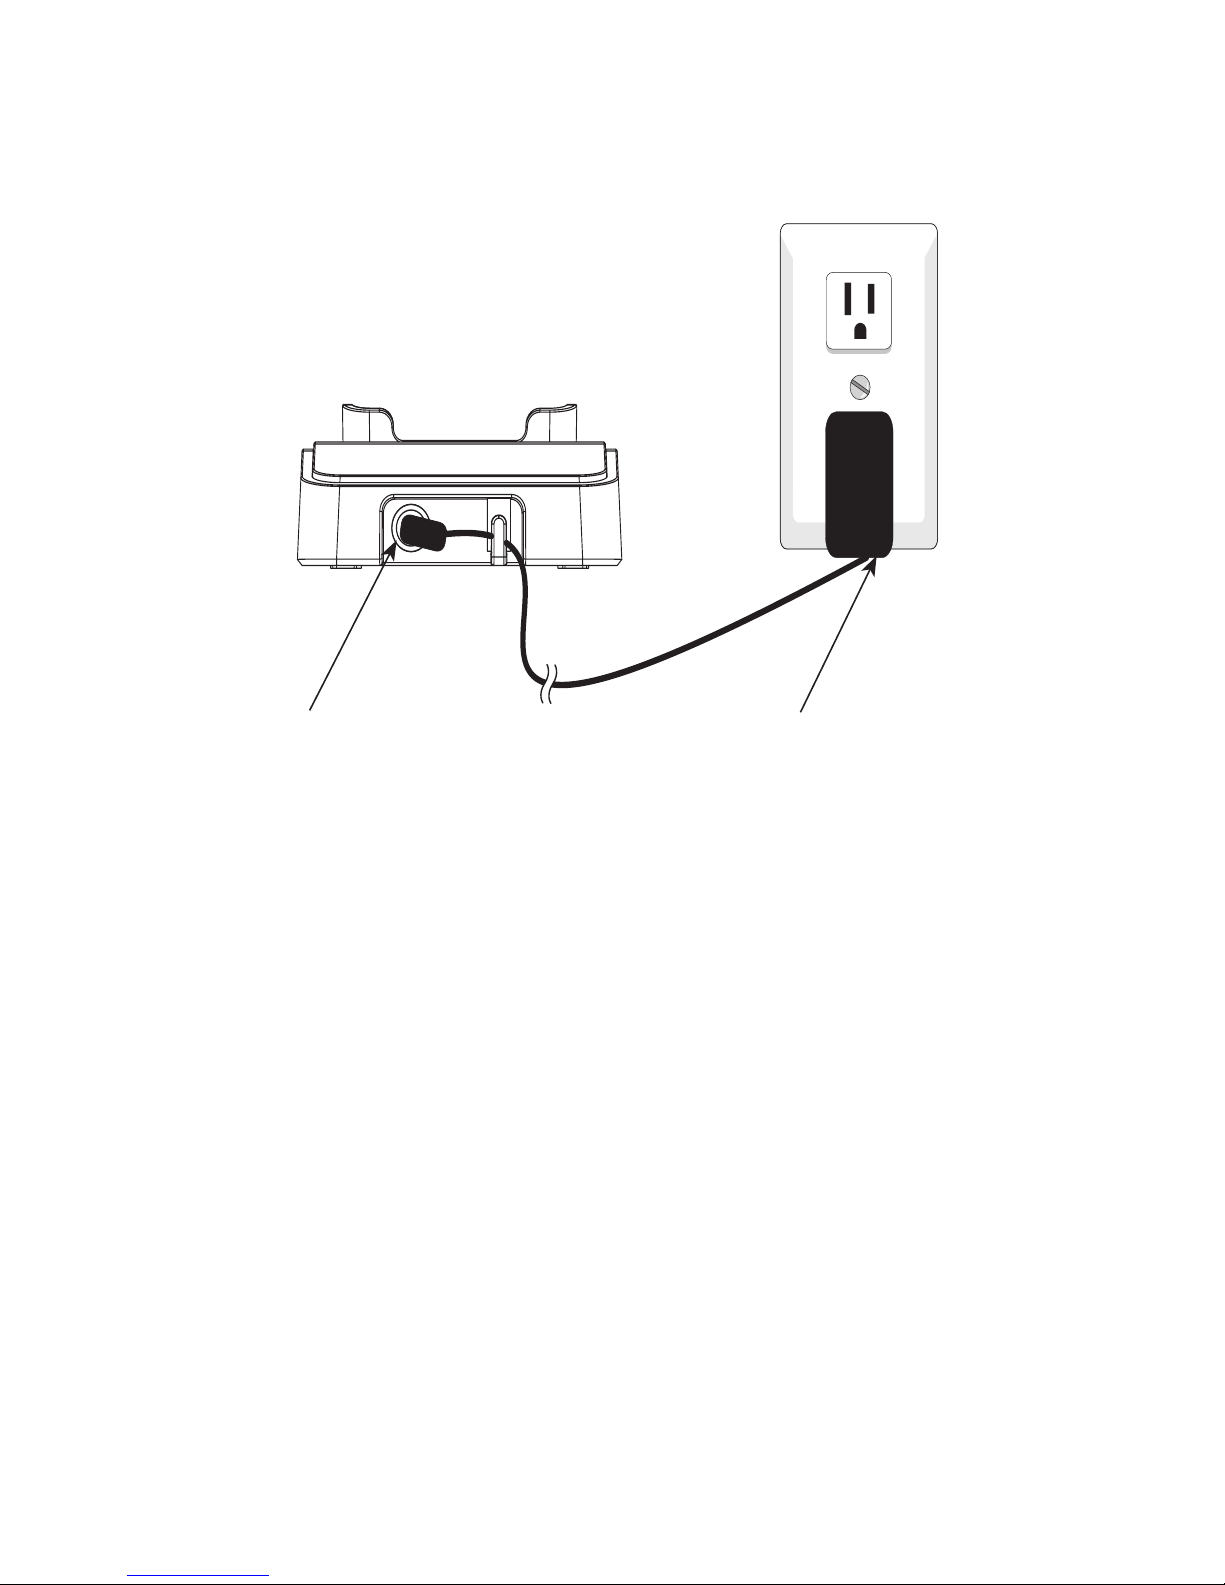
Charger installation ......................................................................................3
Battery installation & charging ...............................................................4
Remote dial pad registration and de-registration........................................6
Register the remote dial pad to the headset
base (with a single headset)........................................................6
Register the remote dial pad to the headset
base (with two headsets)..............................................................7
De-register the remote dial pad ......................................................8
Belt clip.........................................................................................................................9
Remote dial pad operation
Remote dial pad settings........................................................................ 10
Language .................................................................................................. 10
Basic operation...........................................................................................................11
Make a call..............................................................................................................11
On-hook dialing (predialing)........................................................................11
Answer a call.......................................................................................... 12
Using the remote dial pad......................................................... 12
Table of contents

Using the headset ........................................................................ 12
Last number redial............................................................................ 12
Options while on calls .......................................................................... 14
Call waiting........................................................................................... 14
Last number redial............................................................................ 14
Screen icons & display screen messages.................................... 15
Troubleshooting
Troubleshooting........................................................................................ 17
Maintenance and safety
Maintenance............................................................................................... 25
Important safety information............................................................. 26
Appendix
FCC Part 68 and ACTA.......................................................................... 30
FCC Part 15 ................................................................................................ 33
Limited warranty ...................................................................................... 35
Technical specifications........................................................................ 39
Index
Index............................................................................................................... 40

CALL/FLASH
Press to make or answer a
call. During a call, press to
receive call waiting
(page 14).
OFF/CLEAR
During a call, press to
hang up.
While in menus, press to
cancel the operation and
exit the menu display.
While predialing, press to
delete digits (page 11).
CHARGE light
On when the remote dial
pad is charging (page 5).
Getting started
Quick reference guide
Loop
You can string a neck or
wrist cord (not provided)
through this loop.
DELETE
While reviewing the
redial memory, press to
delete an individual entry,
or press to clear the
redial history (page 13).
While predialing, press to
delete digits (page 11).
1
LANG/SEL
Press to review and change
language options (page 10).
Press again to save the
setting.
While reviewing redial
memory, press to select a
phone number (page 12).
up/ down
When you are not using
the dial pad, press to
view the redial memory.
Then press or to
scroll through the redial
memory (page 12).
While in the LANG feature,
press to display the
language options.
While entering digits,
press and hold PAUSE
to insert a dialing pause
(page 13).
For complete instructions on using the headset, please refer to
the manual provided with your TL7610/TL7611/TL7650/TL7651
product. If you are unable to find your manual, visit
www.telephones.att.com to view or download the manual.

Avoid placing the remote dial pad too close to:
• Communication devices such as: television sets, VCRs, or other
cordless telephones.
• Excessive heat sources.
• Noise sources such as a window with traffic outside, motors,
microwave ovens, refrigerators, or fluorescent lighting.
• Excessive dust sources such as a workshop or garage.
• Excessive moisture.
• Extremely low temperature.
• Mechanical vibration or shock such as on top of the washing
machine or work bench.
Getting started
Installation preparation
See pages 4-5
for easy instructions.
You must install and
charge the battery before
using the remote dial pad. STOP!
Your product may be shipped with a protective sticker covering the
remote dial pad display - remove it before use.
For customer service or product information, visit our website at
www.telephones.att.com or call 1 (800) 222-3111.
In Canada, dial 1 (866) 288-4268.
2

3
IMPORTANT INFORMATION
Use only the power adapter supplied with this product. To
order a replacement power adapter, visit our website at
www.telephones.att.com, or call 1 (800) 222-3111.
In Canada dial 1 (866) 288-4268.
The power adapter is intended to be correctly oriented in a
vertical or floor mount position. The prongs are not designed
to hold the plug in place if it is plugged into a ceiling, under-
the-table or cabinet outlet.
1.
2.
1. Make sure the small
end of the power
adapter is plugged into
the jack on the back of
the charger, and then
make sure that the
cord is routed behind
the tab as shown.
2. Plug the power
adapter into a power
outlet not controlled
by a wall switch.
Getting started
Charger installation

4
Getting started
Battery installation & charging
Install the battery as shown below. After installing the battery,
place the remote dial pad in the charger. For optimal performance,
charge the remote dial pad battery for at least six hours before
use.
Insert the battery
plug securely into
the jack located
inside the remote
dial pad battery
compartment,
matching the
color-coded label.
Place the
battery in the
compartment with
the label THIS
SIDE UP facing up
as indicated.
Align the cover
flat against
the battery
compartment,
then slide it
upwards until it
clicks into place.
Step 3
Step 2
Step 1

5
Getting started
Battery installation & charging
Step 4
Charge the remote dial
pad by placing it face
up in the charger. The
CHARGE light is on when
the dial pad battery is
charging.
NOTE:
1. W
hen the battery is charging, you will see the cycling . When the battery is
fully charged, you will see .
2.
If the display on the remote dial pad is blank, try unplugging the power adapter,
and firmly plugging it in again.
IMPORTANT INFORMATION
Use only the supplied rechargeable battery or replacement battery (AT&T
model BT190545). To obtain your replacement battery, visit our website
at www.telephones.att.com, or call 1 (800) 222-3111.
In Canada, dial 1 (866) 288-4268.
CHARGE light

Getting started
Remote dial pad registration and de-registration
The TL7601 remote dial pad allows you to place phone calls with
an AT&T DECT 6.0 cordless headset system. You must register it to
the TL7610/TL7611/TL7650/TL7651 headset base before use. The
remote dial pad should be charged for a minimum of five minutes
before attempting registration to the headset base. You cannot
register the dial pad to the headset base before a headset is
registered to the headset base.
The remote dial pad does not work with an AT&T DECT 6.0 cordless
headset system that is connected to a telephone that is part of a
digital business system unless there is an analog adapter on the
line. Please contact your IT department, telephone administrator,
or your telephone service provider to determine if this remote dial
pad is compatible with your telephone system.
6
Register the remote dial pad to the
headset base (with a single headset)
1. The new remote dial pad should be
charged for at least five minutes before
registering to the headset base. When
the remote dial pad is removed from the
charger, it shows NOT REGISTERED on
the screen.
2. Place the unregistered remote dial
pad into the charger. If PRESS PAIR
4 SEC ON BASE does not appear on
the remote dial pad screen after a few
seconds, remove the remote dial pad
and place it in the charger again.
3. On the headset base, press and hold
the PAIR button for about four seconds
NOT REGISTERED
PRESS PAIR
4 SEC ON BASE
On

PLEASE WAIT...
7
DIAL PAD
1
NOTES:
1. You cannot register a remote dial pad if a system headset is in use.
2. If the registration is not successful, the display shows NOT REGISTERED. Reset
the remote dial pad by lifting it out of the charger and then placing it back in the
charger. Now try the registration process again.
3.
If you have one registered headset, the remote dial pad automatically connects to
the headset after registering on the headset base.
4. If you have two headsets, and you want the other headset to work with the
remote dial pad, you have to de-register all the headsets and the remote dial
pad first. Refer to the de-registration information on page 8. Then re-register the
headsets and dial pad.
5.
Registration time depends on environmental conditions and varies.
Register the remote dial pad to the headset
base (with two headsets)
• The dial pad can only be paired with one
headset, even if there are two headsets
in your system. The dial pad pairs with
the most recently registered headset. The
display indicates the paired dial pad by
showing either
1
or
2
.
DIAL PAD
2
DIAL PAD
1
(until the red MUTE light on the headset
base turns on) and then release the
button. The remote dial pad shows PLEASE
WAIT..., then DIAL PAD REGISTERED. It
takes about 30 seconds to complete the
registration.
4. The MUTE light turns off and you see
the DIAL PAD screen (shown on the left)
indicating successful registration.
DIAL PAD
1
REGISTERED
Getting started
Remote dial pad registration and de-registration

CONNECTING...
NOT REGISTERED
NOTE: De-registering the remote dial pad from the headset base also de-
registers all the headsets. To use the remote dial pad or the headset again,
refer to the registration information on pages 6-7.
De-register the remote dial pad
Please read carefully through all the
instructions on this page before beginning
the de-registration process.
This de-registration de-registers all the items
registered to the headset base, including all
headsets and the remote dial pad.
Press and hold the PAIR button on the headset
base until the MUTE light starts to flash, then
release the PAIR button.
Immediately press and release the PAIR
button again. You must press the PAIR
button while the MUTE light is still flashing.
(If the light stops flashing before the dial
pad is de-registered, pick up the remote dial
pad and place it back into the charger, then
start again with step one above.)
If the de-registration was successful, the
MUTE light on the headset base turns off.
The headset(s) ON/OFF light flashes twice
every five seconds. The dial pad displays
CONNECTING..., then NOT REGISTERED.
1.
2.
3.
8
Flashes
ON/OFF
button
Getting started
Remote dial pad registration and de-registration

9
Getting started
Belt clip
To attach the
belt clip:
Snap the belt clip
into the retaining
tabs on both sides
of the dial pad as
shown in the figure.
To remove the
belt clip:
Gently lift either of
the belt clip retaining
tabs, shown in the
figure, to remove the
belt clip from the dial
pad.

10
Remote dial pad operation
Remote dial pad settings
Language
You can select the language used for all
screen displays.
To select a language:
1. Press LANG/SEL when in idle mode.
2. Use / to scroll to ENGLISH, FRANCAIS
or ESPANOL.
3. Press LANG/SEL again to save your
preference and return to the idle mode.
LANGUAGE
ENGLISH
1
DIAL PAD
1

Remote dial pad operation
Basic operation
Make a call
To make a call:
• Press ON/OFF on the headset to turn on the
headset, then enter the telephone number on
the dial pad, and press CALL/FLASH on the
remote dial pad.
-OR-
• Press ON/OFF on the headset to turn on the
headset, then press CALL/FLASH on the
remote dial pad, and enter the telephone
number on the dial pad.
To end a call:
• Press OFF/CLEAR on the remote dial pad.
-OR-
• Press ON/OFF on the headset.
On-hook dialing (predialing)
1. Enter the telephone number. Press
OFF/CLEAR or DELETE to delete any
unwanted digits.
2. Press CALL/FLASH to dial the displayed
number.
PHONE 0:00:30
1-234-5678
1
Elapsed
time
ENDED 0:00:30
1-234-5678
1
UNABLE TO CALL
TRY AGAIN
1
11
NOTE:
The screen displays the elapsed time of your
telephone conversation (in hours, minutes and seconds).
NOTES:
1.
If it cannot complete the call, the dial pad screen displays
UNABLE TO CALL TRY AGAIN.
2. If you press CALL/FLASH before entering numbers, the dial
pad screen displays ENTER TEL# THEN PRESS CALL.
ENTER TEL#
THEN PRESS CALL
1

Remote dial pad operation
Basic operation
Answer a call
Using the remote dial pad:
• Press CALL/FLASH
-OR-
Press any key (0-9, *or #) on the remote dial
pad.
To end a call:
• Press OFF/CLEAR.
Using the headset:
Press ON/OFF on the headset.
To end a call:
Press ON/OFF on the headset.
Last number redial
To view the five most recently dialed numbers:
• Press one of the / to enter the redial
number display mode.
• Press / repeatedly to view the last five
recently called numbers (up to 30 digits).
Press LANG/SEL to select a phone number, or press
OFF/CLEAR to exit.
To redial a number:
• Press CALL/FLASH to dial the displayed
number.
•
•
•
12
INCOMING
CALL
1
NOTE:
When another headset or telephone is using the
telephone line, LINE IN USE appears on the screen. Press
CALL/Flash during a call to see the elapsed call time.
PHONE 0:00:30
1-234-5678
1
DIAL PAD
LINE IN USE
1

Basic operation
Last number redial (continued)
To remove a number:
• While the desired number is displayed, press
DELETE to delete the displayed number from
the redial memory.
To edit a number:
• While the desired number is displayed, press
LANG/SEL to enter the editing mode, then press
OFF/CLEAR or DELETE to make corrections.
• While entering digits, press PAUSE to insert a
dialing pause.
1-234-567p
1
Remote dial pad operation
13

Options while on calls
Call waiting
If you subscribe to call waiting service with
your local telephone service provider, you
will hear a beep in the headset if there is an
incoming call while you are already on a call.
Press CALL/FLASH on the remote dial pad
or press and hold the MUTE/FLASH key on
the headset to put your current call on hold
and take the new call. Press CALL/FLASH
on the remote dial pad or press and hold the
MUTE/FLASH key on the headset at any time
to switch back and forth between calls.
To end call waiting call, press ON/OFF on the
headset.
When you connect the headset with a corded
phone using LIFTER MODE, press the flash but-
ton on the corded phone to switch back and
forth between calls.
Last number redial
While on a call, pressing or on the
remote dial pad only displays the number
last dialed.
The displayed number is dialed if you
press CALL/FLASH.
Press OFF/CLEAR on the dial pad or press
ON/OFF on the headset to exit the call.
•
•
Remote dial pad operation
14
PHONE 0:00:30
1-234-5678
1
MUTE/FLASH button
NOTES:
1
.
Pressing
CALL/FLASH to
access services
from your local
telephone service
provider will not
affect the elapsed
time, which will
continue to record
the total talk time.
2. You cannot press
OFF/CLEAR to exit
call waiting without
ending the call.

Remote dial pad operation
Screen icons & display screen messages
15
Screen icons
The remote dial pad works with headset 1.
The remote dial pad works with headset 2.
The telephone line is in use.
Battery charging (animated display).
1
2
Display screen messages
The remote dial pad is in idle
mode.
DIAL PAD
ENDED
CONNECTING ...
You have just ended a call.
The remote dial pad is
registering to the headset base,
or has lost communication with
the headset base.
CHARGING
The remote dial pad with a low
battery has been placed in the
remote dial pad charger.
DIAL PAD
REGISTERED
The dial pad has been
successfully registered to the
headset base.
PHONE 0:00:30
1-234-5678
1
This manual suits for next models
2
Table of contents
Other AT&T Telephone Accessories manuals

AT&T
AT&T TL7100 User manual

AT&T
AT&T TL88002 User manual

AT&T
AT&T WF700 User manual

AT&T
AT&T DL70019 User manual

AT&T
AT&T 326 User manual

AT&T
AT&T SPIRIT 1224 Controller User manual

AT&T
AT&T CRL82112 User manual

AT&T
AT&T CLP99286 User manual

AT&T
AT&T AT&T Wireless Home Phone Base User manual

AT&T
AT&T Merlin Instruction Manual

AT&T
AT&T DECT 6.0 SB67128 User manual

AT&T
AT&T TL7100 User manual

AT&T
AT&T CLP99007 User manual

AT&T
AT&T TL7000 User manual

AT&T
AT&T Aspire 3600 User manual

AT&T
AT&T MERLIN Attendant User guide

AT&T
AT&T MS2085 User manual

AT&T
AT&T Call Display 436 User manual

AT&T
AT&T TL86009 User manual

AT&T
AT&T Call Display 435 User manual