AT&T AT&T Wireless Home Phone Base User manual

User Guide
AT&T Wireless Home Phone

The Wireless Home Phone device is designed to provide coverage that is
consistent with other AT&T wireless devices, but AT&T does not represent
that the Wireless Home Phone service will be equivalent to landline phone
service. 911 calls are routed based on the wireless network’s automatic
location technology, but you may have to provide your home address
to emergency responders. Corded or cordless landline home phone
equipment is not included. Wireless Home Phone may not support your fax
machine, alarm services, dial-up internet service, or credit card machines.
Service provided by AT&T Mobility. © 2011 AT&T Intellectual Property. All
rights reserved. AT&T, the AT&T logo and all other AT&T marks contained
herein are trademarks of AT&T Intellectual Property and/or AT&T affiliated
companies. All other marks contained herein are the property of their
respective owners.
Copyright © 2011 ZTE CORPORATION.
All rights reserved.
No part of this publication may be excerpted, reproduced, translated or
utilized in any form or by any means, electronic or mechanical, including
photocopying and microfilm, without the prior written permission of
ZTE Corporation.
The manual is published by ZTE Corporation. We reserve the right to make
modifications on print errors or update specifications without prior notice.
Version No. : V1.0
Edition Time: December 2011
Manual No. : 081704100030

i
Thank you for purchasing an AT&T Wireless Home Phone. To get
the most from your new device, check out our interactive tutorials
at att.com/tutorials. Please select Manufacturer: AT&T and
Model: AT&T Wireless Home Phone from the drop down menus.
Welcome to AT&T
Welcome

ii

iii
Contents
Contents
Getting Started ............................................................................................................ 1
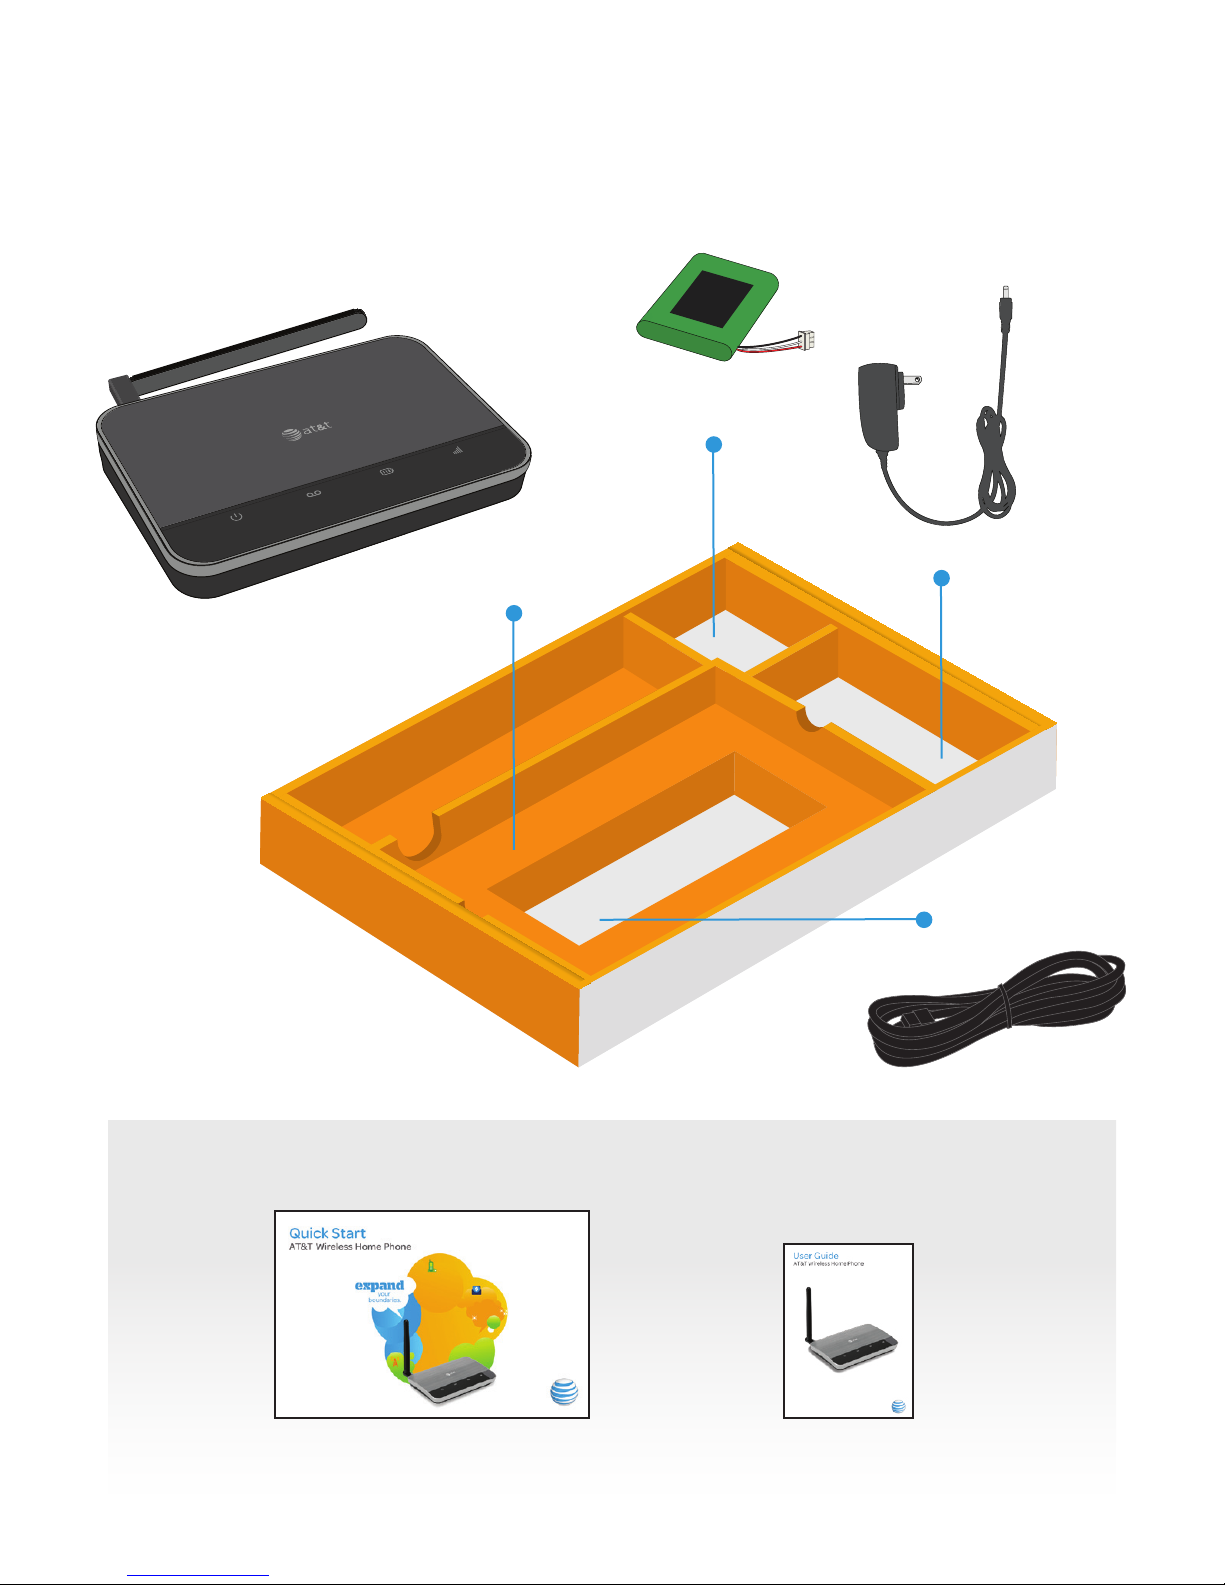
In the Box .................................................................................................................... 1
Getting to Know Your Device ........................................................................... 2
How it Works ............................................................................................................ 4
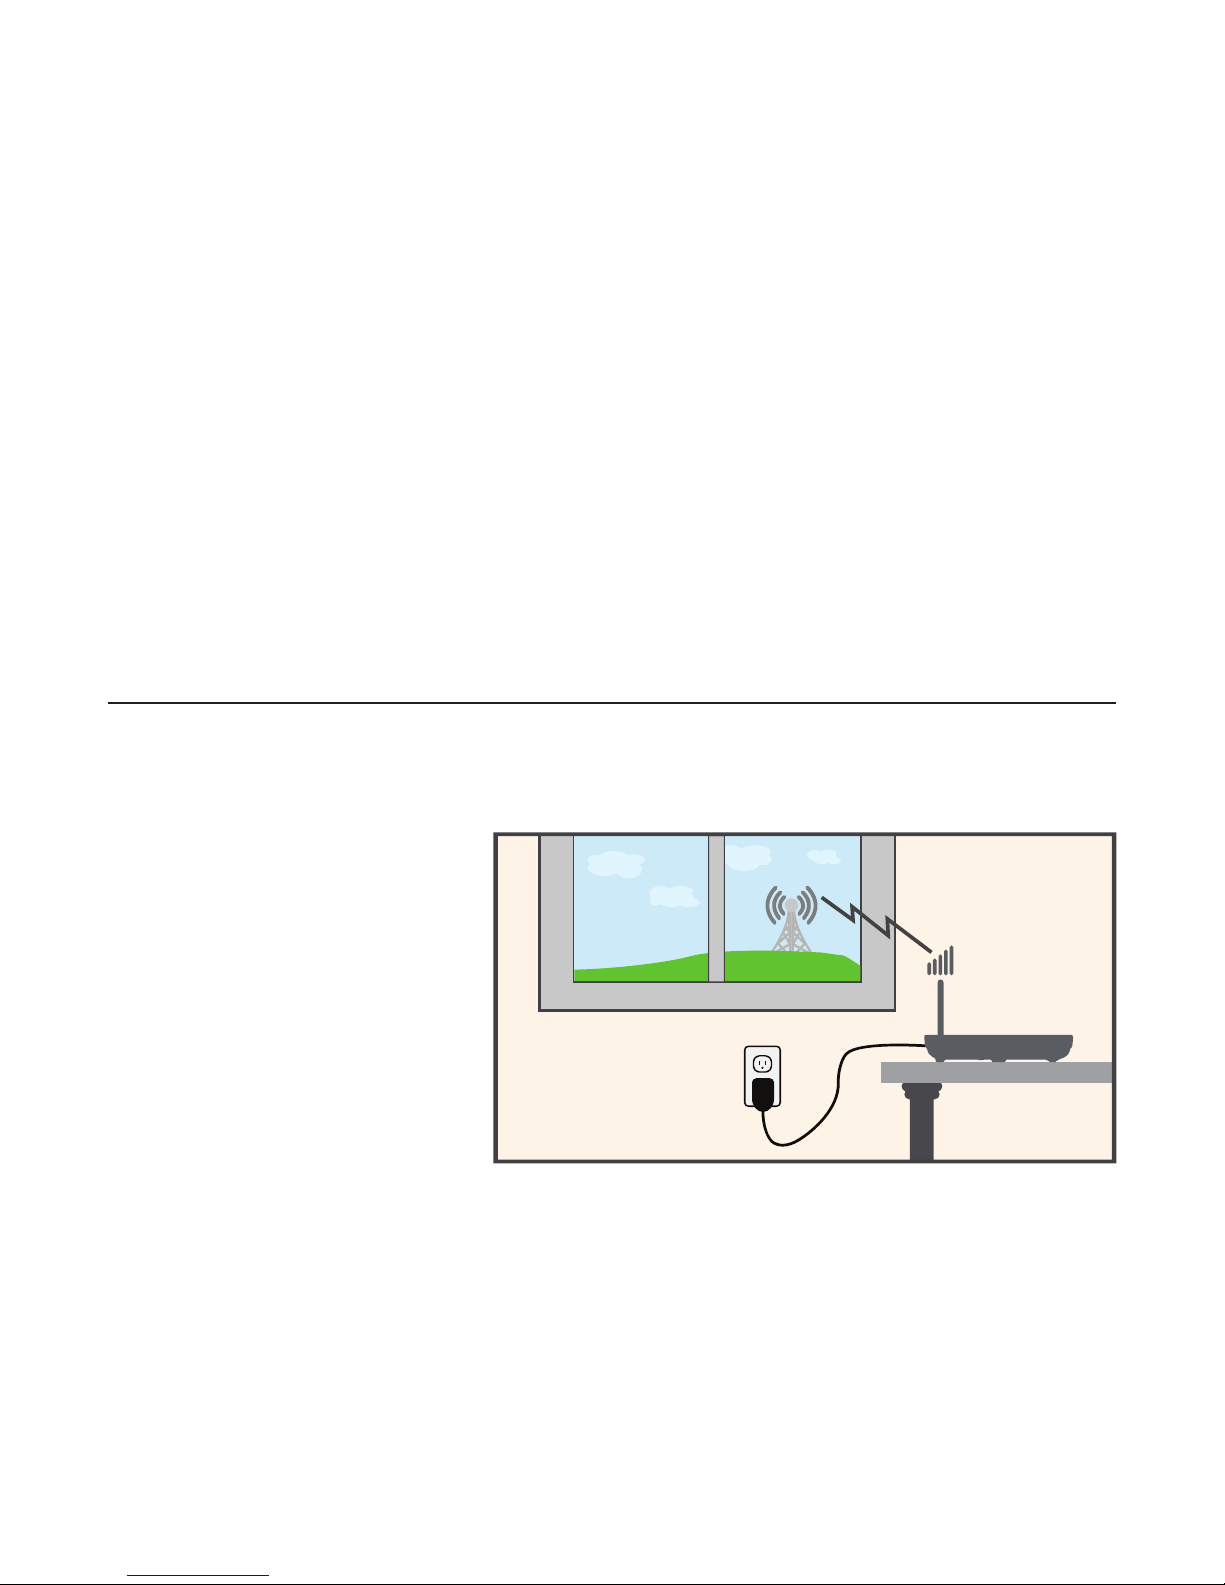
Device Installation ................................................................................................4
Voicemail ................................................................................................................... 8
Transferring a Phone Number ........................................................................ 9
Using Your Device ....................................................................................................10
Calling ........................................................................................................................10
Helpful Tips ............................................................................................................ 12
Important Information ......................................................................................... 14
E911 Service ............................................................................................................ 14
Power Outages ..................................................................................................... 14
Device Compatibility ......................................................................................... 14
In-Home Wiring .................................................................................................... 14
Frequently Asked Questions .............................................................................15
Troubleshooting ....................................................................................................... 18
Specifications ............................................................................................................23
Safety Instructions .................................................................................................24
Radio Frequency (RF) Energy .......................................................................... 26
FCC Compliance ..................................................................................................... 27
Warranty .......................................................................................................................28
How to Get Warranty Service .......................................................................30
Other Warranty Programs..............................................................................30
Notes ................................................................................................................................31

iv

1
In the Box
The package should contain the following items:
Getting Started
Getting Started
Power Cord
Back-up
Battery
Phone Cable
(Optional)
AT&T Wireless
Home Phone
User Guide
Quick Start
Also Included

2
Getting to Know Your Device
Getting Started
Power
Voicemail
Battery Cover
Battery
Charge
Signal
Strength
On/Off
Telephone
Ports
Service
Port*
Antenna
Power
Input
*Reserved for AT&T technical support.
Service port is designed for diagnostic purposes only and is not intended for
customer use. Never place a USB-based device into the Service port of the
Device under any circumstances because doing so may damage the Device
and negate its warranty.

3
Getting Started
Key Icon
Name
Status Condition
Power Green Solid On
Off No power
Voicemail Green Blinking New message waiting
Off No message waiting
Battery
Charge
Green Solid High
Green Blinking Battery in use (High)
Yellow Solid Medium
Yellow Blinking Battery in use (Medium)
Red Solid Low
Red Blinking Battery in use (Low)
Off Battery not connected
Signal
Strength
Green Solid Strong
Green Blinking AT&T 3G MicroCell™ Service*
Yellow Solid Moderate
Red Solid No Service
Red Blinking Check SIM
LED Indicators
The table below describes possible states for each of the
LED indicators.
*For MicroCell owners only. MicroCell sold separately.

4
Getting Started
How It Works
Wireless Home Phone uses the AT&T cellular network to provide
phone service to your corded or cordless home phone(s). Place
it anywhere in your house where you have a wireless signal. It does
not require the use of a home phone wall jack like traditional home
phone service.
Wireless Home Phone provides many calling services, such as
voicemail, Caller ID, Call Waiting, Call Forwarding, and 3-way Calling
for your corded or cordless home phone(s). It also includes a
back-up battery in case of power outage.
Device Installation
Before You Begin
Wireless Home Phone works exclusively with the AT&T cellular
network and DOES NOT use your home’s phone wall jacks.
Your device should
be located:
• Where you have a
strong cellular signal
from a cell tower,
typically near a window
or outside wall.
• Near an electrical
wall outlet.
Select which phone(s) you will use with the Wireless Home Phone:
• You may connect up to two phones.
• If using an existing phone, unplug it from the wall jack.

5Getting Started
Install the Back-up Battery
Remove the lid from the battery compartment.
Insert the battery connection cable into the battery port.
Place the back-up battery in the battery slot and replace the
battery cover.
During a power failure, battery back-up enables voice calling
using a standard corded phone that does not require external
supplied power.
Notes:
• The back-up battery is intended for backup purposes only
and may take approximately five (5) hours to fully charge.
• Charge time may be impacted by environmental factors
and the back-up battery will stop charging when the ambient
temperature is outside of the temperature range allowed for
charging (32 °F - 131 °F).
•
Remove the back-up battery if the device will be disconnected
from AC power for 15 days or more to avoid possible damage.
Connect the Power Cord
Insert the small end of the power cord into the Power port on
the back of your Wireless Home Phone device.
Plug the power cord into an electrical wall outlet that is not
controlled by a wall switch.

6
Connect the Device to a Phone
1) Unplug your phone
from the wall jack.
Note: The “Phone 2” port can be used to connect an additional
phone or answering machine. This port uses the same
telephone number as the “Phone 1” port.
Getting Started
2)
Plug your phone into the “Phone 1”
port on the Wireless Home Phone
device, using your existing phone
cable or included phone cable.
IMPORTANT:
DO NOT plug
the Wireless
Home Phone
into a wall jack.

7Getting Started
Check the Wireless Signal
Raise antenna to an upright position.
Confirm signal strength light is green for optimal performance.
Yellow indicates a moderate signal and may be sufficient.
Note: If you do not see a green light (strong signal), you may
want to choose an alternate installation location.
Place a Test Call
Place a test call from your connected home phone.
Make sure to use 10-digit dialing even for local calls.

8
Getting Started
Useful Tips
• Dial “1” to set up and access your voicemail. Be sure to create
a password for security and remote access. Use of answering
machine systems is not recommended.
• Transferring a landline phone number can take five (5) days or
more. Outgoing calls can be made immediately, while incoming
calls will continue through your old service until the transfer
is complete. Check status at www.att.com/port.
• Your AT&T Wireless Home Phone does not support incoming or
outgoing fax service.
• Your AT&T Wireless Home Phone supports voice only over the
AT&T cellular network.
• Your AT&T Wireless Home Phone does not support rotary or
pulse-dialing phones.
Details on using voicemail and transferring a landline phone
number can be found below and on the following pages.
Voicemail
Your Wireless Home Phone device comes with standard wireless
voicemail. Follow the steps below to setup and use your voicemail.
Setup
Dial 1 on any home phone connected to the Wireless Home Phone
device and wait four (4) seconds to connect to your AT&T wireless
voicemail. Simply follow the voice prompts to complete setup.
To enable remote voicemail retrieval and for added security be
sure to create a password during setup.

9Getting Started
Message Waiting
There are two indicators for a new message waiting: 1) the voicemail
icon; and 2) an intermittent dial tone.
The voicemail icon on your Wireless Home Phone flashes when
a voicemail message is waiting. You will also hear an intermittent dial
tone on any connected phone handset before placing a call.
Retrieving Messages
To retrieve voice messages, dial 1 on any home phone connected
to the Wireless Home Phone device and wait four (4) seconds to
connect to your AT&T wireless voicemail box. Simply follow the
voice prompts to listen to and manage your messages. (Alternately,
you may dial your 10-digit home phone number to access your
voicemail box.)
Remote Retrieval
To retrieve voicemail messages from a phone not connected to the
Wireless Home Phone device, dial the number associated with your
Wireless Home Phone service. When voicemail picks up, press *.
You will then be prompted to enter your password. Simply follow the
prompts to listen to and manage your voicemail messages.
Transferring a Phone Number
Transferring a landline phone number to your Wireless Home
Phone can take five (5) days or more. Outgoing calls can be made
immediately using your Wireless Home Phone, however incoming
calls will continue through your old service until the transfer is
complete. It is recommended that a phone be kept connected
to your existing home wiring or prior service to continue to receive
incoming calls until the transfer is complete. To check the status of
your transfer, visit www.att.com/port.

10 Using Your Device
Calling
Making Calls
Using a phone connected to your Wireless Home Phone device,
place and receive calls as you normally would. The Wireless Home
Phone supports both cordless and corded phone dialing methods.
Note: You will need to dial 10 digits even for local numbers.
Three-Way Calling
While on an existing call, press the Flash (or Talk) key on your
phone to put the first party on hold. When you hear a dial tone, dial
the second parties’ number (wait up to four [4] seconds). When
the second party answers, press the Flash (or Talk) key again to
complete the three-way connection. If the second party does not
answer, press the Flash (or Talk) key to end the connection and
return to the first party.
Note: If your phone does not have a Flash (or Talk) key, use the
off-hook mechanism supported by your phone instead
.
Call Waiting
You will hear two tones if someone calls while you are already on
a call.
To hold the current call and accept the waiting call, press the Flash
(or Talk) key. You can press the Flash (or Talk) key anytime to switch
back and forth between calls.
To clear the current call and accept the waiting call, enter 1 and
press the Flash (or Talk) key.
To reject (User Busy) the waiting call, enter 0 and press the Flash
(or Talk) key.
Using Your Device

11Using Your Device
Notes:
• Your Wireless Home Phone comes with standard three-way
calling and call waiting. Operation of these features will vary
depending on your home phone equipment.
• If your phone does not have a Flash (or Talk) key, then use the
off-hook mechanism supported by your phone.
Call Forwarding
To forward all calls, dial:
1) *21*
2) The 10-digit number to which you wish to forward your calls
3) # key
(Example: *21*1234567890# forwards your calls to the phone
number 123-456-7890)
Please wait at least three (3) seconds and you hear a confirmation
tone for the forwarding to complete before hanging up.
To un-forward calls, dial #21#, please wait at least three (3)
seconds and you hear a confirmation tone for the un-forwarding
to complete before hanging up.
Note:
Applicable wireless minute plan rates apply to forwarded calls.

12
Helpful Tips
Home Answering Machines
Use of answering machine systems is not recommended as some
systems may not be compatible with AT&T Wireless Home Phone.
If you choose not to use the voicemail provided by your Wireless
Home Phone, you can use your home answering machine by
plugging it into the “Phone 2” port on the back of your Wireless
Home Phone device.
Then, set your answering machine to pick up calls in fewer rings
than the voicemail service, which is set to five (5) rings as a default.
Adjusting Volume
Use your home phone’s volume adjustment if available. Alternately,
the volume of the Wireless Home Phone device can be adjusted
if necessary. While on a call, press ** or ## to enter Volume Setting
Mode. Press * to decrease volume. Press # to increase volume.
To exit Volume Setting Mode press any other key or wait five (5)
seconds.
Notes:
• Four volume levels are available (level 1 to level 4); the default
setting is the highest at level 4.
• Your home phone(s) may have a separate volume level setting
function that is independent of the Wireless Home Phone.
Using Your Device

13
Powering On/Off
The On/Off button is used to turn your Wireless Home Phone off when
still connected to the power supply. When powered off, the Wireless
Home Phone will no longer send or receive calls, but it will continue to
charge the back-up battery if still connected to the wall outlet.
To use the On/Off button on your Wireless Home Phone device,
press and hold the button for two (2) seconds to turn power off or
until the Battery and Signal Strength indicator lights turn off (Power
light remains on when connected to an AC power source). To turn
the Wireless Home Phone back on, press and hold the button for
two (2) seconds or until the Battery and Signal Indicator lights turn on.
AT&T 3G MicroCell™
Wireless Home Phone can be used with the AT&T 3G MicroCell
when its within range of the MicroCell signal and the phone number
associated with the Wireless Home Phone device has been added
to the MicroCell’s approved user list. To update your approved user
list, visit att.com/3GMicroCell and click “Manage Settings.”
The signal strength indicator on your Wireless Home Phone device
will flash green when connected to the MicroCell.
TTY Support
TTY (Text Telephony) and TDD (Telecommunications Device
for the Deaf) are supported by Wireless Home Phone. In order to
use the TTY network, you must have a TTY-compatible phone
and be in TTY mode. Note that most digital wireless devices are
TTY-compatible.
Dial *983*889*n# to set the TTY mode.
• n = 0: TTY off mode. The standard voice speaking mode and
listening mode. This is the default setting.
• n = 1: TTY full mode. Transmit and receive the TTY characters.
• n = 2: VCO mode. Receive TTY characters but transmit by
speaking into the speaker.
• n = 3: HCO mode. Transmit TTY characters but receive by
listening to the receiver.
Using Your Device

14
Important Information
E911 Service
911 services are supported just as they are on any wireless device.
You should expect to provide your home address to the emergency
response center responsible for sending first responders (e.g.,
police, medical assistance, or fire) to your location.
Power Outages
Wireless Home Phone has battery back-up with talk time of up to
three and a half (3.5) hours depending on environmental factors.
Please note you’ll need a standard corded phone that doesn’t
require external power to function with battery back-up for all
calling, including 911.
Device Compatibility
Wireless Home Phone does not support your home security
systems, fax machines, dial-up or DSL internet service, DVR
services, medical alert services (e.g., Life Alert), or credit card
machines. The service cannot be used to make 500, 700, 900, 976,
0+ collect, operator assisted, or dial-around calls (e.g., 1010-XXXX).
The device does not support data services (e.g., texting, multimedia
message services (MMS), and data tethering).
In-Home Wiring
Interconnecting to home telephone wiring is not necessary, but
is possible; however, it is not recommended unless you possess
sufficient knowledge of electrical systems. Use with home wiring
requires the physical disconnection from other services, including
the landline coming into your home. Use of a qualified licensed
electrician is highly recommended. Improper installation may
result in phone equipment damage or even a fire.
Other manuals for AT&T Wireless Home Phone Base
10
Table of contents
Other AT&T Telephone Accessories manuals

AT&T
AT&T TL7601 User manual

AT&T
AT&T Merlin Instruction Manual

AT&T
AT&T SPIRIT 1224 Controller User manual

AT&T
AT&T MS2085 User manual

AT&T
AT&T TL7100 User manual

AT&T
AT&T Aspire 3600 User manual

AT&T
AT&T DECT 6.0 SB67128 User manual

AT&T
AT&T TL7100 User manual

AT&T
AT&T WF700 User manual

AT&T
AT&T MERLIN Attendant User guide