ATEMPOWER AP12BB-AC User manual

USERMANUAL
BATTERY BOX AP12BB-AC
PLEASE READ AND UNDERSTAND THIS MANUAL
THOROUGHLY BEFORE OPERATION
V1.2

1
ATEM POWER, born in June 2017, as a synonym for exciting outdoor experience, is an
Australian company with dedication and passion for the R&D of high quality products in the
field of renewable energy products, batteries and related accessories.
Since the company was founded, we have committed to innovation that aims to make your life
infinitely more convenient. And the belief in our conviction for quality and commitment allows
us to innovate in developing products that are optimally tailored to the needs of our amazing
customers.
We engineer and supply solar products for homes, 4x4s, recreational vehicles and virtually
any application you can think of. And we also develop reliable, high performing deep-cycled
batteries and lithium batteries for standby or daily power needs. Accessories include battery
chargers and inverters that are ideal for RV's, commercial vehicles, boats, yachts and many
more applications!
At ATEM POWER, we stay true to our DNA by prioritizing technological innovation designed
to improve our products and striving to provide excellent customer care. Because we are
motivated to explore the limits of solar power!
ABOUT US

WARNINGS & SAFETY INFORMATION
• Before installing a battery in the battery box, ensure that you have read through all relevant product
and safety information for that battery.
Do not strike, throw the battery box.
To connect with the terminals of the battery box, pull up the terminal lids gently. Excessive force may
cause damage to the lids.
Never connect positive (red) and negative (black) terminals of the battery box together. This will cause
the battery to short and create a fire hazard.
Do not insert foreign objects into the ports of the battery box as this may lead to electric shock.
Do not allow metal objects to fall into the battery box. This could cause a short circuit, and poses a risk
to the user.
Do not submerge the battery box in liquids.
Please note that the battery is not included in this purchase.
While working on the battery box please wear protective eyeglasses and clothing. Please wear insulating
gloves and provide necessary protection. Do not wear any metallic items such as watches, bracelets, etc.
Do not attach a battery to the battery box if it or your hands are currently exposed to moisture or rain.
Only use this product at temperature -20°C ~ +60°C (-4°F ~ +140°F).
When charging, adequate ventilation must be provided to dissipate heat and battery gases. Keep clear of
naked flames, sparks or conductive material while charging a battery.
Do not attempt to disassemble the battery box as this may result in electric shock, fire or explosion.
Any attempt to disassemble, perform unapproved repairs or make modifications to the battery box will
void the warranty.
Always use safe lifting techniques when lifting and installing the battery box.
The battery box is not intended to be installed or operated by people (including children) with reduced
physical or mental capabilities, or those who are under the influence of drugs or alcohol.
Make sure that you attach the correct wires to the appropriate terminals of your battery; incorrect
installation could result in damage to the unit or voiding of the warranty.
Make sure wires from an externally connected device are tightened fully when connected to the battery
box terminals. A loose connection will increase electrical resistance and generate heat, and it may even
melt the battery box case.
Do not connect high power appliances like a hair dryer, iron, toaster, heater or kettle to the AC socket as
they greatly exceed the max power output of the inverter and may damage it.
If you charge a lithium-ion battery in battery box with your crank battery through a DCDC charger,
connect the DCDC charger with a grey Anderson plug instead of the red one on the battery box.
Otherwise, it may cause damage to the BMS.
The battery box has a fuse with current rating of 70A. Do not exceed the current rating, otherwise the fuse
will blow and must be replaced with a new one.
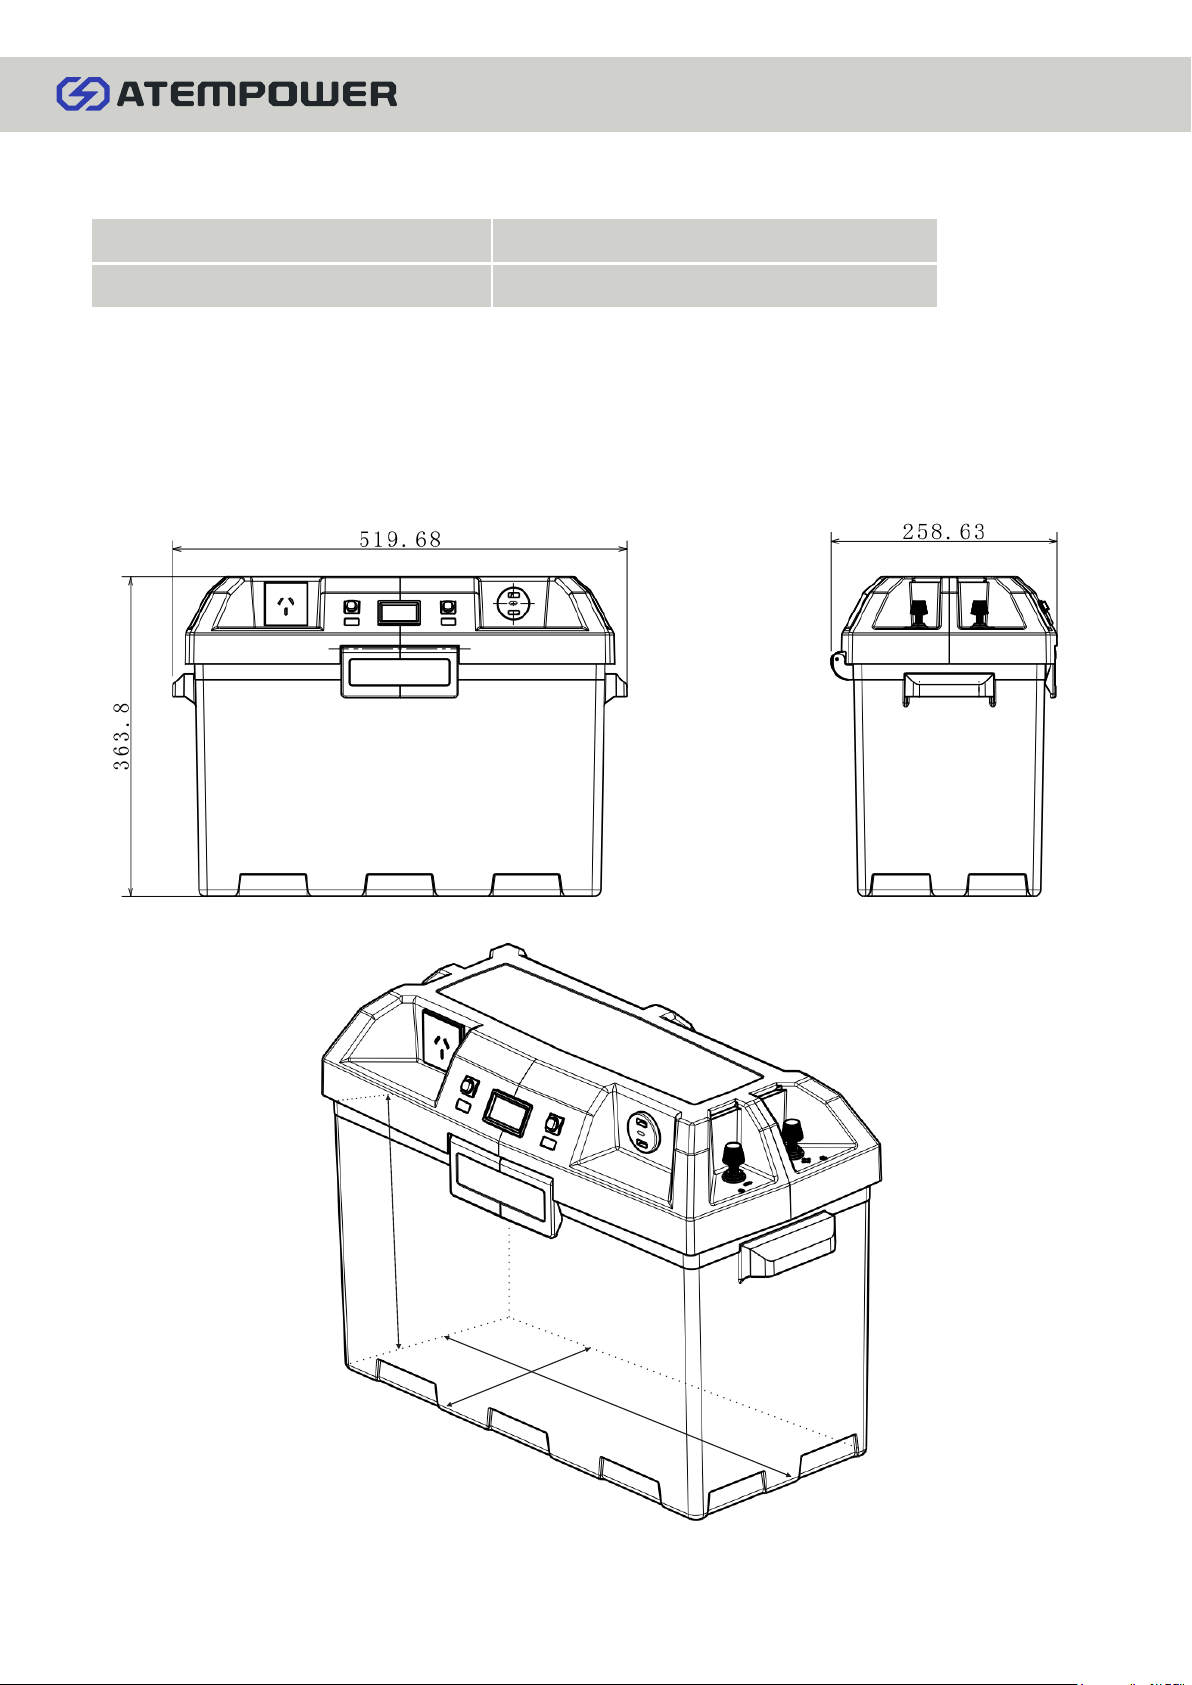
17.52"L (44.5cm) x 7.68"W (19.5cm)This battery box is only suitable for batteries with dimensions up to
x 9.84"H (25.0cm).
Do not exceed the maximum load capacity of the battery box (99.21lbs / 45kg).
•
•
•
•
•
•
•
•
•
•
•
•
•
•
•
•
•
•
•
•
•
2

DIMENSION:
External Dimensions: 20.43"L (51.9cm) x 10.16"W (25.8cm) x 14.29"H (36.3cm)
Internal Dimensions: 17.52"L (44.5cm) x 7.68"W (19.5cm) x 9.84"H (25.0cm)
3
measured in millimeter(mm)
445
195
2 5 0
CONTENTS:
Battery Box X1 Red Anderson Plug X1
User Manual X1 Grey Anderson Plugs X2

ASSEMBLY DRAWING:
1. Positive and Negative Terminals x2
7. USB Type-C Port x1
Max 18W
4
4. ON/OFF Switch(AC) x13. ON/OFF Switch(DC) x1
5. Volt Meter x1 6. Cigarette Lighter Socket Outputs(12V,10A) x3
8. USB Type-A Ports x2
Max 18W (Shared Between Both Ports)
2. Buckle x1
10. Anderson Plug Input (Red)50A x1
(With Voltage Sensitive Relay)
11. Anderson Plug Outputs/Inputs (Grey)50A x2
9. AC Socket Output x1
230V, 50Hz, MAX 500W
1
2
3
45
6
7
8
9
10
11
1
USB Type-C
5V/3A; 9V/2A;12V/1.5A
PD3.0 (PPS): 3.6~12V/3A
(PPS: 20mV/step);
QC3.0: 3.6~12V, 2.6A MAX;
BC1.2: 5V/3.2A
USB Type-A
QC2.0: 5V/3A; 9V/2A;
12V/1.5A;
QC3.0: 3.6~12V, 2.6A MAX
SUPPORTED FAST
CHARGING PROTOCOLS

INSTALLATION INSTRUCTIONS:
USB PORT/ANDERSON PLUG/CIGARETTE LIGHTER SOCKET USE:
5
Step 1: Pull the buckle and open the lid of the battery box.
Step 2: Place the battery in the battery box.
Step 3: Attach the eyelets from the battery box lid to the corresponding positive and negative terminals
on the battery. Make sure connections are fastened and tight.
Step 4: Close the lid and make sure the buckle is latched.
Long press the ON/OFF switch(DC) for 3 seconds to check the reading of the battery power and activate
the port/plug/socket.
Connect the device to the port/plug/socket and charging will begin.
Note:
① For a rechargeable battery, a solar panel (with PWM/MPPT controller) /external battery can be
connected to either grey or red Anderson plug to charge the battery.
② Please note that the red Anderson plug is for power input only. It is controlled by the voltage instead of
the switch.
When the voltage of the battery in the box is below 8V, it will not be charged with external power supply.
Please make sure the voltage of external power supply is higher than that of the battery in the box.
Otherwise, the battery in the box will reversely charge external power supply via the red Anderson plug.
Only when the voltage of external power supply is above 13V, it will charge the battery in the box.
When the voltage of external power supply decreases to 12.5V, charging will stop after 10 seconds.
•
•
AC SOCKET USE:
•
•
Long press the ON/OFF switch(AC) for 3 seconds to check the reading of the battery power and activate
the socket.
Connect the device to the socket and use the device.
Note:
① If the voltage is below 10V, volt meter display will flicker (on for 1s and off for 1s repeatedly)
and there will be no power output after 10s.
② Switch must be long pressed for 3 seconds to be turned on or off.
1.
2.
1.
2.

If the volt meter does not light up
or display the battery's voltage
Problem Cause Solution
If you are not receiving power
through the cigarette lighter
sockets or USB ports
If you are not receiving power
through the Anderson plugs
1. Terminals may be reversely
connected.
2. The battery may have run
out of power.
3. The fuse may have blown.
1. Correctly reconnect positive
and negative terminals.
2. Change the battery.
3. Change the fuse.
MAINTENANCE:
Please keep the inner of the box clean and dry.
Please cover USB ports and cigarette lighter sockets with rubber plugs to prevent potential damage.
Always keep the external terminals clean.
If you are not receiving power
through the AC socket,
PROTECTION FEATURES:
When the voltage has dropped to 10.5V, there will be repetitive 2
consecutive beeps in 30s.
When the voltage has dropped to 10V, there will be repetitive 3 consecutive
beeps in 30s. The inverter will automatically shut down.
When the voltage has risen to 16V, there will be repetitive 4 consecutive
beeps in 30s. The inverter will automatically shut down.
If the load exceeds the rated power, there will be repetitive 11 consecutive
beeps in 30s. The inverter will automatically shut down.
If the temperature rises above 75~80°C (167~176°F), there will be repetitive
5 consecutive beeps in 30s.The inverter will automatically shut down.
Low Voltage Alarm
Low Voltage Protection
High Voltage Protection
Overload Protection
Thermal Protection
When the inverter shuts down, plug out the appliance from the AC socket and turn on the ON/OFF Switch
(AC) again. If the inverter shuts down for thermal protection, wait for the inverter to cool down before
turning on the ON/OFF Switch (AC) again.
6
1.
2.
3.

WARRANTY 24
MONTH
WARRANTY PERIOD:
ATEM POWER warrants that each of our battery box that is purchased while this Warranty is in effect
will be free from defective workmanship and materials for a period of 2 years.
WHAT DOES THE WARRANTY COVER?
Under normal usage conditions, this warranty covers:
Any defect in design or manufacture which results in its failure to perform correctly as described.
Damage or loss incurred in transit.
We will either replace the product or provide you with a refund at our discretion provide that the fault
is found to have been caused by a design or manufacturing defect and not misuse or tampering.
Shipping costs of returning the product for a proven defect.
The limited warranty is the only one that applies to this unit, and it sets forth all the responsibilities of
ATEM POWER.
THE WARRANTY DOES NOT COVER:
Travel and /or other expenses due to customer's location.
Damage caused by mould, adverse weather, extreme temperature, accidents and daily wear and
tear.
This unit is not intended for commercial use. This warranty does not apply to damage to units from
misuse or incorrect installation/connection. Misuse includes wiring or connecting to improper polarity
power sources and using faulty or incompatible devices.
Table of contents
Other ATEMPOWER Batteries Pack manuals