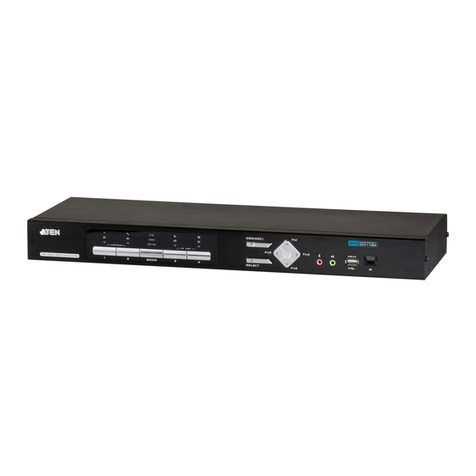
Quick Start Guide
USB 2.0 DVI Dual View KVMP Switch
© Copyright 2012 ATEN®International Co., Ltd.
ATEN and the ATEN logo are trademarks of ATEN International Co., Ltd. All rights reserved. All other
trademarks are the property of their respective owners.
This product is RoHS compliant.
Part No. PAPE-1223-471G Printing Date: 06/2012
CS1642/CS1644 USB 2.0 DVI Dual View KVMP Switch User Instructions
Commutateur KVMP USB 2.0 DVI Dual View CS1642/CS1644 – manuel d’utilisation mise en route rapide
CS1642/CS1644 DVI-Zweischirm-KVMP-Switch für USB 2.0 Bedienungsanleitung
Conmutador KVMP USB 2.0 DVI para dos pantallas CS1642/CS1644 instrucciones para el usuario
Requirements
Console
•TwoDVIcompatiblemonitorscapableofthehighestpossibleresolution
•AUSBmouse
•AUSBkeyboard
•Microphoneandspeakers
Note: APS/2keyboardandmousecanbeusedbyusingtheconverterincludedintheCS1642/
CS1644 package.
Computer
Thefollowingequipmentmustbeavailableoneachcomputer:
•TwoDVIports
Note: ThequalityofthedisplayisaffectedbythequalityoftheDVIdisplaycards.Forbest
results, we recommend you purchase a high quality product.
•USBTypeAport
•Audioports(optional)
Cables
Two/four1.8mcustomUSBDVIDualLinkcablesetsandtwo/four1.8mcustomDVIDualLink
cablesareprovidedintheCS1642/CS1644package.
Hardware Review
FrontView
B
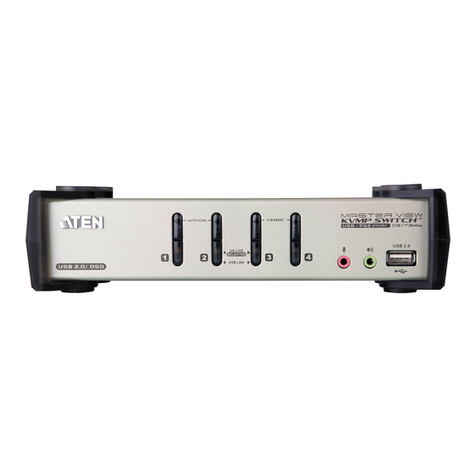
1. LED Status Panel
2.PortSelectionPushbuttons
3.ModeSelectionPushbutton
Rear View
C
1.FirmwareUpgradePort
2. USB 2.0 Peripheral Port
3. KVM Port Section
Hardware Installation
D
TosetupyourCS1642/CS1644installation,refertotheinstallationdiagramthenumbersinthe
diagram correspond to the steps, and do the following:
1.PlugyourUSBkeyboardandUSBmouseintotheUSBconsoleportslocatedontheunit’srear
panel.
2.PlugbothyourconsolemonitorsintotheDVIconsoleportslocatedontheunit’srearpaneland
power on the monitors.
Conguration requise
Console
•DeuxmoniteurscompatiblesDVIprenantenchargelaplushauterésolutionpossible
•UnesourisUSB
•UnclavierUSB
•Unmicrophoneetdeshaut-parleurs
Remarque: vous pouvez utiliser un clavier et une souris PS/2 avec le convertisseur fourni avec
le CS1642/CS1644.
Ordinateur
Lescomposantssuivantsdoiventêtreinstalléssurchaqueordinateur:
•DeuxportsDVI
Remarque:laqualitédel'afchagedépenddelaqualitédelacartegraphiqueDVI.Pourde
meilleursrésultats,ilestconseilléd'acheterunproduitdehautequalité.
•PortUSBdetypeA
•Portsaudio(facultatifs)
Câbles
LecommutateurCS1642/CS1644estlivréavec2/4jeuxdecâblesUSBDVIDualLink
personnalisésde1,8met2/4câblesDVIDualLinkpersonnalisésde1,8m.
Description du matériel
Vue avant
B
1.Voyantsd'état
2.Boutonsdesélectionduport
3.Boutondesélectiondumode
Vue arrière
C
1.Portdemiseàjourdumicroprogramme
2.PortpériphériqueUSB2.0
3. Section des ports KVM
Installation du matériel
D
Pourprocéderàl'installationdevotreCS1642/CS1644,reportez-vousauschémad'installation(les
numérosduschémacorrespondentauxétapesàsuivre)etprocédezcommesuit:
1.BranchezlescâblesdevotreclavierUSBetdevotresourisUSBsurlesportsdeconsoleUSB
situésàl'arrièredel'appareil.
2.BranchezlesdeuxmoniteurssurlesportsdeconsoleDVIsituésàl'arrièredel'appareil,puis
allumez-les.
Voraussetzungen
Konsole
•ZweiDVI-kompatibleMonitore,dieinderLagesind,diehöchstmöglicheAuösungdarzustellen
•EineUSB-Maus
•EineUSB-Tastatur
•MikrofonundLautsprecher
Hinweis:EinePS/2-Mausund–TastaturkönnenüberdenmitdemCS1642/CS1644
mitgelieferten Adapter angeschlossen werden.
Computer
AufjedemSystemmussFolgendesinstalliertwerden:
•ZweiDVI-Ports
Hinweis:DieBildqualitäthängtstarkvonderQualitätderverwendetenDVI-Grakkarteab.Für
optimaleErgebnissesolltenSieggf.einehochwertigeGrakkarteerwerben.
•USB-AnschlussTypA
•Audioports(optional)
Kabel
ZumLieferumfangdesCS1642/CS1644gehörenzwei/vierindividuelleUSB-DVI-Kabelsetsmit
je1,8mLängeundzwei/vierindividuelleDVI-Dual-Link-Kabelsetsmitje1,8mLänge.
Hardwareübersicht
Vorderseitige Ansicht
B
1. LED-Statusanzeigefeld
2.Portauswahl(Drucktasten)
3.Betriebsmodus-Auswahltaste
Rückseitige Ansicht
C
1.PortzurFirmwareaktualisierung
2. USB 2.0-Port für Peripheriegeräte
3.KVM-Portabschnitt
Hardware installieren
D
ZurInstallationdesCS1642/CS1644,siehedasInstallationsdiagramm(dieNummernimDiagramm
entsprechenderReihenfolge),undgehenSiewiefolgtvor:
1.VerbindenSieIhreUSB-TastaturundUSB-MausmitdenUSB-Konsolanschlüssenaufder
Rückseite des Gerätes.
2.VerbindenSieIhrebeidenKonsolmonitoremitdenDVI-Konsolanschlüssenaufder
Geräterückseite, und schalten Sie die Monitore ein.
Requisitos
Consola
•DosmonitoresDVIcompatiblescapacesdemostrarlaresoluciónmáselevadaposible
•UnratónUSB
•UntecladoUSB
•Unmicrófonoyaltavoces
Nota:sideseaconectaruntecladoyunratónPS/2,puedeemplearelconvertidorincluidocon
el CS1642/CS1644.
Ordenador
En cada ordenador se tienen que tener instalados los siguientes componentes:
•DospuertosDVI
Nota:lacalidaddeimagenvieneafectadaporlacalidaddelastarjetasgrácasDVI.Para
obtenerlosmejoresresultados,lerecomendamosqueadquieraunproductodealta
calidad.
•PuertoUSBdetipoA
•Puertosdeaudio(opcional)
Cables
ElCS1642/CS1644vienecon2/4juegosdecablesUSBDVIDualLinkpersonalizadosde1,8m
y2/4cablesDVIDualLinkpersonalizadosde1,8m.
Presentación del hardware
Vista frontal
B
1. Panel de indicadores LED
2.Botonesdeseleccióndepuerto
3.Botóndeseleccióndemodo
Vista posteriort
C
1.Puertoparaactualizacionesdelrmware
2.PuertoUSB2.0paraperiféricos
3.SeccióndepuertosKVM
Instalación del hardware
D
ParainstalarsuCS1642/CS1644,véaseeldiagramadeinstalación(losnúmerosdeldiagrama
correspondenalosdiferentespasosaseguir)yprocedacomoseindicaacontinuación:
1.ConecteeltecladoUSByelratónUSBalospuertosdeconsolaUSBubicadosenelpanel
posterior del equipo.
2.ConectelosdosmonitoresdeconsolaalospuertosdeconsolaDVIubicadosenelpanelposterior
delaunidadyenciéndalos.
3.Plugyourmainmicrophoneandspeakersintotheconsolemicrophoneandspeakerjackslocated
on the unit’s front panel. The microphone and speakers plugged into this panel have priority over
those in the rear panel.
4. Plug your secondary microphone and speakers into the audio console ports located on the unit’s
rear panel.
5.UsingthecustomUSBDVIDualLinkcableset,plugtheDVIconnectorintoanavailableDVI
socket A in the KVM port section of the switch, then plug the accompanying USB, microphone and
speaker connectors into their corresponding USB, microphone, and speaker sockets.
Note:VerifythatalltheplugsareinthesameKVMPortsockets(allinPort1,allinPort2,etc.).
Each socket is marked with an appropriate icon.
6.AttheotherendofthecustomUSBDVIDualLinkcableset,plugtheUSB,monitor,microphone,
andspeakercablesintotheirrespectiveportsonthecomputer.
7.UsingthecustomDVIDualLinkcable,plugtheDVIconnectorintotheDVIsocketBinthesame
KVM port section of the switch.
8.AttheotherendofthecustomDVIDualLinkcable,plugthemonitorcableintoitsrespectiveport
on the computer.
Note: Repeat steps 5, 6, 7, and 8 for each dual-screen PC system you are installing.
9.PlugyourUSBperipheralsintothetypeAsockets(oneislocatedonthefront,thesecondis
locatedontherear).
10. Plug the power adapter that came with your switch into an AC power source, then plug power
adaptercableintotheswitch’sPowerJack.
11. Power on the computers.
Operation
Manual Switching
• Tobringcompletefocus(KVM,Audio,andUSB)toacomputer,presstheportselectionpushbutton
that corresponds to that computer. All three port icons will light up.
• Tobringonlytheaudiofocustoacomputer,presstheModepushbuttontwice(theMode
pushbutton’saudioiconlightsup),andthenpresstheportselectionpushbuttonthatcorrespondsto
that computer. The port’s audio icon lights up.
• TobringonlytheKVM focustoacomputer,presstheModepushbutton once(theMode
pushbutton’sKVMiconlightsup),andthenpresstheportselectionpushbuttonthatcorrespondsto
thatcomputer.Theport’sKVMicon(theportnumber)lightsup.
• TobringonlytheUSBfocustoacomputer,presstheModepushbuttonthreetimes(theMode
pushbutton’sUSBiconlightsup),andthenpresstheportselectionpushbuttonthatcorrespondsto
that computer. The port’s USB icon lights up.
• Pressandholdportselectionpushbuttons1and2simultaneouslyfortwosecondstostartAuto
Scan mode.
3.Branchezlemicrophoneetleshaut-parleursprincipaux sur les entréesmicro ethaut-parleurs
situéesàl'avantdel’appareil.Lemicrophoneetleshaut-parleursbranchésàl'avantdel'appareil
ontprioritésurceuxbranchésàl'arrière.
4.Branchezlemicrophoneetleshaut-parleurssecondairessurlesportsdeconsoleaudiosituésà
l'arrièredel’appareil.
5.Àl’aidedujeudecâblesUSBDVIDualLinkpersonnalisé,branchezleconnecteurDVIsurunport
DVIdetypeAlibredelasectiondesportsKVMducommutateur,puisbranchezlesconnecteurs
USB, micro et haut-parleurs sur les ports USB, micro et haut-parleurs correspondants.
Remarque:veillezàcequetouslescâblessoientbranchéssurlesmêmesportsKVM(toussurle
port1,toussurleport2,etc.).Chaqueportestidentiéparuneicônespécique.
6.Àl’autreextrémitédujeudecâblesUSBDVIDualLinkpersonnalisé,branchezlescâblesUSB,du
moniteur, du micro et des haut-parleurs sur les ports correspondants de l’ordinateur.
7.Àl'aideducâbleDVIDualLinkpersonnalisé,branchezleconnecteurDVIsurleportDVIdetypeB
de la même section des ports KVM du commutateur.
8.Àl'autreextrémitéducâbleDVIDualLinkpersonnalisé,branchezlecâbledumoniteursurleport
correspondantdel'ordinateur.
Remarque:répétezlesétapes5,6,7et8pourchaqueordinateuràdoubleécranquevous
installez.
9.BranchezvospériphériquesUSBsurlesportsdetypeA(l'unestsituéàl'avant,l'autreàl'arrière).
10.Branchezuneextrémitéducâbledel’adaptateursecteurfournisuruneprisedecourant,puis
l'autreextrémitésurlaprised'entréeducommutateur.
11. Allumez les ordinateurs.
Utilisation
Commutation manuelle
•Pourtransférerlecontrôletotal(KVM,audioetUSB)surunordinateur,appuyezsurlebouton
desélectionduportcorrespondantàcetordinateur.Lestroisicônesdeports'allument.
•PourtransféreruniquementlecontrôleKVMsurunordinateur,appuyezunefoissurlebouton
desélectiondumode(l'icôneKVMduboutondemodes'allume),puisappuyezsurlebouton
desélectionduportcorrespondantàcetordinateur.L'icôneKVMduportsélectionné(le
numérodeport)s'allume.
•Pourtransféreruniquementlecontrôleaudiosurunordinateur,appuyezdeuxfoissurlebouton
desélectiondumode(l'icôneaudioduboutondemodes'allume),puisappuyezsurlebouton
desélectionduportcorrespondantàcetordinateur.L'icôneaudioduportsélectionnés'allume.
•PourtransféreruniquementlecontrôleUSBsurunordinateur,appuyeztroisfoissurlebouton
desélectiondumode(l'icôneUSBduboutondemodes'allume),puisappuyezsurlebouton
desélectionduportcorrespondantàcetordinateur.L'icôneUSBduportsélectionnés'allume.
•Appuyezsimultanémentsurlesboutonsdesélectionduport1et2pendant2secondespour
activer le mode de recherche automatique.
3.VerbindenSiedasersteMikrofonunddieerstenLautsprechermitdenMikrofon-undLautsprecher-
KonsolanschlüssenaufderGerätevorderseite.DieseMikrofon-undLautsprecherbuchsenhaben
Prioritätgegenüberdenjenigen,diesichaufderRückseitedesGehäusesbenden.
4.VerbindenSiedaszweiteMikrofonunddiezweitenLautsprechermitdenMikrofon-und
Lautsprecher-Konsolanschlüssen auf der Geräterückseite.
5.VerbindenSiedenDVI-SteckerdesindividuellenUSB-DVI-Dual-Link-Kabelsetsmiteinerfreien
DVI-Buchse(A)imKVM-PortabschnittdesSwitch.VerbindenSieanschließenddiezugehörigen
USB-, Mikrofon- und Lautsprecherstecker mit den entsprechenden Buchsen.
Hinweis:SchließenSieallezusammengehörigenSteckerandieselbenKVM-Portsan(alsoalle
anPort1,alleanPort2usw.).JedeBuchseistdurcheinentsprechendesSymbol
gekennzeichnet.
6.VerbindenSieamanderenEndedesindividuellenUSB-DVI-Dual-Link-KabelsetsdieUSB-,
Monitor-,Mikrofon-undLautsprecherkabelmitdengeeignetenBuchsenamComputer.
7.VerbindenSiedenDVI-SteckerdesindividuellenDVI-Dual-Link-KabelsmitderDVI-Buchse(B)
desselbenKVM-PortabschnittsamSwitch.
8.VerbindenSiedasMonitorkabelamanderenEndedesindividuellenDVI-Dual-Link-Kabelsmitder
zugehörigenBuchseamComputer.
Hinweis: Wiederholen Sie die Schritte 5, 6, 7 und 8 für alle weiteren Zweischirmsysteme, die Sie
anschließenmöchten.
9.VerbindenSieIhreUSB-GerätemitdenTyp-A-Anschlussbuchsen(dieeinebendetsichaufder
Gerätevorderseite,dieandereaufder-rückseite).
10.VerbindenSiedasmitgelieferteNetzteilmiteinerstromführendenSteckdoseundanschließend
mitderNetzeingangsbuchseamSwitch.
11. Schalten Sie die Computer ein.
Bedienung
Manuelle Portumschaltung
•HaltenSieeinederPortauswahltastengedrückt,umdiegesamteComputersteuerung(KVM,
TonundUSB)aufdenComputerdiesesPortsumzuleiten.Daraufhinleuchtenalledrei
Portsymbole.
•UmdieKVM-SteuerungfüreinenbestimmtenComputerzuaktivieren,drückenSiedenModus-
Drucktastereinmal(dasKVM-SymboldesModus-Drucktastersleuchtetauf),unddrückenSie
anschließenddieDrucktastedesbetreffendenComputers.DaraufhinleuchtetdasKVM-Symbol
desPorts(diePortnummer)auf.
•UmdieTonübertragungfüreinenbestimmtenComputerzuaktivieren,drückenSiedenModus-
Drucktasterzweimal(dasAudiosymboldesModus-Drucktastersleuchtetauf),unddrückenSie
anschließenddieDrucktastedesbetreffendenComputers.DaraufhinleuchtetdasAudiosymbol
des Ports auf.
•UmdieUSB-SteuerungfüreinenbestimmtenComputerzuaktivieren,drückenSiedenModus-
Drucktasterdreimal(dasUSB-SymboldesModus-Drucktastersleuchtetauf),unddrückenSie
anschließenddieDrucktastedesbetreffendenComputers.DaraufhinleuchtetdasUSB-Symbol
des Ports auf.
3.Conecteelmicrófonoylosaltavocesprincipalesalasentradasparamicrófonoyaltavoces
ubicadasenelpanelfrontaldelaunidad.Elmicrófonoylosaltavocesconectadosalpanelfrontal
tienenprioridadsobrelosconectadosalpanelposterior.
4.Conecteelmicrófonoylosaltavocessecundariosalospuertosdeconsoladeaudioubicadosen
el panel posterior de la unidad.
5.ConeljuegodecablesUSBDVIDualLinkpersonalizado,conecteelconectorDVIaunpuerto
DVIdetipoAlibredelaseccióndepuertosKVMdelconmutadorylosconectoresUSB,para
micrófonoyaltavocesalospuertosUSB,paramicrófonoyaltavocescorrespondientes.
Nota:asegúresedequetodosloscablesesténenchufadosenlosmismospuertosKVM(todos
enelpuerto1,todosenelpuerto2,etc.).Cadapuertovienemarcadoconunicono
identicativo.
6.EnelotroextremodeljuegodecablesUSBDVIDualLinkpersonalizado,conecteloscablesUSB,
paramonitor,micrófonoyaltavocesalospuertoscorrespondientesdelordenador.
7.ConelcableDVIDualLinkpersonalizado,conecteelconectorDVIalpuertoDVIdetipoBdela
mismaseccióndepuertosKVMdelconmutador.
8.EnelotroextremodelcableDVIDualLinkpersonalizado,conecteelcableparamonitoralpuerto
correspondiente del ordenador.
Nota:repitalospasos5,6,7y8paracadaordenadordedoblepantallaqueinstale.
9.ConectesusdispositivosUSBalospuertosdetipoA(unoubicadoenelpanelfrontalyelsegundo
enelpanelposteriordelaunidad).
10.Conecteeladaptadordealimentaciónincluidoaunatomaeléctricayelcabledeladaptadorala
entradadealimentacióndelconmutador.
11. Encienda los ordenadores.
Funcionamiento
Conmutaciónmanual
•Parapasarelcontroltotal(KVM,audioyUSB)aunordenador,pulseelbotóndeselecciónde
puerto que corresponda a este ordenador. Los tres iconos de puerto se iluminan.
•ParapasarúnicamenteelcontrolKVMaunordenador,pulseunavezelbotóndeselección
demodo(eliconoKVMdelbotóndemodoseilumina).Acontinuación,pulseelbotónde
seleccióndepuertoquecorrespondaaesteordenador.EliconoKVMdelpuertoseleccionado
(númerodepuerto)seilumina.
•Parapasarúnicamenteelcontroldeaudioaunordenador,pulsedosveceselbotónde
seleccióndemodo(eliconodeaudiodelbotóndemodoseilumina).Acontinuación,pulseel
botóndeseleccióndepuertoquecorrespondaaesteordenador.Eliconodeaudiodelpuerto
seleccionado se ilumina.
•ParapasarúnicamenteelcontrolUSBaunordenador,pulsetresveceselbotóndeselección
demodo(eliconoUSBdelbotóndemodoseilumina).Acontinuación,pulseelbotónde
seleccióndepuertoquecorrespondaaesteordenador.EliconoUSBdelpuertoseleccionado
se ilumina.
•Pulselosbotonesdeseleccióndepuerto1y2simultáneamentedurante2segundospara
iniciarelmododebúsquedaautomática.
KeyboardPortOperation
Cycling Through the Ports
Hotkey Action
[Scroll Lock] [Scroll Lock]
[Enter]
BringstheKVM,USBhub,andaudiofocusfromthe
portthatcurrentlyhastheKVMfocustothenextportonthe
installation(1to2;2to1;fortheCS16421to2;2to3;3to4;4to1
fortheCS1644).
[Scroll Lock] [Scroll Lock]
[K] [Enter]
Brings only the KVM focus from the port that currently
hasittothenextportontheinstallation.TheUSBand
audio focus remain where they are.
[Scroll Lock] [Scroll Lock]
[U] [Enter]
BringsonlytheUSBhubfocusfromtheportthat
currentlyhasittothenextportontheinstallation.The
KVM and audio focus remain where they are.
[Scroll Lock] [Scroll Lock]
[S] [Enter]
Brings only the audio focus from the port that currently has it to the
nextportontheinstallation.TheKVMandUSBhubfocusremain
where they are.
Going Directly to a Port
Hotkey Action
[Scroll Lock] [Scroll Lock] [n]
[Enter]
BringstheKVM,USBhub,andaudiofocustothe
computer attached to the port corresponding to the
speciedPortID.
[Scroll Lock] [Scroll Lock] [n]
[K] [Enter] BringsonlytheKVMfocustothecomputerattachedtothespecied
port.TheUSBhubandaudiofocusremainwheretheyare.
Scroll Lock] [Scroll Lock] [n]
[U] [Enter]
BringsonlytheUSBhubfocustothecomputer
attachedtothespeciedport.TheKVMandaudio
focus remain where they are.
[Scroll Lock] [Scroll Lock] [n]
[S] [Enter] Brings only the audio focus to the computer attached to the
speciedport.TheKVMandUSBhubfocusremainwheretheyare.
[Scroll Lock] [Scroll Lock] [n]
[K] [U] [Enter] BringstheKVMandUSBhubfocustothecomputerattachedtothe
speciedport.Theaudiofocusremainswhereitis.
Scroll Lock] [Scroll Lock] [n]
[K] [S] [Enter]
Brings the KVM and audio focus to the computer
attachedtothespeciedport.TheUSBhubfocus
remains where it is.
[Scroll Lock] [Scroll Lock] [n]
[U] [S] [Enter] BringstheUSBhubandaudiofocustothecomputerattachedto
thespeciedport.TheKVMfocusremainswhereitis.
Auto Scanning
Hotkey Action
[Scroll Lock] [Scroll
Lock] [A] [Enter]
Invokes Auto Scan. The KVM focus cycles from port to port
at5secondintervals.FivesecondintervalsistheDefault
setting.
Fonctionnementduportclavier
Utilisation des raccourcis clavier
Raccourcis clavier Action
[Arrêtdél][Arrêtdél]
[Entrée]
TransfèrelecontrôleKVM,USBetaudioduportsurlequelsetrouve
actuellementlecontrôleKVMversleportsuivantdel'installation(1vers
2, 2 vers 1 pour le modèle CS1642,1 vers 2, 2 vers 3, 3 vers 4, 4 vers 1
pourlemodèleCS1644).
[Arrêtdél][Arrêtdél]
[K][Entrée]
TransfèreuniquementlecontrôleKVMduportsurlequelilsetrouve
actuellementversleportsuivantdel'installation.LescontrôlesUSBet
audio ne changent pas de port.
[Arrêtdél][Arrêtdél]
[U][Entrée]
TransfèreuniquementlecontrôleUSBduportoùilsetrouveactuellement
versleportsuivantdel'installation.LescontrôlesKVMetaudione
changent pas de port.
[Arrêtdél][Arrêtdél]
[S][Entrée]
Transfèreuniquementlecontrôleaudioduportsurlequelilsetrouve
actuellementversleportsuivantdel'installation.LescontrôlesKVMet
USB ne changent pas de port.
Accès direct à un port
Raccourcis clavier Action
[Arrêtdél][Arrêtdél][n]
[Entrée] TransfèrelescontrôlesKVM,USBetaudiosurl'ordinateurconnecté
auportcorrespondàl'IDdeportspécié.
[Arrêtdél][Arrêtdél][n][K]
[Entrée] TransfèreuniquementlecontrôleKVMsurl'ordinateurconnectéau
portspécié.LescontrôlesUSBetaudionechangentpasdeport.
[Arrêtdél][Arrêtdél][n][U]
[Entrée] TransfèreuniquementlecontrôleUSBsurl'ordinateurconnectéau
portspécié.LescontrôlesKVMetaudionechangentpasdeport.
[Arrêtdél][Arrêtdél][n][S]
[Entrée] Transfèreuniquementlecontrôleaudiosurl'ordinateurconnectéau
portspécié.LescontrôlesKVMetUSBnechangentpasdeport.
[Arrêtdél][Arrêtdél][n][K]
[U][Entrée] TransfèrelescontrôlesKVMetUSBsurl'ordinateurconnectéau
portspécié.Lecontrôleaudionechangepasdeport.
[Arrêtdél][Arrêtdél][n][K]
[S][Entrée] TransfèrelescontrôlesKVMetaudiosurl'ordinateurconnectéau
portspécié.LecontrôleUSBnechangepasdeport.
[Arrêtdél][Arrêtdél][n][U]
[S][Entrée] TransfèrelescontrôlesUSBetaudiosurl'ordinateurconnectéau
portspécié.LecontrôleKVMnechangepasdeport.
Recherche automatique
Raccourcis clavier Action
[Arrêtdél][Arrêtdél]
[A][Entrée] Activelemodederechercheautomatique.LecontrôleKVMpassed'unport
àl'autretoutesles5secondes.L'intervallepardéfautestde5secondes.
•UmdieautomatischePortumschaltungzustarten,haltenSiegleichzeitigdieTasten1und2
mindestens 3 Sekunden lang gedrückt.
PortüberdieTastaturumschalten
Zwischen den Ports umschalten
Hotkey Aktion
[Rollen] [Rollen]
[Enter]
SchaltetdieKVM-Steuerung,denHubunddieAudiosignalevondemPort,der
aktuelldieKVM-Steuerungbesitzt,aufdennächstenPortderInstallation(1auf2;
2auf1beimCS1642;1auf2;2auf3;3auf4;4auf1beimCS1644)um.
[Rollen] [Rollen]
[K] [Enter]
Schaltet nur die KVM-Steuerung von dem Port, auf dem aktuell der KVM liegt, auf
dennächstenPortderInstallationum.DieUSB-undTonsignalebleibendavon
unberührt.
[Rollen] [Rollen]
[U] [Enter]
SchaltetnurdenUSB-HubvondemPort,aufdemaktuelldieUSB-Signaleliegen,
aufdennächstenPortderInstallationum.DieKVM-undTonsignalebleiben
davonunberührt.
[Rollen] [Rollen]
[S] [Enter]
SchaltetnurdieTonsignalevondemPort,dersiegegenwärtigüberträgt,aufden
nächstenPortderInstallationum.DieKVM-undUSB-Signalebleibendavon
unberührt.
Ports direkt anwählen
Hotkey Aktion
[Rollen] [Rollen]
[n][Enter] SchaltetdenKVM,denUSB-HubunddieAudiosignaleaufdenComputerum,
dermitdemPortnverbundenist.
[Rollen] [Rollen]
[n] [K] [Enter] SchaltetnurdieKVM-SignaleaufdenComputerum,dermitdemangegebenen
PortverbundenistDieUSB-undTonsignalebleibendavonunberührt.
[Rollen] [Rollen]
[n] [U] [Enter] SchaltetnurdieUSB-SignaleaufdenComputerum,dermitdemangegebenen
PortverbundenistDieKVM-undTonsignalebleibendavonunberührt.
[Rollen] [Rollen]
[n] [S] [Enter] SchaltetnurdieTonsignaleaufdenComputerum,dermitdemangegebenen
PortverbundenistDieKVM-undUSB-Signalebleibendavonunberührt.
[Rollen] [Rollen]
[n] [K] [U] [Enter] Schaltet die KVM- und USB-Signale auf den Computer um, der mit dem
angegebenenPortverbundenistDieTonübertragungbleibtdavonunberührt.
[Rollen] [Rollen]
[n] [K] [S] [Enter] Schaltet die KVM- und Tonsignale auf den Computer um, der mit dem
angegebenenPortverbundenistDieUSB-Signalebleibendavonunberührt.
[Rollen] [Rollen]
[n] [U] [S] [Enter] Schaltet die USB- und Tonsignale auf den Computer um, der mit dem
angegebenenPortverbundenistDieKVM-Steuerungbleibtdavonunberührt.
Automatische Portumschaltung
Hotkey Aktion
[Rollen] [Rollen]
[A] [Enter]
Aktiviert die automatische Portumschaltung. Die KVM-Steuerung wird
abwechselndalle5SekundenvoneinemPortaufdenanderenumgeschaltet.Die
Voreinstellung sind fünf Sekunden.
Funcionamientodelpuertodeteclado
Alternar entre los puertos
Teclas de acceso
directo Acción
[Bloq Despl]
[Bloq Despl] [Intro]
Pasa el control KVM, USB y de audio del puerto que actualmente lleva el
controlKVMalpuertosiguientedelainstalación(1al2,2al1paraelCS1642,1al
2,2al3,3al4,4al1paraelCS1644).
[Bloq Despl]
[Bloq Despl] [K] [Intro]
Pasa solamente el control KVM del puerto que lo lleva actualmente al puerto
siguientedelainstalación.LatransmisióndelaseñalUSByladeaudiose
mantienenenlospuertosqueyaestánactivados.
[Bloq Despl]
[Bloq Despl] [U] [Intro]
PasasolamentelatransmisióndelaseñalUSBdelpuertoquelallevaactualmente
alpuertosiguientedelainstalación.ElcontrolKVMylatransmisióndelaseñalde
audiosemantienenenlospuertosqueyaestánactivados.
[Bloq Despl]
[Bloq Despl]
[S] [Intro]
Pasasolamentelatransmisióndelaseñaldeaudiodelpuertoquelalleva
actualmentealpuertosiguientedelainstalación.ElcontrolKVMylatransmisión
delaseñalUSBsemantienenenlospuertosqueyaestánactivados.
Pasar directamente a un puerto
Teclas de acceso directo Acción
[Bloq Despl] [Bloq Despl]
[n] [Intro] Pasa el control KVM, USB y de audio al ordenador conectado al puerto del ID
depuertoespecicado.
[Bloq Despl] [Bloq Despl]
[n] [K] [Intro]
PasasolamenteelcontrolKVMalordenadorconectadoalpuertoespecicado.
LatransmisióndelaseñalUSByladeaudiosemantienenenlospuertosque
yaestánactivados.
[Bloq Despl] [Bloq Despl]
[n] [U] [Intro]
PasasolamentelatransmisióndelaseñalUSBalordenadorconectadoal
puertoespecicado.ElcontrolKVMylatransmisióndelaseñaldeaudiose
mantienenenlospuertosqueyaestánactivados.
[Bloq Despl] [Bloq Despl]
[n] [S] [Intro]
Pasasolamentelatransmisióndelaseñaldeaudioalordenadorconectado
alpuertoespecicado.ElcontrolKVMylatransmisióndelaseñalUSBse
mantienenenlospuertosqueyaestánactivados.
[Bloq Despl] [Bloq Despl]
[n] [K] [U] [Intro]
PasaelcontrolKVMylatransmisióndelaseñalUSBalordenadorconectado
alpuertoespecicado.Latransmisióndelaseñaldeaudiosemantieneenel
puertoqueyaestáactivado.
[Bloq Despl] [Bloq Despl]
[n] [K] [S] [Intro]
PasaelcontrolKVMylatransmisióndelaseñaldeaudioalordenador
conectadoalpuertoespecicado.LatransmisióndelaseñalUSBsemantiene
enelpuertoqueyaestáactivado.
[Bloq Despl] [Bloq Despl]
[n] [U] [S] [Intro]
PasalatransmisióndelaseñalUSByladeaudioalordenadorconectado
alpuertoespecicado.ElcontrolKVMsemantieneenelpuertoqueyaestá
activado.
CS1642/CS1644
The following contains information that relates to China:
4. Console Audio Ports
5. USB 2.0 Peripheral Port
4. Ports de console audio
5.PortpériphériqueUSB2.0
4. Konsol-Audioports
5. USB 2.0-Port für Peripheriegeräte
4. Puertos de consola de audio
5.PuertoUSB2.0paraperiféricos
4.PowerJack
5. USB Console Ports
6. Console Port Section
4.Prised'alimentation
5. Ports de console USB
6. Section des ports de console
4.Stromeingangsbuchse
5. USB-Konsolanschlüsse
6.Konsolportabschnitt
4.Entradadealimentación
5. Puertos de consola USB
6.Seccióndepuertosdeconsola
[Scroll Lock] [Scroll
Lock] [A] [n] [Enter] The KVM focus cycles from port to port at n second intervals.
Hotkey Setting Mode
Invoking HSM
To invoke HSM do the following:
1. Press and hold down [Num Lock].
2. Press and release [-].
3. Release [Num Lock].
To switch to the alternate HSM invocation set, do the following:
1. Invoke HSM
2. Press and release [H].
TheHSMinvocationkeysbecometheCtrlkey(insteadofNumLock)and
theF12key(insteadofminus).
HSMSummaryTable
Key Function
[H] TogglesbetweenthedefaultandalternateHSMinvocationkeys.
[T] TogglesbetweenthedefaultandalternatePortSwitchingkeys.
[F2] EnablesMackeyboardemulation.
[F3] EnablesSunkeyboardemulation
[F10] Removeskeyboardemulationmappings.Keypressdataispassedstraight
through.
[F4] ListsthecurrenthotkeysettingsviathePastefunctionofatexteditor.
[F5] Performs a reset on all USB devices.
[B] TogglesthebeeperOnandOff.
[X] [Enter] Enables/DisablesthePortSwitchingkeys.
[R] [Enter] Resets the hotkey settings to their default status.
[upgrade] [Enter] InvokesFirmwareUpgradeMode.
[D] Invokestheread-and-rememberfunctionfortheEDIDofthecomputer
display attached to the corresponding port
[M] Togglesbetweenmouseemulationenableanddisable.
[F1] SetstheKeyboardandmousetoSPCmodesothatitcanworkunder
specialoperatingsystemsasastandard(104key)keyboardandmouse.
[Arrêtdél][Arrêtdél]
[A][n][Entrée] LecontrôleKVMpassed'unportàl'autretouteslesnsecondes.
Mode de raccourcis clavier
Activation du mode de raccourcis clavier
Pouractiverlemodederaccourcisclavier,procédezcommesuit:
1.Appuyezsurlatouche[Verrnum]etmaintenez-laenfoncée.
2. Appuyez sur la touche [-] et relâchez-la.
3. Relâchez la touche [Verr num].
Pourchangerdetouchesderaccourciclavier,procédezcommesuit:
1. Activez le mode de raccourcis clavier.
2. Appuyez sur la touche [H] et relâchez-la.
LestouchesderaccourciclaviersontdésormaislatoucheCtrl(aulieude[Verrnum])etla
toucheF12(aulieude[-]).
HSMSummaryTable
Touche Fonction
[H] Basculeentrelestouchespardéfautetlesautrestouchesd'activationdu
mode de raccourcis clavier.
[T] Basculeentrelestouchespardéfautetlesautrestouchesdecommutation
de ports.
[F2] Activel'émulationdeclavierMacintosh.
[F3] Activel'émulationdeclavierSun.
[F10] Désactivetouteémulationdeclavierettransmetlessignauxduclavier
sans les convertir.
[F4] Imprimelesparamètresactuelsducommutateuràtraversunéditeurou
traitementdetexte.
[F5] RéinitialisetouslespériphériquesUSB.
[B] Activeoudésactivelesignalsonore.
[X][Entrée] Activeoudésactivelestouchesdecommutationdeports.
[R][Entrée] Rétablitlesparamètrespardéfautdesraccourcisclavier.
[upgrade][Entrée] Activelemodedemiseàjourdumicroprogramme.
[D] ActivelafonctiondesynchronisationvidéoDynaSync,quisauvegardeles
donnéesEDID(Extended Display Identication Data)pouroptimiserla
résolutiondel'afchage.
[M] Activeoudésactivel'émulationdesouris.
[F1] Paramètreleclavieretlasourispourqu’ilsutilisentlemodeSPC(Special
PC)andepouvoirfonctionnersousdessystèmesd’exploitationspéciaux
commeunesourisetunclavierstandards(clavierde104touches).
[Rollen] [Rollen]
[A] [n] [Enter] DieKVM-SteuerungwirdabwechselndallenSekundenvoneinemPortaufden
anderen umgeschaltet.
Hotkey-Einrichtung
Hotkey-Modus(HSM)aktivieren
GehenSiezurAktivierungdesHSMfolgendermaßenvor:
1. Halten Sie die Taste [Num] gedrückt.
2. Drücken Sie die Taste [-], und lassen Sie sie los.
3. Lassen Sie die Taste [Num] los.
UmeineandereTastenkombinationfürdenHotkey-Modusfestzulegen,gehenSie
folgendermaßenvor:
1. Aktivieren Sie den Hotkey-Modus.
2. Drücken Sie die Taste [H].
DaraufhinwirdderHotkey-ModusüberdieTasteStrg(anstellederTasteNum)zusammenmit
F12(anstelleMinus)aktiviert.
Hotkey-Übersichtstabelle
Taste Funktion
[H] SchaltetzwischendenvordeniertenunddenalternativenHotkey-
Aktivierungstasten um.
[T] SchaltetzwischendenvordeniertenunddenalternativenPortumschalttastenum.
[F2] Aktiviert die Macintosh-Tastaturemulation.
[F3] Aktiviert die Sun-Tastaturemulation.
[F10] DeaktiviertdieTastaturemulation,undleitetdieTastatursignaleunverarbeitetweiter.
[F4] DrucktdieaktuelleKongurationdesSwitchübereinenTexteditoroderein
Textverarbeitungsprogrammaus.
[F5] Setzt alle USB-Geräte zurück.
[B] SchaltetdieTonsignaleeinbzw.aus.
[X] [Enter] Aktiviertbzw.deaktiviertdieTastenzurPortumschaltung.
[R] [Enter] Setzt die Hotkey-Einstellungen auf die Standardwerte zurück.
[aktualisieren]
[Enter] AktiviertdenModuszurFirmwareaktualisierung.
[D] AktiviertdieVideoDynaSync-Funktion.DabeiwirddieEDIDdesKonsolmonitors
gespeichert,umdieGrakauösungzuoptimieren.
[M] Aktiviertbzw.deaktiviertdieTastaturemulation.
[F1] AktivierteineTastatur-undMaus-KompatibilitätsartfürspeziellePCs,sodasssie
unterbesonderenBetriebsystemenalsStandardtastatur(104Tasten)und-Maus
arbeiten.
Búsquedaautomática
Teclas de acceso directo Acción
[Bloq Despl]
[Bloq Despl] [A] [Intro] Activaelmododebúsquedaautomática.ElcontrolKVMpasadeunpuertoa
otro cada 5 segundos. El intervalo predeterminado es de 5 segundos.
[Bloq Despl] [Bloq Despl] [A]
[n] [Intro] El control KVM pasa cíclicamente de un puerto a otro cada n segundos.
Modo de teclas de acceso directo
Activar el modo de teclas de acceso directo
Para activar el modo de teclas de acceso directo:
1. Mantenga pulsada la tecla [Bloq Num].
2.Pulselatecla[-]ysuéltela.
3. Suelte la tecla [Bloq Num].
Paracambiarlasteclasdeactivacióndelmododeaccesodirecto,hagalosiguiente:
1. Active el modo de teclas de acceso directo.
2.Pulselatecla[H]ysuéltela.
LasteclasdeactivacióncambianalateclaCtrl(envezde[BloqNum])yalateclaF12(envez
de[-]).
Resumen de las teclas de acceso directo
Tecla Función
[H] Alternaentrelasteclasestándaroalternativaparainvocarelmododeteclasdeacceso
directo.
[T] Alternaentrelasteclasestándaroalternativadeconmutacióndepuertos.
[F2] ActivalaemulacióndetecladoMacintosh.
[F3] ActivalaemulacióndetecladoSun.
[F10] Desactivacualquieremulacióndetecladoytransmitelasseñalesdeltecladosin
transformarlas.
[F4] Imprimelosajustesactualesdelconmutadormedianteuneditoroprocesadordetextos.
[F5] EfectúaunreseteoentodoslesdispositivosUSB.
[B] Activaodesactivalasseñalesacústicas.
[X] [Intro] Activaodesactivalasteclasdeconmutacióndepuertos.
[R] [Intro] Restablecelosajustesdelasteclasdeaccesodirectoasusvalorespredeterminados.
[upgrade] [Intro] Activaelmododeactualizacióndelrmware.
[D] ActivalafuncióndesincronizacióndevídeoDynaSync,queguardalosdatosde
identicacióndepantallaextendida(EDID)paraoptimizarlaresoluciónenpantalla.
[M] Activaodesactivalaemulacióndelratón.
[F1] Estableceelmodoparasistemasoperativosespecialesdeltecladoymouse,simulando
enestecasounteclado(de104teclas)yunmouseestándar.
Online Registration
International:
http://support.aten.com
North America:
http://www.aten-usa.com/
product_registration
Technical Phone Support
International:
886-2-86926959
North America:
1-888-999-ATENExt:4988
United Kingdom:
44-8-4481-58923
All information, documentation, and
specicationscontainedinthismedia
aresubjecttochangewithoutprior
noticationbythemanufacturer.
Pleasevisitourwebsitetondthe
most up to date version.
1 CS1642/CS1644 USB 2.0 DVI Dual View KVMP Switch
2/4CustomUSBDVIDualLink1.8mCableSets(DVI-D)
2/4CustomDVIDualLink1.8mCables(DVI-D)
1 USB-to-PS/2 Converter
1 FirmwareUpgradeCable
1 Power Adapter
1 User Instructions
Package Contents:
A
www.aten.com
www.aten.com
www.aten.com
www.aten.com
Front View
B
Rear View
CHardware Installation
D
