ATI Technologies 100-703138 - TV Wonder Pro PCI-NTSC User manual

i
ATI TV Wonder™
USB Edition
Installation and Setup
User’s Guide
Version 1.0 P/N 117-70069-00
© Copyright 2000, by ATI Technologies Inc.
All rights reserved, including those to reproduce this guide or parts thereof, in any form without
the express written permission of ATI Technologies Inc.
Features and specifications are subject to change without notice. Trademarks and/or registered
trademarks are the properties of their respective owners:
ATI TV WONDER USB Edition, RAGE PRO, LT PRO, RAGE XL, RAGE 128, RAGE 128
PRO, RAGE Mobility, Mobility 128 AGP, RADEON DDR/SDR – ATI Technologies Inc.;
CDDB – Escient;
Pentium is either a registered trademark or trademark of Intel Corporation in the United States
and/or other countries.
Windows is either a registered trademark or trademark of Microsoft Corporation in the United
States and/or other countries.
Millennium G400 is either a registered trademark or trademark of Matrox Graphics Inc. in the
United States and/or other countries.
3D Prophet is either a registered trademark or trademark of Guillemot Corp. in the United States
and/or other countries.
Riva 128 and Riva TNT are either registered trademarks or trademarks of NVIDIA in the United
States and/or other countries.

ii
Disclaimer
The manufacturer (MFR) reserves the right to make changes to this
document and the products which it describes without notice. The
MFR shall not be liable for technical or editorial errors or omissions
made herein; nor for incidental or consequential damages resulting
from the furnishing, performance, or use of this material.

iii
Table of Contents
Using Your ATI TV Wonder™ USB Edition . . . . . . . . 5
Minimum System Requirements .................................................................. 7
Online Help.................................................................................................... 7
Setting up your TV WONDER USB Edition ................................................ 8
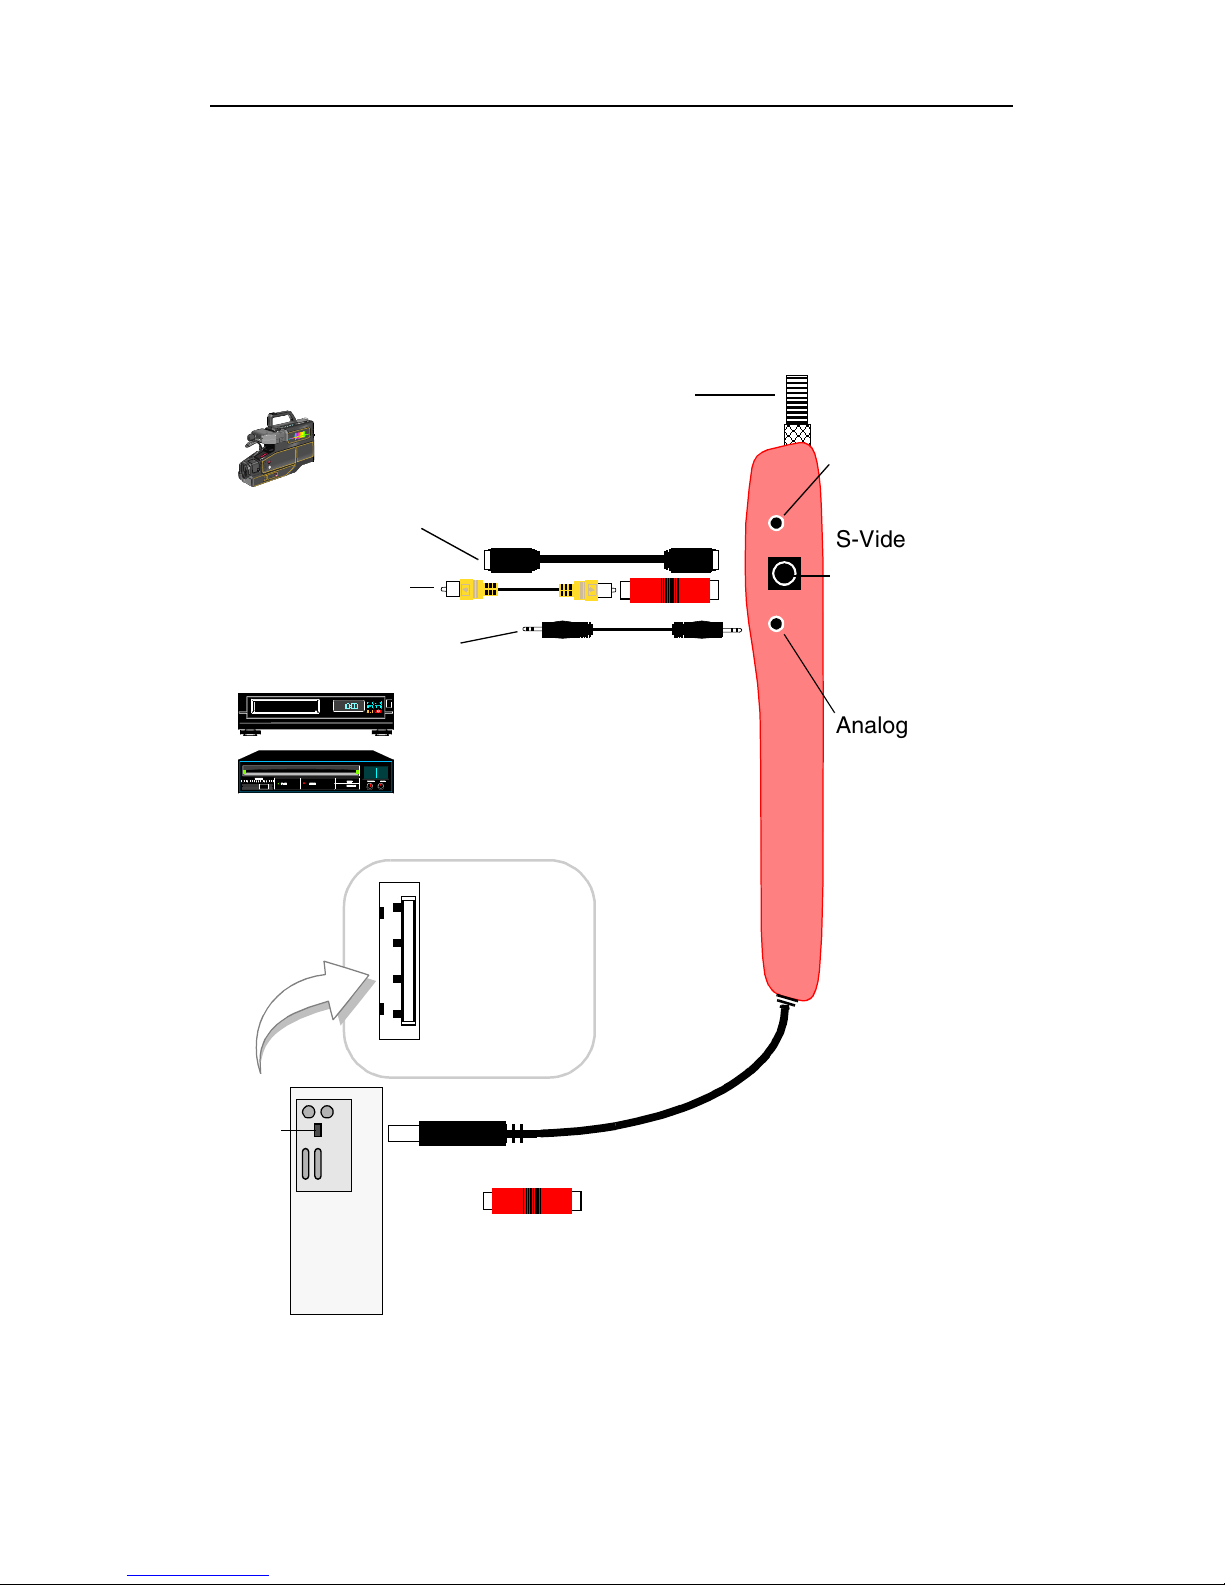
Connecting video and audio devices ...................................................... 9
LaunchPad ................................................................................................... 10
Starting from Windows®taskbar......................................................... 10
Attaching and Detaching Panels.................................................................. 11
TV .................................................................................................... 12
Setting up TV ...................................................................................... 14
Sizing the TV display........................................................................... 15
TV Control menu.................................................................................. 16
TV display settings............................................................................... 17
TV video settings.................................................................................. 18
TV Tuner settings................................................................................. 19
TV Stills Gallery settings ..................................................................... 22
TV Schedule settings............................................................................ 22
ATI TV Bar .......................................................................................... 23
Channel Surfing.................................................................................... 24
Closed Captioning ................................................................................ 25
Hot Words™........................................................................................ 27
TV Magazine........................................................................................ 29
Zooming and panning........................................................................... 31
Video Desktop...................................................................................... 32
Program Lockout.................................................................................. 33
Capturing Video and still images ......................................................... 34
Digital VCR ..................................................................................... 36
Saving and compressing captured video .............................................. 36
Digital VCR settings ............................................................................ 37
TV Listings...................................................................................... 38
Setting up TV Listings ......................................................................... 39
Getting around...................................................................................... 40
Recording ............................................................................................. 40
Viewing ................................................................................................ 41
Views.................................................................................................... 41
Filter options......................................................................................... 42
Actors tab ............................................................................................. 42
Categories tab ....................................................................................... 43
Searches................................................................................................ 43
Favorites Search ................................................................................... 43

iv
Movies tab ............................................................................................ 44
Schedules tab ........................................................................................ 45
Searches tab .......................................................................................... 45
Setting search parameters..................................................................... 46
Sports tab .............................................................................................. 47
Stations tab ........................................................................................... 47
Titles tab ............................................................................................... 48
Days and dates...................................................................................... 48
Stills Gallery ................................................................................... 49
Stills Gallery settings............................................................................ 49
CD Audio......................................................................................... 51
CD Audio settings ................................................................................ 52
CD Database......................................................................................... 53
CD Audio Schedule settings................................................................. 54
Video CD ......................................................................................... 55
Video CD Control menu....................................................................... 56
Capturing still frames from Video CDs ............................................... 57
Zooming and Panning .......................................................................... 57
Video CD Display settings ................................................................... 58
Video CD Preferences settings............................................................. 59
Video CD Stills Gallery settings .......................................................... 60
File Player ....................................................................................... 61
File Player Control menu ..................................................................... 62
Zooming and Panning .......................................................................... 63
File Player Display settings.................................................................. 64
File Player Preferences settings............................................................ 65
File Player Stills Gallery settings ......................................................... 65
File Player Schedule settings................................................................ 65
Schedule ......................................................................................... 66
Schedule settings ................................................................................. 67
Troubleshooting............................................................................. 68
Audio problems ... ................................................................................ 68
Video problems ... ............................................................................... 69
Index . . . . . . . . . . . . . . . . . . . . . . . . . . . . . . . . . Index - 1

5
Using Your
ATI TV Wonder™
USB Edition
ATI TV WONDER USB
Edition is an economical,
external TV-tuner pod that
attaches to your
computer’s USB port.
This chapter explains how
to use the special features
that your TV Wonder
USB Edition offers:
•Live TV from cable
•Live audio up to 16KHz and up to 16-bit
•S-Video or Composite video (via adapter) input for
external video sources
•Full-motion video capture –30 fps at 320x240 (NTSC),
352x288 (PAL) resolution
•VGA (640 x 480) resolution still image capture
•Powered by the USB port

6 Using Your ATI TV Wonder™ USB Edition
IN THIS CHAPTER...
■Setting up your TV WONDER
USB Edition on page 8
■LaunchPad on page 10
■TV on page 12
■AT I T V B ar on page 23
■Digital VCR on page 36
■TV Listings on page38
■Stills Galleryon page49
■CD Audio on page 51
■Video CD on page 55
■File Player on page 61
■Scheduleon page66
■Troubleshooting on page 68

Using Your ATI TV Wonder™USB Edition 7
Minimum System Requirements
Online Help
Feature Help. Click the Help button in the display panel to
open the online help.
Context-Sensitive Help. Context-sensitive help is always
available for each feature; just press the F1 key.
Tool Tips . Simply move the mouse cursor over a control to see
a description of its purpose. As you become familiar with your
TV Wonder USB Edition, you may want to turn off Tool Tips —
click the Show Tool Tips checkbox in the Display tab (for more
information, see TV display settings on page 17).
Computer
system
•PC with a Pentium®processor with MMX
•32 MBytes of memory
•USB port
•Sound card and speakers
Operating
system
Windows 98®, Windows Me®, or Windows
2000®
Display
adapter
16-bit, VGA, with video overlay support. The
following graphics accelerators work with the
ATI TV Wonder USB Edition. (Please visit our
web site, www.ati.com, for an updated list of
supported graphics accelerators.)
ATI products
RAGE PRO, LT PRO, Rage XL, RAGE 128,
RAGE 128 PRO, RADEON DDR/SDR.
RAGE mobility AGP/PCI, Mobility 128 AGP.
Other products
GeForce Guillemot 3D Prophet™,
NVIDIA RIVA 128™,
NVIDIA RIVA TNT2™Model 64,
MATROX Millennium G400™
TV source Antenna or cable
F1

8 Using Your ATI TV Wonder™USB Edition
Setting up your TV WONDER USB Edition
There are two ways to install the hardware and software.
Method 1
1Turn on your system. Using the supplied USB cable,
connect the pod to the USB port.
2When your system finds a USB device:
•Do not select from the list of possible devices.
•Click the option to search. Click Next.
•Check the From a CD option. Insert the Installation CD,
and click Next.
(The wording will vary, depending upon the version of
Windows.)
3Install the application software from the CD.
4Reboot when prompted.
Method 2
1Insert the Installation CD, and install the application
software.
2Reboot when prompted.
3Using the supplied USB cable, connect the pod to the USB
port.
•Do not select from the list of possible devices.
•Click the option to search. Click Next.
•Check the From a CD option. Insert the Installation CD,
and click Next.
(The wording will vary, depending upon the version of
Windows.)

Using Your ATI TV Wonder™USB Edition 9
Connecting video and audio devices
You can connect a variety of analog video and audio devices to
TV Wonder USB Edition—video camera, VCR, laserdisc
player, audiotape, etc. Use the following illustration as a guide.
Cable TV in
Analog
S-Video in
or Composite
video in (via
adapter–see
audio in
Infrared in
Cable with RCA
plugs at each end
Cable with mini-phone
plugs at each end
Cable with S-Video
plugs at each end
}
PC
USB
port
Note: The S-Video-to-Composite video
adapter is included with your ATI TV
WONDER USB Edition. S-Video cables,
RCA cables, and mini-stereo cables are
available separately from a consumer
electronics dealer.
(Remote
control)
Note.)
1234
Yo u r
computer’s
USB port
looks like
this.

10 Using Your ATI TV Wonder™USB Edition
LaunchPad
The LaunchPad provides a convenient way to start all your ATI
TV WONDER USB Edition features —just click the feature
you want. LaunchPad opens automatically when you start your
computer, or if you prefer, you can right-click LaunchPad, and
uncheck Load on Startup in the drop-down menu.
•To dock LaunchPad, right-click it, then click Dock in the
menu. To change the docking position, right-click
LaunchPad while it is docked, point to Side , then choose a
location.
•To change the size of the LaunchPad when it is not docked,
double-click it or right-click it, and choose a size.
The buttons in the upper right of LaunchPad let you access your
desktop settings, get Help, and close LaunchPad.
Starting from Windows®taskbar
1In the Windows taskbar, click Start.
2Point at Programs .
3Point at ATI TV WONDER USB Edition .
4Click CD Audio,File Player, LaunchPad, Video CD, or
TV.
For information about using TV WONDER USB Edition
features, see the online help.
Note
TV, Video CD, and File Player use some of the same
resources. If you try to start one of these features
while another is running, a resource conflict message
appears. You have four choices:
•Run both features with reduced performance,
where possible.
•Suspend the first feature while the other is active.
•Close the first feature.
•Press Cancel to continue without starting the
second feature.

Using Your ATI TV Wonder™USB Edition 11
Attaching and Detaching Panels
You can detach the TV control panel from the display panel,
move it to any location on your screen, and re-attach it.
To detach a panel
Move the cursor to the border of the panel you want to detach.
As the cursor reaches the border, it changes to the detach
symbol. Click the panel, and drag it away.
To attach a panel
Drag a panel to the panel you want to attach until its outline
changes, then release the mouse button. The panels will snap
back together.

12 Using Your ATI TV Wonder™USB Edition
TV
Watch Television on your
computer! You can
receive up to 125 cable
television channels and 70
antenna channels in
smooth, full-motion video
on the whole screen or in
a window.
TV delivers advanced
features: Closed
Captioning, Video/Still
Capture, Channel Surfing,
Scheduled Events, TV
Listings, and more.
When you click the logo in the upper left corner of the display
panel, the “About...”notice appears, and a Task menu displays
available and active features.
For information about using TV controls, see the online help
and Tool Tips.
Note •All channels may not be available in all countries.

Using Your ATI TV Wonder™USB Edition 13
To s tar t TV
from LaunchPad
Click TV USB Edition in the LaunchPad. For information on
LaunchPad, see page 10.
from Windows®taskbar
1In the Windows taskbar, click Start, then point at
Programs .
2Point at ATI TV Wonder USB Edition , then click TV.
You can also start TV from other ATI TV WONDER USB
Edition features—Video CD, CD Audio, and File Player. Click
the ATI logo in the upper left corner of the feature’s control
panel, then click TV.

14 Using Your ATI TV Wonder™USB Edition
Setting up TV
The first time you start TV, you must complete the Initialization
Wizard. After that, the Wizard will not run unless you want to
re-run it in order to change settings. The Initialization Wizard
guides you quickly and easily through setting up TV channels.
Initialization Wizard
Click the Setup button, then click the Display tab.
Click the Initialization Wizard... button. The TV Channels
Initialization Wizard appears. Follow the Wizard’s instructions
to select cable or antenna, choose the broadcast standard, and to
scan for active channels.
•If you have TV Listings installed with its current database, it
will also add the channel name for each channel. For more
information see TV Listings on page 38.
•If you do not hear TV audio, ensure that the TV is tuned to a
broadcasting channel, and that you have made the correct
audio connections. See Troubleshooting on page 68 for more
information.
Click Next >. The End of Initialization Wizard panel appears.
Click Finish to complete TV setup.

Using Your ATI TV Wonder™USB Edition 15
Sizing the TV display
You can resize the TV display using the mouse, the Maximize
button, or CTRL key combination.
•The F2 key hides/shows the control panel, to save desktop
space.
To resize the TV display using the mouse
Drag the display’s border. The TV display maintains a fixed
aspect ratio (width-to-height) of 4:3 to avoid picture distortion.
To display TV in full-screen
Press CTRL+F or ALT+F, or click the Maximize button. To
return to the previous size, click or press the Esc key.
To display preset sizes using the CTRL key
160 x120 pixels CTRL+1
240 x180 pixels CTRL+2
320 x240 pixels CTRL+3
640 x480 pixels CTRL+4
Toggle between full screen and
current size
CTRL+F
ALT+F
Increase size of display panel CTRL + Up Arrow
Decrease size of display panel CTRL + Down Arrow
Ctrl

16 Using Your ATI TV Wonder™USB Edition
TV Control menu
You can access TV functions by right-clicking on the video
viewing area or the control panel. This is very useful in full-
screen mode. The following menu items are available:
Setup Opens the TV setup page.
Always
On Top Displays TV on top of other applications.
Hide
Controls Hides the TV Control panel.
Zooming Select zoom ratio (2x, 4x, or 8x) or Unzoom if already
zoomed. See Zooming and panning on page 31.
Video
Size
Indicates the sizes available for the current panel:
160 x 120
240 x 180
320 x 240
640 x 480
Full Screen
Connector
Specifies the video input:
TV Tuner Selects TV Tuner input.
Composite Selects composite video input. Requires
adapter (see Connecting video and audio
devices on page 9).
S-Video Selects S-Video input.
Closed
Captions
Specifies how closed-captioned text is displayed. You
can also enable the Hot Words and TV Magazine
features. See Hot Words™on page 27 and TV Magazine
on page 29.
About... Displays the About... dialog.
Exit Closes TV.

Using Your ATI TV Wonder™USB Edition 17
TV display settings
The Display settings page lets you control how video is
displayed in TV.
To open the Display settings page
Click the Setup button in the TV control panel, then
click the Display tab.
Screen
Size
Indicates the sizes available for the current panel. If the
current panel does not support resizing, the values are
greyed-out.
Tool
Tips
Show Tool Tip
Show helpful aids for using TV when you point at a control
with your mouse.
Show Shortcut
Show keyboard shortcuts when you point at a control with
your mouse.
Display
Feature
Video Desktop
When TV is minimized, TV display replaces your desktop
pattern.
Fixed Aspect Ratio
Click to preserve the width-to-height ratio when you
resize or zoom the display.
Crop Edges
Crop image edges to hide overscan noise.
Always On Top
Display TV on top of other applications.
Auto Hide Controls when in full screen
Hide TV controls when displaying TV in full screen.
Hide
Player
Hotkey
Specify a keyboard key that hides/displays TV.
Initialization
Wizard
Re-runs the Initialization Wizard. See Initialization Wizard
on page 14.

18 Using Your ATI TV Wonder™USB Edition
TV video settings
The video settings page lets you choose a video connector and
fine-tune video characteristics.
To open the Video settings page
Click the Setup button in the Television control panel,
then click the Video tab.
Connector
Choose cable, composite or S-Video input.
•If you choose Composite or S-Video, you must specify
the Broadcast Standard.
Broadcast
Standard Choose the broadcast standard: NTSC, PAL, or SECAM.
Video
Properties
Color
Adjusts the amount of color in the image.
Brightness
Adjust the amount of white in the image.
Contrast
Adjusts the gradation of tones between light and dark
areas.
Tint
Adjusts the balance of red-to-blue in the image.
•Tint is not adjustable for PAL or SECAM.

Using Your ATI TV Wonder™USB Edition 19
TV Tuner settings
The tuner settings page lets you autoscan for active TV
channels, choose cable or antenna input, name channels, and set
channel-specific options.
To open the Tuner settings page
Click the Setup button in the TV control panel, then
click the TV Tuner tab.
Channel Property Details
When you select a channel and then click the Details... button in
the TV Tuner settings page, the Channel Property Details page
opens to let you set properties for particular channels—favorites
list, channel assignment, and properties for audio, video,
program lockout, and closed captioning.
For example, in the Channel Specific Settings Video page, you
could change a channel to SECAM when the other channels are
(by default) PAL. In the Closed Captioning page you could
enable a set of Hot Words specifically for a particular channel.
Channel
Name You can enter channel names
Details...
Select a channel, then click the Details... button to open
the Channel Property Details page (see Channel
Property Details on page 19).
Autoscan Scans for all active TV channels, and stores them when
you click the Set button.
Cable
Standard Selects the country and cable or antenna.

20 Using Your ATI TV Wonder™USB Edition
Channel
Name Type a name for the channel.
Number Displays the channel number.
Tun es to
Station
Specify the TV station that is received when you tune to a
particular channel. For example, you could assign the
actual channel 5 to the Television’s channel 2.
Autoscanning returns all channel assignments to normal
(see Autoscan on page 19).
Channel in
Favorite List
Check to add the channel to the channels that TV
receives when you click the channel up/down buttons).
To remove a channel, uncheck it.
Channel in
Visual
Selection List
Check to add the channel to the Visual Selection list (see
Channel Surfing on page 24). To remove a channel,
uncheck it.
Channel
Specific
Settings
Audio
Click Audio, then click Details... to open the Sound
details page.
Mute Settings
Global Applies mute settings to
all channels.
Mute On Mutes selected channel.
Mute Off Cancels all muting.
Stereo Activates stereo audio for this
channel, if it provides it.
Mono Activates monaural audio for
this channel.
This manual suits for next models
2
Table of contents
Other ATI Technologies TV Tuner manuals

ATI Technologies
ATI Technologies TV Wonder 550 User manual

ATI Technologies
ATI Technologies All-In-Wonder Radeon User manual

ATI Technologies
ATI Technologies ATI-TV WONDER VE User manual

ATI Technologies
ATI Technologies 100-703271 - AMD TV Wonder 550 PCI Video... User manual

ATI Technologies
ATI Technologies ATI-TV User manual

ATI Technologies
ATI Technologies THEATER 550 PRO User manual

ATI Technologies
ATI Technologies XCLAIM VR User manual