AU Qua Phone QX Installation guide

濡れた状態での充電は、
異 常 な 発 熱・焼 損 などの 原 因となり
大変危険です。
Basic Manual
Contents
Safety precautions
Getting Ready
Basic Operation
Appendix
In case above numbers are not available (for free),
Business hours 9:00 to 20:00 (7 days a week)
0077
-
7
-
111 157
0077
-
7
-
113 113
For inquiries, call:
Customer Service Center
For general, charge, operations (toll free)
Repair and Delivery Service Center
For service canceling procedure
in case of loss or theft (toll free)
From xed-line phones:
0120
-
925
-
919
For loss, theft or damage(toll free)
From xed-line phones/au cell phones,
Pressing "zero" will connect you to an operator,
after calling "157" on your au cellphone.
From au cell phones:
From xed-line phones: From au cell phones:
area code not required
area code not required
0120
-
925
-
314
In case above numbers are not available (for free),
(except Okinawa)
(Okinawa)
0120
-
977
-
033
0120
-
977
-
699
Business hours 9:00 to 20:00 (7 days a week)
Business hours 24-hour (7 days a week)
Cell phone and PHS operators collect and recycle unused
telephones, batteries and battery chargers at stores
bearing the logo regardless of brand and manufacturer
to protect the environment and reuse valuable resources.
July 2017, 1st Edition
Sales: KDDI CORPORATION •OKINAWA CELLULAR TELEPHONE COMPANY
Manufactured by: KYOCERA Corporation

ii
Preface
Thank you for buying the "Qua phone QX" (simply called
the "product" or "main unit" from here on).
Before using the product, be sure to read the "Basic
Manual" (this manual) to ensure correct use.
After you have finished reading the manuals, be sure to
keep them accessible.
List of Packaged Items
Before your start using the product, make sure that you
have all the following packaged with the product.
Main unit
IC Card Tray
Ejecting Tool (sample)
●取扱説明書 (Instruction
Manual) (Japanese)
●設 定 ガ イド (Setting
Guide) (Japanese)
The following items are not included in the package.
・AC adapter ・microSD memory card
・microUSB cable ・Earphones

1
◎Purchase a specified charger (sold separately).
◎The battery is built into the product.
◎Illustrations of cell phones in this manual are only for
reference. They may look different from the actual product.
Operating Instructions
■"Setting Guide" "Basic Manual" (This
Manual)
Handles only basic operations for main features.
■"Basic Manual App"
You can download the Basic Manual app on the product to
confirm operational procedures.
Home screen →[au Supports] →[Basic Manual]
• When you activate for the first time, follow the onscreen
instructions to download and install app.

2
Regarding Notations Used in This Document
■Note on Button Illustrations
In this manual, buttons are represented by simplified as
shown below.
r(Volume
UP button)
l(Volume
DOWN button)
F(Power button)
C H N
Navigation bar

3
■Description of Operations for Selecting
Item/Icon/Button etc.
Notations used for operation procedures in this manual are
as follows.
Description Explanation
Home screen →[ ]
→"DIALPAD" tab →
[1] [4] [1] →[ ]
Tap " (Phone)" at the bottom
of the Home. And after tapping
"DIALPAD" tab, tap " ", "
" and " ", then tap " (Call)" at
the end.
In sleep mode, F
(Power button)
In sleep mode, press F(Power
button).
• Tapping is to select a button or icon displayed on the
screen by lightly tapping it with your finger.
■
Notes on Illustrations/Screenshots
In this manual, screenshots and operations for the product
with au Nano IC Card 04 attached are described.
Screen illustrations shown in this manual may look different
from the actual screens. Note that part of the screen etc. may
be omitted
.
Some icons
etc. are omitted
in this manual.
Notations used in
this manual
Actual screen

4
◎In this manual, the operations with vertically oriented
screens are provided as examples. With horizontally
oriented screens, descriptions for menu item/icon/on-
screen button may be different.
◎Menu items, layers and icons described in this manual
may be different according to functions being used and
conditions.
◎ In this manual, screenshots for body color "White" are
provided as examples.
◎In this manual, "au Nano IC Card 04" is abbreviated as
"au IC card".
◎In this manual, "microSD™ memory card (commercially
available)", "microSDHC™ memory card (commercially
available)" and "microSDXC™ memory card" are
abbreviated as "microSD memory card (commercially
available)" or "microSD".
◎All of the indicated amounts exclude tax unless otherwise
specified.
◎Company names and product names referred to in this
manual are trademarks or registered trademarks of
respective companies. The TM, ® marks may be omitted
in this manual.

5
Contents
5
Contents
Preface ........................................................................... ii
List of Packaged Items ................................................. ii
Operating Instructions ................................................. 1
Regarding Notations Used in This Document............ 2
Contents ..................................................5
Getting Ready..........................................6
Names and Functions of Parts .................................... 6
au IC Card...................................................................... 9
Internal Shared Storage.............................................. 12
Using microSD Memory Card .................................... 12
Charging ...................................................................... 14
Turning the Power On/Off ........................................... 17
Switching to English Display..................................... 17
Start Screen................................................................. 18
Basic Operations ..................................19
Using the Home Screen.............................................. 19
Activating the Apps .................................................... 24
Switching the Home App............................................ 24
Using Standard Home ................................................ 24
Monitoring the Product's Status................................ 25
Checking Your Phone Number................................... 26
Setting Silent Mode..................................................... 26
Setting Airplane Mode ................................................ 27
Making a Call............................................................... 27
Receiving a Call .......................................................... 28
Setting Step-up Ring Volume ..................................... 28
Setting Missed Call Notication ................................ 28
Displaying Menu ......................................................... 28
Setting Home Screen.................................................. 28
Saving Battery Consumption..................................... 29
Safety Precautions................................30
When Using the Product ............................................ 30
Safety Precautions (Observe Strictly)....................... 32
Handling Precautions ................................................. 42
Notes on Waterproof/Dustproof/Shockproof
Properties .................................................................... 49
Notes on Using Bluetooth®/Wireless LAN (Wi-Fi®)
Function....................................................................... 55
Security Code/PIN Code............................................. 57
Notes on Data Communication Charges .................. 59
Notes on Applications ................................................ 59
Setting the App Permissions ..................................... 60
Cell Phone Etiquette ................................................... 60
Appendix................................................62
Updating Software ...................................................... 62
Troubleshooting.......................................................... 63
After-Sales Service ..................................................... 65
SIM Unlock................................................................... 69
Related Accessories ................................................... 70
Main Specications .................................................... 71
Specic Absorption Rate (SAR) of Cell Phones ...... 72
Export Administration Regulations............................74
Intellectual Property Rights ........................................74
Contents

6
Getting Ready
Getting Ready
Names and Functions of Parts
⑤⑩
⑧
⑨
⑪
⑫ ⑭
⑥
③④
②①
⑦
⑬
Getting Ready
①microSD memory card slot
②au IC card slot
③Earphone microphone terminal
Used for connecting earphones (commercially available)
or other accessories.
④Card slot cover
⑤In camera (lens)
⑥Earpiece (receiver)
Hear the other party's voice on call, play sound of answer
memo, etc. with SMART SONIC RECEIVER (▶P. 8).
⑦FPower button
Power ON/OFF, activate/deactivate sleep mode, etc.
⑧Incoming (charging) light
Lights red during charging.
Flashes according to settings for new call.
⑨Proximity sensor / Light sensor
The proximity sensor ensures that the touch panel does
not accidentally respond.
Light sensor detects the ambient light level to adjust the
display brightness.
⑩Infrared port
Send/receive data by infrared communication.
⑪Display (touch panel)
⑫Strap eyelet
⑬Mouthpiece (microphone)
Relays your voice to the other party. Also use to record
audio. Take care not to cover the microphone with your
fingers during a call or recording a video.

7
Getting Ready
⑮
⑯
㉒
㉓
㉑
⑱ ⑲
⑳
⑰
■How to open the card slot cover
Insert a fingernail a small way into one of
the corners marked ○and pull open
the cover.
Be careful not to insert your fingernail all
the way. Doing so may damage the
rubber seal under the cover.
⑭External connection terminal
Connecting a Common AC Adapter 05 (sold
separately), microUSB cable 01 (sold separately), etc.
⑮lr Volume down / up key
Adjusts sound volume. Press and hold l(Volume
down key) for at least one second to set "Silent mode"
(▶P.26).
⑯Built-in GPS / Bluetooth®/ Wi-Fi®antenna*
⑰Photo / Flash light
⑱Out camera (lens)
⑲Built-in sub antenna*
⑳Speaker
Ringtones, alarms, etc. sound from here.
㉑FeliCa antenna*
㉒mark
Hold it over a reader/writer when using Osaifu-Keitai®.
㉓Built-in main antenna*
* The antenna is built into the product. Covering the antenna
with your hand might affect communication quality.
◎The back cover of the product is not removable.
Removing the back cover with force may cause damage
or malfunction.
◎
The battery is built into the product and it is not removable.
To force stop and reboot the product, refer to "Forcing the
Product to Shut Down and Restart" (▶P.17)
.

8
Getting Ready
About SMART SONIC RECEIVER
The product features a SMART SONIC RECEIVER, which
relays sound by vibrating the display. The receiver does not
have any holes, but can be used in a usual manner.
■Touching to Your Ear
Hold the receiver area up to your ear as shown so that your
ear is covered, blocking surrounding sound and increasing
audibility. Move the product up and down, left and right to
suit your hearing and surroundings.
Earpiece (receiver)
Mouthpiece (microphone)
*It is on the bottom.
◎Take care not to cover the mouthpiece (microphone) of
the product with your fingers during a call.
◎ When commercially available earphones are connected,
voice sound can be switched to the one via earphones
not using SMART SONIC RECEIVER.
◎Do not cover the display with stickers or films. Doing so
may affect audibility.
◎Audibility depends on the individual.
◎Audibility also depends on surroundings.

9
Getting Ready
au IC Card
Your phone number etc. is
recorded on the au IC card.
The product is compatible with
au Nano IC Card 04.
IC (metal) part
au Nano IC Card 04
(Back) (Front)
◎Note that mishandling the au IC card might cause
malfunction or damage, be careful not to do the
followings.
• Do not touch the IC (metal) part of the au IC card.
• Check the correct insert direction.
• Do not forcefully attach/remove the card.
◎If the au IC card is not attached correctly or the au IC cad
has any abnormality, the error message is displayed.
◎Do not lose the removed au IC card.
◎Do not insert your au IC card with an conversion adapter
attached. Doing so may cause malfunction.
When au IC Card is Not Inserted
If the au IC card is not inserted, the following operations are
unavailable. And " " appears on the status bar.
• Making*/Receiving a call
• Sending/Receiving SMS
• Initial settings and sending/receiving emails of E-mail
(@ezweb.ne.jp)
• PIN code setting
• Checking your phone number and email address of the
product
Besides the items above, necessary functions such as your
phone number are also unavailable.
* Emergency calls such as 110 (Police), 119 (Fire and Ambulance) and 118
(Regional Coast Guard Headquarters) are unavailable. However, unless
the signal strength is "out of range" in GSM/UMTS/LTE roaming area when
you call, emergency calls are available. (Since emergency call numbers
vary depending on countries, they may be unavailable.)
Attaching/Removing au IC Card
■Cautions on Attaching/Removing
• Attach/Remove the au IC card after turning off the product.
Also, be sure to remove the microUSB plug of the specified
AC adapter from the product.
• When attaching/removing the au IC card, be sure to
unmount the microSD memory card first.
10
Getting Ready
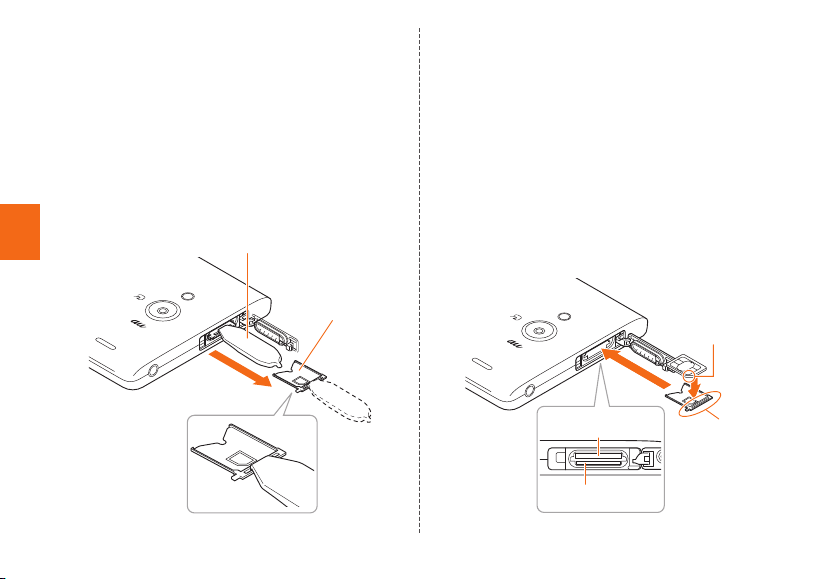
■Attaching au IC Card
• When installing your au IC card, be sure to use the
supplied IC Card Tray Ejecting Tool (sample).
1Turn the power off and open the card slot
cover
2Hook the IC Card Tray Ejecting Tool
(sample) on the edge of the tray and pull
it out
Tray
IC Card Tray Ejecting Tool
(sample)
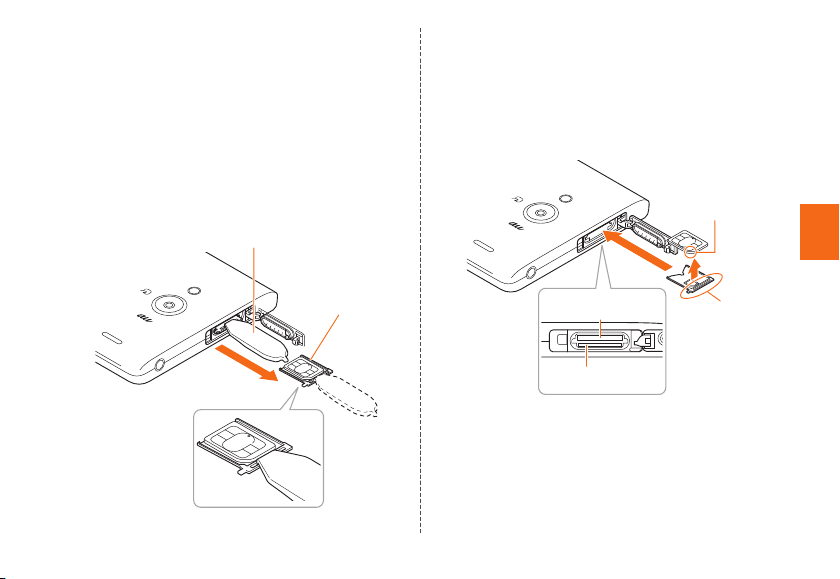
3Put the au IC card on the tray with the
position of the card's notch adjusted,
then insert the tray straight into the au IC
card slot (lower side)
After the tray is inserted, hook the IC Card Tray Ejecting Tool
(sample) on the edge of the tray and press it all the way.
• Insert the card with the IC (metal) part facing up.
• To avoid the au IC card from getting onto the tray,
do not insert it with excessive force. Do not apply
excessive force and insert it all the way straight into
the slot. If the tray does not fit into the slot, do not
press it with force. Pull the tray out and insert it again
with the front edge raised. The au IC card cannot be
recognized if the card gets onto the tray.
Notch
au IC Card slot
(lower side)
microSD memory card
slot (upper side)
Edge of tray
4Close the card slot cover
11
Getting Ready
■Removing au IC Card
• When removing your au IC card, be sure to use the
supplied IC Card Tray Ejecting Tool (sample).
1Turn the power off and open the card slot
cover
2Hook the IC Card Tray Ejecting Tool
(sample) on the edge of the tray and pull
it out
Tray
IC Card Tray Ejecting Tool
(sample)
3Remove the au IC card, then insert the
tray straight into the au IC card slot (lower
side)
After the tray is inserted, hook the IC Card Tray Ejecting
Tool (sample) on the edge of the tray and press it all the
way.
Notch
au IC Card slot
(lower side)
Edge of tray
microSD memory card
slot (upper side)
4Close the card slot cover

12
Getting Ready
Internal Shared Storage
The product can save data to the main unit memory and
microSD memory card.
The main
unit memory
Save data that apps and each app use and media
files such as images captured by screenshot.
microSD
memory
card
Save media files, etc.
◎Data may be saved to the main unit memory depending
on some apps even if a menu or message is displayed.
Using microSD Memory Card
Attaching/Removing microSD
Memory Card
■Attaching microSD Memory Card
1Open the card slot cover of the product
2Conrm the direction of the microSD
memory card and slowly insert it into the
slot until it clicks
When inserting the card into the product, confirm the
card is locked with snaps. Be aware that the card may
fly out if you release your finger before the card is locked.
Be careful about it.
microSD memory card
slot (lower side)
au IC Card slot
(upper side)
3Close the card slot cover

13
Getting Ready
◎The microSD memory card has a back and front side/top
and bottom orientation. Trying to insert the card forcefully
may cause confinement or damage.
Removing microSD Memory Card
1Home screen →[基本機能 (Basic
Function)] →[Settings] →[Storage] →
Tap " "
SD card is dismounted.
2Open the card slot cover of the product
3Slowly push the microSD memory card
toward the slot until it clicks
Pull out the microSD memory card with fingers on
when you hear "click". Keep your fingers on while the
microSD card comes out of the slot. Be aware that
the card may fly out if you release your finger while
pressing hard.
4Slowly pull the microSD memory card
Slowly pull out the card as straight as possible.
Depending on the microSD memory card, it is difficult
to pull out from the slot due to the failure of unlocking.
In that case, remove the card by pulling lightly with
your fingers.
5Close the card slot cover

14
Getting Ready
◎
Do not touch the terminal part of microSD memory card.
◎Do not pull out the microSD memory card forcefully.
Doing so might cause a fault or loss of data.
◎After using the product for a long time, the removed
microSD memory card may become warm. This is not a
malfunction.
◎ When you remove the microSD memory card, be sure to
dismount the card properly.
Charging
The internal battery is not fully charged at the time of
purchase. Charge the battery before using the product.
When the red light turns into green, the charging will be
completed.
◎The product may become warm while charging or during
other operations, this is not abnormal.
◎Charging the product while using the camera function,
the charging time may take longer than usual.
◎Doing various operations with the specified charger (sold
separately) connected, the battery life may get short due
to the short time charging/discharging.
◎ When temperature of environment or the product is
extremely high or low, charging may be stopped. Charge
the battery at room temperature as much as possible.
◎Make sure the connection is correct if the charging light
of the product blinks in red. If the charging light continues
to blink, immediately stop charging, and contact an au
shop or Repair and Delivery Service Center.
◎Right after " " is displayed while charging, the
charging light may not turn to green, but the light will turn
to green soon and the charging will be completed.
◎Keep a metal accessory or conductive materials (metal
pieces, pencil lead, etc.) from coming in contact with the
connection terminal and prevent them from getting inside.
15
Getting Ready
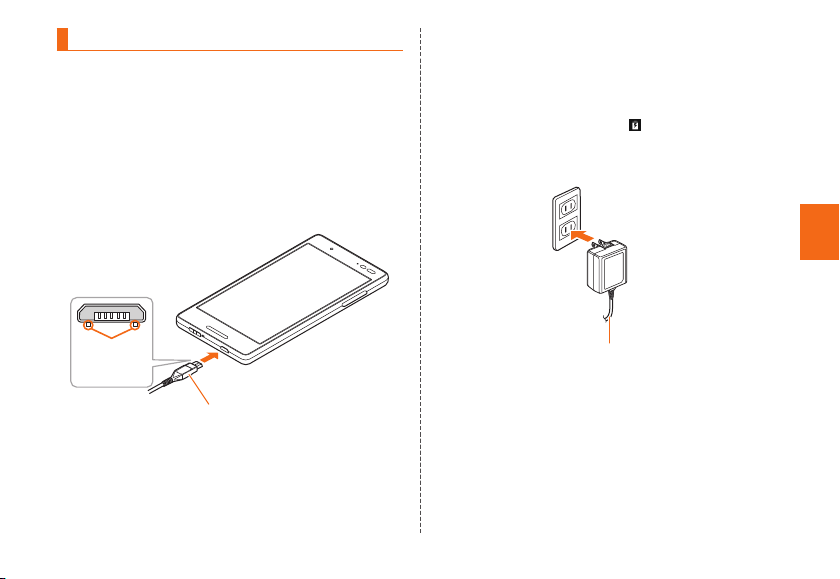
Charging with AC Adapter
How to charge the product using Common AC Adapter
05 (sold separately) is described here. For information on
the specified AC adapter (sold separately), see "Related
Accessories" (▶P. 70).
1Check the orientation of the microUSB
plug of Common AC Adapter 05 (sold
separately) and insert it straight into the
external connection terminal
Common AC Adapter 05 (sold separately)
With the
projection
facing down
2Connect the power plug of Common AC
Adapter 05 (sold separately) to an outlet
(100V - 240V AC)
Make sure that the charging light turns into red. When
the battery power turns on, " " appears on the status
bar.
When charging is complete, the charging light turns
into green.
Common AC Adapter 05 (sold separately)
3When charging is complete, pull out the
microUSB plug of Common AC Adapter
05 (sold separately) straight from the
external connection terminal
4Connect the power plug of Common AC
Adapter 05 (sold separately) to an outlet

16
Getting Ready
◎Note that applying unnecessary force with an external
device connected to the external connection terminal
may cause damage.
◎ When the battery is charged in the case that the batteries
run out, charging light may not turn to green soon, but
charging is started.
Charging with PC
How to charge the product connecting to USB port that
supports PC charging with microUSB cable 01 (sold
separately) is described here.
1Connect the microUSB cable 01 (sold
separately) to the USB port of PC when
the PC is completely activated.
2Check the orientation of the microUSB
plug of microUSB cable 01 (sold
separately) and insert it straight into the
external connection terminal
Make sure that the charging light turns into red.
When charging is complete, the charging light turns
into green
.
• When a screen such as new hardware search
appears on PC, select "Cancel".
USB port of PC microUSB cable 01
(sold separately)
With the
projection
facing down
3When charging is complete, remove the
microUSB cable 01 (sold separately) from
the external connection terminal and PC.
◎ When the battery is charged in the case that the batteries
run out, charging light may not turn to green soon, but
charging is started.
◎The charging time may take longer than charging with a
specified AC adapter. And the charging time also varies
depending on your PC.

17
Getting Ready
Turning the Power On/Off
Turning the Power On
1Press and hold F(Power button) until
the charging light turns on
The start screen appears (▶P. 18).
• For the first time you turn on the product, the initial
setting, "auかんたん設定 (au Easy Setting)" activates.
You need to set as required. For details, refer to
"Initial Settings" in the packaged "Setting Guide".
◎
When logos are being displayed on the screen, do not
touch the screen because the initial setting of the touch
panel activates. Doing so may prevent the touch panel
from working properly.
◎Press F(Power button) when the screen is on or turn
the screen off with no operation for a certain period, the
product enters sleep mode.
Turning the Power Off
1Press and hold F(Power button) for at
least 1 second
2[Power off] →[OK]
Forcing the Product to Shut Down
and Restart
You can force the product to power off and reboot when the
screen does not respond, or the power cannot be turned off.
1Press and hold F(Power button)
and r(Volume up key) for at least 11
seconds
◎If you turn off the product forcibly and restart, an unsaved
data will be lost. Do not perform except when the product
does not respond.
Switching to English Display
Switch the language displayed on the screen to English.
1
Home screen →[基本機能 (Basic Function)]
→[設定 (Settings)] →[言語と入力
(Languages & input)] →[言語 (Languages)]
2[English]
The message "起動中のアプリ、メール送受信、ダウンロードな
どが終了される場合があります。" (Apps, mail transmission/
reception, and downloads may be terminated.) appears,
confirm the content and then tap [OK].

18
Getting Ready
Start Screen
The start screen is displayed when you turn the product on
or cancel the sleep mode.
Switching to the Home Screen
from the Start Screen
You can switch to the home screen with the following
operations when the start screen appears.
1
Swipe/ick
The home screen appears (▶
P. 19). Or, the previous screen
which the product turns to
sleep mode appears.
• Swipe/Flick [ ] / [ ]
displayed at the bottom
of the screen to activate
Phone (▶P.27)/Camera.
《Start Screen》
①
②
①Clock display
②Notications
•
Double-tap a notification to activate notified app.
•
If there are unconfirmed missed calls, you are notified by
snooze (secondary notification). For details, refer to "Setting
Missed Call Notification" (
▶
P. 2 8 ) .
《Secondary Notification Screen》
Sleep Mode
Press F(Power button) while the backlight is turned on
or perform no operation for a certain period, the screen
goes off temporarily and the product enters sleep mode.
Doing the following operation, cancel the sleep mode.
1In sleep mode, press F(Power button)
◎To change the time to enter sleep mode, home screen →
[基本機能 (Basic Function)] →[Settings] →[Display] →
[Sleep], and select the time.
◎ When you press F(Power button) to display the
screen in sleep mode, do not touch the screen. Doing so
may prevent the touch panel from working properly.
Auto Assist
It notifies you of unconfirmed missed calls with vibration
when you pick up the product.
And it controls the functions automatically according to
your actions or lifestyles. For example, the Silent mode is
set when it detects you getting on a train and the snooze is
canceled when it detects you walking.
To use Auto assist, home screen →[基本機能 (Basic
Function)] →[Settings] →[Auto assist], and set each item.
Table of contents
Other AU Cell Phone manuals

AU
AU W32T Specification sheet

AU
AU Aquos Serie miniSHV31 Service manual

AU
AU Digno ISW11K User manual

AU
AU Xperia Z Ultra Sol24 Service manual

AU
AU Urbano V02 User manual

AU
AU FJL22 Installation guide

AU
AU A1402SII Installation guide

AU
AU Aquos Phone SL IS15SH Installation guide

AU
AU TORQUE X01 Installation guide

AU
AU URBANO V01 Installation guide

AU
AU A5505SA Installation guide

AU
AU TORQUE G04 Service manual

AU
AU Basio 2 Installation guide

AU
AU Mirach IS11PT Installation guide

AU
AU INFOBAR A03 Installation guide

AU
AU Aquos SHL25 Quick start guide

AU
AU E09F Specification sheet

AU
AU K002 User manual

AU
AU AQUOS SHV32 User manual

AU
AU Xperia ZL2 Sol25 Service manual


 user guide")


