manuals.online logo
Brands
  1. Home
  2. •
  3. Brands
  4. •
  5. Audiovox
  6. •
  7. Car Video System
  8. •
  9. Audiovox HR7008APKG User manual

Audiovox HR7008APKG User manual

Other manuals for HR7008APKG

1

Other Audiovox Car Video System manuals

Audiovox VE640 - VE - 640 User manual

Audiovox

Audiovox VE640 - VE - 640 User manual

Audiovox MMD92 User manual

Audiovox

Audiovox MMD92 User manual

Audiovox VME 9512 TS - User manual

Audiovox

Audiovox VME 9512 TS - User manual

Audiovox VOD285P User manual

Audiovox

Audiovox VOD285P User manual

Audiovox Movies2Go 128-8290 User manual

Audiovox

Audiovox Movies2Go 128-8290 User manual

Audiovox AVXMTG10UA User manual

Audiovox

Audiovox AVXMTG10UA User manual

Audiovox PAV2000DTV Quick start guide

Audiovox

Audiovox PAV2000DTV Quick start guide

Audiovox VOD10 - Car - Overhead LCD Monitor User manual

Audiovox

Audiovox VOD10 - Car - Overhead LCD Monitor User manual

Audiovox VODEXL10 A User manual

Audiovox

Audiovox VODEXL10 A User manual

Audiovox VOH703 User manual

Audiovox

Audiovox VOH703 User manual

Audiovox ADV200 User manual

Audiovox

Audiovox ADV200 User manual

Audiovox DVD1627 Planning guide

Audiovox

Audiovox DVD1627 Planning guide

Audiovox VOD285S - Dual LCD Monitors User manual

Audiovox

Audiovox VOD285S - Dual LCD Monitors User manual

Audiovox VOD806 - LCD Monitor And TV Tuner User manual

Audiovox

Audiovox VOD806 - LCD Monitor And TV Tuner User manual

Audiovox HRDV700 User manual

Audiovox

Audiovox HRDV700 User manual

Audiovox VOD8512 S User manual

Audiovox

Audiovox VOD8512 S User manual

Audiovox VME 9315BTA BTM 10 User manual

Audiovox

Audiovox VME 9315BTA BTM 10 User manual

Audiovox Mobile Video VOD128A User manual

Audiovox

Audiovox Mobile Video VOD128A User manual

Audiovox D1812PKG - 8" Portable DVD Player D1812pk User manual

Audiovox

Audiovox D1812PKG - 8" Portable DVD Player D1812pk User manual

Audiovox PAV1510DTV Manual

Audiovox

Audiovox PAV1510DTV Manual

Audiovox VOD10A User manual

Audiovox

Audiovox VOD10A User manual

Audiovox VM9414 User manual

Audiovox

Audiovox VM9414 User manual

Audiovox VMO 5020 V User manual

Audiovox

Audiovox VMO 5020 V User manual

Audiovox HR7008APKG User manual

Audiovox

Audiovox HR7008APKG User manual

Popular Car Video System manuals by other brands

Farenheit MD-1510CM instruction manual

Farenheit

Farenheit MD-1510CM instruction manual

Mazda Connect manual

Mazda

Mazda Connect manual

RCA DRC97983 Manual de usuario

RCA

RCA DRC97983 Manual de usuario

Panasonic CY-VHD9401U Service manual

Panasonic

Panasonic CY-VHD9401U Service manual

Stinger HEIGH10 RB10RAM13B installation manual

Stinger

Stinger HEIGH10 RB10RAM13B installation manual

Alpine IVA-W203 - 6.5" Touch Screen 2-DIN DVD In-Dash... owner's manual

Alpine

Alpine IVA-W203 - 6.5" Touch Screen 2-DIN DVD In-Dash... owner's manual

Eonon E1057 instructions

Eonon

Eonon E1057 instructions

Milion D2223 user manual

Milion

Milion D2223 user manual

Metra Electronics 99-8153 installation instructions

Metra Electronics

Metra Electronics 99-8153 installation instructions

Voxx Electronics HR8MA1 owner's manual

Voxx Electronics

Voxx Electronics HR8MA1 owner's manual

Axxera AV604Bi quick start guide

Axxera

Axxera AV604Bi quick start guide

Clarion NX706E owner's manual

Clarion

Clarion NX706E owner's manual

Pyle view PLDN74BTi owner's manual

Pyle view

Pyle view PLDN74BTi owner's manual

Clarion NX602 quick start guide

Clarion

Clarion NX602 quick start guide

RCA DRC6296 - Twin 9" Mobile DVD System Manual Del Usuario

RCA

RCA DRC6296 - Twin 9" Mobile DVD System Manual Del Usuario

Fiat Uconnect 5.0 manual

Fiat

Fiat Uconnect 5.0 manual

Lanzar SVDVD5 owner's manual

Lanzar

Lanzar SVDVD5 owner's manual

Eonon E1060 instructions

Eonon

Eonon E1060 instructions

manuals.online logo
manuals.online logoBrands
  • About & Mission
  • Contact us
  • Privacy Policy
  • Terms and Conditions

Copyright 2025 Manuals.Online. All Rights Reserved.

OPERATION
MANUAL
128-8466
HR7008APKG
Two Custom Vehicle Headrests
with 7” LCD Monitors Touch Screen Control
and Built-in
DVD Player for Rear Entertainment
AUX AUX
IMPORTANT
An LCD panel and/or video monitor may be installed in a motor vehicle and visible to the driver if the LCD panel or video monitor is used
for vehicle information, system control, rear or side observation or navigation. If the LCD panel or video monitor is used for television
reception, video or DVD play, the LCD panel or video monitor must be installed so that these features will only function when the vehicle is
in “park” or when the vehicle’s parking brake is applied.
An LCD panel or video monitor used for television reception, video or DVD play that operates when the vehicle is in gear or when the
parking is not applied must be installed to the rear of the driver’s seat where it will not be visible, directly or indirectly, to be operator of the
motor vehicle.
An LCD panel or video monitor used for television reception, video or DVD play that operates when the vehicle is in gear or when the
parking is not applied must be installed to the rear of the driver’s seat where it will not be visible, directly or indirectly, to be operator of the
motor vehicle.
Licensed under one or more of the following patents:
Patent NOS. 7,245,274 and 6,899,365
3
HR7008APKG
The HR7008APKG contains two vehicle specific head-rests. Each has a 7” Monitor with touch screen control and built-in DVD Player. This
system allows the users to either watch individual DVD’s or watch the same DVD on both monitors. Both users can also share each others
program. The full function remote control can operate either unit by selecting M1 or M2 on the remote.
Quick Start Guide
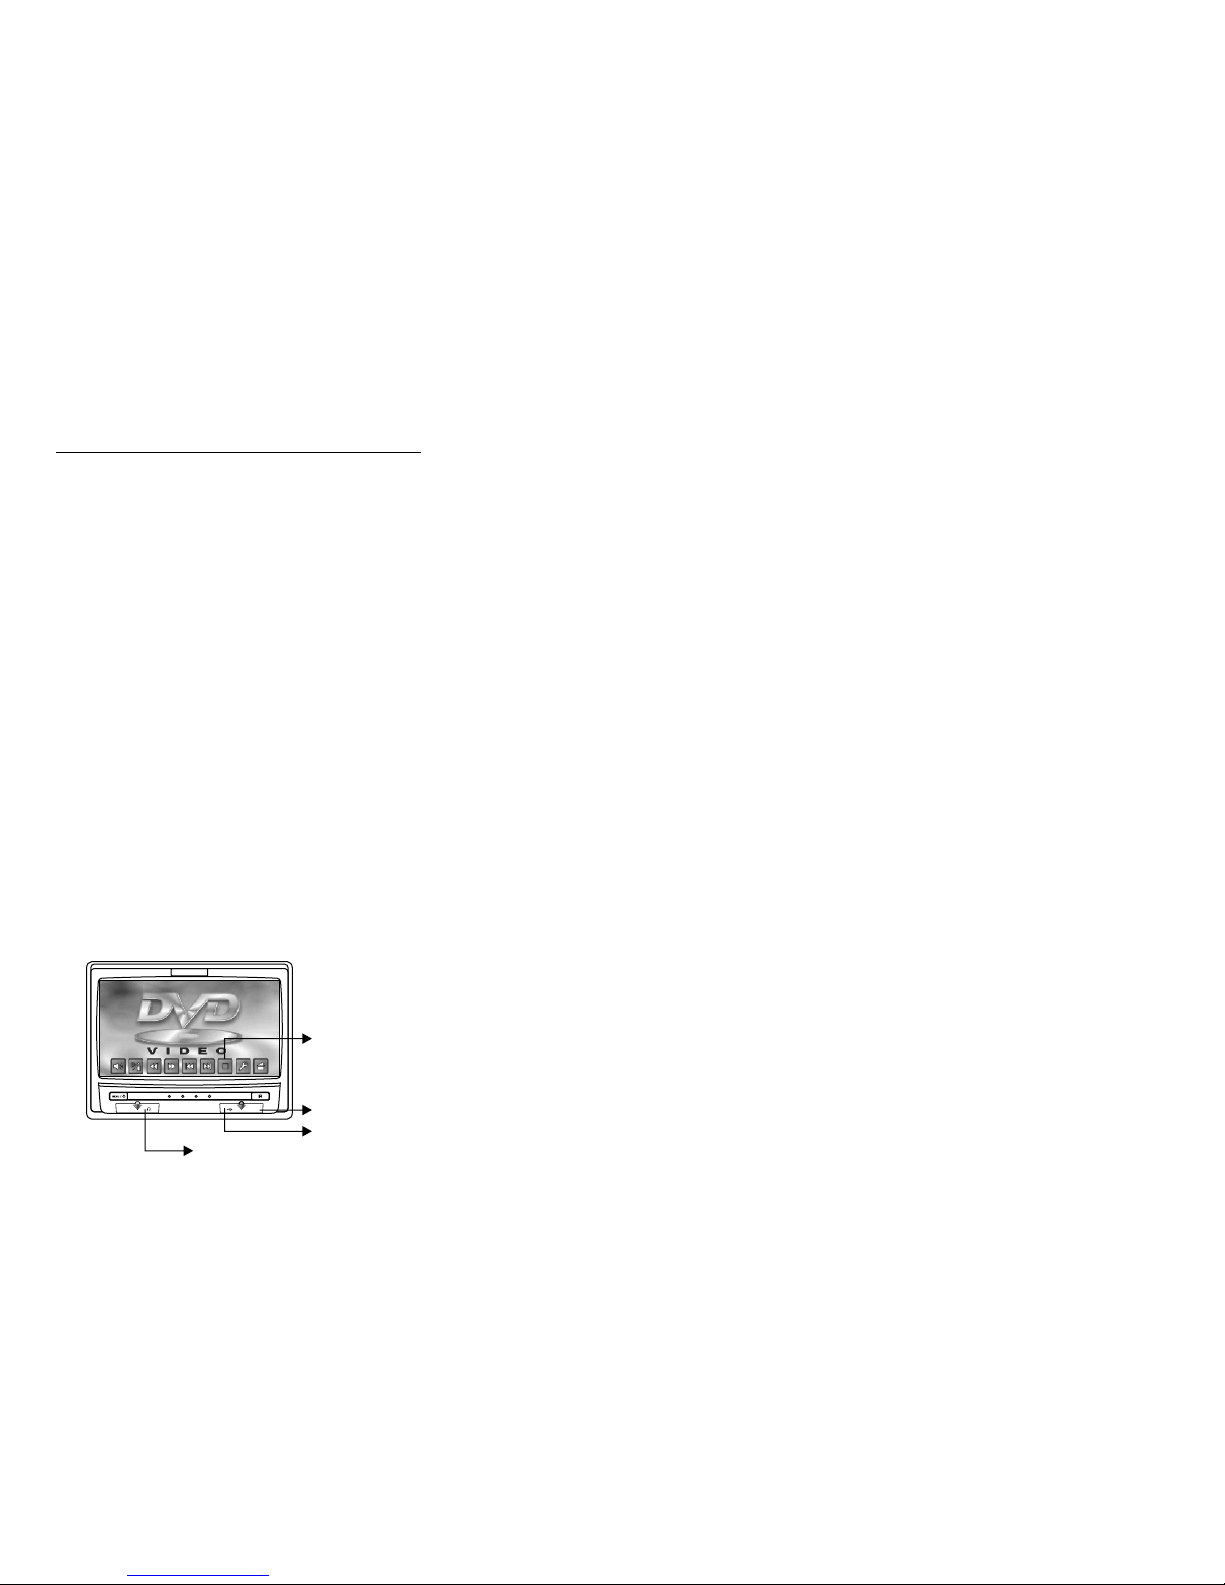
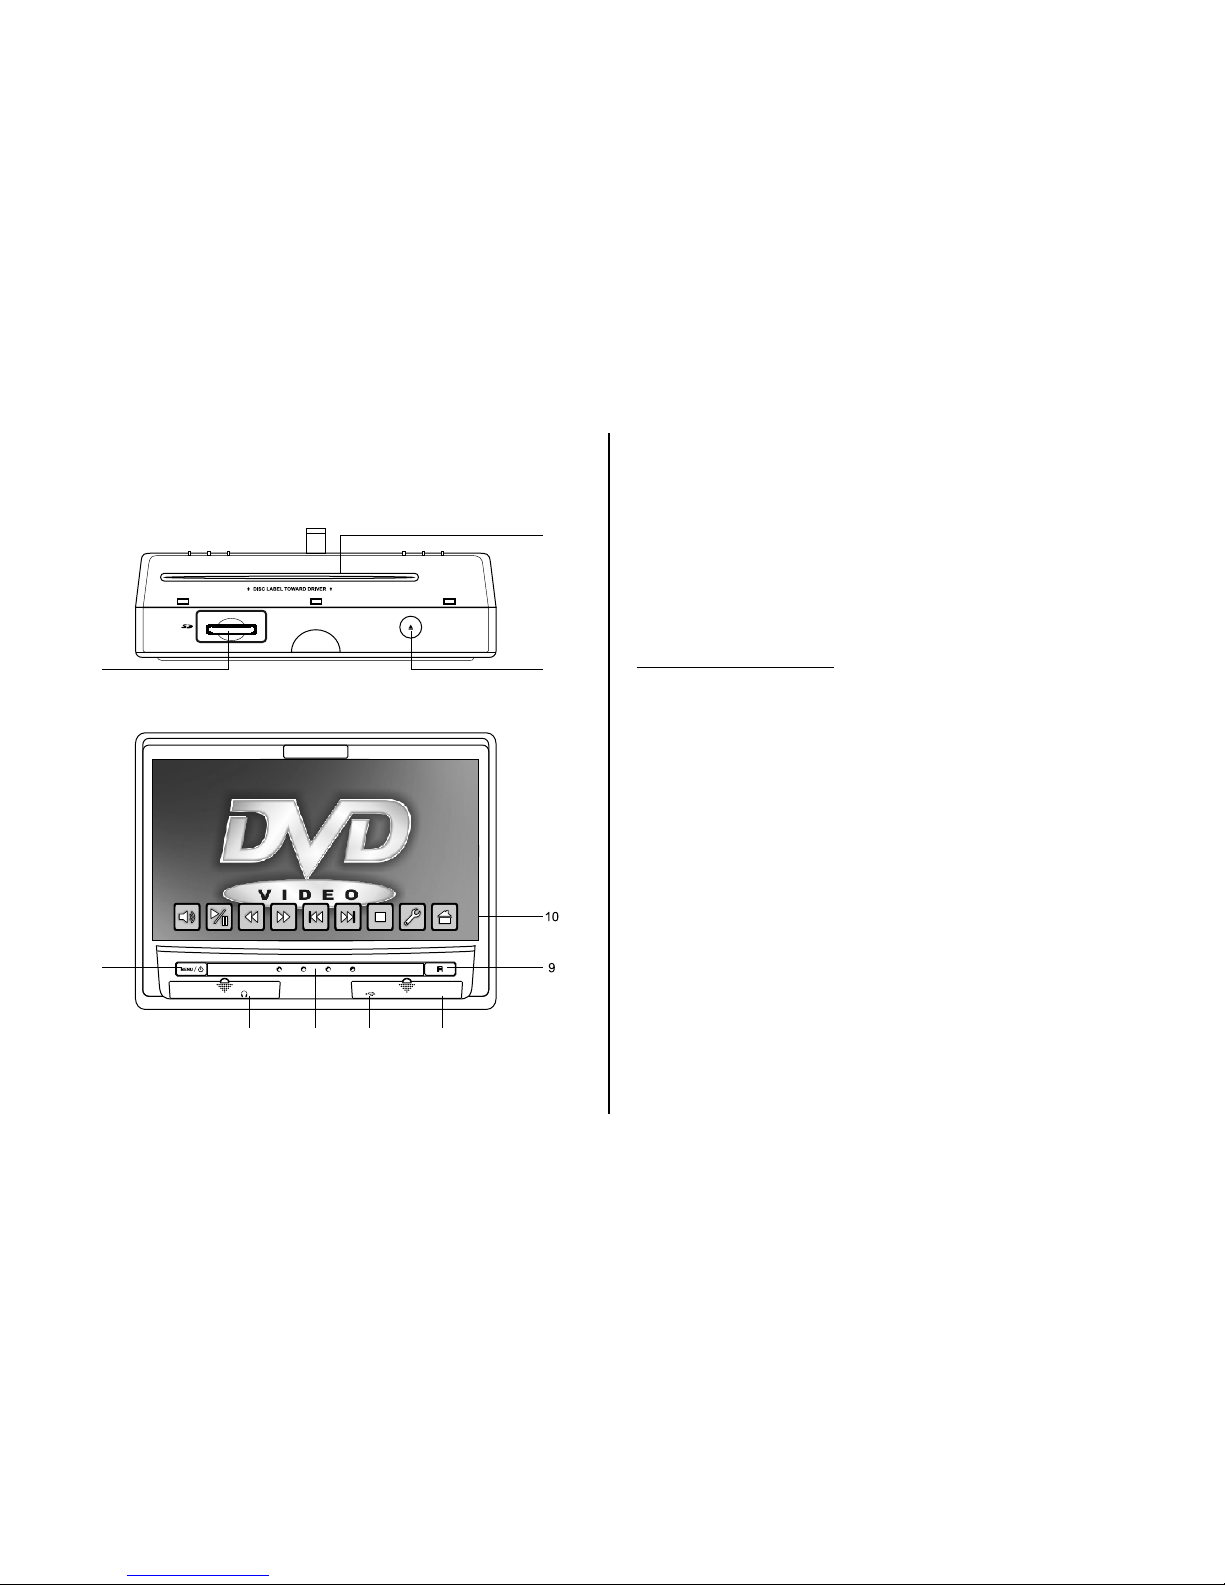
1. Turn on the M1 monitor, to gain access to the DVD slot push at the top center of the screen frame, the screen will tilt forward.
2. Insert a DVD, CD or MP3 disc into the slot, disc label toward driver. Push down gently on the disc until the player pulls the disc in.
3. Use the touch screen to access the DVD mode.
4. Tilt the monitor to a comfortable viewing position (the headrest itself can be tilted forward to help achieve a comfortable viewing
position).
5. Each wireless headphone has a CH A/CH B switch. Turn the volume down to its lowest setting before putting them on your head.
When sitting in front of the M1 screen, use the CH A switch setting. When sitting in front of the M2 screen, use the CH B switch setting.
Set the headphone to the proper channel and press the Power On/Off switch. The power indicator will light up red.
6. When the DVD menu appears, select the menu item using the cursor keys and touch the OK or play button.
7. If audio playback through the vehicle radio is preferred, use the FM transmitter On/Off button on the remote control. Set the vehicle
radio to the channel selected on the M1 monitor. If interference with a local radio station occurs, set the FM modulator to one of the
other 15 radio frequencies using the CHANNEL SELECT button on the remote control.
8. Turn on the M2 Monitor using the power button on the front of the screen or remote control.
9. Tilt the screen to a comfortable viewing position (the headrest itself can be tilted forward to help achieve a comfortable viewing
position).
10. Touch the screen and touch on M1 or use remote control to press SOURCE button to view program from M1 or select from the other
available sources DVD, MEMORY CARD, USB, AV, AUX and MEDIA for M2 Monitor.
NOTE: To operate the M1 screen, press M1 on the remote control.
To operate the M2 screen, press M2 on the remote control.
4
HR7008APKG SYSTEM OVERVIEW
1) The HR7008APKG SYSTEM is a versatile headrest system. The headrests are referred to as M1 and M2 in this manual.
2) The M1 Monitor is comprised of a 7" Touch Screen TFT LCD monitor with built-in DVD player that allows the user to select from several sources (DVD,
SD, USB, M2, AV, AUX, MEDIA and GAME Source). The M1 monitor has a built-in infrared audio transmitter channel (CH A) for use with the two-
channel wireless headphones (CH A)
NOTE: When the DVD menu appears on the screen, touch the desired DVD menu selection to start the DVD playing. Refer to page for 6 operation.
3) The M2 monitor is comprised of a 7" Touch Screen TFT LCD monitor with built-in DVD player that allows the user to select from several sources (DVD,
SD, USB, M1, AV, AUX and MEDIA Source). The M2 monitor has a built-in infrared audio transmitter channel (CH B) for use with the two-channel
wireless headphones (CH B).
NOTE: When the DVD menu appears on the screen, touch the desired DVD menu selection to start the DVD playing. Refer to page for 6 operation.
4) The monitors will display all of the functions with the comprehensive Graphical User Interface (GUI) and can be accessed using the touch screen.
5) The two-channel wireless headphone sets have an A-B switch that allow the users to select the audio from either the M1 (CH A) or the
M2 (CH B).
6) When using the IR remote control, the M1 Monitor will only respond to the remote control unit when the Monitor Select (M1) button on remote control is
pressed. The M2 Monitor only respond to the Remote Control unit when the Monitor Select (M2) button on remote control is pressed.
7) Optional wired headphones allow the user to listen to audio from the system.
8) The M1 and M2 Monitor will accept an audio / video input through the 1/8” jack located on the front of the unit. The audio / video device could be a video
game system, video camera or other input device.
AUX
WIRED HEADPHONE
USB
AUX
TOUCH SCREEN GRAPHICAL USER INTERFACE (GUI)
HR7008A M1/HR7008A
5
9) Press and release the screen at the top of the screen to release the screen for disc insertion. The headrest itself can be tilted forward to help achieve a
comfortable viewing position. Pressing it again will lock the screen back in the closed position.
PULL UP
AUX
USB JACK
WIRED HEADPHONE
PUSH IN
Inner Ring
Hook
Shaft Angle
Closed Position
10) Insert/Eject disc and SD Card
Insert/Eject Disc
Insert/Eject
SD Card 19 Degrees
19 degrees
6
HR7008APKG Touch Screen
The touch screen of the HR7008APKG allows the user to start DVD play by touching PLAY MOVIE or any of the DVD menu features on the LCD screen.
Some DVD’s will not allow this function. One method is to use the remote control instead of the touch screen. The other method is to touch any of
four corners of the screen to pop up the DVD menu navigation screen (below)
Use the up/down/left/right icons to select an item from the DVD menu. Use the Enter to start DVD play.
1
32
AUX
4
5678
M1/M2 Panel Control
1. DVD disc insertion slot.
2. EJECT Button -Press this button to eject the disc.
3. SD Card Reader
4. MENU/POWER Button with Power Indicator LED.
5. Wired Headphone Jack
6. IR Transmitter LEDS.
7. USB Port
8. AUX Jack
9. IR Sensor
10. Graphical User Interface (GUI) Touch Screen
CONTROLS AND INDICATORS DIAGRAM
Control Function Description for M1 and M2 Monitor
7
8
Touch Screen For HR7008AM1/M2
Main Page
Turn on the unit by
pressing
the power button located
on
The lower left of the unit.
I) Touch the panel then
touch the Home icon to
display the Main Menu. The
Main Menu can also be
accessed by pressing the
MENU button on the unit’s
front panel.
ii) The Main Menu screens
for M1 and M2 contains
the following icons:
M1 Unit
DVD, MEMORY CARD,
USB, M2, AV, AUX,
MEDIA, GAME, PIX,
SCREEN OFF, MUTE,
FMM.
M2 Unit
DVD, MEMORY CARD,
USB,M1, AV, AUX, MEDIA,
PIX, SCREEN OFF, MUTE
Main Menu
SCREEN
OFF MUTE
MEDIA
FMM
GAMEAUX
MEMORY
CARD USB M2
DVD
Main Menu
AV
AV
PIX
M1
SCREEN
OFF MUTE
MEDIA
FMM
GAMEAUX
MEMORY
CARD USB M1
DVD
Main Menu
AV
AV
PIX
M2
MEMORY CARD
Insert Memory Card / SD Card into SD CARD slot.
Touch the Main Menu MEMORY CARD icon to set unit’ source
to SD.
USB
Insert the USB to the USB Slot. Touch the Main Menu USB icon
to set the unit’s source to USB.
M2
Touch the Main Menu M2 icon on the M1 unit to link the M1 unit
to the M2 unit. The M1 unit will now receive its AV from M2.
M1
Touch the Main Menu M1 icon on the M2 unit to link the M2 unit
to the M1 unit. The M2 unit will now receive its AV from M1.
AV
Touch the Main Menu A/V icon to route external audio and video
supplied to the system’s AV IN RCA connectors.
NOTE: May not be available on all installations. Contact your
dealer for more information.
AUX
Touch the Main Menu AUX icon to route external audio and
video supplied to the unit via the cable adapter.
MEDIA
Touch the Main Menu MEDIA icon to select the MEDIA display.
GAME
Touch the Main Menu GAME icon on (for M1 only). The GAME
selection is controlled by wireless game controller.
DVD
Touch the Main Menu DVD icon to set the source to DVD. Then
insert the DVD into slot with label face toward driver. Gently push
down on the disc and the disc will load automatically.
PIX
Touch the Main Menu PIX icon to gain access to the display’s
picture controls. The controls available are BRIGHTNESS,
CONTRAST, COLOR, TINT and RESET.
Adjustment of each control is made by touching + (increase) or
- (decrease), then touch
(enter) to exit.
The on screen DVD menu of most DVD’s can be used to select a
DVD menu feature such as “Play Movie”, “Scene Select”, etc. by
touching the menu item on the touch screen. For example,
touching “Play Movie” in the below screen will start movie play.
NOTE: A small number of DVD discs will not function like this. In
that event use the remote control to start the movie or select the
different DVD options.
9
MUTE
Touch the Main Menu MUTE icon to toggle the unit’s audio
between on and off.
SCREEN OFF
Touch the Main Menu SCREEN OFF icon and the screen will
shut off. Touch the screen again to turn it back on. The screen
will turn back on after cycling power.
FMM
Touch the Main Menu FM MODULATOR icon (For M1 only) to
gain access to the FM Modulator controls
To turn on FM Modulator touch +or - icon, then select the FM
modulator transmission frequency by touching - (decrease) or
+ (increase) [88.1MHz ~ 91.1MHz]. Touch (enter) to exit.
Set the vehicle radio to the selected frequency to listen to the
movie over the vehicle sound system.
To turn off the FM Modulator function, touch OFF icon. Then
touch (enter) to exit.
OFF
FMM 88.1 MHZ
PIX
COLOR 16
COLOR 16
Scene Select
•
Extras
•
ETC
•
Audio
•
Play Movie
•
Back View
10
REMOTE CONTROL WITH
WIRELESS GAME CONTROL OPERATION
DIRECTION KEYS
M1/M2
P1/P2
SELECT
TB
A
TA
B
GAME/REMOTE
SELECTOR SWITCH
BATTERY COVER
START
RESET
Battery Installation
Before attempting to operate your remote control, install the
batteries as described below.
1) Turn the remote control face down. Using a finger, slide
battery cover off in the direction of the arrow.
2) Install three “AAA” batteries. Make sure that proper polarity
(+ or -) is observed.
3) Align the cover tabs with the remote control and slide the
cover until it locks.
The remote control will operate the M1/M2. It is not a universal
remote control and will not control equipment from other
manufacturers.
1. Position the GAME/REMOTE selector switch to Game
position.
2. Use the select button (page up & page down) to display the
games (1-32). Then use the direction buttons to move the
arrow to the desired game. Press Start to select the game.
3. A Key : “A Function Key” activates the jump and optional
weapons.
4. B Key : “ B Function Key” activates Bullet fire and attack.
5. TA Key : TURBO “A” Function Key.
6. TB Key : TURBO “B” Function Key.
7. Press Start to begin the game. Press Start again at any time
to pause the game.
8. Press RESET to return to the game menu.
9. P1/P2 selector switch is used for playing 2 player games. P1
is M1 player, P2 is for M2 player.
10. M1/M2 selector switch to M1 position only for games.
11. Return the GAME/REMOTE selector switch to Remote
position after use.
WIRELESS GAME CONTROLLER FUNCTIONAL
DESCRIPTION