auna multimedia 10021815 User manual

DVD-Micro-System
10021815 10021816

Lieferumfang:
• Gerät
• 2.0 Lautsprecher
• Fernbedienung
• UKW-Antenne
• Audio/Video-Kabel
• Bedienungsanleitung
System-Anschluss
Halten Sie sich beim Einrichten der Verbindungen an das abgebildete Schema. Stecken Sie den Netzstecker
nicht in die Steckdose, solange diese Verbindungen noch nicht hergestellt wurden.
Hinweise:
1. Stellen Sie sicher, dass alle Kabel richtig verbunden sind. Andernfalls wird die Audio-Wiedergabe
nicht funktionieren oder fehlerhaft sein.
2. Stellen Sie sicher, dass das Netzkabel nicht mit dem Stromnetz verbunden ist, wenn Sie Kabel
entfernen oder anschließen.
2
2

Grundlegende Funktionen
Wiedergabe
1. Drücken Sie die Power-Taste, um das Gerät einzuschalten. Eine eingelegte Disc wird vom System
automatisch gestartet. Wenn keine Disc eingelegt ist, zeigt das Display „no disk“ an.
2. DrückenSiedieAuswerfen-Taste,umdasCD-Fachzuönen.
3. Legen Sie die Disc ein und schließen Sie das Fach indem Sie die Taste erneut drücken.
Wiedergabe stoppen
1. Drücken Sie „Stop“, um die Wiedergabe anzuhalten. Das Gerät merkt sich die Stelle, an der die
Wiedergabe gestoppt wurde.
2. Drücken Sie „Enter/Play“, um die Wiedergabe an der Stelle fortzusetzen, an der sie gestoppt wurde.
3. Drücken Sie „Stop“ zwei Mal, um die Wiedergabe gänzlich zu beenden.
Vorheriger/Nächster Titel
Sie können während der Wiedergabe Vor und Zurück drücken, um zum vorherigen oder zum nächsten
Kapitel zu springen.
Vor-/Zurückspulen
1. Drücken Sie „FF“, um vorzuspulen. Die Geschwindigkeit erhöht sich bei erneutem Drücken auf die
Taste.
2. Drücken Sie „Enter/Play“, um die Wiedergabe auf normaler Geschwindigkeit fortzusetzen.
3. Drücken Sie „FR“, um zurückzuspulen. Die Geschwindigkeit erhöht sich bei erneutem Drücken auf
die Taste.
4. Drücken Sie „Enter/Play“, um die Wiedergabe auf normaler Geschwindigkeit fortzusetzen.
Pause/Stop
1. Drücken Sie während der Wiedergabe „Pause/Stop“, um die Wiedergabe zu pausieren.
2. Drücken Sie „Enter/Play“, um die Wiedergabe fortzusetzen.
Hinweise:
• Wenn auf dem Display das Symbol Øerscheint, bedeutet das, dass der gewünschte Befehl an
dieser Stelle nicht erlaubt ist.
• Nach einiger Zeit kann sich der Bildschirmschoner einschalten. Drücken Sie in diesem Fall eine
beliebige Taste, um den Bildschirmschoner zu beenden und fortzufahren.
Erweiterte Funktionen
Display
Drücken Sie „Display“, um Informationen wie „gespielter Titel“, „aktueller Titel“, „gespielte Kapitel“
oder „aktuelles Kapitel“ anzeigen zu lassen.
Video-Modus
Drücken Sie die Mode-Taste um bei der Video-Ausgabe zwischen CVBS, YUV oder P-Scan zu wählen.
Hinweis: Drücken Sie diese Taste ein Mal und ein schwarzer Bildschirm erscheint. Drücken Sie die
Taste so oft, bis das normale Bild wieder erscheint. Falls kein Bild erscheinen sollte oder es fehlerhaft
ist, können Sie mit dieser Taste das Problem lösen.
3
3

Untertitel
Drücken Sie „Subtitle“, um alle Untertitel-Optionen einzublenden.
Titel
Drücken Sie „Title“, um das Hauptmenü aufzurufen. (Diese Taste ist nur wirksam, wenn Untermenüs
existieren)
Angle
Drücken Sie diese Taste, um (falls diese Option auf der DVD verfügbar ist) das Bild aus einem anderen
Blickwinkel zu betrachten.
GOTO
Verwenden Sie dieses Funktion, um Kapitel und Zeiten direkt auszuwählen. Wenn Sie ein zweistelliges
Kapitel wählen wollen, drücken Sie „+10“, um die Zahl einzugeben. Drücken Sie „Time“, um das Kapitel
eingeben zu können. Drücken Sie „Time“ erneut, um die Zeit eingeben zu können. Drücken Sie „Time“
ein drittes Mal, um die Zeit in dem aktuellen Kapitel eingeben zu können.
Lautstärke und Stumm
Drücken Sie „+“ und „-„ um die Lautstärke zu erhöhen oder zu verringern. Drücken Sie „Mute“, um das
Audio-Signal stumm zu schalten. Drücken Sie „Mute“ erneut, um die Stummschaltung aufzuheben.
Wiederholen
Mit dieser Funktion können Sie Abschnitte der DVD oder den gesamten Inhalt wiederholen.
• Drücken Sie ein Mal „Repeat“, um den Inhalt des Kapitels zu wiederholen.
• Drücken Sie zwei Mal „Repeat“, um den Inhalt des Titels zu wiederholen.
• Drücken Sie es ein drittes Mal, um den gesamten DVD-Inhalt zu wiederholen.
• Drücken Sie es ein viertes Mal, um die Wiederhol-Funktion aufzuheben.
Hinweis: Bei der Wiedergabe von Musik-CDs, Foto-CDs, MP3- und WMA-CDs wird der Gebrauch des
Haupt-Menüs zum Einstellen der Wiederholung empfohlen.
Zoom
Drücken Sie „Zoom“, um in das Bild hineinzuzoomen. Mit den Richtungstasten können Sie den Bild-
ausschnitt bewegen.
A-B
Der Nutzer kann mit dieser Funktion Abschnitte der DVD markieren, um Sie zu wiederholen. Drücken
Sie am gewünschten Anfangspunkt „A-B“, um den Beginn zu markieren. Drücken Sie die Taste am
gewünschten Ende erneut, um es zu markieren. Drücken Sie „A-B“ ein drittes Mal um die Funktion auf-
zuheben.
Zeitlupe
Drücken Sie „Slow“, um die Wiedergabe zu verlangsamen. Mit jedem Tastendruck wird die Wiedergabe
wie folgt verlangsamt: 1/2-> 1/4 -> 1/8 -> 1/16.
Quelle
Wählen Sie mit „Source“ die gewünschte Signal-Quelle: DVD, UKW, Line-in.
Sprache
Manche DVDs unterstützen mehrere Audio-Sprachen. Drücken Sie „Language“, um durch die verfügbaren
Sprachen zu schalten.
Programmieren
Mit dieser Funktion können Sie die Abspielreihenfolge von Inhalten individuell gestalten. Drücken Sie
„Programme“, um die Liste der Kapitel aufzurufen.
4
4

Spezielle Funktionen
Audio-CD Wiedergabe
Das System ist in der Lage, Audio-CDs wiederzugeben. Drücken Sie Vor/Zurück, um zum nächsten bzw.
zum vorherigen Titel zurückzukehren. Drücken Sie FF/FR, um vor- bzw. zurückzuspulen.
MP3-Wiedergabe
Sobald eine MP3-CD eingelegt wird, zeigt Ihnen das Gerät eine Übersicht des Inhalts an.
Navigieren Sie mit den Richtungstasten durch die Übersicht und drücken Sie Enter/Play, um die
ausgewählte Datei abzuspielen.
Kodak-Bild-CD und JPEG-CD
Sobald eine Kodak-Bild-CD oder eine JPEG-CD eingelegt wird, zeigt Ihnen das Gerät eine Übersicht des
Inhalts an.
Navigieren Sie mit den Richtungstasten durch die Übersicht und drücken Sie Enter/Play, um das
ausgewählte Bild anzuzeigen.
Die Bilder werden nun als Diashow wiedergegeben. Drücken Sie PLAY/PAUSE, um beim aktuellen Bild zu
bleiben. Drücken Sie die Taste erneut um die Wiedergabe wieder aufzunehmen. Drücken Sie Vor/Zurück,
um zum nächsten bzw. vorherigen Bild zu wechseln.
System-Einstellungen
Drücken Sie „SET“ auf der Fernbedienung, um zu diesen Einstellungen zu gelangen.
General (Allgemeine Einstellungen)
TV-Display: Hier können Sie einstellen in welchem Format das Bild dargestellt werden soll.
Angle-Mark (Blickwinkel): Hier können Sie einstellen, welcher Kamera-Winkel verwendet werden soll.
Diese Funktion ist allerdings nicht bei allen DVDs verfügbar.
OSD Language: Hier können Sie die Sprache des Betriebssystems einstellen.
Captions: Für Hörgeschädigte können wir zusätzliche Audio-Informationen zugeschaltet werden. Diese
Funktion ist allerdings nicht bei allen DVDs verfügbar.
Screensaver: Hier können Sie den Bildschirmschoner, der das Bild bei längerem Stillstand schützen soll,
ein- oder ausschalten.
HDCD: Schaltet die Unterstützung der HDCD ein bzw. aus.
Last Memory: Diese Funktion speichert den letzten Punkt der Wiedergabe.
Audio-Einstellungen
SPDIF Ausgabe-Modus: Hier können Sie den SPDIF-Modus ein- bzw. ausschalten. Dieser Modus regelt,
ob die Lautstärke über dieses Gerät oder ein externen Gerät gesteuert wird.
Dolby-Einstellungen:
Dynamic: Hier können Sie einstellen, wie hoch die Lautstärkeunterschiede sein sollen.
So können Sie Filme auf einem gleichmäßigerem Lautstärke-Niveau genießen.
5
5

Video-Einstellungen:
Component: Hier können Sie die gewünschte Video-Ausgabe einstellen.
Quality: Hier können Sie die Bild-Qualität anpassen. Verfügbare Optionen sind: Sharpness (Schärfe),
Brightness (Helligkeit), Contrast (Kontrast)
HDMI-Einstellungen: Hier können Sie die HDMI-Ausgabe ein- bzw. ausschalten und die Auösung
anpassen.
Preference (Wiedergabe-Einstellungen):
TV-Typ: Wählen Sie zwischen PAL, NTSC und Automatik
Audio: Wählen Sie die Standard-Sprache für die DVD-Wiedergabe
Subtitle (Untertitel): Wählen Sie Ihre Standard-Einstellung für Untertitel. Bedenken Sie, dass Ihre
favorisierte Sprache u.U. nicht auf der DVD verfügbar ist.
Disc Menu (DVD-Menü): Wählen Sie Ihre Standard-Einstellung für das DVD-Menü. Bedenken Sie, dass
Ihre favorisierte Sprache u.U. nicht auf der DVD verfügbar ist.
Parental (Kindersicherung): Hier können Sie einstellen, welche Inhalte ohne Passwort-Eingabe frei
abgespielt werden können.
Password: Mit diesem 4-stelligen Passwort können die Kindersicherung freischalten und damit alle In-
halte abspielen.
Default (Werkseinstellung): Mit dieser Option schalten Sie die Wiedergabe-Einstellungen auf die
Werkseinstellungen zurück.
Mikrofon Einstellungen:
1. Gehen Sie zu den Audio-Einstellungen.
2. Wählen Sie den Menüpunkt„Karaoke Setup“.
3. Wählen Sie „MIC Setup“.
4. Hier können Sie das Karaoke-Mikrofon ein- bzw. ausschalten.
5. Unter „MIC Vol“ können Sie die Lautstärke des Mikrofons einstellen.
6. Unter „Echo Level“ können Sie einstellen, wie viel Echo auf das Mikrofon-Signal gelegt werden
soll.
Hinweise:
• Drücken Sie „ECHO+“ oder „ECHO-„ auf der Fernbedienung, um den Mikrofon-Klang anzupassen.
• Das Mikrofon funktioniert nicht während der MP4-Wiedergabe.
Multimedia-Funktionen
Das System unterstützt USB- und SD-Karten-Speicher und ist mit Datei-Formaten wie JPEG, MP3, AVI
und WMA kompatibel.
Inhalte von USB können nur abgespielt werden, wenn keine Disc eingelegt oder keine Speicherkarte
eingesteckt ist. Der Player wird die Inhalte dann automatisch wiedergeben.
Inhalte von SD-Karte können nur abgespielt werden, wenn keine Disc eingelegt oder keine Speicherkarte
eingesteckt ist. Der Player wird die Inhalte dann automatisch wiedergeben.
6
6

Radio
1. Drücken Sie die Taste „Signal Source“, um auf die Radio-Funktion zuzugreifen.
2. Drücken Sie dann „Search“ auf der Fernbedienung. Das System durchsucht die Frequenzen und
speichert die gefundenen Sender auf den 20 Senderspeichern ab.
3. Mit VOR und ZURÜCK schalten Sie zwischen den Sendern hin und her.
4. Mit VORSPULEN UND ZURÜCKSPULEN stellen Sie die Frequenz manuell ein.
Kopieren von Inhalten von CD, MP3 und AVI auf USB.
Von CD
1. Legen Sie die CD ein. Der Player ließt die vorhandenen Inhalte.
2. Drücken Sie dann „Copy“.
3. Wählen Sie mit den Richtungstasten die gewünschten Titel aus.
4. Drücken Sie nach Beendigung des Kopierens „Exit“.
MP3 und AVI
1. Drücken Sie, nachdem alle Titel gelesen wurden „Stop“.
2. Wählen Sie die gewünschte Datei und drücken Sie „Copy“.
3. Drücken Sie zum bestätigen „Enter“. Drücken Sie nach Beendigung des Kopiervorgangs erneut
„Enter“ zum Bestätigen.
Radio
5. Drücken Sie die Taste „Signal Source“, um auf die Radio-Funktion zuzugreifen.
6. Drücken Sie dann „Search“ auf der Fernbedienung. Das System durchsucht die Frequenzen und
speichert die gefundenen Sender auf den 20 Senderspeichern ab.
7. Mit VOR und ZURÜCK schalten Sie zwischen den Sendern hin und her.
8. Mit VORSPULEN UND ZURÜCKSPULEN stellen Sie die Frequenz manuell ein.
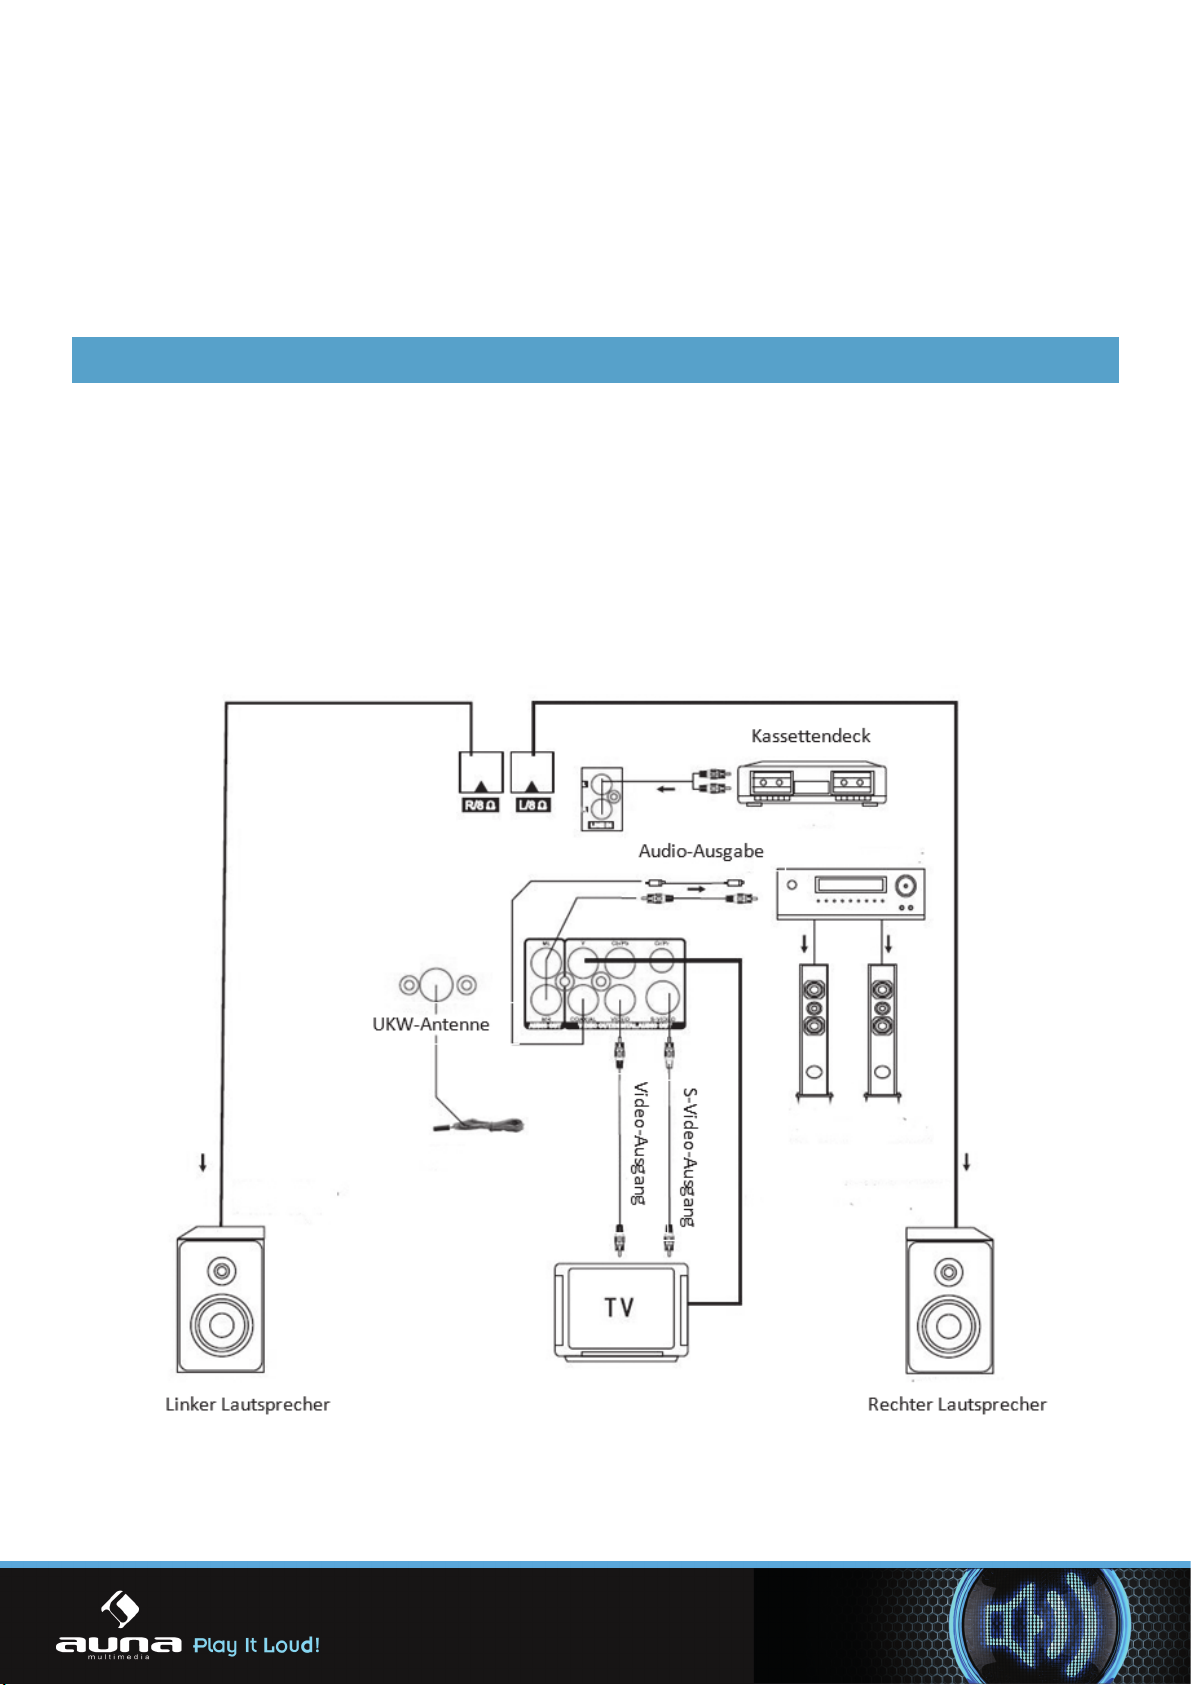
Verbindung zwischen DVD-Player und Lautsprecher
1. Stellen Sie zuerst sicher, dass DVD-Player und Lautsprecher nicht mit dem Stromnetz
2. Verwenden Sie das entsprechende Kabel um beim Kanal „R“ den Anschluss mit der Markierung
„+“ am DVD-Player mit dem Anschluss mit der gleichen Markierung „+“ am Lautsprecher zu
verbinden.
3. Verbinden Sie ebenfalls die Anschlüsse am DVD-Player (Kanal „R“) und dem selben Lautsprecher
mit der Markierung „—„.
4. Wiederholen Sie Punkt 1. und 2. mit Kanal „L“ des DVD-Player und dem 2. Lautsprecher.
Die Bluetooth-Funktion
1. Drücken Sie die Sie die SOURCE-Taste und wechseln Sie zur Quelle „BT“ (Bluetooth). Nachdem
das Bluetooth-Modul eingeschaltet ist, leuchtet der Bluetooth-Indikator 3 Mal blau und ein
doppelter Signal-Ton ertönt.
2. Der Bluetooth-Indikator leuchtet nun rot. Das zeigt an, dass der DVD-Player nach bereits
gekoppelten Bluetooth-Geräten in der Umgebung sucht. Findet er keines, so wechselt das Gerät
in den Koppel-Modus.
3. In diesem Zustand leuchtet der Bluetooth-Indikator abwechselnd blau und rot. Über Ihr
Bluetooth-Gerät können Sie dieses nun mit dem DVD-Player koppeln. Bei erfolgreicher Kopplung
blinkt der Bluetooth-Indikator langsam blau und das akustische Signal ertönt erneut.
4. Nun können Sie die Musik über Gerät steuern und sie über den Audio-Ausgang des DVD-Players
wiedergeben.
5. Auch Anrufe werden nun über die Bluetooth-Verbindung getätigt. Wenn Sie das nicht möchten,
schalten Sie die Bluetooth-Funktion im Falle eines Anrufs ab.
Hinweise: In Abhängigkeit von eventuellen Hindernissen beträgt die Übertragungsreichweite des
Bluetooth-Signals 8-10m.
7
7

Bei einer älteren Version des Bluetooth-Moduls Ihres Gerätes (beispielsweise ihr Mobiltelefon), wird
dieses Sie bei der erstmaligen Kopplung bitten, das Passwort „0000“ einzugeben.
Wenn ihr Bluetooth-Gerät mit zu vielen Geräten gekoppelt ist, kann es u.U. zu Verbindungsproblemen
kommen. Entfernen Sie in diesem Fall andere Geräte aus der Geräte-Liste.
DieBluetooth-VersionenbeiComputernvariierensehrhäug.StellenSiesicher,dassSieeinenaktuellen
Bluetooth-Treiber installiert haben. Sollte die Verbindung dennoch misslingen, wenden Sie sich an den
Computer-HerstelleroderaneinenqualiziertenTechniker.
Problembehebung:
Bevor Sie sich wegen eventueller Probleme an den Hersteller oder den Kundendienst wenden, lesen Sie
sich die folgende Tabelle durch und suchen Sie nach einer Lösung für Ihr Anliegen.
Problem Lösung
Kein Strom • Überprüfen Sie, ob das Netzkabel des Gerätes richtig mit der
Steckdose verbunden ist.
Kein Bild
• Überprüfen Sie, ob das Gerät richtig mit Ihrem Fernseher
verbunden ist.
• Überprüfen Sie, ob der Fernseher richtig funktioniert.
• Drücken Sie die Taste „Video Mode“ mehrmals bis das Bild
erscheint.
• Überprüfen Sie, ob der DVD-Player richtig mit anderen
eventuellen Geräten verbunden ist.
Kein Sound • Überprüfen Sie, ob das Gerät richtig an die Lautsprecher
angeschlossen ist.
Keine Wiedergabe • Überprüfen Sie, ob die Disc richtig eingelegt wurde.
• Reinigen Sie die Disc
Fernbedienung funktioniert nicht.
• Entfernen Sie Hindernisse zwischen Fernbedienung und Gerät.
• Richten Sie die Fernbedienung auf den Infrarot-Empfänger an
der Vorderseite des Gerätes.
• Überprüfen Sie, ob die Batterien der Fernbedienung leer sind.
Tauschen Sie sie gegebenenfalls aus.
Bildstörungen
• Überprüfen Sie, ob die Disc schmutzig oder zerkratzt ist.
• Reinigen Sie sie oder tauschen Sie sie aus.
• Schalten Sie das Gerät aus und schalten Sie es nach 10
Sekunden erneut ein.
Tasten-Fehlfunktion • Schalten Sie das Gerät aus und schalten Sie es nach 10
Sekunden erneut ein.
CHAL-TEC Vertriebs- + Handels GmbH; Wallstraße 16; 10179 Berlin, Germany
8
8

Safety Information
BEFORE USE
Danger! High Voltage! Electric Shock If Opened!
Operate with Caution! Please refer to the related operating
instructions.
Label for Class II Products (Dual Insulation)
To replace the power cord, use the product with the
specification or recommended by the manufacturer.
To avoid electric shock, use the right power cord and
insert it properly.
Laser parts are used in this System. If instructions
described in this Manual are not followed in operating or
adjusting the System, personnel may be exposed to radiation.
WARNING:
Precautions:
Hazardous
Operation:
To avoid fire and electric shock, never attempt to put the
System in the rain or in a place with high humidity. Do open
the System without permission, for the parts inside may have
high voltage. Ask qualified personnel to do the job.
Do not open or repair the System. Such work should be done
by qualified technicians.
Visible or invisible radiations may be sent out when the
System is opened. Therefore, do not open the System so as
to avoid radiation.
1
Safety Information
9
9

Safety Information and Maintenance
2
Safety Information and Maintenance
Please read through this Manual and understand the warning signs and
indications on the parts. Keep the Manual properly for the use of the future.
All parts are specially designed and manufactured so as to ensure safety.
Power supply: Follow the descriptions
on the label and use the power cord
properly.
Keep all parts away from
moisture.
Avoid direct sunshine and high
temperature.
Do not open the cover. Otherwise,
needles, hairpins or coins may fall
into the equipment.
Protect the power cables. Do not
allow it to be pressed by heavy
objects, nor step on it. Do not
stretch or bend it excessively.
If the System is not used for
a long time, unplug the power
cord from the outlet.
Disk Protection
To clean a dirty disk, you should use a clean rag and clean it in
a linear way and from inside to outside.
Keep the player, battery and disk away from environment with
moisture, rain, dust or high temperature (which comes from
heating equipment or direct rays). Keep the disk tray moved in
so as to avoid dust.
Do not apply any soluble substances, such as benzene, thinner,
cleaning agent and anti-static spray, to the color disk.
When the Player is suddenly moved from a cold environment to
a warm environment, water can be condensed on the lens of the
player, which may lead the failure of the disk. In this case, put
the Player in the warm environment till the condensed water on
the lens is totally evaporated.
10
10

3
Disk Protection
Operating Environment
Disk Protection
Disk Protection
Structure of Disk Contents
Interference
Condensed Water
When the System works for a long time,
the panels at the top and bottom of the
device can become warm.
When the device is not used, take out
the disk and unplug the power cord.
If it is not used for a long time, the
System may malfunction or its
performance becomes deteriorated. For
that reason, the device should be
operated occasionally.
Do not place foreign objects onto the
disk tray.
Do not put the device in an environment
with:
Heat source or enclosed space (like in a
car);
High temperature (≥40℃) or high
humidity (≥90%);
Dirt;
Direct sunshine.
Keep the device away from TV, radio
and video recorder so as to avoid
distorted image or sound.
Condensed water may appear on the
device in the cases below:
When it is moved from cold environment
to a warm one, and vise versa;
When it is used in a space with a running
air conditioner system and the cold air
contacts the device;
When it is in the house with much steam
or high humidity.
A device with condensed water may not
work properly. In this case, you can plug
the power cord and keep the machine
running idle for about 2-3 hours. And
the water can be evaporated after the
temperature rises. If the power cord
remains unplugged, water won’t be
condensed on the device.
Do not touch the Replay button.
Do not stick tape or paper onto the
disk. To clean a disk, use a wetted
rag first, then a dry rag.
To avoid damage to the device, do
not apply any soluble substances,
such as benzene and anti-static
spray with ethylene-based substance,
to the disk.
Do not seal up the disk in a place
close heat source, nor in a bathroom
or close to a humidifier.
Seal up the disk in a box, the top of
which shall have no heavy objects.
Normally, the digitalized video disk
comprises of different titles that are
made up of chapters.
Audio disk is made up of tracks.
Each title, chapter and track has a
number, respectively called title
number, chapter number and track
number. But some disks may not
have such numbers.
11
11

4
Set the Size of TV Screen
Accessories
TV screens always have a special proportion that corresponds to its size.
TV
Screen
Displayed Part
4:3 16:9
Common Full Screen Mailbox Type Wide Screen
4:3
16:9
unit 1 piece
2.0 Speaker 1 set
Remote control 1 piece
FM antenna 1 piece
Audio/video cable 1 sets
User’s Manual 1 piece
System Connection
12
12

13
13

Basic Functions
Basic Functions
Preparation
If you want to use watch the disk
contents, turn on the TV, select
the video mode and connect TV
to the DVD Player.
Playing
1. Press the Power button to start
the device. At the time, directions
will appear on the screen, and LED
illuminated. If the disk is not inserted,
words “no disk” will appear on the
screen. If inserted with the tray, the
device will play the disk automatically.
2. Press ON/OFF to withdraw the disk
tray. The device can accept two types
of disks. Follow the indications on the
disk to insert it. Failure to follow such
indication may cause damage to the
disk and malfunction of the player.
Do not put incompatible disks into
the device.
3. Press ON/OFF to move in the disk
tray, and the device will start playing
automatically. Some disks might not
be played automatically, and the user
should manually make selections in
the main interface to start the playing.
You can press Enter/Play on the remote
control or select the corresponding
number for that purpose.
Stop Playing
1. Press Stop to enter the stop mode.
At the time, the “start-up” icons will
appear on the TV screen. The Player
can memorize the stopped place.
2. Press Enter/Play, and the device
will play the disk from the stopped
placed or from the beginning.
3.Press Stop twice to stop playing
completely.
Previous/Next Track
In playing mode, you can press
Previous to go back to the beginning
of the chapter. Each time you press
Previous, the system will jump back
one chapter till it reaches the starting
chapter.
In playing mode, you can press
Next to play the next chapter.
Fast Forward/Reverse
1. Press Fast Forward (FF) to fast
play the contents of the disk. The
playing speed changes each time
you press this button.
2. Press Enter/Play to restore the
normal playing state.
3. Press Fast Reverse (FR) to fast
reverse the contents of the disk.
The playing speed changes each
time you press this button.
4. Press Enter/Play to restore the
normal playing state.
Pause/Stop
1. In playing mode, press Pause/Stop
to make the playing pause. In pause
mode, the system is in mute state.
2. Press Pause/Stop again, and the
system will show the next interface
of the contents.
3. Press Enter/Play to restore the
normal playing state.
Note:
1. If the mark appears on the screen,
it means this operation is forbidden in
this device or disk.
2.The device is controlled by CPU with
settings, and the Screensaver mode
might be activated. You can press any
key to start the device.
6
14
14

Advanced Functions
Advanced Functions
NOTE: The functions said below are only applicable to DVD files. And different
DVD player may provide different functions.
Display
Press Display, and such options for
disk info as “played title”, “current title”,
“played chapter”, “current chapter” and
“close” to appear on the screen.
Video Mode
Press the Mode key to set the video
output as CVBS, YUV or P-Scan.
Note: Press this key once, and the
black screen will appear.
So, press it till the normal screen state
comes back. If the image is interfered
or no image appears on the screen,
you can press Mode to solve the
problem.
Subtitle
Title
Press Subtitle, and all options for subtitle
will appear on the screen.
The language of the subtitle shown for the
first time is the default value of the device.
For example, if “01/02 English” is used as
the subtitle, you can press the Subtitle
again to allow the screen to other
languages, like 02/02 XX.
“01” refers to the current language.
“02” refers to the total number of
languages used in the system
(subject to DVD Player’s model).
Press this key, and the main interface
of the system will appear on the screen.
The user can make options according
to his preference. (This key is effective
only when submenus exist)
Menu
Press this key, and the main interface
of the system will appear on the screen.
The user can make options according
to his preference.(This key is effe
ctive only when submenus exist)
Angle
Press this key to view the DVD
contents from different angle.
GOTO
Use this key to choose chapters
and time while watching DVD
contents.
If you want to choose a chapter
whose number has to digits, you
can press “10+” to set the number.
Press Time to select the chapter
in accordance with the following
contents displayed on the screen:
Title 02/Chapter (enter the required
digits)/32
Press Time twice to select the time
when the DVD contents are played.
The information below will appear
on the screen:
Title 02/10 time : :
Press Time thrice to select the time
point in the chapter. The information
below will appear on the screen:
Chapter 01/32 Time : :
Volume and Mute
Press the key [+] to turn up the
volume and [-] to turn it down.
Press Mute to set the system in
the mute mote (no sound). Press
Mute again to restore the normal
playing state.
Repeat
Perform the operations below to
repeat the chapter, DVD title and
the whole DVD contents.
Press Repeat once to repeat the
7
15
15

contents of the chapter.
Press it twice to repeat the
contents of the title.
Press it thrice to repeat the
whole contents of the DVD disk.
Press it for the fourth time
to cancel the repeat mode.
Note: For disks with such formats
as CD, JPEG, Kodak Picture,
WMA, MP3, HDCD and CD+G,
you should use the main interface
of the system to repeat the playing.
Zoom
Press this key to zoom in the image.
In this mode, the user can also use
the navigation keys to move the
image.
A-B
The user can also mark one
section of the DVD contents
and allow the system to play
it repeatedly. To that effect,
choose the starting point you
want to repeat and press the
key A-B to set Point A when
the DVD contents are being
played, and press it again to
set Point B as ending point.
Then the part between A and
B will be played repeatedly.
Press the key A-B for the third
place to cancel the state.
Slow
Press the key Slow to slow down
the playing. Each time you press
this key, the playing speed changes
as follows:
►1/2→►1/4→►1/8→►1/16.
Source
Choose signal source among
DVD/FM/LINE IN.
Language
Some DVD Players supports multiple
languages. Press the key Language,
and the first audio selection will
appear on the screen. Then you can
make options. Press the key again to
move to another option.
For example,
Audio 1/2: AC 3 2 CH English
Audio 2/2: AC 3 5.1 CH English
Return
In playing mode, you can press Return
to enter the main menu. Press it again
to return to the interface where all
contents of the DVD disk are displayed.
In playing S-VCD and VCD 2.0 disks,
you can press the key Return to return
to the Menu interface, and at the time,
the main interface will appear.
PBC
With the key PBC (play back control),
the system can provide advanced
selection when VCD disk is being
played. Press this key to enter the
related interface (for some disks, the
PBC interface can be reached
automatically). Then press the numeric
keys to make the options. Press the
key again to exit the options.
Programme
With this function, the user can
programme the chapters and play them
in accordance with his own will.Press
Programme, and the chapters list will
appear on the screen, where the user
can choose the desired chapter and
programme it. After that, the user can
move the curser to select the starting
mark. At the time, the system will start
“channel playing”, where the “channel
mark” will appear on the screen.
8
16
16

Special Functions
Special Functions
Audio CD Playback
When a disk with CD format is inserted into the device, the System can pay its
contents automatically.
● Press Previous/Next to change the track, and FF/FR to fast forward or fast
reverse the contents.
●Note: A CD+G disk is equal to an Audio CD.
MP3 Playback
When a disk with MP3 format is about to be
played, the system will automatically display
the navigation interface while the contents are
being uploaded.
●In the navigation interface, use the key Up/Downto make options. After
selection, press Enter/Play to play the file.
●In all the tracks, use the key Up/Down to make options. After selection, press
Enter/Play to play the track.
●In the current interface, press the key Left to return to the previous menu, and
press Previous/Next to enter the previous and next page.
Kodak Picture CD Disc Playback
When a disk with Kodak Picture format is about to be played, the system will
automatically display the navigation interface while the contents are being
uploaded.
●In the navigation interface, use the key Up/Down to make options. After
selection, press Enter/Play to play the file.
●In all the tracks, use the key Up/Down to make options. After selection, press
Enter/Play to play the track.
●Each picture of the Kodak Picture CD will be displayed as slide, whose size is
automatically adjusted in accordance with the proportion of the TV.
●Press the key Main Interface to return to the main interface.
●Press Pause to allow the playing pause and the current picture will remain still.
●Press Previous/Next to view the previous and next picture.
●Press Enter/Play to return the slide mode. Note: The quality of the picture
displayed is subject to the model of the device used for viewing.
JPEG Disk Playback
When a disk with JPEG format is about to be played, the system will automati-
cally display the navigation interface while the contents are being uploaded.
●In the navigation interface, use the key Up/Down to make options. After
selection, press Enter/Play to play the file in a slide manner.
●Press Previous/Next to select the previous and next picture.
●Press Pause to allow the picture-playing pause so that you can view for a
longer time. Press Enter/Play to return to the normal playing state.
9
17
17

System Setup
System Setup
A.TV Display
B. Angle Mark
C. OSD Language
D. Captions
Select the key Set on the remote
control, and the setup interface
will appear on the screen.
1. The user can use the keys
“Up/Down/Left/Right” to make
selections. However, it would be
difficult to use the cursor of the
remote control to perform the
operation. You can press Enter/Play
to make the option, and press Left to
return to the previous interface.
2. Press Set to exit the setup interface.
Interface for Normal Settings
With this interface, you can set the
displaying format of the TV screen,
the video mode and all functions
relating to DVD contents.
With this item, you can select the
displaying format of the TV screen
according to your preference. The
proportion of the displayed part on
the screen is subject to the nature
of the disk and of the TV (refer to
Page 20: Multiple Image Sizes).
In any selected displaying format,
a picture recorded with 4:3 proportion
will always be displayed with the same
width-height proportion.
In the case of DVD disk, the displaying
format might change. You can refer to the
related information for details. If the
contents of DVD disk are recorded
with 16:9 format and the TV displays
the image with proportion of 4:3, the
image will be compacted when
displayed.
Some DVD titles are recorded with
special format. In this case, whatever
displaying format the user selects,
the DVD titles with the original format
will be displayed on the screen.
In playing the DVD contents, the user
can choose one camera angle from
the options to display the contents.
The user can set the OSD language
thorough this item.
For those suffering from hearing, the
supplementary narrations recorded
can be displayed on the screen.
10
18
18

E.Screen saver
F. HDCD
B. SPDIF output mode
G. Last Memory
Note: This function is only effective
for those disks with hidden subtitles.
After the system enters the stop
state for several minutes, the
screensaver mode will be enabled
and a moving image will appear on
the screen.
HDCD is the short form of “high
density compact disk”.
If the power fails abruptly, the
DVD Player can memorize the
place where the playing was
stopped. When the power is
restored, the system can play
the disk from the stopped place.
Setting the Speaker
You can use this item to set
Left/Right Channel or Stereo
DOWNMIX Mode
1 indicates the left channel.
2 indicates the right channel.
Use this item to set the SPDIF output
mode. In original SPDIF mode, the
user can only adjust the volume of
MP3 contents, not for contents with
DVD or CD format.
This DVD Player provides three audio
output options.
Disable SPDIF: In this analog
surround mode, the cables at the rear
of the panel are connected to the two
audio output ports to output the audio
source.
11
19
19

E.Screen saver
F. HDCD
B. SPDIF output mode
G. Last Memory
Note: This function is only effective
for those disks with hidden subtitles.
After the system enters the stop
state for several minutes, the
screensaver mode will be enabled
and a moving image will appear on
the screen.
HDCD is the short form of “high
density compact disk”.
If the power fails abruptly, the
DVD Player can memorize the
place where the playing was
stopped. When the power is
restored, the system can play
the disk from the stopped place.
Setting the Speaker
You can use this item to set
Left/Right Channel or Stereo
DOWNMIX Mode
1 indicates the left channel.
2 indicates the right channel.
Use this item to set the SPDIF output
mode. In original SPDIF mode, the
user can only adjust the volume of
MP3 contents, not for contents with
DVD or CD format.
This DVD Player provides three audio
output options.
Disable SPDIF: In this analog
surround mode, the cables at the rear
of the panel are connected to the two
audio output ports to output the audio
source.
11
20
20
This manual suits for next models
1
Table of contents
Other auna multimedia Stereo System manuals

auna multimedia
auna multimedia 10029104 User manual

auna multimedia
auna multimedia 10008845 User manual

auna multimedia
auna multimedia Graceland User manual

auna multimedia
auna multimedia Graceland User manual

auna multimedia
auna multimedia Memphis User manual

auna multimedia
auna multimedia CD-99 User manual

auna multimedia
auna multimedia AV3800USB User manual

auna multimedia
auna multimedia 10008985 User manual

auna multimedia
auna multimedia MC-30 DAB User manual

auna multimedia
auna multimedia Doppel User manual