auna multimedia 10008845 User manual

Micro-HiFi-System
10008845 10022749

Sehr geehrter Kunde,
zunächst möchten wir Ihnen zum Erwerb Ihres Gerätes gratulieren.
Bitte lesen Sie die folgenden Anschluss- und Anwendungshinweise sorgfältig durch und befolgen Sie
diese um möglichen technischen Schäden vorzubeugen.
Aufbau und Anschluss
1. Wandmontage ** Befestigungsmaterial nicht im Lieferumfang enthalten **
Bringen Sie zwei Nägel auf gleicher Höhe an. Die Entfernung zwischen diesen sollte 73/146mm
betragen.
Notiz: Die Größe der Nägel: 3.5x25
2. Lautsprecheranschluss
tes
2
tes

Funktion & Bedienung
1. Lautspreche
2. CD-Fach
3. Wiedergabe/Pause
4. Stopp-Taste
5. Abbrechen/Frequenzsuche
(Auf/Ab)-Taste
6. Wiederholungstaste
7. Wecker-Taste
Fernbedienung
1. Standby/Ein-Taste
2. Modus-Taste
3. Speicher-Taste
4. Abbrechen/Frequenzsuche ab
5. Stopp-Taste
6. Voreinstellung/Ordner ab
7. Wiederholungstaste
8. Equalizer-Taste
9. Stummschaltung
10. Lautstärke -
Batterie der Fernbedienung erneuern
Drücken und schieben Sie die Batteriefachabdeckung zum Öffnen nach unten. Setzen Sie die neue
Knopf-batterie (CR2032)entsprechend der Polmarkierungen ein. Setzen Sie die Abdeckung wieder
ein und schieben Sie diese bis zum Einrasten nach oben.
**Batterie im Lieferumfang enthalten**
Entfernen Sie den Sicherungsstreifen vor Gebrauch.
Batterietausch:
8. IR-Empfänger
9. LCD-Anzeige
10. Standby-LED-Anzeige
11. Standby/Ein-Taste
12. Öffnen/Schließen-Taste
13. Modus-Taste
14. Speicher-Taste
15. Lautstärkeregler +/-
11. Introfunktion
12. Lautstärke +
13. Einschlaftimer
14. Wecker-Taste
15. Voreinstellung/Ordner hoch
16. Zufallswiedergabe
17. Abbrechen/Frequenzsuche hoch
18. Mono/Stereo-Taste
19. Öffnen/Schließen-Taste
20. Wiedergabe/Pause
16. USB-Anschluss
17. SD-Kartenleser
18. FM-Radioantenne
19. Netzschalter
20. Kopfhöreranschluss
21. Lautsprecherausgang (L&R)
22. Netzschalter
23. Netzkabel
3

LCD-Anzeige
A. Einschlaftimer-Anzeige
B. Wecker-Anzeige
C. Album-/Senderspeicher-Nummernanzeige
D. Stereo-Anzeige
E. Lautstärke hoch/niedrig-Anzeige
F. Titel/Nummer/Zeit-Anzeige
Grundfunktionen
Beim ersten Einstecken des Netzsteckers und Betätigen des Netzschalters auf der Rückseite wechselt
das Gerät in den Standby-Modus. Schalten Sie das Gerät durch Drücken der Standby/Ein-Taste ein.
Zum vollständigen Abschalten muss der Netzschalter auf der Rückseite gedrückt und der Stecker aus
der Steckdose gezogen werden.
Ein/Standby
1. Drücken Sie Standby/Ein am Gerät oder auf der Fernbedienung.
2. Wählen Sie die gewünschte Quelle (CD/USB/SD-Karte/BT/AUX oder Radio) durch Drücken der
Modus-Taste. Die entsprechende Anzeige leuchtet dann.
3. Regeln Sie die Lautstärke mittels der entsprechenden Tasten am Gerät oder der Fernbedienung.
4. Drücken Sie erneut Standby/Ein, um das Gerät abzuschalten.
Notiz:
1. Sollte während der Wiedergabe von CD/USB/SD/iPod für 15 Minuten kein Signal anliegen, wechselt
das Gerät automatisch in den Standby-Modus.
2. Während des Standby-Modus können Sie durch Drücken einer beliebigen Taste die Anzeige für
10 Sekunden leuchten lassen.
3. Ist während des iPhone/iPod/iPad-Modus ein entsprechendes Gerät am Dock angeschlossen,
schaltet sich das Gerät nach 4 Std. in den Standby-Modus. 10 Minuten vor Ablauf dieser Zeit
blinkt „Auto OFF“ auf der Anzeige. Durch Drücken von „INTRO“ setzen Sie den Timer auf 4 Stunden
zurück.
4. Schalten Sie das Gerät zur Stromersparnis am Netzschalter ab.
Uhrzeit einstellen
Im Standby-Modus
1. Drücken und halten Sie die Speicher/Uhr-Einst.-Taste bis die Anzeige „12-hour“ (bzw. „24-hour“)
anzeigt und blinkt.
2. Stellen Sie mit der Abbrechen/Frequenzsuche (Auf/Ab)-Taste den Anzeigemodus „12/24-hour“
ein.
3. Drücken Sie die Speicher/Uhr-Einst.-Taste erneut. Die Stunden blinken nun. Stellen Sie nun mit
der Abbrechen/Frequenzsuche (Auf/Ab)-Taste die Stunden ein.
4. Drücken Sie die Speicher/Uhr-Einst.-Taste erneut. Die Minuten blinken nun. Stellen Sie nun mit
der Abbrechen/Frequenzsuche (Auf/Ab)-Taste die Minuten ein.
5. Drücken Sie abschließend zum Speichern erneut die Speicher/Uhr-Einst.-Taste.
6. Sollten Sie während dieser Einstellung 10 Sekunden lang keine Taste drücken, wird der Einstell
modus verlassen.
4

Weckfunktion einstellen (über Fernbedienung)
Im Standby/Ein-Modus
1. Nach dem Einstellen der Uhrzeit drücken Sie für einige Sekunden die Wecker-Taste. “ ON“ und
„00:00“ wird angezeigt und die Stunden blinken (Siehe F1).
2. Stellen Sie nun mit der Abbrechen/Frequenzsuche (Auf/Ab)-Taste die Stunden ein.
3. Drücken Sie die Wecker-Taste erneut. Die Minuten blinken nun. Stellen Sie nun mit der Abbrechen
/Frequenzsuche (Auf/Ab)-Taste die Minuten ein.
4. Drücken sie die Wecker-Taste erneut, um den Einschalttimer zu aktivieren.
5. Nach der Einstellung der Einschaltzeit erscheint “ OFF“ auf der Anzeige und die Stunden blinken
(Siehe F2).
6. Wiederholen Sie Schritte 2&3. Drücken zum Abschließen der Einstellung noch einmal die Weckertaste.
7. Nun können Sie mittels Abbrechen/Frequenzsuche (Auf/Ab)-Taste zwischen den verschiedenen
Quellen (TUNER (Radio), CD, USB oder CARD) wählen.
8. Drücken Sie zur Bestätigung die Wecker-Taste, es wird „VOL“ angezeigt und Sie können mit der
Abbrechen/Frequenzsuche (Auf/Ab)-Taste die Lautstärke einstellen.
9. Sollten Sie während dieser Einstellung 10 Sekunden lang keine Taste drücken, wird der Einstell
modus verlassen.
10.Nach dem Einstellen der Einschalt- und Abschaltzeit drücken Sie die Wecker-Taste und es wird
angezeigt.
11.Das Gerät schaltet sich zur eingestellten Uhrzeit selbstständig ein und beginnt mit der Wiedergabe.
Notiz:
Sollte wenn Sie diese Funktion aktivieren „ERROR“ angezeigt werden, sind wahrscheinlich Ein- und
Abschaltzeit identisch. Ändern Sie bitte sie Abschaltzeit.
Equalizer einstellen (über Fernbedinung)
Es gibt folgende voreingestellte Klangeffekte:
Einschlaftimer (über Fernbedienung)
1. Wenn Sie die Musik zum Einschlafe nutzen, drücken Sie die Einschlaftimer-Taste.
2. Wählen Sie zuerst die gewünschte Quelle. Drücken Sie nun durch Drücken der Einschlaftimer-
Taste die gewünscht Zeit nach der ich das Gerät automatisch anschalten soll:
Wiedergabequelle wählen
Durch Drücken der Modus-Taste können Sie in folgender Reihenfolge zwischen den verschiedenen
Quellen wählen:
5

Radiowiedergabe
1. Drücken Sie die Modus-Taste bis „TUNER“ angezeigt wird.
2. Mittels der Abbrechen/Frequenzsuche (Auf/Ab)-Taste können Sie nun die Frequenz einstellen.
Mono/Stereo
Nur während der FM-Radiowiedergabe
1. Drücken Sie während der Wiedergabe „SELECT“ auf der Fernbedienung. Das Symbol „ “ zeigt
Ihnen, dass Sie den besten Empfang haben.
2. Drücken Sie erneut „SELECT“, um zum Mono-Modus zu wechseln.
Automatische Sendersuche
1. Drücken Sie die Abbrechen/Frequenzsuche (Auf/Ab)-Taste für einige Sekunden, lassen Sie dann
die Taste los. Das Gerät wechselt nun zum nächsten Sender mit einer ausreichenden Signalstärke.
2. Wiederholen Sie diesen Schritt um zum nächsten Sender zu wechseln.
Sender speichern
Sie können bis zu 30 Sender im Speicher ablegen.
1. Wechseln Sie zum gewünschten Sender.
2. Drücken Sie die Speicher-Taste.
3. Drücken Sie Voreinstellung/Ordner (Auf/Ab) bis der Speicherplatz erreicht ist.
4. Drücken Sie zum Speichern erneut die Speicher-Taste.
5. Um weitere Sender zu speichern, wiederholen Sie Schritte 2 bis 4.
6. Um die Speicherplätze zu ändern, wiederholen Sie Schritte 2 bis 4.
Notiz:
1. Das Speichern eines neuen Senders auf den Platz eines Bestehenden löscht diesen.
2. Nach dem Ausschalten des Geräts werden die Sender weiterhin gespeichert.
3. Während des Standby-Modus drücken Sie Voreinstellung/Ordner (Auf/Ab), um alle gespeicherten
Sender zu löschen.
Gespeicherten Sender aufrufen
1. Drücken Sie Voreinstellung/Ordner (Auf/Ab) bis der gewünschte Speicherplatz erreicht ist.
2. Es werden immer Speicherplatz und die dazugehörige Frequenz angezeigt.
FM-Antenne
Ziehen Sie die Antenne für einen besseren Empfang vollständig aus.
CD/MP3/WMA-Bedienung
Wiedergabe von CD (CD/MP3/WMA)
1. Wechseln Sie mittels Modus-Taste zum CD-Modus.
2. Drücken Sie Öffnen/Schließen, das CD-Fach öffnet automatisch.
3. Legen Sie eine CD ein und drücken erneut Öffnen/Schließen, um das Fach zu schließen.
Notiz:
1. Das Gerät kann CD, CD-R, CD-RW, MP3 und WMA-Disks wiedergeben.
2. Es kann „8cm“- und „Multi Section“-MP3-CDs wiedergeben.
3. Die Datenrate von MP3 und WMA beträgt: (a) MP3: 8-256 kbps (b) WMA: 8-192 kbps
4. Es können maximal 99 Ordner mit 999 Titeln verwaltet werden.
5. Falls keine Disk oder eine Nichtlesbare eingelegt ist, wird „TOC, NO DISC“ angezeigt (Siehe F4).
6

Gesamte CD/MP3/WMA-CD wiedergeben
1. Legen Sie eine Disk ein und es werden die Titel und Ordner eingelesen. Anschließend beginnt
die Wiedergabe des ersten Titels automatisch.
2. Drücken Sie zum Pausieren Wiedergabe/Pause erneut, die Abspielzeit blinkt.
3. Um den Titel zu ändern, drücken Sie Abbrechen/Frequenzsuche (Auf/Ab)-Taste. Um vor- bzw.
zurückzuspielen halten Sie die Abbrechen/Frequenzsuche (Auf/Ab)-Taste gedrückt.
4. Um die Wiedergabe fortzusetzen, drücken Sie erneut Wiedergabe/Pause.
5. Um die Wiedergabe zu Beenden drücken Sie die Stopp-Taste.
MP3/WMA
1. Legen Sie eine MP3/WMA-Disk ein und es werden die Titel und Ordner eingelesen. Anschließend
beginnt die Wiedergabe des ersten Titels automatisch.
2. Drücken Sie zum Pausieren Wiedergabe/Pause erneut, die Abspielzeit blinkt.
3. Um den Titel zu ändern, drücken Sie Abbrechen/Frequenzsuche (Auf/Ab)-Taste. Um vor- bzw.
zurückzuspielen halten Sie die Abbrechen/Frequenzsuche (Auf/Ab)-Taste gedrückt.
4. Um die Wiedergabe fortzusetzen, drücken Sie erneut Wiedergabe/Pause.
5. Um das Album zu ändern, drücken Sie Voreinstellung/Ordner (Auf/Ab).
6. Um die Wiedergabe zu Beenden drücken Sie die Stopp-Taste.
Notiz:
Sollte das Gerät nicht fehlerfrei arbeiten, trennen Sie das Gerät von der Stromversorgung und
schließen es erneut an.
ID3-Anzeige
Im MP3/WMA-Modus
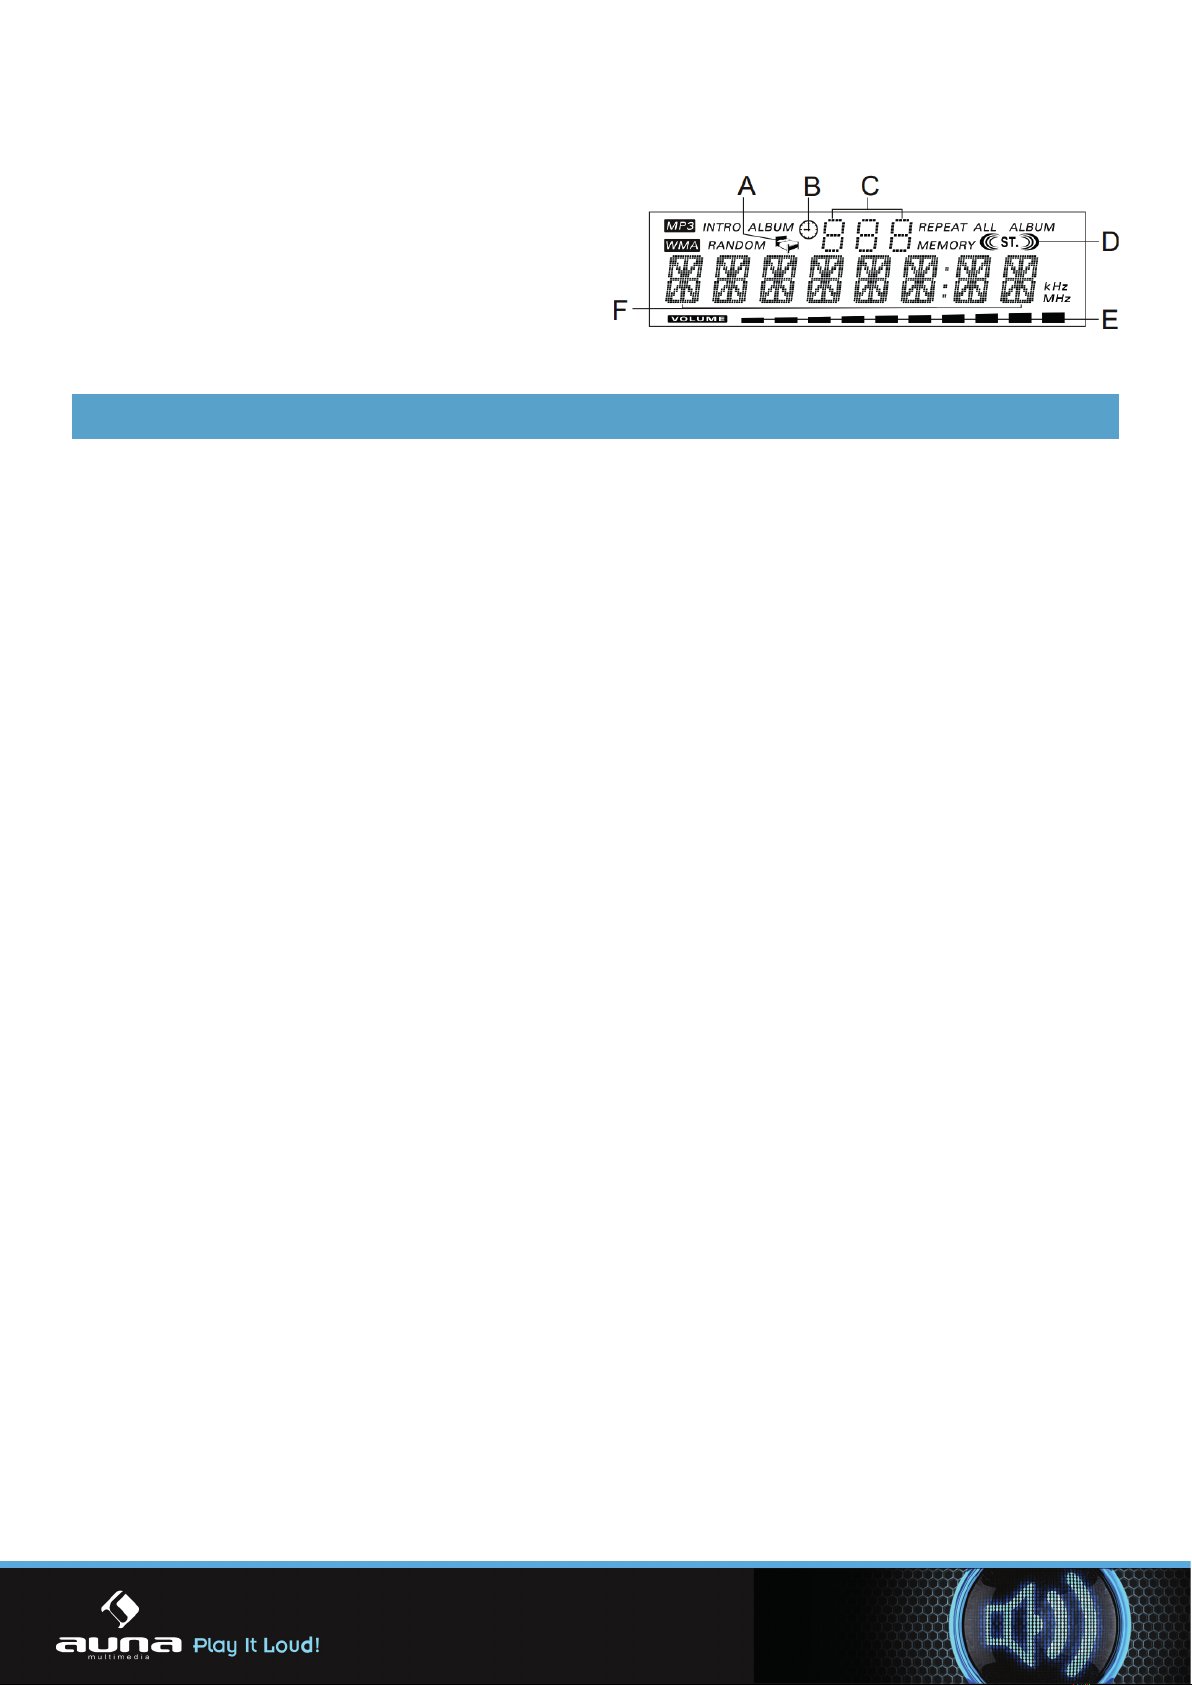
1. Drücken Sie „MEMORY“, um die ID3-Anzeige zu aktivieren.
2. Sollte in der MP3/WMA-Datei eine ID3-Information enthalten sein, werden automatisch Titel,
Künstler und Album angezeigt.
3. Drücken Sie zum Deaktivieren erneut „MEMORY“.
USB/SD-Bedienung
Im Standby-Modus
1. Verbinden Sie das Gerät mit einem USB-Medium bzw. legen eine SD-Speicherkarte ein.
2. Wechseln Sie mittels Modus-Taste in den USB- oder SD/MMC-Modus. Ein werden alle Ordner und
Titel auf dem Medium erfasst.
3. Falls mehrere Ordner vorhanden sind:
• Drücken Sie Voreinstellung/Ordner (Auf/Ab) um zwischen diesen zu wechseln.
• Benutze die Abbrechen/Frequenzsuche (Auf/Ab) -Tasten um zwischen den Titeln zu wechseln.
4. Falls ID3-Information vorhanden sind:
• Drücken Sie während der Wiedergabe „MEMORY“ um sich die Information anzeigen zu
lassen. Die Information wird fortlaufend von rechts nach links angezeigt.
• Drücken erneut „MEMORY“ um die Funktion zu deaktivieren. Es wird „ID3 OFF“ angezeigt.
Notiz:
1. Das Gerät kann in diesem Modus nur MP3 und WMA wiedergeben.
2. Das Gerät unterstützt die meisten USB-/SD-Medien mit einer Größe von bis zu 32GB. Größere
Medien können eventuell gar nicht oder nach einer längeren Ladezeit gelesen werden.
3. Das Gerät unterstützt USB 1.1 und 2.0.
4. Das Gerät unterstützt keine „DRM FILE“-geschützten WMA-Dateien.
7

Gesamtes Speichermedium wiedergeben
1. Drücken Sie zum Pausieren Wiedergabe/Pause erneut, die Abspielzeit blinkt.
2. Um die Wiedergabe fortzusetzen, drücken Sie erneut Wiedergabe/Pause.
3. Um die Wiedergabe zu Beenden drücken Sie die Stopp-Taste.
Notiz:
Das USB-Medium bzw. die SD-Speicherkarte darf nur im Standby-Modus mit dem Gerät verbunden
werden, da sonst das Gerät oder Speichermedium beschädigt werden kann.
Wiedergabe wiederholen (über Fernbedienung)
Im CD-Modus
1. Drücken Sie die Wiederholungstaste einmal, „REPEAT“ wird angezeigt. Das Gerät wiederholt den
aktuellen Titel.
2. Drücken Sie die Wiederholungstaste ein zweites Mal, „REPEAT ALL“ wird angezeigt. Das Gerät
wiederholt alle Titel.
3. Drücken Sie die Wiederholungstaste ein drittes Mal, die Wiederholfunktion ist deaktiviert.
Im MP3/WMA-Modus
1. Drücken Sie die Wiederholungstaste einmal, „REPEAT“ wird angezeigt. Das Gerät wiederholt den
aktuellen Titel.
2. Drücken Sie die Wiederholungstaste ein zweites Mal, „REPEAT ALL“ wird angezeigt. Das Gerät
wiederholt alle Titel.
3. Drücken Sie die Wiederholungstaste ein drittes Mal, „REPEAT ALBUM“ wird angezeigt. Das Gerät
wiederholt das aktuelle Album.
4. Drücken Sie die Wiederholungstaste ein viertes Mal, die Wiederholfunktion ist deaktiviert.
Zufallswiedergabe
1. Drücken Sie die Zufallswiedergabe-Taste, die Funktion ist aktiviert und „RANDOM“ wird angezeigt.
2. Drücken Sie die Zufallswiedergabe-Taste erneut, um zur normalen Wiedergabe zu wechseln.
Introfunktion
1. Drücken Sie Introfunktion, es werden die ersten 10 Sekunden aller Titel wiedergegeben und „INTRO“
angezeigt.
2. Drücken Sie Introfunktion erneut, um die Funktion zu deaktivieren.
Wiedergabeliste programmieren
Sie können eine Wiedergabeliste von 32 Titeln im CD-Modus bzw. 64 Titeln im MP3/WMA/USB/SD-
Modus programmieren. Die Programmierung ist nur im Stopp-Modus möglich.
1. Programmieren
Im CD-Modus
1. Drücken Sie die Speicher-Taste, um zum Programmiermodus zu wechseln (Siehe F1).
2. Benutzen Sie die Abbrechen/Frequenzsuche (Auf/Ab) -Tasten, um zwischen den Titeln zu wechseln.
3. Drücken Sie die Speicher/Uhr-Einst.-Taste erneut, um die Auswahl zu bestätigen.
Im MP3/WMA/USB/SD-Modus
1. Drücken Sie die Speicher-Taste, um zum Programmiermodus zu wechseln. Die Albumnummer
blinkt (Siehe F2).
2. Drücken Sie Voreinstellung/Ordner um das Album zu wechseln.
3. Drücken Sie die Speicher-Taste erneut, die Titelnummer blinkt (Siehe F3).
8

4. Benutzen Sie die Abbrechen/Frequenzsuche (Auf/Ab) -Tasten, um zwischen den Titeln zu wechseln.
5. Drücken Sie die Speicher-Taste erneut, um die Auswahl zu bestätigen.
2. Programm-Wiedergabe
Drücken Sie Wiedergabe/Pause und der erste Titel der Liste wird wiedergegeben. Nach der Wieder-
gabe aller Titel wird die Titelanzahl und Wiedergabezeit der MP3/WMA-Titel angezeigt.
3. Programm-Wiedergabe abbrechen
1. Drücken Sie die Stopp-Taste oder öffnen und schließen Sie das CD-Fach, um die Wiedergabeliste
zu löschen.
2. Sobald Sie eine neue Wiedergabeliste programmieren, wird die alte Liste gelöscht.
Notiz: Während der programmierten Wiedergabe
1. Drücken Sie Wiederholung einmal, „REPEAT“ wird angezeigt. Der aktuelle Titel wird wiederholt.
2. Drücken Sie Wiederholung ein zweites Mal, „REPEAT ALL“ wird angezeigt. Alle Titel werden wiederholt.
3. Drücken Sie Wiederholung ein drittes Mal, die Wiederholfunktion ist deaktiviert.
AUX-Wiedergabe
Der AUX-Anschluss bendet sich auf der linken Seite des Gerätes. Verwenden Sie einen 3,5mm-
Klinkekabel um weitere Wiedergabegeräte anzuschließen.
1. Drücken Sie die Modus-Taste, um zum AUX-Modus zu wechseln.
2. Über den Lautstärkeregler kann die Lautstärke reguliert werden.
Notiz:
1. Das 3,5mm-Klinkekabel sind nicht im Lieferumfang enthalten.
2. Während des AUX-Modus, schaltet sich das Gerät nach 4 Std. in den Standby-Modus. Hierbei ist
egal, ob ein Tonsignal anliegt oder nicht. 10 Minuten vor Ablauf dieser Zeit blinkt „Auto OFF“ auf
der Anzeige. Durch Drücken von „INTRO“ setzen Sie den Timer auf 4 Stunden zurück.
Stummschaltung (über Fernbedienung)
1. Drücke Sie Stummschaltung, die Lautstärkeanzeige blinkt und die Tonwiedergabe wird zeitweise
unterbrochen (Siehe F4).
2. Drücken Sie Stimmschaltung erneut, um die Funktion zu deaktivieren.
Verwendung von Kopfhörern
Schließen Sie Ihre Kopfhörer (3,5mm Mini-Stereoanschluss) an den Kopfhöreranschluss auf der rech-
ten Seite des Gerätes an. Der Ton wird nun über die Kopfhörer nicht die Lautsprecher wiedergegeben
9

Datenblatt
Die technischen Daten können ohne vorherigen Hinweis geändert werden.
Belüftungshinweis: „Die Belüftungsöffnungen dürfen während des normalen Gebrauchs nicht
abgedeckt werden.“
Sicherheitshinweise und Gewährleistung
• Diese Bedienungsanleitung dient dazu, Sie mit der Funktionsweise dieses Produktes vertraut zu
machen. Bewahren Sie diese Anleitung daher stets gut auf, damit Sie jederzeit darauf zugreifen
können.
• Sie erhalten bei Kauf dieses Produktes zwei Jahre Gewährleistung auf Defekt bei sachgemäßem
Gebrauch.
• Bitte verwenden Sie das Produkt nur in seiner bestimmungsgemäßen Art und Weise. Eine
anderweitige Verwendung führt eventuell zu Beschädigungen am Produkt oder in der Umgebung
des Produktes.
• Ein Umbauen oder Verändern des Produktes beeinträchtigt die Produktsicherheit. Achtung
Verletzungsgefahr!
• Öffnen Sie das Produkt niemals eigenmächtig und führen Sie Reparaturen nie selber aus!
• Behandeln Sie das Produkt sorgfältig. Es kann durch Stöße, Schläge oder den Fall aus bereits
geringer Höhe beschädigt werden.
• Halten Sie das Produkt fern von Feuchtigkeit und extremer Hitze.
ACHTUNG:
Es wird keine Haftung für Folgeschäden übernommen. Technische Änderungen und
Irrtümer vorbehalten!
Wichtige Hinweise zur Entsorgung
Dieses Elektrogerät gehört NICHT in den Hausmüll. Für die fachgerechte Entsorgung wenden Sie sich
bitte an die öffentlichen Sammelstellen in Ihrer Gemeinde.
Einzelheiten zum Standort einer solchen Sammelstelle und über ggf. vorhandene Mengenbeschrän-
kungen pro Tag/ Monat/ Jahr sowie über etwa anfallende Kosten bei Abholung entnehmen Sie bitte
den Informationen der jeweiligen Gemeinde.
10
Stromversorgung: AC 230V ~50 Hz
USB-Ladestrom: 5V 500mA
Abmessungen Gerät: 250 (B) x 96 (T) x 204 (H) mm
Abmessungen Lautsprecher: 162 (B) x 92 (T) x 204 (H) mm
Gewicht: 2.12 kg
Radio
Frequenzbereich: FM 87,5-108 MHz
CD-Laufwerk
Optischer Abnehmer: 3-Strahl-Laser
Frequenzempndlichkeit 100 Hz - 16 kHz

Warnhinweise
• Reparaturen am Gerät sollten nur von einer autorisierten Fachwerkstatt durchgeführt werden.
• Öffnen Sie in keinem Fall das Gerät.
• Falscher Zusammenbau führt möglicherweise zu Fehlfunktionen oder dem Totalausfall.
• Das Gerät sollte vor jeglichen Feuchtigkeit und direkter Sonneneinstrahlung geschützt werden.
• Das Gerät bitte nicht mit Reinigungsmitteln reinigen.
• Verwenden Sie zur Reinigung nur ein trockenes (Mikrofaser) Tuch.
• Schließen Sie das Gerät nur an die dafür vorgesehene Netzspannung.
• Schließen Sie das Gerät in keinem Fall an andere Spannungen als vorgesehen an.
Die Gewährleistung verfällt bei Fremdeingriffen in das Gerät.
Hinweise zur Entsorgung
Be ndet sich die linke Abbildung (durchgestrichene Mülltonne auf Rädern) auf dem
Produkt, gilt die Europäische Richtlinie 2002/96/EG. Diese Produkte dürfen nicht mit
dem normalen Hausmüll entsorgt werden. Informieren Sie sich über die örtlichen
Regelungen zur getrennten Sammlung elektrischer und elektronischer Gerätschaf-
ten. Richten Sie sich nach den örtlichen Regelungen und entsorgen Sie Altgeräte
nicht über den Hausmüll. Durch die regelkonforme Entsorgung der Altgeräte werden
Umwelt und die Gesundheit ihrer Mitmenschen vor möglichen negativen Konsequen-
zen geschützt. Materialrecycling hilft, den Verbrauch von Rohstoffen zu verringern.
Das Produkt enthält Batterien, die der Europäischen Richtlinie 2006/66/EG unterliegen und nicht mit
dem normalen Hausmüll entsorgt werden dürfen. Bitte informieren Sie sich über die örtlichen Be-
stimmungen zur gesonderten Entsorgung von Batterien. Durch regelkonforme Entsorgung schützen
Sie die Umwelt und die Gesundheit ihrer Mitmenschen vor negativen Konsequenzen.
Konformitätserklärung
Hersteller: Chal-Tec GmbH, Wallstraße 16, 10179 Berlin, Deutschland.
Dieses Produkt entspricht den folgenden Europäischen Richtlinien:
2004/108/EG (EMV)
2011/65/EU (RoHS)
2006/95/EG (LVD)
11

Assembly Drawing of Unit and Speaker
1. xing the board for wall mounting ** Screw Not Included **
Parallel the two nails that x into the wall, the distance of them should keep in (73/146) mm.
Note:
The size of the nail: 3.5*25BA.
2. Speakers connection
tes
12
2. Speakers connection
tes

Features & Controls
1. SPEAKER
2. CD DOOR
3. PLAY/PAUSE BUTTON
4. STOP BUTTON
5. SKIP/TUNE SEARCH UP or
DOWN BUTTON
6. REPEAT BUTTON
7. TIMER BUTTON
REMOTE CONTROL
1. STANDBY/ON BUTTON
2. MODE BUTTON
3. MEMORY BUTTON
4. SKIP/TUNE SEARCH
DOWN BUTTON
5. STOP BUTTON
6. PRESET/FOLDER/ARROW
DOWN BUTTON
7. REPEAT BUTTON
8. EQ BUTTON
9. MUTE BUTTON
10. VOLUME “-” BUTTON
PUTTING THE BATTERIES INTO THE REMOTE CONTROL
8. IR SENSOR
9. LCD DISPLAY WINDOW
10. STANDBY LED INDICATOR
11. STANDBY/ON BUTTON
12. CD OPEN/CLOSE BUTTON
13. MODE BUTTON
14. MEMORY BUTTON
15. VOLUME “+” or “-” BUTTON
11. INTRO BUTTON
12. VOLUME “+” BUTTON
13. SLEEP BUTTON
14. TIMER BUTTON
15. PRESET/FOLDER/ARROW
UP BUTTON
16. RANDOM BUTTON
17. SKIP/TUNE SEARCH
UP BUTTON
18. MONO/ST. BUTTON 5
19. CD OPEN/CLOSE BUTTON
20. PLAY/PAUSE BUTTON
Press down on the compartment cover, and slide the cover
off to open the compartment. Place the one CR2032 batte-
ry in the remote control according to the polarity markings
(„+“ and „-”) inside the compartment and on the battery.
Place the cover into the compartment, press down lightly,
and push it inside until it snaps on.
Note: If the remote control is not in use for long periods,
the battery will become weak and the remote control will
not function, please replace with a new one if the above
happens
**Battery included **
PLEASE REMOVE SAFETY STRIP
BEFORE USING THE UNIT
CHANGE THE
BATTERY:
16.USB DEVICE IN PORT
17. SD CARD IN SLOT
18. FM ANTENNA
19. LINE IN JACK
20. HEADPHONES JACK
21. SPEAKER OUT (L & R) JACK
22. AC POWER SWITCH
23. AC POWER CORD
13

LCD DISPLAY WINDOW
A. SLEEP INDICATOR
B. TIMER INDICATOR
C. ALBUM/RADIO MEMORY NUMBER INDICATOR
D. STEREO INDICATOR
E. VOLUME HIGH/LOW INDICATOR
F. TRACK/NUMBER/TIME INDICATOR
Operating the Unit
When you rst plug the unit into the AC outlet, then press the power switch on the bottom of the unit,
the unit will be in standby mode, the black light of standby is red. You can now press the STANDBY/
ON button on the unit or on the remote control to switch the unit ON. The black light of the multi-
function display will light on blue. Pull the AC plug out of the wall socket if you want to switch off
completely.
POWER/STANDBY
1. Press the STANDBY/ON button on the unit or on the remote control to switch the unit on.
2. Select the sound source (CD, USB, CARD, BT, AUX or TUNER) by pressing the MODE button. The
corresponding display will light up.
3. Adjust the volume with the VOLUME (+ or -) button on the unit or VOLUME (+ or -) button on
the remote control.
4. Press the STANDBY/ON button again to turn off the unit.
Note:
1. If there is no signal under the CD/USB DEVICES/ SD CARD/ iPod mode, the main unit will be
switched off within 15 minutes automatically.
2. During in standby mode, press any button/key can make the display light for 10 seconds.
3. During in iPhone/iPod/iPad mode, the iPhone/iPod/iPad player inserted on the iPod docking bracket,
the main unit will be switched to Standby mode automatically after 4 hours which convert to iPod
mode start the timer. In the 10 minutes before the unit switched to Standby mode, the display
will show “Auto OFF” and ash. Press the “INTRO” button to resume playback, time for 4 hours
again.
4. Please turn the main switch off to save energy, when you do not use the unit.
CLOCK SETTING
During in the STANDBY mode.
1. Press and hold the MEMORY button until the time displays will change to 12-hour (or 24-hour)
digit and ash.
2. Press the SKIP/TUNE SEARCH (UP or DOWN) button to adjust 12-hour or 24-hour digit.
3. Press the MEMORY button again, the HOUR digit will ash on the display, press the SKIP/TUNE
SEARCH (UP or DOWN) button to adjust HOUR digit.
4. Press the MEMORY button once more, the MINUTE digit will ash on the display, press the SKIP/
TUNE SEARCH (UP or DOWN) button to adjust MINUTE digit.
5. Press the MEMORY button again to conrm the time.
6. Each enable state as shown above will be cleared if the key is not pushed in10 seconds.
14

TIMER SETTING (on the remote control)
During in the STANDBY OFF/ON mode.
1. After adjusting clock, press the TIMER button for a few seconds, „ ON“ and „00:00“ appears on
the display and the HOUR digit ashes.
2. Press the SKIP/TUNE SEARCH (UP or DOWN) button to adjust it.
3. Press the TIMER button again, the MINUTE digit will start ashing, adjust it by pressing the SKIP/
TUNE SEARCH (UP or DOWN) button.
4. Press the TIMER button once more to conrm and order TIMER ON time.
5. 5. After adjusting „TIMER ON“, „ OFF“ appears on the display and the HOUR digit ashes.
6. Repeat the above steps 2 to 3, and then press the TIMER button once more to conrm and order
TIMER OFF time.
7. Now the „TUNER“ appears on the display with ashing, adjust “TUNER, CD, USB, CARD” by pres
sing the SKIP/TUNE SEARCH(UP or DOWN) button.
8. Press the TIMER button again, the timer „VOL-13” indicator appears on the display and ashes,
adjust the timer volume high or low by pressing the SKIP/TUNE SEARCH(UP or DOWN) button.
9. Each enable state as shown above will be cleared if the button is not pushed in 10 seconds.
10.10. After adjusting „TIMER ON“ and „TIMER OFF“, press the TIMER button, „ „ appears on the
display.
11.The unit will be switched on automatically at „TIMER ON“ order and start playing; the unit will be
switched off automatically at „TIMER OFF“ order.
Note:
If the display shows „ERROR“ whiles you set the “TIMER ON”, it means both “TIMER ON” and “TIMER
OFF” is the same. In this case, please go to “TIMER OFF” to set the off time rst.
EQ CONTROL (on the remote control)
EQ shows the present sound tone. When you press the EQ button, the sound tone changes as below:
TO SET SLEEP FUNCTION (on the remote control)
1. If you want to fall asleep to music, press the SLEEP button.
2. You may select the TUNER, CD/MP3, USB, CARD, BT or AUX mode in sleep function to play from
90, 80, and 70 up to10 minutes of music before shutting itself off automatically.
MODE SELECT
The function is that when it presses the MODE button the mode is changed. Display changes as
below:
15

Radio Operation
1. Press the MODE button on the main unit (or remote control) to select the TUNER mode that to
select the FM operation.
2. Select the desired frequency with the SKIP/TUNE SEARCH (UP or DOWN) button on the main unit
(or remote control).
Mono/Stereo Select
This unit can receive the FM mode only.
1. When you want to select FM stereo station, press the SELECT button on the remote control once
only. The „ „ indicator will appear on the display that the reception is at its best.
2. When you press the SELECT button once again, the FM STEREO indicator will turn off & switch to
MONO FM status.
Automatic Tuning
1. Press the SKIP/TUNE SEARCH (UP or DOWN) button for a few seconds, and then release the
button. The tuner will automatically search the rst station of sufcient signal strength.
2. Repeat above procedure if you wish to select another station.
Programming preset stations
You can also preset stations of your choice and store up to 30 FM stations in its memory.
1. Tune to the required station.
2. Press the MEMORY button.
3. Press the PRESET/FOLDER (UP or DOWN) button for your desired station number.
4. Press the MEMORY button again to conrm your selection.
5. To program more stations into memory, repeat the above steps 2 to 4.
6. To change the stored preset stations, repeat the above steps 2 to 4.
Notes:
1. Storing a new station into a preset location will erase the previously stored station in that location.
2. Power off will not erase the memory of preset stations. Perform the stations presetting procedures
again to store the stations.
3. During the unit in STANDBY mode, press and hold the PLAY/PAUSE button to erase all preset
memory.
Selecting the Preset Stations
1. Press the PRESET/FOLDER (UP or DOWN) button to select the desired preset station number.
2. The numeric location of that preset station is displayed along with the corresponding frequency.
FM Antenna
Extend the FM antenna for better FM reception.
CD/MP3/WMA Operation
Listening To Compact Disc (CD/MP3/WMA)
1. Press the MODE button on the unit to select the CD mode.
2. Press the CD OPEN/CLOSE button on the main unit (or remote control), and then the CD door will
open automatically.
3. Insert the CD/MP3 disc into the CD compartment, press the OPEN/CLOSE button again to close
the CD door. The main unit will read the CD/MP3 disc automatically.
NOTE:
1. This unit can play CD, CD-R, CD-RW, MP3 and WMA discs. (2) It can read „ 8 cm „ and „ Multi
Section „ MP3 DISC.
2. The „Playback Transfer Rate“ in MP3 and WMA. (a). In MP3, transfer bit rate : 8 - 256 kbps. (b).
In WMA, transfer bit rate : 8 - 192kbps.
3. The „Max Readable 99 folders and 999 tracks“.
4. If no disc or can`t read TOC, NO DISC will be displayed.
16

Playing The Entire CD/MP3/WMA-CD
1. Insert the CD disc into the CD compartment, the main unit will automatically read the total
number of the folders and tracks at the same time. Then the unit will play the rst track of the
CD disc automatically.
2. Press the PLAY/PAUSE button once again, the time elapsed indicator will ash.
3. Press SKIP/TUNE SEARCH(UP or DOWN) button once to change Track NO., press and hold the
SKIP/TUNE SEARCH (UP or DOWN) button once to skip fast forward or backward of each song.
4. To resume playback, press the PLAY/PAUSE button once more again.
5. To stop playback, press the STOP button once on the unit (or remote control).
MP3/WMA
1. Insert the MP3/WMA disc into the CD compartment, the main unit will automatically read the
total number of the folders and tracks at the same time. Then the unit will play the rst track of
the MP3/WMA disc automatically.
2. Press the PLAY/PAUSE button once again, the time elapsed indicator will ash.
3. To change Track NO., Press SKIP/TUNE SEARCH(UP or DOWN) button once. Press and hold the
SKIP/TUNE SEARCH (UP or DOWN) button once to skip fast forward or backward of each song.
4. To resume playback, press the PLAY/PAUSE button once more again.
5. To change the ALBUM NO., press the PRESET/FOLDER (UP or DOWN) button once.
6. To stop playback, press the STOP button once on the unit (or remote control).
Note:
If the main unit is not working properly, disconnect the power source and then reconnect it again
ID3 OPERATION
During in the MP3/WMA mode
1. Press the MEMORY button once to open the ID3 function.
2. If the MP3/WMA le is written “ID3”, it will automatically search the information of “TITLE NAME”,
“ARTIST NAME” and “ALBUM NAME” indicated on the display.
3. Press the MEMORY button again. Then the unit will resume playing normally.
USB/SD Card Operation
During in the STANDBY mode
1. Insert the USB DEVICE or SD CARD.
2. Press the MODE button on the main unit (or remote control) to select the USB or CARD mode. The
main unit will automatically read the total number of the folders and tracks at the same time.
Then playback starts with the rst track. The display shows the current track number and its
elapsed time.
3. If the USB memory device more than one folder.
• Press the PRESET/FOLDER (UP or DOWN) button to select each folder.
• Press the SKIP/TUNE SEARCH(UP or DOWN) button to select current track in desired folder.
4. If the MP3 and WMA are written in „ID3“.
• During the unit in the MP3 or WMA playing. Press the MEMORY button once. The display will show
a „ID3 ON“, and then it will automatically search more than 64 letters for „TITLE NAME“, „ARTIST
NAME“ or „ALBUM NAME“ which move from the right corner to the left corner on the display
continuously.
• Press the MEMORY button once again. The display will show a „ID3 OFF“, and then the main unit
will play normally.
17

Note:
1. The main unit can play MP3 and WMA only in this mode.
2. This unit can support most of USB devices and SD/SDHC cards (up-to 32GB memory capacity for
SDHC). It cannot access (or, need longer time to access) those devices with big memory capacity.
3. It can support USB version 1.1 and 2.0.
4. The main unit does not support the WMA le which is protected “DRM FILE”.
Playing The Entire ash disc
1. To interrupt playback, press the PLAY/PAUSE button. The time elapsed indicator will ash.
2. To resume playback, press the PLAY/PAUSE button again.
3. To stop playback, press the STOP button.
Note:
In any time, the USB DEVICE or SD CARD must be xed well under in the STANDBY mode to avoid
the main unit and USB DEVICE or SD CARD were damaged.
REPEAT PLAY (on the remote control)
CD
1. Press the REPEAT button once , REPEAT is displayed. The main unit will play the current track
repeatedly.
2. Press the REPEAT button twice, REPEAT ALL is displayed. The main unit will play all tracks repeatedly.
3. Press the REPEAT button thrice, REPEAT function will be off.
MP3/WMA
1. Press the REPEAT button once , then REPEAT is displayed. It will play the current track repeatedly.
2. Press the REPEAT button twice, REPEAT ALL is displayed. It will play all tracks repeatedly.
3. Press the REPEAT button thrice, then REPEAT ALBUM is displayed. It will play repeatedly the
current album.
4. Press the REPEAT button four times, then REPEAT function will be off.
RANDOM PLAY(on the remote control)
1. Press the RANDOM button once , and then RANDOM is displayed.
2. Press the RANDOM button once again, and then resume to normally play.
INTRO PLAY(on the remote control)
1. Press the INTRO button once, and then INTRO is displayed. The main unit will play the rst 10
seconds of each track.
2. Press the INTRO button twice, and then resume to normal play.
PROGRAM MODE
User can make the program up to 32 tracks in CD mode or 64 tracks in MP3/WMA/USB/SD CARD
mode in any desired order. Program mode is activated while in stop mode.
1. How to play the program
CD
1. Press the MEMORY button, shift to PROGRAM mode.(F1)
2. Press the SKIP/TUNER SEARCH(UP or DOWN) button, the track number will be changed.
3. Press the MEMORY button to conrm the track number.
MP3/WMA/USB/SD CARD
1. Press the MEMORY button, shift to PROGRAM mode. The album number is ashing. (F2)
2. Press the PRESET/FOLDER (UP or DOWN) button, the album number will be changed.
3. Press the MEMORY button , the track number is ashing.(F3)
18

4. Press the SKIP/TUNER SEARCH button, the track number will be changed.
5. Press the MEMORY button to con rm the track number.
2. PROGRAM PLAY
Press the PLAY/PAUSE button on the unit (or remote control), it will be play starting with the rst
track of the program. When all tracks have been played, the unit display will show the number of
tracks and the playing time of the CD/MP3/WMA tracks.
3. CANCEL PROGRAM
1. Press the STOP/MENU button once, or open the CD tray door and close it again then the memory
will be erased.
2. Set a new program, the existing one will be cleared.
Note : During in the program mode.
1. Press the „REPEAT“ button once, the „REPEAT“ indicator will light on the display. Then the main
unit will repeat the current track.
2. Press the „REPEAT“ button twice, the „REPEAT ALL“ will light on the display. Then the main unit
will repeat all the total number of tracks.
3. Press the „REPEAT“ button once more again. The main unit will return to play the program normally.
AUX IN PLAY
The AUX input is located on the left hand side of the unit. Use a 3.5mm stereo jack cable to connect
audio equipment through the LINE IN jack.
1. To select the AUX input function, repeatedly press the MODE button on the unit (or remote
control) until the AUX is indicated on the display.
2. Press the VOLUME (+ or -) button to adjust the sound output level.
Note:
1. LINE in cable not included.
2. During in Aux mode, whether there is signal or not, the main unit will be switched to Standby
mode automatically after 4 hours which convert to Aux mode start the timer. In the 10 minutes
before the unit switched to Standby mode, the display will show “Auto OFF” and ash. Press the
“INTRO” button to resume playback, time for 4 hours again.
MUTE SETTING (on the remote control)
1. When you press the MUTE button once on the remote control, the volume level will ash and the
audio output will be temporarily terminated.(F4)
2. Press the MUTE button again, the volume level and the audio output will return to normal.
LISTEN TO THE MUSIC BY USING HEADPHONE
Plug your headphones (3.5mm mini-stereo plug) into the headphones jack on the left penal of the
unit. The sound will be heard through the headphones, not the speaker.
19

Speci cations
SPECIFICATION SUBJECT TO CHANGE WITHOUT FURTHER NOTICE.
Ventilation warning: „The normal ventilation of the product shall not be impeded for intended use“
Hints on Disposal
According to the European waste regulation 2002/96/EC this symbol on the product or
on its packaging indicates that this product may not be treated as household waste.
Instead it should be taken to the appropriate collection point for the recycling of electri-
cal and electronic equipment. By ensuring this product is disposed of correctly, you will
help prevent potential negative consequences for the environment and human health,
which could otherwise be caused by inappropriate waste handling of this product. For
more detailed information about recycling of this product, please contact your local
council or your household waste disposal service.
Your product contains batteries covered by the European Directive. 2006/66/EC, which cannot be dis-
posed of with normal household waste. Please check local rules on separate collection of batteries. The
correct disposal of batteries helps prevent potentially negative consequences on the environment and
human health.
Declaration of Conformity
Producer: Chal-Tec GmbH, Wallstraße 16, 10179 Berlin, Germany.
This product is conform to the following European Directives:
2004/108/EC (EMC)
2011/65/EU (RoHS)
2006/95/EC (LVD)
20
POWER SUPPLY: AC 230V ~50 Hz
USB PORT CHARGING: 5V 500mA
UNIT DIMENSION: 250 (W) x 96 (D) x 204 (H) mm
SPEAKER BOX DIMENSION: 162 (W) x 92 (D) x 204 (H) mm
N.W.: 2.12 kg
Radio Section
FREQUENCY RANGE: FM 87,5-108 MHz
Compact Disc Section
OPTICAL PICKUP: 3-Strahl-Laser
FREQUENCY RESPONSE 100 Hz - 16 kHz
This manual suits for next models
1
Table of contents
Languages:
Other auna multimedia Stereo System manuals

auna multimedia
auna multimedia MC-30 DAB User manual

auna multimedia
auna multimedia AV3800USB User manual

auna multimedia
auna multimedia NR-620 User manual

auna multimedia
auna multimedia 10021815 User manual

auna multimedia
auna multimedia 10008985 User manual

auna multimedia
auna multimedia Graceland User manual

auna multimedia
auna multimedia MCD-81 User manual

auna multimedia
auna multimedia Graceland User manual

auna multimedia
auna multimedia CD-99 User manual

auna multimedia
auna multimedia 10029104 User manual