Aura CF30240B User manual

1
INSTALLATION, OPERATION AND MAINTENANCE MANUAL
Radiant Infrared Electric Heater
–
Aura Carbon Fiber Wall Mount Electric Heater
Model n◦CF30240B
MODELS
VOLTAGE
TOTAL POWER (W)
CURRENT(AMPS)
CF30240B
208/240
2250/3000
10.8/12.5
FIRE/EXPLOSION HAZARD WARNING
NOT FOR USE IN HAZARDOUS OR EXPLOSIVE ATMOSPHERES
During operation, always ensure combustible materials are kept at a safe distance from the heater
body and from the emitted radiant energy. This heater is not intended for use in hazardous areas where
flammable vapours, gases, liquids or other combustibles are present. Failure to do so can result in
personal injury/or property damage.
FOR OUTDOOR RESIDENTIAL AND INDOOR OR OUTDOOR COMMERCIAL USE
INFORESIGHT CONSUMER PRODUCTS INC. * 125 TRADERS BLVD #4 * MISSISSAUGA, ONTARIO * 905-568-7655

2
TABLE OF CONTENTS
1 - SAFETY ............................................................................................................................................................... 3
2 - INSTALLATION INSTRUCTIONS .......................................................................................................................... 5
3 - OPERATING INSTRUCTIONS............................................................................................................................... 8
3.2.1 Operation of the Remote Control ......................................................................................................9
4 - MAINTENANCE ................................................................................................................................................ 10
5 - Limited Express Warranty................................................................................................................................ 13
WARNINGS
THIS ELECTRIC APPLIANCE PRODUCES INFRARED HEAT, AND FAILURE TO FOLLOW
WARNINGS AND INSTRUCTIONS CAN CAUSE FIRE, ELECTRIC SHOCK, OR INJURY.
Heater must be installed by a certified electrician and installation must
adhere to all local, state and national electric codes.
READ AND SAVE THESE INSTRUCTIONS
Please read this owner’s manual carefully before using the unit and keep the manual for future reference.
USE THIS HEATER ONLY AS DESCRIBED IN THIS MANUAL. ANY OTHER USE NOT RECOMMENDED BY THE
MANUFACTURER MAY CAUSE FIRE, ELECTRIC SHOCK OR INJURY TO PERSONS
Notice: Changes or modifications not approved by the party responsible for compliance will void the user's
authority to operate the equipment.

3
IMPORTANT INSTRUCTIONS
When using electrical appliances, basic precautions should always be followed to reduce the risk of fire, electric
shock, and injury to persons, including the following outlined in section 1 –SAFETY. Read all instructions before installing
or using this heater.
1 - SAFETY
WARNINGS
WARNING: FIRE OR EXPLOSTION HAZARD
•Failure to precisely follow safety warnings could
result in serious injury or property damage.
•Heater has hot surfaces and arcing or sparking
parts inside. Do not use the heater in areas where
gasoline, paint or flammable vapors or liquids are
used or stored.
•Heater is not to be installed or used in an area
containing hazardous or flammable materials
including but not limited to rags, fabrics, spray or
aerosol cans, cleaning compounds, plastic
containers, paper products, organic dusts,
straw/hay, gasoline, kerosene, lighter fluid, etc.
•To prevent a possible fire, do not block air intakes
or exhaust in any manner.
•Do not insert or allow foreign objects to enter any
ventilation or exhaust opening as this may cause an
electric shock or fire, or damage to the heater.
•Do not cover the heater in any manner, do not hang
clothing on or near the heater.
•Caution! Do not use the heater together with
another appliance connected to the same supply
line or connected to the same breaker.
•Heater must be properly grounded
•The power cord must not be left on or around the
heater body.
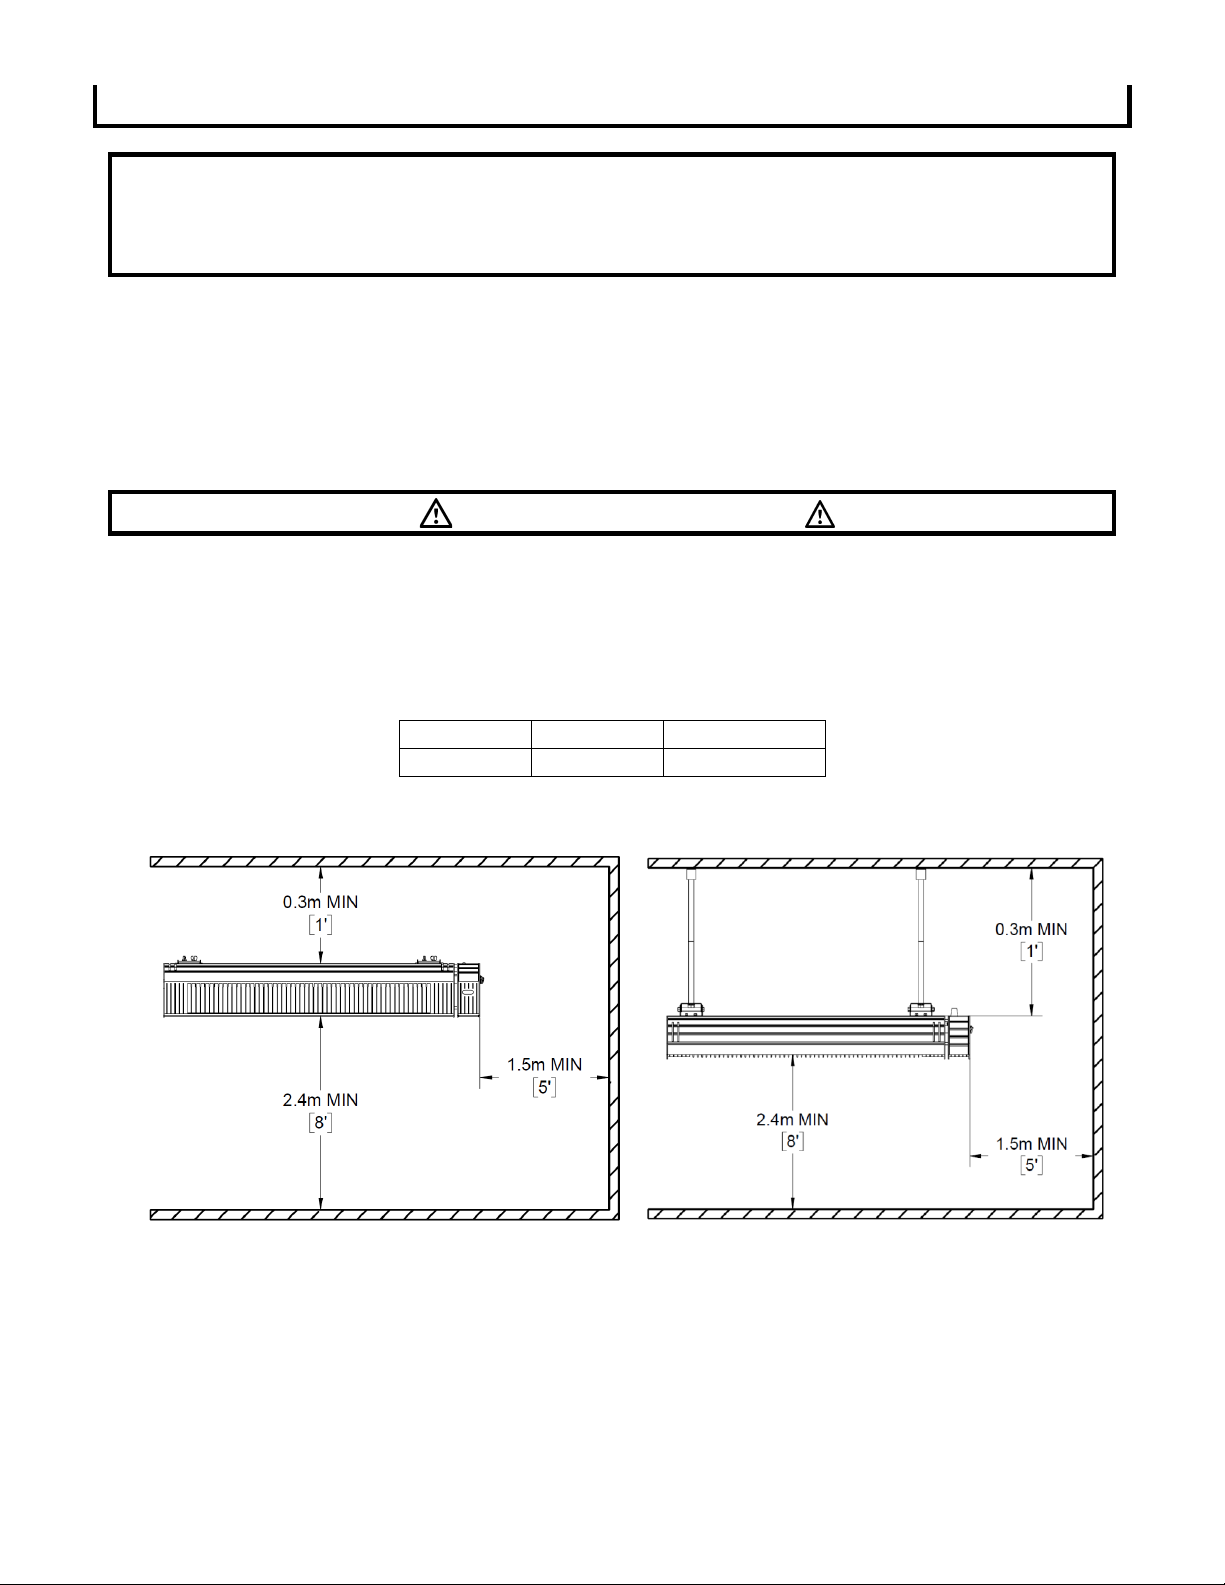
•Keep combustible materials, such as furniture,
pillows, bedding, papers, clothes, curtains, etc. at
least 6 feet (1.8m) from the front of the heater and
keep them away from sides and rear.
WARNING: PERSONAL INJURY HAZARD - OPERATION
•This heater is hot when in use. To avoid burns, do
not let bare skin touch hot surfaces.
•Extreme caution is necessary when any heater is
used by or near children or other persons with
reduced physical, sensory or mental capabilities.
•Never leave the heater unattended while it is
operating.
•Do not use the heater without the aluminium grille
in place.
•Do not operate any heater after it malfunctions.
Disconnect power at service panel and have heater
inspected by an electrician before reusing.
•Do not use the heater to light cigarettes or similar
materials.
•Do not insert objects in heater openings. Electrical
shock could result.
•To disconnect heater, turn controls to off, and turn
off power to the heater circuit at the main
disconnect panel

4
WARNING: PERSONAL INJURY HAZARD - CLEANING AND MAINTENANCE
•To avoid property damage, personal injury
or death due to electrical shock DO NOT
service the unit without turning the unit
OFF and disconnecting the heater from the
main power supply.
•Before cleaning the unit or replacing the
emitter, turn off the main power. Make sure
the heater and/or the emitter is cool before
handling.
•Service must be performed only by a
qualified service technician.
WARNING: INSTALLATION
•This product must be installed by a certified
electrician and must adhere to all local,
state and national electric codes (NEC)
•This product is not suitable for indoor
residential use (Indoor commercial
installation is acceptable)
•Do not direct the radiant part of the heater
towards the ceiling.
•Specified minimum clearances from front,
sides, bottom and back of unit must be met.
Failure to meet clearance minimums can
result in fire.
•Heater is not for use in bathrooms, laundry
areas or other locations where unit could fall
into water.
•Do not use the heater if it has been dropped
or damaged in any way. Ensure the emitter is
not cracked or chipped visually. Contact an
authorized Aura dealer for support.
•Do not use the heater if the power cord is
damaged. Contact an authorized servicer or
qualified electrician to replace the cord prior
to use.
•Unplug the appliance when it is not in use for
long periods of time, or for cleaning and
maintenance.
•Heater is not to be recessed
•The heater must be installed at level on a
flat, stable surface, rigid enough to safely
withstand the weight of the heater and the
heater must not be covered by any flexible
material, such as carpets, plastic or fabric.
SAVE THESE INSTRUCTIONS

5
2 - INSTALLATION INSTRUCTIONS
Heater installation must be carried out by qualified personnel in compliance with local National Codes
(NEC) as well as any other applicable standards. Failure to comply with applicable requirements could
result in personal injury and/or property damage. Wiring procedures and connections shall be made in
accordance with national and local electrical codes having jurisdiction.
AURA infrared heaters produce radiant heat that warms people and objects, rather than the air around them.
The heater can be wall or ceiling mounted and includes brackets which allow the user to direct the infrared heat
where desired.
To reduce the risk of fire, do not store or use gasoline or other flammable vapors and liquids in the vicinity of
the heater.
2.1 INSTALLATION CLEARANCE DISTANCES
DANGER FIRE HAZARD
The minimum clearances indicated on the nameplate and in the user manual must be observed at the time of
installation. Allow at least 6’(1.5 m) between all sides of the heater to flammable objects.
CAUTION: High temperatures are present, risk of fire! Keep electrical cords, drapery, furnishings and other
combustibles at least 6 feet (1.8m) from the front of the heater and away from the sides and rear.
Minimum Clearance Distances
Floor
Ceiling
Adjacent walls
8’ (2.4 m)
1’ (30 cm)
5’ (1.5m)
Wall Mounted Clearances
Ceiling Suspended Clearances
2.2 ELECTRICAL INSTALLATION
Safety Precautions
1. Each power supply circuit must be properly grounded.
2. Use a certified ground fault protection device for wet environment installations.
3. Use a proper electrical connection box
4. Supply voltage and frequency must correspond to the electrical rating indicated on unit’s information
plate

6
2.3 WALL-MOUNTED INSTALLATION
THE CF30240B HEATER MUST BE INSTALLED WITH BOTH MOUNTING BRACKETS PROVIDED IN THE BOX.
1. Take the heater out of the box and remove all
protective foam inserts.
2. The heater comes with ceiling suspension
brackets installed. To mount the heater on the
wall, these brackets must be switched to the
wall mount pivot brackets. Unscrew the
fasteners holding the ceiling suspension
brackets to remove them. Keep all parts and
fasteners, you will need them in the next step.
3. Install the two wall mount pivot brackets using
the screws removed in the previous step.
4. Select the installation location on the wall by
identifying the studs or structural beams that will
allow the heater to be securely attached.
WARNING: Ensure minimum clearances outlined in
section 2.1 are met.
5. Securely fasten the L-shaped brackets to the
mounting surface using both fixing holes in the
short part of the bracket. NOTE: Wall bolts or
anchors are not supplied. Select an appropriate
size to provide adequate support for the weight
of the unit and taking into consideration any
wind load conditions.
CAUTION: If there is any question regarding
security of the bolts and fixtures, contact a
professional contractor.
6. Mount the heater to the brackets with the
terminal box at the right side of the heater.
7. Adjust the heater to the desired directional
angle, then fix in this position by tightening the
fixing bolts on the brackets at the back of the
heater.
8. Secure the electrical supply cable so it does not
contact the heater body or obstruct the air vents.
Follow local and national electrical code
requirements.
The angles of attachment are 20° to 70°, measured
from the mounting wall.

7
2.4 CEILING MOUNTED INSTALLATION
WARNING
Heater should be hung using rigid mounting brackets, the unit must not
be able to swing in any direction under applied load from wind or
persons. It is highly recommended that users install the heater with the
ceiling mounting hardware provided.
HEATER POSITION MUST MAINTAIN A MINIMUM CEILING CLEARANCE OF
0.3m (1’)
1. Assemble the ceiling mounting hardware as
shown in the guide below. The socket head cap
screw should be used on the ceiling bracket
side, and the hexagon head cap screw should
be used on the heater bracket side for
clearance purposes. See Illustration.
2. Secure the heater to the mounting brackets
using nuts and washers provided.
3. Select the installation location on the ceiling by
identifying the studs or structural beams that
will allow the heater to be securely attached.
NOTE: ceiling bolts or anchors are not supplied.
Select an appropriate size to provide adequate
support for the weight of the unit (14.3lbs /
6.5Kg) and take into consideration any wind load
conditions.
4. Attach the unit to the ceiling using the ceiling
brackets and user selected bolts. An illustration
of the bolt pattern dimensions is shown to the
right.
5. The heater can be hung vertically or pointed at
a maximum angle of 45° from vertical.
NOTICE: NEVER direct the infrared heat produced
by the appliance at an adjacent wall.
6. Secure the electrical supply cable so it does not
contact with the heater body or cover the
heater air vents.

8
2.5 ADJUSTING DIRECTIONAL POSITIONING
WARNING
Never attempt to move or adjust the heater angle while it is running. Personal
injury could result.
1. Turn off the heaters electrical supply line from the main power supply.
2. Allow the heater to cool before adjusting the angle.
3. Loosen the fixing bolts on the brackets at the back of the heater; adjust the heater as desired, then re-
tighten the fixing bolts.
Notice :The unit produces radiant heat that warms people and objects rather than the air around them. Install
the heater at an angle which points the reflector at the target space. Do not point the heater at windows or vacant
spaces, as the heat will not be delivered to the occupants.
3 - OPERATING INSTRUCTIONS
Caution! The heater must be properly installed before it is used.
Caution! When the heater is not in use for extended periods of time, be sure to set the operating mode to the
"OFF" position.
The heater has two modes of operation, these two modes can be selected using the button on the right side of
the heater.
Manual Mode
Remote Mode
OFF
INCORRECT
CORRECT

9
3.1 MANUAL MODE
When the manual mode is selected, the heater will operate at 100% of rated power.
3.2 REMOTE MODE
The remote control must be pointed in the direction of the receiver on the heater body (located on the front
face) and must be used within a maximum distance of 6 m.
In remote mode the heater has 6 power levels. The power level can be selected with the remote. The selected
power level is displayed on the screen on front of the heater. The remote mode only works with the remote
control supplied with the product. L0 represents standby while L6 represents the maximum heating level.
3.2.1 OPERATION OF THE REMOTE CONTROL
Symbol
Description
˄
Up one heating level
MAX
The heater goes directly to the highest heating level (short
delay on start).
˅
Down one heating level.
ON
To switch the heater ON: Press On.
The heater has a soft start function using only 16% of
maximum power. 4 seconds after the heater has been turned
on, it will automatically switch to the last heating level used.
In case of the first-time use, after 4 seconds the heater will
automatically switch to 100% power.
OFF
To switch the heater OFF: Press OFF. The heater will switch to
Standby mode (the receiver indicator will light up).
Display
Description
Power setting
L1
Heating level 1
33%
L2
Heating level 2
50%
L3
Heating level 3
66%
L4
Heating level 4
80%
L5
Heating level 5
88%
L6
Heating level 6
100%
L0
Standby
0%

10
Notice:
1. Use 2 pieces AAA, 1.5V batteries (not included) in the remote control. Remove the batteries when not in use for an
extended period of time to increase battery life.
2. The heater can be still used normally in the event the remote control is misplaced, however it must be used in manual
mode. Contact your local authorized Aura Dealer for remote replacement.
3. The remote-control function may not work if there is a barrier between the remote control and heater.
4. Replace the batteries as required to ensure correct remote functionality.
4 - MAINTENANCE
WARNINGS
1. Allow the heater and the emitter to cool down before handling.
2. Installation and maintenance must be performed by a qualified technician.
3. Turn off the power before beginning maintenance.
4. Do not attempt to service or repair the unit while it is running.
5. Should the heater be dropped or damaged or malfunction at any time, immediately turn off the main
power source and do not use it until it has been examined by an authorized service facility.
Notice: Do not touch the emitter with bare hands. Wearing soft cotton gloves is highly recommended. Finger
prints will burn into the carbon emitter during use and cause premature heater failure. If the emitter is
anidvertently touched, or if it needs to be cleaned, carrefully wipe it using rubbing alcohol or methylated spirits.
4.1 CLEANING
To remove dust or dirt on the reflector, follow these steps:
1. Turn the power to «OFF» and disconnect the heater from the main power supply.
2. Remove screws from the left side cover and slide the perforated front grille out of the heater body.
3. Carefully wipe the reflector with a soft, lint-free cloth.
4. After cleaning, be sure to properly reinstall the heater grille.

11
4.2 REPLACING THE EMITTER
Contact your distributor for the correct replacement emitter, providing the model number and rating from the
rating label. Using an incorrect replacement emitter can cause the heater to fail.
Notice: Read through the Emitter replacement procedure below before beginning the replacement. For easier
replacement, remove the heater from the wall or ceiling.
1. WARNING! TURN OFF THE POWER AND
DISCONNECT THE HEATER FROM THE MAIN
POWER SUPPLY. FAILURE TO DISCONNECT
HEATER BEFORE REPLACING THE EMITTER
COULD CAUSE ELECTRIC SHOCK OR DEATH!
2. Turn OFF the power and disconnect from main
power supply.
3. Be sure the heater and the emitter are cool:
burns can result from touching hot
components.
4. Remove screws from the left side of the heater
fixture and remove the aluminum end cap.
(keep these parts).
5. Carefully slide the protective grille out of the
heater body to expose the emitter and the
plastic sealing connectors.
6. Carefully unscrew the protective plastic cap
and carefully slide the cap back cap to expose
the wire/ metal connector system.
Caution! Disconnect the metal locking
connectors by squeezing the metal tab.
7. Bend the metal tabs to remove the small
reflector shield sheet metal parts. Hold on to
these pieces. This will allow you to slide the
emitter into a bigger cavity to remove it from
the reflector and heater body. Properly dispose
of the broken emitter at your local recycling
center.
8. Hold the new emitter by the ceramic ends or
wear clean dry gloves to prevent and position
the new lamp inside the unit.
Ceramic Infrared Emitter End

12
9. Insert the new emitter through the reflector
openings. Insert the Reflector Shields and bend
the tabs back into place. The Reflector Shields
hold the emitter in the correct position during
operation. It is important that they are re-
installed during emitter replacement.
10. Connect the new emitter to the terminals of
the heater; screw in the protective plastic caps
11. Carefully replace the protective aluminum
grille and screw the protective end cap in place.
Due to ongoing product improvements, specifications and dimensions are subject to change and correction without notice and
without incurring obligations. Determining the application and suitability for use of any product is the responsibility of the
installer. Additionally, the installer is responsible for verifying dimensional data on the actual product prior to beginning any
installation preparations.
Incentive and rebate programs have precise requirements as to product performance and certification. All products meet
applicable regulations in effect on date of manufacture; however, certifications are not necessarily granted for the life of a
product. Therefore, it is the responsibility of the applicant to determine whether a specific model qualifies for these
incentive/rebate programs.
Manual Revision: C: 2020-11-20

13
5 - LIMITED EXPRESS WARRANTY
RESIDENTIAL INSTALLATION/USE:
LIMITED ONE (1) YEAR PARTS WARRANTY
Inforesight Consumer Products Inc. warrants all parts of the infrared
heaters to be free from defects in workmanship and materials for
normal residential use and maintenance for one (1) year from the date
of purchase by the original consumer.
COMMERCIAL INSTALLATION USE:
LIMITED ONE (1) YEAR PARTS WARRANTY, Ninety (90) DAY
EMITTER (LAMP) WARRANTY
Inforesight Consumer Products Inc. warrants all parts (excluding the
emitter lamp) of the infrared heater to be free from defects in
workmanship and materials for normal commercial use and
maintenance for one (1) year from the date of purchase.
Inforesight Consumer Products Inc, warrants the emitter lamp of the
infrared heater to be free from defects in workmanship and materials for
normal commercial use and maintenance for one (1) year from the date
of purchase.
The Limited Warranties described above apply only when the Infrared
Heater is installed and operated per Inforesight Consumer Products Inc.
installation and operating instructions for normal use.
EXCEPTIONS
The Limited Warranty does not cover normal maintenance-Inforesight
Consumer Products recommends that regular inspection/maintenance
be performed according to the Installation and Operation Manual
Additionally, labor charges, diagnostic charges, transportation charges
for replacement parts, replacement of the bulb, or any other service
calls/repairs are not covered by this Limited Warranty. It also does not
cover any portion or component of the system that is not supplied by
Inforesight Consumer Products, regardless of the cause of failure of
such portion or component.
CONDITIONS FOR WARRANTY COVERAGE
Unit must be operated according to Inforesight Consumer Prod.
operating instructions included with the unit and cannot have been
subjected to accident, alteration, improper repair, neglect or misuse, or
an act of God (such as a flood)
•Installation must be according to Inforesight Consumer Products
Inc. Instructions
•Rating plate has not been altered or removed
•Unit is not operated in a corrosive environment
•Performance cannot be impaired by use of any product not
authorized by Inforesight Consumer Products Inc. or by any
adjustment or adaptations to components
•Damage has not been a result of inadequate wiring or voltage
conditions, use during brown-out conditions, or circuit interruptions
DURATION OF WARRANTY & REGISTRATION
The warranty begins on the date of purchase by the original consumer.
purchase. The consumer must retain a receipted bill of sale as proof of
warranty period. Without this proof, the express warranty begins on the
date of shipment from the factory.
REMEDY PROVIDED BY THE LIMITED EXPRESS WARRANTY The
sole remedy under the Limited Warranty is replacement of the defective
part. If replacement parts are required within the period of this warranty,
Inforesight Consumer Products Inc. replacement parts shall be used;
any warranty on the replacement part(s) shall not affect the applicable
original unit warranty. Labor to diagnose and replace the defective part
is not covered by this Limited Express Warranty. If for any reason the
replacement part/product is no longer available during the warranty
period, Inforesight Consumer Products Inc. shall have the right to allow
a credit in the amount of the current suggested retail price of the
part/product instead of providing repair or replacement.
LIMITATION OF LIABILITY
1. There are no other express or implied warranties. Inforesight
Consumer Products Inc, makes no warranty of merchantability.
We do not warrant that the unit is suitable for any particular
purpose or can be used in buildings or rooms of any particular
size or condition except as specifically provided in this Installation
and Operation document. There are no other warranties, express
or implied, which extend beyond the description in this document.
2. All warranties implied by law are limited in duration to the one-
year term of the Parts Warranty. Your exclusive remedy is limited
to the replacement of defective parts. We will not be liable for
any consequential or incidental damages caused by any
defect in this unit.
3. This warranty gives you specific legal rights and you may also
have other rights which vary from state to state. Some states do
not allow limitation on how long an implied warranty lasts or do
not allow the exclusion or limitation of incidental or consequential
damages, so the above limitations or exclusions may not apply to
you,
4. No warranties are made for units sold outside the continental
United States and Canada. Your distributor or final seller may
provide a warranty on units sold outside these areas.
5. Inforesight Consumer Products Inc. will not be liable for damages
if our performance regarding warranty resolution is delayed by
events beyond our control including accident, alteration, abuse,
war, government restrictions, strikes, fire, flood, or other acts of
God.
HOW TO OBTAIN WARRANTY SERVICE OR PARTS
If you have a warranty claim or service question, contact Inforesight
Consumer Products Inc, at 905-568-7655. Have the model number and
date of purchase available for this call. Do not return your unit to the
store where it was purchased.
Owner responsibilities are set forth in the instruction manual -
read it carefully.
Limited Express Warranty
AURA® Infrared Heaters
Table of contents
Other Aura Electric Heater manuals
Popular Electric Heater manuals by other brands

SHUFT
SHUFT UniMAX-R 850SE EC Technical manual

Sentiotec
Sentiotec Home Premium Combi STL704S instructions

Dimplex
Dimplex Ventosa VNS15 operating instructions

Bromic Heating
Bromic Heating platinum Smart-heat instruction manual

Helo
Helo ROCHER Instructions for installation and use

Holmes
Holmes HFH5505 owner's guide