Aurora 151-701-0000 Manual

Technical Information
no.
912-100-0108
page
1/11
status: 14.07.05
Heater Trolly
1 Safety advises
2 Device description
3 Function description
4 Mounting informations
5 Usage
6 Technical data
7 Electrical connection
8 Maintenance
9 Spare parts
10 Optional accessories
11 Fault diagnosis
A U R O R A
Konrad G. Schulz GmbH & Co.KG
Südring 4
D-69427 Mudau
Tel.: 0 62 84 / 92 02-0
Fax: 0 62 84 / 92 02 99
www.aurora-eos.com
Technical modifications reserved
author: 29.01.1999 KH
date/name
checked: 20.07.05 W.Le
date/name
released: 20.07.05 W.Le
date/name
a) 8268 23.07.02 KH
d) 9708 28.06.04 KH g) 10682 14.07.05 KH j
b) 9193 09.01.04 KH
e) 10132 01.12.04 KH h k
c) 9641 02.06.04 KH f) 10199 11.01.05 KH i l

Technical Information
no.
912-100-0108
page
2/11
status: 14.07.05
1 Safety advises
Please consider the following advice for your own safety.
•Please have maintenance work and repairs exclusively carried out by authorised
personnel.
•Do not grip into the unit and do not put objects inside.
•Maintenance work is to be carried out only when the blower-motor is not running. In
order to avoid injuries, the blower is to be separated from the current circuit.
•Attention! Danger of burning! Please do not get into contact with the heat
exchanger and its connections. Cooling tubes and cooling hoses can be hot and
stand under pressure. Be careful by touching them. This also applies to the
resistance on the blower when working at the opened unit and the construction part
has not completely cooled down.
2 Device description
This technical information is valid for the following versions:
AURORA-
part no.
nominal
voltager
blower
speed level
air outlet
151-701/702-0000 12V/24V 2-speed 5 sockets ∅55 mm
151-701/702-0001 12V/24V 1-speed 5 sockets ∅55 mm
151-701-0002 12V 2-speed without sockets
151-701/702-0003 12V/24V 2-speed 2 sockets ∅55 mm
151-701-0004 12V 2-speed without sockets
151-701/702-0005 12V/24V 2-speed 1 socket ∅70 mm
151-701-0006 12V 1 socket ∅55 mm
2 Small Louver
151-701/702-0007 12V/24V 2-speed 3 socket ∅42 mm
151-702-0008 24V 3-speed 2 socket ∅30 mm
roll nozzle
151-701-0010 12V 2-speed 2 sockets ∅50 mm
151-701-0011 12V 2-speed 3 sockets ∅55 mm
151-701-0012 12V 3-speed without sockets
151-701-0013 12V 2-speed 3 sockets ∅55 mm
151-701-0014 12V 2-speed 5 sockets ∅55 mm
151-701-0015 12V 2-speed 4 sockets ∅55 mm
151-701/702-0016 12V/24V 2-speed 2 sockets ∅55 mm
151-701-0017 12V 2-speed 4 sockets ∅55 mm
151-701-0018 12V 3-speed without sockets
151-701/702-0019 12V/24V 3-speed 2 sockets ∅55 mm
151-701-0021 12V 3-speed air outlet opening
1 socket ∅55 mm, 45°
151-702-0022 24V 3-speed 2 socket ∅55 mm
151-701-0023 12V 2-speed 2 socket ∅42 mm

Technical Information
no.
912-100-0108
page
3/11
status: 14.07.05
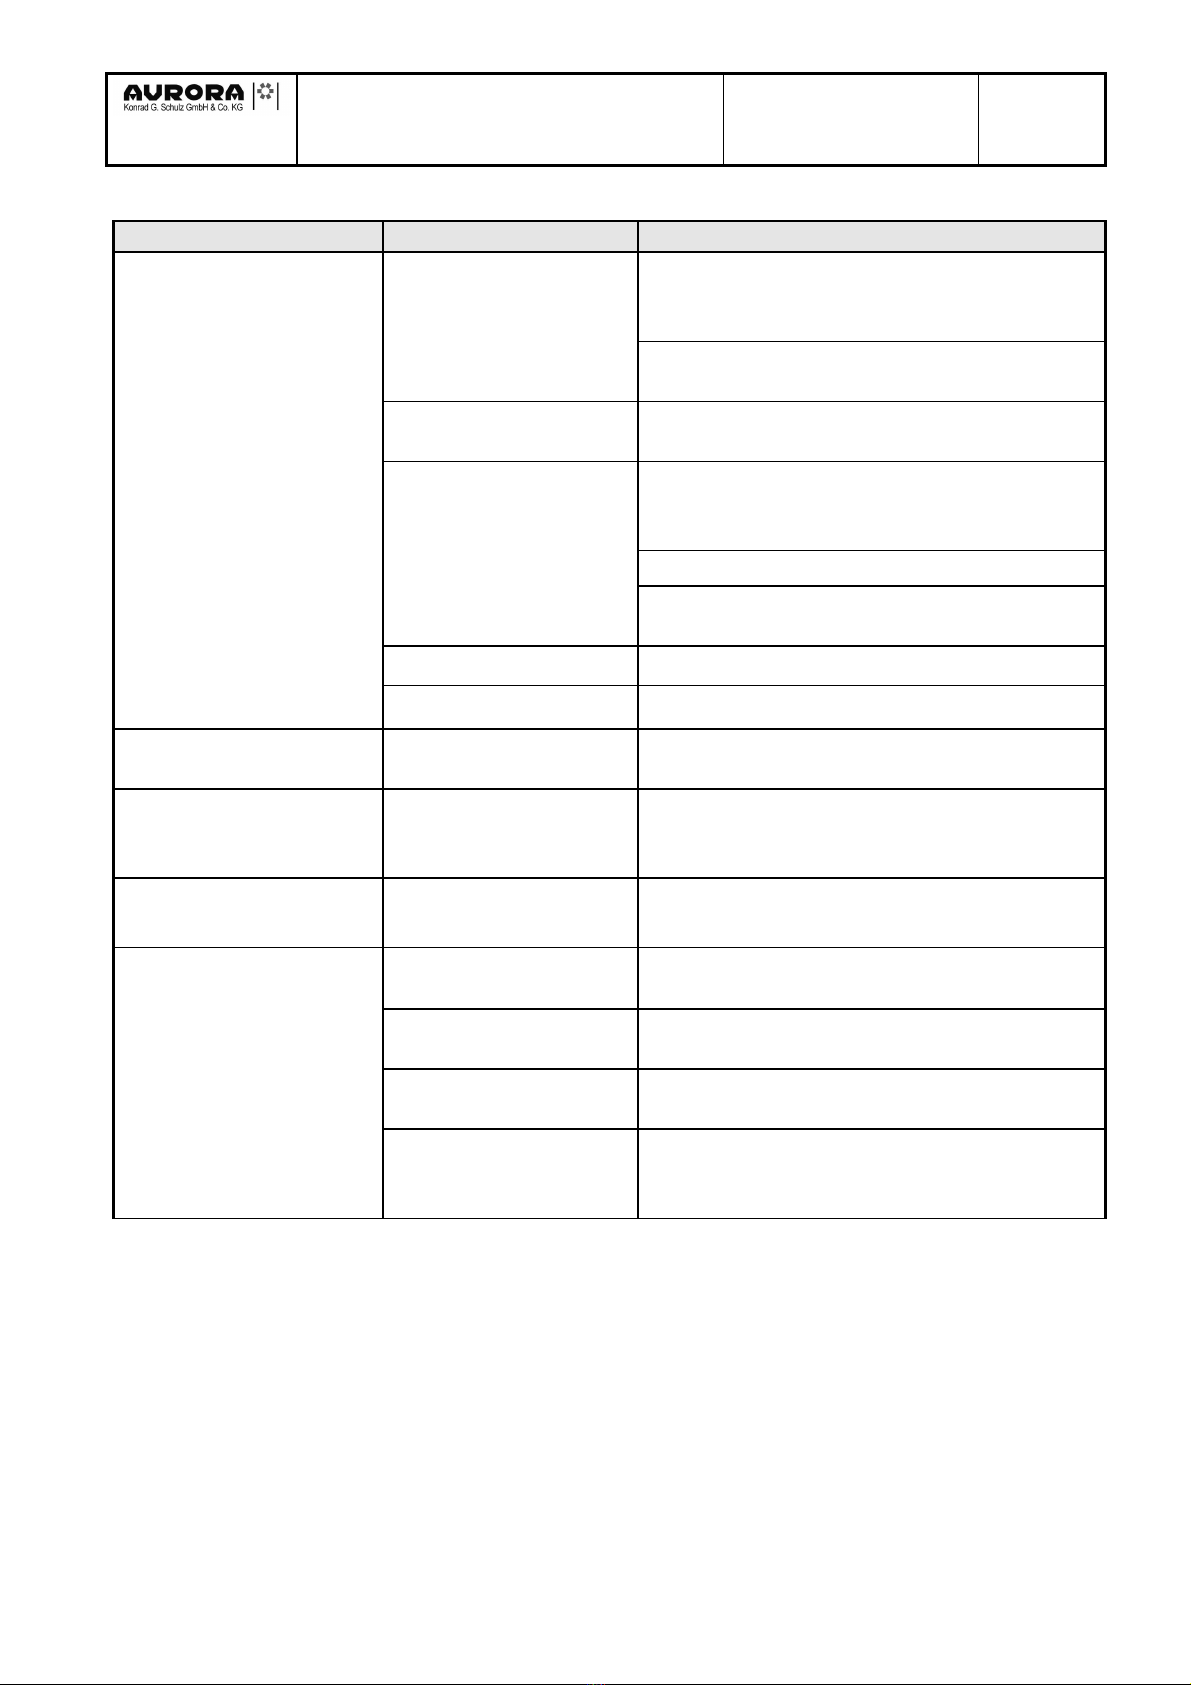
The heater versions differences are the nominal voltage, the sockets quantity
and diameter and the air outlets.
The version 151-701-0017 can be delivered without heat exchanger as an
ventilation unit with part no. 136-701-0017.
The version 151-701-0023 has an air suction case.
All versions have a housing made of steel sheet.
The heater is delivered by AURORA completely pre-mounted, the installation
into the vehicle is carried out by the customer.
The flat tube heat exchanger with connection diameter 15 mm and the twin
radial blower DRG 370 are integrated into the heater.
The different blower speeds are achieved using a dropping resistor.
The blower is protected against overload by a micro-temperature-fuse MTS
connected to the resistor.
3 Function description
The blower sucks in the air via the opening. The air goes the heat exchanger,
heat up and will be lead into the interior.
You can choose between 1-,2-,and 3-speed level blower versions. The blower
will be operated with a switch, e.g. the AURORA Control-Panel, deliverable as
an option.
Example for a version with three speed level:
switch position 0 blower is out
switch position 1 slowest air outflow (slow speed level))
switch position 2 medium air outflow (middle speed level)
switch position 3 maximum air outflow (highest speed level)
The heat exchanger brought forward the heat to the air that flow through.
The heating power can be operated by opening or closing the water valve with
a control panel (accessoir)
4 Mounting informations
•Serving work may only be carried out by trained and authorised personnel.
The units should be handled and assembled expertly according to the
installation instructions.
•Modifications must be approved and released by AURORA. Otherwise the
guarantee will automatically become invalid.
•You should similarly agree the purpose of the application of the heating unit
with AUROA. This is particularly true where extreme environmental conditions
can arise at the installation location such as e.g. unusual temperatures,
vibrations etc.

Technical Information
no.
912-100-0108
page
4/11
status: 14.07.05
•Take note of the installation location in the cab. Install the unit according to
the space available at the most appropriate spot on the mounting points
provided.
•The fixing points must be level to avoid strains in the unit housing.
Consequences
The function of the unit can be impaired if you don’t follow this advice. The unit
housing may even become damaged.
If water gets into the unit its function can also be impaired under certain
circumstances. You should therefore fit the unit at a location which is protected
from water.
Please pay attention to the actual technical supplement to the general terms of
sale and the safety instructions in contact & Info of www.aurora-eos.com.
Take care of the mounting position of the Trolly. The axis of the blower motor
must be in a horizontal position.
Before installation of the device the electrical connection and the water
connection are to be set up.
The warm air hoses are pushed over the heaters sockets. According to the
installation situation it may be necessary to provide additional means of fixing
the warm air hoses using a worm drive hose clip over the sockets.
It is essential to use appropriate worm drive hose clips for connecting the warm
water hoses to the heat exchanger.
The fixing of the heater is made with screws to the mounting links slotted holes
7x10 mm of the housing sheet.
5 Operation
The operation is made with vehicle side operation elements.
AURORA can deliver a Control Panel (accessories) for the operation.
6 Technical data
Technical data for the standard versions 151-701-0000 and 151-702-0000:
•
V
water
= 1000l/h
test voltage
. 13 V / 26 V
blower
speed
•
Vair
[m³/h]
•
Q
80
[kW]
P
el
[W]
L
P
[dB(A)] ±
±±
±0,5
2 344 6,5 128 73
1 238 5 69 64

Technical Information
no.
912-100-0108
page
5/11
status: 14.07.05
7 Electrical connection
Electrical connection diagram see according drawing of the heater
cable specification: FLRY 1,5 mm
2
8 Maintenance
The heater is maintenance-free. To assure an optimal function for a long period
we recommend a regularly check of:
- hoses for chaffing and kinks, damage and porosity
- the fixing, leak control and laying of the hoses and fittings.
The hose fixings are to be tightened if necessary.
- the electrical connections on the correct state and firm position
Cooling water circuit:
When refilling the cooling water quality has to be considered. When using
AURORA water valves the warranty expires when defects occur due to
contamination in the water circuit. (see TI 971-190-0003 anticorrosion/antifreeze
solution. Please order in the case of need)
9 Spare parts
spare parts list for Trolly 151-701/702-0000, 151-701/702-0003, 151-701-0011,
151-701-0013, 151-701-0014, 151-701-0015, 151-701/702-0016, 151-701-0017
description part no.
12V
part no.
24V
heat exchanger
∅
15 mm
283
-
701
-
0001
283
-
701
-
0001
twin radial blower DRG 370
131
-
101
-
0061
131
-
102
-
0061
resistor
413
-
300
-
0001
413
-
300
-
0002
cable set 2
-
speed
217
-
100
-
0008
214
-
700
-
0013
socket
∅
55 mm
431
-
420
-
0014
431
-
420
-
0014
spreading rivet
494
-
500
-
0013
494
-
500
-
0013
spare parts list for Trolly 151-701/702-0001
description part no.
12V
part no.
24V
heat exchanger
∅
15 mm
283
-
701
-
0001
283
-
701
-
0001
twin radial blower DRG 370
131
-
101
-
0061
131
-
102
-
0061
cable set 1
-
speed
214
-
700
-
0011
214
-
700
-
0011
socket
∅
55 mm
431
-
420
-
0014
431
-
420
-
0014
spreading rivet
494
-
500
-
0013
494
-
500
-
0013

Technical Information
no.
912-100-0108
page
6/11
status: 14.07.05
spare parts list for Trolly 151-701-0002
description part no.
12V
heat exchanger
∅
15 mm
283
-
701
-
0001
twin radial blower DRG 370
131
-
101
-
0061
cable set 2
-
speed
217
-
100
-
0008
resistor
413
-
300
-
0001
spare parts list for Trolly 151-701-0004
description part no.
12V
heat exchanger
∅
15 mm
283
-
70
1
-
0002
twin radial blower DRG 370
131
-
101
-
0005
hose bend
∅
15 mm
485
-
360
-
0002
resistor
413
-
300
-
0001
spare parts list for Trolly 151-701/702-0005
description part no.
12V
part no.
24V
heat exchanger
∅
15 mm
283
-
701
-
0001
283
-
701
-
0001
twin radial blowe
r DRG 370
131
-
101
-
0061
131
-
102
-
0061
resistor
413
-
300
-
0001
413
-
300
-
0002
cable set 2
-
speed
217
-
100
-
0008
214
-
700
-
0013
socket
∅
55 mm
431
-
420
-
0014
431
-
420
-
0014
spreading rivet
494
-
500
-
0013
494
-
500
-
0013
socket
∅
70 mm
431
-
420
-
0017
431
-
420
-
0017
spare parts list for Trolly 151-701-0006
description part no.
12V
heat exchanger
∅
15 mm
283
-
701
-
0003
twin radial blower DRG 370
131
-
101
-
0065
socket
∅
55 mm
431
-
420
-
0014
spreading rivet
494
-
500
-
0013
water tap
281
-
700
-
0002
hose bend
∅
15 mm
485
-
360
-
0002
Small L
ouver
334
-
314
-
0004

Technical Information
no.
912-100-0108
page
7/11
status: 14.07.05
spare parts list for Trolly 151-701-0007 and 151-702-0007
description part no.
12V
part no.
24V
heat exchanger
∅
15 mm
283
-
701
-
0001
283
-
701
-
0001
twin radial blower DRG 370
131
-
101
-
0061
131
-
102
-
0061
resistor
413
-
300
-
0001
413
-
300
-
0002
cable set 2
-
speed
217
-
700
-
0008
217
-
700
-
000
6
socket
∅
42 mm
431
-
420
-
0012
431
-
420
-
0012
spreading rivet
494
-
500
-
0013
494
-
500
-
0013
spare parts list for Trolly 151-702-0008
description part no.
12V
heat exchanger
∅
15 mm
283
-
701
-
0001
twin radial blow
er DRG 370
131
-
102
-
0061
resistor
413
-
300
-
0001
cable set 3
-
speed
214
-
700
-
0012
socket
∅
70 mm
431
-
420
-
0017
spreading rivet
494
-
500
-
0013
roll nozzle
334
-
341
-
0002
spare parts list for Trolly 151-701-0010
description part no.
12V
heat exchanger
∅
15 mm
283
-
701
-
0004
twin radial blower DRG 370
131
-
101
-
0067
resistor
413
-
300
-
0001
socket
∅
50 mm
431
-
420
-
0013
spreading rivet
494
-
500
-
0013
spare parts list for Trolly 151-701-0012 and 151-701-0018
description part no.
12V
heat exchanger
∅
15 mm
283
-
701
-
000
1
twin radial blower DRG 370
131
-
101
-
0061
resistor
413
-
300
-
0001
cable set 3
-
speed
214
-
700
-
0012

Technical Information
no.
912-100-0108
page
8/11
status: 14.07.05
spare parts list for Trolly 151-701-0019
description part no.
12V
part no.
24V
heat exchanger
∅
15 mm
283
-
701
-
0001
283
-
701
-
0001
twin radial blower DRG
370
131
-
101
-
0068
131
-
102
-
0068
resistor
413
-
300
-
0001
413
-
300
-
0002
cable set 3
-
speed
217
-
100
-
0007
217
-
100
-
0007
socket
∅
55 40 long
431
-
420
-
0014
431
-
420
-
0014
spreading rivet
494
-
500
-
0013
494
-
500
-
0013
spare parts list for Trolly 151-701-0021
description part no.
heat exchanger
∅
15 mm
283
-
701
-
0001
twin radial blower DRG 370
131
-
101
-
0061
resistor
413
-
300
-
0001
cable set 3
-
speed
214
-
700
-
0012
socket Ø55 45°
431
-
420
-
0035
spreading rivet
494
-
500
-
0013
spare parts list for Trolly 151-702-0022
description part no.
heat exchanger
∅
15 mm
283
-
701
-
0001
twin radial blower DRG 370
131
-
102
-
0068
resistor
413
-
300
-
0002
cable set 3
-
speed
217
-
100
-
0007
socket Ø55
431
-
420
-
0014
spreading rivet
494
-
500
-
0013
spare parts list for Trolly 151-701-0023
description part no.
heat exchanger
∅
15 mm
283
-
701
-
0007
twin radial blower DRG 370
131
-
101
-
0061
resistor
413
-
300
-
0001
cable set 2
-
speed
217
-
100
-
0009
socket Ø42
431
-
420
-
0012
spreading rivet
494
-
500
-
0013
Filter PPI30
436
-
440
-
0135
10 Optional accessories
Accessories upon request

Technical Information
no.
912-100-0108
page
9/11
status: 14.07.05
11 Fault diagnosis
Fault Cause Remedy
Blowers will not work
Fuse defective or
loose
Is the fuse correctly seated? If
necessary insert correctly. Renew
defective fuses. If a new defect occurs
within a short time this indicates a
possible short-circuit.
Examine blowers for a blockage or
another type of defect and rectify the
cause.
No vehicle power
Switch on ignition and/or main battery
switch.
Check battery charge level.
Check battery connections.
Check vehicle operating instructions for
possible advice.
Connecting plug has
become loose
Is the plug connection seated properly
at the rear of the unit? If not assemble it
correctly.
Check connection on blower switch.
Open up the unit and check the
internal electrical connections.
Connecting cable
damaged or torn out
Replace cable. Check for correct
cable routing and connections
according to the drawing.
Electrical connections
reversed
Check connecting wires according to
the drawing and if necessary assemble
correctly.
Blower switch
defective
test switch or change it if necessary
Blockage in fan unit Rectify the cause of the blockage, e.g.
object in impeller. If necessary install
new fan unit. WARNING! Observe safety
instructions.
Blower motor
defective
Exchange fan unit
No earth connection
Check electrical connections,
especially earth and if necessary
correct the cabling

Technical Information
no.
912-100-0108
page
10/11
status: 14.07.05
Fault Cause Remedy
Blowers will not
operate at all speeds
Micro-temperature
fusing (MTS) has
been triggered
Exchange resistor and check the
blower motor for the cause of
functional faults
Free up intake/outlet openings and
exchange resistor
Blower switch
defective
Exchange blower switch
Connecting plug
has become loose
Check plug connection at rear of unit
for proper seating. If not assemble it
correctly
Check connection on blower switch
Check the internal electrical
connection
resistance defective Exchange resistance
relay defective Exchange relay
Blower only runs in the
maximum speed level
Unit only has one
speed
Install resistor and cable set for multi-
speed versions
Blower only runs at
low and medium
speed
Third speed fuse
defective
Exchange fuse
Blower cannot be
switched off
Short-circuit in cable
or blower switch
Rectify short-circuit, if necessary install
new cable(s) and/or switch.
Blower only operates
at reduced power
Incorrect nominal
voltage
The nominal voltage of the unit and
the vehicle power circuit must agree
Contacts
contaminated
clean plug contacts. Proceed carefully
to avoid
Electrical lines are
underdimensioned
Install recommended cable cross-
section
Heat exchanger
severely
contaminated
Carefully clean avoiding damage
which can lead to leaks.
Warning! Observe safety instructions!

Technical Information
no.
912-100-0108
page
11/11
status: 14.07.05
Fault Cause Remedy
Heating will not
function
Vehicle engine is not
running
Start engine
Cooling water still
cold
Wait until the engine reaches operating
temperature
Water valve closed Open valve
Water lines kinked or
squashed
Eliminate fault by installing correctly.
Water pump pressure
insufficient
Heat exchanger does not have cooling
water flowing through it. Install
additional pump or a more powerful
one.
Reduced heating
performance
Volumetric air flow
from blower is too
low
See action to take under “Blower”
Water flow rate
through heat
exchanger is too low
Water lines kinked or squashed. Relay
hoses. Water pump pressure too low
(See above for action)
Air in heat
exchanger
When the pumping pressure is sufficient
the heater is self bleeding. Install
additional or more powerful water
pump.
Unit is
underdimensioned
Provide about 1 kW of heating power
for each cubic metre of cabin air. Install
additional heating or a more powerful
unit
Water escaping from
the unit
Hose connection
has come loose
Check hose seatings and tighten hose
clamps
Water hose
damaged
Install and connect new hose
Heat exchanger
damaged
Install and connect original
replacement part. Warning! Follow
safety instructions!
This manual suits for next models
28
Table of contents
Other Aurora Heater manuals
Popular Heater manuals by other brands

Webasto
Webasto Air Top 2000 ST B installation instructions

Prem-I-Air Elite
Prem-I-Air Elite EH1274 quick start guide

Sunhouse
Sunhouse SPHN Installation and operating instructions

Schwank
Schwank SchwankAir 4000 Series installation manual

Evinox
Evinox ModuSat XR Installation, commissioning and servicing instructions

Detroit Radiant Products
Detroit Radiant Products LD3-15-40 installation manual