Avantco 177SL612A User manual

User Manual
www.AvantcoEquipment.com 1
Meat Slicer Instruction Manual
Model: 177SL612A
Please read and keep these instructions. Indoor use only.
10/2018
User Manual

User Manual
2 www.AvantcoEquipment.com
Unpacking:
Unpack the product and check for any damage incurred during transit. This should be reported to the responsible
carrier, railway or postal authority, and a request for a damage report should be made.
These instructions must be followed for us to guarantee our full support of your claim for
protecting against loss from concealed damage. The form for filing such a claim will be
provided by the carrier.
General Installation And Operation
Instructions:
The Avantco Auto/ Manual slicer is a medium duty electrically driven appliance. The unit has been designed to
meet the highest safety and hygiene standards. The robust aluminum construction and powerful drive motors ensure
long and reliable operation and use.
1. Place the unit in the desired location with the on/off switch facing the operator. DO NOT plug the unit in at this point.
The supporting table should be stable and at the correct working height. The work surface should be in a dry loca-
tion and preferably away from heavy traffic areas.
2. Clean the unit with a DAMP cloth using a neutral P.H. dish detergent. Wipe and dry the machine. (See Cleaning
instructions on page 3 of this manual.)
3. Set the thickness of slice required using the control knob adjacent to the on/off switch.
4. The meat support platform should be in the start position that is close to the operator. Lift up the food pusher; place
the meat to be sliced on the support platform against the raw edge. Return the food pusher to its original position
now on top of the meat to be sliced.
6. After you are finished cutting, turn off machine and collect the product slices in the exit area.
!
Cut through the greasiest dishes, glassware, cutlery, pots, and pans with
Sunbright 32 oz. pot and pan dishwashing liquid. This heavy-duty pot and pan
dishwashing liquid was specially designed for the institutional environment with
its super concentrated, high active, high sudsing formula.
5. The unit can be operated in either MANUAL or AUTO feed modes.
5.1. MANUAL MODE.
H
Ensure the control lever H in diagram 1 is position A. This handle disengages
auto feed function.
Switch on the blade motor only and using the handle on the food pusher,
push the carraige back and forth to begin cutting the food.
Diagram 1
A
B
5.1. AUTO FEED MODE.
Ensure the control lever H in diagram 1 is position B. This handle engages
the auto feed function.
Switch on the blade motor first and then auto feed motor. The unit will now
automatically cut the meat loaded.

User Manual
www.AvantcoEquipment.com 3
Safety
1. The units are designed to operate an alternating current (A.C) only. DO NOT CONNECT TO DIRECT CURRENT (D.C).
2. Please ensure that the power supply cord does not come into contact with hot surfaces.
3. If the supply cord is damaged, it must be replaced with a new cord assembly. (Available from the suppliers agent.)
4. The appliance must only be used for its intended purpose.
5. It is strongly suggested that the operators of this machine wear close fitting clothes. It is essential when blade
maintenance or cleaning is undertaken that suitable hand protection gloves are used.
6. ALWAYS unplug the slicer before undertaking cleaning or maintenance of the unit.
7.These machines must be operated by trained personnel and should never be used by unskilled operators or children.
8. The blade must be replaced when it has reduced in size by 5mm.
LubriQuik food grade silicone spray lubricant is ideal for use on virtually any equip-
ment or machinery that makes contact with food, such as slicers, conveyor sys-
tems, bottling and canning machinery, bakery equipment, and dairy equipment.

4
User Manual
Cleaning
1. It is essential to follow all the safety instructions at all times.
2. Make sure that the unit is unplugged before cleaning.
3. The unit should never be immersed in water.
4. Do not use abrasive cleaning agents or solvents to clean this machine. Clean with a damp cloth.
REMEMBER! The blade is extremely sharp and for safety, ensure that the slice thickness knob is in the ‘0’ position.
5. After cleaning, wipe the appliance with a dry cloth and allow the unit to dry completely before reuse.
6. If the operation of the food carriage is not smooth, lay the machine on its side, clean the slide bar and lubricate with
a food safe lubricant, like Lubriquik .
Cleaning and Sanitizing:
1. Turn the slicer off and unplug.
2. Turn the thickness control knob all the way to the right.
3. Remove the product table locking knob, and then remove the product table.
4. Remove Slicer Deflector that is over the knife.
5. Clean all removed parts, slicer knife and base with hot water and detergent.
6. Rinse with hot water and sanitize.
7. Reassemble slicer
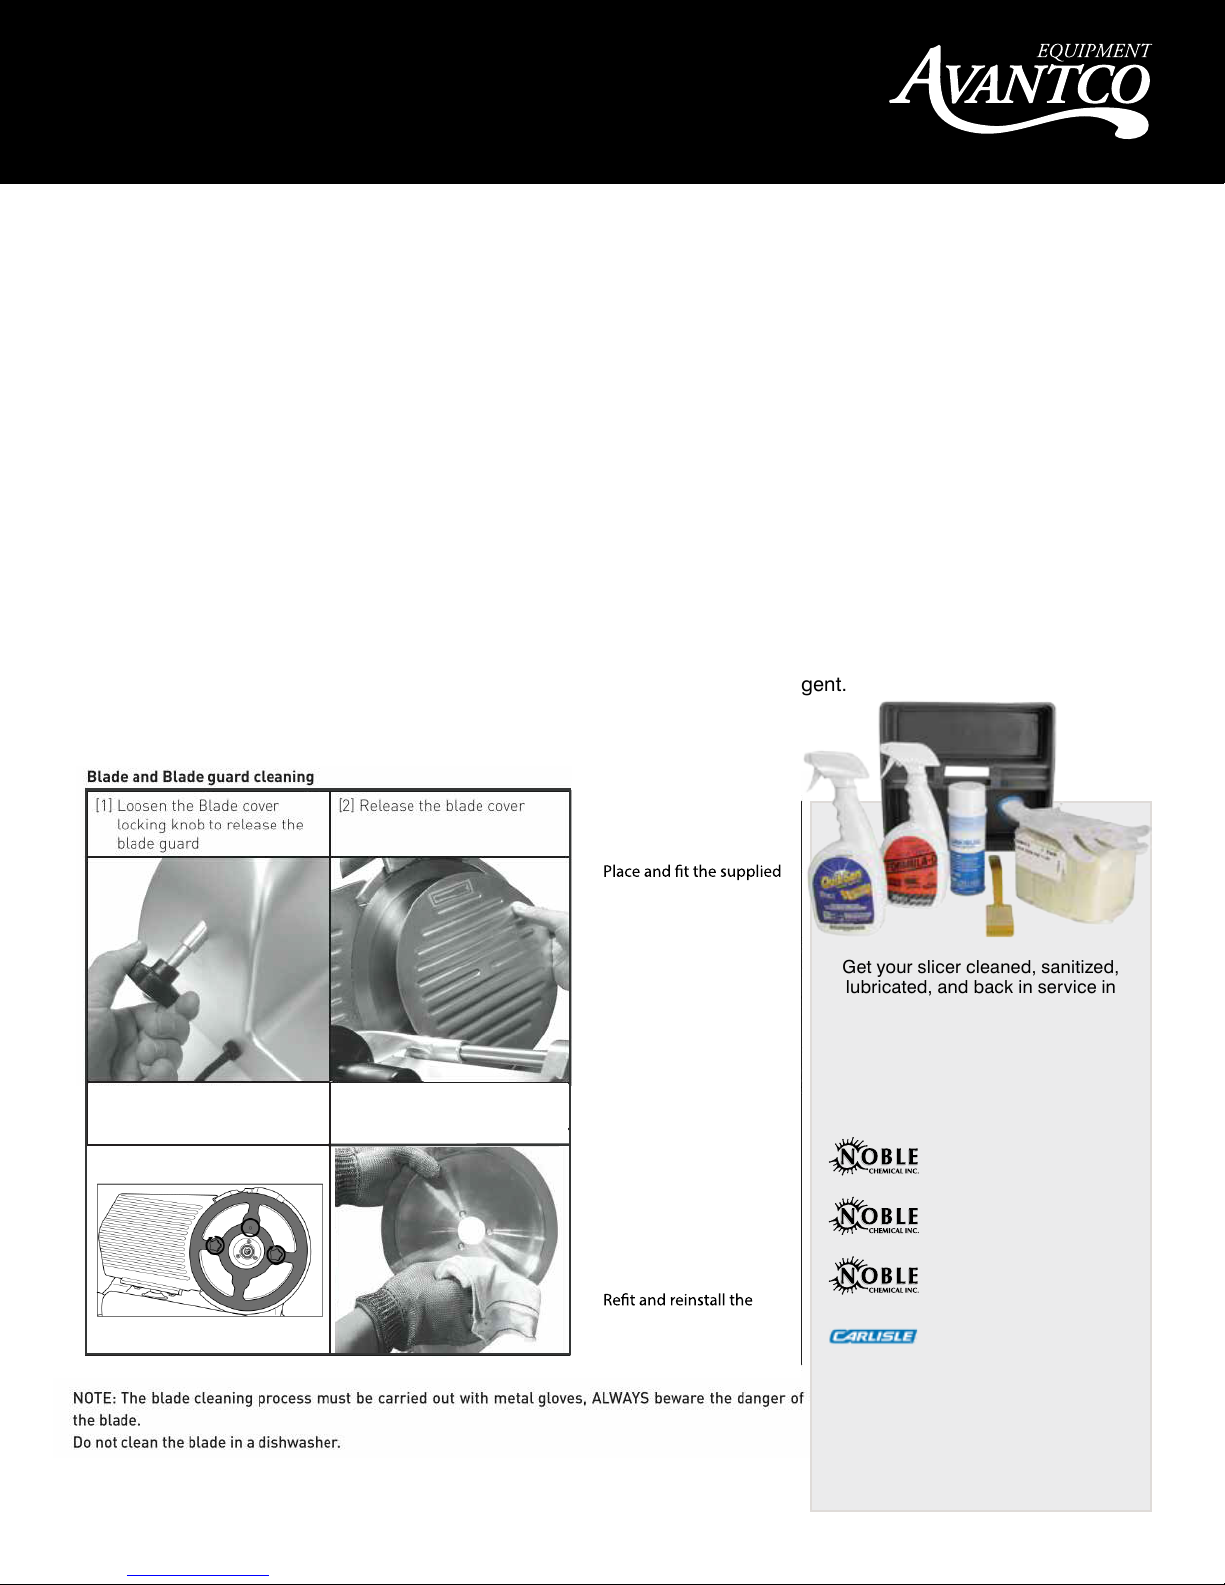
Get your slicer cleaned, sanitized,
lubricated, and back in service in
a flash with our meat slicer safety
cleaning kit. The slicer cleaning kit
packs all of the cleaning supplies
and accessories you need into a
convenient plastic carrying caddy.
8 Piece Set Includes:
Formula D
Spray Degreaser
QuikSan
Spray Sanitizer
LubriQuick
Silicon Lubricant
Easy Slicer
Cleaning Wand
60 Scrub Pads
1 Cut Resistant Glove
1 Brush
1 Plastic Carrying Case
• The blade cleaning must
be carried out with metal
gloves and a wet cloth!
•
blade removal tool with the
notch at the top right side.
• Rotate and align the two
screw holes on the blade
with the two screw handles
of the blade removal tool.
• Then screw and tighten
the two handles of the
blade removal tool into the
blade and lock it in place.
• Unscrew the screws that
fasten the blade to the
appliance.
• Lift the blade removal tool
with the two handles to
remove the blade.
• Keep the blade removal
tool in place when cleaning.
•
blade in reverse order after
cleaning.
[3] Fit the blade removal tool [4] Remove and clean the
blade
www.AvantcoEquipment.com

User Manual
www.AvantcoEquipment.com 5
Blade Sharpening
1. This operation should be undertaken if the cutting blade becomes dull. It should be noted that the blade is made
from hardened material and under normal use should only need sharpening once a year.
2. Unplug the unit.
3. Ensure that the slice thickness knob is in the ‘0’ position.
4. CAREFULLY clean the part of the blade to be sharpened.
5. Unlock the sharpening device using the safety locking screw. Lift up the sharpening assembly and rotate it 180° so
that both grinding wheels are in the correct position. Lower the sharpening device and lock in position.
6. Plug in the machine and switch on.
7. Using the button at the rear of the sharpening unit, push the stone against the rotating blade for approximately
30 seconds.
8. After sharpening, it is important to remove the grinding wheel from the blade by letting go of the push button on the
front of the sharpening device. Run the slicer for 2-3 seconds after letting go of this button.
9. Return the sharpening device to its original position by unlocking the safety screw and rotating by 180°.
Electrical Connection Information
Model Description Volts /HZ HP Watts Plug Type
177SL612A Avantco 12” Auto / Manual Slicer 120 / 60 1/2 HP 550 W NEMA 5-15P

User Manual
6www.AvantcoEquipment.com
LEGEND Description
PB1/PB3 Push Button Stop
PB2/PB4 Push Button Start
T1/ T2 Over Temp. Safety
Motor
R1/R2 Relay 120V
C1/C2 Capacitor 20MF
M1 Motor - 120V
M2 Motor - 120V
Wiring Diagram
E
NL
120V 60Hz
R1
PL1
F1
R2
PL2
F2
M2
M1
PB1
PB2
R1
T1
PB3
PB4
R2
T2
F1/ F2 Cooling Fan

User Manual
www.AvantcoEquipment.com 7
Exploded Parts Diagrams - SL612A

User Manual
Diagram
#
Part Name Replacement
Part #
Quantity
Needed
5Movable clapboard 177PSL A5 1
6 Blade cover 177PSL A6 1
8Director 177PSLA8 1
9Motor 177PSLA9 1
11 Carriage knob 17 7P SL A11 1
12 Carriage push handle 177P SL A12 1
13 Metal Feet 177P SL A13 4
15 Thickness adjusting
knob
177P SL A15 1
17 Clamp handle 177PSL A17 1
21 Clamping box knob 177PSL A21 1
29 Fine sharpening stone 177PSL A29 1
30 Sharpener cover 177PSLA30 1
31 Sharpener cover knob 177PSLA31 1
25, 32,
33, 34,
35
Ejector assembly 177PSLA32 1
40 Belt 177PSL A40 1
41 Blade guard knob 177PSL A41 1
43 Blade 177PSL A43 1
45 Cam pin 177PSL A45 1
46 Sliding cam axle 177PSL A46 1
47 Gauge carriage 177PSL A47 1
Diagram
#
Part Name Replacement
Part #
Quantity
Needed
48 Cam regulator 177PSL A48 1
49 Capacitor 177PSL A49 1
52,53 Carriage assembly 177PSL A52 1
54 Upper towing bracket 177PSL A54 1
57 Upper towing bracket
axle
177PSL A57 1
58 Upper towing buffer
spring
177PSLA58 2
60 Lower towing bracket 177PSL A60 1
61 Lower towing bracket
axle
177PSL A61 1
66 Manual mode handle 177PSL A66 1
67 Automatic motor 177PSLA67 1
80 Motor capacitor 177PSL A80 1
81 Relay circuit board as-
sembly
177PSL A81 1
82 Radiator fan 177PSL A82 2
84 Blade guarding ring 177PSLA84 1
87 Coarse sharpening stone 177PSLA87 1
92 Director screw 177PSLA92 1
97 Support bracket 177PSLA97 1
99 Sharpener Assembly 177PSL A99 1
100 Threaded carriage knob
stud
177P SL A10 0 1
101 Blade pulley assembly 177P SL A101 1
8www.AvantcoEquipment.com

User Manual
www.AvantcoEquipment.com 9
Limited Warranty
All equipment, which is sold under Avantco trademark and used for commercial purpose is warranted against defects
in materials and workmanship. The warranty runs for one year from the date of original installation and is for the benefit
of the original purchaser only. All other Warranties, Expressed or Implied, Statutory or Otherwise, including Without
Limitation any implied Warranty of Merchantability or Fitness for Purposes are excluded. The Seller shall in no event be
liable for direct, indirect or consequential damages in connection with Avantco commercial products.
This warranty is not effective if damage occurs because of accident, carelessness, improper installation, lack of
proper set – up, supervision when required or if the equipment is installed or operated in any manner contrary to the
installation and operating instructions. In these cases, repairs will be made at a reasonable cost. Work performed by
unauthorized personnel or unauthorized service agencies voids this Warranty. Using the slicer to slice raw or frozen
meat will void the warranty.
Residential use voids the warranty.
This warranty does not apply to, and Avantco is not responsible for, any warranty claims made on products sold or used
outside of the United States.
Other manuals for 177SL612A
1
Table of contents
Other Avantco Kitchen Appliance manuals

Avantco
Avantco SL309 User manual

Avantco
Avantco 178MC34HC User manual

Avantco
Avantco 177SL612A User manual

Avantco
Avantco 178UDD378 User manual

Avantco
Avantco 177CU55ETL User manual

Avantco
Avantco 177CFD10 User manual

Avantco
Avantco 178UDD1HC User manual

Avantco
Avantco UDD1 User manual

Avantco
Avantco RG1812 User manual

Avantco
Avantco EX SUPER User manual