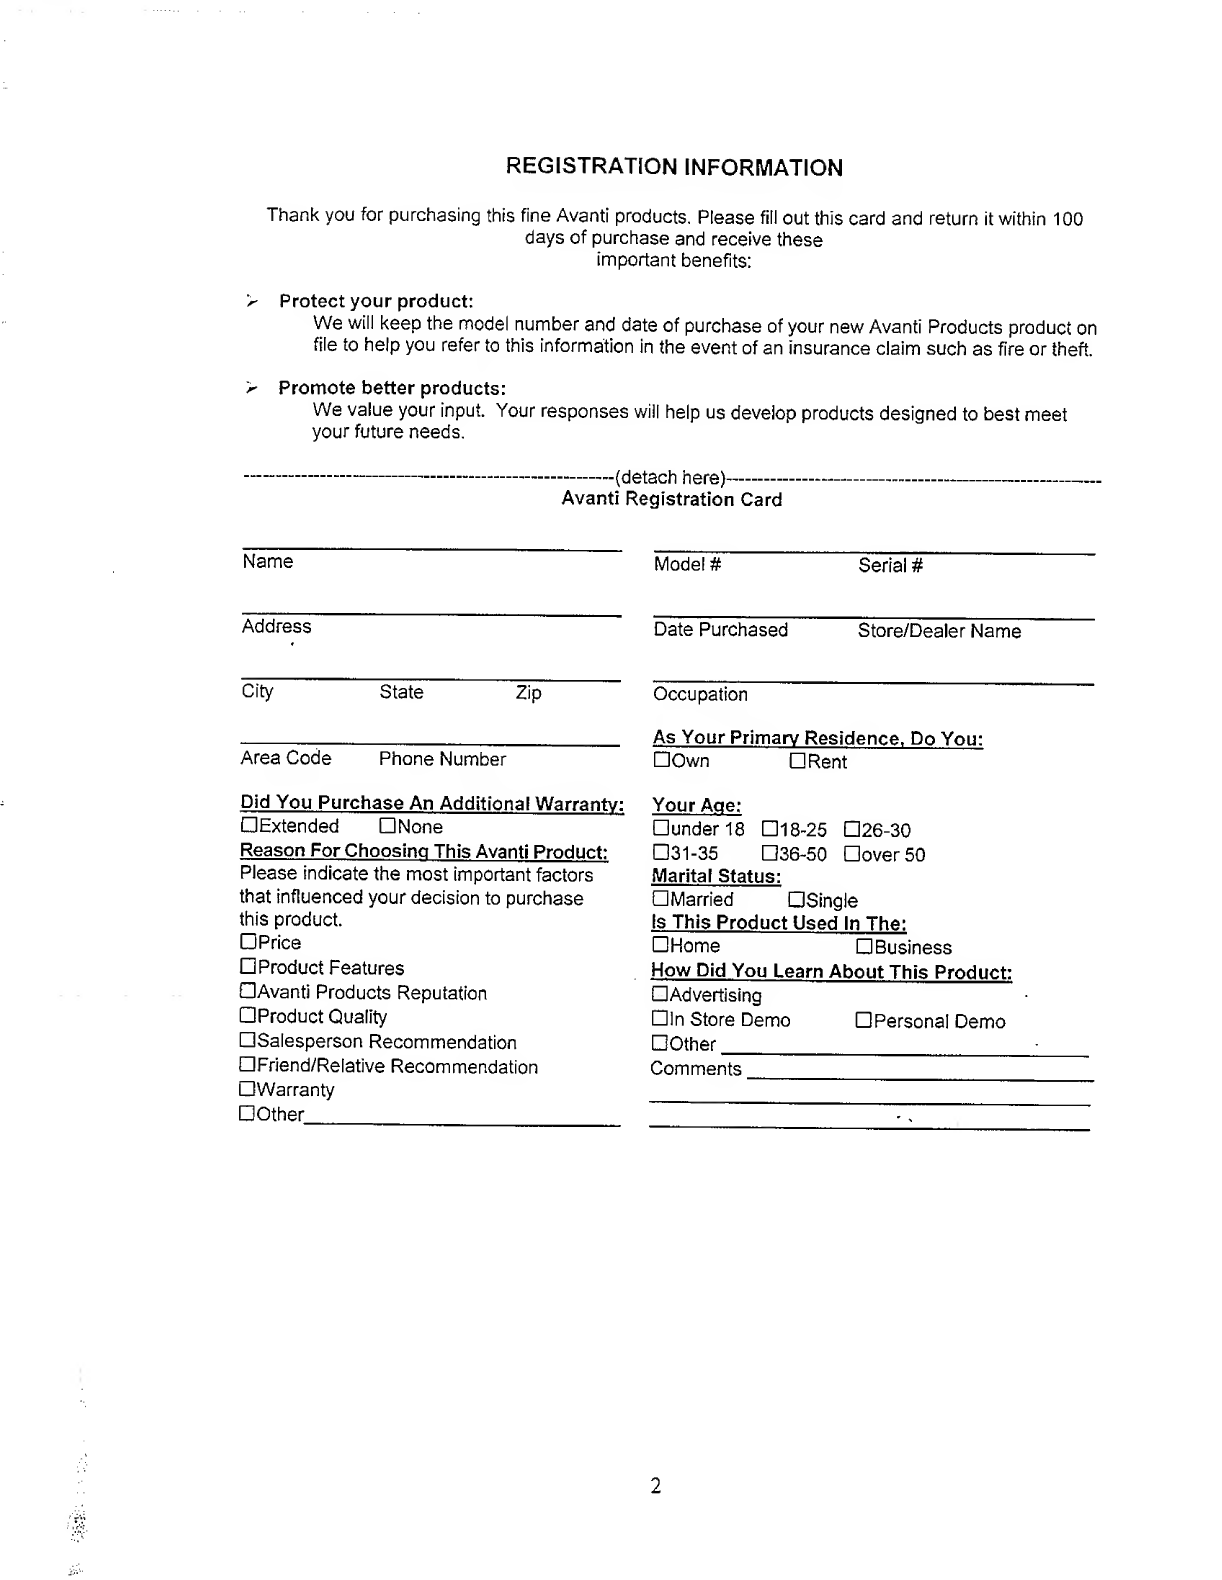
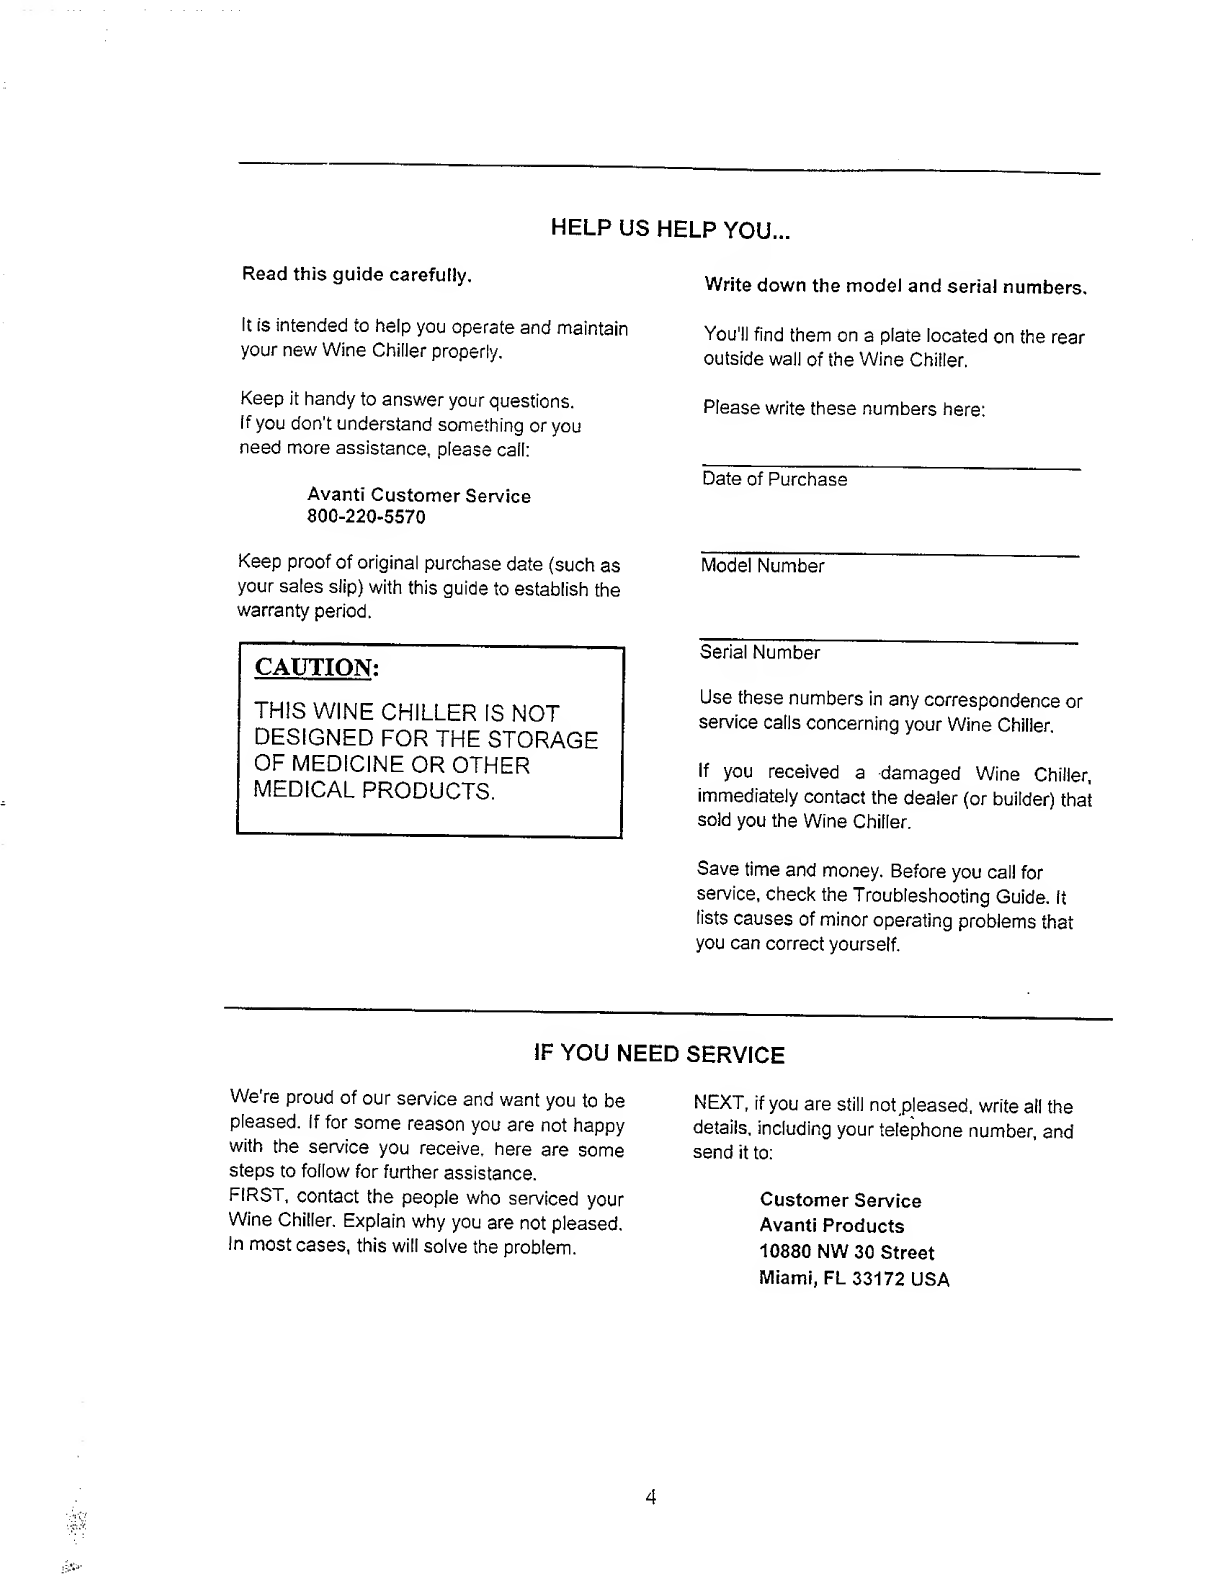
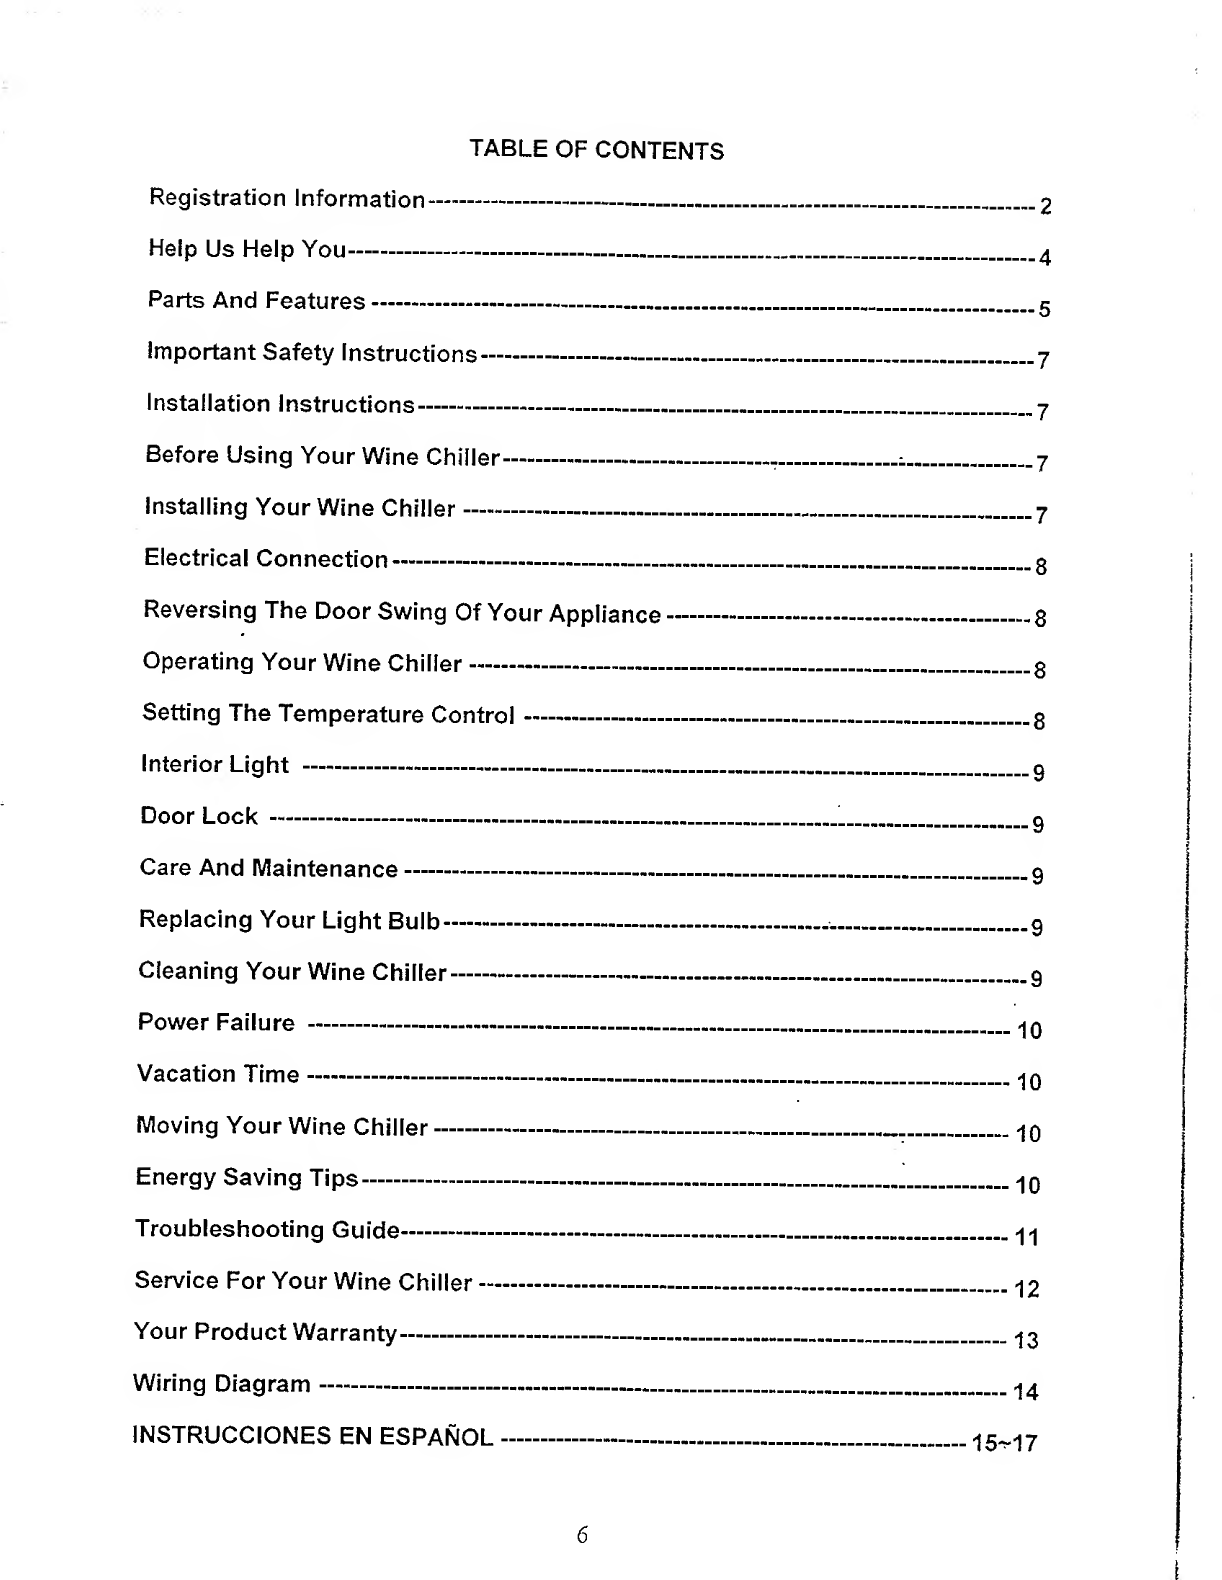
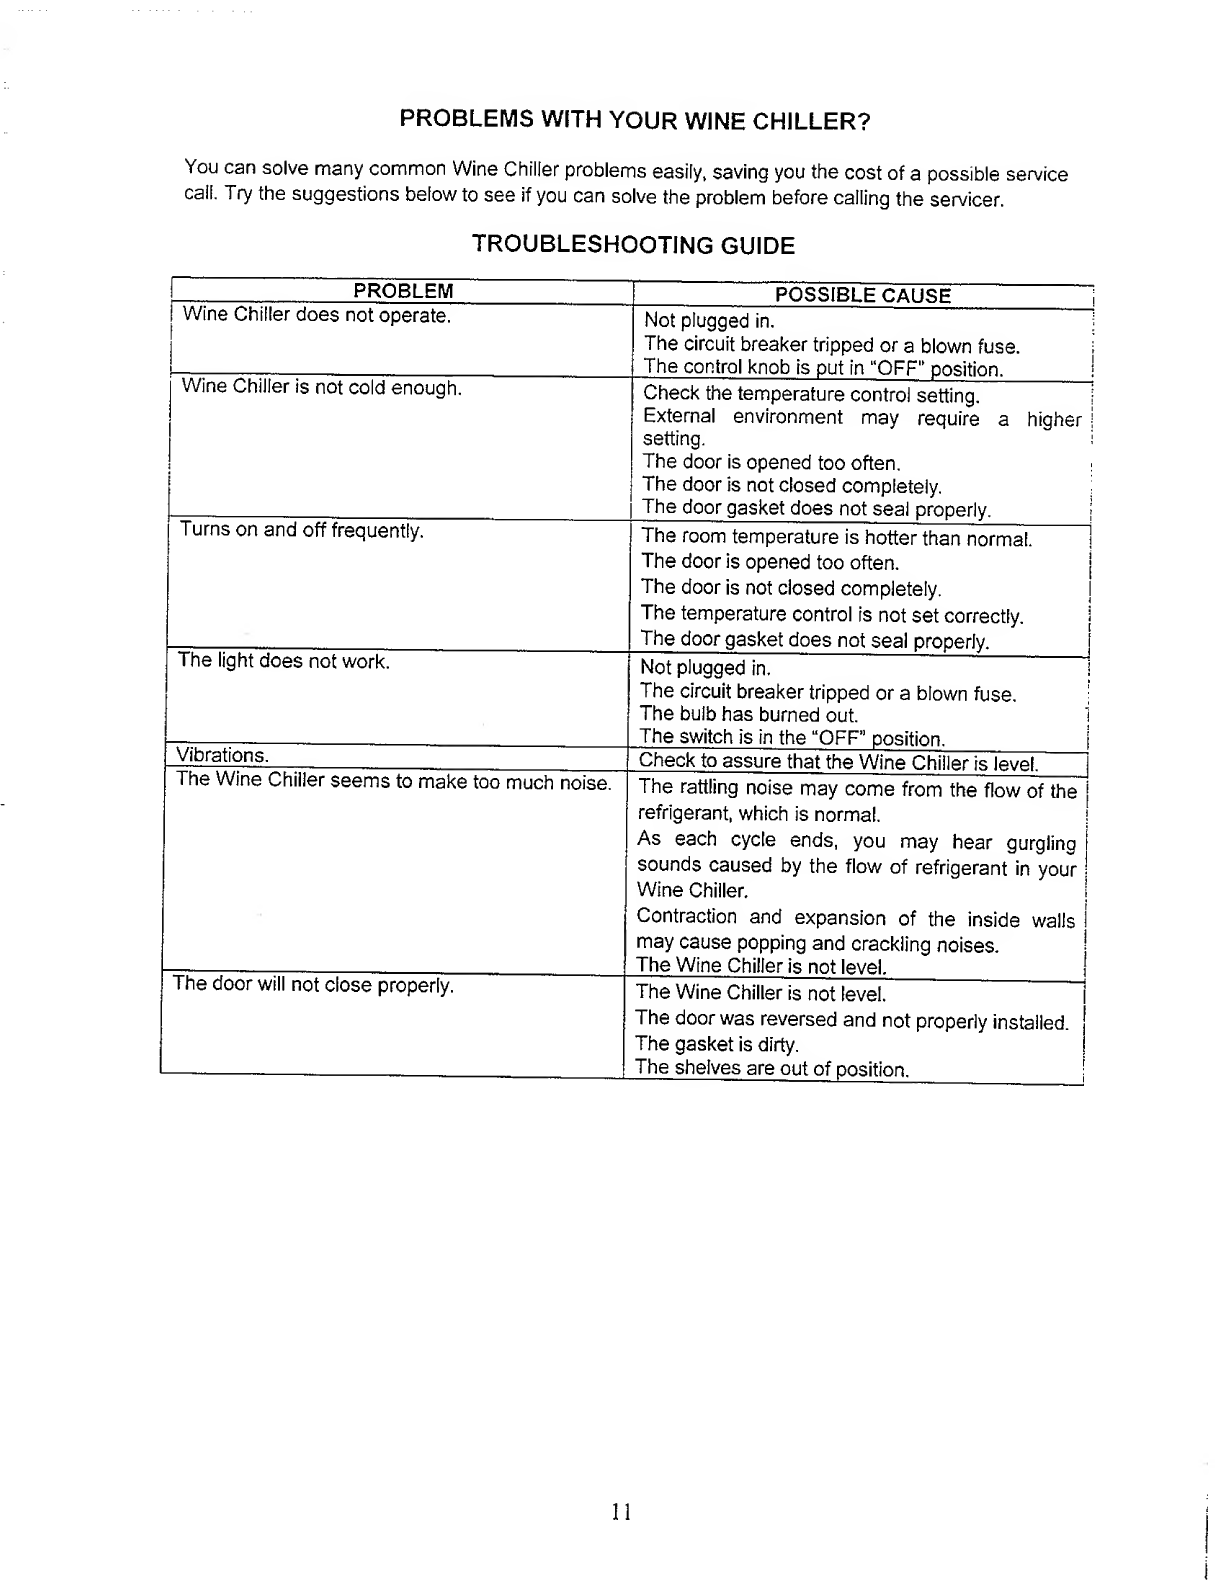
Avanti WC3200BG User manual

WINE
CHILLER
INSTRUCTION
MANUAL
MANUAL
DE
INSTRUCCIONES
Model
Number/
No.
de
Modelo:
WC3200BG
BEFORE
USE,
PLEASE
READ
AND
FOLLOW
ALL
SAFETY
RULES
AND
OPERATING
INSTRUCTIONS.
La
seccion
en
espanol
empieza
en
la
pagina
15.
Avanti
Products
has
a
policy
of
continuous
improvement
on
its
products
and
reserves
the
right
to
change
materials
and
specifications
without
notice.
Avanti
Products,
A
Division
of
The
Mackle
Co.,
Inc.
P.O.
Box
520604
-
Miami,
Florida
33152
www.avantiproducts.com

REGISTRATION
INFORMATION
Thank
you
for
purchasing
this
fine
Avanti
products.
Please
fill
out
this
card
and
return
it
within
100
days
of
purchase
and
receive
these
important
benefits:
>
Protect
your
product:
We
will
keep
the
model
number
and
date
of
purchase
of
your
new
Avanti
Products
product
on
file
to
help
you
refer
to
this
information
in
the
event
of
an
insurance
claim
such
as
fire
or
theft.
>
Promote
better
products:
We
value
your
input.
Your
responses
will
help
us
develop
products
designed
to
best
meet
your
future
needs.
-(detach
here)-
Avanti
Registration
Card
Name
Address
City
State
Zip
Area
Code
Phone
Number
Did
You
Purchase
An
Additional
Warranty:
□
Extended
DNone
Reason
For
Choosing
This
Avanti
Product:
Please
indicate
the
most
important
factors
that
influenced
your
decision
to
purchase
this
product.
□
P
r
ice
□
Product
Features
□
Avanti
Products
Reputation
□
P
r
oduct
Quality
□
S
alesperson
Recommendation
□
F
riend/Relative
Recommendation
□
W
arranty
□
O
ther_
Model
#
Serial
#
Date
Purchased
Store/Dealer
Name
Occupation
As
Your
Primary
Residence.
Do
You:
□
O
wn
DRent
Your
Age:
□
u
n
der
18
□
18-25
D26-30
□
3
1
-
35
Dse-SO
Dover
50
Marital
Status:
□
M
a
rried
DSingle
Is
This
Product
Used
In
The:
□
H
ome
^Business
How
Did
You
Learn
About
This
Product:
□
A
dvertising
□
in
Store
Demo
□
P
e
r
sonal
Demo
□
O
ther
__
Comments
_
2

HELP
US
HELP
YOU...
Read
this
guide
carefully.
It
is
intended
to
help
you
operate
and
maintain
your
new
Wine
Chiller
properly.
Keep
it
handy
to
answer
your
questions.
If
you
don't
understand
something
or
you
need
more
assistance,
please
call:
Avanti
Customer
Service
800-220-5570
Keep
proof
of
original
purchase
date
(such
as
your
sales
slip)
with
this
guide
to
establish
the
warranty
period.
CAUTION
:
THIS
WINE
CHILLER
IS
NOT
DESIGNED
FOR
THE
STORAGE
OF
MEDICINE
OR
OTHER
MEDICAL
PRODUCTS.
Write
down
the
model
and
serial
numbers.
You'll
find
them
on
a
plate
located
on
the
rear
outside
wall
of
the
Wine
Chiller.
Please
write
these
numbers
here:
Date
of
Purchase
Model
Number
Serial
Number
Use
these
numbers
in
any
correspondence
or
service
calls
concerning
your
Wine
Chiller.
If
you
received
a
damaged
Wine
Chiller,
immediately
contact
the
dealer
(or
builder)
that
sold
you
the
Wine
Chiller.
Save
time
and
money.
Before
you
call
for
service,
check
the
Troubleshooting
Guide.
It
lists
causes
of
minor
operating
problems
that
you
can
correct
yourself.
IF
YOU
NEED
SERVICE
We're
proud
of
our
service
and
want
you
to
be
pleased.
If
for
some
reason
you
are
not
happy
with
the
service
you
receive,
here
are
some
steps
to
follow
for
further
assistance.
FIRST,
contact
the
people
who
serviced
your
Wine
Chiller.
Explain
why
you
are
not
pleased.
In
most
cases,
this
will
solve
the
problem.
NEXT,
if
you
are
still
notpleased,
write
all
the
details,
including
your
telephone
number,
and
send
it
to:
Customer
Service
Avanti
Products
10880
NW
30
Street
Miami,
FL
33172
USA
4

PARTS
&
FEATURES
1.
Interior
light
2.
Chrome
Shelves
3.
Chrome
Basket
4.
Light
Switch
5.
Control
Knob
6.
Adjustable
Leg
7.
Security
Lock
8.
Handle
5

TABLE
OF
CONTENTS
Registration
Information--
Help
Us
Help
You--
4
Parts
And
Features--
Important
Safety
Instructions--
Installation
Instructions--
Before
Using
Your
Wine
Chiller---1_7
Installing
Your
Wine
Chiller--
Electrical
Connection--
Reversing
The
Door
Swing
Of
Your
Appliance-8
Operating
Your
Wine
Chiller--
Setting
The
Temperature
Control-3
Interior
Light
--
Door
Lock---9
Care
And
Maintenance--
Replacing
Your
Light
Bulb-..._9
Cleaning
Your
Wine
Chiller-9
Power
Failure
-
i
q
Vacation
Time-
i
q
Moving
Your
Wine
Chiller-
i
q
Energy
Saving
Tips--
Troubleshooting
Guide-n
Service
For
Your
Wine
Chiller-
1
2
Your
Product
Warranty--
Wiring
Diagram--
1
N
S
TRUCCIONES
EN
ESPANOL-15-17
6

IMPORTANT
SAFETY
INSTRUCTIONS
yWARNINGy
To
reduce
the
risk
of
fire,
electrical
shock,
or
injury
when
using
your
appliance,
follow
these
basic
precautions:
•
Read
all
instructions
before
using
the
Wine
Chiller.
j
•
DANGER
or
WARNING:
Risk
of
child
entrapment.
j
Child
entrapment
and
suffocation
are
not
problems
of
the
past.
Junked
or
abandoned
j
appliances
are
still
dangerous
...
even
if
they
will
“just
sit
in
the
garage
a
few
days”.
•
Before
you
throw
away
your
old
Wine
Chiller:
Take
off
the
doors.
Leave
the
shelves
in
place
so
that
children
may
not
easily
climb
inside.
j
•
Never
allow
children
to
operate,
play
with,
or
crawl
inside
the
appliance.
I
•
Never
clean
appliance
parts
with
flammable
fluids.
The
fumes
can
create
a
fire
j
hazard
or
explosion.
I
•
Do
not
store
or
use
gasoline
or
any
other
flammable
vapors
and
liquids
in
the
vicinity
of
this
or
any
other
appliance.
The
fumes
can
create
a
fire
hazard
or
explosion.
-Save
these
instructions-
INSTALLATION
INSTRUCTIONS
>
Before
Using
Your
Wine
Chiller
•
Remove
the
exterior
and
interior
packing.
•
Check
to
be
sure
you
have
all
of
the
following
parts:
•
6
Shelves
•
2
Keys
•
1
Basket
•
1
Handle
•
1
Instruction
Manual
•
Before
connecting
the
Wine
Chiller
to
the
power
source,
let
it
stand
upright
for
approximately
2
hours.
This
will
reduce
the
possibility
of
a
malfunction
in
the
cooling
system
from
handling
during
transportation.
•
Clean
the
interior
surface
with
lukewarm
water
using
a
soft
cloth.
•
Install
the
handle
on
the
left
side
of
the
door.
>
Installation
of
Your
Wine
Chiller
•
This
appliance
is
designed
to
be
recessed
or
built-in
(fully
recessed).
•
Place
your
Wine
Chiller
on
a
floor
that
is
strong
enough
to
support
it
when
it
is
fully
loaded.
To
level
your
Wine
Chiller,
adjust
the
front
adjustable
leg
at
the
bottom
of
the
unit.
•
Locate
the
Wine
Chiller
away
from
direct
sunlight
and
sources
of
heat
(stove,
heater,
radiator,
etc.).
Direct
sunlight
may
affect
the
acrylic
coating
and
heat
sources
may
increase
electrical
consumption.
Extreme
cold
ambient
temperatures
may
also
cause
the
unit
not
to
perform
properly.
•
Avoid
locating
the
unit
in
moist
areas.
•
Plug
the
Wine
Chiller
into
an
exclusive,
properly
installed-grounded
wall
outlet.
Do
not
under
any
circumstances
cut
or
remove
the
third
(ground)
prong
from
the
power
cord.
Any
questions
concerning
power
and/or
grounding
should
be
directed
toward
a
certified
electrician
or
an
authorized
Avanti
Products
service
center.
7

Electrical
Connection
/f'
Warning/^
Improper
use
of
the
grounded
plug
can
result
in
the
risk
of
electrical
shock.
If
the
power
cord
is
damaged,
have
it
replaced
by
an
authorized
Avanti
Products
service
center.
This
appliance
should
be
properly
grounded
for
your
safety.
The
power
cord
of
this
appliance
is
equipped
with
a
three-prong
plug
which
mates
with
standard
three
prong
wall
outlets
to
minimize
the
possibility
of
electrical
shock.
Plug
the
appliance
into
an
exclusive
properly
installed-grounded
wall
outlet.
Do
not
under
any
circumstances
cut
or
remove
the
third
(ground)
prong
from
the
power
cord.
Any
questions
concerning
power
and/or
grounding
should
be
directed
toward
a
certified
electrician
or
an
authorized
Avanti
Products
service
center.
This
appliance
requires
a
standard
115/120
Volts
A.C.
~/60Hz
electrical
outlet
with
three-prong
ground.
The
cord
should
be
secured
behind
the
appliance
and
not
left
exposed
or
dangling
to
prevent
accidental
injury.
Do
not
use
an
adapter
plug
with
this
appliance.
Do
not
use
an
extension
cord
with
this
appliance.
If
the
power
cord
is
too
short,
have
a
qualified
electrician
or
service
technician
install
an
outlet
near
the
appliance.
>
Reversing
the
Door
Swing
of
Your
Appliance
This
appliance
has
the
capability
of
the
door
opening
from
either
the
left
or
right
side.
The
unit
is
delivered
to
you
with
the
door
opening
from
the
left
side.
Should
you
desire
to
reverse
the
opening
direction,
please
call
service
for
reversal
instructions.
OPERATING
YOUR
WINE
CHILLER
>
Setting
the
Temperature
Control
•
To
control
the
internal
temperature,
adjust
the
control
dial
according
to
the
ambient
temperature
or
purpose
of
use.
•
The
first
time
you
turn
the
unit
on,
set
the
temperature
control
to
“MAX”
position.
•
The
settings
of
temperature
control
are
“OFF”,
"MIN”,
"NORMAL"
and
"MAX”.
After
20
minutes,
adjust
the
temperature
control
setting
to
“NORMAL”.
The
setting
of
"NORMAL"
should
be
appropriate
for
home
or
office
wine
chiller
use.
•
To
turn
the
Wine
Chiller
off,
turn
the
temperature
control
to
"OFF”.
NOTE:
•
Turning
the
temperature
control
to
“OFF"
position
stops
the
cooling
cycle,
but
does
not
shut
off
the
power
to
the
Wine
Chiller.
•
If
the
unit
is
unplugged,
power
lost,
or
turned
off,
you
must
wait
3
to
5
minutes
before
restarting
the
unit.
If
you
attempt
to
restart
before
this
time
delay,
the
Wine
Chiller
will
not
start.
•
The
range
between
“MIN"
and
“MAX"
is
from
45°F
to
65°F,
which
is
ideal
for
the
storage
of
wines.
It
is
recommended
you
install
the
Wine
Chiller
in
a
place
where
the
ambient
temperature
is
between
72-78
degrees
Fahrenheit.
If
the
ambient
temperature
is
above
or
below
recommended
temperatures,
8

the
performance
of
the
unit
may
be
affected.
For
example,
placing
your
unit
in
extreme
cold
or
hot
conditions
may
cause
interior
temperatures
to
fluctuate.
The
range
of
45-65
degrees
Fahrenheit
may
not
be
reached.
Recommended
temperatures
for
chilling
wine:
Degrees
Red
Wines:
60-65°
F
Dry/White
Wines
50-59°
F
Sparkling
Wines
45-49°
F
Rose
Wines
49-51°
F
Control
Position
MIN
NORMAL
MAX
NORMAL
The
above
temperatures
may
fluctuate
depending
on
whether
or
not
the
interior
bulb
is
on
or
off
or
whether
the
bottles
are
located
on
the
upper/middle
or
lower
section.
>
Interior
Light
You
can
turn
the
interior
light
on
or
off
by
the
light
switch.
^
Door
Lock
Your
unit
is
provided
with
a
lock
and
key
combination.
The
keys
are
located
inside
the
plastic
bag
that
contains
the
User’s
Guide.
Insert
the
key
into
the
lock
and
turn
it
counterclockwise
to
unlock
the
door.
To
lock
the
door
do
the
reverse
operation
making
sure
metal
pin
is
engaged
completely.
Remove
the
key
and
place
it
in
a
secure
place
for
safekeeping.
CARE
AND
MAINTENANCE
>
Replacing
Your
Light
Bulb
NOTE:
All
parts
removed
must
be
saved
to
do
the
replacement
of
the
light
bulb.
Before
removing
the
light
bulb,
either
unplug
the
appliance
or
disconnect
the
electricity
leading
into
the
appliance
at
the
main
power
supply.
Failure
to
do
so
could
result
in
electrical
shock
or
personal
injury.
•
Press
the
light
switch
to
the
“OFF"
position.
•
Remove
the
screw
"5”.
•
Remove
the
light
bulb
cover
“4”
by
pulling
the
bottom
end
of
the
light
bulb
cover
gently.
•
Unscrew
the
bulb
"
2
".
•
Replace
with
a
10-watt
bulb
that
is
the
same
shape
and
size.
•
Replace
the
light
bulb
cover
“4”
and
tighten
screw
"5".
1
-
Bulb
Holder
2-Bulb
3
-
Bulb
Holder
Case
4
4
-
Bulb
Cover
5
-
Screw
1
5
>
Cleaning
Your
Wine
Chiller
•
Turn
the
temperature
control
to
"OFF”,
unplug
the
appliance,
and
remove
all
items
including
shelves
and
basket.
•
Wash
the
inside
surfaces
with
a
warm
water
and
baking
soda
solution.
The
solution
should
be
about
2
tablespoons
of
baking
soda
to
a
quart
of
water.
•
Wash
the
shelves
and
basket
with
a
mild
detergent
solution.
9

•
Wring
excess
water
out
of
the
sponge
or
doth
when
cleaning
area
of
the
controls,
or
any
electrical
parts.
•
Wash
the
outside
cabinet
with
warm
water
and
mild
liquid
detergent.
Rinse
well
and
wipe
dry
with
a
clean
soft
cloth.
Power
Failure
Most
power
failures
are
corrected
within
a
few
hours
and
should
not
affect
the
temperature
of
your
appliance
if
you
minimize
the
number
of
times
the
door
is
opened.
If
the
power
is
going
to
be
off
for
a
longer
period
of
time,
you
need
to
take
the
proper
steps
to
protect
your
contents.
Vacation
Time
Short
vacations:
Leave
the
Wine
Chiller
operating
during
vacations
of
less
than
three
weeks.
Long
vacations:
If
the
appliance
will
not
be
used
for
several
months,
remove
all
items
and
unplug
the
power
cord.
Clean
and
dry
the
interior
thoroughly.
To
prevent
odor
and
mold
growth,
leave
the
door
open
slightly:
blocking
it
open
if
necessary.
Moving
Your
Wine
Chiller
•
Remove
all
items.
•
Securely
tape
down
all
loose
items
(shelves)
inside
your
appliance.
•
Turn
the
adjustable
leg
up
to
the
base
to
avoid
damage.
•
Tape
the
door
shut.
•
Be
sure
the
appliance
stays
secure
in
the
upright
position
during
transportation.
Also
protect
outside
of
appliance
with
a
blanket,
or
similar
item.
Energy
Saving
Tips
•
The
Wine
Chiller
should
be
located
in
the
coolest
area
of
the
room,
away
from
heat
producing
appliances,
and
out
of
the
direct
sunlight

PROBLEMS
WITH
YOUR
WINE
CHILLER?
You
can
solve
many
common
Wine
Chiller
problems
easily,
saving
you
the
cost
of
a
possible
service
call.
Try
the
suggestions
below
to
see
if
you
can
solve
the
problem
before
calling
the
servicer.
TROUBLESHOOTING
GUIDE
1
PROBLEM
POSSIBLE
CAUSE
|
Wine
Chiller
does
not
operate.
!
Not
plugged
in.
The
circuit
breaker
tripped
or
a
blown
fuse.
The
control
knob
is
put
in
“OFF"
position.
Wine
Chiller
is
not
cold
enough.
Check
the
temperature
control
setting.
External
environment
may
require
a
higher
setting.
The
door
is
opened
too
often.
:
The
door
is
not
closed
completely.
The
door
gasket
does
not
seal
properly.
i
Turns
on
and
off
frequently.
The
room
temperature
is
hotter
than
normal.
The
door
is
opened
too
often.
The
door
is
not
closed
completely.
The
temperature
control
is
not
set
correctly.
1
The
door
gasket
does
not
seal
properly.
The
light
does
not
work.
Not
plugged
in.
!
The
circuit
breaker
tripped
or
a
blown
fuse.
;
The
bulb
has
burned
out.
1
The
switch
is
in
the
“OFF”
position
Vibrations.
Check
to
assure
that
the
Wine
Chiller
is
level
|
The
Wine
Chiller
seems
to
make
too
much
noise.
The
rattling
noise
may
come
from
the
flow
of
the
refrigerant,
which
is
normal.
j
As
each
cycle
ends,
you
may
hear
gurgling
1
sounds
caused
by
the
flow
of
refrigerant
in
your
i
Wine
Chiller.
Contraction
and
expansion
of
the
inside
walls
1
may
cause
popping
and
crackling
noises.
The
Wine
Chiller
is
not
level.
The
door
will
not
close
properly.
The
Wine
Chiller
is
not
level.
!
The
door
was
reversed
and
not
properly
installed,
j
The
gasket
is
dirty.
The
shelves
are
out
of
position.
11

SERVICE
FOR
YOUR
WINE
CHILLER
We
are
proud
of
our
customer
service
organization
and
the
network
of
professional
service
technicians
that
provide
service
on
your
Avanti
appliances.
With
the
purchase
of
your
Avanti
appliance,
you
can
have
the
confidence
that
if
you
ever
need
additional
information
or
assistance,
the
Avanti
Products
Customer
Service
team
will
be
here
for
you.
Just
call
us
toll-free.
AVANT!
PRODUCTS
CUSTOMER
SERVICES
Product
Information
800-323-5029
Whatever
your
questions
are
about
our
products,
help
is
available.
Part
Orders
You
may
order
parts
and
accessories
that
will
be
800-220-5570
delivered
directly
to
your
home
by
personal
check,
money
order,
Master
Card,
or
Visa.
In-Home
Repair
Service
An
Avanti
Products
authorized
service
center
will
800-220-5570
provide
expert
repair
service,
scheduled
at
a
time
that
is
convenient
for
you.
Our
trained
servicers
know
your
appliance
inside
and
out.
12

Staple
your
sales
receipt
here.
Proof
of
original
purchase
date
Is
needed
to
obtain
service
under
warranty.
_
WHAT
1$
COVERED
LIMITED
ONE-YEAR
WARRANTY
For
one
year
from
the
date
of
purchase
by
the
original
owner,
Avanti
Products
will,
at
its
option,
repair
or
replace
any
part
of
the
unit,
which
proves
to
be
defective
in
material
or
workmanship
under
normal
use.
During
this
period
Avanti
Products
will
provide
all
parts
and
labor
necessary
to
correct
such
defects
free
of
charge,
so
long
as
the
unit
has
been
installed
and
operated
in
accordance
with
the
written
instructions
in
this
manual.
In
rental
or
commercial
use,
the
warranty
period
is
90
days.
All
Avanti
Appliances
of
3.5
cubic
feet
capacity
or
less
must
be
brought/sent
to
the
appliance
service
shop
for
repair.
LIMITED
SECOND
THROUGH
FIFTH
YEAR
WARRANTY
For
the
second
through
the
fifth
year
from
date
of
original
purchase,
Avanti
Products
will
provide
a
replacement
compressor
free
of
charge
due
to
a
failure.
You
are
responsible
for
the
service
labor
and
freight
charges.
In
rental
or
commercial
use,
the
limited
compressor
warranty
is
one
year
and
nine
months.
Cost
to
move
the
appliance
to
the
servicers’
shop
and
back
to
the
user’s
home,
as
may
be
required,
are
the
user’s
responsibility.
WHAT
IS
NOT
COVERED
•
Content
losses
of
food
or
other,
due
to
spoilage.
•
Incidental
or
consequential
damages.
•
Parts
and
labor
costs
for
the
following
will
not
be
considered
as
warranty:
•
Door
springs,
and/or
frames.
•
Inner
door
panels,
door
rails
and/or
door
supports.
•
Light
bulbs
and/or
plastic
housing.
•
Plastic
cabinet
liners.
•
Punctured
evaporator
that
voids
the
warranty
on
the
complete
sealed
system.
Repairs
performed
by
unauthorized
servicers.
Service
calls
that
do
not
involve
defects
in
material
or
workmanship
such
as
customer
education,
door
reversal,
or
proper
installation.
Service
calls
that
are
related
to
external
problems,
such
as
abuse,
misuse,
inadequate
electrical
power,
accidents,
fire,
floods,
or
acts
of
God.
Replacement
of
house
fuses
or
resetting
circuit
breakers.
Failure
of
the
product
if
it
is
used
for
other
than
its
intended
purpose.
This
warranty
does
not
apply
outside
the
Continental
USA.
13

-J
LU
Z
WIRING
DIAGRAM
THERMOSTAT
COMPRESSOR

INSTRUCCIONES
DE
SEGURIDAD
ATENCION
INSTRUCCIONES
PARA
LA
CONEXION
A
TIERRA
^Este
aparato
electrodomestico
debe
estar
conectado
a
tierra.
En
caso
de
un
cortocircuito
eiectrico.
la
jconexion
a
tierra
reduce
el
riesgo
de
choque
eiectrico
proporcionando
un
cable
a
tierra
con
una
[enchufe
de
conexion
a
tierra.
Este
enchufe
debe
estar
conectado
en
un
tomacorriente
instalado
jcorrectamente
y
conectado
a
tierra.
I
lADVERTENCIA
-
El
uso
inadecuado
del
enchufe
de
conexion
a
tierra
puede
resultar
en
un
riesgo
de
jchoque
eiectrico.
Consulte
con
un
electricista
o
persona
de
reparaciones
competente
si
no
jcomprenden
bien
las
instrucciones
de
conexion
a
tierra
o
si
existe
alguna
duda
sobre
si
el
aparato
lesta
conectado
a
tierra
correctamente.
NO
USE
UN
CORDON
DE
PROLONGACION
ELECTRICA
Use
un
tomacorriente
de
pared
exclusivo.
No
conecte
su
vinera
a
cordones
de
prolongacion
electrica
o
junto
a
cualquier
otro
electrodomestico
en
el
mismo
tomacorriente
de
pared.
ADVERTENCIA
IMPORTANTE:
Una
vinera
vacia
es
una
atraccion
muy
peligrosa
para
los
ninos.
Saque
todas
las
juntas,
pestillos,
tapas
o
puerta
de
todo
electrodomestico
que
no
este
en
uso,
o
tome
alguna
medida
para
asegurar
que
no
presente
peligro.
INSTRUCCIONES
DE
INSTALACION
Saque
los
embalajes
exteriores,
limpie
bien
el
exterior
con
un
pafio
suave
seco,
y
el
interior
con
un
pano
humedo
y
tibio.
Evite
colocar
la
vinera
cerca
de
una
fuente
de
calor,
luz
de
sol
directa,
o
lugar
humedo.
Ubicacion
1.
Seleccione
un
lugar
con
su'piso
fuerte
y
nivelado.
2.
Deje
una
pulgada
de
espacio
entre
la
parte
posterior
de
la
vinera
y
toda
pared
contigua.
3.
Evite
la
luz
directa
del
sol
o
calor.
La
luz
directa
del
sol
puede
afectar
la
capa
de
acrilico.
Las
fuentes
de
calor
en
su
proximidad
provocaran
un
consumo
mayor
de
eiectricidad.
OPERACION
Para
evitar
vibraciones,
el
compartimiento
interior
debe
estar
bien
nivelado.
Para
encender
la
vinera,
gire
e!
control
de
temperatura
a
la
posicion
que
corresponda
a
la
temperatura
deseada.
La
temperatura
variara
dependiendo
de
la
cantidad
de
botellas
almacenadas
y
la
frecuencia
con
que
se
abre
la
puerta,
Gire
el
control
a
la
posicion
"OFF"
(apagado)
para
desconectar
el
ciclo
de
enfriamiento.
Cuando
la
vinera
no
se
use
por
un
periodo
largo,
desconecte
el
enchufe
y
deje
la
puerta
entreabierta.
Nota:
Espere
entre
3
a
5
minutes
antes
de
volver
a
encender
si
el
funcionamiento
ha
sido
interrumpido.
15

DISCO
DEL
TERMOSTATO:
(Instalado
en
la
parte
superior)
Para
controlar
la
temperature
dentro
del
refrigerador
para
vinos.
•
La
primera
vez
que
encienda
la
unidad,
gire
el
control
a
la
posicion
’’MAX".
•
Despues
de
20
minutos,
mueva
el
control
a
la
posicion
"NORMAL".
•
Para
apagarlo,
gire
el
control
a
la
posicion
"OFF".
Se
recomienda
que
Ud
coloque
su
vinera
en
un
lugar
donde
la
temperatura
ambiental
se
mantenga
entre
23-25
grados
centigrados.
Si
la
temperatura
ambiental
oscila
afuera
de
esos
limites,
pueda
afectar
la
temperatura
de
la
caja.
Por
ejemplo.
si
su
unidad
esta
situada
en
lugares
donde
hay
temperaturas
muy
frias
o
calientes
tambien
puede
afectar
la
temperatura
de
la
caja.
Si
la
bombilia
interior
esta
siempre
encendida,
la
temperatura
de
la
caja
estara
mas
elevada.
Temperaturas
recomendadas
para
enfriar
vinos:
GRADOS
POSICION
CONTROL
Vinos
secos:
10
-
14°
C
NORMAL
Vinos
rosados:
9.5-10.5°
C
NORMAL
Vinos
tintos:
14.5-18°
C
MIN
Vinos
espumosos:
7
-
9°
C
MAX
Luz
interior
La
luz
interior
se
controla
manualmente
y
no
funciona
al
abrir
ni
cerrar
la
puerta.
Para
prender
la
luz,
presione
el
interruptor
manual
de
la
luz,
ubicado
en
la
rejilla
delantera
debajo
de
la
puerta
de
vidrio.
Cerradura
de
la
puerta
Su
unidad
viene
equipada
con
una
combinacion
de
cerradura
y
Have.
Las
Haves
(2)
estan
dentro
de
la
bolsa
plastica
junto
al
manual
de
instrucciones.
Introduzca
la
Have
en
la
cerradura
y
girela
hacia
la
izquierda
para
abrir
la
puerta.
Para
cerrarla,
gire
la
Have
hacia
la
derecha.
Quite
la
Have
y
coloquela
en
un
lugar
seguro
para
evitar
que
se
pierda.
Desconqelacion
Su
refrigerador
para
vinos
ha
sido
disenado
con
un
sistema
de
descongelacion
de
“ciclo
automatico".
Las
superficies
refrigeradas
del
compartimiento
para
vinos
se
descongela
automaticamente,
durante
el
ciclo
“apagado”
del
control
de
enfriamiento
(termostato).
El
agua
descongelada
del
compartimiento
es
eliminada
automaticamente,
encauzandola
hacia
una
bandeja
de
goteo
ubicado
en
el
compresor.
La
transferencia
de
calor
del
compresor
evapora
el
agua.

MANT
ENIMIENTO^^ill^^
'""V
Limpieza
Para
limpiar
el
interior,
use
un
pano
suave
con
una
solucion
de
una
cucharada
de
bicarbonato
de
sodio
por
cada
cuarto
de
agua,
o
una
solucion
de
espuma
de
jabon
suave,
o
un
detergente
suave.
Para
lavar
las
rejillas,
s^quelas
deslizandolas
con
cuidado,
y
use
una
solucion
de
detergente
suave;
luego
sequelas
con
un
pano
suave.
Limpie
el
exterior
con
un
pano
humedo
suave
y
un
poco
de
detergente
suave
o
productos
de
limpieza
para
electrodomdsticos.
Periodo
de
vacaciones
Para
periodos
cortos
de
vacaciones,
deje
los
controles
en
la
posicion
normal.
Durante
ausencias
mas
largas;
(a)
saque
todas
las
botellas,
(b)
desconecte
la
vinera
del
tomacorriente,
(c)
limpie
bien
el
refrigerador
para
vinos,
(d)
deje
la
puerta
abierta
para
evitar
la
formacion
de
condensacion,
moho
u
olores.
Corte
de
corriente
La
mayoria
de
los
cortes
de
corriente
se
corrigen
en
una
o
dos
horas
y
no
afectaran
las
temperaturas
de
su
vinera
para
vinos.
Sin
embargo,
Ud.
debera
reducir
la
cantidad
de
veces
que
abra
la
puerta
cuando
la
corriente
este
apagada.
Durante
los
cortes
de
corriente
de
larga
duracion,
tome
medidas
para
proteger
sus
alimentos.
Si
Ud.
se
muda
Saque
o
asegure
todos
los
articulos
dentro
de
su
vinera.
Para
evitar
que
los
tornillos
nivelantes
se
averfen,
girelos
completamente
hacia
la
base.
Cambio
de
la
bombilla
Para
cambiar
la
bombilla
del
com
parti
mien
to
interior;
Saque
el
tornillo
que
sujeta
el
protector
de
la
bombilla;
saque
el
protector.
Reemplace
la
bombilla.
NOTA:
La
bombilla
no
debe
excederde
10
vatios,
Vuelva
a
colocar
el
protector
de
la
bombilla.
Coloque
nuevamente
el
tornillo
que
sujeta
la
cubierta.
Algunas
reglas
importantes
para
el
uso
correcto
de
la
vinera.
•
Las
bebidas
se
deben
guardar
en
botellas
cerradas.
•
No
sobrecargue
el
compartimiento
interior.
•
No
abra
la
puerta
a
menos
que
sea
necesario.
•
Si
la
vinera
se
guardara
sin
uso
por
periodos
largos,
se
sugiere
que,
luego
de
una
limpieza
cuidadosa,
se
deje
la
puerta
entreabierta
para
permitir
que
el
aire
circule
dentro
de
la
caja
y
evitar
una
posible
formacion
de
condensacion,
moho
u
olores.
•
Nunca
cubra
los
estantes
del
compartimiento
para
vinos
con
papel
de
aluminio
o
cualquier
otro
material
para
cubrir
estantes
que
puedan
obstruir
la
circulation
del
aire.
17
Other manuals for WC3200BG
1
Table of contents
Other Avanti Wine Cooler manuals

Avanti
Avanti WCR683DZD-1 User manual

Avanti
Avanti WC31 User manual

Avanti
Avanti WBV19DZ User manual

Avanti
Avanti EWC16B User manual

Avanti
Avanti WC1001 User manual

Avanti
Avanti WCR5449SS User manual

Avanti
Avanti WC1000 User manual

Avanti
Avanti EWC18N2PD User manual

Avanti
Avanti WC681BG-2 User manual

Avanti
Avanti WCR682SS-1 User manual

Avanti
Avanti WCR5403SS User manual

Avanti
Avanti WC34TM User manual

Avanti
Avanti WC34T2P User manual

Avanti
Avanti SWBC250D User manual

Avanti
Avanti SWC2801 User manual

Avanti
Avanti WCR683DZD User manual

Avanti
Avanti WCR683DZD-2 User manual

Avanti
Avanti EWC28 User manual

Avanti
Avanti WCR4600S User manual

Avanti
Avanti WCR5104DZD User manual