manuals.online logo
Brands
  1. Home
  2. •
  3. Brands
  4. •
  5. Avaya
  6. •
  7. IP Phone
  8. •
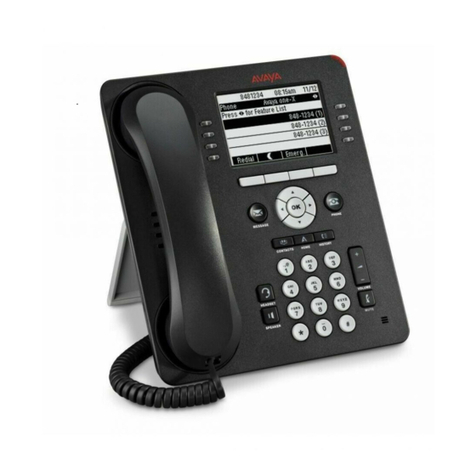
  9. Avaya one-X 9620C User manual

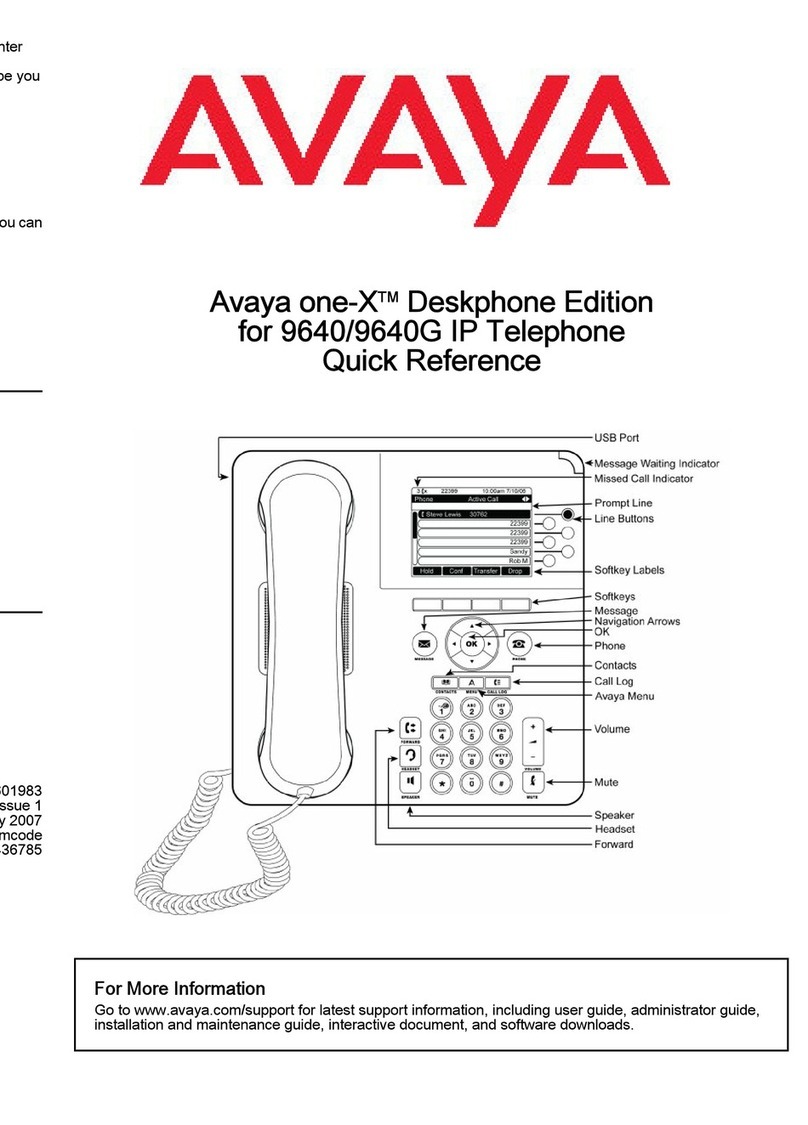
Avaya one-X 9620C User manual

Navigation tips
Anavigation icon appears in the telephone display to indicate that you can scroll to more options
or information. Use the up and down navigation arrows to scroll up or down through lists; holding
either arrow for a few seconds produces a fast scroll. Use the right and left navigation buttons to
move between the Phone screen and Features list, or the Features list and the System Numbers
list.
When you scroll to a line on the display, that line is selected.
Avaya Menu
You can use theAvaya Menu to adjust and customize options and settings for your telephone,
access additional Web-based applications, get information about your phone and network settings,
and log out. When you press the Avaya Menu button, you see one of the following menus,
depending on how your administrator has set up your system and on the applications available to
you:
• Options & Settings...
• Browser...
• Network Information...
• About Avaya one-X
• Log Out
Options & Settings lets you change your call settings, personalize button labels, adjust brightness
and contrast, select your ringing pattern, set up favorites, assign speed dial entries, and more.
The Browser menu contains additional web-based applications. (If no web applications are
available for your phone, the Browser menu is not shown.)
Network Information shows a summary of network-related parameters for your phone and provides
diagnostic information. If your administrator has set up Web applications, this option appears under
the Phone Settings menu instead.
About Avaya one-X provides the release number of your telephone software.
Log Out lets you sign off the phone, to protect your settings or to allow another user to log in.
Making an emergency call
You do not have to be logged in to make an emergency call. If emergency calling was set up by
your system administrator, the Phone screen has an Emergency softkey to immediately connect
you with a preset emergency services number.
When the EMERG softkey is pressed, the phone dials the default emergency number stored in
PHNEMERGNUM. parameter of the settings file.
Your system administrator can configure the PHNMOREEMERGNUMS parameter in the settings
fileforyourextensionwithtenadditional emergency numbers.Ifauserdialsanyoneofthe specified
emergency numbers, the deskphone will handle the call as an emergency call even if the telephone
is in the locked or unregistered state.
Avaya recommends that for phones connected to SES, only one emergency number should be
defined. For use with third-party gateways, refer the relevant Application Notes for necessary
provisioning to enable the configuration.
Important:
Duringtelephone failover (switchingbetween telephonesystem servers duringa systemfailure)
the Emergency softkey may not be available until your telephone is connected with an alternate
server, usually within several seconds.
1. Press the Emerg. softkey.
2. If the deskphone prompts "Do you want to make an emergency call?", press the Yes
softkey.
Some call servers will call back to confirm the emergency status. The phone automatically
answers the incoming call on the Speaker by going off hook.
3. To end the emergency call, press the End Call softkey or press the Speaker button.
Speed dialing a person
On the Phone screen, press and briefly hold the dialpad key assigned to the person you want
to call. Or, if speed dial numbers are assigned to a button module attached to your phone, press
the button assigned to the person you want to call.
Putting a call on hold
1. Press Phone to view the main Phone screen, if necessary.
2. If you are not active on the line you want to put on hold, select that line.
3. Press Hold.
Note:
The phone might display a hold timer when you put a call on hold.
4. Press Resume or the line button of the held call to retrieve the call. Your system
administratormay have administeredthe Hold Recall feature, whichalerts you visuallyand
with a priority ring to remind you of a held call after a certain period of time.
Transferring a call
1. FromthePhonescreen,ifthecalltobetransferredis notalreadyactive(highlighted),select
the line on which the call to be transferred appears.
2. Press Transfer.
3. Dial the telephone number, or call the person from the Contacts list, or call the person
from the Call Log list.
4. If unattended transfers have been administered, you can hang up now if you do not want
to announce the call. Otherwise, press Complete or OK.
Note:
Unanswered transfers may be returned to your telephone as a recalled transfer. In this
case, you hear a priority ring and see the display message Return next to the call.
Using the conference feature
Setting up a conference call
1. From the Phone screen, select your active call.
2. Press Conf.
3. Dial the telephone number, or call the person from the Contacts list, or call the person from
the Call Log list.
4. When the person answers, press Join or OK to add the person to the existing call.
5. Press Add and repeat these steps to add another person to the conference call.
Adding a person on hold to a conference call
1. From the Phone screen, select your active call.
2. Press Conf, or Add if you are already in a conference.
3. Select the call on hold that you want to add to the conference.
4. Press Resume to take the call off hold.
5. Press Join or Conf to add the person to the conference call.
About Features
In addition to the Features menu, your administrator might also provide selected features on
softkeys on the call appearance (Phone) screen. Frequently used features can also be set up on
the Quick Touch panel, if the panel is activated. For more information about what features and
options are available for your extension, contact your system administrator.
Accessing the Features menu
1. From the Phone screen, use the navigation button and scroll to the right side to access the
Features menu.
The icon next to a feature indicates the feature is available, the icon next to a feature
indicates the feature is activated, and the icon next to a feature indicates the feature
is not available. For models with LEDs, the LED next to the feature name indicates if the
feature is currently on or off. If the light is on, the feature is on.
Toreturntothe mainPhonescreen,press Phoneorscrolltothe left.Scrollingrightdisplays
the System Numbers menu screen; scrolling right again displays the Phone screen.
2. Scroll down to see the features that have been administered for your extension.
The green LED next to the Feature button indicates if the feature is currently on or off. If
the light is on, the feature is on. The red LED next to the Feature button blinks while the
feature label is displayed on the screen.
Send All Calls
You can also turn Send All Calls on or off by using the telephone Features list.
1. From the Phone screen, scroll right to access the Features menu.
2. Select Send All Calls.
3. Press Select or OK to turn Send All Calls on or off.
Contacts
You can save up to 250 names and up to 6 telephone numbers per name.
Note:
If you press the Contacts button and nothing happens, your system administrator has disabled
the button and its functionality. In this case, you cannot add, edit or delete any existing contacts.
However you can view the existing contact entries.
Searching for a contact
You can search for a person using the full (first and last) name, a partial first and/or last name, a
first or last name only, or any combination of full or partial first or last name. When on-hook dialing
is disabled, you can also jump to a certain group of letters in your contact list by pressing the
associated dial pad key. For example, if you press "3" the contact list displays entries starting with
3, D, E or F depending on your particular contact entries.
1. Press the Contacts button.
2. Press the More softkey.
3. Press the Search softkey.
4. Enter the person's full or partial first name if desired.
To enter the last name only, skip this step and the next and scroll down to the Last Name
field.
5. Press the OK softkey.
6. Enter the person's full or partial last name.
7. Press the Search softkey or the OK button to start searching the Contact list.
8. If more than one contact is found, scroll through the search results using the up or down
arrow.
9. Press the Call softkey to call the person or press the +Contact softkey to edit contact
information.
Extended searching
1. Press Contacts.
2. Search.
3. Use the to enter all or part of the first and last name of the person you want to call.
4. Search to start the search.
5. If the search displays the name and number of the person you want, select the line on
which that person appears and press the appropriate softkey:
•Callto dial that person's number.
•Details to see detail information on this person.
•+Contacts to add this person to your Contacts list.
•Cancel to return to the Search screen.
6. If the search does not locate the person you want, press Cancel and use this procedure
to perform a different search. For example, if you entered a partial first and/or last name,
enter the name in its entirety and search again.
Calling a person from the contacts list
You can call a contact in your contacts list by touching the name in the list.
1. Press the Contacts button.
2. Select the person or number you want to call.
3. Locate the contact you want to call by typing the name of the person as listed.
For example, if you added John Smith to your contacts List as “Smith, John”, start typing
his last name rather than his first name. Each time you press the dialpad, the list display
shifts to match your input. Alternately, you can scroll up or down to locate the contact.
4. Press Call or OK.
Adding a new contact
1. Press Contacts.
2. Press New.
3. Enter the first and last name using the dialpad.
4. Select the next field.
5. Enter the number.
6. Select the next field.
7. To know the presence information for this person select Yes on the Track Presence field.If
presence information is available for this person, presence icons will subsequently appear
next to this person's name/number on the Phone or Contact screen.
8. Select the type of number entered (Work, Home, Mobile, Track Presence).
9. Press Primary if applicable.
The primary number is the one that will always display without having to go into contact
details.
10. If you have another number for this contact, select the next field and repeat from step 5.
You can add up to five additional numbers for this contact, but you can designate only one
number as primary.
11. Press Save or OK.
Editing a contact
1. Press Contacts.
2. Search for and select the contact you want to edit.
3. Press More > Edit.
4. Choose the field you want to edit.
5. Use the dialpad and softkeys to make changes to the contact information.
6. Press Save or OK.
Call Log
Calling a person from the call log
1. Press the Call Log button.
2. Scroll to the left or right to view a separate list of all calls, missed (unanswered) calls,
answered calls, or outgoing calls.
3. Scroll up or down to select the person or number you want to call.
4. Select the person or number you want to call.
5. Press the Call softkey or the OK button.
Adding an entry from the call log to your contacts list
1. Press Call Log.
2. Select the number you want to add to your Contacts list.
3. Press +Contact.
4. Edit the name and telephone number, if necessary.
5. Press Save.
Changing the language
1. Press Avaya Menu.
2. Select Options & Settings...
3. Press Select or OK.
4. Select Language & Region.
5. Press Select or OK.
6. Select Language.
7. Press Select or OK.
8. Select a display language.
9. Press Select or OK.
10. Press Yes to confirm the selected language.
For more information
Gotowww.avaya.com/support forlatestsupportinformation,includingtheuserguide, administrator
guide, installation and maintenance guide, interactive document, and software downloads.
16-601947
Issue 6
March 2012
Avaya one-X®Deskphone SIP for 9620/9620C/
9620L IP Telephones Release 2.6.7 Quick
Reference Guide

Other manuals for one-X 9620C

1

This manual suits for next models

2

Other Avaya IP Phone manuals

Avaya IP Office 9608 Installation and operating instructions

Avaya

Avaya IP Office 9608 Installation and operating instructions

Avaya ONE-X 1608 User manual

Avaya

Avaya ONE-X 1608 User manual

Avaya one-X 9600 Series Product manual

Avaya

Avaya one-X 9600 Series Product manual

Avaya 1140E Reference guide

Avaya

Avaya 1140E Reference guide

Avaya IP Office 2402 User manual

Avaya

Avaya IP Office 2402 User manual

Avaya E169 User manual

Avaya

Avaya E169 User manual

Avaya IP OFFICE 2410 User manual

Avaya

Avaya IP OFFICE 2410 User manual

Avaya J129 User manual

Avaya

Avaya J129 User manual

Avaya one-X Quick Edition Manual

Avaya

Avaya one-X Quick Edition Manual

Avaya IP Office 5420 + EU24 User manual

Avaya

Avaya IP Office 5420 + EU24 User manual

Avaya IP Office 9608 User manual

Avaya

Avaya IP Office 9608 User manual

Avaya J100 Series User manual

Avaya

Avaya J100 Series User manual

Avaya 9650 Deskphone Edition User manual

Avaya

Avaya 9650 Deskphone Edition User manual

Avaya 1616 User manual

Avaya

Avaya 1616 User manual

Avaya IP Office 9608 User manual

Avaya

Avaya IP Office 9608 User manual

Avaya IP Office Phone Manager User manual

Avaya

Avaya IP Office Phone Manager User manual

Avaya 9601 User manual

Avaya

Avaya 9601 User manual

Avaya IP Office 4.2 User manual

Avaya

Avaya IP Office 4.2 User manual

Avaya Application Solutions Quick reference guide

Avaya

Avaya Application Solutions Quick reference guide

Avaya 7316E User manual

Avaya

Avaya 7316E User manual

Avaya IP Office Phone Manager User manual

Avaya

Avaya IP Office Phone Manager User manual

Avaya 4625SW User manual

Avaya

Avaya 4625SW User manual

Avaya 5601 User manual

Avaya

Avaya 5601 User manual

Avaya 4620 User manual

Avaya

Avaya 4620 User manual

Popular IP Phone manuals by other brands

Escene WS118 user manual

Escene

Escene WS118 user manual

Mitel MiVoice 5360 Quick reference guide

Mitel

Mitel MiVoice 5360 Quick reference guide

Grandstream Networks Grandstream GXP-1200 Quick installation guide

Grandstream Networks

Grandstream Networks Grandstream GXP-1200 Quick installation guide

Cisco 7925G - Unified Wireless IP Phone VoIP Administration guide

Cisco

Cisco 7925G - Unified Wireless IP Phone VoIP Administration guide

SoundPoint IP 430 quick start guide

SoundPoint

SoundPoint IP 430 quick start guide

Cisco 8851 quick start guide

Cisco

Cisco 8851 quick start guide

Hybertone EP-8201 user manual

Hybertone

Hybertone EP-8201 user manual

Escene ES205 user manual

Escene

Escene ES205 user manual

Snom uc600 quick start guide

Snom

Snom uc600 quick start guide

Federal Signal Corporation I-IPTEL1 manual

Federal Signal Corporation

Federal Signal Corporation I-IPTEL1 manual

Nec Casio DT700 user manual

Nec Casio

Nec Casio DT700 user manual

Mitel 6863i user guide

Mitel

Mitel 6863i user guide

Gigaset DE700 IP PRO user manual

Gigaset

Gigaset DE700 IP PRO user manual

Aastra 6753I Quick reference guide

Aastra

Aastra 6753I Quick reference guide

Binatone Smart 63 instructions

Binatone

Binatone Smart 63 instructions

Mitel USER GUIDE 8662 user guide

Mitel

Mitel USER GUIDE 8662 user guide

LG-Nortel 8820/30 Quick start user guide

LG-Nortel

LG-Nortel 8820/30 Quick start user guide

Grandstream Networks GXV-3140 Technical specifications

Grandstream Networks

Grandstream Networks GXV-3140 Technical specifications

manuals.online logo
manuals.online logoBrands
  • About & Mission
  • Contact us
  • Privacy Policy
  • Terms and Conditions

Copyright 2025 Manuals.Online. All Rights Reserved.