Avaya one-X 4610SW User manual

MICHIGAN STATE UNIVERSITY
Telecommunication Systems
Avaya
Campus
PBX
Avaya 4610 SW
User Guide

MICHIGAN STATE UNIVERSITY
Avaya 4610 SW Telephone User Guide
Michigan State University
Telecommunication Systems
W110 Public Safety
East Lansing, MI 48824-1219
Phone 517.353.5515 • Fax 517.353.6633
Email [email protected]
Website www.telecom.msu.edu
August 2009

3
Table of Contents
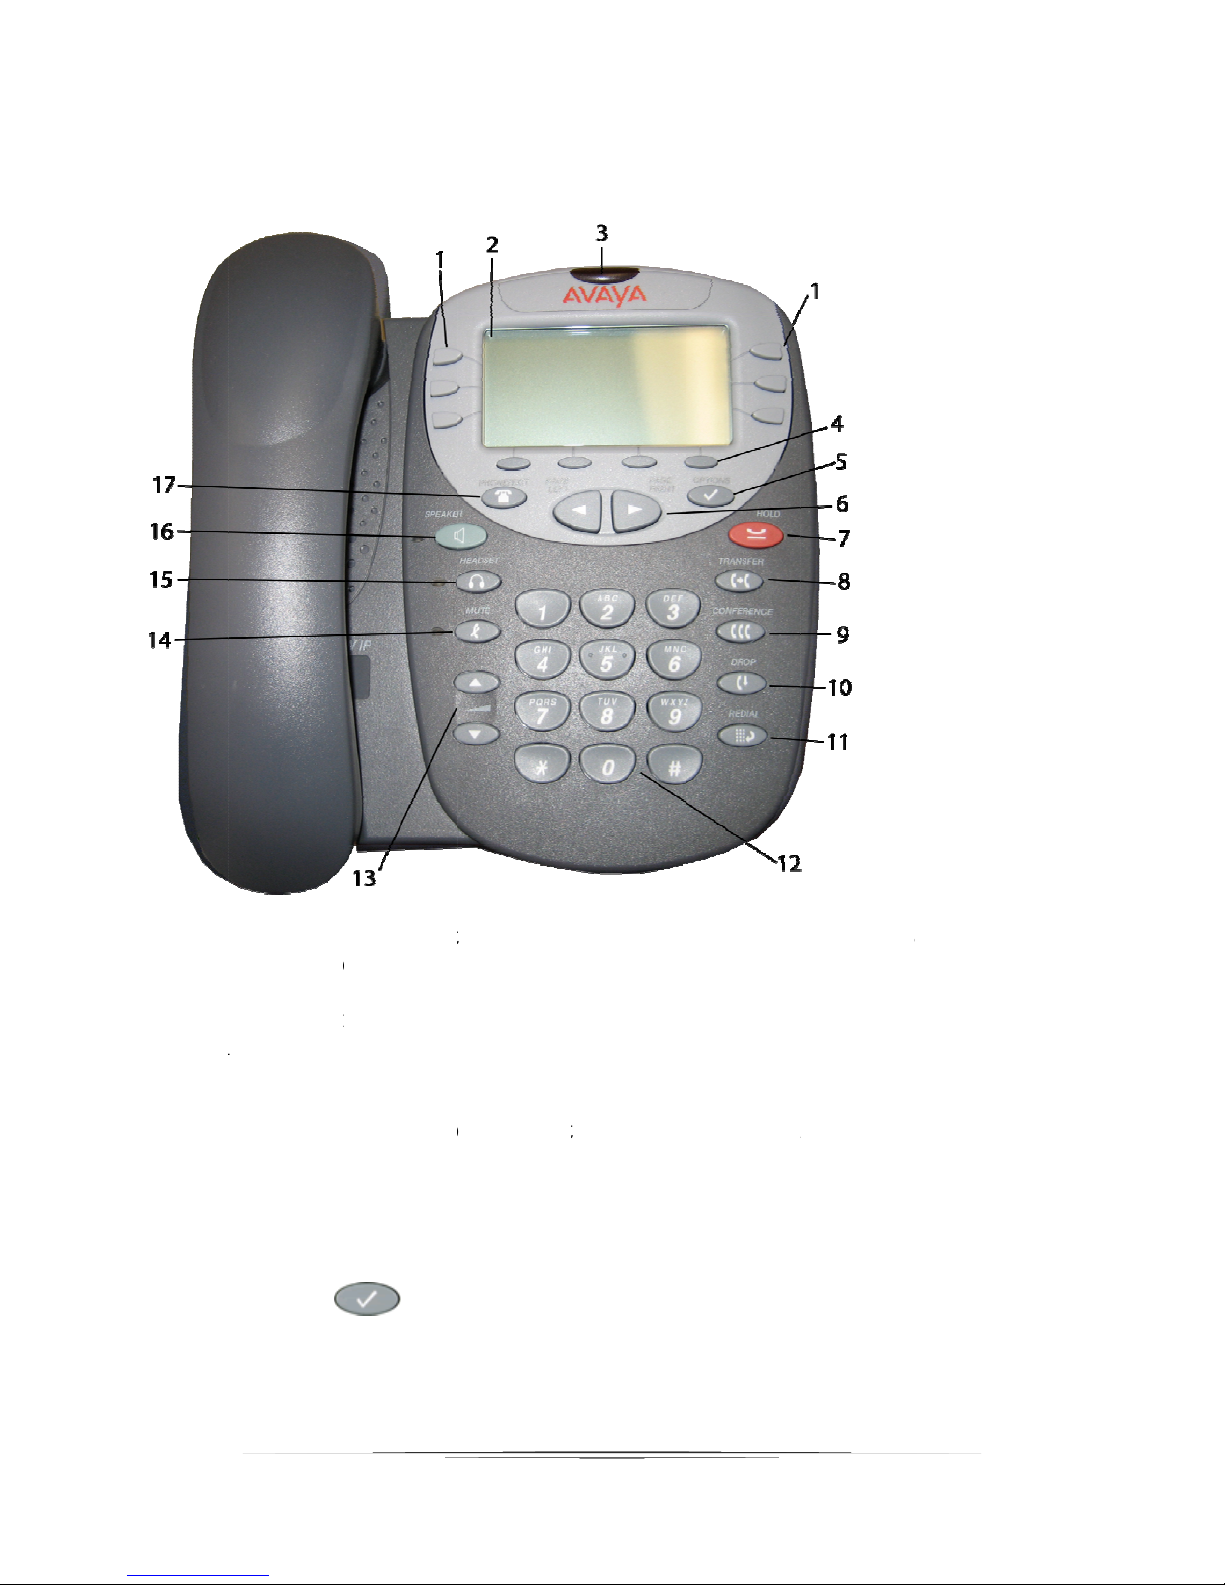
TelephoneComponents............................................................................................................................4
CallAppearanceandCallIdentificationDisplays......................................................................................7
DialingInstructions...................................................................................................................................7
StatusIcons...............................................................................................................................................8
Answer,Place,andEndaCall...................................................................................................................9
Redial......................................................................................................................................................10
Speakerphone.........................................................................................................................................10
Hold.........................................................................................................................................................11
Transfer...................................................................................................................................................11
Conference..............................................................................................................................................12
SpeedDial...............................................................................................................................................12
WorkingintheSpeedDialScreen...........................................................................................................13
AbbreviatedDialing.................................................................................................................................17
Options....................................................................................................................................................18
CallLog....................................................................................................................................................20
TheCallLogSummaryScreen.................................................................................................................20
WorkingintheCallLogScreens..............................................................................................................21
Message..................................................................................................................................................24
SendAllCalls...........................................................................................................................................24
CallForwardingAllCalls..........................................................................................................................25
CallPark...................................................................................................................................................25
CallPickup...............................................................................................................................................26
BridgedAppearance................................................................................................................................26
Directory.................................................................................................................................................26
DialIntercom...........................................................................................................................................27
LabelAction.............................................................................................................................................27

Telep
1) Call
a
features.
2) Displ
a
provide
d
3) Mess
a
system.
T
4) Softk
e
the corre
softkey l
a
5) Optio
applicati
o
hone C
o
a
ppearance
/
An undersc
o
ay
— This a
r
d
by the Ava
y
ag
e lamp
—
T
his indicat
o
ey
s— Thes
e
sponding s
o
a
bels, press
ns button
o
n settings
c
o
mpon
e
/
feature bu
t
o
re indicate
s
r
ea shows s
t
y
a call serv
e
—
When lit, i
n
o
r can also
b
e
keys allo
w
o
ftkey labels
any softkey
.
— D
i
c
an be updat
e
nts
t
tons — For
s
the curren
t
t
atus for the
e
r, and the
H
n
dicates yo
u
b
e optioned
t
w
you to per
fo
change acc
o
.
i
splays the
fi
ed.
4
accessing i
n
t
ly selected
c
call appear
a
H
ome, Speed
u
have a mes
t
o flash for i
n
fo
rm specifi
c
o
rding to th
e
fi
rst Options
n
coming/ou
t
c
all appeara
n
a
nces, infor
m
Dial, Call
L
sage waitin
g
n
coming ca
l
c
functions.
T
e
screen dis
p
main scree
n
t
going lines
a
n
ce.
m
ation for a
c
L
og, and Op
t
g
on your v
o
l
ls.
T
he functio
n
p
layed. To i
n
n
, from whic
a
nd progra
m
c
all, inform
a
t
ions screen
s
o
ice messagi
n
n
s available
n
itially view
h display a
n
m
med
a
tion
s
.
n
g
and
n
d

5
6) Arrow keys — Depending on the current screen display, you can use these keys to
move between screen pages, to cycle through Call Log and Speed Dial entries, and to move the
cursor during data entry.
7) Hold button — Red button used to place a call on hold.
8) Transfer button — Transfers a call to another phone.
9) Conference button — Sets up conference calls with more than one other person.
10) Drop button — Drops the last person added to a Conference call or ends the current
call, if you are not on a Conference call.
11) Redial button — Redials the last number dialed from the phone or displays a list of
the last three numbers dialed for selection. Set using the Options button.
12) Dialpad — Standard 12-button pad for dialing telephone numbers.
13) Volume control buttons — For adjusting speaker, handset, headset, or ringer volume
depending on which component is in use.
14) Mute button — For turning off the microphone (handset, headset, or speaker).
When the Mute feature is active, the person at the other end of the call cannot hear you.
15) Headset button — For activating a headset connected to the 4610 headset jack.
16) Speaker button — For accessing the built-in two-way speakerphone.
17) Phone/Exit button — Pressing this button returns you to the Home screen.

6
Navigating Application Screens
Your telephone uses telephone Feature buttons, Line/Feature buttons, and softkeys for maximum
flexibility in operating the telephone and working with its applications.
Telephone Feature buttons are used in the Phone Application and appear on the face of the
telephone around the dialpad. Telephone buttons have an icon on the top to indicate the button
function. These buttons provide mostly call-handling features like:
•Transfer,
•Conference,
•Hold, and
•Redial.
Two additional telephone Feature buttons are:
•Phone/Exit - used to exit call-related features and restore the Phone screen to the
display, and
•Options - used to access the Options function to set certain telephone parameters
and view telephone/server/connection status and other information for troubleshooting.
The Page Left and Page Right buttons between the Phone/Exit and Options buttons are
also considered telephone buttons. Use the Right Arrow to move forward or the Left Arrow to
move backward from one display screen to another. These paging buttons work in conjunction
with the paging indicators ( ) you might see on an application screen. Paging indicators show
that a screen has more than one page, and help you navigate forward and back through those
additional pages.
To activate the function or feature represented by a telephone button, just press the appropriate
button.
Line/Feature buttons ( ) appear on both sides of the display area. These buttons provide call
appearance Lines and other call-related features in the Phone Applications. Line/Feature buttons
also serve as application-specific buttons in the Call Log or other applications. For example,
pressing a Line/Feature button in the Call Log Application selects the corresponding entry, so
you can take further action with your selection. When you enter text on a screen, for example
labeling a Speed Dial button, several Line/Feature buttons provide editing features like
backspacing or hyphenation.
To Press
Move between screens or

7
Return to Page 1 of the Home
screen at any time
Call Appearance and Call Identification Displays
Your telephone has six call appearance/feature buttons per screen page. Beginning with the first
button in the upper left corner of the telephone and going down, the display identifies the buttons
in the left column. These buttons are considered call appearance/feature buttons 1 through 3. On
the display, these buttons are identified by default labels a, b, c, etc., where arepresents call
appearance/feature button 1. The buttons in the right column run from 4 through 6.
When you receive or make calls, the available call identification information is displayed where
the date and time appear when the telephone is idle. For example, when you dial an extension,
that number is shown and then replaced by the called party’s name and extension. The call
identification information associated with an extension is provided by the call processing system.
When a call is received from another extension, the caller’s name is shown; when a call is
received from outside, the calling number (if available), “OUTSIDE CALL,” or a trunk identifier
is shown.
One call appearance is usually underlined. When a call arrives at the telephone, the ringing icon
blinks on the corresponding call appearance. After you answer the call, the active call icon is
displayed.
Dialing Instructions
To dial a/an: Dial:
Campus number The last 5-digits of the number.
Local number “8” plus the 7-digit number.
Domestic long distance number “8” plus “1” plus the area code plus the 7-digit number.
International long distance number “8” plus “011” plus the number.
Toll free number “8” plus “1” plus 800/866/877/888 plus the 7-digit
number.

8
Emergency “911”.
University Operator “0”.
Status Icons
The icons displayed on the call appearance/feature buttons of your telephone are explained in the
following table.
Icon Definition
Ringing An incoming call is waiting to be answered.
Active The call you are currently handling. If you have a
bridged call appearance on your telephone, this icon will
appear when that appearance is active.
On hold A call currently on hold.
On soft hold A call put on hold during a transfer or conference.
Phone Application
The Phone Application is the primary application. Use this application to make and receive calls.
Also use this application to perform call-handling operations like conference calls or transferring
calls to another telephone.
Speed Dial Application
The Speed Dial Application provides access to Speed Dial buttons, which facilitate automatic
dialing. Use this application to:
•set up buttons for speed dialing,
•update Speed Dial button labels, or
•remove the label from a Speed Dial button.

9
Call Log Application
The Call Log Application provides three lists, each showing up to 15 outgoing, incoming
answered or missed calls. Use this application to:
•call a person directly from the Call Log, or
•add the name and telephone number of a log entry to a Speed Dial button.
Web Access Application
The Web Access Application provides access to Web pages reachable through links from a
Home page and connected pages. This application is optional. Your System Administrator must
specifically administer the Web Access Application for your business environment. Depending
on the Home page links available, you can browse Corporate intranet sites or browse the World
Wide Web.
Telephone Options
Access the Options function using the Options ( ) button below and to the right of the
display area. Using Options menus, you set certain telephone parameters, such as:
•display area contrast,
•how you want the Redial button to work,
•when you want your saved information backed up or restored,
•the language in which the telephone displays information, or
•how you want your Feature buttons labeled.
Answer, Place, and End a Call
Toansweranincomingcall:
1. When a call arrives at your telephone, you hear a ringing tone and a blinking bell icon
appears on the associated call appearance. In addition, call identification information is
displayed.
If you are not active on another call, answer the call using your handset, headset, or
speakerphone.
If you are active on a call already, place the active call on hold, and then answer the
incoming call.

10
If the call appearance for the ringing call is not displayed on the current Home screen
page, use the Arrow keys to switch between the pages. Use the Exit
button to return to the Home screen. When you locate the call appearance for the ringing
call, press the corresponding call appearance button.
Tomakeacallmanually:
1. Go off hook using the handset, headset, or speaker.
2. When you hear dial tone, enter the extension or telephone number using the dialpad.
Note: If you are calling an off-campus number, be sure to dial “8” first to access an
outside line.
Redial
Toredialthelastnumberthatyoudialed:
1. Press the Redial button.
oThe last number or URI dialed is automatically redialed.
Toredialusingalistofthelastthreenumberscalled:
1. Press the Redial button.
oThe Redial screen displays the last three numbers or URIs dialed.
oThe prompt “Select number to dial.” appears on the top of the display line.
1. Press the Line/Feature button associated with the number you want to redial.
1. If the call can be dialed, the telephone displays the Phone screen.
2. The selected number dials automatically.
Speakerphone
Tomakeoransweracallwithoutliftingthehandset,ortousethespeakerphonewithany
feature:
1. Press the Speaker button.
2. Make or answer the call, or access the selected feature.
3. Adjust speakerphone volume if necessary.

11
Tochangefromtheheadsettothespeakerphone:
1. Press the Speaker button.
Tochangefromthehandsettothespeakerphone:
1. Press the Speaker button.
2. Hang up the handset.
Tochangefromthespeakertothehandset:
1. Pick up the handset and talk.
Toendaspeakerphonecall:
1. Press the Speaker button again.
Hold
Toputacallonhold:
1. Press the Hold button.
Toreturntotheheldcall:
1. Press the call appearance button of the held call.
Transfer
Totransferthecurrentcalltoanotherextension:
1. While on a call, press the Transfer button. The current call is placed on hold.
2. When you hear dial tone, dial the number to which the call is to be transferred.

12
3. When it rings on the other end, press the Transfer button again. Or, when the
party answers, announce the call, explain that you are transferring a call, and then hang
up.
4. If the line is busy or if there is no answer, press the Drop button. Then, you can
return to the held call by pressing its call appearance button. This procedure can be used
if voicemail answers the transferred call. Repeat the transfer and hang up after the first
ring.
Conference
Toaddanotherpartytoacall:
1. While on a call, Press the Conference button. The current call is placed on hold.
2. When you hear dial tone, dial the number of the person you want to add to the call.
3. Wait for an answer. Explain that you are setting up a conference call.
4. To add the person to the call, press the Conference button again. The parties in
the conference are now able to talk to each other.
5. Repeat Steps 1 through 4 for each additional conference party.
6. To be included in the conference call, press the Conference button.
Toaddaheldcalltoanactivecall:
1. Press the Conference button.
2. When you hear dial tone, press the call appearance button corresponding to the held call.
3. Press the Conference button again.
Toremovethelastpersonaddedtotheconferencecall:
1. Press the Drop button.
Speed Dial
Using the Speed Dial screen, you can store up to 48 speed dial entries in the personal directory of
your telephone. You can access this screen by pressing the SpDial softkey at the Home screen.
(You may have to press any one of the softkeys to display the softkey labels.)

13
When you have created a speed dial list, the Speed Dial screen displays the saved entries in
alphabetical order. A single page displays six entries. You can make a call directly from this
screen by pressing the button associated with a displayed entry.
The figure below shows a sample Speed Dial screen.
In addition to placing calls from the Speed Dial screen, you can add entries, delete entries, and
make changes to saved entries in your personal speed dial list using the softkeys displayed at the
bottom of the screen.
Working in the Speed Dial Screen
To Press
Place a call to a displayed entry
and return to the current Home
screen
The button associated with the entry
Scroll through pages of speed
dial entries
Use the index feature to locate
a specific entry quickly
Press keys 2 through 9 to locate entries beginning
with the letters that correspond to these keys. For
example, press 3 to locate the first entry that begins
with the letter “D.”
Add an entry to the speed dial
list The Add softkey
Change information stored in
the speed dial list The Edit softkey

14
Delete an entry from the speed
dial list The Delete softkey
Return to the Home screen in
which you were working
previously
The Done softkey
Return to the Home screen at any time
Toaddspeeddialentriestoyourpersonaldirectory:
1. If the softkey labels are not displayed, press any softkey button to display the softkey
labels.
2. Press the SpDial softkey.
3. Press the Add softkey.
4. Using the dialpad, enter the name for your speed dial entry. You can enter up to 13
characters.
Note: Keep in mind that each time you press a key on the dialpad, the alphabetic
character associated with the key is shown on the screen display. In some cases, you may
need to press the same key repeatedly to select other alphabetic characters. For example,
to enter “Jack:”
oPress 5for “J.” This first letter is automatically entered as an uppercase letter. All
of the following characters in the word appear in lowercase.
oPress 2for “a.” Then, press the Right Arrow key to advance the cursor.
oPress 2three consecutive times for “c.”
oPress 5twice for “k.”
Note that you must use the Right Arrow key if the next character you want to enter
uses the same key as the character you just entered (for example, the characters “a” and
“c” are both entered using the 2key).
5. When you are finished entering a name, press the Done softkey.
6. If you want to add a telephone number, use the dialpad to enter the number of the person
for whom you are establishing a Speed Dial button. You can enter numbers up to 20
characters long, including special characters.
Note: It is important that you observe the following conventions as you enter speed dial
numbers:

15
oYou must include the code required to access an outside line (for example, “8”)
for external telephone numbers.
oYou can use the Pause softkey to insert a 1.5-second pause. It is often useful to
include a pause (or series of pauses) in beeper/pager numbers to allow a paging
system enough time to answer.
oYou can use the Hyphen softkey to insert hyphens between segments of a
telephone number (for example, “9-732-555-1212”). The hyphen may make the
number easier for you to read but does not affect dialing.
7. If you want to add a URI, press the URI softkey.
oThe Speed Dial URI Entry screen displays the prompt "Use dialpad to enter
URI.".
8. Use the dialpad to enter the URI of the person for whom you are establishing a Speed
Dial button.
9. Press the Done softkey.
oThe telephone displays the Speed Dial Field Selection screen.
10. Verify that the name and number/URI entered are correct.
11. When you are finished entering the telephone number, do one of the following:
To save your entries and return to the Speed Dial screen, press the Save softkey.
To continue without saving your entries, press the Cancel softkey.
To return to the Home screen without saving your entries, press the Phone/Exit
button.
12. Repeat Steps 3 through 11 to add more entries.
TomakeacalltoapersonaldirectoryentryusingtheSpeedDialfeature:
1. If the softkey labels are not displayed, press any softkey button to display the softkey
labels.
2. Press the SpDial softkey.
3. Press the button next to the entry you want to call. (If the entry you want is not displayed
on the current page, use the Arrow keys to cycle through the entries.)
oThe telephone dials the number/URI for you.
Toeditstoredspeeddialentries:
1. If the softkey labels are not displayed, press any softkey button to display the softkey
labels.

16
2. Press the SpDial softkey.
3. Press the Edit softkey.
Note: You can use the Arrow keys or the index feature to locate the entry you
want to edit.
4. Press the Line/Feature button associated with the button you want to update.
5. If you want to change the name, press the Line/Feature button next to the Name: field.
oUse the Left Arrow softkey or the Right Arrow softkey to move the cursor to
the right of the character(s) to be changed. Press the Backspace button to remove
the character(s) and reenter the character(s).
Note: The Name field allows up to 13 characters.
6. If you want to change the telephone number, press the Line/Feature button next to the
Number: field.
oUse the Left Arrow softkey or the Right Arrow softkey to move the cursor to
the right of the character(s) to be changed. Press the Backspace button to remove
the character(s) and reenter the character(s).
Note: The Number field allows up to 24 characters.
7. If you want to change the URI, press the URI: softkey.
oUse the Left Arrow softkey or the Right Arrow softkey to move the cursor to
the right of the character(s) to be changed. Press the Backspace button to remove
the character(s) and reenter the character(s).
Note: The URI field allows up to 256 characters.
8. Press the Done softkey.
oThe telephone displays the Speed Dial Field Selection screen.
Note: Pressing Delete while in the Name or Number field deletes the entire Speed Dial
label. Alternately, pressing Cancel at any time returns you to the Speed Dial Main screen
without updating the label.
9. When you are finished making changes, do one of the following:
To save your entries and return to the Edit screen, press the Save softkey.
To return to the Edit screen without saving your entries, press the Cancel softkey.
To return to the Home screen without saving your entries, press the Phone/Exit
button.

17
10. Repeat Steps 3 through 9 to edit more entries.
Todeletestoredspeeddialentries:
1. If the softkey labels are not displayed, press any softkey button to display the softkey
labels.
2. Press the SpDial softkey.
3. Press the Delete softkey.
4. Press the feature button corresponding to the entry you want to delete.
Note: If the entry you want to delete is not displayed on the current screen page, use the
Arrow keys to cycle through the speed dial list. You can also use the index
feature to move to the page containing the entry.
oThe prompt “Press delete again to confirm.”.
5. Visually verify that you want to delete that name and number or URI.
Note: If you want to cancel the deletion without removing this Speed Dial button, press
Cancel. No deletion occurs and the telephone displays the Speed Dial Main screen.
6. Do one of the following:
To delete the selected entry, press the Delete softkey.
To return to the Delete screen without deleting the entry, press the Cancel softkey.
To return to the Home screen without deleting the entry, press the Phone/Exit
button.
7. Repeat Steps 3 through 6 to delete more entries.
Abbreviated Dialing
Allows you to store internal and external telephone numbers for quick, one button dialing.
ToprogramorreprogramanADbutton:
1. Dial the AD Program access code *0.
2. Press the call appearance button next to the button to be programmed.
3. Dial the telephone number you want to store (including 8 + 1 + area code when
necessary).
4. Press #.
5. Wait for confirmation tone.

18
6. If you want to program another button, repeat Steps 1 through 4.
7. To end programming, hang up.
TocallanumberusinganADbutton
1. Press the AD button to automatically dial the stored number.
Options
The Options screen allows you to personalize your options such as ring pattern, contrast control,
call log setup and visual ringing.
A sample Options screen is shown in the figure below.
To Press
Select an option The associated button
Return to the Home screen in
which you were working
previously
The Done softkey
Return to the Home screen at any time
Toselectapersonalizedringingpattern:
1. If the softkey labels are not displayed, press any softkey button to display the softkey
labels.
2. Press the Option softkey.

19
3. Press the Ring Options feature button.
4. Press the Ring Pattern feature button.
5. Use the Arrow keys or the dialpad to cycle through all eight ringing patterns.
Note: To listen to a specific ring pattern, press the Play softkey for a selected ring pattern
number.
6. Do one of the following:
If you want to save the ringing pattern that you have just selected, press the Save softkey.
You will hear a confirmation tone, and you are returned to the Options screen.
If you want to return to the Options screen without changing the ring pattern, press the
Cancel softkey.
If you want to return to the Home screen without changing the ring pattern, press the
Phone/Exit button.
Toselectacontrastlevel:
1. If the softkey labels are not displayed, press any softkey button to display the softkey
labels.
2. Press the Option softkey.
3. Press the Contrast feature button.
4. Use the Arrow keys to adjust the level of contrast.
5. Do one of the following:
To return to the Options screen, press the Done softkey.
To return to the Home screen, press the Phone/Exit button.
TospecifythecalltypesthatyouwanttoappearintheCallLog:
1. If the softkey labels are not displayed, press any softkey button to display the softkey
labels.
2. Press the Option softkey.
3. Press the Log Setup feature button.
4. Press Yes/No softkey to indicate which types of calls you want to appear in the Call Log.
5. Do one of the following:

20
If you want to save the selections that you have just made, press the Save softkey. You
will hear a confirmation tone, and you are returned to the Options screen.
If you want to return to the Options screen without saving your entries, press the Cancel
softkey.
If you want to return to the Home screen without saving your entries, press the
Phone/Exit button.
TosettheVisualRingoption:
1. If the softkey labels are not displayed, press any softkey button to display the softkey
labels.
2. Press the Option softkey.
3. Press the Ring Options feature button.
4. Press the Flash Message Lamp feature button.
5. Press the Yes/No softkey to indicate whether you want Visual Ring enabled.
6. Do one of the following:
If you want to save the setting you just selected, press the Save softkey. You will hear a
confirmation tone, and you are returned to the Options screen.
If you want to return to the Options screen without changing the setting, press the Cancel
softkey.
If you want to return to the Home screen without changing the setting, press the
Phone/Exit button.
Call Log
Your telephone can store up to 48 entries in the Call Log. By default, all types of calls are
logged, and the number of new unanswered calls is displayed below the date and time on your
telephone.
The Call Log Summary Screen
The Call Log Summary screen, which is accessed by pressing the Log softkey on the Home
screen, displays the call identification information when available.
Each page of the Call Log Summary screen can display three entries. You can use and
to page through all logged calls.
Other manuals for one-X 4610SW
9
Table of contents
Other Avaya Telephone manuals

Avaya
Avaya IP Office 9608 User manual

Avaya
Avaya 3606 User manual

Avaya
Avaya 700500205 User manual

Avaya
Avaya 3725 User manual

Avaya
Avaya one-X 9621G User manual

Avaya
Avaya one-X Quick Edition User manual

Avaya
Avaya 6201 User manual

Avaya
Avaya J159 User manual

Avaya
Avaya IP OFFICE 2410 User manual

Avaya
Avaya IP500 User manual

Avaya
Avaya IP OFFICE 2420 User manual

Avaya
Avaya Definity 8410D User manual

Avaya
Avaya T7316 User manual

Avaya
Avaya TAS FreiTel-IP Supplement

Avaya
Avaya IP Telephones User manual

Avaya
Avaya 4610 User manual

Avaya
Avaya IP OFFICE 2420 Manual

Avaya
Avaya Definity 6211 User manual

Avaya
Avaya one-X 9621G User manual

Avaya
Avaya 1408 User manual