AVF 1040700 Manual

CNL454-E Leaflet No. / No. de folleto 466043 rev 00
English language / Idioma Español
Read through ALL instructions before commencing installation.
If you have any questions about this product or issues with installation contact
the customer services help line before returning this product to the store.
See www.cmx.avfgroup.com for installation video
Lea todas las instrucciones antes de comenzar la instalación.
Si tiene alguna pregunta sobre el producto o problemas con la instalación.
llame a la línea de servicio al consumidor antes de devolverlo.
Vea www.cmx.avfgroup.com para el video de instalación
40kg
88lbs
55"
140cm
Fit the TV Mounting Plate
Fije La Placa De Montaje De TV
Fit the Wall Bracket
Fije el Soporte de Pared
Connect the TV
Conecte la TV
2 Person Installation Recommended
Instalación De 2 Personas Recomendado
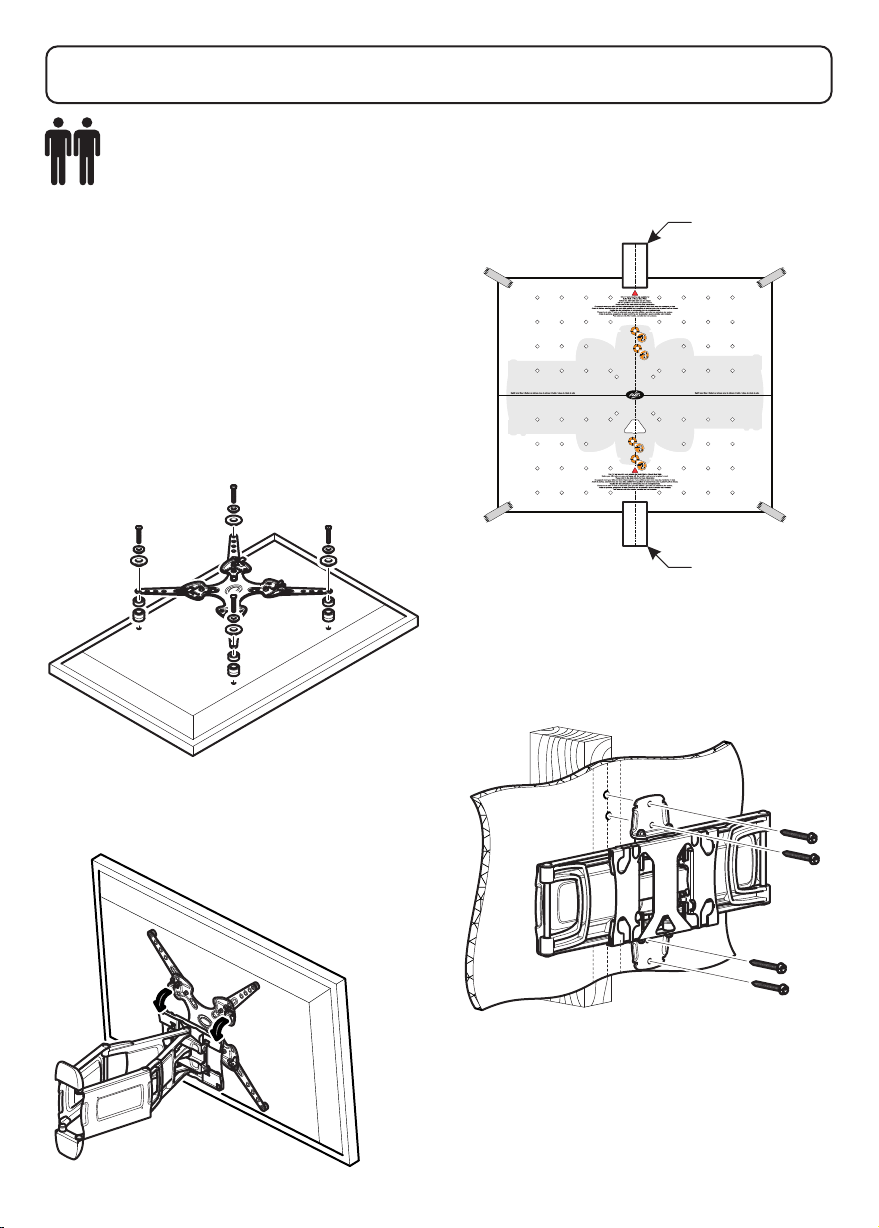
Assembly Overview
Ensambladura General
bottom of TV
parte inferior
de la TV
Determine your TV position
Determine la posición de su TV
top of TV
parte superior
de la TV

Measure the TV fixing holes Width and Height
Mida los orificios de su TV, lo ancho y lo alto
1
Fitting the TV Mounting Plate
Fijando La Placa De Montaje De TV
2
Fitting the Wall Bracket
Fijando la Placa a la Pared
3
Fitting the Wall Bracket Covers
Fijando Las Cubiertas Del Soporte De Pared
5
Preparing the Front Adaptor Plate
Preparando La Placa Adaptadora Frontal
6
Connecting the TV
Conectando la TV
7
8
9
Index
Índice
Conserve todos los envasados en caso de que el soporte tenga que ser devuelto.
El contenido puede variar de la fotografía / ilustración.
No necesitará todas estas partes, espere que sobren algunas según las especificaciones
de su TV.
Este producto está diseñado para el uso en el interior solamente. El uso de este
producto en el exterior podría llevar al fracaso y lesiones personales.
Es la responsabilidad del instalador de asegurarse de que la pared de montaje es de un
nivel adecuado y carece de todo los servicios (gas, electricidad, agua, etc.).
AVF no acepta ninguna responsabilidad por cualquier daño o pérdida causada por la
instalación de este producto en una pared inadecuada.
Preparing the TV Mounting Plate
Preparando La Placa De Montaje De TV
Cable Management
Manejo de Cable
4Determine your TV position
Determine la posición de su TV
Retain all packaging in case the bracket needs to be returned.
Contents may vary from photography/ Illustrations.
You will not need all these parts, so expect there to be some left over depending upon the
specification of your TV.
This product is intended for indoor use only. Use of this product outdoors could lead to failure and
personal injury.
It is the responsibility of the installer to ensure that the mounting wall is of a suitable standard and
void of any services (eg gas, electricity, water etc).
AVF accept no responsibility for any damage or loss caused by installing this product in a sub
standard wall.

B
B
A
C
Dx4
Boxed Parts
Piezas en la Caja
Stud Finder
Detector de vigas
de madera
Ø 1/8"
Wood
Madera
Ø 3/8"
Masonry
Masonería
Tools Recommended
Herramientas recomendadas

TV Screws, Reducers and Spacers
Tornillos, Reductores y Espaciadores para TV
Kx4 Lx4
Mx4
J2x4 J4x4
M4 M5
25mm
J6x4
M6
25mm
25mm
H1x4 H2x4
J9x4
M8
25mm
I1x12 I2x4
J7x4
M6
45mm
J10 x4
M8
45mm
16mm
M8
J8x4
J5x4
M6
16mm
J1x4
M4
16mm
J3x8
M5
16mm
Fx8 Gx16
M6
Ex8
M6
Nx1
4mm
465711rev00
O1O2
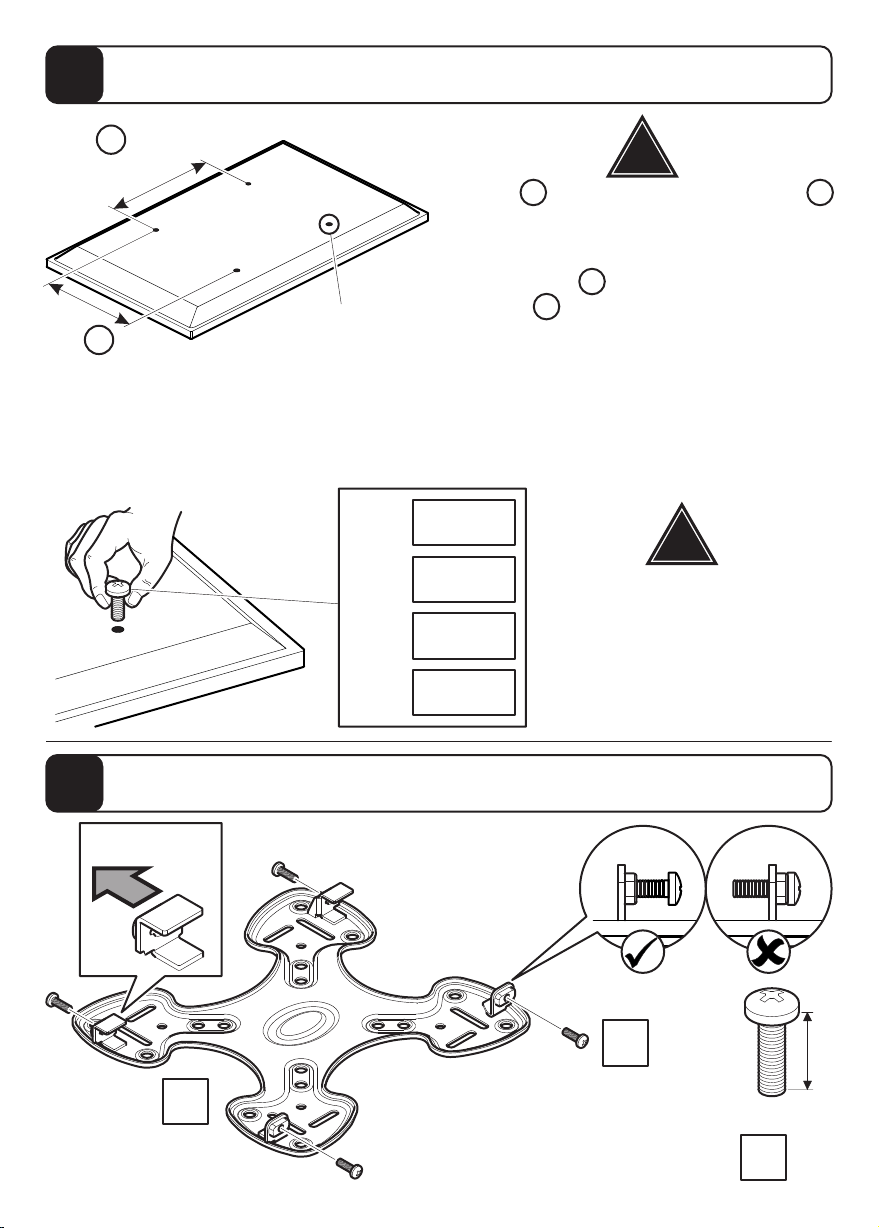
You are provided with 4 diameters of TV fixing screws, M4, M5, M6 and M8. Determine the screw
diameter that fits and remember for step 5.
Se le proporciona con 4 diámetros de tornillos de fijación para su TV: M4, M5, M6 y M8.
Determine el diámetro del tornillo que le quede a su TV y recuérdelo para el paso 5.
1
!
J5-J7
J3/J4
J1/J2
M8 =
M6 =
M4 =
M5 =
J8-J10
2
J3x4
M5
16mm
C
J3
Preparing the Front Adaptor Plate
Preparando La Placa Adaptadora Frontal
75 - 400mm
Y
!
75 - 400mm
X
Measure the TV fixing holes Width and Height
Mida los orificios de su TV, lo ancho y lo alto
TV Fixing Holes
Orificios de su TV
para Fijar el Soporte
After completing step 5 you will
have fittings left over, please keep
for future reference
Después de completar el paso 5
usted tendrá conexiones sobrantes,
por favor guarde para
futura referencia.
Top
Parte Superior
If width X is greater than 400mm or height Y
greater than 400mm STOP installation now and
contact the customer help line
Si la anchura X es mayor que 400mm o la
altura de Y es mayor que 400mm DETENGA
la instalación inmediatamente y póngase en
contacto con la línea de ayuda al cliente

Preparing the TV Mounting Plate
Preparando La Placa De Montaje De TV
3
If in any doubt please call the customer help line.
Si tiene alguna duda, comuníquese con la línea de atención al cliente.
X 400mm Y 100mm
X 400mm Y 200mm
X 300mm Y 200mm X 400mm Y 300mm
X 300mm Y 300mm X 400mm Y 400mm
X 300mm Y 100mm
X 75 - 400mm Y 75 - 400mm
X
If your TV fixing holes match any of the sizes shown above you will not need to use any adaptors.
Please go to step 4.
Si los orificios de ajuste del TV coinciden con cualquiera de los tamaños que se indican arriba, no
necesitará utilizar adaptadores. Continúe con el paso 4
Y
C
100
mm
200mm
75
mm
100
mm
75
mm 200
mm
Use the option that fits your TV / Utilice la opción que mejor se adapte a su TV
Do not fully tighten / No ajuste completamente
OPTION 2 / OPCIÓN 2
OPTION 1 / OPCIÓN 1
X 75mm
X 100mm Y 100mm
X 200mm Y 100mm
X 200mm Y 200mm
OPTION 1 / OPCIÓN 1
Y 75mm

HOLES
ORIFICIOS
SLOTS / RANURAS
SLOTS / RANURAS
!
100
mm
X 300mm
Y
200
mm
X 300mm
Y
D D
CC
=
=
HOLES / ORIFICIOS
SLOTS / RANURAS
When attaching adaptors D you must always
use HOLES x4 and either of the SLOTS.
Para colocar adaptadores D deberá
siempre utilizar ORIFICIOS x4 y alguna
de las RANURAS.
OPTION 2 / OPCIÓN 2
HOLES
ORIFICIOS
Fx8 Gx16
M6
Ex8
M6
G
F
E
C
D
D
D
D
Example shown is
400mm x 400mm fixings.
El ejemplo se muestra con
fijaciones de 400mm x 400mm
Top
Parte Superior

X 400mm
400
mm
Y
X 75mm - 400mm
D D
C C
Adaptors D can be fixed in different positions in
the slots on Plate C to match your TV fixing holes.
Los adaptadores D puedenfijarse en diferentes
posicionesen las ranuras de la placa C para que
coincidan conlos orificios de fijación desu televisor.
75mm -
400mm
Y
200
mm
Y
X 400mm
300
mm
Y
X 400mm
D
D
CC
300
mm
Y
X 300mm
100
mm
Y
X 400mm
D
D
C C
=
=
HOLES / ORIFICIOS
SLOTS / RANURAS

4Determine your TV position
Determine la posición de su TV
Assemble Positioning Template
Monte la plantilla de posición
i
O1
O2
Joining templates O1 and O2 will give you a guide that represents the height and center of
YOUR TV so you can position YOUR TV perfectly and know exactly where to drill your wall.
Si une las plantillas O1 y O2 obtendrá una idea que representa la altura y el centro de SU TV,
por lo cual podrá ubicar SU TV perfectamente y sabrá dónde perforar su pared
con precisión

ii Lay template on the back of the TV as shown in the images below.
Align the fixing holes on the template O1 with the TV fixing holes on the back of your TV.
If your TV has fixing holes that are not shown on the template O1 simply punch 4 holes
that match your TV fixing holes.
Coloque la plantilla en la parte posterior de la TV como muestran las imágenes a continuación.
Nivele los orificios de anclaje en la plantilla O1 con los orificios de anclaje de la TV en la parte
posterior de la misma. Si su TV tiene orificios de anclaje que no figuran en la plantilla O1,
simplemente perfore 4 orificios que coincidan con los orificios de anclaje de su TV.
Example shown is
400mm x 400mm fixings.
El ejemplo se muestra con
fijaciones de 400mm x 400mm.

iv
iii
O1
O2
Remove the template from the back of your TV before you continue
Quite la plantilla de la parte posterior de su TV antes de continuar
Align template O2 with the top of your TV and cut so it is flush with the bottom of your TV
and stick in position.
Nivele la plantilla O2 con la parte superior de su TV y corte para que quede alineada con
la parte inferior de su TV y firme en esa posición.
Cut the template O2
so it is flush with the
bottom of your TV
Corte la plantilla O2
de manera que quede
alineada con la parte
inferior de su TV
O2
bottom of TV
parte inferior
de la TV
Align template O2
with top of your TV
Nivele la plantilla O2
con la parte superior
de su TV
O2
top of TV
parte superior
de la TV
Top
Parte Superior

vUse template O1 and O2 to determine the position of your TV on the wall.
When you are happy with the position ensure template is level and fix to wall. Before
marking the drill points you will need to determine the wall type that you have i.e. Solid
Wall or Wood Stud Wall. Ensure the drilling area is free from mains services
(Gas / Electric / Water).
Use las plantillas O1 y O2 para determinar la posición de su TV en la pared.
Cuando esté conforme con la posición, asegúrese que la plantilla esté nivelada y quede
fija a la pared. Antes de marcar los puntos de perforación, deberá determinar el tipo de
pared que tiene; por ej.: pared sólida o pared con estructura de madera.
Asegúrese de que el área de perforación no dañará los servicios de red
(gas / electricidad / agua)
spirit level line
Iínea de nivel
de aire
Represents the bottom of your TV.
Representa la parte inferior de su TV.
Represents the top of your TV.
Representa la parte superior de su TV.
Mark drill points x4 with a suitable sharp object.
If you are installing on a wood stud wall,
ensure you mark in the center of the wood stud
Marque los puntos de perforación x 4 con un objeto filoso adecuado.
Si lo va a instalar en una pared con estructura de madera,
asegúrese de marcar en el centro de dicha estructura.
vi Remove template from wall and continue with installation.
Quite la plantilla de la pared y proceda con la instalación.
5Fitting the TV Mounting Plate
Fijando la Placa de Montaje a su TV
TV
TV TV TV
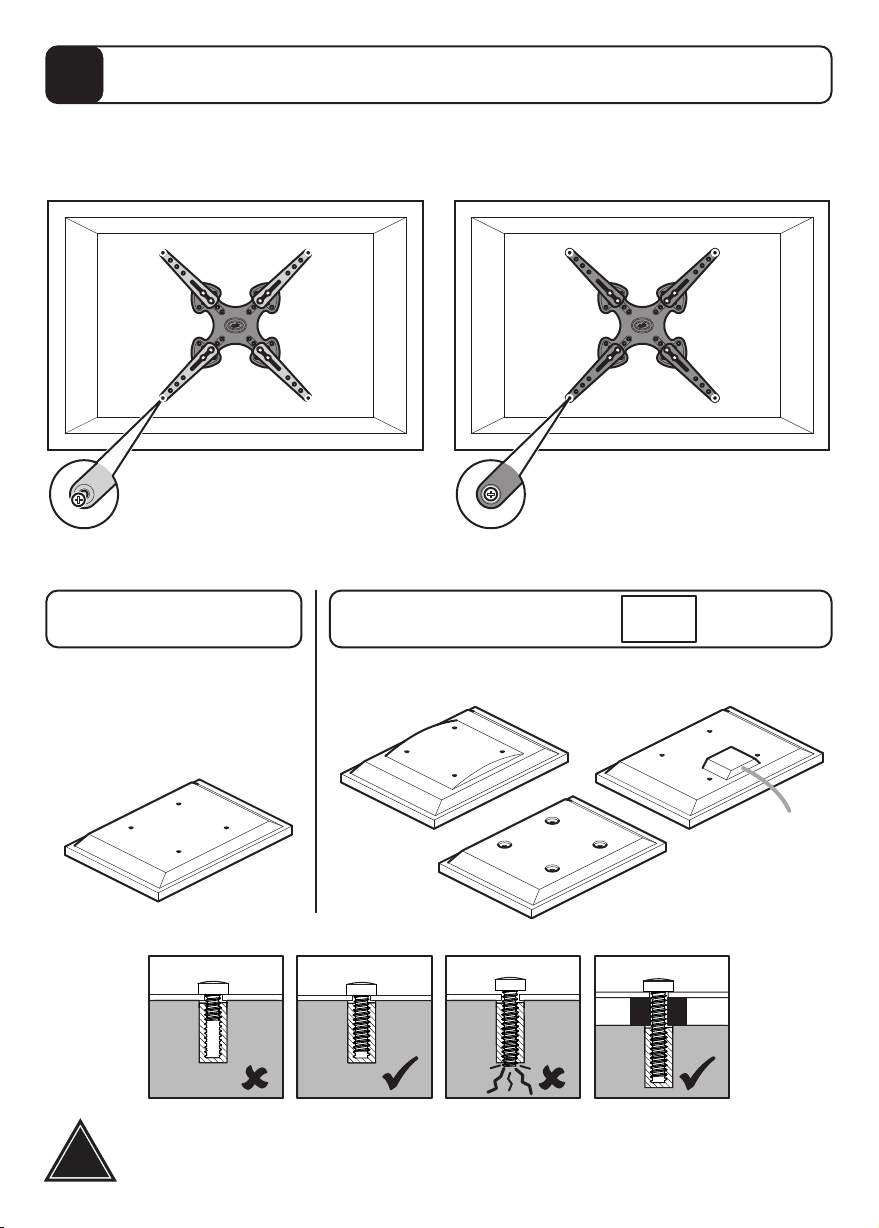
Spacers
Espaciadores I1/I2
No Spacers
Sin espaciadores
For TVs with flat/
unobstructed back
Para TVs con la parte posterior
plana / sin obstáculos
For TVs with irregular/obstructed back
Para TVs con la parte posterior irregular / con obstáculos
WARNING / ADVERTENCIA
After completing step 5 you will have fittings left over, please keep for future reference.
Después de completar el paso 5 usted tendrá conexiones sobrantes, por favor guarde
para futura referencia.
!
Before you fully tighten the TV mounting plate please check that the mounting plate holes line up
with the fixing holes on the back of your TV.
Antes de fijar completamente la placa de montaje de TV verifique que los orificios de la placa de
montaje coincidan con los orificios en la parte posterior de su TV
Holes do not line up and small
adjustment is required before you
fully tighten
Los orificios no coinciden y es
necesario hacer un pequeño ajuste
antes de fijar completamente
Holes line up and no adjustment is
required before you fully tighten
Los orificios coinciden y no es
necesario hacer ningún ajuste antes
de fijar completamente

J1/J2x4
H2x4
H1x4
M5
H1x4
M6
H1x4
M8
J3/J4x4 J5-J7x4
J8-J10 x4
M4
C
I2
I1
and / or
I2x4
I1x4
and / or
I2x4
I1x4
and / or
I2x4
I1x4
and / or
I2x4
I1x4
J1-J10
H2
H1
Fixings shown are valid
for options 1 & 2
Las fijaciones que se
muestran son válidas para
opciones de 1 y 2
Attach the brackets to the back of your TV using suitable screw, reducer and spacer combinations.
Coloque los soportes a la parte posterior de su TV usando la combinación adecuada de
tornillo, reductor y espaciador.
Screw
diameter
dependant
Depende
del diámetro
de tornillo
If required
Si se requiere
If required
Si se requiere
Top
Parte Superior
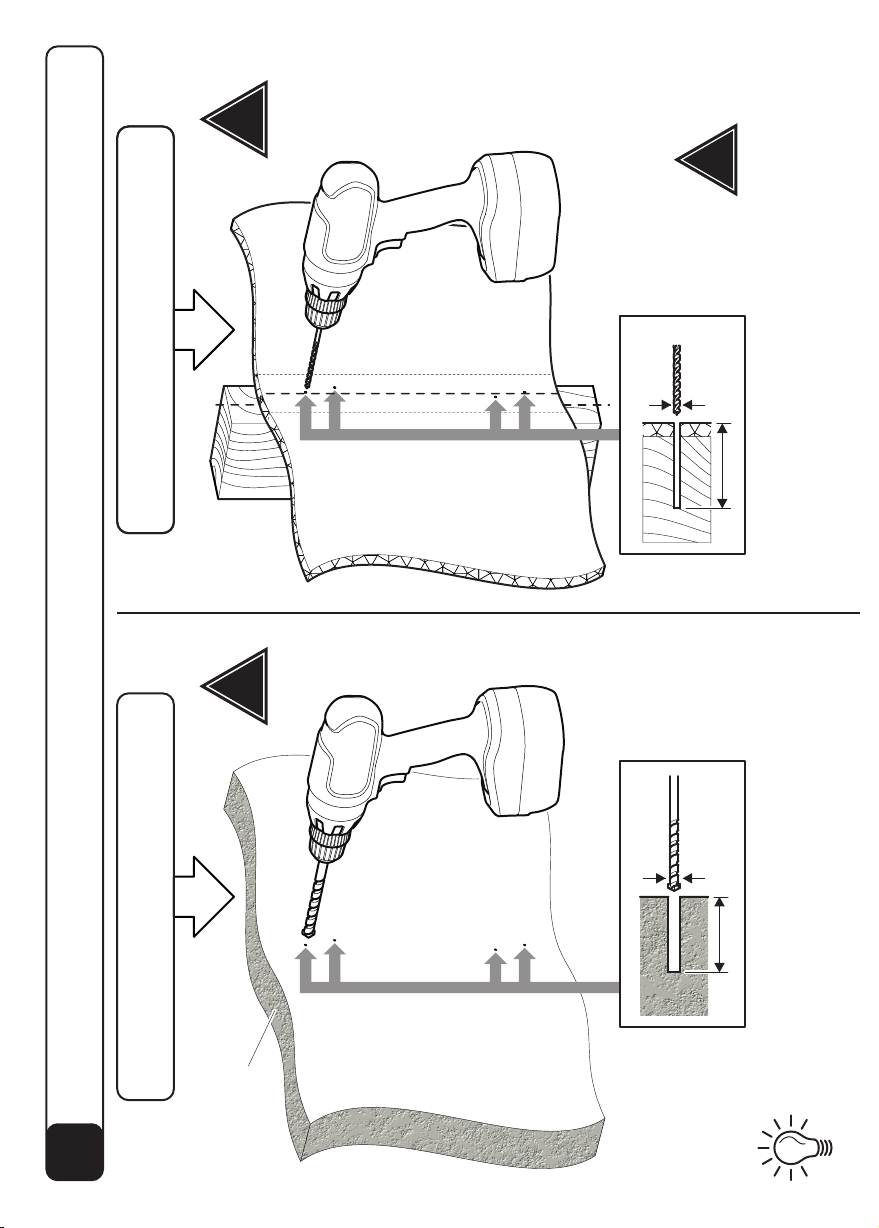
6Fitting the Wall Bracket
Fijando la Placa a la Pared
Solid Wall / Pared sólida
!
Take care
Tenga cuidado
!
Take care
Tenga cuidado
Concrete
Concreto
Remove dust from hole
Elimine el polvo del agujero
Ensure bracket is in the
centre of the wood stud
Asegúrese de que el
soporte está en el centro
de la viga de madera
Wood Stud / Viga de madera
!
80mm (31/8")
Ø3/8"
80mm (31/8")
Ø1/8"
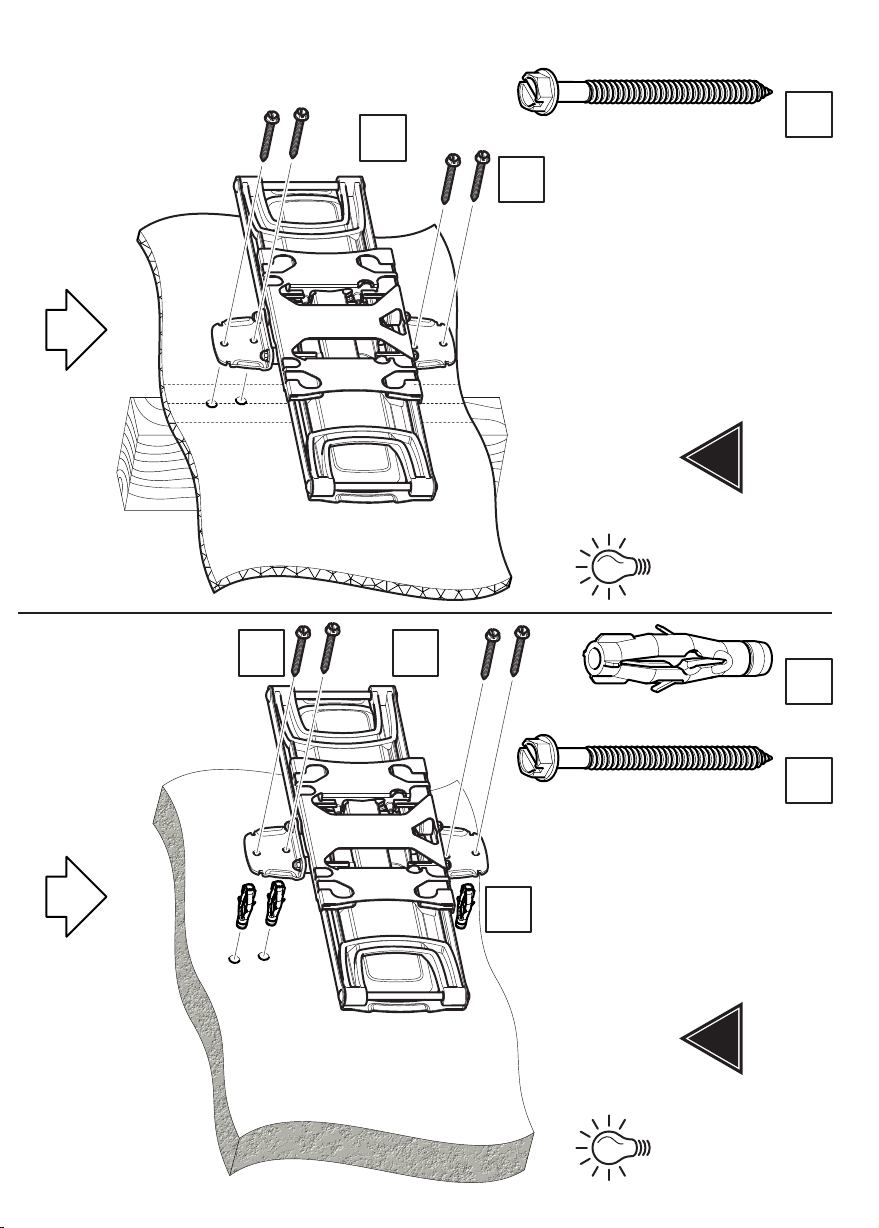
Lx4
A
A
K
L
Kx4 Kx4
K
! !
DO NOT over tighten screws
Tighten screws by hand only
NO sobre apriete los tornillos.
Apriete los tornillos sólo a mano
DO NOT over tighten screws
Tighten screws by hand only
NO sobre apriete los tornillos.
Apriete los tornillos sólo a mano
Lubricate screw
thread with soap
Lubrique la rosca
del tornillo con jabón
Lubricate screw
thread with soap
Lubrique la rosca
del tornillo con jabón
7
B
B
8
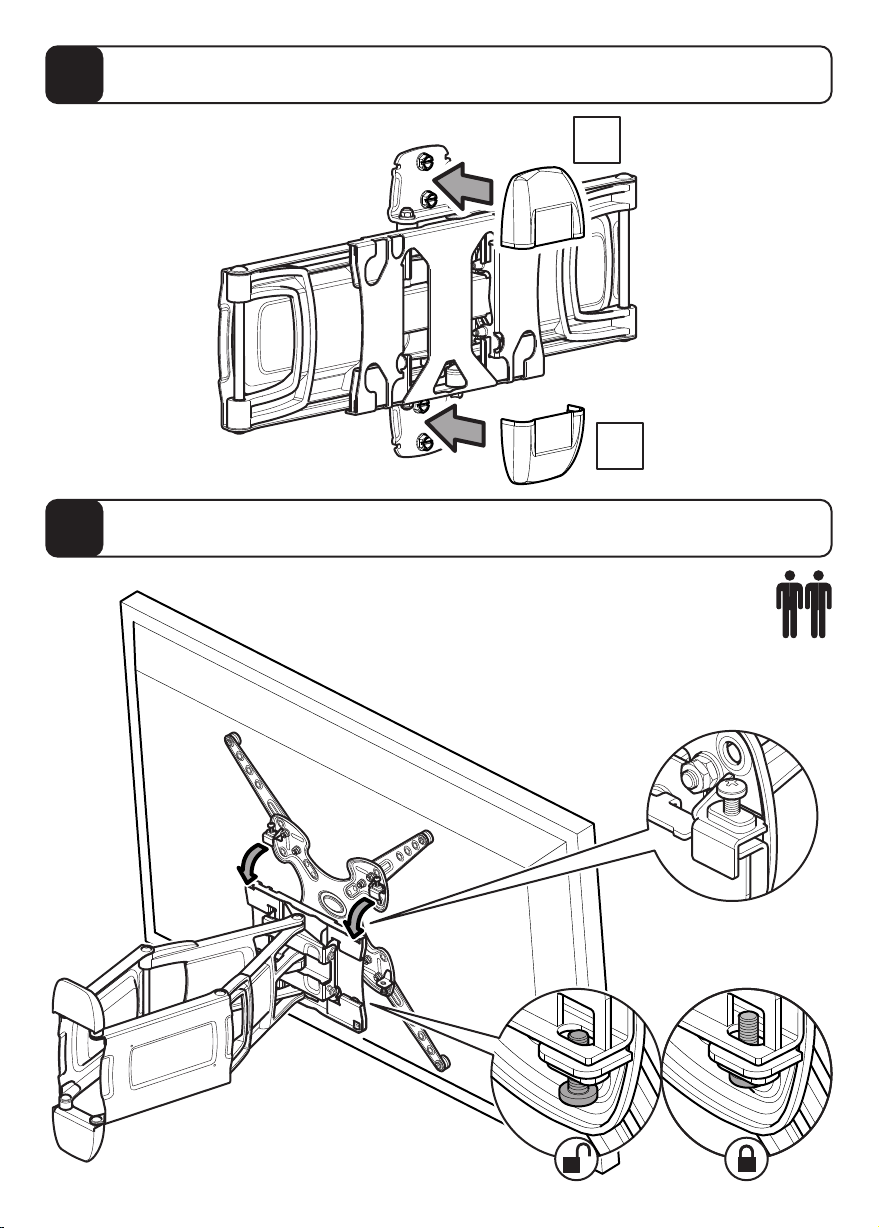
Fitting the Wall Bracket Covers
Fijando Las Cubiertas Del Soporte De Pared
Connecting the TV
Conectando la TV
Attaching and Locking
Sujetando y Asegurando

9
!Mx4
MM
Cable Management
Manejo de Cable
Ensure cables don’t
restrict arm movement
Asegure que los cables no restringen
el movimiento de los brazos
Check all fittings are tight
Compruebe que todas las
fijaciones estén bien apretadas

TV Levelling / Nivelación de TV
Lock tilt / Cerradura de la función de inclinación
Optional
Opcional
x4
Nx1
4mm
This manual suits for next models
1
Table of contents
Other AVF TV Mount manuals


