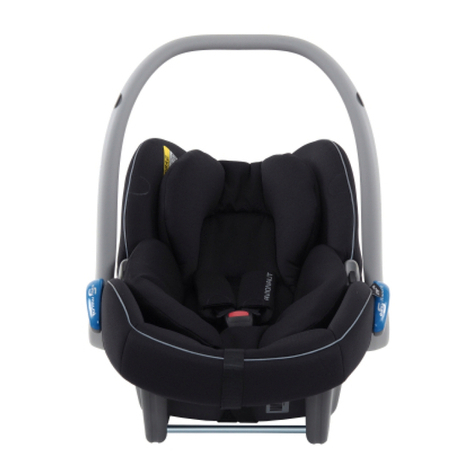
Avionaut DOCK User manual

1
2
3
4
7
8
9
14
10
11
12
15
1. Foot prop

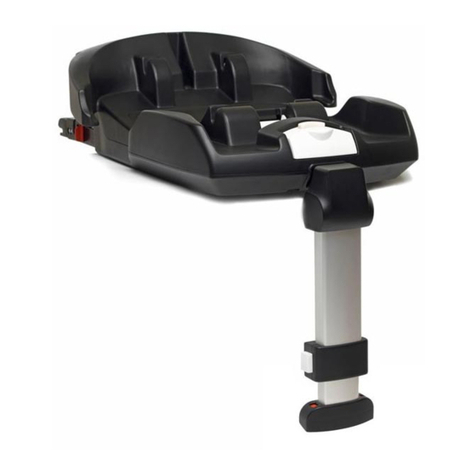
Installing the base
We recommend that the instructions shall be kept with the car seat during its life period.
This child restraint device is categorised as "semi all-purpose”. It has received a certification of approval in
accordance with ECE Regulation No. 44/04 for general use in vehicles fitted with the Isofix anchoring system
(see vehicle manuals).
It can be installed on all car seats which are allowed as Isofix seats in accordance with the vehicle manual,
depending on the weight class of the child seat and the Isofix size category.
The weight class and the Isofix size category for which this child restraint device is suitable is C (0-13 kg).
ATTENTION
4

Installing the base with a seat belt
This child restraint device is categorised as “all-purpose”. It has received a certification of approval in
accordance with ECE Regulation No. 44/04 for general use in vehicles and can be installed on most car seats
(however not on all).
A correct installation is possible if the manufacturer of the vehicle declares in the vehicle manual that the
vehicle has been prepared for the installation of a child restrain device categorised as “all-purpose” for this
age group. The child restraint device was categorised as “all-purpose” based on more restrictive
requirements than those applied to previous designs, for which this information was not provided.
The child restraint device has received a certification of approval in accordance with the last version of ECE
Regulation No. 44/04 for all-purpose devices and it meets more restrictive requirements than previous
versions.
It is suitable if the certified vehicles fitted with 3-point seat belts with a reel, which are approved as
compliant with ECE Regulation No. 16 or other equivalent standards.
Placing and adjusting the seat belt correctly is essential for your child’s safety. Never place the seat belt ina
different way than specified in this manual.
Make sure that all belts used for installing the device which holds the child seat are stretched tight and the
belt which holds the child is adjusted to its body and is not twisted.
ATTENTION
5
DEAR CUSTOMER !
Thank you for buying the base for a child seat.
Karwala company has designed this product to provide safety to your child in its first stage of life. The
product has been produced in compliance with special quality standards and meets the highest safety
standards defined by the regulation ECE R 44/04 for child safety seats.
Research has shown that a significant number of child safety seats are used incorrectly. Please, take your
time and read this manual carefully. Your child’s optimum safety can be guaranteed only if Carlo base and
a child seat are used correctly. A simple and fast system for fastening the child seat to the base decreases the
risk that the child seat will be used incorrectly and increases your child’s safety.
Carlo base has been tested and approved for use in connection with the following child seats
(these products are labelled with symbol):
• Carlo, group 0 (10 kg)
• Avionaut Kite, group 0+ (up to 13 kg}
The base can be used only on car seats facing the front of the car. The child seat Avionaut Kite (group 0+)
or Carlo (group 0) can be placed on the base onlyin the rear-facing position.
6

Because there are various seat belt and fastening systems used in cars nowadays, you should prove before
buying the base whether it can be properly mounted in your car. The base is to be used only in a car.
Secure all collapsible seats, make sure that both Isofix Catch Arm Hooks are correctly fastened at the
anchorage points. Always use the foot prop to ensure safe use. The foot prop must be fully pulled out and
blocked at all times.
No objects must be put in the leg space in front of the base.
Never leave your child alone in the car.
Do not modify the base in any way. The result may be partial or full loss of its safety features.
The base must be always secured in the car, even if it is not used.
Make sure that the objects transported in the car are well secured. Objects which are not secured may
cause injury in the event of an accident.
During longer journeys take short breaks for the child to move a little.
The manufacturer is aware that the restraint devices can cause depressions in the car seat upholstery.
The manufacturer is not liable for any possible damage done this way.
After an accident the base and the child seat may not provide safety due to invisible damage. Therefore
they should be exchanged.
Information for users
7

Installing the base with a seat belt
1. Put the base on the car seat so that the foot prop hangs loose in front of the seat.
2. Press button 3 and push the base to the back of the seat.
3. Push button 6 and release the press frame 7.
8

Installing the base with a seat belt
4. Pull the seat belt. Pull its lower part through the blue guide slots 14 and snap it in the seat belt buckle.
5. Tighten the lower part of the seat belt so that the block can be fastened. Press the press frame 7 down
(Click!).
6. Pull the foot prop 1 out so that it presses tightly against the floor. It is important that the foot prop is
blocked. No objects must be put under it.
9

Installing the base with
1. Put the base on the car seat so that the foot prop hangs loose in front of the seat. - Fig. 5
2. Snap the ISOFIX Catch Arm Hooks 9 in the Isofix anchorage points. When they lock in place, you will hear
click! - Fig. 6
(the display 11 shows green, which means that the base has been fastened correctly). - Fig. 7
3. Press button 3, push the base to the back of the car seat as far as possible. - Fig. 8
4. Pull the foot prop 1 until it is tightly pressed against the floor of the car. - Fig. 9
5. It is important that the foot prop is blocked. No objects must be put under it.
10

Uninstalling the base installed with a seat belt
1. 1. Unfasten the seat belt. - Fig. 1
2. 2. Shift the block mechanism 6 - Fig. 2. Pull the press frame 7 up and take the seat belt out of the guide
slots 9. - Fig. 3
3. 3. Release the block mechanism of the foot prop 2. - Fig. 4
Uninstalling the base installed with
1. Push the foot prop 1 in by pressing button 2. - Fig. 10
2. Press button 9 and pull the base away from the back of the car seat. - Fig. 11
3. Pull the button releasing the Isofix Catch Arm Hook 10 towards you.
Repeat the action on the other side. - Fig. 12
The display 11 shows red. - Fig. 13
11

Installing the child seat on the base
The base has been tested and approved for use with the child seats AVIONAUT CARLO and KITE (these
products are labelled with symbol), which are fitted with mounting bars 15.
1. Place the child seat over the base, facing towards the rear of the car. - Fig. 14
2. Snap the child seat in the anchoring system of the base 8 starting with the fasteners at the front of the base
(You will hear Click! and the display 5 will show green) - Fig. 15
3. Place the handle so that it faces the back of the car seat (the handle must be blocked) - Fig. 15
• When installing the base with the seat belt, pull the breast part of the seat belt through the guide slot at the
back of the child seat. - Fig. 16
Uninstalling the child seat from the base
1. Put the handle of the child seat vertically, pull the shoulder belt from the guide slot at the back of the child
seat. - Fig. 18
2. Press button 4, which releases the block of the base 8 and pull the child seat up. - Fig. 19
Cleaning and maintenance of Carlo base
The parts made of plastic should be cleaned with warm water and soap. Do not use any aggressive chemical
agents.
12

Warranty
General conditions:
• The warranty period is 24 months from the date of purchase.
• The manufacturer guarantees good quality and functionality of the product on condition that it is used
for its intended purpose and in accordance with the manual.
• Only the first buyer has warranty rights and they cannot be transferred to third parties.
• Should defects appear, go to the sales point with the product, the original warranty card signed by the
shop, and a receipt or other document of sale.
• The warranty for the consumer goods sold does not exclude, limit, or sustain the Buyer’s rights
follwing from the sales agreement.
• The warranty is valid in the country of purchase and is satisfied by the authorised distributor.
The warranty does not include:
• Natural wear and tear of the individual components of the base.
• Mechanical and thermal damage to the product.
• Losing small elements of the equipment.
• Damage caused by the failure to use the product as specified in the manual.
• Other damage for which the Buyer is to blame.
• Products from which serial numbers have been removed.
• Products repaired by persons not qualified.
13

CARLO BASE
Inhaltsverzeichnis
Bilder
Achtung
Sehr geehrter Kunde
Informationen für den Benutzer
Montage der Base mit dem Autogurt
Demontage der mit dem Autogurt montierten Base
Montage der Base mit Isofix
Demontage der mit Isofix montierten Base
Montage der Babyschale auf der Base
Demontage der Babyschale aus der Base
Reinigung und Instandhaltung
Garantie
1
16,17
18
19
20
23
22
23
24
24
24
25
14

15

Montage der Base mit
Wir empfehlen, das Handbuch während seiner Lebensdauer zusammen mit dem Autositz aufzubewahren.
Die Rückhaltevorrichtung für Babys gehört zur Halbuniversalkategorie. Sie hat eine Bauartzulassung gemäß
ECE-Regelung Nr. 44/04 für allgemeine Nutzung in den mit Isofix-Verankerungssystem ausgestatteten
Fahrzeugen bekommen (sehe Gebrauchseinleitung des Fahrzeugs).
Sie eignet sich zur Montage auf allen Sitzplätzen, die als Isofix-Sitzplätze zugelassen sind (gemäß
Gebrauchseinleitung des Fahrzeugs) abhängig von der Gewichtsklasse der Babyschale
und der Isofix-Größenkategorie. Die Gewichtsklasse und die Isofix-Größenkategorie, für die diese
Rückhaltevorrichtung für Babys vorgesehen ist, ist C (0-13 kg).
ACHTUNG
16

Montage der Base mit dem Autogurt
Die Rückhaltevorrichtung für Babys gehört zur Universalkategorie. Sie hat eine Bauartzulassung gemäß ECE
Regelung Nr. 44/04 für allgemeine Nutzung in Fahrzeugen bekommen und eignet sich zur Installierung auf
den meisten Sitzplätzen im Wagen (jedoch nicht auf allen).
Eine richtige Montage ist möglich, wenn der Hersteller des Fahrzeugs in der Gebrauchsanleitung des
Fahrzeugs angibt, dass das Fahrzeug für die Installierung einer Rückhaltevorrichtung der Universalkategorie
für Kinder in diesem Alter geeignet ist.
Die Rückhaltevorrichtung für Babys wurde anhand noch strenger Anforderungen in die Universalkategorie
eingestuft, als die Anforderungen, die für die früheren Projekte, die mit dieser Information nicht versehen
wurden, galten.
Die Rückhaltevorrichtung für Babys bekam ein Zertifikat einer Universalvorrichtung gemäß der neusten
Fassung ECE R44/04 und erfüllt noch strengere Anforderungen, als die früheren Varianten.
Sie ist geeignet, wenn die zugelassenen Fahrzeuge mit 3-Punkt-Sicherheitsgurten mit dem Aufroller
ausgestattet sind, die gemäß der VN/ECE-Regelung Nr. 16 oder anderen gleichwertigen Normen zugelassen
sind Der richtige Verlauf und Anpassung des Autogurtes hat große Bedeutung für die Sicherheit Ihres Babys.
Führen Sie niemals den Gurt anders, als es in dieser Gebrauchsanleitung beschrieben wurde.
Prüfen Sie, ob alle Befestigungsgurte der Befestigungsvorrichtung der Babyschale gespannt sind und der
Gurt, der das Baby hält, seinem Körperbau angepasst und nicht verdreht ist.
ACHTUNG
17

Sehr Geehrter Kunde !
Wir danken Ihnen dafür, dass Sie die Base für eine Babyschale gekauft haben.
Die Firma Karwala war bei der Entwicklung dieses Produkts auf die Sicherheit Ihres Babys in seiner ersten
Lebensphase besonders aufmerksam. Das Produkt wird gemäß den speziellen Qualitätsnormen hergestellt
und erfüllt die höchsten Sicherheitsstandards gemäß der Norm ECE R 44/04 für die in Fahrzeugen zu
benutzenden Rückhaltevorrichtungen für Babys.
Untersuchungen haben ergeben, dass eine wesentliche Anzahl von Babyschalen nicht richtig benutzt wird.
Deswegen bitten wir Sie darum, dass Sie diese Gebrauchsanleitung genau lesen. Die optimale Sicherheit
Ihres Babys kann nur dann garantiert werden, wenn die Carlo Base mit der Babyschale richtig benutzt werden.
Ein einfaches System zur schnellen Befestigung der Babyschale auf der Base verringert das Risiko, dass
die Babyschale falsch benutzt wird und gleichzeitig erhöht die Sicherheit Ihres Babys.
Die Carlo Base wurde geprüft und zur Nutzung mit den folgenden Babyschalen (diese Produkte sind mit
dem Symbol gekennzeichnet) zugelassen:
• Carlo, Gruppe 0 (10 kg)
• Avionaut Kite, Gruppe 0+ (bis 13 kg)
Die Base darf nur auf den vorwärts gerichteten Sitzplätzen montiert werden.
Die Babyschale Avionaut Kite (Gruppe 0+) bzw. Carlo (Gruppe 0) darf nur gegen die Fahrtrichtung montiert
werden.
18

Da in Wagen verschiedene Arten von Sicherheitsgurten und Befestigungssysteme zum Einsatz kommen,
prüfen Sie vor dem Einkauf, ob die Base in Ihrem Wagen richtig montiert werden kann. Die Base darf nur in
einem Wagen benutzt werden.
Sichern Sie alle klappbare Sitze, prüfen Sie, ob die beiden Isofix-Rastarmhaken in den Verankerungspunkten
richtig befestigt sind. Benutzen Sie immer das Stützbein der Base, um sichere Nutzung zu gewährleisten; das
Stützbein muss immer vollständig ausgeschoben und blockiert werden.
Man darf keine Gegenstände im Beinraum vor der Base stellen.
Lassen Sie das Baby nie unbeaufsichtigt im Auto zurück.
Man darf keine Modifizierungen an der Babyschale vornehmen. Sie können verursachen, dass das Produkt
seine Sicherheit teilweise oder völlig verliert.
Die Base muss im Wagen immer gesichert sein, auch wenn sie nicht benutzt wird.
Prüfen Sie, ob die Gegenstände in Ihrem Wagen entsprechend gesichert sind. Nicht gesicherte Gegenstände
können beim Unfall Verletzungen verursachen.
Bei längeren Fahrten machen Sie kurze Pausen, damit Ihr Baby sich ein bisschen bewegen kann.
Dem Hersteller ist bewusst, dass Rückhaltevorrichtungen Druckspuren im Polster des Autositzes
hinterlassen können. Der Hersteller haftet nicht für die eventuell entstandenen Beschädigungen.
Nach einem Unfall kann möglicherweise volle Sicherheit der Base und der Babyschale aufgrund unsichtba-
rer Beschädigungen nicht garantiert werden. Deshalb sollen sie ersetzt werden.
Informationen für den Benutzer
19

Montage der Base mit dem Autogurt
1. Stellen Sie die Base auf den Autositz so, dass das Stützbein locker vor dem Sitzplatz herunterhängt.
2. Betätigen Sie den Druckknopf 3 und schieben Sie die Base dicht an die Sitzlehne zu.
3. Schieben Sie den Druckknopf 6 und entsperren Sie den Druckrahmen 7.
20

Montage der Base mit dem Autogurt
4. Ziehen Sie den Autogurt heraus. Führen Sie den unteren Teil des Gurtes durch die blauen Schlitzen 14
und rasten Sie ihn in die Schnalle des Autos ein.
5. Spannen Sie den unteren Teil des Gurtes so, dass die Sperrevorrichtung geschlossen werden kann.
Rasten Sie den Druckrahmen 7 ein (Klick!).
6. Schieben Sie das Stützbein 1 heraus, bis es fest auf dem Fahrzeugboden stützt. Es ist wichtig, dass der
Mechanismus des Stützbeins gesperrt ist, man darf keine Gegenstände unter das Stützbein legen.
21

Montage der Base mit
1. Stellen Sie die Base auf den Autositz so, dass das Stützbein locker vor dem Sitzplatz herunterhängt
- Bild 5
2. Rasten Sie die Isofix-Rastarmhaken 9 in die Isofix-Verankerungspunkte ein, beim Einrasten hören Sie Klick!
-Bild 6 (die Anzeige 11 wird grün, was bedeutet, dass die Base richtig befestigt worden ist). - Bild 7
3. Betätigen Sie den Druckknopf 3, schieben Sie sie maximal an die Sitzlehne des Autositzes zu. - Bild 8
4. Schieben Sie das Stützbein 1 heraus, bis es fest auf dem Fahrzeugboden stützt. - Bild 9
5. Es ist wichtig, dass der Mechanismus des Stützbeins gesperrt ist, man darf keine Gegenstände unter das
Stützbein legen.
22
Table of contents
Languages:
Other Avionaut Car Seat manuals

Avionaut
Avionaut evolvair User manual

Avionaut
Avionaut PIXEL User manual

Avionaut
Avionaut AeroFIX Guide

Avionaut
Avionaut AeroFIX User manual

Avionaut
Avionaut AeroFIX RWF Guide

Avionaut
Avionaut Cosmo Guide

Avionaut
Avionaut AeroFIX RWF User manual

Avionaut
Avionaut MaxSpace User manual

Avionaut
Avionaut MaxSpace Guide

Avionaut
Avionaut GLIDER User manual