AW Technologies TrachFlush User manual

English | AWT-1030 #4.0 TrachFlush Instructions for Use
1
Instructions for Use
TF-SA-XX
Software version 4.0.x.x
AWT-1030 | 2022-10-12

English | AWT-1030 #4.0 TrachFlush Instructions for Use
2
TrachFlush
Instructions for Use
October 2022
AWT-1030

English | AWT-1030 #4.0 TrachFlush Instructions for Use
3
Table of Contents
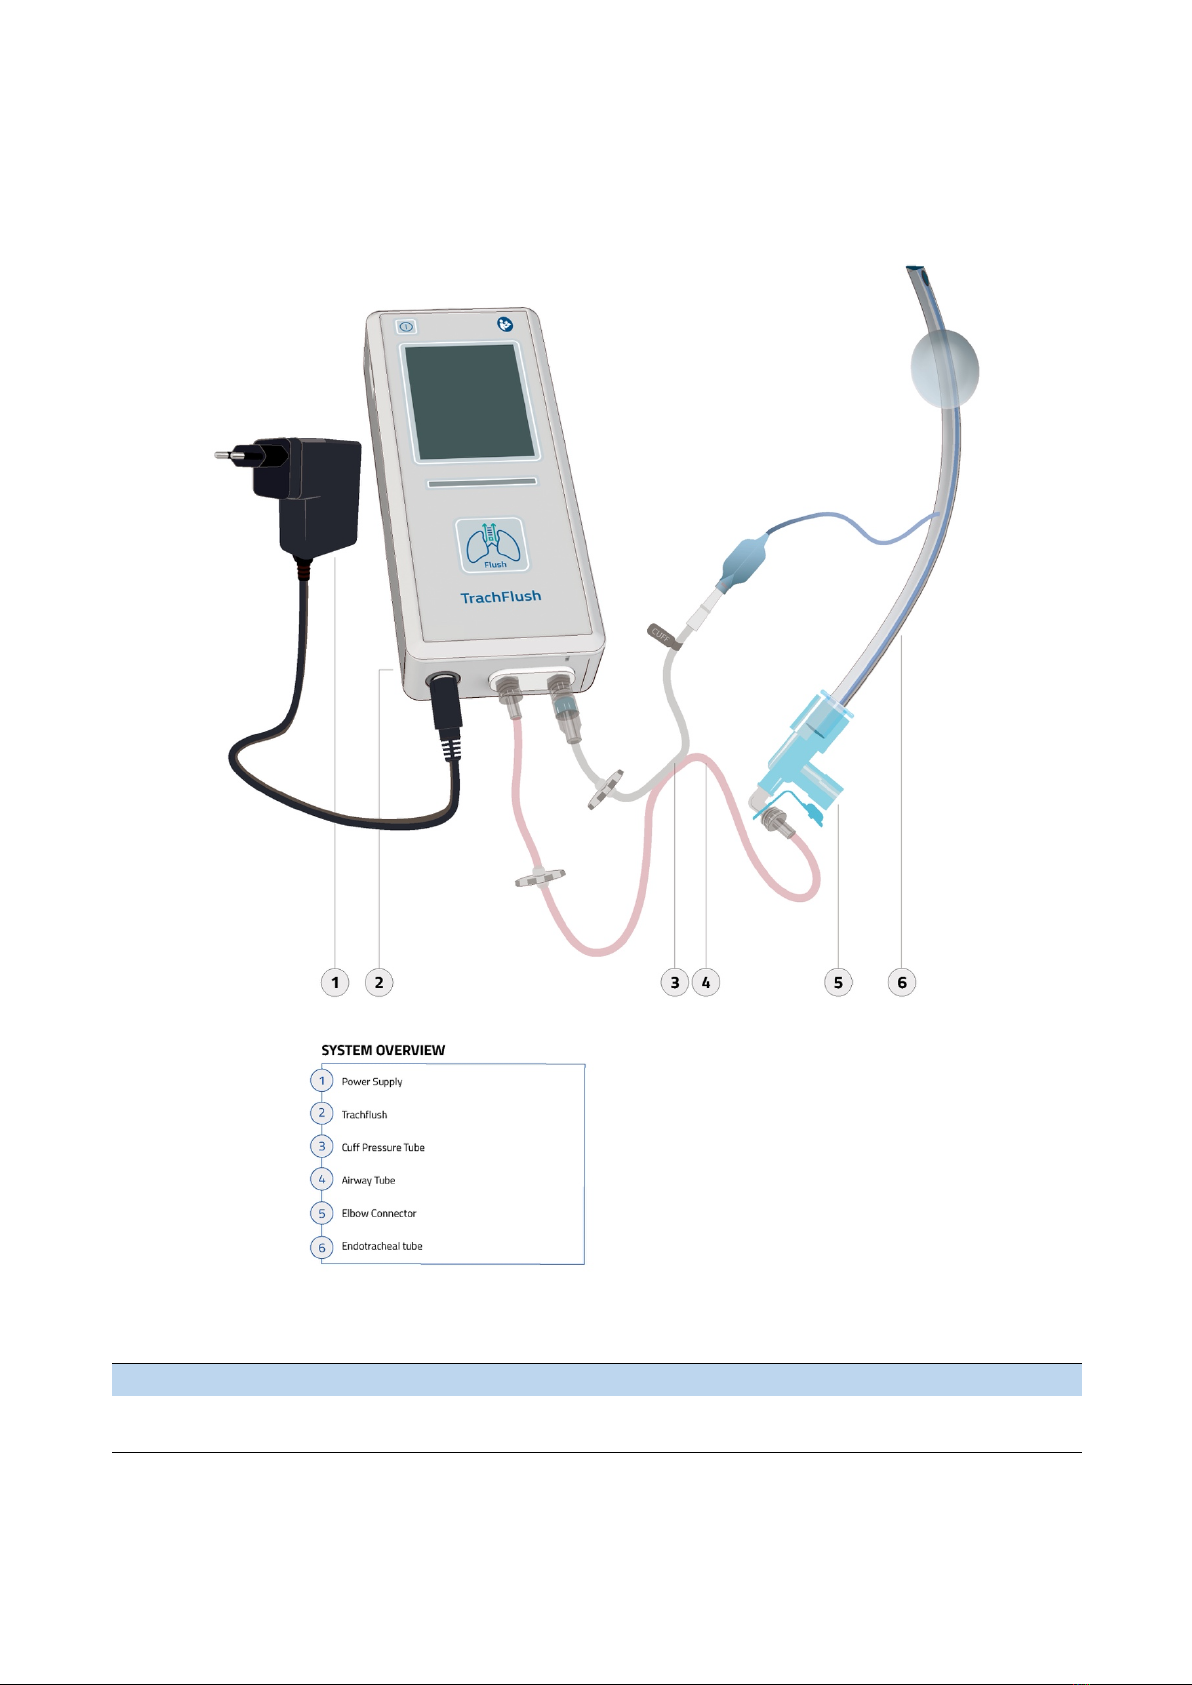
1. Device overview .......................................................................................................................................... 7
2. TrachFlush Connections ............................................................................................................................... 8
3. Getting started ............................................................................................................................................ 9
3.1. Connect the device to primary power ............................................................................................................. 9
3.2. Turning ON the device ................................................................................................................................... 10
3.3. Connect the Cuff Pressure Tube and Airway Tube to the device ................................................................... 12
3.4. Connect the Cuff Pressure Tube and Airway Tube to the patient .................................................................. 13
3.5. Adjust cuff pressure ....................................................................................................................................... 14
4. Flush Control ............................................................................................................................................. 15
4.1. Perform Flush Control on Pressure Control Ventilation (PCV) ....................................................................... 16
4.2. Perform Spont Flush Control on Pressure Support Ventilation (PSV) ............................................................ 20
5. Deflate ....................................................................................................................................................... 24
5.1. Perform deflate ............................................................................................................................................. 25
6. Cuff hold .................................................................................................................................................... 26
6.1. Perform cuff hold .......................................................................................................................................... 27
7. Turning OFF the device .............................................................................................................................. 28
8. Alarms and troubleshooting ...................................................................................................................... 29
8.1. Information Signals ....................................................................................................................................... 30
9. Mounting the TrachFlush device ................................................................................................................ 32
10. Cleaning and maintenance ......................................................................................................................... 33
10.1. Cleaning of TrachFlush device and equipment .............................................................................................. 33
10.2. Disposal of Cuff Pressure and Airway Tube set ............................................................................................. 33
10.3. Maintenance of TrachFlush device ................................................................................................................ 33
10.4. Disposal of TrachFlush device ........................................................................................................................ 33
11. Intended use and operators ....................................................................................................................... 34
12. Standards and approvals ............................................................................................................................ 34
13. EMC Declarations IEC 60601-1-2:2014 ........................................................................................................ 35
Electromagnetic environment – guidance ............................................................................................................ 36
14. Specifications ............................................................................................................................................. 39
14.1. Physical, performance, and environmental data .......................................................................................... 39
14.2. Symbols on labels .......................................................................................................................................... 40
15. Parts and accessories ................................................................................................................................. 41
16. Warranty ................................................................................................................................................... 42
16.1. Miscellaneous ................................................................................................................................................ 43

English | AWT-1030 #4.0 TrachFlush Instructions for Use
4
© 2022 AW Technologies ApS, Amalienborgvej 57, DK-9400 Noerresundby. All rights reserved.
Printed in Denmark.
No part of this publication may be reproduced, stored in a database or retrieval system, or
transmitted in any form or by any means, electronic, mechanical, or by photocopying, recording,
or otherwise, without prior written permission of AW Technologies ApS.
This document may be revised, replaced, or made obsolete by other documents by AW
Technologies ApS at any time and without notice. Ensure that you have the most current
applicable version of this document; if in doubt, contact the technical support department of AW
Technologies ApS, Denmark. While the information set forth herein is believed to be accurate, it is
not a substitute for the exercise of professional judgment.
Nothing in this document shall limit or restrict in any way AW Technologies ApS’s right to revise or
otherwise change or modify the equipment (including its software) described herein, without
notice. In the absence of an express, written agreement to the contrary, AW Technologies ApS has
no obligation to furnish any such revisions, changes, or modifications to the owner or user of the
equipment (including software) described herein.
The equipment must be operated, serviced, or upgraded only by trained professionals. AW
Technologies ApS’s sole responsibility with respect to the equipment and its use is as stated in the
limited warranty provided in this document.
AW Technologies ApS shall not be liable for any loss, cost, expense, inconvenience, or damage that
may arise out of misuse of the product, or if non-AW Technologies ApS parts were used when
replacing parts, or if serial numbers were amended, deleted, or removed.
If returning parts to AW Technologies ApS, be sure to use the standard AW Technologies returned
goods authorization (RGA) procedure. Disposal of parts shall follow all local, state, and federal
regulation with respect to environmental protection.
Product and company names mentioned herein may be the trademarks and/or registered
trademarks of their respective owners.
AW Technologies ApS will make available, on request, circuit diagrams, component parts lists,
descriptions, calibration instructions, or other information that will assist appropriately trained
personnel to repair those parts of the equipment designated by AW Technologies ApS to be
repairable.

English | AWT-1030 #4.0 TrachFlush Instructions for Use
5
Document conventions
WARNING
A WARNING alerts the user to the possibility of injury, death, or other serious adverse reactions
associated with the use or misuse of the device.
CAUTION
A CAUTION alerts the user to the possibility of a problem with the device associated with its use or
misuse, such as device malfunction, device failure, damage to the device, or damage to other
property.
NOTICE
A NOTICE emphasizes information of particular importance.
Units of measure
The document uses cmH2O representative of all pressure units. 1 cmH2O equals 0.981mbar, which
equals 0.981 hPa.
General notes
WARNING
• MR UNSAFE. Keep away from magnetic resonance imaging (MRI) equipment. TrachFlush is
not designed for the MR environment.
• Modifications to the device are not permitted.
• To prevent increased emissions, decreased immunity, or interrupted operation of the
TrachFlush device or any accessories, use only accessories or cables that are expressly
stated in this manual.
• Only for use on adults (+18 years of age).
CAUTION
• Use only the AW Technologies disposable Cuff Pressure and Airway Tube with filter, safety
valve, and lock. Use of any other tubing will damage the device and result in loss of cuff
pressure. Use of any other tubing without a filter may result in the device being
contaminated.
• Do NOT kink the tubing.
NOTICE
• The use of this equipment is restricted to one patient at a time who is intubated with an
endotracheal tube (ETT) or tracheostomy tube (TT).
• If there is visible damage to any part of the TrachFlush device, do not use the device.
Technical service is required.
• Familiarize yourself with these Instructions for Use before using this device on a patient.

English | AWT-1030 #4.0 TrachFlush Instructions for Use
6
• Install the TrachFlush device in a position where the primary power supply can easily be
disconnected.
• To electrically isolate the TrachFlush device from all poles of the primary power supply
simultaneously, disconnect the power plug.
• The device is not protected against the effects of defibrillator use.
• The manufacturer can only be responsible for the safety, reliability, and performance of
the TrachFlush device if all the following requirements are met:
o Appropriately trained personnel carry out assembly operations, extensions,
readjustments, modifications, maintenance, or repairs.
o The electrical installation of the relevant room complies with the appropriate
requirements.
o The TrachFlush device is used in accordance with the Instructions for Use.
• The TrachFlush device requires special precautions regarding EMC and must be installed
and put into service according to the EMC information provided in the EMC declarations in
section 13.

English | AWT-1030 #4.0 TrachFlush Instructions for Use
7
1.
Device overview
Not all elements are displayed at the same time and are only shown here for information
purposes.
Figure 1: Device overview
Alarms and power
1. Power ON / OFF button
2. Alarm bar
3. Alarm silence button
1
3
Pressure display
4. Actual cuff pressure
5. Set cuff pressure (target)
6. Unit of measure
7. Adjustment buttons
4
5
6
Control panel
8. Deflate button
9. Cuff hold information bar
10. Cuff hold button
11. Alarm bar (LED)
12. Flush Button
7
8
9
12
10
11
2

English | AWT-1030 #4.0 TrachFlush Instructions for Use
8
2.
TrachFlush Connections
NOTICE
Only #1, #2, #3, and #4 above is a part of the TrachFlush device. The elbow connector (#5) and the
endotracheal tube (#6) is not a part of the TrachFlush device but is shown here for connectivity overview.
Figure 2: TrachFlush Setup Overview

English | AWT-1030 #4.0 TrachFlush Instructions for Use
9
3.
Getting started
CAUTION
Prior to use, confirm that the ETT or TT cuff is made of Polyvinyl chloride (PVC) or Polyurethane (PU).
TrachFlush can ONLY be used with ETT cuffs or TT cuffs made of these materials.
Prior to use, confirm that the ETT or TT is between 5.0mm and 10.0mm in Inner Diameter (ID) as TrachFlush
only supports ETTs and TTs in these sizes.
3.1.
Connect the device to primary power
WARNING
Only use the supplied PSU with the device. Use of unauthorized PSU may damage the device. If the PSU is
damaged a new PSU should be ordered from AW Technologies.
NOTICE
Keep the power supply always connected to stable power. If disconnected from power or power is lost, the
TrachFlush device will alarm and shut down within 30 seconds.
The TrachFlush device is powered by a power supply unit (PSU) connected to AC power.
Connect the power cable as follows:
1. Connect the appropriate plug adaptor.
2. Plug the adapter into a mains AC power source.
3. Connect the power plug end of the power cable to the power port on the TrachFlush
device.
Figure 3: Connecting the device to primary power

English | AWT-1030 #4.0 TrachFlush Instructions for Use
10
3.2.
Turning ON the device
Press and hold the Power ON / OFF button for three (3) seconds.
When turning on, the device performs a self-test, during which the display turns on, LED-bar lights
up and the alarm sounds, and the signal (booting) will appear on the screen. If this does not
occur, see Section 8.
Once the device is turned on, calibration is required. Remove tubes before calibration. To perform
calibration, press (accept) and await calibration. Once calibration is completed, connect
tubes, see section 3.3 and 3.4.
Figure 4: Turning on TrachFlush
Figure 5: TrachFlush Booting
Figure 6: Calibration process

English | AWT-1030 #4.0 TrachFlush Instructions for Use
11
If TrachFlush detects that the tubes are not removed prior to calibration, the text will be
highlighted in red as shown in Figure 7.
Once the device is calibrated, the main screen will appear (as shown in Figure 8) and Cuff Control
functionality will be OFF until pressure is set, see section 3.5.
NOTICE
On the main screen, the Actual Cuff Pressure measured ( ) will be shown, in this case 25
cmH2O. When powering up, the Set Cuff Pressure ( ) will be off until set by the operator.
Figure 8: TrachFlush main screen
Figure 7: TrachFlush detects
tubes are not disconnected

English | AWT-1030 #4.0 TrachFlush Instructions for Use
12
3.3.
Connect the Cuff Pressure Tube and Airway Tube to the device
Step 1: Connect the Cuff Pressure Tube (transparent tube) connector to the cuff inlet socket of the
TrachFlush by twisting it on as shown in Figure 9.
Step 2: Connect the Airway Tube (pink tube) connector to the airway inlet socket of the TrachFlush
device by twisting it on as shown in Figure 10.
Figure 9: Device connectivity, connecting Cuff Pressure Tube
Figure 10: Device connectivity, connecting Airway Tube

English | AWT-1030 #4.0 TrachFlush Instructions for Use
13
3.4.
Connect the Cuff Pressure Tube and Airway Tube to the patient
Step 1: Connect the Airway Tube (pink tube) connector to the standard luer lock gas outlet on the
patient’s connector or HME filter by twisting it on as shown in Figure 11.
NOTICE
If no standard luer lock gas outlet is available, attach a connector or an HME filter with luer gas outlet. to
the patients breathing system.
Step 2: Connect the Cuff Pressure Tube (transparent tube) connector (labelled “Cuff”) to the ETT
or TT cuff connector by pushing it in as shown in Figure 12
Figure 11: Patient connectivity, connecting Airway
Tube
Figure 12: Patient connectivity, connecting Cuff Pressure Tube

English | AWT-1030 #4.0 TrachFlush Instructions for Use
14
3.5.
Adjust cuff pressure
For an overview of the pressure display, see Section 1.
NOTICE
It is recommended to keep the cuff pressure between 25cmH2O and 30cmH2O for adult ETTs/TTs.
TrachFlush Cuff Controller can regulate cuff pressures between 5 and 50cmH2O.
To adjust the set (target) pressure:
Step 1: Press the (increase) or (decrease) button to increase or decrease the cuff pressure.
Step 2: Press the (accept) button to apply the new cuff pressure or press the (decline) button
to cancel the cuff pressure adjustment and return to previous settings.
As shown in Figure 13 above, the device will increase the pressure, currently at 20 cmH2O, to the
target of 25 cmH2O once the new set pressure is accepted by the operator.
Figure 13: Adjust cuff pressure

English | AWT-1030 #4.0 TrachFlush Instructions for Use
15
4.
Flush Control
The Flush Control for pressure control ventilation (PCV) can be activated by pressing the Flush
button, see section 4.1. The Spont Flush Control for pressure support ventilation (PSV) can be
activated by pressing and holding the Flush button for three (3) seconds, see section 4.2
The Flush Control and Spont Flush Control maneuver rapidly deflates and inflates the cuff during
the inspiratory phase upon activation.
Upon activation, the device checks the ventilator settings to ensure the function activates under
proper conditions, see section 14.1 for information on appropriate ventilator settings.
By default, the cuff will after the deflation automatically return to the set target pressure.
1. Flush button
Figure 14: Flush Control
1

English | AWT-1030 #4.0 TrachFlush Instructions for Use
16
4.1.
Perform Flush Control on Pressure Control Ventilation (PCV)
Please follow these steps to perform a Flush Control maneuver.
WARNING
Only adjust the ventilator settings if it is clinically safe for the patient and adjustments should only be
temporarily when performing the Flush Control maneuver(s). Remember to return settings if adjusted.
Do not disconnect the tubes during Flush Control.
CAUTION
Check if ventilator settings are set as follows:
1. Mode
a. Pressure Control Ventilation (PCV)
2. Settings
a. Pressure above PEEP is minimum 10 cmH2O
b. PEEP is minimum 5 cmH2O
c. Inspiratory time is minimum 1.33 seconds
d. P-ramp is maximum 100 mSec
e. Cuff pressure is between 15 cmH2O and 35 cmH2O
NOTICE
TrachFlush will only perform the Flush Control maneuver if these ventilator and cuff pressure settings are
met.
Step 1: Press the Flush button to activate the Flush Control as shown in Figure 15 below
Figure 15: Performing a Flush

English | AWT-1030 #4.0 TrachFlush Instructions for Use
17
When Flush is activated, then on the TrachFlush screen, the signal (Flush in Progress) will be
shown and the LED-bar will flash cyan until Flush has completed, as shown in Figure 16.
NOTICE
When Flush is activated, the TrachFlush device uses at least one (1) inspiratory cycle to check for correct
ventilator settings as defined in Section 14.1.
If the ventilator settings are found correct, on the next inspiratory cycle the Flush Control maneuver is
performed.
If the ventilator settings are not found correct, TrachFlush will not perform the Flush Control until
corrected. On the screen, information signals will inform what settings are not found correct, see
Section 8.1 for description of information signals. Until the settings are found correct, the device
provides options for “Initiate Spont Flush” (see section 4.2) or “Cancel” the Flush Control
maneuver. If cancelled, TrachFlush will return to Cuff Controller mode.
Once settings are found correct, the Flush Control maneuver will automatically start.
Figure 16: Flush in Progress
Figure 17: Ventilator settings incorrect

English | AWT-1030 #4.0 TrachFlush Instructions for Use
18
When the Flush Control maneuver is completed, the signal (Flush Complete) and “OK” button
will appear on the screen as shown on Figure 18.
After the “OK” button has been pressed to acknowledge the Flush is completed, TrachFlush
returns to main screen as shown in Figure 19.
Step 2(OPTIONAL): Evaluate the effect of the Flush Control maneuver and, if considered
necessary, repeat Step 1.
Step 3: Return to Pre-Flush Control ventilator settings after Flush Control maneuver(s) (only if the
ventilator settings were adjusted before performing a Flush Control maneuver)
TrachFlush will display the (Return to Pre-Flush Ventilator Settings) symbol 15 seconds after
the last Flush Control maneuver, if TrachFlush has detected changes to ventilator settings, as
shown in Figure 20.
Figure 18: Flush Complete
Figure 19: Main screen

English | AWT-1030 #4.0 TrachFlush Instructions for Use
19
Figure 20: Return to Pre-Flush
Ventilator Settings

English | AWT-1030 #4.0 TrachFlush Instructions for Use
20
4.2.
Perform Spont Flush Control on Pressure Support Ventilation
(PSV)
Please follow these steps to perform a Spont Flush Control maneuver.
WARNING
Only adjust the ventilator settings if it is clinically safe for the patient and adjustments should only be
temporarily when performing the Spont Flush Control maneuver. Remember to return settings.
When a Spont Flush Control is activated, TrachFlush will perform the Flush during the next inspiratory cycle.
Use ONLY on Pressure Support Ventilation (PSV).
Do not disconnect the tubes during Spont Flush Control.
CAUTION
Check if ventilator settings are set as follows:
1. Mode
a. Pressure Support Ventilation (PSV)
2. Settings
a. Pressure above PEEP is minimum 10 cmH2O
b. PEEP is minimum 5 cmH2O
c. Frequency is less than 28 b/min
NOTICE
TrachFlush will only perform the Spont Flush Control maneuver if the frequency is less than 28 b/min.
Step 1: Press and hold the Flush button for 3 seconds to enter the Spont Flush Control menu as
shown in Figure 21 below
Figure 21: Activate a Spont Flush
Control maneuver
Other manuals for TrachFlush
1
Table of contents
Other AW Technologies Medical Equipment manuals