AWA DP7560 User manual

Please read this User Manual carefully to ensure proper use of this product and keep this manual
for future reference.
DVD/MPEG4/CD/MP3/ PLAYER /DVB-T tunerATV
USER MANUAL
DP7560
Plea se read t his Use r Manu al care full y to ensu re prop er use of th is product an d kee p thi s man ual
for fut ure refere nce.
DVD/MPEG4/ CD /M P3 / PLAY ER /DVB -T tunerATV
USER MAN UA L
DP 7 560

Safety Precautions
1
3
DVD Use Manual Content
INTRODUCTION
Remote Control
Connecting to a TV set
2
MPEG4/MP3 PLAYBACK
The Setup Menu System
Remote Control Operation
OTHERS
Troubleshooting
Specifications
4
6
3
10
KODAK Picture CD playback
6
2
Panel Illustration
DVB PART
The Setup Menu System
7
DVD PART
SCREEN SET PART
The Setup Menu System
10
ATV PART
The Setup Menu System
11
12
1. The apparatus shall not be exposed to dripping or Splashing and
that no objects filled with liquids, such as Vases, shall be placed
the apparatus.
2. The mains plug is used as the disconnect device, the disconnect
device shall remain readily operable.
3. To be completely disconnect the power input, the mains plug of
apparatus shall be disconnected from the mains.
4. The mains plug of apparatus should not be obstructed or should
be easily accessed during intended use.
Accessories Includes
12

11
Safety Instructions
CAUTION
RISK OF ELECTRIC SHOCK
DO NOT OPEN
Position the cables so that they cannot be walked on or pinched by items
placed on or against them.
Do not use the portable DVD Player in humid or damp conditions.
Do not allow the portable DVD Player to get wet.
Do not expose the portable DVD Player to dripping or splashing.
Do not place water filled objects such as vases on top of the portable
DVD Player.
Do not place naked flame sources, such as candles, on the top of the
portable DVD Player.
Cleaning
ALWAYS unplug the Portable DVD Player before you clean it.
Do not use liquid or aerosol cleaners.
Clean the Portable DVD Player with a soft, damp (not wet) cloth.
Ventilation
The slots and openings on the Portable DVD Player are for ventilation.
Do not cover or block them as it may cause overheating.
NEVER let children push anything into the holes or slots on the case.
Servicing
There are no user serviceable parts in this Portable DVD Player.
When servicing, refer to qualified service personnel.
Consult your dealer if you are ever in doubt about the installation,
operation or safety of this unit.
Safety is Important
Keep this information in a safe place for future reference.
Please read all the safety information before using the product.
Safety Considerations.
To ensure your safety and the safety of others, please ensure you
read the Safety Instructions before you operate this product.
Battery Disposal
Please ensure batteries are disposed of safely.
Check with your local authority for disposal regulations.
Never dispose of batteries in a fire or with other household waste.
This symbol indicates that this product incorporates double
insulation between hazardous mains voltage and user accessible
parts. When servicing use only identical replacement parts.
WARNING: To reduce the risk of fire or electric shock, do
not expose this apparatus to rain or cords.
Special notice
A few highlights or dark spots may occur on the LCD screen. It is a very common
phenomenon of the activematrix display technology, and does not mean any defects
or faults. Never try to repair this machine by yourself. In case of any faults. Please
turn off the unit at once, and notify our Company or the corresponding dealer. The
display is made up of many precision electronic components. Any disassembly or
modification may lead to further damage.
Correct Disposal of this product. This making indicates that this
product should not be disposed with other household wastes
throughout the EU. To prevent possible harm to the environment or
human health from uncontrolled waste disposal, recycle it
responsibly to promote the sustainable reuse of material
resources. To return your used device, please use the return and
collection systems or contact the retailer where the product was
purchased. They can take this product for environmental safe recycling.
Caution:Danger of explosion if battery is incorrectly replaced.Replace only
with the same or equivalent type.
Warning:The battery (battery or batteries or battery pack) shall not be
exposed to excessive heat such as sunshine,fire or the like.
Warning:To reduce the risk of fire or electric shock, do not expose this
apparatus to rain or moisture.The appapatus shall not be exposed to
dripping or splashing and that no objects filled with liquids,such as
vases,shall not be placed on apparatus.
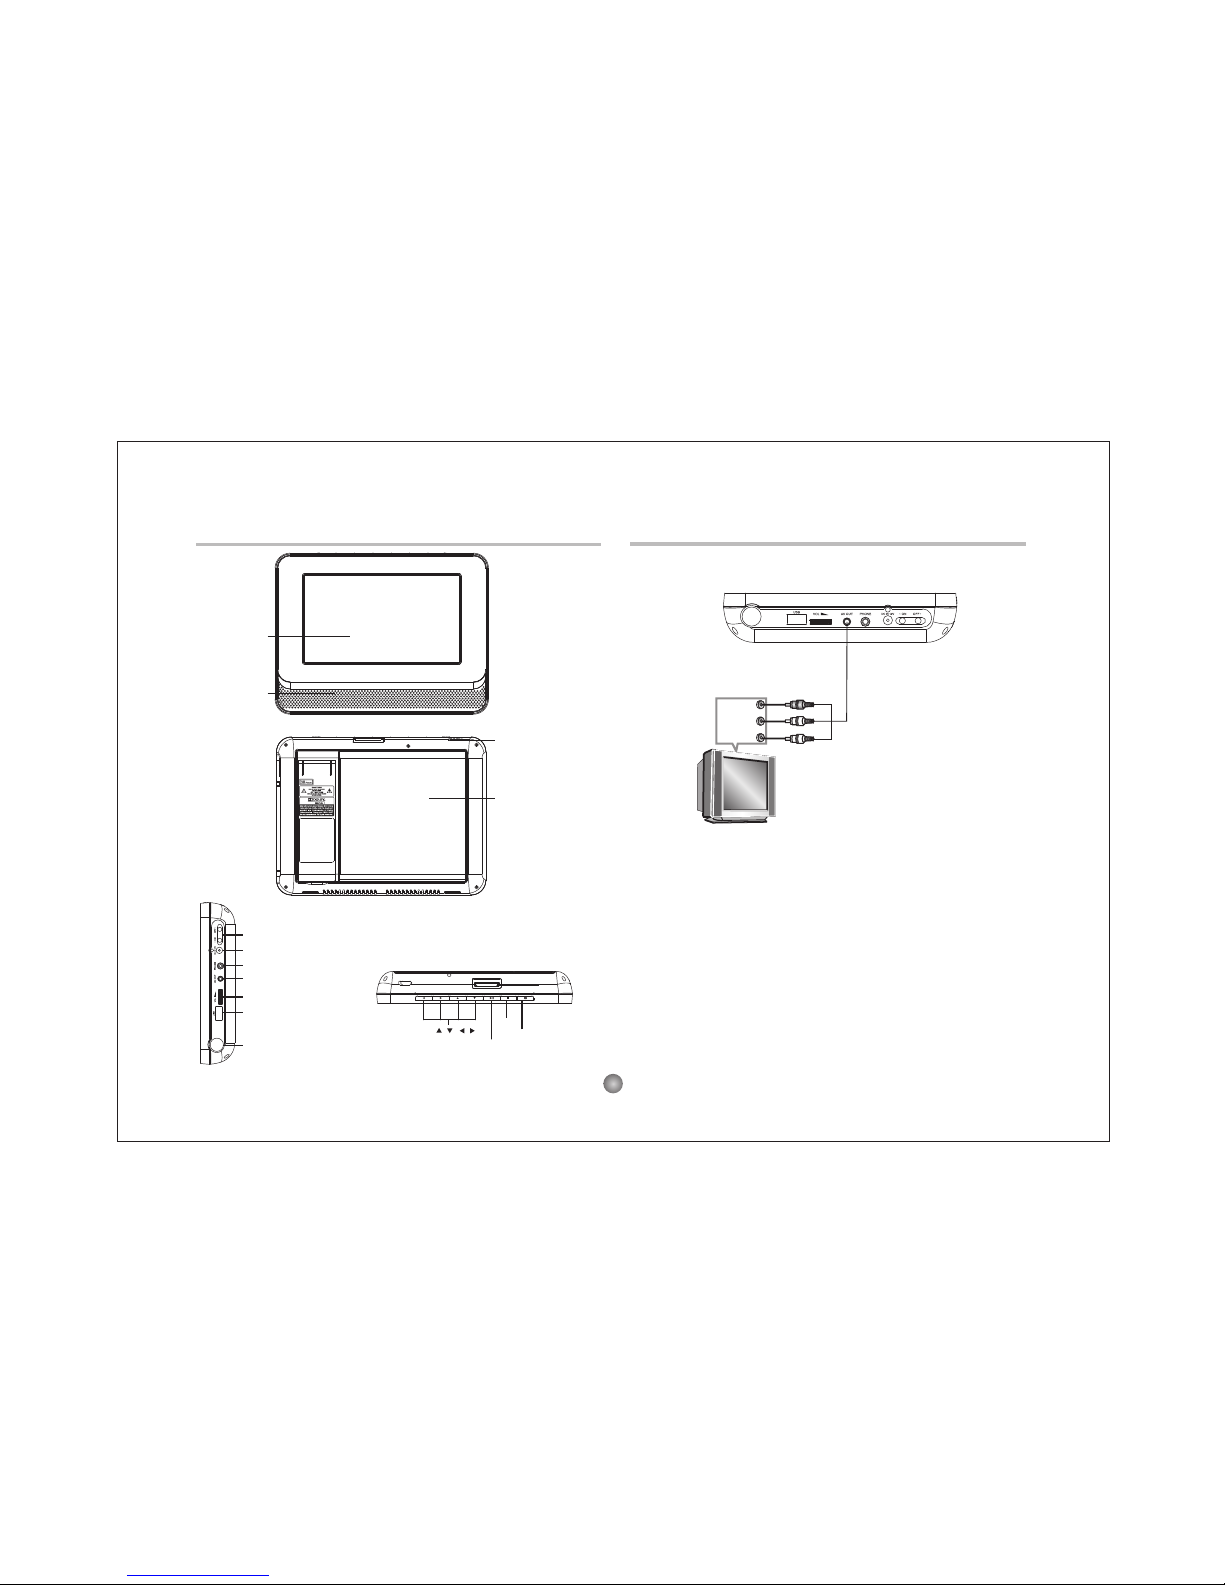
Warning:Only use attachments/accessories specified provided by the
manufacturer,the Portable DVD Player is supplied by AC adapter,the AC
adapter is used as disconnect device,the disconnect device shall remain
readily operable.
When the apparatus was in electrostatic circumstance, it may be
malfunction and need to reset by user.
Warning:The USB memory stick should be plug in the unit directly. USB
extension cable should not be used to avoid failing of data transferring
and interference caused.

Panel Illustration Connecting to a TV Set Connections
L
R
CVBS
White
Red
Yellow
VIDEO IN
AUDIO IN
2
ANT IN 75 ohm
LCD DISPLAY
SPEAKER
DISC TOP
OPEN DISC TOP
MOVE( , , , ) SOURCE
STOP
POWER ( ON/OF)
DC 12V INPUT JACK(power supply)
HEADPHONE
AV OUTPUT
VOLUME
USB IN
PLAY/PAUSE

HOW TO REPLACE THE BATTERY
STEP 1: PUSH THE BUTTON TOWARD LEFT;
STEP 2: PULL THE BATTERY LOADER OUT.
Remote Control BATTERIES
INCORRECT USE OF BATTERIES MAY CAUSE THEM TO LEAK,
CORRODE OR EXPLODE.
Be sure to place the batteries in the correct direction.
It is dangerous to charge/heat/open or short-circuit the batteries.
Do not leave dead or expired batteries or mix old/new batteries.
When not using the remote control for a long duration of time, remove
the batteries. When operating range becomes reduced, replace all
batteries with new, fresh ones.
If leakage from the battery occurs, wipe the battery liquid from the
battery compartment, then replace.
Remote Control
1. In this manual, will be used to represent different
NAVIGATION ARROWS on the remote respectively.
2. In order to operate any of the remote functions, you must first press
the Power button on the DVD player.
3. Some of the keys is multiple key. They can be used in DVD mode or
in DVB mode.
Introduction
1
2
CR2025
3
About Built-in Rechargeable Battery
Precautions related to battery recharge
1. Once the battery is fully discharged, immediately recharge it
(regardless of whether you plan to use the battery or not) in order to
maximize the battery life. When the power is low, the battery icon will
be shown on the upper left corner of the TFT for warning.
2. To charge the battery, please connect this player to AC mains via
the AC adapter and the charge indicator will turn on in red, and the
indicator will turn into green when the battery is fully charged. This
will take about 2-2.5 hours if the player is in off mode or 4.5-6 hours if
the player is in working mode.
Using and maintaining your rechargeable batteries
1. Please make sure you always use only the AC adapter included with
the player to recharge your batteries.
2. Recharge efficiency will degrade when the environmental
o o o o
temperature drops below 50 F (10 C) or exceed 95 F (35 C).
3. The lasting time of the fully charged battery when a headphone is
connected to the player is approximately 2 hours
Note:
NUMBER
KEY SELECT
GOTO
TV/RADIO
SOURCE
TITLE
ZOOM/EPG
SUBTITLE
NEXT
PREV
FUNCTION
SPEAKER
PROG
MENU
ANGLE
MUTE
REPEAT/FAVORITE
ENTER
EXIT
AUDIO
PLAY/PAUSE
STOP/TEXT
REV
FWD
SETUP
MOVE( )
MU TE DI SP LAY S PE AK ER
SO UR CE
RA ND OM PR OG AN GL E
TI TL E
RE V P RE V NEXT
ZO OM /E PG
GOTO
ME NU
SU BT IT LE
AU DI O
RE PE AT/FAV
SE TU P PL AY/ PAU SE
S P/ TE XT TO
TV /R AD IO
FU NC TI ON
10+
EX IT
RANDOM
DISPLAY

Advanced Features
The setup menu system---DVD PART
General Steps of setup menu
In the DVD mode, Press the <STOP> button, Then press <setup>
button, the DVD main setup menu appears.
A. DVD Setup-Language Setup
Press the Up and Down button move on the
DVD setup and to enter. The DVD Setup-
lanuage Setup option appear the screen.
1) MENU
Notes:
If your preferred language is not availabel, the disc s default
language will be played.
Highlight the MENU option, and press the
Arrow buttons to choose the menu language
you prefer. Press <ENTER> to confirm. If
the disc you are playing has that Language
availabel. It will display the menu in the
language.
Main Menu
DVD Setu p
DVB Menu
System S et ti ng
Game
Exit
:Sele ct : Co nf irm
B. DVD Setup-Audio Setup
Press <DOWN> arrow button to highlight the Audio Setup option
on the screen.
2) DOWNMIX
C. DVD Setup-Custom Setup
Press the <Down> arrow button to highlight the Custom Setup option
on the screen.
There are two modes, one is Lo/Ro, one is Lt/Rt.
DVD Se tup-A udio Setu p
:Sele ct : Co nf irm
AeDown mix
4) EXTER NAL SUBTIT LE
Highlight the EXTERNAL SUBTITLE option, and press the Arrow
buttons to choose the supported subtitle language when playing
MPEG4 format discs.
DVD Setup-Custom Setup
:Sele ct : Co nf irm
AePare ntal Ct rl
Angl e Mark
1) PARENTAL CTRL
2) AUDIO
Highlight the AUDIO option, and press the Arrow buttons to choose
the audio language you prefer. Press <ENTER> to confirm. If the
disc you are playing has that language available, it will output the
language.
3) SUBTITLE
Highlight the SUBTITLE option, and press the Arrow buttons to
choose the subtitle language you prefer. Press <ENTER> to confirm.
If the disc you are playing has that language available, it will display
subtitles in that language.
4
Parental Ctrl:1,2:G,3:G,4:PG13,5,6:R,7:NC17,8 the eight levels.
The first level discs are open to people of ever age and eight level
only suitable for the adult. If you want to change the parental ctrl
setting, enter the user’s a ge c ontrol item a nd t hen e nter f our digital
password. The default password is 6666 (if you are using this player
for the first time, just input this code).If the input code has been
confirmed, the level setting up menu will appear. Move the cursor to
choose the expected level and press <ENTER> button to confirm
and memory it. Move the cursor to the "ENTER" and press<ENTER>
button to confirm and withdraw to the “user setup” menu or press
<ENTER> button to directly withdraw from the operation.
1. DVD MENU

DVD Se tup Men u- Langu age Set up
: Selec t : Confi rm
AeOSD
Advanced Features
The setup menu system---DVD PART
B. System setting Menu-Display Setup
Press the <DOWN> arrow button to
highlight the Setup option on the screen
In the System Setting Menu-Display
Setup.
1) TV Standard
According to the Color System of the TV, you can choose the TV
Standard.
TYPE
According to the Display type, you can choose 4:3PS, 4:3LB or 16:9.
C. System setting Menu-Preference
Press the Down arrow button to highlight
the Preference option on the screen.
2) Display
DVD Se tup-D isplay Se tup
:Sele ct : Co nf irm
AeTV Stan dard
Disp lay Type
1) OSD LANGUAGE
Highlight the OSD LANGUAGE option, and
press the Arrow buttons to choose the OSD
language you prefer. Press <ENTER> to
confirm, and it will display OSD in that
language.
1) UI Style
According to UI Style, you can choose Style1, Style2, Style3, Style4.
2) Change PIN -The default password is 6666.
3) Default Type
In the Default Type options, you can choose the DVD MODE, DVB
MODE, USB MODE, ATV MODE user Select MODE, Last operation
Type MODE.
NOTE: In the Default Type, If you choose the DVB MODE. That next
power on the PLAYER will direct enter DVB MODE, no again display
the SOURCE list.
4) Default The Default setup options are RESTORE factory setup,
Let your PLAYER work on the default state.
5) System Info The system info includes model, HW, SW and Date.
5
2) ANGLE MARK
There are On and Off the two choices for this item. If in the ON mode,
when play a disc which the content is multi-angle shot, you may press
the <ANGLE> button on the remote control to enjoy the scene in
different angles.
D. DVD Setup-Exit
Press the <DOWN> arrow button to highlight the <EXIT> option on
the screen In the DVD Setup-Exit ,Choose the Exit option to return
the DVD main Setup.
2.System Setting
Press the <SETUP> button, the DVD main setup menu appears the
screen, then press the <DOWN> button to highlight the system
setting option.
A. System Setting Menu-language Setup
Press the <UP> and <DOWN> button moveon the System setting and
to enter button. the System setting Menu-lanuage Setup option appear
the screen.In the System setting Menu-language Setup, you can setup
the OSD option.

3. Game options
Press the <SETUP> button, the DVD main setup menu appears the
screen, then press the <DOWN> button to highlight the Game option.
Press the <UP> and <DOWN> button move on the DVD setup and
press <ENTER> button to confirm the Main Menu-Game option,
appear the screen.
In the Main Menu-Game Setup, you can
setup the Mine, Tetris, Rush Hour,
Calendar four kinds of games. For
example:If you want to play the Mine
Game, you can press the <DOWN>
button to highlight the Mine options.
Then press the <ENTER> button to
Enter. As below:Other Game options operation same to the Mine Game.
Main Me nu
Mine
Tetris
Rush H ou r
Cale nd ar
Exit
:Select : Co nf ir m
Press to select the file when the cursor
appears in the file window. Press select
to play the current file select by the cursor.
Press to switch between the directory
window and the file window.
Note:
The player will not function correctly under
the following condition:
1. The disc is badly scratched, damaged or dirty.
2. The disc is not finalized.
3. The recording format is not supported by the player.
Current
directory
name
Current MP3/JPEG file
name. If a JPEG file is
playing, the name should
have a JPEG extension.
When a Mp3 disc is loaded, the screen will display as follows:
MP3 Playback
Advanced Features
The setup menu system---DVD PART Kodak picture CD Playback
The Introduction of KODAK Picture CD
A Kodak picture CD has the size and shape of a regular CD. You
can order a KODAK Picture CD simply by checking the box on the
photo finishing envelope when you drop off a roll of film(35mm or
Advanced Photo System(APS) color print film) at the time of
processing in Kodak Express store displaying “Kodak Picture
Cd”sign. When your order is returned, you receive your prints,
negatives, and your full roll of pictures safely stored on your
KODAK Picture CD. Each KODAK Picture CD brings you the tools
to enhance, share and manage your pictures on your computer.
You also can record the JPEG picture into CD-R or CD-RW with the
CD-Rewriter yourself.
Note:
1. The Max. Size of JPEG Picture can be supported: 3840X3840
pels
2. JPEG stands for Joint Picture Experts Group. It is the first
nternational Standard on Still Picture Compressing: ISO 10918-1,
constituted by the Committee on Still Picture compressing
Standard of ISO. The pictures on KODAK Picture CD are stored in
this format(JPEG). This player can decode the JPEG picture in
KODAK Picture CD and playback the pictures in different modes.
Now, you can playback KODAK Picture CD on this player and view
your wonderful pictures on your TV in the comfort of your living
room. When a Kodak Picture CD is inserted on a player an
automatic slide show is launched. Each picture in the Kodak
Picture CD will be displayed consecutively in a slide-show fashion
and will be scaled to fit in the whole TV screen.
6

The setup menu system---DVB PART Advanced Features
1. First Time Installation
After all the connections have been made
properly, switch on your TV. Make sure the
receiver is connected to the home antenna
and press <POWER> to switch the receiver
on. If you are using the receiver for the first
time, a First Time Installation menu will be
displayed to guide you through the initial
setup. Use the remote controller to finish the
setup.
A. At the First time installation menu, select
YES and press <ENTER> button on the remote
controller to proceed.
D. Wait to complete the scanning.In case you
want to stop the scanning, press the
<RETURN> button. The channels already
found will still be stored.
B. Enter your regional settings, include your
Country, Language, Time Zone . Then select
<NEXT> to proceed.
C. Select Yes to start the automatic channel
search.
First Time In sta llation
Do you want t o sta rt first tim e
Install ati on Wizard?
Yes No
First Time In sta llation(1)
Back Next
Country
Language
Time Zone
England
Germany
Spain
France
Italy
First Time In sta llation(2)
Do you want t o sta rt Auto Searc h?
Previou s cha nnel list will be r epl aced.
Yes NoBack
E. When finished, all active channels found
will be stored automatically. The last found
channel will be played.
2. DVB Mode of Main Menu
Press the <SETUP> button, the DVB main setup menu appears the
screen, then press the <DOWN> button to highlight the DVB Menu
option.
DVB Me nu -P ro gram Searh- Au to ma tic
Exit S av e & Ex it
Progress
Channel No
Frequency
TV List Music List
DVB Menu-P rog ram L ist
:Sele ct : Co nf irm
TV Prog ram
Musi c Progr am
Sort
A. DVB MENU-Program list
Press the <UP> and <DOWN> button
move on the DVB Menu and to enter
button to enter the DVB Menu-Program
list option, appear the screen.
DVB Menu -P ro gr am L is t- Pr ogram Edit Table
:Se le ct :Con fi rm E xi t: S ave & Exi t
No..Program Name Favor Move Del
1 Ideal World
2 UKTV Brtl deas
3 TMF
4 The HITS
1) TV Program
Press the <RIGHT> button to highlight the
TV Program, Then press the <ENTER>
button to enter the TV program options,
appear the screen. All active channels are
listed in the Program List, allowing you to
make your own Favorite channel group,
move, delete channels.
Creating Favorite Channel Groups
This feature allows you to group your favorite channels. To create your
favorite groups:
a. Select the channel which you would like to add to the group and go to
the Favor column.
b. When the Favor column of the desired channel ishighlighted, one red
heart symbol will appear after press the <ENTER> button.Pressing the
<ENTER> button again will un-select the channel of the favorite group.
c. Once your favorite group is created, you can press the <FAVORITE>
keys to quickly access your favorite channels.
Moving a Channel
a. Select the channel which you like to move and go to the Move column.
b. Press <ENTER> button and a symbol will be displayed.
c. Use the <UP / DOWN> key to move the channel to a desired position.
d. Press <ENTER> button again will be exit the moving channel mode.
7

1) Automatic Search.
Choose the Automatic Search options, This
operation same the
First Time Installation. Refer
to First time Installation.
2) Manual Search.
If any channel is missing after auto search,
or you want to add newly launched channels,
you can use Manual Search to scan the
desired channels. To manually search the
target channel, you must know its parameters,
e.g., the channel number. After the channel is
found, it is appended to the current channel list
Deleting a Channel
a. Select the channel which you like to delete and go to the Del column.
b. Press <ENTER> button and an X symbol will be displayed. Repeat
this step in the channel to be deleted.
c. Press <SETUP> or <RETURN> button and the marked channel will
be deleted.
d. Press <ENTER> button again will exit the deleting channel mode.
2) Music Program
Press the <DOWN> button to highlight the Music Program, Then press
the <ENTER> button to enter the Music program options, appear the
screen.
NOTE: This Music program options operation same the TV Program.
3) Sort
Press the <DOWN> button to highlight the Sort options, yon can
choose the channels Sort style. As: By Name, By Service ID, By
Channel number, By LCN.
B. DVB Menu-Program Search
Press the Up and Down button moveon the DVB
Menu-Program Search option appear the screen.
In the DVB Menu-Program Search, you can setup
the Automatic Search, Manual Search options.
The setup menu system---DVB PART Advanced Features
a. Enter the Manual Search menu via Main Menu > Program
Search > Manual Search.
b. Specify the appropriate channel number in the Channel No field
by press <DOWN> and <UP> button. Enter your selection, the
frequency and bandwidth values are changed accordingly.
c. Select <ENTER> button to start manual search
d. If no signal is found, a message indicating no signal will appear.
Otherwise scanned channel will be saved and appended to the
current channel list.
C. DVB Menu - Parental Control
This feature allows you to prevent children or unauthorized people
from watching channels.
1) Enter Main Menu > Parental Control. First, you will need to
enter PIN as prompted to use the parental control menu. (The
default PIN is 6666.)
2) After correct PIN input, the following options are provided:
Channel Lock: Allows you to activate or de-activate the overall
parental control. When set to YES, all the channels with locking
settings will be locked.
Parental Setting: In the channel list,
select the channel you want to lock and
then press <ENTER>. A padlock symbol
will be displayed. To remove the lock,
press <ENTER> again.
Parental Set tin g
Program Name Lock
No.
1
2
3
4
5
6
7
8
9
10
DIMO
FTV
FMTV
FTVN
TTV-1
TTV-2
HAKKA
CTS
CTS-IQ
CTS-EQ
D. DVB Menu-System Setting
1) Country
In the Country options, you can
choose a kinds of the Countries. As:
England Germany, Italy, France,
Spain etc.
DVB Menu-P rog ram List
:Sele ct : Co nf irm
Coun try
Language
GMT Usage
Time Zon e
Syst em Sche dule
8

2) Language
Press the <DOWN> button to highlight the Language options, then
Press the <ENTER> button to into the Language setup.
1 st /2nd Audio : This option allows you to select your first and
second choice for the audio language. If neither of your selected
language is available on the program transmitted, the main
language of the program will be used.
Subtitle : Allows you to select the subtitle language. If your selected
language is not available on the program transmitted, the main
language of the program will be used.
Exit: you can choose the Exit options to return the System setting.
3) GMT usage:
Allows you to enable/disable Greenwich Mean Time (GMT) usage. If
you know the GMT time zone of your location, set GMT usage to ON
and select an appropriate time zone. If you prefer to set the time
manually, select OFF in GMT usage item and then manually select
the date and time.
4) Time Zone
Select an appropriate time zone to display the local time correctly.
Both EPG and system schedule need a correct time zone setting.
5
Press the <DOWN> button to highlight the System Schedule
options, then Press the <ENTER> button to into the System
schedule setup.
) System Schedule
This feature allows the receiver to automatically
switch on and tune to a pre-specified channel for a pre-set length of
time. Up to10 tasks can be scheduled.
The setup menu system---DVB PART Advanced Features
a. In the Schedule pane, use the <UP / DOWN> key to select a task
and use <RIGHT / LEFT > key to switch between Inactive and
Active.
b. Press <ENTER> to enter the detail page.c. Enter the following
settings as required. Use the <UP / DOWN> key to move between
setting items, the <RIGHT / LEFT> key to switch between available
selections and numeric keys to enter numeric value. Mode: You can
repeat the task by setting the frequency as Once, Daily or Weekly. Or
you can select Stop to disable the
task. Start and End Time: Enter
the start and end time that
automatically turns on and off the
receiver.
Channel Type: Select TV or radio
channel as required. Channel No:
Select the channel to be played at
scheduled time.
d. When the setting is done, press
<SETUP> or <RETURN> to save
the changes.
9

1.Press SOURCE button to select ATV MODE.
2.Press SETUP to display options as follows.
A. Press DOWN button to select AUTO
SEARCH, Press Right button to start auto
search.
B. Press UP and DOWN button to select
MANUAL SEARCH, Press Right or Left
button to start manual search.
AUTO SEARCH
MANUAL SEARCH
FINE
POSITION 4
S-SYS L
SKIP OFF
UHF 585.25MHz
SELECT ADJUST
SWAP 0
TV M ENU
NOTE:
1.Auto Search always start from program number 0.
2.If the indication frequency stopped for a while during searching,
it means
a new channel found and it will be saved, If weak signal received,
the channel may be skipped and it will not save.
3.When Auto Search or Manual Search, you can press SETUP
button to stop Auto Search or Manual Search.
SCREEN SET PART
D. Press UP and DOWN button to select
current channel number and channel frequency will be displayed at
the bottom of the menu. Press Left or Right button to view the
previous or next channel.
POSITION, the
E. Press UP and DOWN button to select SWAP, you can
change the channel position here.Set the channel number with
Left/Right buttons, press DOWN button and confirm with Right.
F. Press UP and DOWN button to select S-SYS, you can
change the audio system I, DK, BG.
NOTE:
1.On audio system carrier: I stands for 6.0MHz, DK stands for 6.5
MHz and BG stands for 5.5MHz,pleaselect the audio system
according to local broadcaster.
2.Color system(it will auto setup according to audio system):
A.While audio system is I, color system is PAL-I.
B.While audio system is DK, color system is PAL-DK .
C.While audio system is BG, color system is PAL-BG .
3.In case of picture or sound have noise, please check the audio
system first.
G. Press UP and DOWN button to select SKIP to skip the channel.
Press the FUNCTION button to display PICTURE setting as bellow:
Press DOWN button to highlight the desired item.
Press LEFT and RIGHT to adjust the screen brightness,
contrast, color, HUE(for NTSC only), aspect ratio, color system,
OSD language, or set to default values.
BRIGHT 50
CONTRAST 50
COLOR 50
HUE 50
S-COLOR AUTO
LANG ENGLISH
DEFAULT
SELECT ADJUST
ZOOM 16:9
PI CTURE
C. Press UP and DOWN button to select FINE tune, Press
Left and Right button to fine Tune the frequency .
of the selected channel will decrease or increase 50kHz.
NOTE: Press Left or Right button once, the central frequency
10
ATV PART
Advanced Features

"BAD DISC" DISPLAYED
Ensure the disc is not warped,
damaged or deformed.
Ensure the disc is not badly stained
or damaged.
Ensure the disc format is
compatible with the player.
Please check whether you have
NO PICTURE OR SOUND
Ensure the power button is on.
Ensure the power outlet is operational.
Ensure the power cord is not damaged.
Ensure the power plug is connected
firmly to the outlet.
"NO DISC" DISPLAYED
Ensure you have put the disc on the tray.
Ensure the disc is not upside down.
Ensure the disc is not distorted, stained
or scratched.
Ensure the audio jacks are securely connected.
Ensure the audio connector is not damaged.
Ensure the volume is turned up in VOL/CH
setup.
Ensure you have set the player's AUDIO
settings correctly.
Ensure you have ENTERed the correct AV
input for your TV.
Ensure the audio is not set to mute.
POOR PICTURE OR SOUND
Ensure you have set the player's AUDIO
settings correctly.
Ensure the disc is not scratched or stained.
Ensure the AV connector or the output terminal
is not damaged.
Ensure the video jacks are securely connected.
Ensure you have ENTERed the correct AV input
for your TV.
Ensure the video connector is not damaged.
Ensure you have set the player's VIDEO
settings correctly.
REMOTE NOT WORKING
Ensure the remote batteries are working.
Point the remote control directly at the
player's IR sensor.
Remove any obstacles between the
remote and the IR sensor.
UNIT NOT WORKING
Turn off the power, and then turn it on
again.
SOUND BUT NO PICTURE
PICTURE BUT NO SOUND
If you have any questions, please consult the troubleshooting guide below.
Troubleshooting Other
Before you request for repair
Phenomena below does not necessarily mean failure with TV set.
Please check following before you request for repair.
Phenomena
No picture, no sound Improper connection with AC adapter orCar
adapter. Use of unauthorized power
supply. Power Switch is on OFF position.
No image Whether antenna adjusted correctly;
Whether the correct Channel or Countryselected.
May need to reset or search.
No sound
Whether the sound is turned to the end.
Whether earphone plugged in.
Whether press speaker button? Whether press
mute button? Sound system correct set in ATV
mode?
Diamonds in picture Whether antenna adjusted correctly; Maybe too
weak signal at the receiving place.
No signal Whether the correct Country selected;
Maybe signal too weak.
Dark picture Adjust Brightness, Contrast correctly
Diamonds in picture
orinferior sound
during driving.
The signal too weak at that place
Possible causes
11

Specifications are subject to change without notice.
Other
Specifications
600 Memorized TV Channels (DVB-T) /RADIO channels
64 (DVB-T) Number of MUX supported
Accessories Includes:
Play mode
Disc mode
Function
Video S/N ratio
Resolution
Frequency response
Audio S/N ratio
Dynamic range
Distortion
D/A Converter
Input Frequency
Display Device
Receiving Channel
Sound System
Screen Size
Video output
Audio output
Power Voltage
Power consumption
Size
Weight
NTSC/PAL
DVD,VCD, CD, MP3, CD-R, CD-RW, JPEG,
DVD+ -R/W, WMA, AVI
≥65dB.
≥500 lines.
fs 96KHz: 20Hz-20KHz:+/-1dBI
≥90dB
≥80dB
< 0.01%
96KHz/24bit
VHF 48.25MHz~412.5MHz
UHF 412.5MHz~863.25MHz
Color LCD
ATV: DI 48.25MHz~863.25MHz
BG 48.25MHz~863.25MHz
(DK / I / BG)
7 inches
1Vp-p(75 W)
2CH
DC IN 12V
≤15W
206x160x40mm
0.7kg
12
DTV: VHF 177.5MHz~226.5MHz
UHF 474 MHz~858 Mhz
This product incorporates copyright protection technology that is
protected by U.S. patents and other intellectual property rights.
Use of this copyright protection technology must be authorized by
Rovi Corporation, and is intended for home and other limited viewing
uses only unless otherwise authorized by Rovi Corporation.
Reverse engineering or disassembly is prohibited.
DVD, DVBT, ATV, USB
MUTE DISPLAY
SPEAKER
RANDOM PROG
ANGLE
TITLE
REV PREV NEXT
ZOOM/EPG
GOTO
MENU
SUBTITLE
AUDIO
REPEAT/FAV
SETUP PLAY/PAUSE
SP/TEXT
TO
TV/RADIO
SOURCE
10+
EXIT
FUNCTION
Please read this User Ma nual carefu lly to ensure p roper use of thi s product and k eep this manua l
for future referenc e.
DVD/MPE G4/CD /MP3/ P LAYER /DV B-T tune rATV
USER MANU AL
DP756 0
The unit cannot play DTS audio on DVD video disc

Subject to the warranty repair conditions below, this product is
warranted for 1 year from the original date of purchase covering
both parts and labour.
The benefits conferred by this warranty are in addition to and not in
derogation of all rights and remedies in respect of this product which
the consumer has under the Trade Practices Act and other State and
Territory laws.
Warranty Repair Conditions
A. This warranty only applies provided the product:-
· Has been purchased in Australia and sold by Authorised Distributors
or Dealers and only where the products are used and serviced within
Australia
· Is taken for service when required to an Authorised Service Agent,
together with written instructions indicating specific problem or function
requiring investigation.
· Has valid proof of purchase and presented when warranty service is
requested.
· Has only been used in a domestic application.
· Has been installed and operated in accordance as noted in the
operating instructions under normal use and reasonablecare (in the
opinion of the Service Centre).
· Has not been damaged by the use of accessories which in the opinion
of the Service Centre are defective or incompatible with the product.
· Has not been tampered with or repaired (including unauthorised
alterations) by anyone other than the Telefix or an Authorised Service
Centre.
B. The warranty does not cover:-
· Damage, malfunction or failure resulting from use of incorrect
voltages, incorrect installation, accidental damage, misuse,neglect,
build-up of dirt or dust abuse, wear and tear, maladjustment of customer
controls, mains supply problems,thunderstorm activity or Acts of God,
pixel error, infestation by insects or vermin, exposure to abnormally
corrosiveconditions or any foreign object or matter having entered the
product.
· Mileage or travelling time in respect of service outside the authorised
Telefix Service Centre nor pick up and delivery cost incurred.
Product Warranty
· Service calls arising from failure to correctly operate the product or
to observe noted instructions, or repair which reveals the product is in
normal working order.
· Cabinet parts, user replacement batteries or leads unless the
defective items are reported at the time of purchase.
C. Service calls only apply to Television display devices (CRT, LCD,
Plasma) with screen sizes greater than 59cm in the major metropolitan
areas of Australia or the normal operating areas of the nearest
Authorised Service Centers.
D. Requested service visits to the customer premises will be made
during normal working hours of the customary working week upon
request by the customer. Where such a visit is made on a day arranged
by the customer and the service technician is unable to obtain access
to the product, the Service Centre will be entitled to make a separate
charge for service call fee, time and distance travelled.
E. Telefix and its Authorised Service Centres may charge for work done
where the product is found to be in good working order.
Example, charges may be made where the problem is found to be due to
incorrect setting of customer controls, use of poor associated equipment
(e.g. poor antenna systems) or the inability of the product to operate with
faulty or incompatible equipment.
F. If the product is sent to an Authorised Service Centre, the owner is
responsible for the cost of transport to and from the Service Centre.
In addition, the product is at the owners risk while in transit to and from
the authorised Service Centre.
G. No person is authorised to make or give any assertions, statements or
undertakings, whether expressed or implied about the product other than
or additional to the terms of this warranty.
PLEASE READ INSTRUCTION MANUAL CAREFULLY
Should you encounter any problems?
DO NOT RETURN THIS PRODUCT TO THE STORE OF PURCHASE
Please contact Telefix for Warranty Support
1300 366 144
Email: warrantyhelp@awa.com.au
The original proof of purchase must be kept and produced for service requirements.

Table of contents
Other AWA Portable DVD Player manuals