Axesstel PX300 Series User manual

1

2
INTRODUCTION
The Fixed Wireless phone operates through a wireless connection instead of a landline
phone cable, enabling the subscriber to set up the phone anywhere wireless service
is available.
Axesstel CDMA 2000 Fixed Wireless Phone provides high quality and
superior performance with many features such as excellent voice quality, packet data
service, speaker phone, world clock, calculator, short message service, etc.
A large 3-line liquid crystal display provides a user-friendly interface for quick and easy-
to-understand information display.
FEATURES
1. Speaker Phone with Hands-Free Dialing
2. Signal Strength Indicator
3. Redial
4. Volume Control
5. Rubber Keypad with Backlit
6. Battery Power Backup
7. Graphic LCD Screen with Backlit
8. Speed Dialing
9. Automatic Sending
10. Phonebook
11. Short Message Service
12. World Clock and Calculator
13. Data Call Service with Speed up to 153kbps
14. Fax service (PC fax)

3
TABLES OF CONTENTS
Advanced Features
Safety Precautions……………………… Changing Greeting Message………..
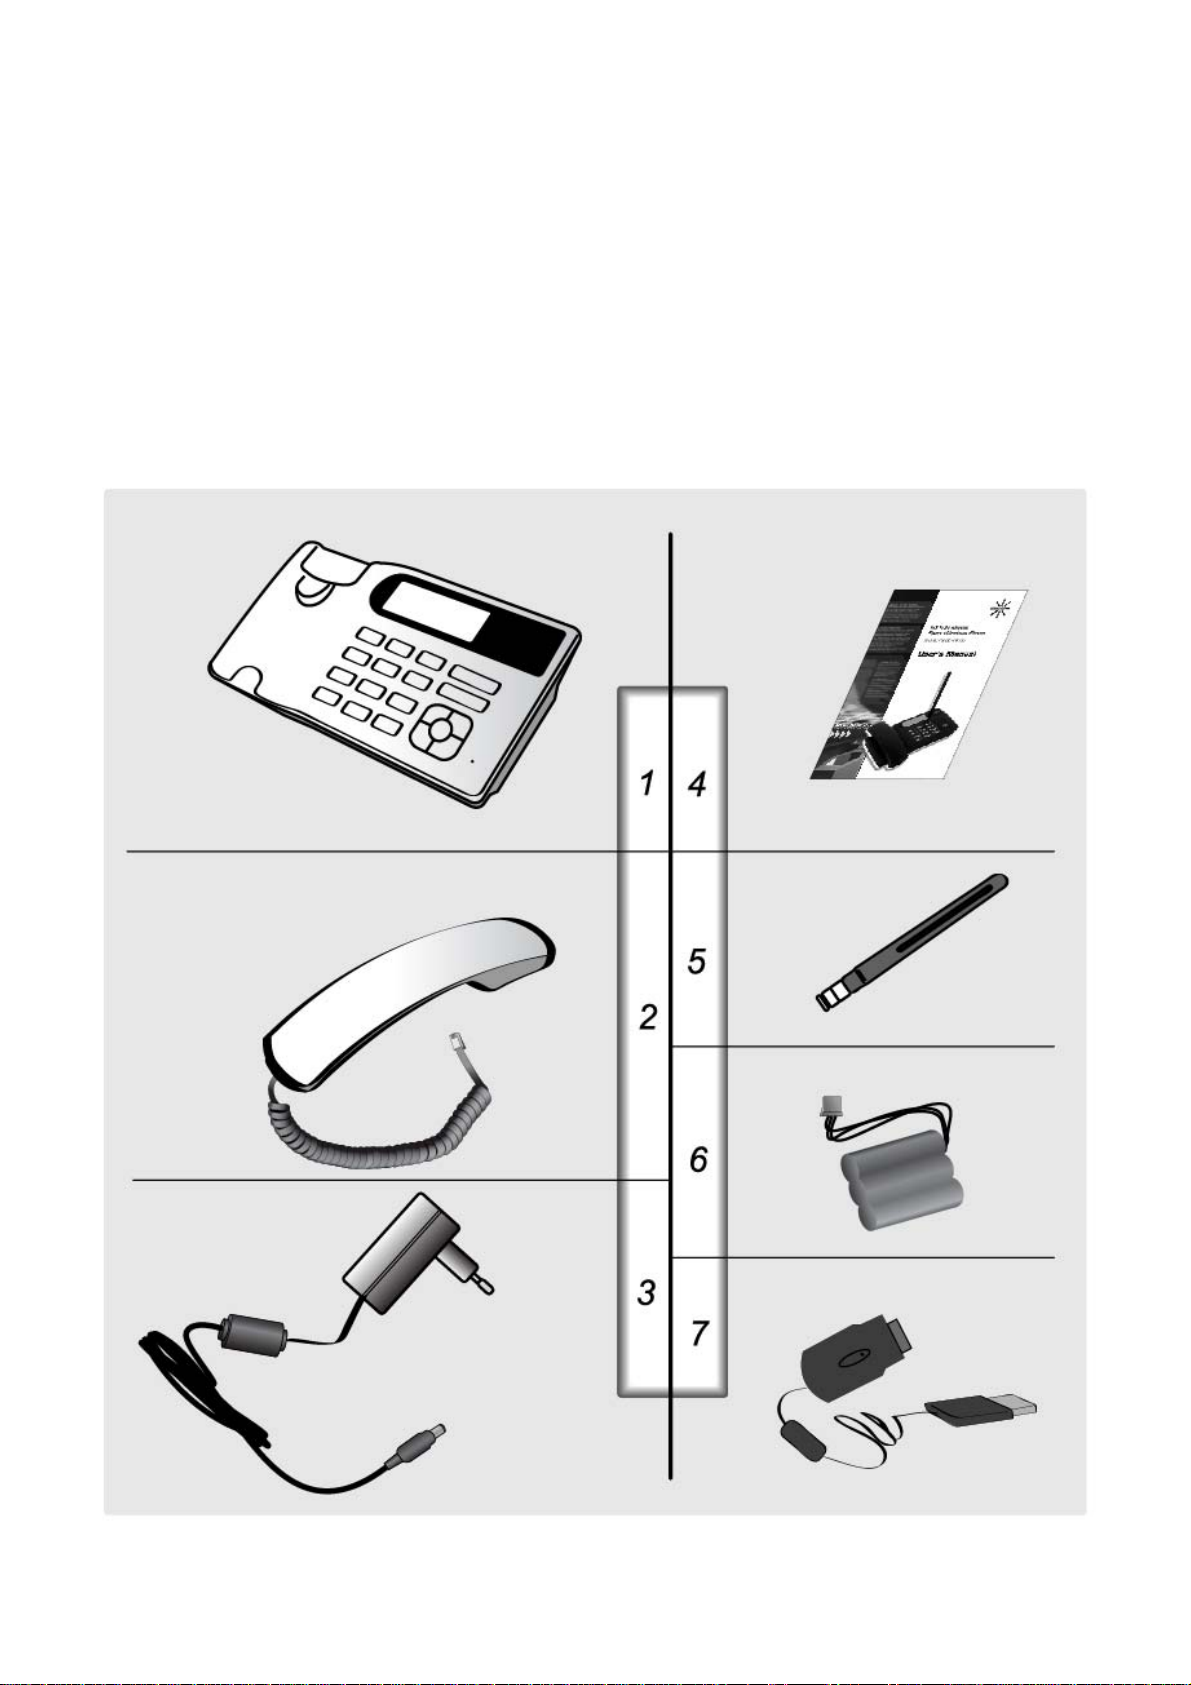
Checking the Parts ……………………… System Reset ………………………...
Setting up Your Phone ……….……….. Restricting Use of the Phone ……….
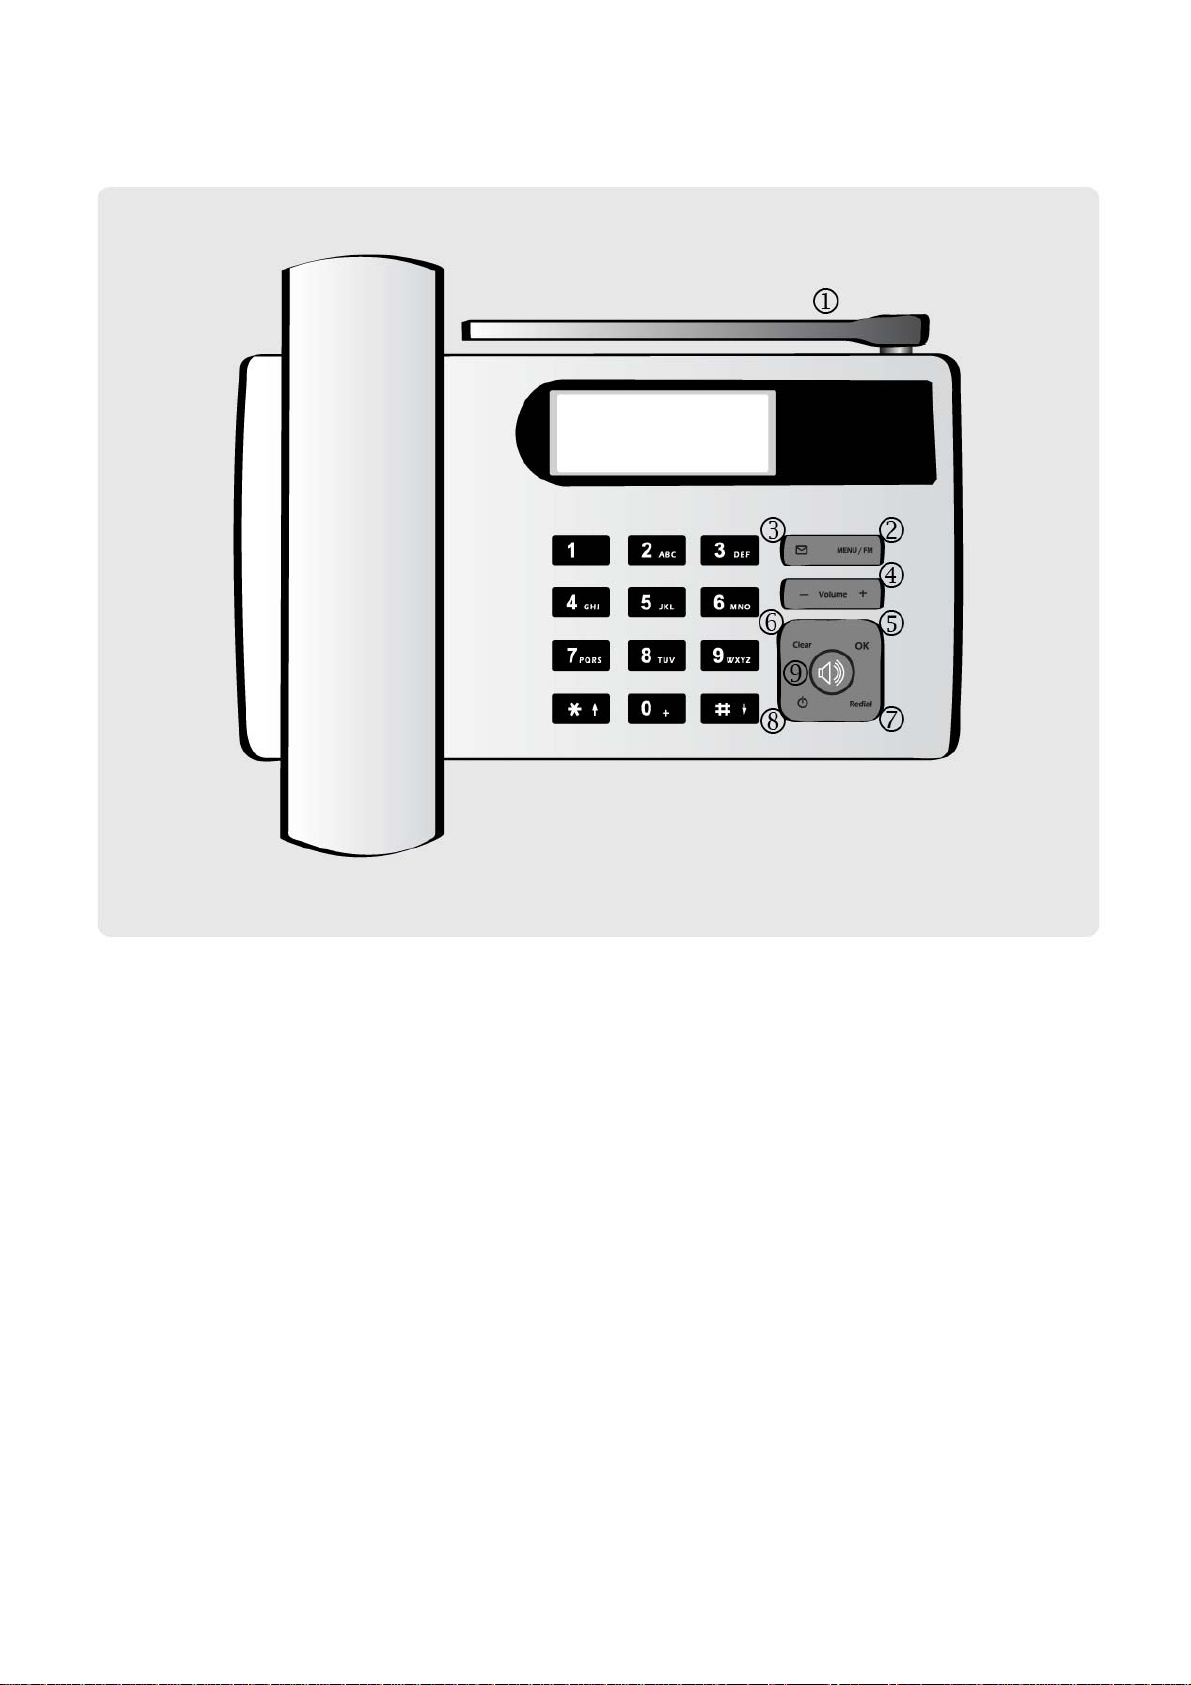
Getting to Know Your Phone ……….… Locking / Unlocking the Phone ……..
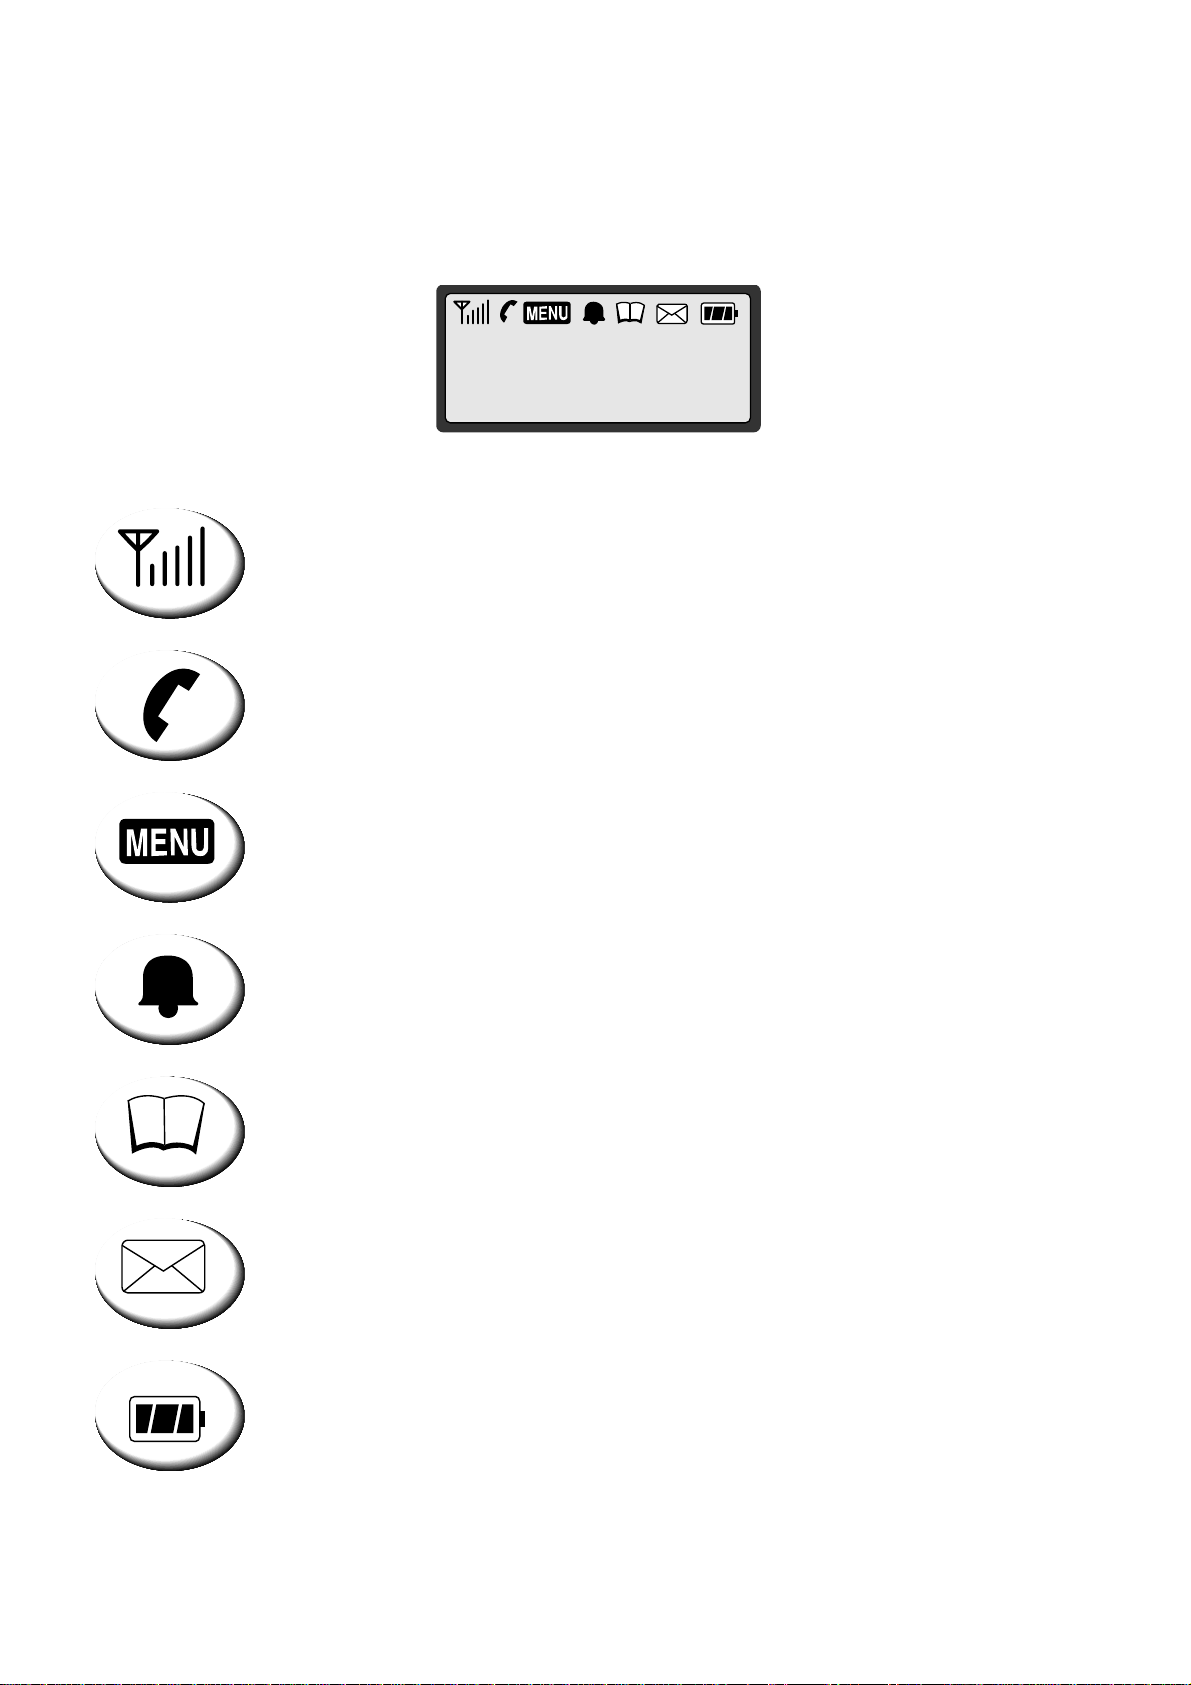
Display Icons ……………………………. Changing the Lock Code……………
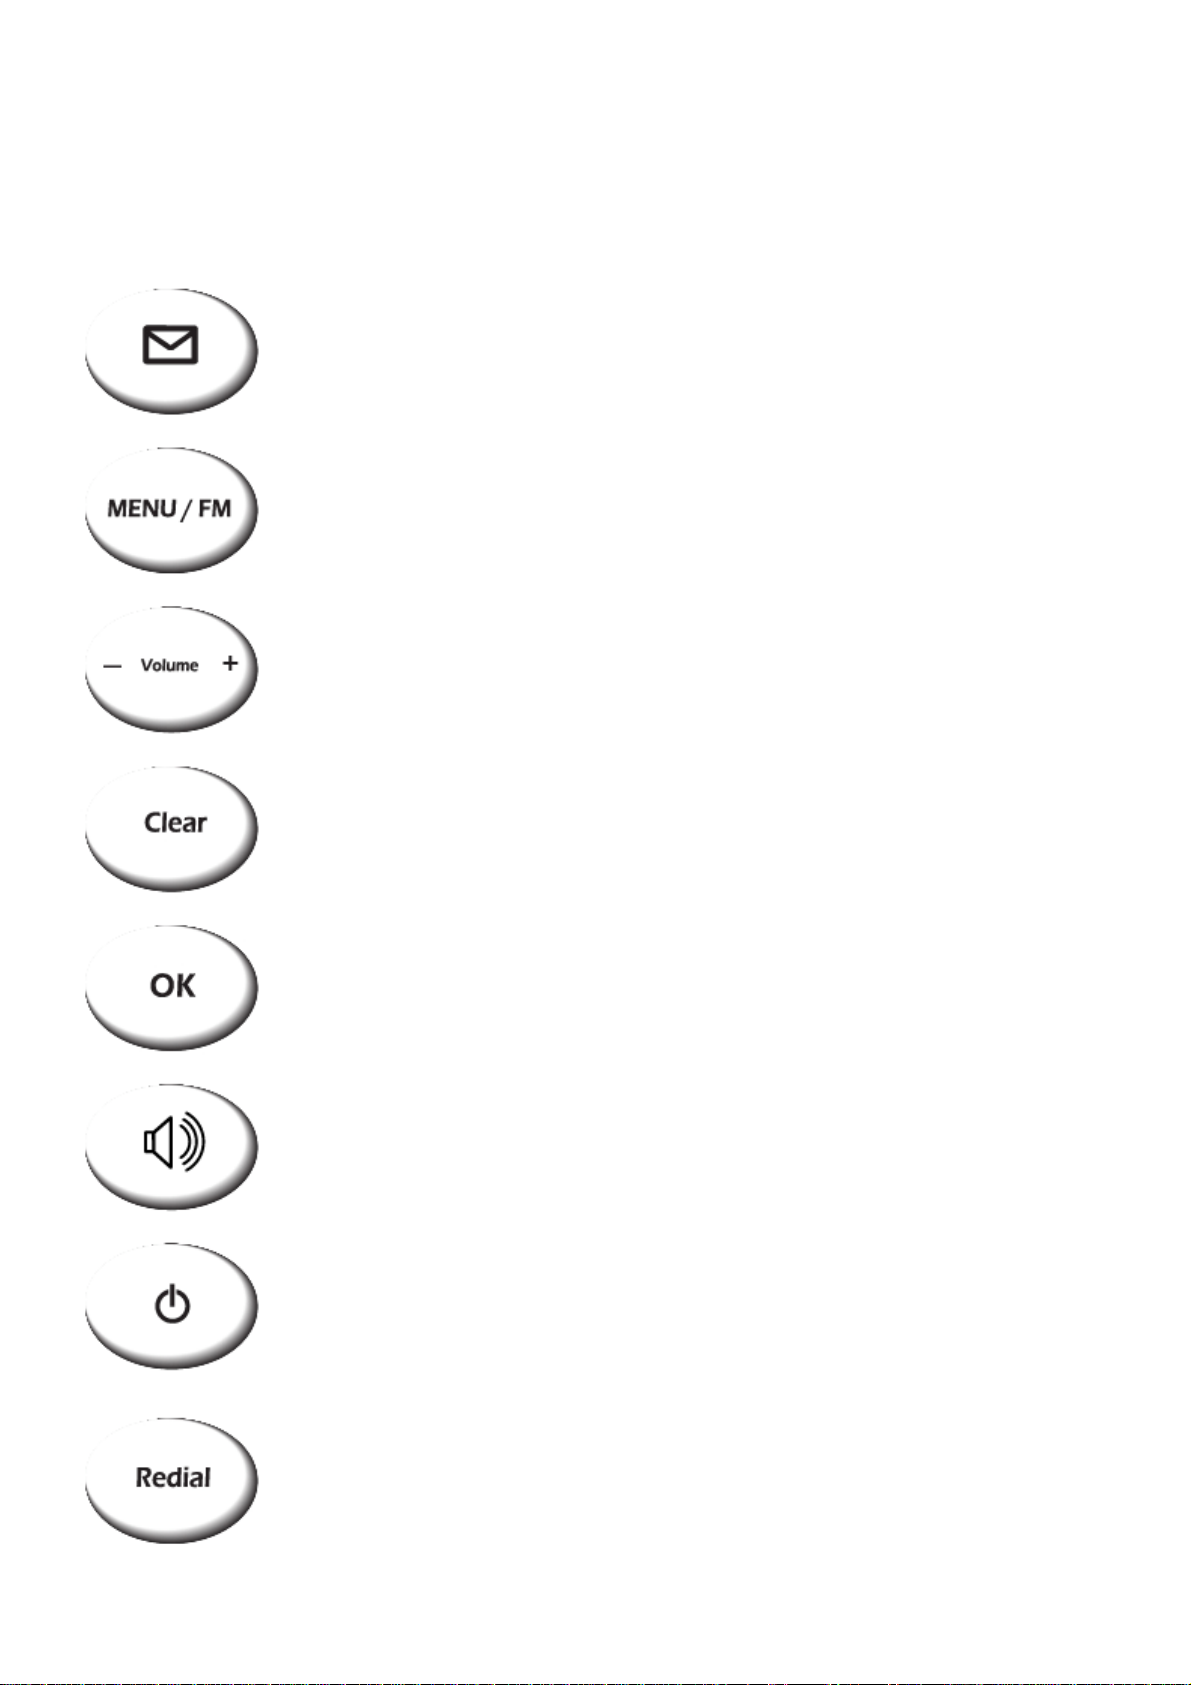
Function Keys…………………………... World Clock …………………………
Calculator……………………………
Basic Operation
Making Calls ....………………………… Optional Features
Redial……………………………………. Call Forwarding ……………………....
Receiving Calls ………………………… Call Waiting …………………………..
Adjusting Volumes …………………….. Three-Way Calling……………………
Choosing the Ring Tone ……………… Data Call Service………………………
Message Service ..…………………….
FM Radio(Optional) ……………………. Miscellaneous
Menu Table ……………………………
Phone Book Specification …………………………..
Internal Phone Book……………………
Storing in phonebook ………………….
Searching for Entries in Phonebook….
Erasing an Entry in Phonebook ….…..
Erasing All Entries in Phonebook ....…
One-Touch Dialing ………………….…
Two-Touch Dialing ………………….…
Useful Features
Call History..........................................
Displaying Your Phone Number..........
Setting up Your LCD…………….…….
Mute……………………………….…….
Selecting Time Mode………………….
Setting the Alarm………………………
Checking and Clearing Call Times…..
Setting Warning Alerts………………...
4
5
6
8
9
10
12
12
13
14
14
15
18
20
20
21
23
23
24
24
26
27
27
28
28
28
29
30
32
32
33
33
34
34
34
36
36
36
36
38
39

4
SAFETY PRECAUTIONS
1. Avoid placing the phone in a dusty location, or near a source of gas or fire.
2. Don't Shake, hit or drop the phone.
3. To clean the outside of the phone, use only a soft, dry cloth. The chemicals
in alcohol, benzene or acetone can damage the surface of the phone.
4. Do not twist or pull the cord out of the phone.
5. Do not disassemble the phone.
6. Do NOT use the power adapter if:
- The power cord is damaged.
- The phone has been dropped or damaged in any way.
7. Use only the AXESSTEL provided adapter for the phone. Do not use the AXESSTEL
adapter for any other purpose.
8. Use only the AXESSTEL provided antenna. Do not use the antenna for any
other purpose.
9. Frequency and length of use can affect the life of the self-charging battery.
Contact your customer service if the battery is not operating properly.
10. Use only the designated self-charging battery. Dispose of exhausted batteries
properly. Never discard a battery in or near fire or flame.
11. Do not place the telephone near water, for example, near a bathtub, sink, wet
basement, or swimming pool.
NOTE 1: The input and output voltages are indicated on the adapter.
(Input: AC 100~240V, 50~60 Hz, Output: DC 5.5V, 1A)

5
CHECKING THE PARTS
Once you have unpacked your phone, make sure that you have all the parts shown
below. If any piece is missing or broken, please call your customer service.
1. Main Unit 4. User Manual
2. Handset 5. Antenna
3. Power Adapter 6. Battery
7. Data cable (USB - optional)
*USB cable is optional

6
SETTING UP YOUR PHONE
Installing the phone
This phone operates by receiving DC power from the AXESSTEL power adapter
that connects to an electrical outlet. The phone is equipped with a rechargeable
battery as a back up in case of an AC power failure.
Desktop installation
Connect the antennaAttach the handset
ON/OFF power switch is located
on the bottom side of the phone.
Please turn on the power switch to
"ON" for operation
And Press and Hold Power key
on the front side of the phone.
Plug the Power adapter into an
appropriate Wall outlet
Open the battery cover and
connect the battery

7
SETTING UP YOUR PHONE
Service Status Check
Display in the Service Area
When the power cord is connected properly,
all segments of the LCD window will turn on briefly.
The number of bars of signal strength indicator
(antenna icon) indicates the strength of service signal
of the area. The display will show the greeting with date
and time.
You can change the greeting. (See page 31)
Display in area with no service
When there is no service signal detected in your area,
no antenna bar appears. Contact your service provider
for the coverage area information.
Also check if the antenna is connected
AXESSTEL
THU 10/09 5:24P
AXESSTEL

8
GETTING TO KNOW YOUR PHONE
1. Antenna: Adjusting the position of antenna improves the sound quality of the call.
2. Menu/FM: Press to access the phone's menus.
Press and hold the key for a few seconds to start FM Radio.
(FM is optional. PX310F/PX320F/PX330F only)
3. Message: Press to retrieve messages.
4. Volume Key(-, +): Let you adjust sound levels and scroll through the menu options
and displays.
5. OK: Stores phone numbers, and any settings you select in the menu within the
phone's memory
6. Clear: Lets you clear your last entry.
7. Redial: Allows you to redial the last number
8. Power On/Off: Press and hold the key for a few seconds to turn on or off your phone
9. Speaker Phone: Turn on or off the speaker phone feature

9
DISPLAY ICONS
Icons display on the screen to indicate what features you are using, e.g. signal
strength, battery status and etc...
Indicate the strength of the signal. More bars indicates
stronger signal.
Indicates that a voice or data call is in progress.
Indicates that you are using the phone's menu.
Indicates that the alarm has been set.
Indicates that you are in the Phonebook menu.
Indicates that you have text message or a voice mail message.
Indicates the level of battery power. The more bars, the
more power. When the battery is low, the icon blinks,
and an alert tone sounds.
AXESSTEL
THU 10/09 5:24P

10
FUNCTION KEYS
Press this key to retrieve messages.
Press this key to display the phone's main menu.
Press and Hold this key to turn on or off the FM radio.
If there is an incoming call or if the user attempts to make
an outgoing call while the FM radio is on, the FM radio turns off
automatically
Press this key to control the volume of keypad, earpiece
and speaker. In the menu mode, use this key to scroll through
the menu items.
Clears information from display screen.
- To erase one character from the display screen, press it once.
- To erase all characters on the screen, press and hold.
- To go back one step in the menu mode, press it once
Press this key to store a phone number in the phone book or to save
menu settings.
The Speaker button is used to place or receive a call without
using the handset. The integrated microphone and speaker on the
Main unit allows hands free conversation.
Press and hold this key for a few seconds to turn on or off your phone
Press this key to redial the last number called or to connect a
call right after dialing the number without waiting until the call
is connected automatically.

11
Basic Operation
Making Calls
Redial
Receiving Calls
Adjusting Volumes
Choosing the Ring Tones
Message Service
FM Radio(Optional)

12
MAKING CALLS
1. Make sure your phone is turned on.
2. Pick up the handset to hear a dial tone.
When the phone fails to acquire service signal, you will
hear "No Service" tone (intermittent tone).
3. Dial the number to call. The LCD window displays
the number.
4. Wait for a moment for auto calling or press <REDIAL>.
5. When the other person answers, begin conversation.
6. To end the call, replace the handset on the main unit.
NOTE1: Modifying a phone number while dialing.
- To erase the last digit entered: Press <CLEAR>.
- To erase the entire number: Press <CLEAR> and hold.
- To input symbol “+” : Press <0> and hold
NOTE2: Automatic calling
The phone was programmed to place a call automatically 4~10 seconds after last
digit entry. To disable automatic calling or change the delay time.
1. Press <MENU> , <0> , <1>.
2. Press <VOLUME KEY>(or <*>, <#>) to select different time or 'OFF',
then press <OK> to save. Once automatic calling is disabled, you have to
dial the number and press <REDIAL> to place a call.
REDIAL
Redial the last number you dialed.
1. Pick up the handset or press <SPEAKER>.
2. Press <REDIAL>.
NOTE: You may not redial when there is no last number dialed stored
in the memory. "NO LAST CALL!" message is displayed on the LCD.
CALLING....
02255558282
PLEASE
DIAL

13
RECEIVING CALLS
When there is an incoming call, the phone rings blinks
"Incoming Call" message on the display.
1. Simply pick up the handset or press <SPEAKER> to answer
the call.
2. To disconnect, replace the handset or press <SPEAKER>.
NOTE: When the ringer volume is set to 'Silent', the
phone does not ring. Only the "Incoming Call“
message blinks.
When the Caller ID service is activated.
Call ID Display
The Caller ID feature displays the caller's number when the
phone receives a call. If the caller's name and number are
linked together in the phone book, the caller's name is
displayed. Contact your service provider to activate this
feature.
NOTE: If the call is not answered, the phone displays the
“Missed Call" message with the call arrival date and
time.
INCOMING CALL
123-456-7890
INCOMING CALL
AMIT
MISSED 1CALL
THU 10/09 2:56P

14
ADJUSTING VOLUMES
You can control the sound volumes including the key tone,
Earpiece, speaker and the ringer
Adjusting key tone volume
Press <VOLUME KEY> repeatedly until it reaches proper volume.
Adjusting external speaker volume
Press <VOLUME KEY> repeatedly during hands free call to
adjust external speaker volume.
Adjusting earpiece volume
Pick up the handset and press <VOLUME KEY> repeatedly
during a phone call to adjust earpiece volume.
Adjusting ring volume
1. Press <MENU> , <5> , <3>.
2. Press <VOLUME KEY>(or <*> , <#>) to adjust ringer volume.
3. Press <OK> to save.
NOTE: If 'Silent' is selected, the phone does not ring
when an incoming call comes in. Only the
"INCOMING CALL" message blinks on the display.
CHOOSING THE RING TONES
You can choose from twenty different ring tones.
1. Press <MENU> , <5> , <2>.
2. Press <VOLUME KEY> (or <*>, <#> ) to select ring type.
3. Press <OK> to save.
KEY VOLUME
SPEAKER VOLUME
EARPIECE VOLUME
RING VOLUME
RING TONE
▶TONE # 1

15
MESSAGE SERVICE
Message service is a network dependent feature and is available only when your
service provider supports it. Check with your service provider to ensure it is
providing message service before using this function.
Message memory is available up to 20 INBOX, 10 SAVED MSG, 10 DRAFT MSG.
Sending New Text Messages
1. Press <MESSAGE> . Press <1>(New Message).
2. Write message using the keypad. Toggle between uppercase,
Lowercase, and numeric by pressing <MESSAGE> button.
3. Press <OK>. Press <2> (Send).
4. Enter destination number and press <OK>.
5. Once the destination number has been entered, the message
will be sent.
NOTE: To change default message options, access Message
option menu.
Sending Saved Text Messages
1. Press <MESSAGE> , <5>(Saved MSG).
2. Select message to resend with <VOLUME KEY> (or <*>, <#>)
and press <OK>.
3. To edit the message press <MESSAGE>.
Sending New Text Messages using Templates
1. Press <MESSAGE>. Press <4> (Templates).
2. Press <VOLUME KEY>(or <*>,<#>) to view and select the desired template.
3. Press <OK> to insert that template into the message body.
4. Continue to type in the rest of the message.
5. Press <OK>. Press <2> (Send).
6. Enter destination number and press <OK>.
1: NEW MESSAGE
2: INBO
X
PHONE NUMBER
123_
HELLO_
SENDING...
PLEASE WAIT...

16
MESSAGE!
10/12 4:04 P
1: NEW MESSAGE
2: INBOX
▶1: SUNNY
2: 0123456789
10/12 4 : 04 PM
FROM:0123456789
ERASE MSG?
▶
Y
ES
THE MESSAGE
IS ERASED
VOICE MSG
10/12 4:05
A
3: VOICE MSG ▼
4: TEMPLATES
Received Text Message
1. When text message arrives, e.g. 'MESSAGE! 10/12 4:04PM'
displays shortly and appears in the icon line.
2. Press <MESSAGE> ,<2>(Inbox).
3. Press <VOLUME KEY> (or <*>, <#>) to select message you
want to see and press <OK>.
4. The message, arrival time and call back number (if available)
Is displayed. If the message is long, it will be scrolled down
in 3 seconds automatically.
To scroll up and down manually,
press <VOLUME KEY> (or <*>, <#>).
5. If the message contains call back number and you want to
make a call to that number.
press <REDIAL> if you want to call back.
NOTE: If the call back number is stored in the phonebook
with a name, the name will display instead of the
phone number.
6. To forward the received message to another number,
press <MENU>.
7. To write a reply to the sender, press <MESSAGE>.
Delete Text Message
1. After reading the <MESSAGE>, Press <VOLUME KEY>
to erase the message.
2. Press <OK> to confirm erase.
Retrieving Voice Messages
1. When voice messages arrive, e.g. "VOICE MSG“
10/12 4:04 PM" shortly appears and <SMS ICON> appears
in the icon line.
2. Press <MESSAGE> ,<3>(Voice MSG) or press <OK>
to view message directly.
3. Press <REDIAL> to dial voice mail service center.

17
ERASE ALL?
▶
Y
ES
MESSAGE ALERT
▶ON
Erasing All Messages
1. Press <MESSAGE> , <7>(Erase MSG).
2. Select 'YES' with <VOLUME KEY> (or <*>, <#>).
3. Press <OK>.
Setting/Releasing Message Alert
1. Press <MESSAGE>, <8>(MSG Option), <1>(MSG Alert).
2. Select ON or OFF with <VOLUME KEY>(or <*>, <#>).
3. Press <OK>.
NOTE: While the message alert is set, the phone will alert
user when messages arrive.
Saving Sent Message
1. Press <MESSAGE>, <8> (MSG Option), <5> (Save Sent MSG).
2. Select "ON" or "OFF" with <VOLUME KEY> (or <*>, <#>).
3. Press <OK>.
While this option is turned on, outgoing new messages will be automatically
saved. Retrieve the saved messages by accessing Saved Message Menu.
Setting Message Priority Type
1. Press <MESSAGE> , <8> (MSG Option), <4> (MSG Priority).
2. Select "NORMAL" or "URGENT” with <VOLUME KEY> (or <*>, <#>).
3. Press <OK>.
Setting Message Auto Delete
1. Press <MESSAGE> , <8> (MSG Option), <6> (Auto Delete).
2. Select "ON" or "OFF“ with <VOLUME KEY> (or <*>, <#>).
3. Press <OK>.
When Auto Delete is enabled, the phone will automatically delete oldest received
messages in INBOX in case of full memory.

18
FM Radio (Optional, PX310F/PX320F/PX330F only)
Using FM Radio
1. Press and hold <MENU/FM> to turn on the Radio.
2. Entering Radio Mode, Preset Channel and Frequency
display
on the screen.
3. Press <*> or <#> lightly to move the preset channel.
4. Press<VOLUME KEY> to change the volume.
5. To stop FM Radio, Press <CLEAR>.
NOTE 1: If the phone FM radio is ON and you lift the phone handset or there is an
incoming call, the FM Radio stops automatically, switching to the phone mode.
Also pressing <SPEAKER> to use Speaker phone stops the FM Radio.
NOTE 2: Power cord acts as FM Radio Antenna. For best reception, plug in the power
cord to the phone while listening to FM Radio.
PROGRAMMING and USING PRESET
10 programmable presets are available.
1. Press<MENU/FM> to toggle between normal and preset modes.
2. In ”Preset Mode” the preset channel number and frequency
appear.
3. In “Preset Mode”, press <*> or <#> to change from
one preset channel to another
4. In “Normal Mode”, only the channel frequency appears.
Press<*> or <#> to increase or decrease the frequency.
Press and hold <*> or <#> to scan the next channel frequency.
5. In “Normal Mode”, press and hold Number key to store the radio channel
at the Number position.
Auto Preset
Press <REDIAL> button for automatic scan of available stations. Once the scan is
Performed, the phone will automatically store detected stations to 10 presets.
Ch 0 107.1 MHz
107.1 MHz

19
Phonebook
Internal phonebook
Storing in phonebook
Searching for Entries in Phonebook
Erasing an Entry in Phonebook
Erasing all Entries in Phonebook
One-Touch Dialing
Two-Touch Dialing

20
NAME ?
_
PHONE NUMBER ?
_
MEMORY LOCATION
SPEED DIAL : [01]
OVERWRITE ?
01 : SUNNY
CONFIDENTIAL ?
NO
INTERNAL PHONEBOOK
Your phone has an internal "Phonebook" in which you can store
up to 150 frequently used names and numbers.
STORING IN PHONEBOOK
1. Press <MENU>, <1>.
2. Enter the name by pressing the alphanumeric keypad
and pressing <OK> after completed.
NOTE1: If you do not want to enter a name. just press
<OK> here. The number will be saved as
"No Name".
NOTE2: Name entry is limited to maximum of 16 letters.
How to Enter &Edit Texts
You can enter letters using the alphanumeric keypad.
Each button has 3 to 4 letters assigned. Each stroke on the button scrolls the assigned
alphabet letters and the numeric value. Stop pressing when the letter you want appears.
You can switch between uppercase, lowercase, and numeric characters by pressing
<MESSAGE>.
To enter special characters. Press <1> repeatedly.
For space, press <#>. To go back, press <*>.
A single stoke on <CLEAR> will erase the last letter in line.
3. Enter the telephone number and press <OK>.
Up to 32 digits can be saved.
4. An empty location displays automatically.
Press <OK> to save the number in the location.
5. To assign a different location, enter 2 digit location number and press <OK>.
NOTE:
If you select the location in which a number
has already been stored, “OVERWRITE?” will be
displayed. Press <OK> to overwrite or press
to go back to automatic location.
6. “CONFIDENTIAL?” will be displays. Press <OK>
if no secret feature is necessary. To store the number in
secret, select ’YES’ by pressing <VOLUME KEY>
(or <*>, <#>) and press <OK> .
NOTE: Secretly saved number will not be displayed unless
the lock code is entered. One or two touch-dialing
secretly saved number will prompt lock code entry.
This manual suits for next models
6
Table of contents
Other Axesstel Telephone manuals

Axesstel
Axesstel PX320N User manual

Axesstel
Axesstel ACW-T800 User manual

Axesstel
Axesstel AXW-P450 User manual

Axesstel
Axesstel PX130N User manual

Axesstel
Axesstel PX210 User manual

Axesstel
Axesstel CDMA PX330N User manual

Axesstel
Axesstel PXA20 User manual

Axesstel
Axesstel PG110 User manual

Axesstel
Axesstel PG530 Technical manual

Axesstel
Axesstel PX210 User manual