manuals.online logo
Brands
  1. Home
  2. •
  3. Brands
  4. •
  5. Axiom
  6. •
  7. Speakers
  8. •
  9. Axiom Millennia M50 User manual

Axiom Millennia M50 User manual

1. e Speakers: / 1. Les Enceintes:
Turn the speakers around and look at the back panel. You’ll see a pair of 5-way
clear-plastic binding posts, to which you are going to connect the speaker
cables from your receiver or amplier.
Each gold binding post has a colored ring around it-- RED is POSITIVE,
BLACK is NEGATIVE. Most receiver and amplier manufacturers use this
color code and you should use it as well--it makes things a lot easier to hook
up your speaker cables.
You will also see a positive (+) sign engraved in the plastic beneath the RED
binding post, and a negative (-) sign beneath the BLACK post. Your amplier
may or may not have these positive and negative symbols. If you wish, you can
use these symbols along with the color coding to guide you.
+++
Examinez le panneau arrière des enceintes. Vous y trouverez une paire de bornes
“5 façons” plaquées or auxquelles vous devrez connecter les câbles de haut-parleur
provenant de votre récepteur ou amplicateur.
Chaqueborneest dotéed’unebague decouleur- ROUGE est lePOSITIFet NOIRest le
NÉGATIF. La plupart des fabricants de composantes électroniques utilisent ce code
couleur et vous devriez le respecter. Il simplie la connexion des câbles de haut-parleur.
Vous verrez également un symbole positif ( + ) gravé dans le plastique sous la borne
ROUGE et un symbole NÉGATIF ( - ) sous la borne NOIRE. Votre amplicateur n’est
pas nécessairement doté de ces symboles positifs et négatifs. Ils sont complémentaires
aux codes couleur et vous aideront à respecter la polarité de vos connexions.
Step-by-step instructions on conguring your oorstanding speakers.
Instructions, étape par étape, pour la mise en fonction de vos enceintes colonnes.
M50 Floorstanding Speakers
Owners Manual
Model: M50 Modèle :
Enclosure: Dual Vortex Clôture :
Max Amp Power: 200 Watts Puissance maximale admissible :
Min Amp Power: 10 Watts Puissance minimale :
Freq Resp +/-3dB (Hz): 39 - 22kHz Réponse en freq. +/- 3dB :
Freq Resp +3dB- 9dB (Hz): 29 - 22kHz Réponse en freq. + 3dB/- 9dB :
Impedance (Ohms): 8 Ohms Impédance :
SPL in Room 1w/1m (dB): 93 dB Sensibilité en salle 1w/1m :
SPL Anechoic 1w/1m (dB): 89 dB Sensibilité Anéchoïque 1w/1m :
X-Over 2.2 kHz Filtre :
Tweeter: Single 1” Transducteur d’aigu :
Woofer: Dual 6.5” Transducteur de grave :
Dimens. H W D (inches): 35.5” x 9.25” x 13” Dimensions HLP pouces :
Dimens. H W D (mm): 902 x 235 x 330 Dimensions HLP mm:
Weight kg each: 17.373 kg Poids en Kilo chacun :
Weight lbs each: 38.3 lbs Poids en lb chacun :
e Axiom Warranty
All our speaker models; towers, bookshelves, surrounds, centers, subwoofers and
all our ampliers; subwoofer and multichannel ampliers are warrantied against
manufacturer’s defects for 5 years.
AXIOM CANADA INC. warrants this audio loudspeaker system (the “Product”)
to be free from original manufacturing defects in materials and workmanship for
ve years from date of purchase from an authorized Axiom dealer. This warranty
extends only to the original consumer purchaser. AXIOM CANADA INC. does
not warrant goods used in commercial or industrial applications. This warranty
does not cover any expenses incurred in any removal or re-installation of the
product.
If the product should prove so defective within the warranty period, return the
product by prepaid delivery to AXIOM CANADA INC., along with the original
sales invoice or other proof of purchase, which establishes eligibility for warranty
service. AXIOM CANADA INC. will, at its option, replace or repair the product
free of charge and return the product by prepaid delivery. This warranty does not
apply to any product, which has been damaged, misused, altered or repaired by
anyone other than an AXIOM CANADA INC. authorized service facility.
Any implied warranties including tness for use and merchantability are limited
in duration to the period of the express warranties set forth above, and no person
is authorized to assume for Axiom Canada Inc. any other liability in connection
with the sale of the product. Axiom Canada Inc. expressly disclaims liability for
any incidental and consequential damages caused by the product. The remedies
provided under this warranty are exclusive and in lieu of all others.
This warranty gives specic legal rights. In addition, there may be other legal
rights arising from the sale of the product, which vary from province to province
or state to state. Some provinces / states do not allow the exclusion or limitation
of incidental or consequential damages, so the above limitation or exclusion may
not apply in some areas.
3. Le récepteur (ou l’amplicateur):
Examinez les bornes de sortie haut-parleur situées sur le panneau arrière de
votre récepteur ou amplicateur. À moins qu’il ne soit très ancien, les bornes
seront rouges et noires, comme celles de vos enceintes, ou du type à ressort,
également codées rouge et noir. Les très anciens amplis sont dotés de barrettes
à vis.
La borne ROUGE ( + ) de la sortie du canal droit de votre ampli doit être
reliée à la borne ROUGE ( + ) de l’enceinte droite. La borne NOIRE ( - ) de
la sortie du canal droit de votre ampli doit être reliée à la borne NOIRE ( - )
de l’enceinte droite. Répétez l’opération pour connecter les sorties du canal
gauche de votre ampli aux bornes de l’enceinte gauche, puis pour connecter les
enceintes ambiophoniques gauche et droite (à la gauche et à la droite de votre
position d’écoute), l’enceinte du canal central, et les enceintes additionnelles
arrière requises par les systèmes 6.1 ou 7.1.
Si votre récepteur ou amplicateur respecte le nouveau code de couleur de
C.E.A pour chaque canal, le terminal négatif (-) sera toujours noir, le terminal
positif sera de diérente couleur correspondant a chaque canal du système
ambiphonique.
Si vous êtes confus, notez la polarité positive (+) et la négative (-) pour chaque
haut-parleur. et le câble de chaque haut-parleur.
2. e Cables: / 2. Les Câbles:
Examine your speaker cables. On the ends, there may be spade lugs or
banana plugs, each one color-coded red or black like your speaker binding
posts to help you identify the red and black (positive and negative) wires
on each end of the cable. If the cable ends are bare wires and lack color
coding, check the wires: one may be copper-colored, the other silver. Some
generic cables may simply have a colored thread or a ribbed pattern on the
plastic insulation to indicate the positive wire. Alternatively, some speaker
cables, like Axiom’s, may have writing on one side or the other (perhaps the
brand name, for example) or even a positive sign or negative sign on each
of the conductors. Whichever you have, just follow the Red-To-Red, Black-
to-Black connection rule or use the + to + or - to - connection scheme for
each cable pair.
+++
Examinez vos câbles de haut-parleur. Il y aura peut-être à chaque extrémité
des cosses à fourche ou des ches banane. Chacune est codée rouge ou noir,
comme les bornes de vos enceintes, pour vous aider à déterminer le l positif et
le l négatif. Si les extrémités des ls sont dénudés, sans code couleur, examinez
bien les ls - l’un deux pourrait être de couleur cuivre, l’autre argent. Certains
câbles bon marché utilisent une gaine de plastique codée couleur ou striée
pour identier le l positif. Certains câbles, comme celui d’ Axiom, ont une
écriture inscrite sur un seul côté du l pour diérencier une polarité de l’autre.
Quelque soit les câbles que vous utilisez, connectez- les toujours en respectant
le code “rouge à rouge” et “noir à noir” (ou “+ à +” et “- à -”).
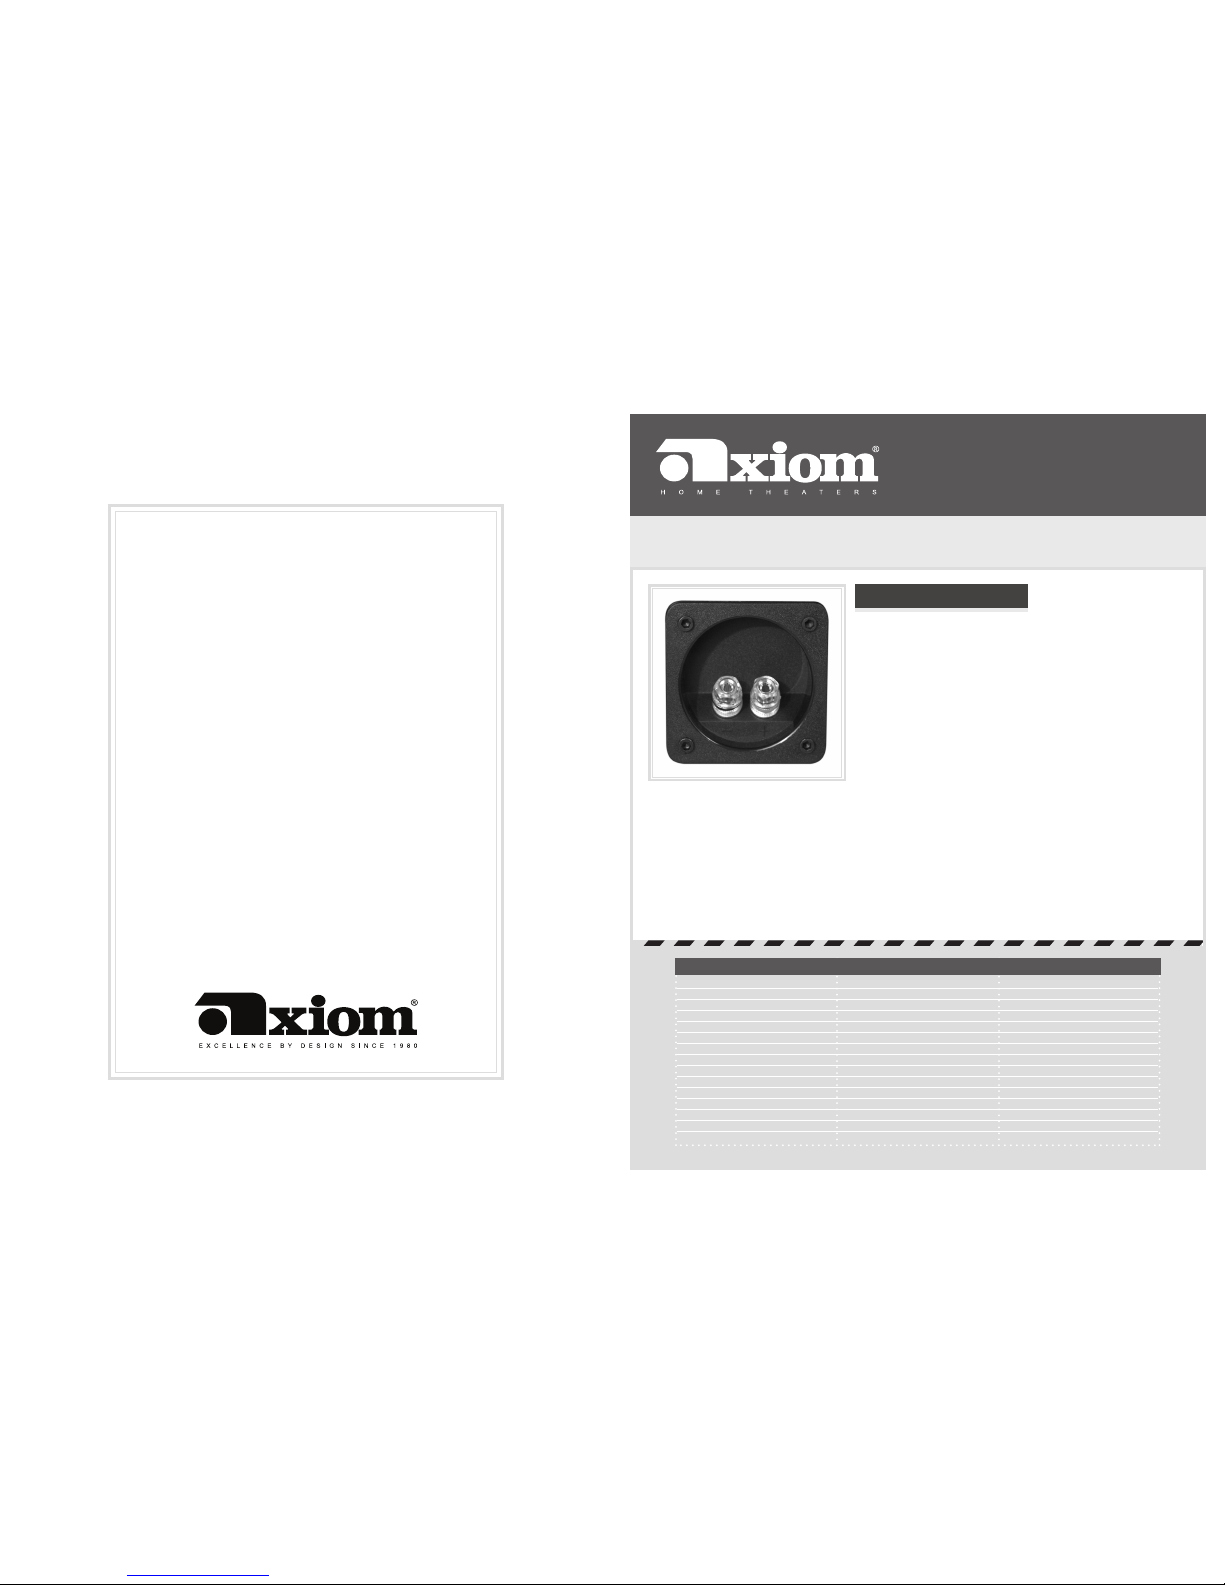
3. e Receiver (Amplier):
Look at the speaker connectors on the rear panel of your receiver or
amplier. Unless it’s very old, these will usually be red and black binding
posts, like those on your speakers, or red and black spring-loaded push
connectors. Vintage ampliers may have only screw terminals.
e Red (+) terminal on your receiver’s Right speaker output connects to
the Red (+) binding post of the Right speaker. e Black (-) terminal on
your receiver output connects to the Black (-) binding post on the Right
speaker. Follow the same pattern to connect the receiver’s Le speaker
outputs to the Le speaker’s binding posts, then the le surround (the
speaker to your le from your listening seat), and right surround speakers,
the center-channel speaker, and additional rear speaker(s) required by 6.1-
or 7.1-channel systems.
If your A/V receiver or amplier has the new Consumer Electronics
Association color coding (pictured below) for each speaker channel, the
negative terminal (-) will always be black, however, the positive terminal (+)
will have a dierent color corresponding to each channel of the surround
system.
If you nd this color coding confusing, note the positive (+) and negative
(-) polarity for each speaker and the speaker cable.
H.P avant gauche; blanc
H.P. caisson de grave; pourpre
( sortie RCA seulement )
H.P avant droit; rouge
H.P. avant central; vert
H.P. cote gauche; bleu
H.P. cote droit; gris
H.P. arrière gauche; brun
H.P. arrière droit; beige
Step 1 / Étape 1
Bare ends of speaker wire.
Extrémités dénudées des ls d’enceinte.
Step 2 / Étape 2
Leave washer down.
Laissez la rondelle vers le bas.
Step 3 / Étape 3
Insert bare end of wire through exposed hole
on binding post. Ensure postive wire from
Amp is in red connector.
Insérez l’extrémité dénudée du l à travers le
trou exposé sur la borne d’attache. Assurez-vous
que le l positif en provenance de l’amplicateur
est dans le connecteur rouge.
Step 4 / Étape 4
Tighten nuts with supplied plastic wrench.
Serrez les écrous avec la clé en plastique fournie.
Step 1 / Étape 1
Li washer.
Soulevez la rondelle.
Step 2 / Étape 2
Insert spade into slots in binding post. Ensure
positive wire from Amp is in red connector.
Insérer la cosse dans les fentes de la borne
d’attache. S’assurer que le l positif en
provenance de l’amplicateur est dans le
connecteur rouge.
Step 3 / Étape 3
Tighten nuts with supplied plastic wrench.
Serrez les écrous avec la clé en plastique fournie.
Step 1 / Étape 1
Tighten nuts with supplied plastic wrench
Serrez les écrous avec la clé en plastique fournie.
Step 2 / Étape 2
Ensure positive wire from Amp is in red connector.
Assurez-vous que le l positif en provenance de
l’amplicateur est dans le connecteur rouge.
Step 3 / Étape 3
Insert banana plug.
Insérez la che banane.
Bare Wire Spade Lug (1/4-inch Spade) Banana Plug (3/4-inch Spacing)
Fildénudé Cosse à Fourche (Cosse de 1/4-po) Fiche Banane (Espacement de 3/4-po)
Front Le speaker: White
Subwoofer: Purple
(line-level RCA output only)
Front Right: Red
Center: Green
Le Surround (side): Blue
Right Surround (side): Gray
Le Back Surround: Brown
Right Back Surround: Tan
Step-by-step instructions on conguring your oorstanding speakers.
Instructions, étape par étape, pour la mise en fonction de vos enceintes colonnes.
Plastic Wrench
La clé en plastique

This manual suits for next models

1

Other Axiom Speakers manuals

Axiom FMS 16/24 Specification sheet

Axiom

Axiom FMS 16/24 Specification sheet

Axiom VP150 User manual

Axiom

Axiom VP150 User manual

Axiom Architectural W100 User manual

Axiom

Axiom Architectural W100 User manual

Axiom ED80P User manual

Axiom

Axiom ED80P User manual

Axiom ED120A User manual

Axiom

Axiom ED120A User manual

Axiom VP160 User manual

Axiom

Axiom VP160 User manual

Axiom W100 User manual

Axiom

Axiom W100 User manual

Axiom VP180 v3 User manual

Axiom

Axiom VP180 v3 User manual

Axiom FMS QS Specification sheet

Axiom

Axiom FMS QS Specification sheet

Axiom AX2065P User manual

Axiom

Axiom AX2065P User manual

Axiom ED150A User manual

Axiom

Axiom ED150A User manual

Axiom AX12C User manual

Axiom

Axiom AX12C User manual

Axiom CX15A User manual

Axiom

Axiom CX15A User manual

Axiom QS8 v3 User manual

Axiom

Axiom QS8 v3 User manual

Axiom Axiom VP150 User manual

Axiom

Axiom Axiom VP150 User manual

Axiom M60 User manual

Axiom

Axiom M60 User manual

Axiom MILLENNIA M50 v2 Technical manual

Axiom

Axiom MILLENNIA M50 v2 Technical manual

Axiom M80 v4 User manual

Axiom

Axiom M80 v4 User manual

Axiom M100 User manual

Axiom

Axiom M100 User manual

Axiom VP100 User manual

Axiom

Axiom VP100 User manual

Axiom Architectural Series W22 Specification sheet

Axiom

Axiom Architectural Series W22 Specification sheet

Axiom AX6C User manual

Axiom

Axiom AX6C User manual

Axiom LFR180 User manual

Axiom

Axiom LFR180 User manual

Axiom ED60P User manual

Axiom

Axiom ED60P User manual

Popular Speakers manuals by other brands

Polk Audio RT1000i instruction manual

Polk Audio

Polk Audio RT1000i instruction manual

Philips 3000 series user manual

Philips

Philips 3000 series user manual

Power Dynamics HSR30 instruction manual

Power Dynamics

Power Dynamics HSR30 instruction manual

Pyle PPHP122SM user manual

Pyle

Pyle PPHP122SM user manual

Genius SP-HF1800A Quick start manual

Genius

Genius SP-HF1800A Quick start manual

Electro-Voice EVOLVE50M-SB-US user manual

Electro-Voice

Electro-Voice EVOLVE50M-SB-US user manual

JL Audio C7-350cm owner's manual

JL Audio

JL Audio C7-350cm owner's manual

Sven MS-105 Operation manual

Sven

Sven MS-105 Operation manual

Tannoy VX 12.2Q Specifications

Tannoy

Tannoy VX 12.2Q Specifications

Yamaha NS-AP6500M owner's manual

Yamaha

Yamaha NS-AP6500M owner's manual

Sony SS-SP42FW - Left / Right Channel Speakers Specifications

Sony

Sony SS-SP42FW - Left / Right Channel Speakers Specifications

Ultimate Ears MEGABOOM How-to guide

Ultimate Ears

Ultimate Ears MEGABOOM How-to guide

Harman JBL IRX100 Series user guide

Harman

Harman JBL IRX100 Series user guide

Eltax Voyager BT12 instruction manual

Eltax

Eltax Voyager BT12 instruction manual

Turbosound TCX SERIES quick start guide

Turbosound

Turbosound TCX SERIES quick start guide

Zeck Audio Club Serie owner's manual

Zeck Audio

Zeck Audio Club Serie owner's manual

Sony SA-VA100 operating instructions

Sony

Sony SA-VA100 operating instructions

Bang & Olufsen Beosound Emerge user guide

Bang & Olufsen

Bang & Olufsen Beosound Emerge user guide

manuals.online logo
manuals.online logoBrands
  • About & Mission
  • Contact us
  • Privacy Policy
  • Terms and Conditions

Copyright 2025 Manuals.Online. All Rights Reserved.