manuals.online logo
Brands
  1. Home
  2. •
  3. Brands
  4. •
  5. Axiom
  6. •
  7. Speakers
  8. •
  9. Axiom VP100 User manual

Axiom VP100 User manual

Other Axiom Speakers manuals

Axiom QUADPOLAR QS8 v3 User manual

Axiom

Axiom QUADPOLAR QS8 v3 User manual

Axiom VP100 v2 User manual

Axiom

Axiom VP100 v2 User manual

Axiom AX2010A User manual

Axiom

Axiom AX2010A User manual

Axiom MILLENNIA M50 Technical manual

Axiom

Axiom MILLENNIA M50 Technical manual

Axiom Architectural Series W100 Specification sheet

Axiom

Axiom Architectural Series W100 Specification sheet

Axiom AX4CL User manual

Axiom

Axiom AX4CL User manual

Axiom VP180 v3 User manual

Axiom

Axiom VP180 v3 User manual

Axiom AX2065AV2 User manual

Axiom

Axiom AX2065AV2 User manual

Axiom FMS 16/24 Specification sheet

Axiom

Axiom FMS 16/24 Specification sheet

Axiom ED120P User manual

Axiom

Axiom ED120P User manual

Axiom M80 User manual

Axiom

Axiom M80 User manual

Axiom VP100 v2 User manual

Axiom

Axiom VP100 v2 User manual

Axiom AX2010P User manual

Axiom

Axiom AX2010P User manual

Axiom VP150 User manual

Axiom

Axiom VP150 User manual

Axiom AX800A NEO User manual

Axiom

Axiom AX800A NEO User manual

Axiom M100 User manual

Axiom

Axiom M100 User manual

Axiom ED150A User manual

Axiom

Axiom ED150A User manual

Axiom Axiom VP150 User manual

Axiom

Axiom Axiom VP150 User manual

Axiom FMS QS Specification sheet

Axiom

Axiom FMS QS Specification sheet

Axiom W2 Specification sheet

Axiom

Axiom W2 Specification sheet

Axiom Architectural W2 User manual

Axiom

Axiom Architectural W2 User manual

Axiom EP600 User manual

Axiom

Axiom EP600 User manual

Axiom M0 User manual

Axiom

Axiom M0 User manual

Axiom T2 User manual

Axiom

Axiom T2 User manual

Popular Speakers manuals by other brands

Electro-Voice LR4S engineering data

Electro-Voice

Electro-Voice LR4S engineering data

Definitive Technology Sound Cylinder user guide

Definitive Technology

Definitive Technology Sound Cylinder user guide

AudioSource LS545 user manual

AudioSource

AudioSource LS545 user manual

Paso C402-T Instructions for use

Paso

Paso C402-T Instructions for use

Altec Lansing 416-8C LF SPEAKER manual

Altec Lansing

Altec Lansing 416-8C LF SPEAKER manual

Kenwood KFC-1072 Servise manual

Kenwood

Kenwood KFC-1072 Servise manual

Peavey ProSys 112 user guide

Peavey

Peavey ProSys 112 user guide

JBL Control Contractor 60 Series installation instructions

JBL

JBL Control Contractor 60 Series installation instructions

Aura STORM-8 owner's manual

Aura

Aura STORM-8 owner's manual

Oontz ANGLE 3 PLUS quick start guide

Oontz

Oontz ANGLE 3 PLUS quick start guide

Electro-Voice LR4A engineering data

Electro-Voice

Electro-Voice LR4A engineering data

Rave RK-650-ICA-B owner's manual

Rave

Rave RK-650-ICA-B owner's manual

Flux Reference Series installation manual

Flux

Flux Reference Series installation manual

Lanzar AQAWBS64BK installation manual

Lanzar

Lanzar AQAWBS64BK installation manual

DAPAudio DCS-6230 manual

DAPAudio

DAPAudio DCS-6230 manual

Aluratek ABS03F quick start guide

Aluratek

Aluratek ABS03F quick start guide

Kenwood KES-5A instruction manual

Kenwood

Kenwood KES-5A instruction manual

Sonance ORIGINAL SERIES instruction manual

Sonance

Sonance ORIGINAL SERIES instruction manual

manuals.online logo
manuals.online logoBrands
  • About & Mission
  • Contact us
  • Privacy Policy
  • Terms and Conditions

Copyright 2025 Manuals.Online. All Rights Reserved.

Rev: 1.1 v1
e Axiom Warranty
All our speaker models; towers, bookshelves, surrounds, centers, subwoofers and all our ampliers; subwoofer and
multichannel ampliers are warrantied against manufacturer’s defects for 5 years.
AXIOM CANADA INC. warrants this audio loudspeaker system (the “Product”) to be free from original
manufacturing defects in materials and workmanship for ve years from date of purchase from an authorized Axiom
dealer. This warranty extends only to the original consumer purchaser. AXIOM CANADA INC. does not warrant
goods used in commercial or industrial applications. This warranty does not cover any expenses incurred in any
removal or re-installation of the product.
If the product should prove so defective within the warranty period, return the product by prepaid delivery to AXIOM
CANADA INC., along with the original sales invoice or other proof of purchase, which establishes eligibility for
warranty service. AXIOM CANADA INC. will, at its option, replace or repair the product free of charge and return
the product by prepaid delivery. This warranty does not apply to any product, which has been damaged, misused,
altered or repaired by anyone other than an AXIOM CANADA INC. authorized service facility.
Any implied warranties including tness for use and merchantability are limited in duration to the period of the
express warranties set forth above, and no person is authorized to assume for Axiom Canada Inc. any other liability
in connection with the sale of the product. Axiom Canada Inc. expressly disclaims liability for any incidental and
consequential damages caused by the product. The remedies provided under this warranty are exclusive and in lieu
of all others.
This warranty gives specic legal rights. In addition, there may be other legal rights arising from the sale of the
product, which vary from province to province or state to state. Some provinces / states do not allow the exclusion or
limitation of incidental or consequential damages, so the above limitation or exclusion may not apply in some areas.
La Garantie Axiom
Tous nos modèles d’enceintes; les tours, les compactes, les ambiophoniques, les centres, les caissons de basse et tous nos amplicateurs et
amplicateurs multicanaux sont garantis contre les défauts de fabrication pour une période de 5 ans.
AXIOM CANADA INC garantit que cette enceinte audio (le «Produit») est exempte de toutes défectuosités de matériaux et de main-
d’œuvre pendant cinq ans à compter de la date d’achat. Cette garantie s’applique uniquement à l’acheteur original.
AXIOM CANADA INC ne garantit pas les biens utilisés dans des applications commerciales ou industrielles. Cette garantie ne couvre pas
les frais encourus dans l’altération ou la réinstallation du produit.
Si le produit s’avère défectueux pendant la durée de la validité de la garantie, retournez le produit port payé à AXIOM CANADA INC.,
avec la facture originale ou une autre preuve d’achat, qui justie l’éligibilité aux prestations de garantie. AXIOM CANADA INC, à sa seule
discrétion, remplacera ou réparera le produit gratuitement et retournera le produit par courrier prépayé.
Cette garantie ne s’applique pas à tout produit, qui a été endommagé, mal utilisé, abusé, modié ou réparé par quelqu’un d’autre qu’un
centre de service autorisé par AXIOM CANADA INC.
Toute garantie implicite, y compris l’aptitude à l’utilisation et la commercialisation sont limitées dans la durée à la période de la garantie
expresse énoncée ci-dessus, et aucune personne n’est autorisée à assumer pour Axiom Canada Inc. toute autre responsabilité en rapport avec
la vente du produit. Axiom Canada Inc. décline expressément toute responsabilité pour tous dommages indirects et consécutifs causés par
le produit. Les recours prévus sous cette garantie sont exclusifs et remplacent tous les autres.
Cette garantie donne des droits spéciques. En outre, il peut exister d’autres droits découlant de la vente du produit, qui varient d’une
province ou d’un état à l’autre. Certaines provinces / états n’autorisent pas l’exclusion ou la limitation des dommages fortuits ou consécutifs,
les limitations ou exclusions qui précèdent peuvent ne pas s’appliquer dans certaines régions.
Location: / Positionnement:
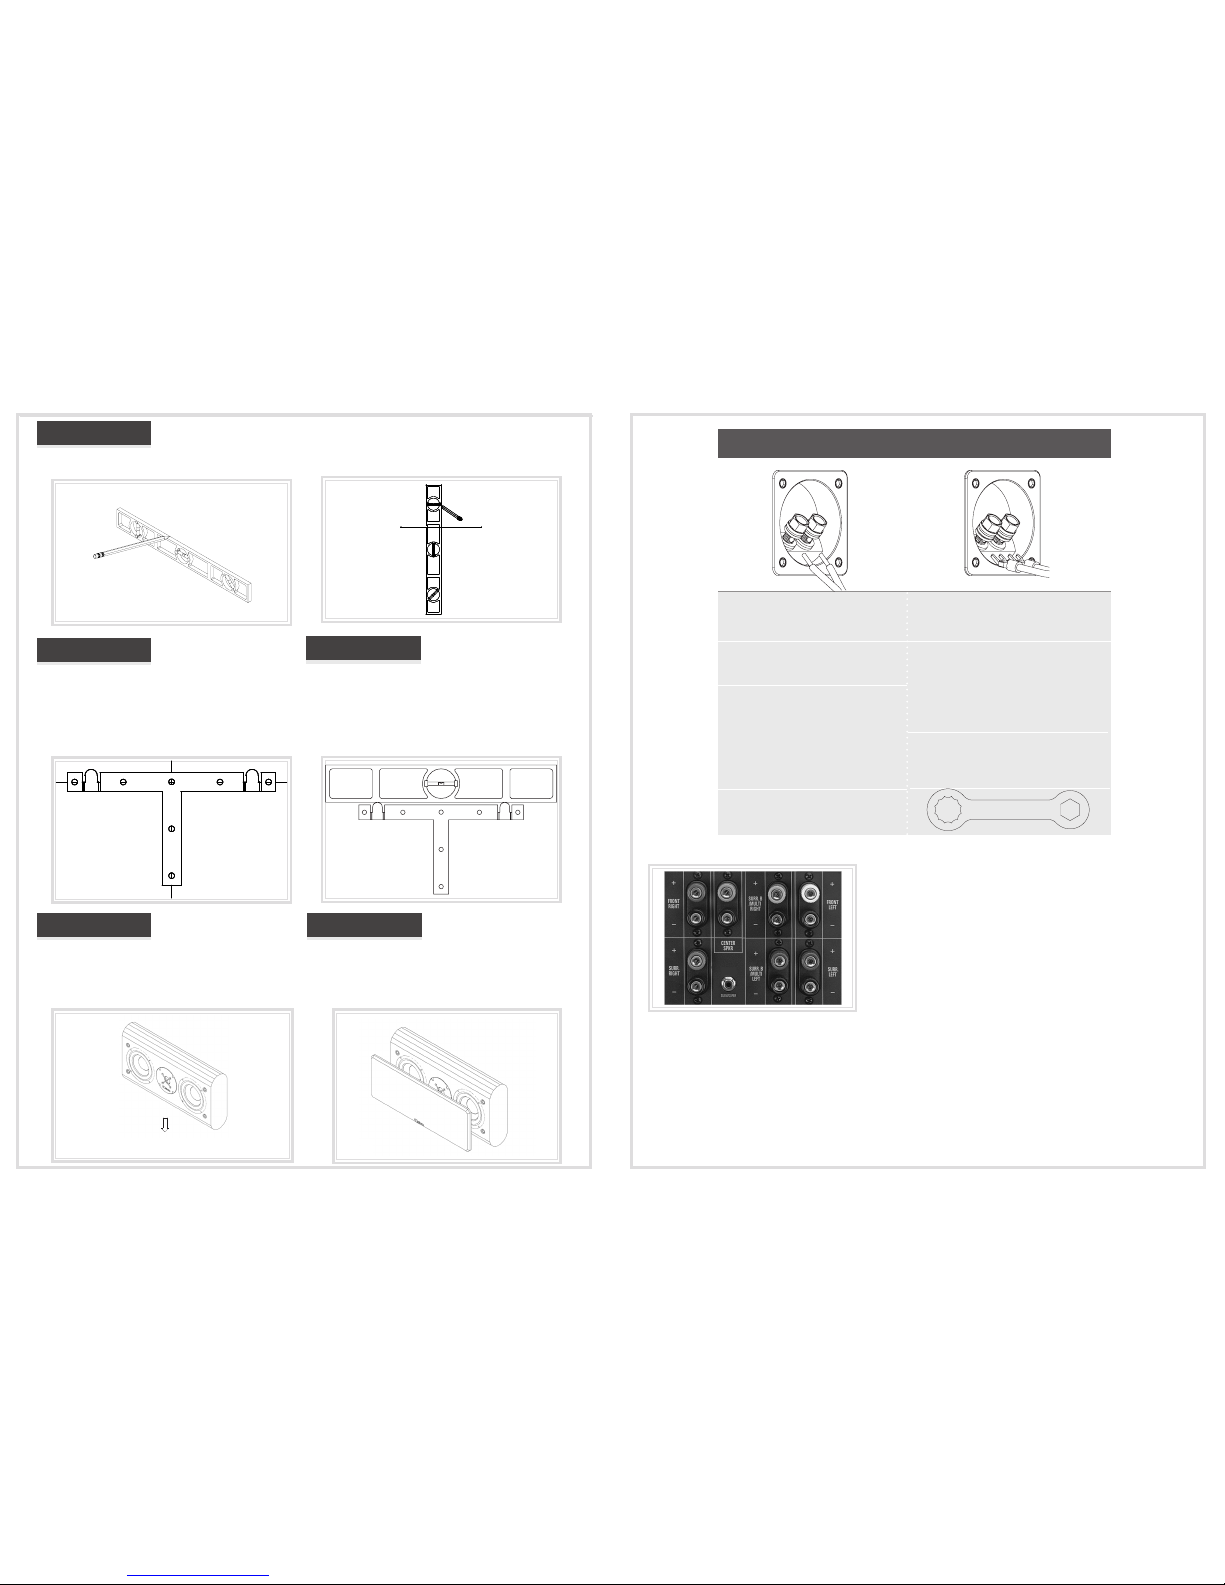
Step-by-step instructions on conguring your on-wall speakers.
VP100 On-Wall Speakers
Owners Manual
Model: VP100 On-Wall Modèle :
Max Rec. Amp Power: 200 Watts Puissance maximale admissible :
Min Amp Power: 10 Watts Puissance minimale :
Frequency Response +/- 3dB: 105Hz – 22 kHz Réponse en freq. +/- 3dB :
Frequency Response + 3dB/- 9dB: 70Hz – 22 kHz Réponse en freq. + 3dB/- 9dB :
Impedance: 8 Ohms Impédance :
SPL In Room 1w/1m: 93 dB Sensibilité en salle 1w/1m :
SPL Anechoic 1w/1m: 89 dB Sensibilité Anéchoïque 1w/1m :
X-Over: 2.7 kHz Filtre :
Tweeter: Single 1” Titanium Transducteur d’aigu :
Woofer: Dual 5.25” Aluminum Transducteur de grave :
On-wall Dimensions HWD mm: 225 x 431 x 91 Dimensions en saillie HLP mm :
On-wall Dimensions HWD inches: 8.85 x 16.95 x 3.6 Dimensions en saillie HLP inches :
Weight kg each: 5 kg Poids en Kilo chacun :
Weight lbs each: 11.05 lbs Poids en lb chacun :
is is by far the most important step before you even begin the
installation. Mount the VP100 On-Wall center channel speaker
above or below your TV screen, properly centered and no farther
than 2 feet away. e center speaker anchors movie dialog and
vocals at the TV screen, so keep it reasonably close to the screen.
Avoid corner locations if possible. Please make sure the speaker
wire has a clear path from your stereo or A/V receiver to the
placement of your speaker.
e Axiom On-Wall Speakers are designed to be installed on a
common stud wall, preferably fastened directly to a stud. If this is
not possible the use of a suitable wall anchor (not included) will
be required.
Ceci est de loin l’étape la plus importante avant même le début de
l’installation. Bien centrée et à moins de 60 cm de distance de ce dernier,
positionnez l’enceinte centrale sur surface murale VP100 au-dessus ou
au-dessous de votre téléviseur, L’enceinte centrale ancre le dialogue et
les voix au téléviseur, il faut donc la placer près de l’écran. Si possible,
évitez l’installation dans les coins. Veuillez vous assurer qu’il n’y ait
pas d’obstacle qui obstrue le passage des ls de l’enceinte jusqu’ à votre
récepteur stéréophonique ou Audio/Vidéo. Les enceintes sur surface
murale Axiom sont conçues pour être installées sur un mur à colombage
standard, préférablement xées directement à un colombage. Si ce n’est
pas possible, il faudra utiliser des xations (non comprises) appropriées à
votre type de surface murale.
Step 1 / Étape 1:
Step 2 / Étape 2:
Step 4 / Étape 4:Step 5/ Étape 5:
Step 3 / Étape 3:
Bare Wire
Fildénudé
Step 1 / Étape 1
Bare ends of speaker wire.
Extrémités dénudées des ls d’enceinte.
Step 2 / Étape 2
Leave washer down.
Laissez la rondelle vers le bas.
Step 3 / Étape 3
Insert bare end of wire through exposed hole
on binding post. Ensure postive wire from
Amp is in red connector.
Insérez l’extrémité dénudée du l à travers le
trou exposé sur la borne d’attache. Assurez-vous
que le l positif en provenance de l’amplicateur
est dans le connecteur rouge.
Step 4 / Étape 4
Tighten nuts with supplied plastic wrench.
Serrez les écrous avec la clé en plastique fournie.
Step 1 / Étape 1
Li washer.
Soulevez la rondelle.
Step 2 / Étape 2
Insert spade into slots in binding post. Ensure
positive wire from Amp is in red connector.
Insérer la cosse dans les fentes de la borne
d’attache. S’assurer que le l positif en
provenance de l’amplicateur est dans le
connecteur rouge.
Step 3 / Étape 3
Tighten nuts with supplied plastic wrench.
Serrez les écrous avec la clé en plastique fournie.
Spade Lug (1/4-inch Spade)
Cosse à Fourche (Cosse de 1/4-po)
Using a pencil, draw a horizontal line and a vertical line at the desired speaker location. Note: it
is extremely important to place the vertical line on a wall stud for security.
À l’aide d’un crayon, tracez une ligne horizontale et une ligne verticale à l’endroit désiré pour positionner
l’enceinte.
Place the metal T bracket over the pencil lines on the wall so the
lines are centered in the holes of the T bracket. Insert one screw in
the center of the T bracket.
Positionnez le support de métal en « T » sur les lignes de façon à ce que
celles-ci soient au centre des trous du support en « T ». Fixez une seule vis au
centre du support en « T ». Répétez l’opération pour l’autre support en « T ».
It is important that the T bracket is installed level. Place a level on
top of the T bracket and make any necessary adjustments. Screw
the T bracket to the wall using screws appropriate for your wall
material.
It est important que le support de métal en « T » soit installé bien au niveau.
Placez un niveau sur le dessus du support en « T » et apportez les corrections
nécessaires. Vissez les supports en « T » au mur en utilisant les vis et
xations adéquates pour votre type de surface murale.
Place grille on speaker.
Installez la grille à l’enceinte.
Connect speaker wires to speaker (See next page). Lift speaker
over the metal tabs and slide it down until speaker is securely
locked in place.
Branchez les ls de l’enceinte à l’enceinte (Consultez la page suivante).
Soulevez l’enceinte au-dessus des languettes métalliques et glissez-la vers
le bas jusqu’à l’enceinte soit verrouillée en place de façon sécuritaire.
Front Le speaker: White
Subwoofer: Purple
(line-level RCA output only)
Front Right: Red
Center: Green
Le Surround (side): Blue
Right Surround (side): Gray
Le Back Surround: Brown
Right Back Surround: Tan
Look at the speaker connectors on the rear panel of your receiver or amplier. Unless it’s
very old, these will usually be red and black binding posts, like those on your speakers,
or red and black spring-loaded push connectors. Vintage ampliers may have only screw
terminals.
If your A/V receiver or amplier has the new Consumer Electronics
Association color coding (pictured on the le) for each speaker channel, the negative
terminal (-) will always be black, however, the positive terminal (+) will have a dierent
color corresponding to each channel of the surround system.
If you nd this color coding confusing, note the positive (+) and negative (-) polarity for
each speaker and the speaker cable.
H.P avant gauche; blanc
H.P. caisson de grave; pourpre
( sortie RCA seulement )
H.P avant droit; rouge
H.P. avant central; v ert
H.P. cote gauche; bleu
H.P. cote droit; gris
H.P. arrière gauche; brun
H.P. arrière droit; beige
Examinez les bornes de sortie haut-parleur situées sur le panneau arrière de votre récepteur ou amplicateur.
À moins qu’il ne soit très ancien, les bornes seront rouges et noires, comme celles de vos enceintes, ou
du type à ressort, également codées rouge et noir. Les très anciens amplis sont dotés de barrettes à vis.
Si votre récepteur ou amplicateur respecte le nouveau code de couleur de C.E.A pour chaque canal, le
terminal négatif (-) sera toujours noir, le terminal positif sera de diérente couleur correspondant a chaque
canal du système surround.
Si vous êtes confus, notez la polarité positive (+) et la polarité négative (-) pour chaque enceinte et chaque
câble d’enceinte.