Axis 700 User manual


Preface
AXIS 700 User’s Manual 1
Preface
Thank you for purchasing the AXIS 700 Network Scan Server. This product has been developed
to simplify distribution and archiving of paper-based information in workgroup and production
scanning environments, by connecting scanners directly to the network for anyone to use.
This specific model is designed for Ethernet-based networks running TCP/IP.
About Axis
Axis Communications is dedicated to providing innovative solutions for the network connection
of computer peripherals. Since the start in 1984, it has been one of the fastest growing companies
in the market and is now a leader in its field. The headquarters are located in Lund, Sweden, with
subsidiaries in Beijing, Boston, Hong Kong, Paris, London, Shanghai, Singapore, Seoul, Taipei
and Tokyo.
Axis Communications has a distributor network operating in more than 60 countries world wide,
marketing six product lines:
Network Scan Servers. The AXIS 700 Network Scan Server has been developed to simplify
distribution and archiving of paper-based information in workgroup and production scanning
environments, by connecting scanners directly to the network for anyone to use.
Network CD-ROM Servers. Multi-protocol CD-ROM servers provide a flexible and cost
efficient solution for sharing CD-ROMs across the network. The AXIS StorPoint CD is available
as standalone and tower module in both Ethernet and Token Ring versions. The tower module
variant is also available in a 100 Mbps Fast Ethernet version.
Network Storage Servers. Multi-protocol Storage Servers provide a flexible and cost efficient
solution to network storage. The AXIS StorPoint HD is available as a standalone module, a tower
module and as a self-contained total solution for Jaz drives. All models are Ethernet versions.
Network Print Servers. These intelligent Ethernet and Token Ring print servers support a
wide range of LAN protocols. The AXIS 150, 152, 540, 542, 560, 570 and 570 MIO are
Ethernet print servers, while the AXIS 640, 642, 660, 670, and 670 MIO are Token Ring print
servers. The new AXIS PrintPoint 560/100 and the AXIS PrintPoint 1P 560/100 print servers
support 10baseT (Ethernet) or 100baseTX (Fast Ethernet) technology.

Preface
2 AXIS 700 User’s Manual
Network Camera Servers. The AXIS Web Camera 200 is a digital camera with built-in Web
server that supports TCP/IP and Internet-related protocols. Connecting directly to Ethernet, it
produces high quality pictures that can be published around the globe, over Internet and intranet
networks.
IBM Mainframe and S/3x – AS/400 Printer Interfaces. These products include a wide
range of plug-in interfaces and standalone products such as the AXIS Cobra+, AXIS 330/370
Cobra, AXIS HP MIO, the AXIS AFP IPDS-to-PostScript converter, the AXIS AFP MIO/IOP
IPDS-to-PCL converters, and the AXIS 570/670 and AXIS 570/670 MIO SNA print servers.
About this Manual
This manual applies to the AXIS 700 Network Scan Server with software release 1.00 and
subsequent releases until otherwise notified.
This manual is also available in electronic on-line format, together with more information at the
Axis Web site.
The manual consists of four sections and additional appendices:
1. Introduction – The AXIS 700, how it works, where to use it and its main features.
2. Basic Installation – How to connect your AXIS 700 to the network and set up the
communication for TCP/IP.
3. Configuring the AXIS 700 – How to configure the AXIS 700.
4. Using the AXIS 700 – How to scan using the AXIS 700.
Every care has been taken in the preparation of this manual; if you detect any inaccuracies or
omissions, please inform us at the address on the back cover. Axis Communications AB cannot be
held responsible for any technical or typographical errors and reserves the right to make changes
in this manual and to the product without prior notice.
Copyright Information
The unauthorized copying of materials that are covered by copyright and other international
proprietory or intellectual property rights is prohibited in most countries. Axis Communications
AB recommends that the users of this equipment seek the necessary authorizations for copying
material. The instructions for use in the manual shall not be considered as an inducement to
make illicit duplications of material. Any duplication will be made at the user’s own risk.

Preface
AXIS 700 User’s Manual 3
Electromagnetic Compatibility (EMC) Notices
USA
This equipment generates, uses, and can radiate radio frequency energy and if not installed and used in accordance with the
instruction manual, may cause interference to radio communications. It has been tested and found to comply with the limits for a
Class A computing device pursuant to Subpart B of Part 15 of FCC rules, which are designed to provide reasonable protection against
such interference when operated in a commercial environment. Operation of this equipment in a residential area is likely to cause
interference in which case the user at his own expense will be required to take whatever measures may be required to correct the
interference. Shielded cables should be used with this unit to ensure compliance with the Class A limits.
Europe
This digital equipment fulfils the requirements for radiated emission according to limit B of EN55022/1994 and the requirements for
immunity according to EN50082-1/1992 residential, commercial and light industry. (Compliance is not valid for unshielded
network cables.)
Trademark Acknowledgements
AIX, DOS, Ethernet, IBM, Macintosh, Microsoft, Netscape, OS/2, UNIX, Windows, Windows for Workgroups, Windows NT and
Windows 95 are registered trademarks of the respective holders.
AXIS 700 User’s Manual Revision 1.0
Part No: 15475 Dated: October 1997
Copyright © Axis Communications AB, 1997

Preface
AXIS 700 User’s Manual 4

Table of Contents
AXIS 700 User’s Manual 5
Table of Contents
Section 1 Introduction . . . . . . . . . . . . . . . . . . . . . . . . . . . . . . . . . . . . . . . . . . . . . . . . . . 7
The AXIS 700 Network Scan Server . . . . . . . . . . . . . . . . . . . . . . . . . . . 7
How it Works . . . . . . . . . . . . . . . . . . . . . . . . . . . . . . . . . . . . . . . . . . . . . 7
Main Benefits . . . . . . . . . . . . . . . . . . . . . . . . . . . . . . . . . . . . . . . . . . . . . . 9
Section 2 Basic Installation . . . . . . . . . . . . . . . . . . . . . . . . . . . . . . . . . . . . . . . . . . . . . . 11
Checking and Identifying the Hardware . . . . . . . . . . . . . . . . . . . . . . . . 11
The AXIS 700 User Interface . . . . . . . . . . . . . . . . . . . . . . . . . . . . . . . . 12
The Front Panel Indicators . . . . . . . . . . . . . . . . . . . . . . . . . . . . . . . . . . 13
Connecting the AXIS 700 to the Scanner. . . . . . . . . . . . . . . . . . . . . . . 14
Connecting the AXIS 700 to the Network. . . . . . . . . . . . . . . . . . . . . . 17
Basic Setup for TCP/IP. . . . . . . . . . . . . . . . . . . . . . . . . . . . . . . . . . . . . . 18
Section 3 Configuring the AXIS 700 . . . . . . . . . . . . . . . . . . . . . . . . . . . . . . . . . . . . . . . 27
Accessing the Configuration Pages . . . . . . . . . . . . . . . . . . . . . . . . . . . . 28
Section 4 Using the AXIS 700 . . . . . . . . . . . . . . . . . . . . . . . . . . . . . . . . . . . . . . . . . . . . 37
Scanning Methods . . . . . . . . . . . . . . . . . . . . . . . . . . . . . . . . . . . . . . . . . 37
Scanning to a Web Browser . . . . . . . . . . . . . . . . . . . . . . . . . . . . . . . . . 39
Scanning to a Destination . . . . . . . . . . . . . . . . . . . . . . . . . . . . . . . . . . . 42
Specifying Scanning Parameters . . . . . . . . . . . . . . . . . . . . . . . . . . . . . . . 44
Viewing the Scanned Images . . . . . . . . . . . . . . . . . . . . . . . . . . . . . . . . . 46
Appendix A Troubleshooting . . . . . . . . . . . . . . . . . . . . . . . . . . . . . . . . . . . . . . . . . . . . . . 49
Restoring Factory Default Settings . . . . . . . . . . . . . . . . . . . . . . . . . . . . 49
Front Panel Indicator Conditions . . . . . . . . . . . . . . . . . . . . . . . . . . . . . 51
LCD Error Messages . . . . . . . . . . . . . . . . . . . . . . . . . . . . . . . . . . . . . . . 53
Appendix B The Parameter List . . . . . . . . . . . . . . . . . . . . . . . . . . . . . . . . . . . . . . . . . . . . 55
Appendix C Updating the Software . . . . . . . . . . . . . . . . . . . . . . . . . . . . . . . . . . . . . . . . . 57
Appendix D Technical Specifications . . . . . . . . . . . . . . . . . . . . . . . . . . . . . . . . . . . . . . . . . 59
Appendix E How To Contact Axis . . . . . . . . . . . . . . . . . . . . . . . . . . . . . . . . . . . . . . . . . 63

Section 1: Introduction
AXIS 700 User’s Manual 7
Section 1 Introduction
The AXIS 700 Network Scan Server
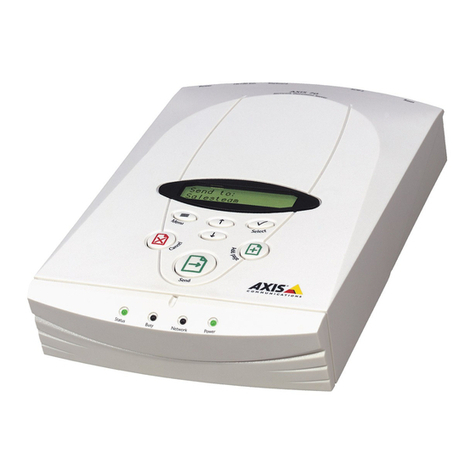
The AXIS 700 connects scanners to Ethernet networks.
How it Works
The AXIS 700 is connected as a node in an Ethernet network,
enabling scanners to be accessed through the network, via Internet and
intranet-related protocols. It can be used independently of file servers,
i.e. communication takes place directly between the network client
and the AXIS 700. This results in high performance, reliability and
independence of other equipment.
The file-server independent approach makes the installation quick and
convenient. In most environments, the physical connection to the
network is the only installation required prior to using the AXIS 700.
No software needs to be installed on clients or file servers, except for
applications for viewing the generated images in TIFF or JPEG
format.

Section 1: Introduction
8 AXIS 700 User’s Manual
The AXIS 700 is configured and managed using a Web browser.
Scanning can be performed from a Web browser, but you can also use
the AXIS 700 user interface to scan to an e-mail address or to a file on
an FTP server. These methods cover a whole range of network
environments and application needs.
At the Axis WWW Home Page (http://www.axis.com/) you can
download further technical information. You can also download on-
line manuals and the latest versions of the AXIS 700 software.
Alternatively, your Axis dealer will provide you with the assistance or
information you require.
The AXIS 700 is covered with a best-of-breed warranty and service
program. If you take advantage of the Axis User Group free
membership, you can obtain a 5 year warranty, free software upgrades
and support. In the USA and Canada there is also a 24 hour unit
replacement service and a 90 days money back guarantee. You have
access to the Axis User Group from the AXIS 700 Home Page and
Administration page, or refer to the Axis WWW Home Page for more
details.
World
Wide
Web

Section 1: Introduction
AXIS 700 User’s Manual 9
Main Benefits
File Server
Independence
The AXIS 700 comes pre-installed with all the network functionality
required. Communication takes place directly between the network
client and the AXIS 700, i.e. peer-to-peer. No server-based
applications are required to be installed before the AXIS 700 can be
used.
Ease of Use The AXIS 700 is designed to be as easy as possible to install and use:
• No special software to learn
• Integrated scanner drivers, image-file creation and network
transfer methods
• Auto-detection of scanner type at startup
• Auto-selection of sheet feeder or flatbed
• Destination and scanning profiles saved for regular use
Flexibility The range of transfer methods and image formats enable you to adapt
the AXIS 700 to your needs rather than the other way round.
Speed The AXIS 700 uses the AXIS ETRAX chip, a 32 bit RISC processor,
and supports scanners with built-in compression and image-processing
modules.
Security Configurations can be protected by supervisor login and passwords.
Maintenance Using Flash memory for storing the AXIS 700 software means that it
is easy to upgrade the software from the network using FTP.
Network
Management
Management is made a simple process using a Web browser.

Section 1: Introduction
10 AXIS 700 User’s Manual

Section 2: Basic Installation
AXIS 700 User’s Manual 11
Section 2 Basic Installation
Checking and Identifying the Hardware
Unpack and inspect all parts for damage. Contact your dealer if
anything is missing. All packaging materials are recyclable.
The standard delivery contains the following:
❏AXIS 700 Network Scan Server:
❏AXIS 700 User’s Manual (Part no: 15475)
❏AXIS 700 Quick Installation Guide (Part no: 15476)
❏AXIS 700 Quick User’s Guide (Part no: 15663)
❏AXIS Product Guide (Part no: 14412)
❏AXIS User Group registration leaflet (Part no: 15119)
❏Power supply (12V DC):
Optional accessories:
❏50-pin high-density shielded SCSI connector (Honda) (Part no:
14259)
❏50-pin low-density shielded SCSI connector (Centronics) (Part
no: 14259)
Part no: AXIS 700
Ethernet 0075-1
Part no: PS-E or PS-C
Europe 15507 14235
UK 15509 14236
USA 15508 14256
Japan 15511 14257
Australia 15510 14258

Section 2: Basic Installation
12 AXIS 700 User’s Manual
The AXIS 700 User Interface
AXIS 700 User Interface
The AXIS 700 message display consists of 2 lines by 16 characters
indicating status and menu options. The user interface includes these
keys:
Key Description
Scan Scans one or more pages from the attached scanner’s flatbed or sheet
feeder.
Send Sends the scanned image to its destination and releases the AXIS 700
for other users. Pressing this key only, both scans and sends theimage
to its destination.
Menu Selects scanning functions.
Enter Selects multiple destinations and saves IP settings.
Arrow Allows the scrolling and selection of menu options.
Cancel Cancels the scanning process at any stage and clears any selections
made from the menu.
$;,6
9HUVLRQ ;;;

Section 2: Basic Installation
AXIS 700 User’s Manual 13
The Front Panel Indicators
The front panel indicators show the status of the AXIS 700. The
indicators have the following functions:
•Status – Flashes during startup. When the AXIS 700 is ready for
use, this light goes out. If lit, check the LCD for an error message.
•Busy - Will be lit when the AXIS 700 is allocated for use, and
when scanning is in progress.
•Network – Indicates network activity.
•Power – Indicates that power is connected to the AXIS 700.
Note: ❏While the AXIS 700 is idle, the Power indicator should be lit, the
Network indicator should flash randomly, and the Status and
Busy indicators should be off.

Section 2: Basic Installation
14 AXIS 700 User’s Manual
Connecting the AXIS 700 to the Scanner
The AXIS 700 is a standalone unit, located beside the scanner. One
AXIS 700 device is required for each scanner.
Notes: ❏Make sure that the power supply (PS-C, 12 V DC, 36VA or PS-
E, 12 V DC, 13,2VA), included in the delivery is marked with the
correct mains voltage.
❏When connecting and disconnecting cables always make sure the
power is not connected to the AXIS 700, as the SCSI bus may
become damaged.

Section 2: Basic Installation
AXIS 700 User’s Manual 15
To connect the AXIS 700 to your scanner, follow these steps:
1. Record the serial number of the AXIS 700. You will need this
number during the network configuration described in “Basic
Setup for TCP/IP” on page 18. The number is found on the
underside label of the server.
2. Connect the SCSI cable to the SCSI connector on the AXIS 700.
3. Connect the SCSI cable to the scanner.
4. The scanner must have the SCSI terminated. See the scanner
documentation.
5. Power up the scanner.
6. Power up the AXIS 700 by connecting the external power supply to
the AXIS 700.
The AXIS 700 LED indicators will flash during power up and self test.
During the self test, the AXIS 700 LCD will display:
where x.xx is the software version number.
If the Internet address has not yet been set, the AXIS 700 will prompt
you to set it:
$;,6
9HUVLRQ [[[
(GLW ,3 DGGUHVV
SCSI connector

Section 2: Basic Installation
16 AXIS 700 User’s Manual
Set the Internet address according to the description in “Using the User
Interface” on page 21.
The AXIS 700 will then search for and display the product name of
the attached scanner.
When the Status indicator stops flashing and remains off, the AXIS
700 is ready for use. If no destinations have been set, the AXIS 700
LCD will display:
Otherwise, the AXIS 700 LCD will display:
where “xxxxxx” is a destination that has been setup on the
Configuration Destination page from the Web browser. See
“Destination ’ on page 30.
$OORFDWH XVLQJ
:HE EURZVHU
6HQG WR
[[[[[[

Section 2: Basic Installation
AXIS 700 User’s Manual 17
Connecting the AXIS 700 to the Network
Notes: ❏Make sure that your network is ready to accept a new node.
❏Always consult the Network Administrator before making
changes to the network configuration.
The AXIS 700 is equipped with 10baseT and 10base2 connectors.
To connect the AXIS 700 to your network, follow these steps:
1. Turn off the AXIS 700 by unplugging the power supply.
2. Connect the network cable to the appropriate connector.
3. Power up the AXIS 700 by connecting the external power supply.
Network connectors
Power supply
connector
10baseT 10base2

Section 2: Basic Installation
18 AXIS 700 User’s Manual
Basic Setup for TCP/IP
To establish communication with the TCP/IP environment, you must
assign an Internet address and make up a unique host name for your
AXIS 700. The Internet address can be set from Windows (via a DOS
window), OS/2, UNIX, or from the AXIS 700 user interface.
Before you begin • You will need administrator privileges on the Windows NT server
or root privileges on your UNIX system.
• Have the serial number found on the underside label of the AXIS
700 device available.
• Make sure the AXIS 700 is powered up and attached to the
network.
• Always consult the Network Administrator before making
changes to the network configuration.
Assign an Internet
Address and a Host
Name
Enter the Internet address and host name into your host table using
the following instructions:
1. Acquire an unused Internet address from your Network
Administrator and make up a unique host name for your AXIS
700.
2. The host tables are normally located in these directories:
• Windows 95 - c:\windows\hosts
• Windows NT - c:\winnt\system32\drivers\etc\hosts
• UNIX - /etc/hosts
• OS/2 - c:\etc\hosts

Section 2: Basic Installation
AXIS 700 User’s Manual 19
3. Add the Internet address and host name to your system host table
by appending the following line:
Example:
Caution 0Do not use the above Internet address when installing your AXIS 700.
Always consult your Network Administrator before assigning an
Internet address.
4. UpdateyourAliasNamedatabases.Ifyoursystemutilizesaliasname
databases such as Yellow Pages (YP) or Network Information
Services (NIS), you should update these. On most systems this is
done by entering the following commands:
Note: ❏If the host name has not been included in the system host table as
described above, the following instructions on how to download
the Internet address can still be performed. In this case, simply
replace the host name entry with the Internet address.
<Internet address> <host name>
192.36.253.80 spserv
cd /var/yp
make
Other manuals for 700
3
Table of contents
Other Axis Server manuals

Axis
Axis Video Server 242S IV User manual

Axis
Axis 2400AM Instruction Manual

Axis
Axis 2400+ Instruction Manual

Axis
Axis 250S Blade User manual

Axis
Axis NETEYE 200 User manual

Axis
Axis 247S User manual

Axis
Axis S2108 User manual

Axis
Axis 7000 Service manual

Axis
Axis 7000 User manual

Axis
Axis AXIS 241QA User manual

Axis
Axis 241Q Blade User manual

Axis
Axis Developer Board and Device Server AXIS 82+ User manual

Axis
Axis Camera Station S1232 Tower User manual

Axis
Axis AXIS 243Q Blade User manual

Axis
Axis 241Q Blade User manual

Axis
Axis 700 Quick setup guide

Axis
Axis 241Q Blade User manual

Axis
Axis 25281R1 User manual

Axis
Axis 70 User manual

Axis
Axis 243SA User manual