Axon Body 2 User manual

Camera Operation LED
The Axon Body 2 camera’s operation LED displays the system’s current operating
mode.
Operating Mode Operation LED
Recording
Recovering interrupted video* Blinking red
Buering Blinking green
Booting up/powering down
Error state** Solid red
*When the Function LED also is blinking red.
**When the Function LED also is solid red.
Camera Function LED
The Axon Body 2 camera’s function LED displays when certain functions are enabled.
Function Enabled Function LED
Mute Blinking blue
Camera error *** Solid red
Bluetooth feature is booting up Solid blue
***Use the power switch to turn the camera o and on.
Battery LED
The camera’s battery LED displays the battery’s remaining capacity, when the device
is being used or when charging.
Battery Status Battery LED
Battery capacity is 41–100% Green
Battery capacity is 20–40% Yellow
Battery capacity is less than 20% Red during operation; ashing red and
yellow during charging
Battery critically low Blinking red and yellow
Axon Body 2 Quick Start Guide
English
Recording
The Axon Body 2 camera has two operating modes. The default mode, or BUFFERING
mode, provides pre-event buering to capture activities that occur before you activate
the EVENT (recording) mode.
1Turn the system on. Move the ON/OFF switch to the ON position.
• The camera takes a few seconds to boot up and be ready to record (the red area
under the switch will be exposed with the switch moved to the ON position).
• The operation LED will be solid red and then transition to blinking green when
the system goes into BUFFERING mode.
• The Axon Body 2 camera will go into BUFFERING mode after the boot up
sequence. The BUFFERING mode holds the previous 30 seconds of video [NO
AUDIO] leading up to the beginning of a recording.
Solid Red
Boot Up Mode
Blinking Green
BUFFERING Mode
2To record, quickly double-press the EVENT button.
• The camera now records audio as well as video.
• The camera will beep twice to let you know that recording has started. The two
beeps will repeat every two minutes (audio notications can be deactivated
if necessary).
• The operation LED will blink red.
3 To add a marker to the video, quickly press and release the Function button.
4To stop audio recording (mute), press and hold the Function button for three
seconds.
5To stop all recording and return to BUFFERING mode, press and hold the EVENT
button for at least three seconds until there is a long, audible beep.
With default settings, the system does not capture audio in BUFFERING mode, so
anything recorded in that mode will be video-only. BUFFERING mode starts only
after the camera is turned on. The system does not record when the Axon Body 2
camera is turned o.
EVENT Button
Blinking Red - EVENT Mode
Axon Body 2 Wall Charger (not shown)
Hardware
Axon Body 2 USB Cable
Axon Body 2
Camera
Read, understand, and follow all current instructions, warnings, and relevant TASER training materials before using any Axon system. The most up-to-date
warnings and instructions are available at www.taser.com.
Before using an Axon Body 2 camera, ensure it is fully charged, and connect it to Evidence.com via the Axon Dock or Evidence Sync software to ensure it is
properly congured. See Battery LED and Recharging the Battery and Uploading Data for more information. If the battery is removed or its charge is ever
depleted, recharge and reconnect the camera again.
Quick Reference
Upload Status LED
Bottom View
Camera Lens
Power Switch
Red = On/Buffering
Recharging/Dataport
Data Transfer & Recharging
through PC or Axon Dock
Top View
Operation LED
EVENT Button
Double Tap = Start Record
Hold 3 Sec = Stop Record
Speaker
Battery LED
Green = 41% - 100%
Yellow = 20% - 40%
Red = Less Than 20%
Microphone Battery Status Button
Push to Show Status of
Battery
Function Button
Mute or add marker
Function LED

Axon Dock Upload Status LED
When you plug your camera into the Axon Dock, the upload status LED on the bottom of the camera displays the system’s status
System Status LED Indication
Initial connection (momentary) Solid red (for 20 seconds or fewer)
In queue awaiting upload Solid yellow
Device ready (all videos uploaded successfully) and fully charged Solid green
Device not assigned, agency mismatch, camera set in the oine mode, or device error Blinking red
Uploading data Blinking yellow – DO NOT remove the camera from the Axon Dock
Firmware update, internal battery charging, extremely low battery, or memory full Blinking red and yellow – DO NOT remove the camera from the Axon Dock
Transfer error, device re-trying to transfer Blinking green and yellow
Network error Blinking red, yellow, and then green (cycling all colors)
Axon Dock has no communication with the camera LED o
Using Axon View
The Axon View application enables you to replay video and add metadata (GPS, title,
case ID, and category) to your videos using a smart phone or multimedia player.
1Using your smart device, download the Axon View application
from the Google Play store or the iTunes App Store. Search
Axon View.
2On your smart device, open the Axon View application and
follow the onscreen instructions.
Note: All data is stored on the Axon camera. No videos are
stored on your smart device.
Notication
The camera emits beeping sounds called audio prompts to notify you of the system
status. These audio prompts usually occur after you perform an action with the camera.
For some actions, the camera also vibrates while making an audio prompt.
Operating Mode Audio Vibration
Powering on or o One beep Once
Recording an event Two beeps
(every two minutes)
Twice
(every two minutes)
Press the battery button while the
camera is recording Two beeps Twice
The device is ending an event and
returning to BUFFERING mode One long beep Once, long duration
The battery is at 20% capacity or
lower
Four quick beeps
(every ve minutes)
Four times, quickly,
every ve minutes
Camera memory is full (camera
will not record). Three beeps Three times
Bluetooth is a trademark of the Bluetooth SIG, Inc. Google Play is a trademark of Google, Inc. iTunes is a trademark of Apple, Inc. IOS is a trademark of Cisco Systems, Inc. Windows is a
trademark of Microsoft Corporation.
, A XON, Axon, Axon Body 2, Axon Dock, Axon View, Evidence.com, Evidence Sync, and TASER are trademarks of TASER International, Inc., some of which are registered in the US and
other countries. For more information, visit www.taser.com/legal. © 2017 TASER International, Inc.
MPC0205 Rev: D
Recharging the Battery and Uploading Data
If you do not have an Axon Dock, upload video with a Windows compatible computer
using Evidence Sync: TASER.com/syncdownload.
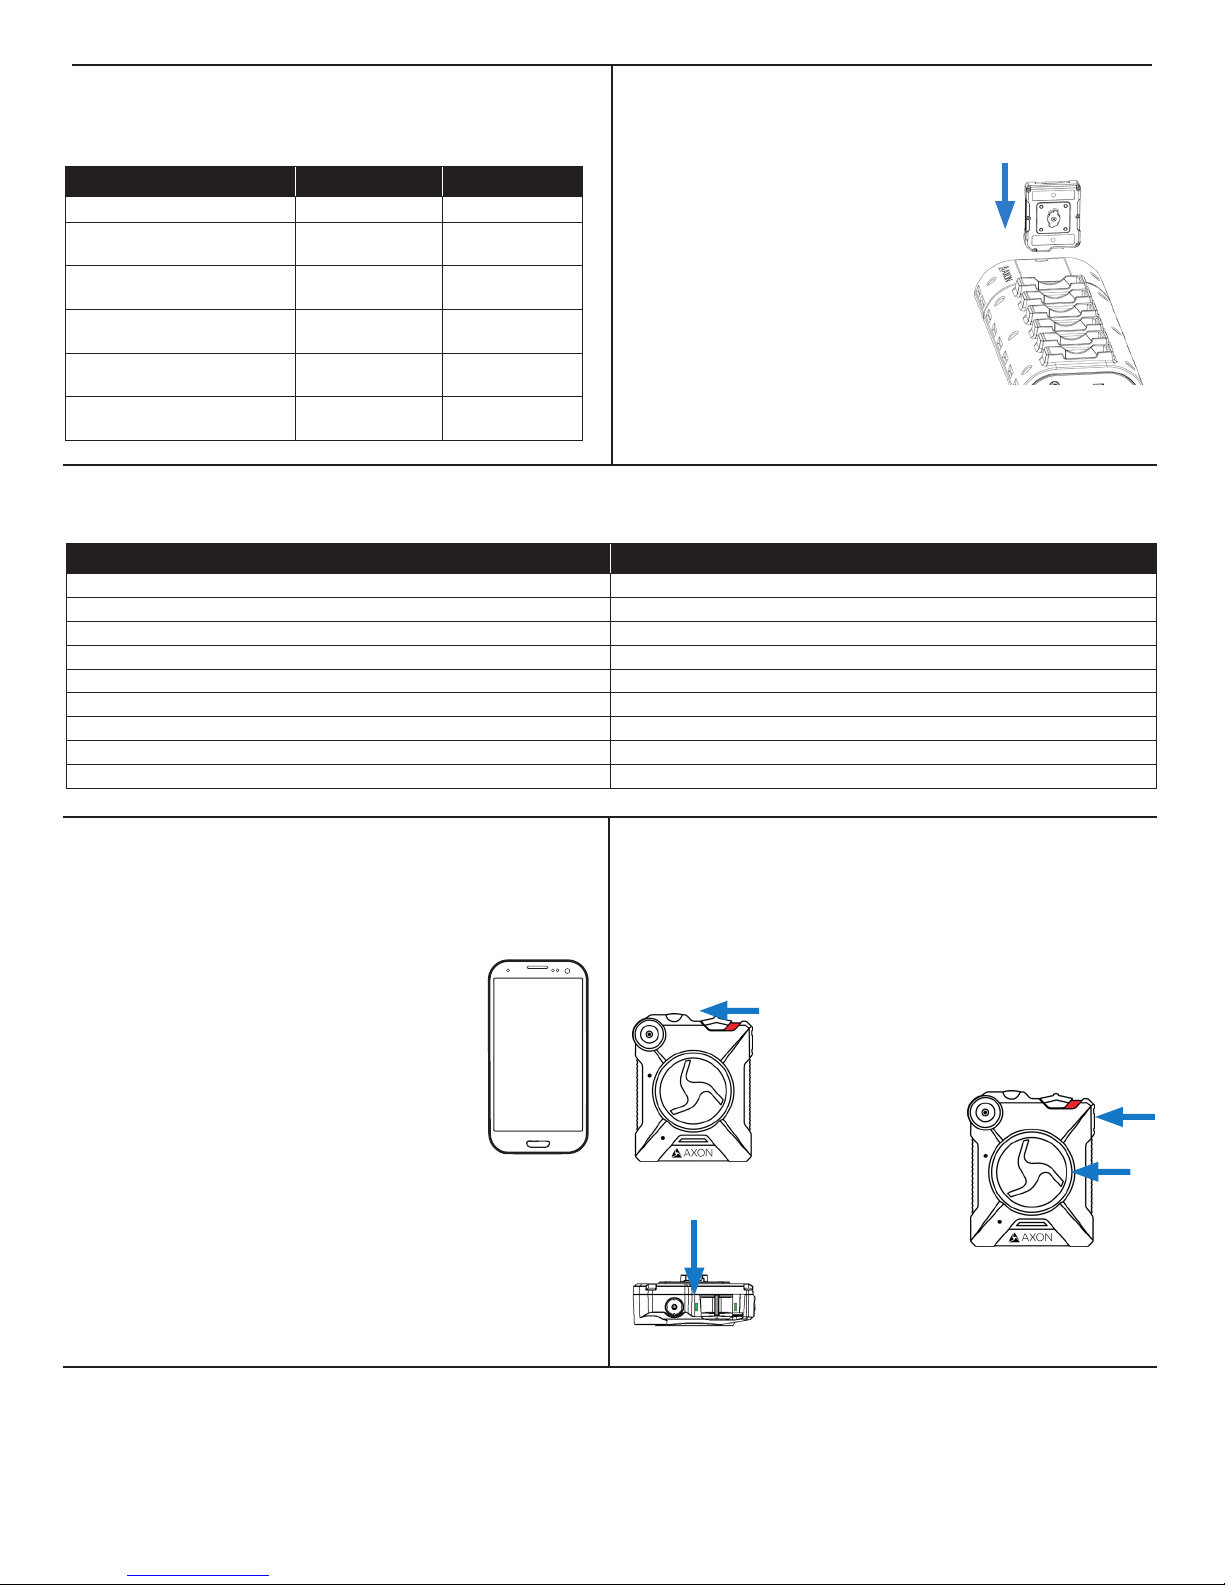
1Ensure the Axon Body 2 camera is o. Insert the
camera into the Axon Dock as shown. The dock
automatically uploads data to Evidence.com services,
deletes videos from the camera, and charges the
camera. (The camera must be registered to your
Evidence.com account.)
2At the beginning of the next shift, ensure that your
camera (if one has been assigned to you) displays
with a green upload status LED before removing it
from the dock.
Pairing the Axon Body 2 Camera with a Smart Device
1Turn on the Axon Body 2 camera.
2Wait until the Function LED is not lit anymore.
2Hold down the Function and EVENT buttons for ve seconds.
3Wait until you hear four beeps. The Function LED will blink green.
4On your smart device, follow the onscreen instructions.
2. Hold down the Function and EVENT buttons for ve
seconds.
1. Turn on the Axon Body 2 camera.
3. The Function LED will blink green;
you will hear four beeps.
Other manuals for Body 2
6
Table of contents
Other Axon Accessories manuals
Popular Accessories manuals by other brands

Dorner
Dorner AquaPruf 7400 Ultimate CE Series Installation, Maintenance, and Parts Manual

FIBARO
FIBARO FGK-101 operating manual

Eaton
Eaton GHG 521 operating instructions

Byron
Byron BY302 Installation and operation instruction

Stiga
Stiga Micro Blade Assembly & instruction manual

Carlson
Carlson BRx6 Calibration