Axon Signal Sidearm User manual

Axon Signal Sidearm
User Manual
Model AX1012
IMPORTANT SAFETY INSTRUCTIONS
Read all warnings and instructions. Save these
instructions.
The most up-to-date warnings and instructions are
available at www.axon.com
MMU0069 Rev: F

Contents
i
Chapter 1: Overview.......................................................................................................... 1
What is it?......................................................................................................................................................1
Chapter 2: Registration, Assignment, and Operation ...........................................2
Register, Assign, and Reassign .............................................................................................................2
Option A: Axon Device Manager App (Recommended) ...........................................................2
Option B: Axon Evidence.com ..........................................................................................................4
Firmware Updates......................................................................................................................................6
Upload Sensor Logs to Axon..................................................................................................................8
Operating Modes........................................................................................................................................9
Setup - Exit Low Power Mode ...........................................................................................................9
Verification and Calibration - Test Mode .....................................................................................10
Operation - Field Mode .....................................................................................................................10
Operation - Mute Mode ...................................................................................................................... 11
Sensor Reset............................................................................................................................................... 11
Chapter 3: Maintenance and Troubleshooting ...................................................... 12
Battery Replacement...............................................................................................................................12
Troubleshooting .......................................................................................................................................13
Technical Support .................................................................................................................................... 16
Chapter 4: Additional Information ............................................................................ 17
Warranty Policy .........................................................................................................................................17
Warnings......................................................................................................................................................17
Radio Waves ...............................................................................................................................................17
Declaration of Conformity................................................................................................................ 19
Compliance Marks.................................................................................................................................... 19

1
Chapter 1: Overview
What is it?
Signal Sidearm is a sensor that alerts Axon cameras when an ocer draws their pistol. It attaches
to popular duty holsters and is powered by an o-the-shelf coin cell battery.
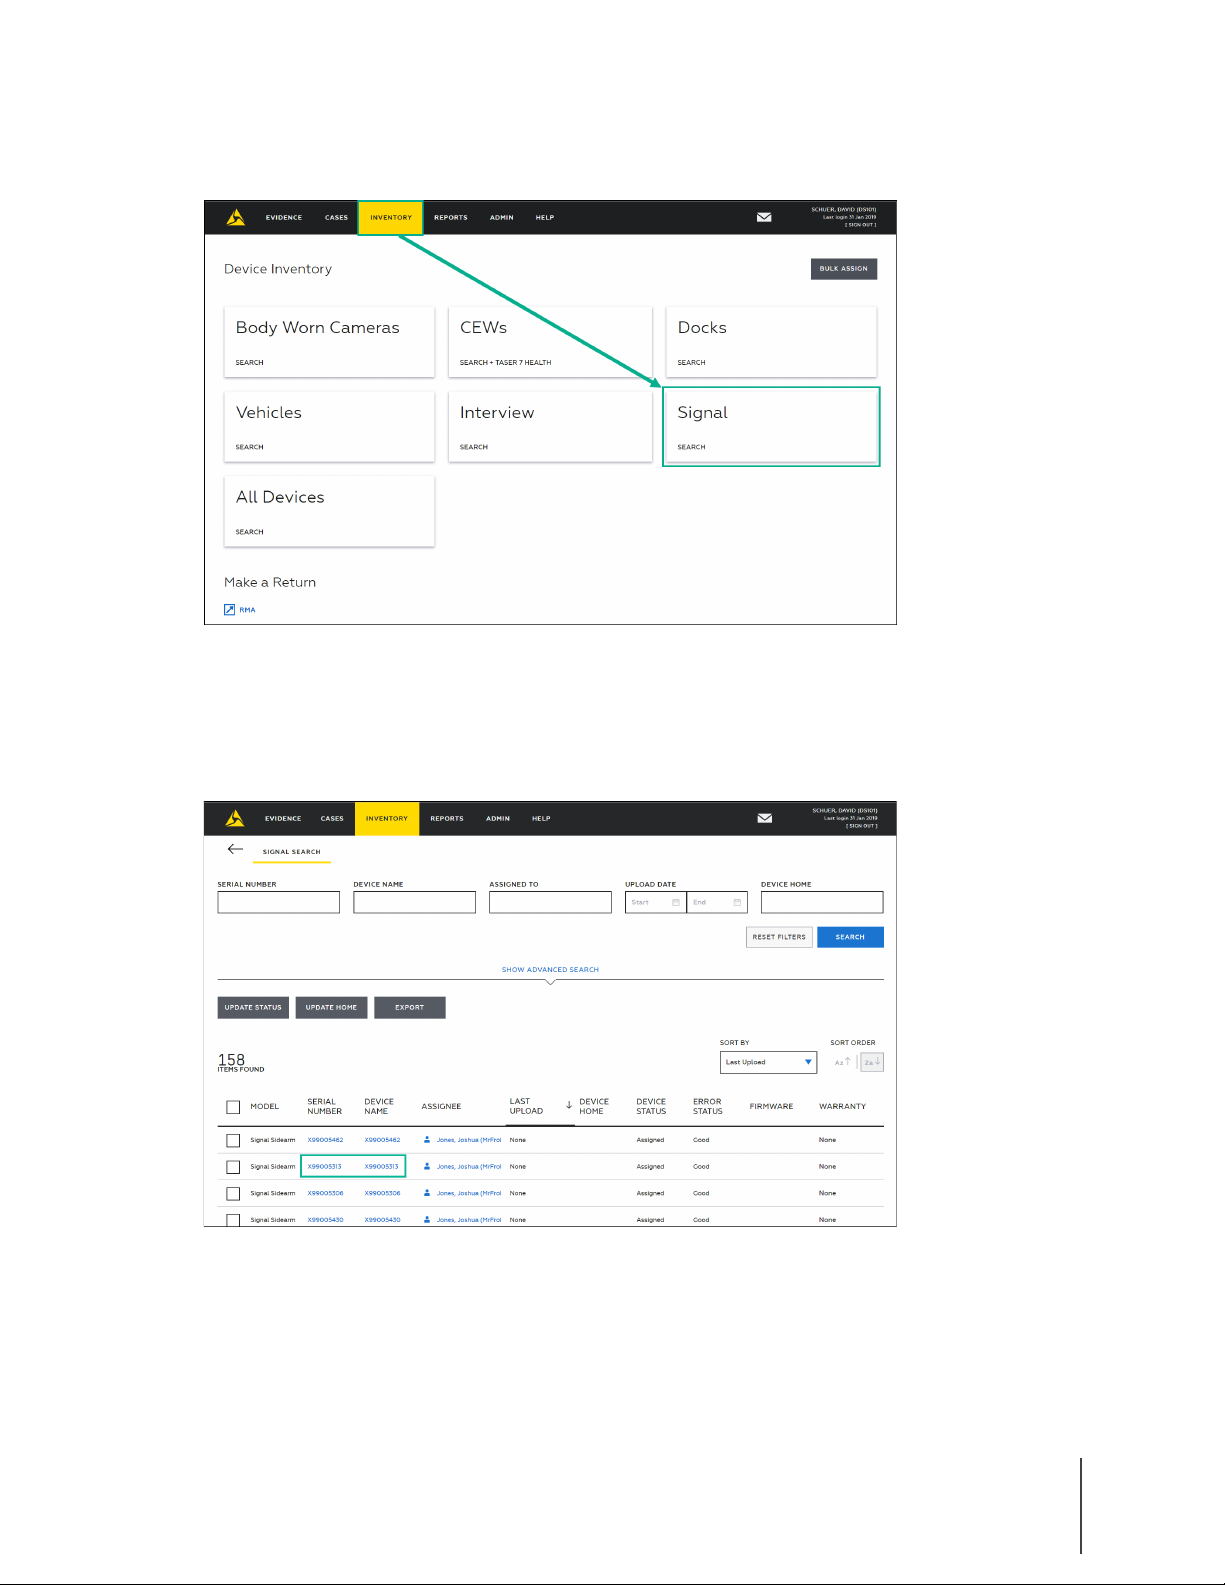
Signal Sidearm is supported on:
• Axon Body 2, Axon Flex 2, and Fleet system cameras with firmware v1.11.16 or higher.
• Axon Device Manager v2.0 or higher.
AAThese screws hold the sensor together. Remove them to
replace the battery.
BThese screws attach the sensor to the holster bracket. Remove
them to separate the sensor from the bracket.
CLED shows battery status and other status information.
DButton used to put the sensor into dierent operating modes.
See Chapter 2 for information on the operating modes.
LED REFERENCE
Mode Status LED indication
Low Power O
Placement Used to determine optimal position of the sensor when
installing the adhesive mount and verify placement.
To verify placement – remove pistol from holster, exit Low
Power mode, then return pistol to holster and check LED:
Red blinking – incorrect sensor placement
Yellow blinking – acceptable sensor placement for bracket
mount
Green blinking – acceptable sensor placement for
adhesive mount
When an installed sensor exits Low Power mode with pistol
in holster, the LED blinks red and you can enter Test Mode.
Test Rapidly blinking yellow = after double button press. Remove
pistol, The LED blinks blue three times once the sensor
has recognized the pistol removal and then the sensor
calibration begins. The LED rapidly blinks green three times
once calibration is successfully complete. The LED rapidly
blinks red three times if calibration is unsuccessful,refer to
the Troubleshooting section of this manual.
Solid green = pistol holstered.
O = pistol removed.
Field Solid green, then slowly blinking green 3 times = 3 second
button press to enter Field Mode from Test Mode.
O = pistol holstered or removed.
Mute Solid and then blinking green or red = 3 second button press
to enter Mute Mode. Green = battery power is good. Red =
battery needs to be replaced.
Sensor Reset Solid or blinking green = battery power is good.
Solid or blinking red = battery needs to be replaced.
Blinking blue = sensor reset has started.
A
A A
B
B
D
C

2
This chapter covers how to register, assign, and reassign Signal Sidearm to users. It also provides
information on Signal Sidearm’s operating modes. Note: The terms “sensor” and “unit” are used
interchangeably.
Important: Your Axon Evidence.com administrator should verify the Signal Configuration for your
agency before deploying Signal Sidearm.
Register, Assign, and Reassign
Use Option A or B, described below, to register, assign, and reassign sensors to users.
Important: Maintain up-to-date device assignments to ensure the accuracy of audit trails and
delivery of low battery notifications and other alerts. Low battery notifications cannot be sent for
unassigned devices.
Option A: Axon Device Manager App (Recommended)
Axon Device Manager (ADM) records the sensor’s serial number with Near Field Communication
(NFC) technology and is the easiest and most accurate way to record serial numbers and
assignments to Axon Evidence.com.
1 Open the Axon Device Manager (ADM) app.
2 Log in to your agency’s Evidence.com account and then tap Press to Begin as shown in
Figure 1.
3 Place the sensor on the back of the phone, with the mute button facing the phone. Slowly
move the sensor around to find the NFC tag. Hold the unit until ADM finds the sensor.
Chapter 2: Registration, Assignment, and
Operation
Figure 1

Chapter 2: Registration, Assignment, and Operation 3
Axon Signal Sidearm User Manual
Note: The NFC reader is typically located on the back of phones. Refer the manufacturer’s
guide for your device to determine the location of its NFC reader.
4 Once ADM finds the sensor:
A. To register and assign a sensor: Enter the name or badge number of the person you want
to assign the sensor to and then tap enter, as shown in Figure 2.
B. To reassign a sensor: Tap Reassign, enter the name or badge number of the person you
want to assign the sensor to, and then tap enter, as shown in Figures 3 and 4.
The Signal Sidearm sensor is assigned and information is updated in Axon Evidence.com.
5 Tap Complete to exit or begin scanning another sensor.
Figure 2
Figure 3 Figure 4

Chapter 2: Registration, Assignment, and Operation 4
Axon Signal Sidearm User Manual
Option B: Axon Evidence.com
Administrators manually record sensor serial numbers in Axon Evidence.com and assign them to
users. Administrators must make sure they accurately transcribe each sensor’s serial number.
Note: Serial numbers start with the letter “X” and are located on the back of the sensor. So, it is a
best practice to register and assign units before they are installed on holsters. To manage
sensors in Axon Evidence.com, you must have Device Administration permission.
Register and Assign on Axon Evidence.com
1 Sign in to your Axon Evidence.com account.
2 On the menu bar, click Admin and then under Devices and Applications, click Signal Sidearm
Registration.
3 Enter the Signal Sidearm sensor Serial Number, as shown in Figure 5.
Optional: Enter the name or badge number of the person you want to assign the sensor to
in the Assignee field.
4 Click Register Device.
Reassign on Axon Evidence.com
1 Sign in to your Axon Evidence.com account.
Figure 5

Chapter 2: Registration, Assignment, and Operation 5
Axon Signal Sidearm User Manual
2 On the menu bar, click Inventory and then click Signal, as shown in Figure 6.
3 Search for the Signal Sidearm sensor you want to reassign. You can search by serial number,
currently assigned user, or model.
In the search results, click the Serial Number for the Signal Sidearm unit you want to
reassign, as shown in Figure 7.
Figure 7
Figure 6

Chapter 2: Registration, Assignment, and Operation 6
Axon Signal Sidearm User Manual
4 Click the Assign Device tab.
5 Enter the name or badge number of the person you want to assign the sensor to in the
Assign Device To field, as shown in Figure 8.
6 Click Assign Device.
Firmware Updates
Axon periodically releases firmware updates for Axon devices. It is important that you maintain
the latest firmware on your sensors to get the best performance and stability.
1 Open Axon Device Manager (ADM).
2 Log in to your agency’s Axon Evidence.com account.
3 In ADM, tap the Settings menu in the upper left.
4 Under Firmware Updates, tap Devices as shown in Figure 9.
Figure 9
Figure 8

Chapter 2: Registration, Assignment, and Operation 7
Axon Signal Sidearm User Manual
5 Tap Signal Sidearm in the devices list.
Note: If this is the first time you are updating Signal Sidearm firmware or uploading, you
might be asked to enable location services. Tap Okay to enable location services.
This is necessary to connect over Bluetooth.
6 Place the unit you are updating in Mute Mode.
Note: The sensor automatically returns to Field Mode after 30 seconds elapses. If the
sensor returns to Field Mode before the firmware update begins, you must place it in
Mute Mode again.
7 Place the unit on the back of the phone, with the mute button facing the phone. This will
initiate the Bluetooth pairing of the device to the phone.
Note: The NFC reader is typically located on the back of phones. Refer the manufacturer’s
guide for your device to determine the location of its NFC reader.
If Signal Sidearm unit’s firmware is out-of-date, an update will automatically begin after
pairing. The update can be monitored by the progress bar at the top of the screen, as shown
in Figure 10.
Figure 10

Chapter 2: Registration, Assignment, and Operation 8
Axon Signal Sidearm User Manual
8 Repeat steps 6 and 7 with other signal sidearm units to update the firmware for multiple
devices at one time. If multiple devices are being updated, there is still only one progress
bar, as shown in Figure 11. We recommend updating no more than 5 units at one time.
9 When the firmware update is complete, the Sidearm unit will reboot and automatically
unpair from the phone
Upload Sensor Logs to Axon
If a sensor is not functioning properly, Axon may ask you to upload the device’s internal logs.
1 Open the ADM app.
2 Log in to your agency’s Axon Evidence.com account.
3 In ADM, tap the Settings menu in the upper left.
4 Under Firmware Updates, tap Devices, as shown in Figure 12.
Figure 12
Figure 11

Chapter 2: Registration, Assignment, and Operation 9
Axon Signal Sidearm User Manual
5 Tap Signal Sidearm in the devices list.
Note: If this is the first time you are updating Signal Sidearm firmware or uploading logs,
you might be asked to enable location services. Tap Okay to enable location services.
This is necessary to connect over Bluetooth.
6 Place the unit you are updating in Mute Mode.
Note: The sensor automatically returns to Field Mode after 30 seconds elapses. If the sensor
returns to Field Mode before the firmware update begins, you must place it in Mute
Mode again.
7 Place the unit on the back of the phone, with the mute button facing the phone.
Note: The NFC reader is typically located on the back of phones. Refer the manufacturer’s
guide for your device to determine the location of its NFC reader.
8 If the firmware is out-of-date it will immediately begin updating firmware. Once complete,
re-pair the unit with the phone.
9 If the firmware is up-to-date, the Signal Sidearm unit will appear with the Options button.
Tap Options
10 Tap Send Logs as shown in Figure 13. A status bar will appear showing the progress of the
log uploads. Multiple device logs can be uploaded at one time.
Operating Modes
Signal Sidearm has four operating modes; Low Power Mode, Test Mode, Field Mode, and Mute
Mode. Low Power Mode is used for shipping and storing the sensor. Test Mode is used to calibrate
the sensor and verify correct operations. The sensor should be in Field Mode during normal
operations. Mute Mode allows you to remove your pistol from the holster, but NOT alert Axon cameras
to record.
Important: The sensor can only enter Field Mode from Test Mode and can only enter Mute Mode
from Field Mode.
Setup - Exit Low Power Mode
The sensor is “asleep” in Low Power Mode. We recommend keeping the sensor in this mode when
it is not in use for an extended period of time, such as during shipping, storage, or bonding.
Figure 13

Chapter2:Registration,Assignment,andOperation 10
Axon Signal Sidearm User Manual
1 After the sensor is installed, press the button to wake up the sensor and
enter Placement Mode (see the Axon Signal Sidearm Adhesive Mount
Installation Guide for more on using Placement mode).
With a pistol in the holster, the LED blinks red to indicate the sensor
entered Placement Mode. If you do not continue with the Placement
Mode or Test Mode steps in 30 seconds, then the sensor goes back to
sleep.
3 sec
Verification and Calibration - Test Mode
Calibrate the sensor and use Test Mode to confirm that it detects your pistol.
Note: The sensor DOES NOT alert cameras to record when it is in Test Mode.
1 With the pistol in the holster, quickly double press the sensor button.
The LED rapidly and continuously blinks yellow to indicate the sensor
is waiting for you to remove the pistol from the holster.
2 Remove the pistol from the holster. The LED blinks blue three times
once the sensor has recognized the pistol removal and then the
sensor calibration begins. The LED rapidly blinks green three times
once calibration is successfully complete. The LED rapidly blinks red
three times if calibration is unsuccessful, refer to the Troubleshooting
section of this manual.
3 Place the pistol in the holster. The LED should illuminate green.
4 Remove the pistol from the holster. The LED should turn o.
5 Repeat steps 3 and 4 three more times. If the LED does not
illuminate or turn o repeat from step 1. In case the problem persists:
Adhesive Mount - remove the mount and then reinstall a new
mount, ensuring correct sensor placement.
Bracket Mount - repeat the installation and ensure the sensor is as
close to the holster as possible.
6 The sensor is ready to enter Field Mode. Your pistol can remain in the
holster when entering Field Mode.
If you do not put the sensor into Field Mode in 30 seconds, the
sensor returns to Low Power Mode.
Operation - Field Mode
In Field Mode, the LED is o. The sensor alerts Axon cameras to record when your pistol is removed
from the holster.
1 Press and hold the button for 3 seconds to go from Test Mode to Field
Mode. The LED shows green and then slowly blinks 3 times to indicate
the sensor has entered Field Mode.
2 When your pistol is removed from the holster, Signal Sidearm alerts
Axon cameras to record. The duration of the alert is 30 seconds.
3 If you need to remove your pistol without alerting Axon cameras to
record, put your sensor in Mute Mode.
Quick
Double
Press
Press

Chapter 2: Registration, Assignment, and Operation 11
Axon Signal Sidearm User Manual
3 sec
Operation - Mute Mode
Use Mute Mode to remove your pistol from the holster, but NOT alert Axon cameras to record.
1 Press and hold the button for 3 seconds to go from Field Mode to Mute
Mode. The LED shows a solid color and then slowly blinks when you
enter Mute Mode.
The color of the LED indicates the status of your battery.
• A green solid and blinking LED means Mute Mode is active and the
battery is good.
• A red solid and blinking LED means Mute Mode is active and the
battery is low and needs to be replaced.
The sensor automatically returns to Field Mode after you remove your
pistol from the holster or after 30 seconds elapses, whichever happens
first.
Sensor Reset
If you have an issue with the sensor, refer to the Troubleshooting section of this manual. You may
need to reset the sensor. You can reset the sensor from any mode. Follow the steps below to reset
the sensor:
25 sec
1 Press and hold the button for approximately 25 seconds. You should
see the following LED indications:
• Initially, the LED shows a solid green or red. The color indicates
battery status.
• Then, the LED blinks the color indicating battery status. The sensor
is in Mute Mode.
• Finally, the LED blinks blue. Sensor reset has started. Release the
button.
Do not continue to hold the button. Continuing to hold the button
causes the LED to turn solid red and restores the sensor back to its
original factory settings. If this accidentally occurs, connect the sensor
to the Axon Device Manager App to ensure it has the latest firmware.
See the Firmware Updates section of this manual for more information.
2 When reset is complete, the LED blinks green 3 times and the sensor
enters Test Mode. You can now calibrate the sensor. If there is no activity
for 30 seconds, the sensor returns to Low Power Mode.

12
Chapter 3: Maintenance and Troubleshooting
This chapter provides information on replacing the battery in the Signal Sidearm sensor,
troubleshooting, and contact information for Technical Support.
Note: Extended exposure to concentrated amounts of sunscreen can cause cracks in the Signal
Sidearm device plastic housing. If you notice cracks in your device, please contact Technical
Support.
Battery Replacement
There are two ways to know when it’s time to replace the sensor’s battery:
• The LED blinks red when entering in Mute Mode.
• You are sent a notification email from Axon Evidence.com.
Follow these steps to replace the battery.
You will need a Torx T6 screwdriver, which was provided to your agency at the time of purchase,
and a new CR2430 battery.
1 If your pistol and holster are on your duty belt, put the sensor in Mute Mode and safely
remove your pistol.
2 Remove the top and bottom screws that attach the sensor to the bracket, as shown in
Figure A.
3 Remove the four outer screws to take the sensor apart, as shown in Figure B.
4 Open the snaps, shown in Figure C, by placing the blade of a flat head screw driver into the
slot and twist the blade. The snap will release easily.
5 Replace the CR2430 battery and reassemble the sensor as shown in Figure D.
When the sensor has a new battery, the sensor automatically enters Test Mode. If the sensor
does not detect any activity after being in Test Mode for 30 seconds, it enters Low Power
Mode.
6 Re-attach the sensor to the bracket with the screws removed in Step 2.
Figure B: Remove
sensor screws
Figure D: Replace battery and screwsFigure A: Remove
from bracket
Figure C: Open
snaps

13
Chapter 3: Maintenance and Troubleshooting
Axon Signal Sidearm User Manual
7 Place the sensor in Mute Mode and then use the Axon Device Manager (ADM) app to connect
to the sensor and check for firmware updates. Connecting to ADM verifies the sensor is
working correctly using Bluetooth and that the sensor’s clock is set. Optionally, you can
upload the sensor’s logs after checking for firmware updates.
Troubleshooting
This section covers general troubleshooting. If your issue persists or it is not listed, please contact
Technical Support (see page 16 for contact information).
My LED continues to rapidly blink yellow during calibration.
• Possible Casue: This indicates that the sensor is not able to detect the insertion and
removal of the pistol.
Remedy: This can occur if the calibration was started with the pistol removed from the
holster. Place the pistol in the holster and then begin calibration. Once the LED starts to
rapidly blink yellow, remove the pistol from the holster. If this does not correct the issue,
check the placement of the device to ensure it is appropriately located.
Calibration is failing and the LED blinks red at the end of the procedure.
• Possible Cause: This indicates that there was an error during calibration and that the
results of calibration were not acceptable to appropriately function in Field Mode.
Remedy: Ensure that the pistol is fully removed from the holster for the duration of
the calibration procedure. If this does not correct the issue, check the placement of the
device to ensure it is correctly located.
My Axon camera does not activate when I draw my pistol from my holster.
• Possible Cause 1: The Axon camera or the Signal Sidearm sensors are not powered on or
do not have sucient battery power to function properly.
Remedy 1: Ensure that the camera is powered on and has sucient battery power. If you
have received a notification indicating that your Signal Sidearm sensor is low on battery,
the battery needs to be replaced. You can check the status of the battery by entering
Mute Mode (hold button for 5 seconds). If the battery is low, the LED will blink red rather
than green. If the battery is low or the sensor does not respond to the 5-second press,
try replacing the battery.
• Possible Cause 2: The Signal Sidearm sensor is loose or was not installed correctly.
Remedy 2: If any of the screws holding the sensor to the bracket or the bracket to the
holster have come loose, the sensor may not be able to consistently determine the state
of your pistol. Tighten all screws and check to see if that solves the activation issues.
Additionally, check to make sure the Signal Sidearm bracket is correct for your holster.
• Possible Cause 3: The Signal Sidearm sensor was installed on a non-approved holster or
the incorrect bracket was used to install the sensor.
Remedy 3: Obtain the correct bracket from Axon for your holster and reinstall.
• Possible Cause 4: The Signal Sidearm sensor was subjected to a major impact, became
submerged, or was damaged in some other way.
Remedy 4: The sensor may have been damaged in a manner where it is no longer able to

14
Chapter 3: Maintenance and Troubleshooting
Axon Signal Sidearm User Manual
function properly. You can attempt to replace the battery or reset the sensor (see Sensor
Reset on page 10). If this does not resolve the issue, please contact Axon technical
support.
• Possible Cause 5: If the Signal Sidearm sensor was used outside the operating temperature
range, you may experience unexpected behavior.
Remedy 5: Allow the sensor to warm or cool to the point where it is in the operating
temperature range of the sensor. The sensor normal operating and storage temperature
range: -4 °F to 122 °F [-20 °C to 50 °C].
• Possible Cause 6: The Signal Sidearm sensor may have a firmware issue that is preventing
it from functioning properly.
Remedy 6: Reset the sensor, see Sensor Reset on page 10.
• Possible Cause 7: There may be a problem with your camera.
Remedy 7: If your camera is not reacting to your Signal Sidearm sensor or to other
Axon Signal enabled sensors, there may be a problem with your camera. Consult the
troubleshooting guide for your camera.
• Possible Cause 8: There is an aftermarket modification to your pistol or holster that is
interfering with the functionality of the Signal Sidearm sensor.
Remedy 8: Signal Sidearm works with published holsters and pistols that have not been
modified. Modifications such as using an aftermarket slide or painting the holster may
cause the Signal Sidearm sensor to not function correctly.
• Possible Cause 9: Your Signal Sidearm sensor is not in Field Mode.
Remedy 9: Your sensor may be in Mute Mode (blinking green LED). Wait 30 seconds for
your sensor to exit Mute Mode.
Your sensor may be in Test Mode (LED on solid if pistol is in holster or o if pistol is out
of holster). Hold the button for 5 seconds to enter Field Mode.
Your sensor may be in Low Power Mode. Press the button to enter Test Mode, then press
and hold for 5 seconds to enter Field Mode.
I am unable to enter Mute Mode.
• Possible Cause 1: Your Signal Sidearm sensor is not in Field Mode.
Remedy 1: Your sensor may be in Mute Mode (blinking green LED). Wait 30 seconds for
your sensor to exit Mute Mode.
Your sensor may be in Test Mode (LED on solid if pistol is in holster or o if pistol is out
of holster). Hold the button for 5 seconds to enter Field Mode.
Your sensor may be in Low Power Mode. Press the button to enter Test Mode, then press
and hold for 5 seconds to enter Field Mode.
• Possible Cause 2: The button may be damaged and unable to receive any input.
Remedy 2: There is no solution to this problem that will allow you to maintain full
functionality of your sensor. You can diagnose a problem with the button by first replacing
the battery. After the battery is replaced, if you hold the button for 5 seconds and do not

15
Chapter 3: Maintenance and Troubleshooting
Axon Signal Sidearm User Manual
exit Test Mode, the button is damaged. Stop using your Signal Sidearm sensor.
• Possible Cause 3: The Signal Sidearm sensor may have a firmware issue that is preventing
it from functioning properly.
Remedy 3: Reset the sensor, see Sensor Reset on page 10.
My camera activated, but I haven’t drawn my pistol.
• Possible Cause 1: Your camera may have activated because another Axon Signal device
was used in range of your camera.
Remedy 1: This is intended functionality of your camera.
• Possible Cause 2: Your Signal Sidearm sensor may have registered a false positive. This
could be the result of multiple issues.
Remedy 2: If your Signal Sidearm sensor has been functioning properly, inspect the
sensor for any damage. If you get repeated false positives, your Signal Sidearm may be
malfunctioning. Please contact Axon technical support.
I’m having trouble installing the sensor on my holster. It’s too tight and the bracket is
bending or there is a big gap between the sensor and the holster.
• Possible Cause 1: You may have the incorrect bracket for your holster or your holster is
not a supported model.
Remedy 1: Ensure your bracket is correct for you holster. If you do not have the correct
bracket, one can be requested from Axon.
• Possible Cause 2: You may have placed a spacer on the incorrect side of the bracket.
Remedy 2: Use of a holster spacer is acceptable, provided that the spacer is installed
between the bracket and the belt clip. Do not install a spacer between the bracket and
the holster as this may reduce performance of your Signal Sidearm sensor.
My battery lasted much less time than the published battery life specification.
• Possible Cause 1: The battery life estimate is based on typical sensor use. If you use Mute
Mode or draw your pistol much more frequently than the typical use case, then battery
life can be reduced.
Remedy 1: Axon does not recommend adjusting the use of your pistol and holster to
improve battery life.
• Possible Cause 2: Your Signal Sidearm sensor may have a firmware or hardware issue that
is causing it to use more battery power than expected.
Remedy 2: Replacing the battery will reset the sensor and should correct any firmware
problem that is causing the battery to drain too quickly. If this problem continues, then
there may be a hardware problem with your sensor. Please contact Axon technical
support.
My Signal Sidearm is too sensitive.
• Possible Cause 1: The Signal Sidearm sensor has been designed with the input of law
enforcement ocers to provide an optimal balance of sensitivity for registering true
pistol draws and rejecting normal daily interactions with the pistol.

16
Chapter 3: Maintenance and Troubleshooting
Axon Signal Sidearm User Manual
Remedy 1: Each holster and pistol combination may result in a slightly dierent distance
that the pistol can be withdrawn before the sensor registers the absence of the pistol.
In general, once the end of the pistol’s slide passes the center of the sensor, the sensor
can detect that the pistol is no longer present. It typically takes between one and two
seconds for this to occur.
My Signal Sidearm sensor keeps ending up in Test Mode or Low Power Mode.
• Possible Cause 1: The design and location of the button on the sensor is intended to
prevent accidental presses or holds, but in some rare cases, it may be possible that an
action by the user may result in the button being held down without the user’s knowledge.
This will cause the sensor to reset.
Remedy 1: You may need to study your daily activities and identify the cause to prevent
this from happening.
• Possible Cause 2: The battery in your sensor may be very low and the sensor may be
powering o and restarting randomly.
Remedy 2: You can check for a low battery by entering Mute Mode and looking at the
LED. Replace the battery if it is low.
• Possible Cause 3: The button or button circuitry may be damaged in such a way that it
appears to be held down.
Remedy 3: If your sensor is resetting repeatedly, this is likely the cause and you will need
to replace your sensor.
• Possible Cause 4: The wrong battery size or type was inserted in the sensor, the battery
was inserted upside down, or the battery holder is damaged or corroded. This may be
causing an intermittent connection.
Remedy 4: Visually inspect the sensor battery holder and the battery. If there is any
corrosion or the battery holder appears to be partially disconnected from the circuit
board, stop use of the sensor immediately. Ensure that the battery type is a CR2430 and
is installed with the “+” facing up.
The LED is very dim, flickering, or does not turn on when expected.
• Possible Cause 1: The battery in your sensor may be very low and/or the sensor may be
very cold.
Remedy 1: Replace the battery and/or allow the sensor to warm up.
• Possible Cause 2: The LED may be damaged.
Remedy 2: Reset the sensor, see Sensor Reset on page 10. If doing so results in dim,
flickering, or no LED activity, you have a damaged LED. Your sensor will continue to
function without a functioning LED, but it will be dicult to know when the sensor is in
Mute Mode.
Technical Support
For questions or support:
• Visit www.axon.com and see Support options
• Call 1-800-978-2737.

17
Chapter 4: Additional Information
Warranty Policy
Axon Enterprise warranty provisions are applicable on all Axon Signal Sidearm products. See
Axon Enterprise’s website, www.axon.com, for detailed warranty information.
Warnings
For a full list of the warnings associated with this product, see www.axon.com.
Radio Waves
The Signal Sidearm transmission is in the frequency range of 2402 to 2480 MHz.
Changes or modifications to the equipment not expressly approved by the manufacturer could
void the product warranty and the user’s authority to operate the equipment.
Your wireless device is a radio transmitter and receiver. It is designed and manufactured not
to exceed the emission limits for exposure to radio frequency (RF) energy set by the Federal
Communications Commission (FCC) of the U.S. Government.These limits are part of comprehensive
guidelines and establish permitted levels of RF energy for the general population. The guidelines
are based on standards that were developed by independent scientific organizations through
periodic and thorough evaluation of scientific studies. The standards include a substantial safety
margin designed to assure the safety of all persons, regardless of age and health. Before a device
model is available for sale to the public, it must be tested and certified to the FCC that it does
WARNING! FOLLOW SAFETY INSTRUCTIONS
These warnings should be read prior to use of the Axon Signal Sidearm sensor. Please read
and carefully follow all Axon Signal Sidearm sensor installation and operation instructions.
Failure to follow these instructions may result in improper installation which could interfere
with the holster’s performance. Do not install the Axon Signal Sidearm sensor in a way that will
interfere with the proper functioning of the holster. Do not perform installation of the Axon
Signal Sidearm sensor while a firearm is in the holster. Great care should be used when handling,
storing or transporting firearms or when placing or removing a firearm from a holster. Should
any holster installed with an Axon Signal Sidearm sensor become worn, loose, broken, defective
or ill-fitting, or unsafe, cease use immediately. Failure to follow these warnings may result in
serious injury or death to you or others.
!

Chapter 4: Additional Information 18
Axon Signal Sidearm User Manual
not exceed the limit established by the government-adopted requirement for safe exposure.
This equipment has been tested and found to comply with the limits for a Class B digital device,
pursuant to part 15 of the FCC Rules. These limits are designed to provide reasonable protection
against harmful interference in a residential installation. This equipment generates, uses and can
radiate radio frequency energy and, if not installed and used in accordance with the instructions,
may cause harmful interference to radio communications. However, there is no guarantee that
interference will not occur in a particular installation. If this equipment does cause harmful
interference to radio or television reception, which can be determined by turning the equipment
o and on, the user is encouraged to try to correct the interference by one or more of the following
measures:
Reorient or relocate the receiving antenna.
Increase the separation between the equipment and receiver.
Connect the equipment into an outlet on a circuit dierent from that to which the receiver is
connected.
Consult Axon Enterprise Technical Support for help.
FCC/IC NOTICE: This device meets the body worn human exposure limits found in ANSI/ IEEE
C95.1, 2005. Proper operation of this equipment according to the instructions found in this guide
will result in exposure substantially below the FCC’s recommended limits. To comply with the
FCC and ANSI C95.1 RF exposure limits, this device has been tested for compliance with FCC RF
Exposure limits in the typical configuration. The radiated output power of this wireless device is
far below the FCC radio frequency exposure limits.
AVIS Commission fédérale des Communications (FCC)/Industrie Canada (IC): Cet appareil
répond aux limites d’exposition humaines du corps trouvées dans ANSI/IEEE C95.1, 2005. Le bon
fonctionnement de cet équipement selon les instructions contenues dans ce guide entraînera
une exposition nettement inférieure aux limites recommandées par la Commission Fédérale des
Communications (FCC). Afin de respecter les limites d’exposition à l’énergie radiofréquence (RF)
de la FCC et de l’ANSI C95.1, ce dispositif a été testé pour se conformer aux limites d’exposition
à l’énergie radiofréquence (RF) de la FCC dans la configuration typique. La puissance de sortie
rayonnée de ce périphérique sans fil est bien inférieure aux limites d’exposition radiofréquence de
la Commission Fédérale des Communications (FCC).
This device complies with part 15 of the FCC Rules. Operation is subject to the following two
conditions: (1) This device may not cause harmful interference, and (2) this device must accept any
interference received, including interference that may cause undesired operation.
THIS MODEL DEVICE MEETS THE GOVERNMENT’S REQUIREMENTS FOR EXPOSURE TO RADIO
WAVES.
CE DISPOSITIF RÉPOND AUX EXIGENCES GOUVERNEMENTALES POUR L’EXPOSITION AUX
ONDES RADIO.
Section 8.4 of RSS-GEN
This Device complies with Industry Canada License-exempt RSS standard(s). Operation is subject
to the following two conditions: 1) this device may not cause interference, and 2) this device must
accept any interference, including interference that may cause undesired operation of the device.
Cet appareil est conforme aux normes d’exemption de licence RSS d’Industrie Canada. Son
utilisation est soumise aux conditions suivantes : 1) cet appareil ne doit pas causer de brouillage,
This manual suits for next models
1
Table of contents
Other Axon Accessories manuals