Axtel PRIME X3 User manual

1
PL
V1.3
NEW GENERATION OF PROFESSIONAL HEADSETS
INSTRUKCJA
INSTRUCTION
MANUAL
PL
EN
PRIME X3
www.axtelworld.com

www.axtelworld.com2
Welcome to the world of Axtel.
THANK YOU for choosing Axtel Prime X3.
Made in the EU
Model: PRIME X3
Product No.: AXH-PRX3D, AXH-PRX3M

EN
3
CONTENTS
1. Contents of the package 4
2. Product descripon 5
2.1 Descripon of the headset 5
2.2 Descripon of the base staon 6
3. First start-up 7
3.1 Connecng the device 7
3.2 Acvang the headset 7
3.3 Turning o the base and the headset 7
3.4 Pairing – connecng a new headset to the
base
7
4. Headset setup 7
4.1 Connecng to a desk phone 7
4.2 Connecng to a computer 9
4.3 Connecng to a mobile phone 9
5. Use 9
5.1 Answering and ending calls 9
5.2 Making a call 10
5.3 Call managing 10
5.4 Adjusng the volume for each channel
separately
10
5.6 Loss of signal and connecon with the base 11
5.7 Hearing protecon adjustment
11
5.8 Reseng the headset 11
6. Recommendaons 12
7. Declaraons and warnings 12
8. Headset parameters 13
9. Accessories 14
10. Notes 28

www.axtelworld.com4
1. Contents of the package
AXH-PRX3D
AXH-PRX3M
Wireless DECT headset with
DECT Base staon
Headset base for charging and call
control
RJ9/RJ9 cable (PN AXP-XRJ)
220 V power supply
MicroUSB/USB–A cable
Figure 1
Figure 3
Figure 4
Figure 5
Figure 2

EN
5
2. Product descripon
2.1 Descripon of the headset
Figure 6
MFB
answering calls and
switching between
channels
Dock connector
– for charging and
the base
Microphone mute (MUTE)
Flexible and adjustable headband
Volume up buon (+)
Volume down buon (-)
Adjustable
microphone arm
Reset
buon

www.axtelworld.com6
1 2 3 4
MicroUSB socket
Power supply
socket
to the power
RJ9 socket
Slide switch*
Buons for the
adjustment of
RJ9 socket
RJ45 socket
FIgure 8
* -
BASE STAT ION
2.2 Descripon of the base staon
4 buons on the base
Docking port
for the headset
– charging
– pairing
FIgure 7
Desk phone , Computer
and Mobile phone
1. The Desk Phone
channel
2. The Computer -
sion channel.
3. The Mobile Phone -
oth®transmission channel.
4. The Microphone Mute (MUTE)
microphone.

EN
7
3. First start-up
3.1 Connecng the device
3.2 Acvang the headset
1 second.
3.3 Turning o the headset and the base
3.4 Pairing – connecng a new headset to the base
-
-
.
Headset included in the package does not require pairing.
4. Headset setup
4.1 Connecng to a desk phone (see Figure 9 and 10)
port.
-
set port.
Note:
In this case you need to buy the correct cable
(secon 10. Accessories).
hps://axtelworld.com/headsets/compability/

www.axtelworld.com8
the slide switch .
a) C onnecng to a desk phone equipped with a dedicated headset port.
AXP-XRJ
the base. (see Figure 9a)
b) Connecng to a desk phone that does not have a headset port.
handset port.
AXP-XRJ cable – one end into
phone
(see Figure 9b)
c) Oponal connecon via EHS cable ‒ connect the EHS cable into the
(see gure 10)
EHS cable. Connect the EHS cable
-
Figure 10Figure 9
9a) 9b)
9a)
9b)
Slide switch
Slide switch
Przełącznik polaryzacji*

EN
9
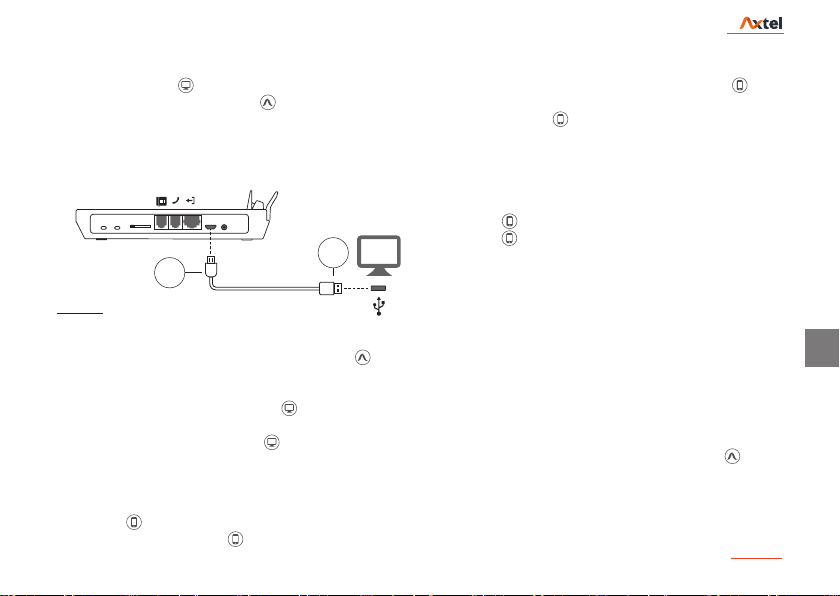
4.2 Connecng to a computer (see Figure 11)
glowing white.
Receiving computer calls from the MFB and from the base is only
possible with fully compable applicaons/messengers.
-
vailable.
-
on the base so that it is
4.3 Connecng to a mobile phone
®
on the base the pictogram starts
on the
®
is indicated by the
Mobile Phone pictogram on the base glowing white.
4.4 LinkBack
®
Mobile Phone
A Bluetooth connecon® is only possible with a mobile phone.
5. Use
5.1 Answering and ending calls
-
• To answer a call from the headset – shortly press the MFB .
to the channel of the incoming call.
Figure 11
micro
USB
USB
A

www.axtelworld.com10
5.2 Making a call
Desk phone:
on the headset
on the base and dial the appropriate
Available only with a proper EHS cable.
Mobile phone and computer
-
nected devices.
5.3 Call managing
Answering another call and pung the current call on hold.
the MFB
-
Answering another call on a dierent channel and ending the current
call.
the MFB
on the headset.
Switching between acve channels
headset – by pressing the MFB
base
5.4 Adjusng the volume for each channel separately
-
+/- (Figure 6).
-
gnal.
-
5.5 Mung the microphone (MUTE)
+/-
-

EN
11
5.6 Loss of signal and connecon with the base
5.7 Hearing protecon adjustment
(see Figure 12)
To change the Acousc Protecon
headset on the base and then press both +/- volume control buons
simultaneously for approximately 3 seconds. A diode indicates the
• Single
decibels
• Double
decibels
• Triple
decibels
5.8 Reseng the headset
(point 1 in Figure 13).
We recommend using a thin, pointed object for this purpose.
point 2 in Figure 13).
Pressing both
1 second changes
MFB
Figure12
1
2
Figure 13

www.axtelworld.com12
6. Recommendaons
device.
and disinfect the headset.
layers and sponges at least every 6 months.
• It is recommended to clean the headset with special wipes desi-
-
incomplete.
rapidly.
7. Declaraons and warnings
-
cable.
• Using the headphones while riding a bicycle or driving a motor
between the moving parts.
on.
•
Warning against the use of the headphones by child-
ren. Since the headphones contain small components,
they should be kept out of the reach of children under
3 years of age.

EN
13
8. Headset parameters
TECHNICAL DATA
CONNECTIVITY
Yes
-
set and the base DECT
®
®version
®range
SOUND PARAMETERS
WIDEBAND
Microphone impedance
Microphone type Electret with ambient noise
Yes
Yes
Yes
DSP Yes
Yes
WORKING TIME

www.axtelworld.com14
9. Accessories
• EHS (Electronic Hook Switch) cable
hps://axtelworld.com/headsets/compability/
• Headphone sponge (PN AXS-LES)
• Microphone sponge (PN AXS-MIC)
• RJ9/3xRJ9 cable (PN AXP-XRJ3)
hps://axtelworld.com/headsets/compability/
• RJ9/Jack 2.5mm cable (PN AXP-XJ25)
hps://axtelworld.com/headsets/compability/
• RJ9/Jack 3.5mm cable (PN AXP-XJ35)
hps://axtelworld.com/headsets/compability/
• RJ9/RJ45 cable (PN AXP-XRJ45)
hps://axtelworld.com/headsets/compability/
• MicroUSB/USB-A Cable (PN AXP-XUSB)
• 220 V Region-specic power supply version:
PN EU: AXP-XZAS)
(PN US: AXP-XZASUS)
(PN UK: AXP-XZASUK)
• Axtel Prime X3 Duo headset (PN AXP-PRXD)
the base

Witamy w świecie Axtel.
DZIĘKUJEMY za wybór Axtel Prime X3.
Wyprodukowano w UE
Model: PRIME X3
Nr produktu: AXH-PRX3D

www.axtelworld.com16
SPIS TREŚCI
1. Zawartość opakowania 17
2. Opis produktu 18
2.1 Opis słuchawki 18
2.2 Opis stacji bazowej 19
3. Pierwsze uruchomienie 20
3.1 Podłączenie urządzenia 20
3.2 Uruchomienie słuchawki 20
3.3 Wyłączenie słuchawki i bazy 20
3.4 Parowanie - łączenie nowej słuchawki z bazą 20
4. Konguracja zestawu słuchawkowego 20
4.1 Podłączenie do telefonu stacjonarnego 20
4.2 Podłączenie komputera 22
4.3 Podłączenie telefonu komórkowego 22
5. Użytkowanie 22
5.1 Odbieranie i kończenie połączenia 22
5.2 Nawiązywanie połączenia 23
5.3 Zarządzanie połączeniami 23
5.4 Regulacja głośności oraz czułości mikrofonu 23
5.5 Wyciszenie mikrofonu (MUTE) 23
5.6 Utrata zasięgu oraz połączenia z bazą 24
5.7 Regulacja poziomu ochrony słuchu 24
5.8 Resetowanie słuchawki 24
6. Zalecenia 25
7. Deklaracje i ostrzeżenia 25
8. Parametry słuchawki 26
9 Akcesoria 27
10 Notes 28

17
PL
1. Zawartość opakowania
Słuchawka
dwuuszna lub jednouszna
z mikrofonem
Stacja bazowa DECT
Kabel RJ9/RJ9 (PN AXP-XRJ)
Zasilacz 220 V
Kabel microUSB/USB–A
Rysunek 1
Rysunek 3
Rysunek 4
Rysunek 5
Rysunek 2

www.axtelworld.com18
2. Opis produktu
2.1 Opis słuchawki
Elastyczny i regulowany pałąk
Przycisk MFB
Złącze słuchawki
Wyciszenie mikrofonu (MUTE)
Rysunek 6
Przycisk ciszej (-)
–
Przycisk głośniej (+)
–
Przycisk
Reset
Regulowane
ramię mikrofonu

19
PL
STACJA BAZOWA DECT
2.2 Opis stacji bazowej
4 przyciski na bazie
Port dokujący
słuchawki
– parowanie
1 2 3 4
Gniazdo microUSB
Gniazdo zasilania
zasilacza
Gniazdo RJ9
Przełącznik polaryzacji*
Przyciski regulacji
Gniazdo RJ9
Gniazdo RJ45
Rysunek 7 Rysunek 8
Telefon stacjonarny Komputer oraz Telefon komórkowy
-
1. Telefon stacjonarny -
nem stacjonarnym 2. Komputer
3. Telefon komórkowy
®4. Wycisze-
nie mikrofonu (MUTE) -
*

www.axtelworld.com20
3. Pierwsze uruchomienie
3.1 Podłączenie urządzenia
3.2 Uruchomienie słuchawki
-
.
3.3 Wyłączenie słuchawki i bazy
przez
3.4 Parowanie - łączenie nowej słuchawki z bazą
-
.
Słuchawka dostarczana z zestawem nie wymaga parowania.
4. Konguracja zestawu słuchawkowego
4.1 Podłączenie do telefonu stacjonarnego (patrz rysunek 9 i 10)
:
Uwaga! -
W tym przypadku należy do-
kupić odpowiedni kabel (punkt 10. Akcesoria)
.
hps://axtelworld.com/headsets/compability/
This manual suits for next models
2
Table of contents
Languages:
Other Axtel Headset manuals

Axtel
Axtel PRO MS duo User manual

Axtel
Axtel PRIME X3 DUO SE User manual

Axtel
Axtel M2 WB duo User manual

Axtel
Axtel MS2 UC mono User manual

Axtel
Axtel PRIME X1 User manual

Axtel
Axtel Elite HDvoice duo User manual

Axtel
Axtel PRO duo WB NC User manual

Axtel
Axtel Elite HDvoice duo NC User manual

Axtel
Axtel MS2 UC mono User manual