Babybrezza BRZ00139 Manual

Instructions
for set-up, use and cleaning
Setting Guide This setting guide should only be used as general reference.
After some uses, you will learn what settings will work best for your bottles.
Always test bottle temperature before feeding baby.
© 2017 Baby Brezza Enterprises LLC
Quick Warm Quick Warm
Room Temperature 70˚F / 21˚C
Glass BottlePlastic Bottle
3oz / 90ml 3oz / 90mlsetting 3 setting 1
4oz / 120ml 4oz / 120mlsetting 4 setting 2
5oz / 150ml 5oz / 150mlsetting 5 setting 3
6oz / 180ml 6oz / 180mlsetting 6 setting 4
7oz / 210ml 7oz / 210mlsetting 7 setting 5
8oz / 240ml 8oz / 240mlsetting 8 setting 6
9oz / 270ml 9oz / 270mlsetting 9 setting 6
1oz / 30ml 1oz / 30mlsetting 1
2oz / 60ml 2oz / 60mlsetting 2
Cold Temperature REFRIGERATED 39˚F / 4˚C
Room Temperature 70˚F / 21˚C Cold Temperature REFRIGERATED 39˚F / 4˚C
Glass BottlePlastic Bottle
3oz / 90ml3oz / 90ml setting 3 setting 1
4oz / 120ml4oz / 120ml setting 4 setting 2
5oz / 150ml5oz / 150ml setting 5 setting 3
6oz / 180ml6oz / 180ml setting 6 setting 3
7oz / 210ml7oz / 210ml setting 7 setting 4
8oz / 240ml8oz / 240ml setting 8 setting 5
9oz / 270ml9oz / 270ml setting 9 setting 6
1oz / 30ml1oz / 30ml setting 1
2oz / 60ml2oz / 60ml setting 2
Steady Warm Steady Warm
Glass BottlePlastic Bottle
2oz / 60ml
3oz / 90ml
4oz / 120ml
5oz / 150ml
6oz / 180ml
7oz / 210ml
8oz / 240ml
9oz / 270ml
1oz / 30ml
2oz / 60ml
3oz / 90ml
4oz / 120ml
5oz / 150ml
6oz / 180ml
7oz / 210ml
8oz / 240ml
9oz / 270ml
1oz / 30ml
3oz / 90ml 3oz / 90mlsetting 3 setting 2
2oz / 60ml 2oz / 60mlsetting 2 setting 1
4oz / 120ml 4oz / 120mlsetting 4 setting 4
5oz / 150ml 5oz / 150mlsetting 5 setting 4
6oz / 180ml 6oz / 180mlsetting 6 setting 5
7oz / 210ml 7oz / 210mlsetting 7 setting 7
8oz / 240ml 8oz / 240mlsetting 8 setting 7
9oz / 270ml 9oz / 270mlsetting 9 setting 7
1oz / 30ml 1oz / 30mlsetting 1
Glass BottlePlastic Bottle
setting 2
setting 3
setting 4
setting 5
setting 6
setting 7
setting 8
setting 9
setting 1
setting 2
setting 3
setting 4
setting 5
setting 6
setting 7
setting 7
setting 1

Save these instructions
IMPORTANT SAFEGUARDS
1. Read all instructions before using.
2. Do not touch hot surfaces. Use handles.
3. To protect against electric shock and injury to persons do
not immerse cord, plug, water tank or appliance in water
or other liquid.
4. Close supervision is necessary when any appliance is used
by or near children.
5. Unplug from outlet when not in use and before cleaning.
Allow to cool before inserting or removing parts, and before
cleaning the appliance.
6. Do not operate this appliance with a damaged cord or plug.
If the appliance malfunctions or has been damaged in any
manner, contact Elfe Juvenile Products at 1-800-667-8184
7. The use of accessory attachments not recommended by the
appliance manufacturer may cause re, electric shock or injury.
8. Use on level surface and be sure there is no debris under the
unit and the rubber pads are touching the surface.
9. Household use only. Do not use outdoors.
10. Do not let cord hang over edge of table or counter, or touch
hot surfaces.
11. Extreme caution must be used when moving an appliance
containing hot liquids.
12. Do not place on or near hot gas or electric burner, or in a heated oven.
13. Do not use appliance for other than intended use.
14. This appliance has a polarized plug (one blade wider than the other).
To reduce risk of electric shock, this plug is intended to t into a
polarized outlet only one way. If the plug does not t fully into
the outlet, reverse the plug. If it still does not t, contact a qualied
electrician. Do not attempt to modify the plug in any way.
15. To disconnect, turn appliance o, then remove plug from wall outlet.
16. Make sure machine is turned o before unplugging.
17. A short power-supply cord is provided to reduce risks of becoming
entangled in or tripping over a longer cord. Longer detachable
power-supply cords or extension cords are available and may be used
if care is exercised in their use. If using the machine with an extension
cord, make sure the cord is the proper electrical rating for the machine.
18. The extension cord should be arranged so that it does not drape over a
counter top or tabletop, where it can be pulled on by children or tripped
over unintentionally.
19. Before serving make sure food is at safe temperature for baby.
20. Unplug cord from wall outlet before serving milk or food warmed in
appliance.
21. Do not leave cord within child’s reach.
When using electrical appliances, basic safety precautions
should be followed, including the following:
1
CAUTION: To maintain the compliance with the RF exposure guideline, place the unit at least 8in/20cm from nearby persons.
CAUTION: If E1, E2, E3, or E4 error messages appear on the bottle warmer screen, please contact customer service before any
continued use of the bottle warmer.
This device complies with Industry Canada’s license-exempt RSSs. Operation is subject to the following two conditions:
(1) This device may not cause interference.
(2) This device must accept any interference, including interference that may cause undesired operation of the device.
2
SAFE+SMART BOTTLE WARMER® PARTS
TECHNICAL DATA
Model: BRZ00139 Supply Voltage: 120V ~ 60Hz Current: 4.4A Heater Power: 500W
Bottle Warmer
Cover
Control Panel
Bottle Tray
Heating Chamber
Window
Quick Warm Fill Line
Power Cord
Heating Chamber
Base

FEATURES
• Features 2 Warming Modes:
Steady Warm Mode: A warm water bath gently
heats milk to body temperature, preserving essential
nutrients found in breast milk, which can break down
at high temperatures.
Quick Warm Mode: Steam is used to safely & eciently
heat formula or milk fast.
• Simple Defrost: Safely defrost frozen breast milk
pouches.
• The easy-to-use control panel allows you to set up
your warmer whether starting with cold or room
temperature milk.
• The Baby Brezza App lets you control the warmer from
your smartphone and alerts you when your bottle is
ready.
• Works with all bottle types. Always remove venting
systems when warming. Bottles with bottom
venting systems may leak when heating.
3
TOUCH DISPLAY CONTROLS
Once connected, the setup screen will display on your mobile device. *
APP INTERFACE
Room Temp
Cold Temp
Quick Warm
Steady Warm
LCD Screen Setting Icons:
Press repeatedly to
select setting
Setting
Guide
Warming
Speed
Scroll
Volume
Control
Setting
Scroll
Starting
Temperature
Scroll
Timer
Start/Cancel
Button
Power
Room
Temperature Cold
Temperature Quick
Setting Steady
Setting
Bluetooth LED LCD
* English or French can be set at app start up.
Press to
start warming
4
USING THE SAFE+SMART BOTTLE WARMER® MOBILE APP
CHOOSE A HEATING MODE: STEADY OR QUICK
DETAILS FOR EACH MODE ON THE FOLLOWING PAGES
The bottle warmer can bet set up straight from your smart phone or tablet. Download and install the Baby Brezza Bottle Warmer App
available on the app store & Google play. Bluetooth is required on your mobile device to connect to the Safe+Smart Bottle Warmer.
1
bluetooth
compatible
Place the bottle into the warmer and ensure that the
tabs around the bottle tray rim align with the slots
in the bottle warmer.
2
STEADY QUICK
warm water
heat
steam
heat
Press on the warmer and touch on your
mobile device to connect.
Always remove
venting systems
when warming.
Bottles with bottom
venting systems may
leak when heating.

5 6
QUICK WARMSTEADY WARM
6. Press to begin heating.
1. Fill the bottle warmer with water until it matches the level of the milk inside the bottle.
Always use room temperature water for best heating results.
Using warm, hot or cold water will result in inaccurate or dangerous bottle temperatures.
1. Fill the bottle warmer with room temperature water to the“Quick Warm” ll line.
Always use room temperature water for best heating results.
Using warm, hot or cold water will result in inaccurate or dangerous bottle temperatures.
2. Close the bottle warmer cover.
4. Use the setting guide on the back of this manual to determine the setting for your bottle.
Make sure to select the correct bottle size and material.
• If your bottle is cold
(refrigerated 39°F / 4°C) press
repeatedly to select your setting.
5. Identify the starting temperature of your bottle.
• If your bottle is room temperature (approximately 70F/21C) press
repeatedly to select your setting.
If you are warming multiple bottles, allow the bottle
warmer to cool before warming the next bottle.
If you are warming multiple bottles, allow the bottle
warmer to cool before warming the next bottle.
Fill warmer with water to
level of milk in the bottle.
Fill warmer with water to
the Quick Warm Fill line.
3. Press to turn on machine.
7. Warmer will beep when bottle is ready. Remove bottle immediately after
warming is complete, swirl bottle gently and check temperature
before feeding baby .
7. Warmer will beep when bottle is ready. Remove bottle immediately after
warming is complete, swirl bottle gently and check temperature
before feeding baby .
2. Close the bottle warmer cover.
4. Use the setting guide on the back of this manual to determine the setting for your bottle.
Make sure to select the correct bottle size and material.
3. Press to turn on machine.
6. Press to begin heating.
Please note: the quick warm mode uses steam to warm bottles.
Please use caution when opening the lid after warming cycle is complete.
Always use the orange bottle tray to remove the bottle from the warmer
and avoid touching any hot areas of the bottle warmer.
Outside of warmed bottle may be hot immediately after warming.
• If your bottle is cold
(refrigerated 39°F / 4°C) press
repeatedly to select your setting.
5. Identify the starting temperature of your bottle.
• If your bottle is room temperature (approximately 70F/21C) press
repeatedly to select your setting.

7
It is very important to de-scale this appliance every 4 weeks to ensure that it continues to work properly.
Pour all remaining water out of the water chamber. To de-scale, mix 2oz (60ml) of white vinegar with
4oz (120ml) of cold water into the water chamber, and then run one heating cycle on setting 5 until
any scaling has been removed. Please ensure proper ventilation when descaling with vinegar.
DE-SCALING THE BOTTLE WARMER
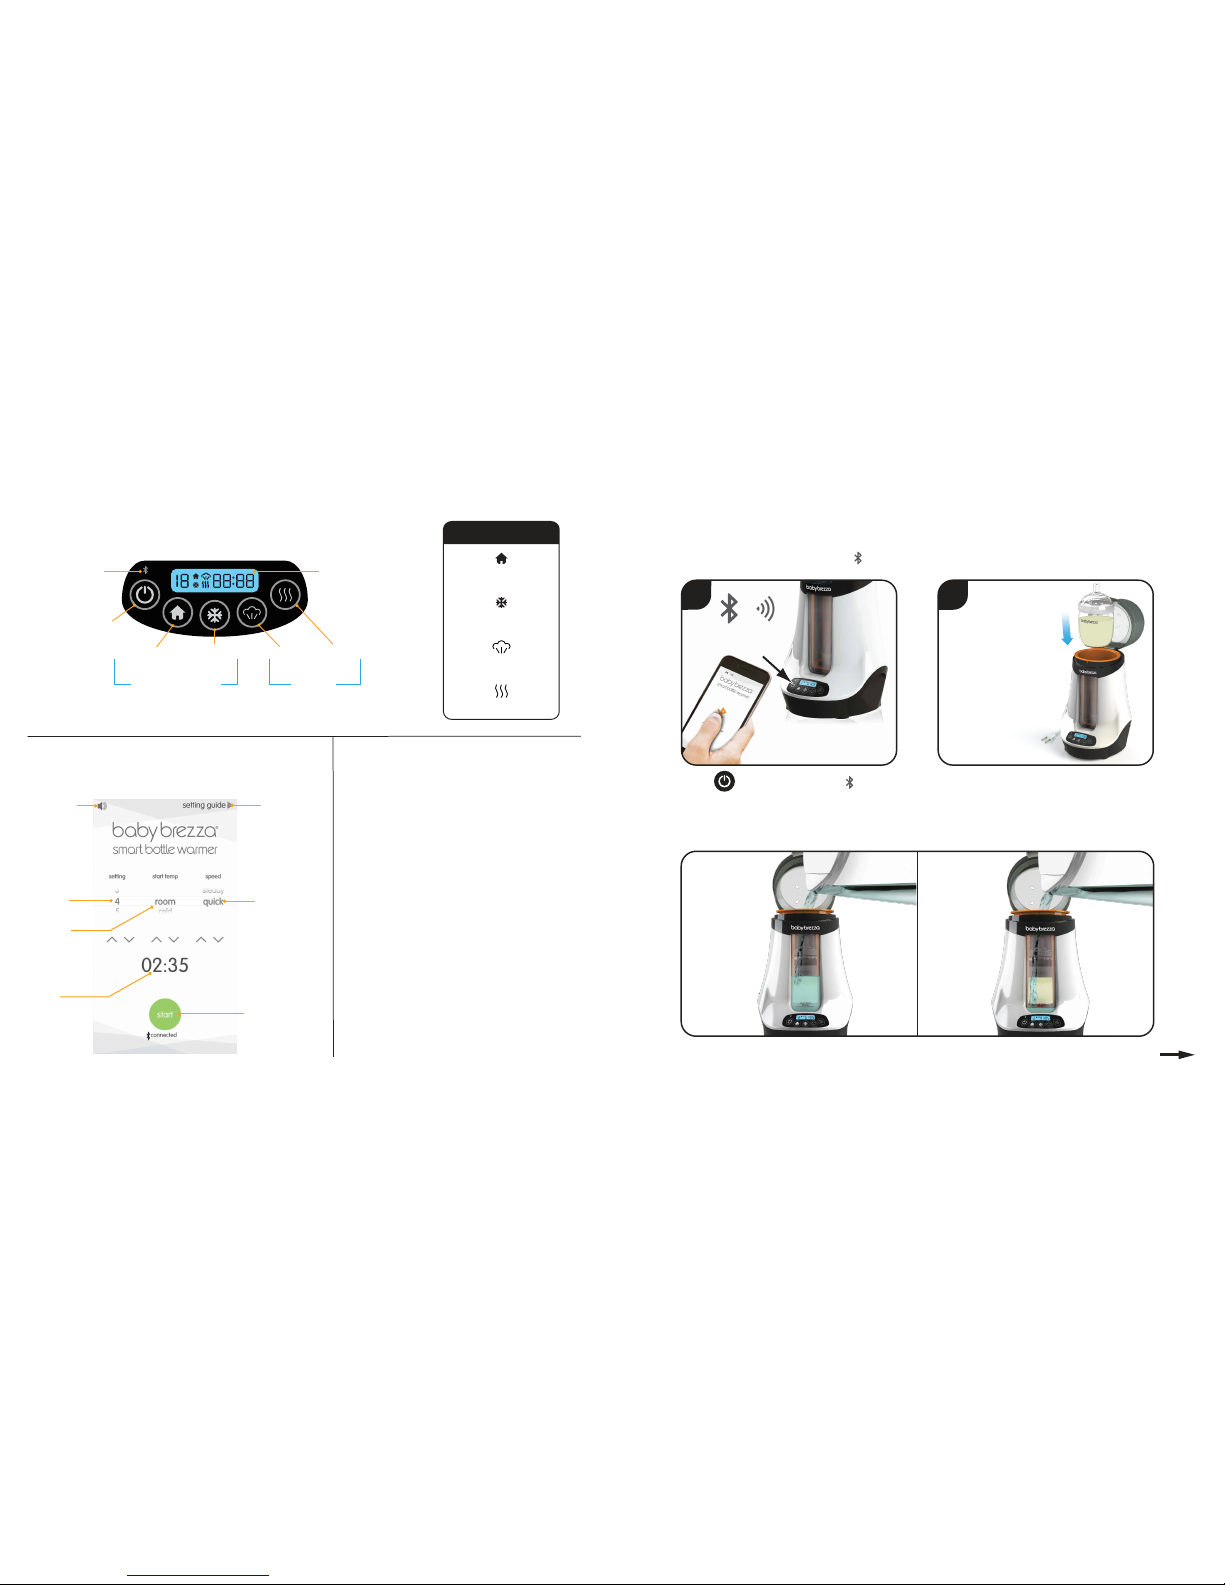
DEFROSTING FROZEN MILK POUCHES
Then press to begin heating.
To use the defrost setting, place a frozen milk pouch into the warmer and ll water to the line of the milk in the pouch.
CLEANING THE BOTTLE WARMER
Unplug the bottle warmer and
remove the bottle tray from the
base.
Carefully pour out any remaining
water inside the base.
1 2
Wipe all parts dry before next use.
If necessary, wipe base exterior
with damp cloth. Do not use scouring
pads, abrasives or solvents for cleaning.
32
Always allow warmer to cool before cleaning
Press the temperature setting until the“F” icon is displayed on the LCD screen,
8
Possible Remedy
Warmed bottle is too cold.
(Quick & Steady warm
settings) Try a higher setting according to your preference.
Ensure that bottle tray is lined up with bottle tray
slots in the bottle warmer.
Turn on the Bluetooth connectivity in your mobile
device before syncing to the unit.
Mobile device needs to be within 20ft of the bottle
warmer.
Ensure that plug is securely inserted into the power outlet.
TROUBLESHOOTING
Condition Possible Cause
Unit will not power on. Unit is unplugged.
is held for too long.
Bottle Tray is misaligned inside bottle warmer.
Bluetooth connectivity in mobile device is not
turned on.
Mobile device is out of range.
Lid will not close.
Press to turn on the unit. Do not hold down the
button.
Machine will not sync to
mobile device or is
disconnected.
Warmed bottle is too hot.
(Quick warm setting)
Not enough water added to bottle warmer.
Setting time is too long or incorrect setting
chosen.
Add water to the marked Quick Warm ll line.
Try a lower setting according to your preference.
Warmed bottle is too hot.
(Steady warm setting)
Not enough water added to bottle warmer.
Setting time is too long or incorrect setting
chosen.
Add water until it matches the height of liquid in your
bottle.
Try a lower setting according to your preference.
Too much water added to bottle warmer.
Setting time is too short or incorrect setting
chosen.
Reduce water in bottle warmer to the required height
based on your setting. (Refer to page 5).
“E5” error displays on machine
or “Error” message displays on
app.
Little or no water has been added to the
machine.
Add cold water to the machine and let it sit and cool for
5 min. Empty out cold water and restart the bottle
warmer. Make sure to add the appropriate amount of
water needed for warming.
E1, E2, E3, or E4 error displays
on machine.
Internal malfunction in machine. Please contact customer service before continuing to
use your machine.
If you can not remedy problems with the machine by using the troubleshooting chart above, do not return your warmer to the store,

9
CUSTOMER SERVICE
If you are experiencing problems with your Baby Brezza Safe + Smart Bottle Warmer, please call our Customer Service department at
1-800-667-8184 or by email at: [email protected] before returning the product so that we can oer you our best service customized to
your particular situation.
The limited warranty is valid only on products bought through authorized resellers and used in Canada. Buying through an
unauthorized reseller or using this product outside of Canada automatically voids this warranty. This warranty is available to
consumers only.You are a consumer if you own a Baby Brezza Bottle Warmer that was purchased at retail for personal, family or
household use. Except as otherwise required under applicable law, this warranty is not available to retailers or other commercial
purchasers or owners. We warrant that your Baby Brezza Bottle Warmer will be free of defects in material or workmanship under
normal home use for one year from the date of original purchase. Customer will be required to present original proof of purchase
in order to obtain the warranty benets. In the event that you do not have proof of purchase date, the purchase date for
purposes of this warranty will be the date of manufacture. If your Baby Brezza Bottle Warmer should prove to be defective
within the warranty period, we will repair it or, if we consider it necessary, replace it. To obtain warranty services, please call
LIMITED 1-YEAR WARRANTY
NOTE: This equipment has been tested and found to comply with the limits for a Class B digital device, pursuant to Part 15 of
the FCC Rules. These limits are designed to provide reasonable protection against harmful interference in a residential installation.
This equipment generates, uses and can radiate radio frequency energy and, if not installed and used in accordance with the instructions,
may cause harmful interference to radio communications. However, there is no guarantee that interference will not occur in a particular
installation. If this equipment does cause harmful interference to radio or television reception, which can be determined by turning the
equipment o and on, the user is encouraged to try to correct the interference by one or more of the following measures:
• Reorient or relocate the receiving antenna.
• Increase the separation between the equipment and receiver.
• Connect the equipment into an outlet on a circuit different from that to which the receiver is connected.
• Consult the dealer or an experienced radio/TV technician for help.
Warning: Changes or modications to this unit not expressly approved by the party responsible for compliance could void
the user’s authority to operate the equipment.
Look for these other great
baby brezza products!
Sterilizer+DryerFormula Pro®
Available in 5oz & 9oz
Glass and Plastic
Ultra-wide mouth makes it
easiest to fill.
Easier
Only 2 parts make it amazingly
easy to clean.
Cleaner
Anti-ColicTruFlo Vent System
greatly minimizes gas.
Healthier
Ergonomic
Babies love to hold it,
and you will too.
Table of contents
Other Babybrezza Bottle Warmer manuals