7. Następnie naciskając przycisk T1/T2 (15d) wybierz odpowiedni tryb pracy laktatora:
• T1 to program cyklu krótkiego (zassanie, zwolnienie, zatrzymanie) – służący do masażu
pobudzającego laktację
• T2 to program cyklu dłuższego (zassanie, zatrzymanie, zwolnienie) – służący do właściwego
ściągania pokarmu
8. Aktualnie pracujący program sygnalizowany jest podświetleniem diody umieszczonej na
pompie. Zmiana trybu T1/T2 możliwa jest także podczas pracy laktatora.
9. Przyciskami + i – (15e) ustaw odpowiedniąsiłę ssania, zgodnie z indywidualnym
zapotrzebowaniem.
10. Zakończ odciąganie pokarmu, gdy mleko przestanie wypływaćz piersi.
11. Ilości odciąganego pokarmu będązróżnicowane, zależą one od stopnia uregulowania
laktacji
, pory dnia oraz ilości przyjmowanych płynów. Odciąganie pokarmu z pełnych piersi
może potrwaćnawet 30 min.
12. W celu zakończenia pracy laktatora naciśnij przycisk zasilania (15c) i przytrzymaj go przez
2 sekundy, ażzniknie podświetlenie tego znaku.
13. Korzystanie z laktatora nie powinno byćbolesne. Jeśli odciąganie pokarmu sprawia Ci
ból, widzisz zaczerwienienia i podrażnienia piersi – niezwłocznie skontaktuj sięz doradcą
laktacyjnym.
14. Po zakończeniu odciągania pokarmu umyj wszystkie części laktatora i przygotuj je do
sterylizacji.
MOŻLIWE PROBLEMY
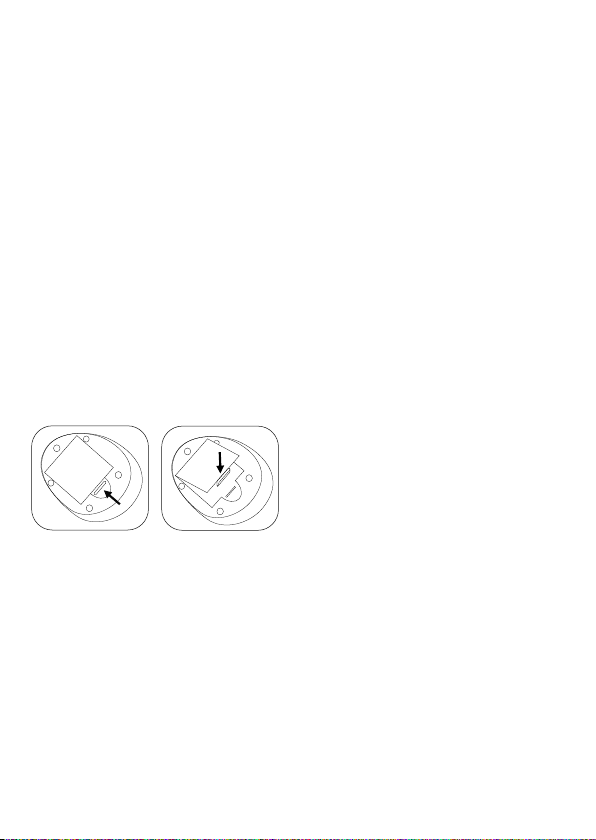
NIE PRACUJE POMPA:
• Sprawdźczy baterie zostały prawidłowo umieszczone w przegródce na baterie - zgodność
biegunów baterii z oznaczeniem na przegródce. Sprawdźtakże czy baterie sąmocno
osadzone w przegródce .
• Jeśli używasz zasilacza, upewnij się, że jest on prawidłowo podłączony do laktatora, i do
kontaktu.
BRAK LUB SŁABNĄCA SIŁA SSĄCA:
• Upewnij się, że wszystkie części laktatora zostały prawidłowo ze sobąpołączone
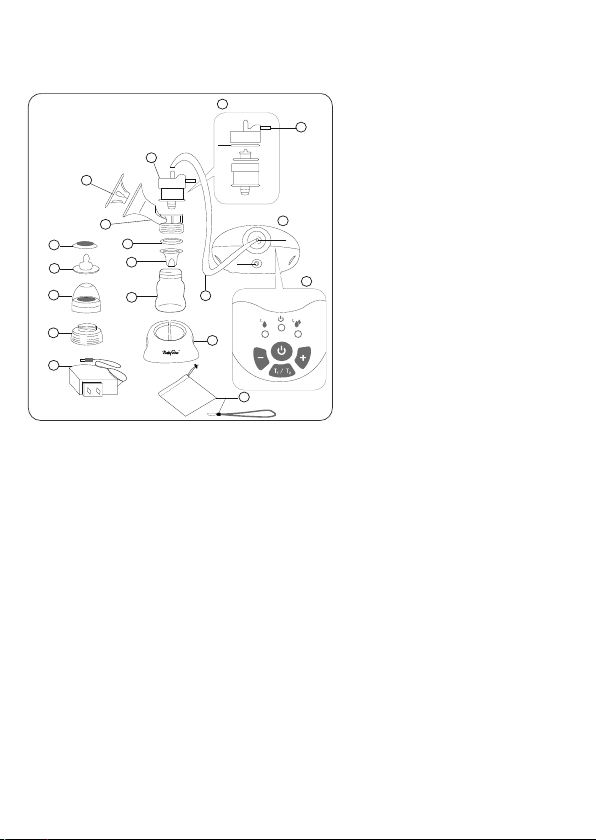
• Sprawdźczy zawór korpusu (6c) nie skleiłsięz górnączęściąkorpusu (6a). W tym celu
rozkręć korpus i osusz wszystkie jego elementy. Uwaga! Nie usuwaj zaworu korpusu(6c) –
zabezpiecza on przed dostaniem siępłynów do pompy laktatora.
• Sprawdźczy w górnej części korpusu znajduje sięzawór upustowy. Jeśli go tam nie ma –
zastosuj zapasowy zawór upustowy dołączony do zestawu.
• Sprawdźmoc baterii. Jeśli sąsłabe , wymieńje na nowe lub podłącz zasilacz sieciowy.
• Sprawdź, czy pomiędzy pierśa silikonowąnakładkęnie dostało siępowietrze. Jeśli dostało
siętam powietrze, wyjmij pierśi ponownie umieść jąw lejku laktatora.
POMOC LAKTATORA W PROBLEMACH ZWIĄZANYCH Z KARMIENIEM PIERSIĄ
• Nadmiar pokarmu - kiedy pierśjest za bardzo wypełniona mlekiem, dziecku jest trudno
prawidłowo uchwycićbrodawkę. Odciągając nadmiar pokarmu sprawisz, że pierśbędzie
miękka, a tym samym ułatwisz dziecku prawidłowy uchwyt brodawki.
• Niedobór pokarmu - niedostateczna ilość pokarmu sprawia, że dziecko szybko się
denerwuje i zniechęca do ssania piersi. Używając laktatora BabyOno pomiędzy właściwymi
karmieniami, pobudzisz pierśdo wytwarzania większej ilości pokarmu.
• Kształt brodawki - szczególnie w początkowej fazie karmienia, wiele kobiet skarży sięna
kształt swoich brodawek, które sąniedostatecznie wypukłe - przez co dziecko ma trudności
z właściwym ich uchwyceniem. Regularne stosowanie laktatora może Ci pomóc w szybszym
tempie przystosowaćpierśdo karmienia.