manuals.online logo
Brands
  1. Home
  2. •
  3. Brands
  4. •
  5. Bacharach
  6. •
  7. Other
  8. •
  9. Bacharach MVR-300 UK User manual

Bacharach MVR-300 UK User manual

1: OVERVIEW
The Bacharach MVR-300 UK version detects refrigerant leaks in
occupied spaces.
4: SAFETY INSTRUCTIONS
CODE COMPLIANCE: Comply with all local and naonal
laws, rules, wiring codes, and regulaons associated with
this equipment.
TECHNICIAN USE ONLY: This unit must be installed by a
suitably qualified technician who will install this unit in
accordance with these instrucons and the standards in his
parcular industry/country. Operators of the unit should be
aware of the regulaons and standards in their indus-
try/country for the operaon of this unit. These notes are
only intended as a guide and the manufacturer bears no
responsibility for the installaon or operaon of this unit.
Failure to install and operate the unit in accordance with
these instrucons and with industry guidelines may cause
serious injury including death and the manufacturer will not
be held responsible in this regard.
SAFE MOUNTING: This detector must be connected by a
marked, suitably located and easily reached switch or
circuit-breaker as means of disconnecon.
CAUTION: DO NOT MOUNT the MVR-300 in an
area that may contain flammable liquids or
vapors. Operaon of electrical equipment in
such an area constutes a safety hazard.
World Headquarters
621 Hunt Valley Circle
New Kensington, PA 15068 USA
Phone: 724-334-5000 • Fax: 724-334-5001
Toll Free: 1-800-736-4666
114A Georges Street Lower
Dun Laoghaire • Co Dublin • Ireland
Phone: +353 1 284 6388
Fax: +353 1 284 6389
CAUTION: Mounng in ceiling voids in a hotel
room would not strictly comply with EN378.
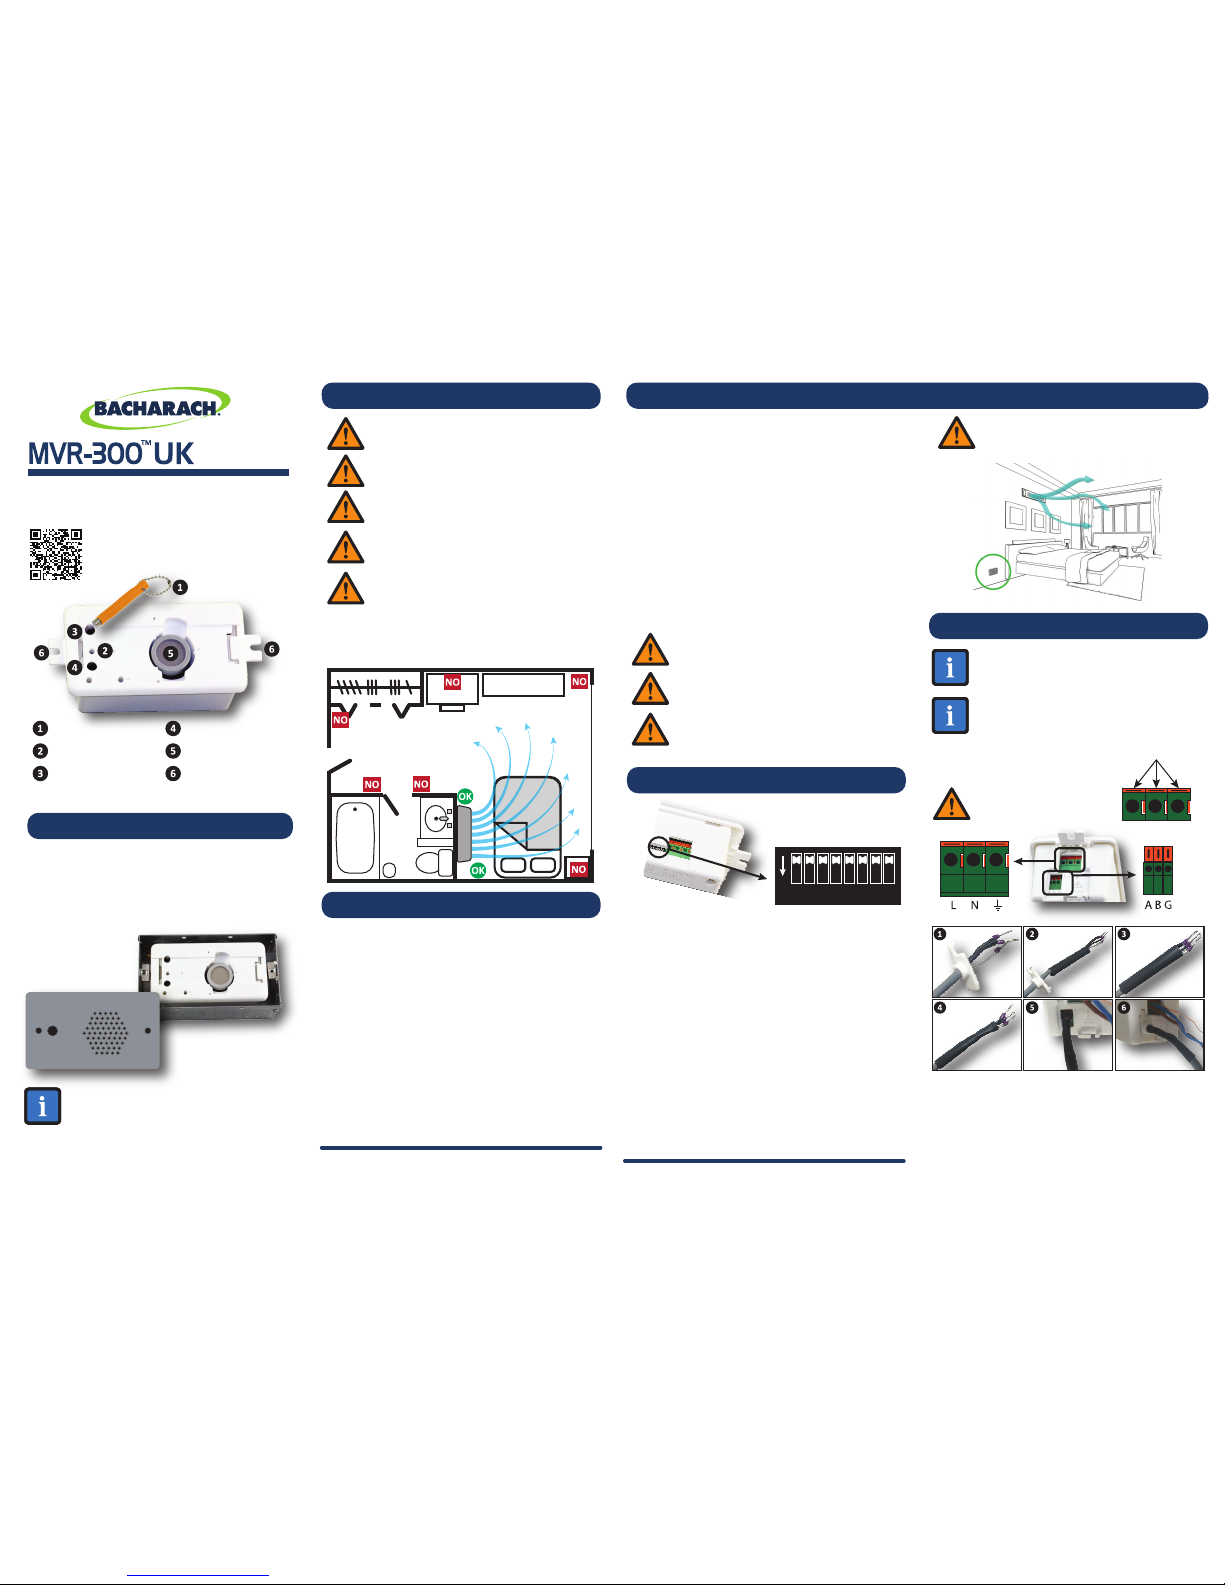
IMPORTANT: Mount at a height between 100
and 150 mm (4 and 6 inches) off the floor.
Avoid dras and heat sources (like radiators),
and avoid sources of steam.
P/N: 6203-9002 Revision 2 August 2018
INSTALLATION GUIDE
MVR-300 Proper vs. Improper Placement Locaons
6: INSTALLATION
REFRIGERANT
GAS DETECTOR
Website: www.mybacharach.com ● E-mail: help@mybacharach.com
CAUTION: Ensure all wiring
connecons are made before
applying power.
ENVIRONMENTAL CONSIDERATIONS: Carefully
consider the full range of environmental condions
to which the instruments will be exposed.
TARGET GAS CONSIDERATIONS: The physical data of
the gas or vapor to be detected must be observed.
APPLICATION CONSIDERATIONS: The specifics of the
applicaon (for example, possible leaks, air move-
ment/dra, etc.) must be observed.
ACCESSIBILITY CONSIDERATIONS: The degree of
accessibility required for maintenance purposes
must be granted.
ELECTRONIC CONSIDERATIONS: The system contains
sensive electronic components that can be easily
damaged. Do not touch or disturb any of these
components.
2: MOUNTING CONSIDERATIONS
Mount the MVR-300 according to the above consideraons,
product dimensions, and maximum wiring lengths.
3: INSTALLATION SPECIFICATIONS
Outputs: Relay outputs (2)
2 SPDT, 1 A at 30 VDC,
1 A at 125 and 250 VAC, resisve load
Modbus: Connecon: RS-485 terminal block
Baud rate: 9600 or 19200 (selectable)
Default baud: 9600
Start bits: 1; Data bits: 8
Parity: None (default), odd, even (selectable)
Stop bits: 1 (default) or 2 (selectable)
Retry me: 500 ms (min) between retries
End of msg: Silent 3.5 characters
Power: 100 to 240 VAC, 50/60 Hz, 4 W
Wiring Power: 3-core cable, 14 to 20 AWG (0.5 to 2.0 mm2)
Wiring Relays: 3-core cable, 18 to 20 AWG (0.5 to 1.0 mm2)
Wiring Modbus: 2-core twisted, shielded pair 18 to 24 AWG
(0.2 to 1 mm2) with 120 Ω characterisc
impedance; Use Belden 8761 or similar;
Maximum diameter of cable + heat shrink
must be ≤5 mm (0.2 in)
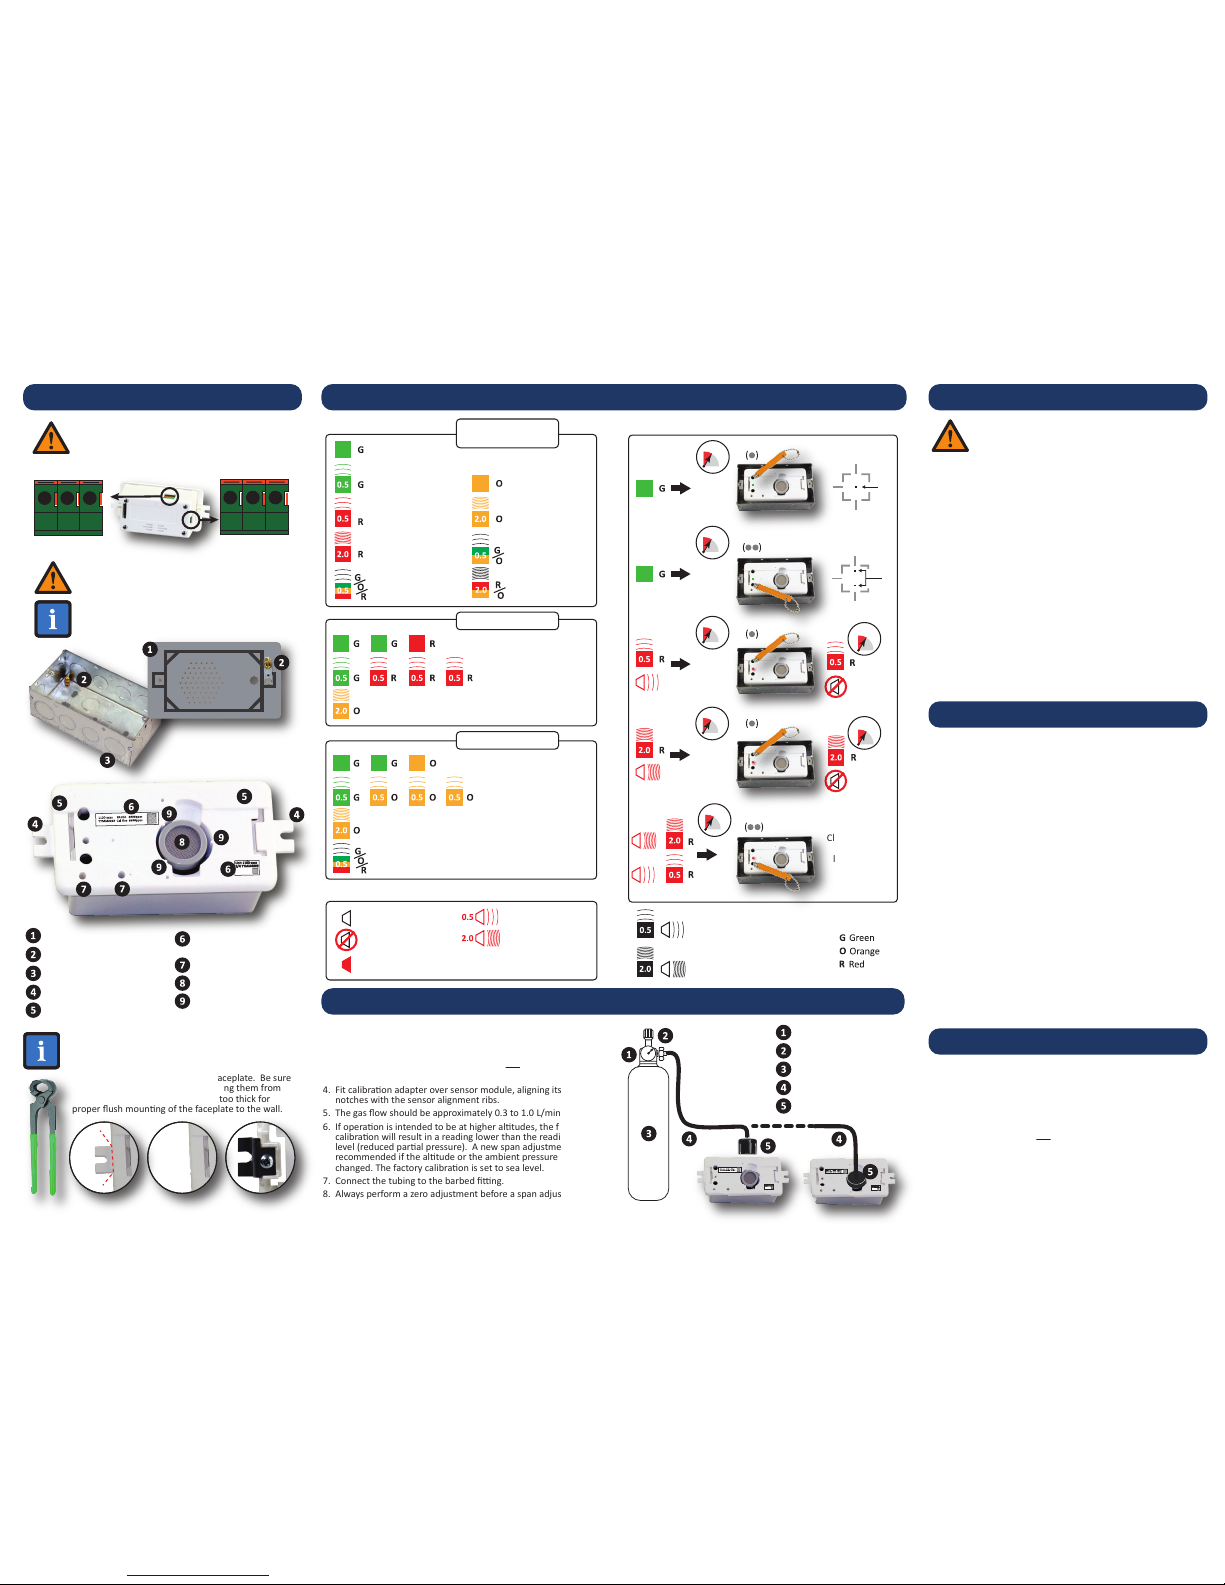
NOTE: The MVR-300 UK is designed for use in
2-gang and 3-gang UK back boxes with a minimum
depth of 47 mm (1.9”).
The refrigerant detector can be calibrated and maintained
non-intrusively using a magnec wand.
The detector is for indoor applicaons. It is housed in an ABS
enclosure that fits into most 2-gang UK electrical back boxes
(not included). Thinner metal mounng tabs are provided for
flush mounng in UK back boxes with higher mounng tabs.
Copyright © 2018 Bacharach, Inc. All Rights Reserved
5: CONFIGURATION
When inserng the wire into the terminal,
release the spring clamp by pushing back
the release latch.
Push to release
1234
ON
5678
Gas alarms and status messages are indicated visually by a
3-colored LED and audibly by a buzzer. In case of an alarm
and/or fault, relays switch (for example, shut-off valves or alarm
devices).
NOTE: Before installing the MVR-300, refer to the
calibraon gas concentraon label and record the
value for use in step 16 of the calibraon procedure.
NOTE: The manufacturer of this product requires that
a bump test or calibraon be performed following
installaon to verify instrument funconality.
CAUTION: RS-485 signal cable must be
insulated to the highest voltage level in the
system. Protect the RS-485 signal cable by using
the supplied installaon kit.
1. Prepare signal cable and put boot over the signal cable.
2. Add appropriately sized ferules (not included) if required.
3. Apply 10 cm piece of shrink wrap as close to the wire ends/
ferules as possible while leaving some free wire to allow
connecon to the detector.
4. Heat the shrink wrap.
5. Connect signal wires/ferules to the detector.
6. Slide rubber boot along the wire and shrink wrap assembly
and connect it to the detector.
Power
Modbus
(See Steps 1-6)
1 Restart
Off Normal operaon (Default)
On Restart MVR-300
2,3 Alarm ON Delay
Off, Off No delay (Default)
Off, On 5 minute delay
On, Off 10 minute delay
On, On 15 minute delay
4 Failsafe
Off Normal relay operaon (Default)
On Failsafe relay operaon
5 Relay 2 Fault Indicaon
Off High alarm or fault (Default)
On High alarm only
6 Alarm Latching
Off Alarms automacally reset (Default)
On Alarms latch and require manual reset
7 Buzzer Disable
Off Buzzer enabled (Default)
On Buzzer disabled
8 Enable Reset to Factory Defaults
Off Normal operaon (Default)
On Reset enabled (see manual for details)
For more detailed informaon, scan here or
visit www.mybacharach.com to access the
MVR-300 User Manual (P/N 6203-9000).
Magnec Wand
3-color status LED
Magnec switch 1 (
•
)
Magnec switch 2 (
••
)
Sensor Module
Plasc Mounng Tabs
Example of a customized
faceplate (not included)
Sample UK back box
(not included)
MVR-300 is a trademark of Bacharach, Inc. All rights reserved.
8A. ZERO ADJUSTMENT
7: OPERATION OVERVIEW
LED Operaon
SHIELD WIRE WARNING: Connect the shield of
Modbus wires to the earth ground of the central
control system (e.g., chassis, ground bus bar, etc.). Normal mode,
no alarm
Low gas alarm
High gas alarm
Fault
Under range
(perform
zero adjust)
Over range
(remove gas)
Offline (not in
calibraon
mode)
Normal/Alarm/Fault/
Special States
Waing to start
calibraon mode
During calibraon
Zero calibraon
error
Zero Cal Mode
Waing to start
calibraon mode
During calibraon
Span calibraon
error
Span Cal Mode
Magnec Switch Funcons
Buzzer Operaon
No alarm Low gas alarm
Muted alarm High gas alarm
Fault (connuous)
8: GENERAL CALIBRATION PROCEDURE
1. The detector must not be in alarm or fault condion. (One
excepon is a negave gas concentraon fault -- which requires
a zero calibraon.)
2. Calibraon gas must be in balance of air, not Nitrogen (N2).
3. Aach the pressure regulator to the calibraon gas cylinder.
4. Fit calibraon adapter over sensor module, aligning its 3
notches with the sensor alignment ribs.
5. The gas flow should be approximately 0.3 to 1.0 L/min.
6. If operaon is intended to be at higher altudes, the factory
calibraon will result in a reading lower than the reading at sea
level (reduced paral pressure). A new span adjustment is
recommended if the altude or the ambient pressure is
changed. The factory calibraon is set to sea level.
7. Connect the tubing to the barbed fing.
8. Always perform a zero adjustment before a span adjustment.
8B. SPAN ADJUSTMENT
WARNING: Ambient air can be used to zero the
sensor instead of synthec air only if the area is
known to be free of the target gas or any gas to which
the sensor may be cross-sensive. In this case, no
cylinder or calibraon adapter is needed for the zero
adjustment.
9. Tap and hold ( • ) for >5 seconds. The LED will blink
green-green-red when the detector is ready.
10. Apply synthec air (or use ambient air per warning above).
11. Tap ( • ) within 30 seconds to confirm start of calibraon.
Otherwise the detector will me-out and return to normal
operaon.
12. As the process progresses, the LED will blink green-red,
green-red-red, green-red-red-red, etc.
• To abort calibraon, tap and hold ( • ) for >5 seconds,
turn off gas flow and remove the calibraon adapter.
The detector will return to normal operaon.
• If calibraon is successful (green LED), skip to step 13.
• If calibraon is unsuccessful (orange LED blinks @ 2 Hz),
then tap ( • ) to discard the calibraon aempt, and see
User Manual (P/N 6203-9000) for troubleshoong.
13. Turn off gas flow from synthec air.
14. Replace synthec air tank with calibraon gas tank in
preparaon for span adjustment (if required).
9. BUMP TEST
Negave gas
fault (perform
zero adjust)
Recovery from
span calibraon
2.0 = 2.0 Hz
2 cycles/second
FAST flash/chirp
0.5 = 0.5 Hz
0.5 cycles/second
SLOW flash/chirp
LED Colors
6: INSTALLATION (CONTINUED)
Warmup mode
(≈ 6 minutes)
15. Tap and hold ( •• ) for >5 seconds. The LED will blink
green-green-orange when the detector is ready.
16. Apply span gas in the concentration listed on the cal gas
concentration label (beneath the detector’s cover plate).
This may require the temporary removal of the bezel and
cover plate to see the label.
17. Tap ( •• ) within 30 seconds to confirm initiation of
the calibration. Otherwise the detector will time-out and
return to normal operation.
18. As the calibration process progresses, the LED will blink
green-orange, green-orange-orange,
green-orange-orange-orange, etc.
• To abort calibration, tap and hold ( •• ) for >5 seconds,
turn off gas flow and remove the calibraon adapter.
The detector will return to normal operaon aer
6 minutes of recovery me.
• If calibraon is successful, the LED will blink
green-orange-red indicating ‘offline’). Turn off gas flow
and remove the calibraon adapter. After 6 minutes
the detector will return to normal operation.
• If calibraon is unsuccessful (orange LED blinks @ 2 Hz),
then tap ( •• ) to discard the calibraon aempt, and
see User Manual (P/N 6203-9000) for troubleshoong.
Turn off gas flow and remove the calibraon adapter.
After 6 minutes the detector will return to normal
operation.
1. Inform building personnel of test so that certain alarms
may be inhibited (e.g., shutdown valves, notification of
authorities, etc.).
2. Connect adapter and target gas according to instructions in
General Calibration Procedure.
3. Apply a sufficiently high concentration of target gas to
trigger alarms, but not pure refrigerant or hydrocarbons
(e.g., do not use a butane lighter).
4. Once the alarm thresholds are exceeded, all designated
gas alarm relays will be activated and the digital outputs
will transmit the corresponding gas concentrations.
5. Turn off gas flow and remove calibration adapter.
High Gas Alarm
or Fault
Relay #2
NC NOCOM
Low Gas Alarm
Relay #1
NC NOCOM
Example of custom faceplate
Grounding lugs
Example of UK back box
Mounng tabs
Direcon arrows (×2) for
proper mounng
Sensor type/calibraon and
ID/serial number labels
Test point access holes (×2)
Replaceable sensor module
Sensor alignment ribs (×3)
5 s
8A
5 s
8B
5 s
5 s
5 s
Latched
alarm
60 min
60 min
Clears one
or both
latched
alarms
Flow meter
Pressure regulator
Calibraon gas
Tubing
Calibraon adapter
Back view of a customized
faceplate (not included)
Sample
UK back box
(not included)
NOTE: For specificaons and recommended drill
paerns for customizing a metal UK faceplate, visit the
MVR-300 product page at www.MyBacharach.com.
NOTE: For UK back boxes with “higher” mounng
tabs, remove the thick plasc mounng tabs from
the detector (using wire snips or nippers) and screw
on the thinner metal mounng tabs (included) to
ensure flush wall mounng of the faceplate. Be sure
to dry fit the plasc tabs before cung them from
the detector to verfiy that they are too thick for
proper flush mounng of the faceplate to the wall.
COVER GROUNDING: For proper cover ground-
ing, wire the ground lug of the faceplate to the
ground lug of the earth grounded back box.
If the custom faceplate drill paern does not accommodate the two magnec switch
locaons, the faceplate must be removed to use the magnec wand funcons.

Other Bacharach Other manuals

Bacharach MGS-150 User manual

Bacharach

Bacharach MGS-150 User manual

Bacharach Model 105 Manual

Bacharach

Bacharach Model 105 Manual

Bacharach MGS 550 User manual

Bacharach

Bacharach MGS 550 User manual

Popular Other manuals by other brands

Troy-Bilt FLEX Chipper Shredder Operator's manual

Troy-Bilt

Troy-Bilt FLEX Chipper Shredder Operator's manual

ReelCraft TH5425 OMP operating instructions

ReelCraft

ReelCraft TH5425 OMP operating instructions

Ferplast chef pro user manual

Ferplast

Ferplast chef pro user manual

fish mate 1200 instructions

fish mate

fish mate 1200 instructions

Summerset SSRFR-24DK1 Installation instructions & owner's manual

Summerset

Summerset SSRFR-24DK1 Installation instructions & owner's manual

MTX iThunder user guide

MTX

MTX iThunder user guide

Sealey SM40.V2 instructions

Sealey

Sealey SM40.V2 instructions

Oase HeatUp Basis 10 W Operating instructions and guarantee

Oase

Oase HeatUp Basis 10 W Operating instructions and guarantee

Megger SFC250 user guide

Megger

Megger SFC250 user guide

EMG MMTW Installation information

EMG

EMG MMTW Installation information

R&J Enterprises Fusion Series instructions

R&J Enterprises

R&J Enterprises Fusion Series instructions

Parkside 291642 Translation of the original instructions

Parkside

Parkside 291642 Translation of the original instructions

Stratasys CLEANSTATION CSIIP user guide

Stratasys

Stratasys CLEANSTATION CSIIP user guide

Sunex Tools 4930A operating instructions

Sunex Tools

Sunex Tools 4930A operating instructions

Tetra StarterLine instruction manual

Tetra

Tetra StarterLine instruction manual

IBM HS21 BLADECENTER - X5460 FOR SPEC CPU2006 specification

IBM

IBM HS21 BLADECENTER - X5460 FOR SPEC CPU2006 specification

NextWave Digital TDR-2190 operating instructions

NextWave Digital

NextWave Digital TDR-2190 operating instructions

Genie Tech Pro Link user guide

Genie

Genie Tech Pro Link user guide

manuals.online logo
manuals.online logoBrands
  • About & Mission
  • Contact us
  • Privacy Policy
  • Terms and Conditions

Copyright 2025 Manuals.Online. All Rights Reserved.