Backyard Cat Enclosures Paws Playhouse User manual

1
Nd some help? Email us at sales@backyardcatenclosures.com.au or phone 1300 440 453
Getting Started
Requirements & Tips
1
Watch our Paws Playhouse assembly video, here:
backyardcatenclosures.com.au/customer-portal
Password: meowmeow
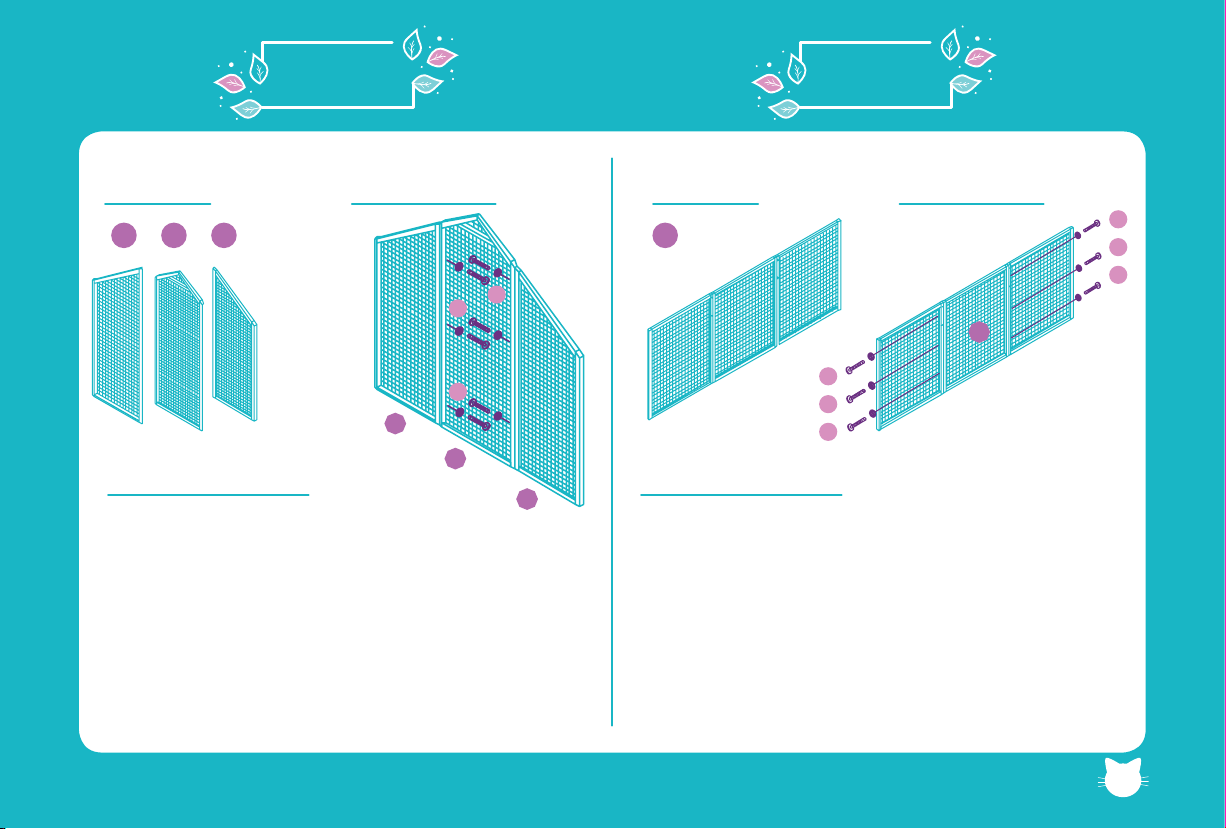
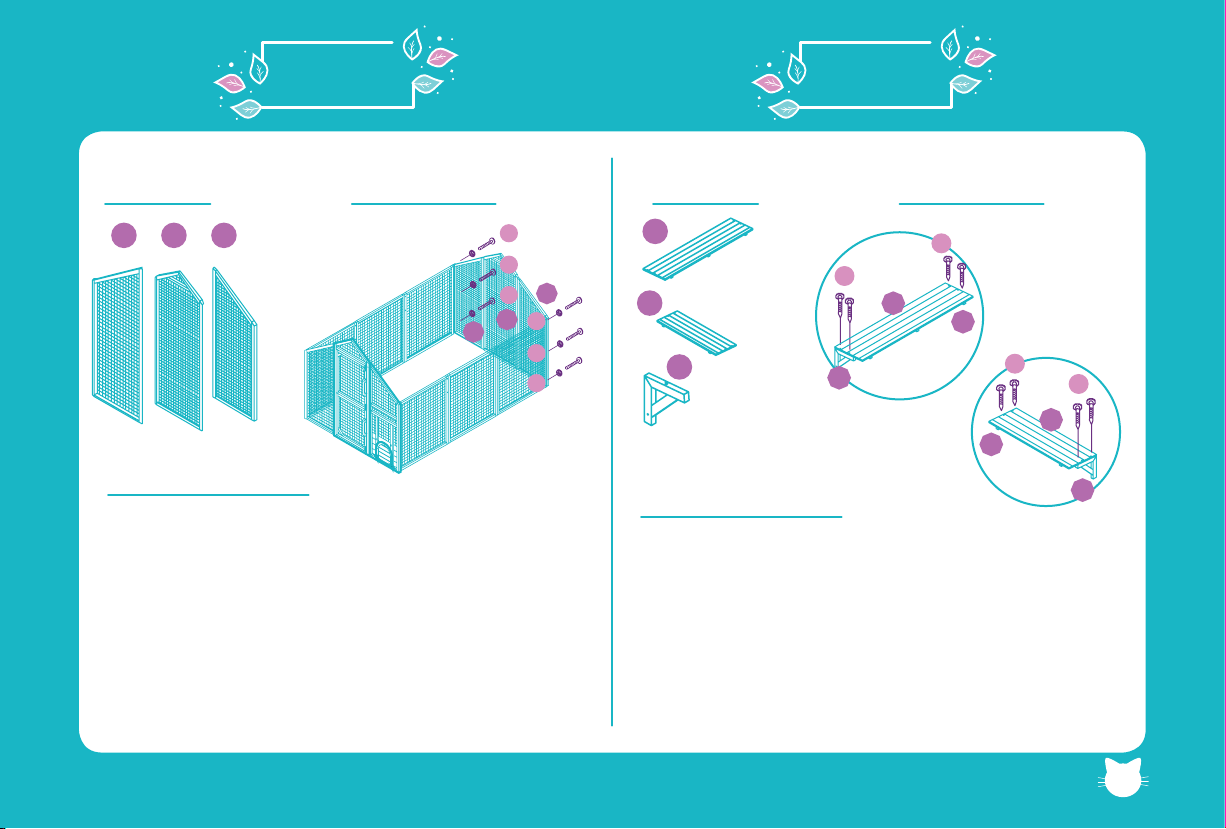
5Assemble the enclosure
on flat ground & move into
position once completed.
6
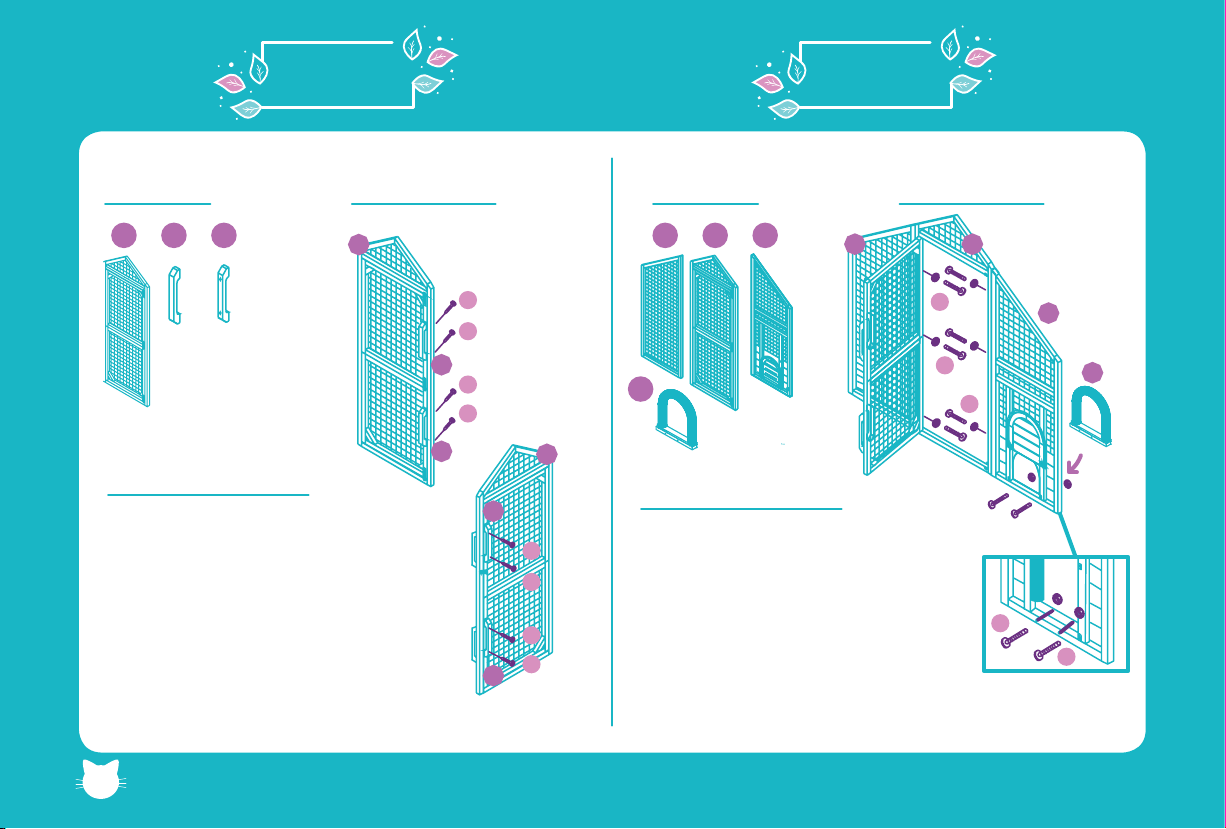
You will need to paint your cat enclosure, & make sure you repaint every 3 years, to keep it in top
condition and for warranty purposes. Some locations in Australia may require more regular coats
due to the harsh environment. You must paint both sides of every panel. We recommend you do
this PRIOR TO ASSEMBLY for the best nish. We recommend Dulux Weathershield Exterior Paint.
1
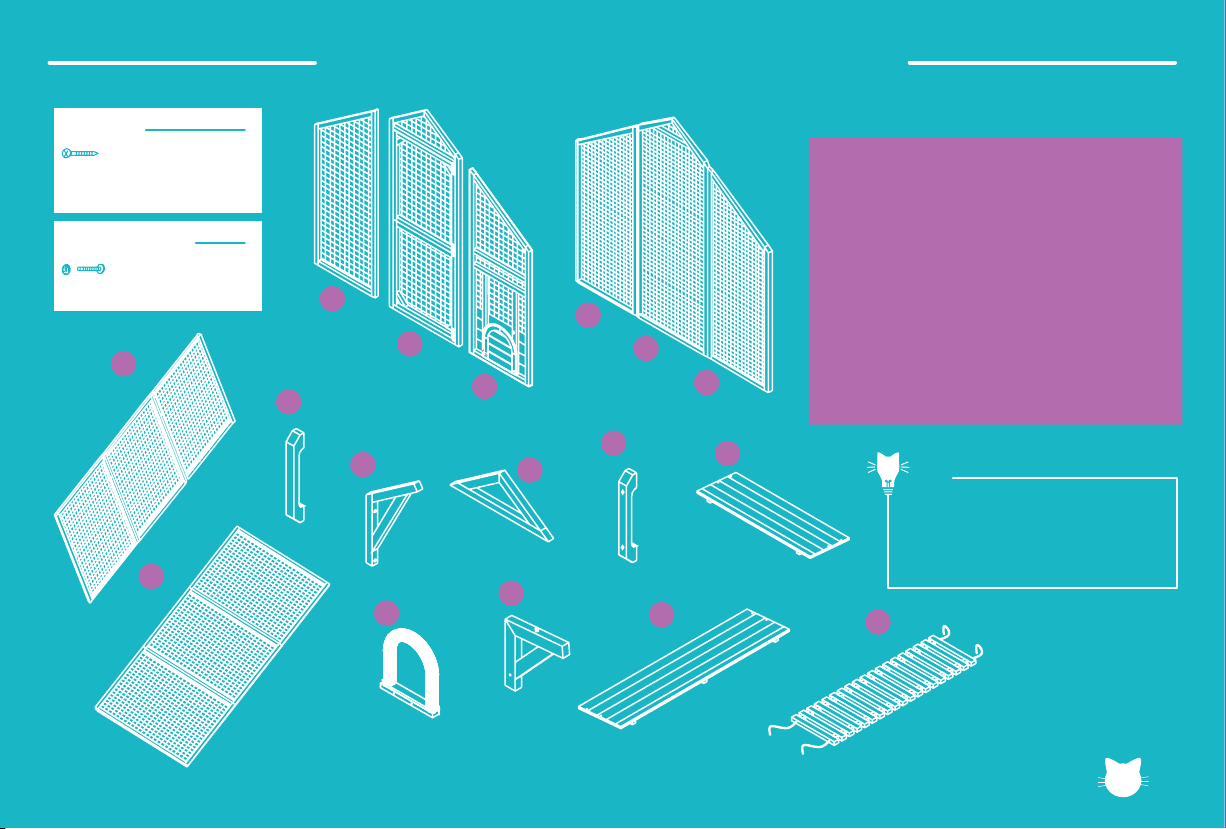
UNPACK ALL THE BOXES
COMPLETELY and line up all
the bags of hardware so you
can easily grab bolts & screws
duringassembly.
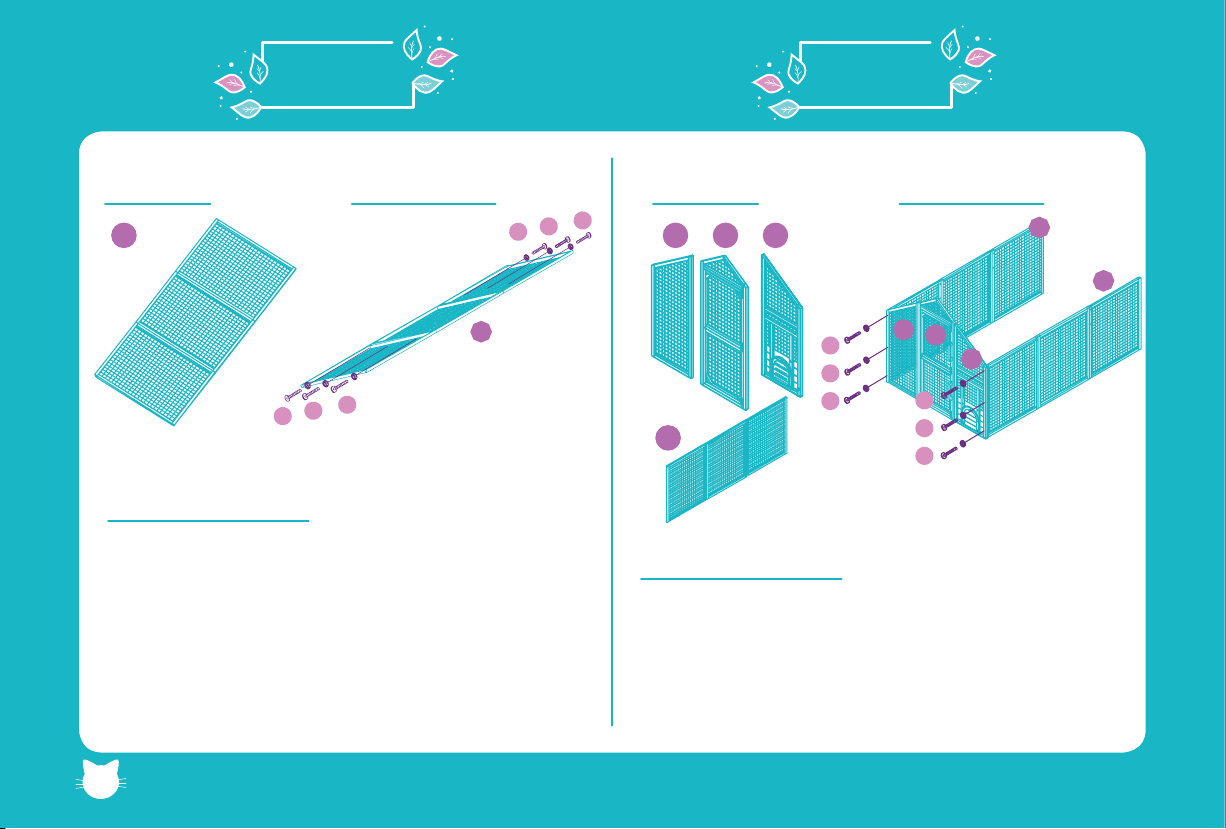
2Put a Phillips head bit (Size:
PH2) on a power drill. Ensure
your bit ts nicely into the
screws. We have provided
one if you don’t have one.
3Give yourself around
1 to 2 hours so you
don’t rush & make
mistakes.
3
HRS
4
Nd some help? Email us at [email protected] or phone 1300 440 453
Read!
Must
Pictures!
Send us
your cat

2
Nd some help? Email us at [email protected] or phone 1300 440 453
What’s Inside Your Boxes
7x2
1
2
3
12
5
4
6x2
11 x2
8x2
9x4 10 x2
14 x 10
16
17 x2
15 x4
13
As you have probably painted your
enclosure, this page will be helpful
in identifying each panel by shape
instead of number!
Tip
Disclaimer : This product is designed solely for the
purpose of giving your cat an outdoor living option. It
is not intended to keep all predators out, and may not
be enough to stop a dog or other animal from harming
your cat.
To ensure security and safety, additional measures such
as a secure foundation and ooring, backyard fencing,
electric fences, night lights and additional locks may
be required to prevent burrowing in or out. The addition
of padlocks to the enclosure to prevent entry by other
humans is also recommended if of concern to you.
Screws
52pcs
4pcs
20pcs
C M6 x 80 56pcs
A M4 x 55
B M4 x 60
D M4 x 25
F M6 x 100 2pcs
Nuts + Bolts

Nd some help? Email us at [email protected] or phone 1300 440 453
3
Start off by attaching the handles.
Install ‘Pieces 8’ (door handles) to
the outside of ‘Piece 2’ (the door)
drilling them in from the back
with ‘A’ screws.
Then install ‘Pieces 11’ to the
inside of ‘Piece 2’ with ‘B’ screws.
2 8 11
Step 2
Pieces Diagram
Instructions
Pieces Diagram
A
8
A
A
A
B
B
B
B
11
8
11
2
2
Fit ‘Piece 1’ & ‘Piece 3’ to the left & right
of ‘Piece 2’ with ‘C’ bolts and nuts.*
Install ‘Piece 13’ (cat brush) onto
‘Piece 3’ with ‘F’ bolts and nuts.
Instructions
*Note: Ensure that the head of the bolt starts from the inside door
frame of Piece 2 otherwise the door will not close properly.
1
123 2
3
C
C
C
13
13
F
x2 x2
F
OUTSIDE VIEW
INSIDE VIEW
Step 1

4
Nd some help? Email us at [email protected] or phone 1300 440 453
Attach ‘Piece 12’, ‘Piece 5’ and ‘Piece
4’ together with ‘C’ bolts and nuts.
Now you have assembled the back of
the enclosure. Pawesome!
Pieces Diagram
Instructions
Pieces Diagram
In this step we will be preparing the side walls of the
enclosure.
Stretch ‘Piece 6’ out and install ‘C’ bolts and nuts so
the wall stays straight.
Repeat process for the other ‘Piece 6’.
Instructions
12
5
4
C
C
C
12 5 4 6
C
C
C
C
C
C
6
x2
Step 4Step 3

Nd some help? Email us at [email protected] or phone 1300 440 453
5
Now it is time to prepare the enclosure roof!
Stretch ‘Piece 7’ out and install ‘C’ bolts & nuts so
the roof stays straight.
Repeat process for the other ‘Piece 7’ & then move
on to the next step!
Pieces Diagram
Instructions
Pieces Diagram
This step will be easier with an extra set of hands.
Join the walls from STEP 4, with the front panel
from STEP 2 using ‘C’ bolts.
Instructions
7
7
6
C
C
C
6
CCC
CCC
C
C
C
6
123
12
3
x2
x2
Step 6Step 5

6
Nd some help? Email us at [email protected] or phone 1300 440 453
Finish the perimeter of the
enclosure by attaching the back
panel from STEP 3 using ‘C’ bolts.
Pieces Diagram
Instructions
Pieces Diagram
Let’s go ahead and assemble the shelves to
get them ready for the next step!
Attach ‘Piece 14’ (shelf supports) to ‘Pieces
15’ & ‘Piece 16’ (shelves) with ‘D’ screws.
Instructions
15
12 5 4 C
12 5
416
14
X 4
C
C
C
C
C
x4
x 10 14
14
14
14
16
15
D
D
D
D
Step 8Step 7

Nd some help? Email us at [email protected] or phone 1300 440 453
7
Attach the bridges by tying the rope
through the holes in the shelves. Ensure
that the rope is tied taught for stability.
Instructions 15
17
9
9
9
9
C
C
C
C
C
C
C
C
9
17
x4
x2
Pieces Diagram
Next attach ‘Piece 9’ (roof supports) with ‘C’ bolts, as shown
above highlighted in dark purple to locate placement.
Pieces Diagram
Take the assembled shelves from STEP 8 & attach onto the
walls of the enclosure.
The placement of the shelves are determined by the pre-drilled
holes in the timber. These holes are easier to indicate from the
outside of the enclosure. The shorter shelf ts onto the back
wall of the enclosure at a lower height than the rest.
.
Instructions
Note: Screw shelves from the outside.
A
A
A
A
A
A
A
A
A
A
16
15
15
15
15
Tip: Ensure that shelves are held rmly & ush with timber & then screw in.
15 x4
16
Step 10Step 9

8
Nd some help? Email us at [email protected] or phone 1300 440 453
Pieces Diagram
Yay, it’s the last step!
Attach the roof of the enclosure to the structure from STEP
5&6 with ‘A’ screws. Finally, x the roof brackets and roof
supports onto the roof with ‘A’ screws. Make sure brackets are
aligned with roof.
Instructions
10
7
10
A
10
7
7
A
A
A
AAA
A
A
A
A
A
A
A
A
A
AA
A
A
x2
You’re all done!
pawesome
Tip: Have someone apply pressure to the roof from outside when screwing brackets in place.
Step 11

9
Nd some help? Email us at sales@backyardcatenclosures.com.au or phone 1300 440 453
Nd some help? Email us at [email protected] or phone 1300 440 453
Yoshi & Loki
loving their Paws Playhouse!
9
*Once you have provided us with your images, we will provide you with a discount
code. Single transaction use only - not valid with any other offers. Item must be in
stock on our website. Photos must be high resolution and able to be shared online
as per our customer photo guide available on our website.
Send us a picture of
for use on any of our
cat accessories
Paws Playhouse
your cat in the
and get a 10%discount code
*
TM
9

11
Nd some help? Email us at sales@backyardcatenclosures.com.au or phone 1300 440 453
We are here for you!
Need some advice, having issues setting up
your enclosure or perhaps you have some
kitty questions? We’re happy to help!
Get in touch with us, call, live chat or email
us anytime!
Need a helping hand?
Backyardcatenclosures.com.au
sales@backyardcatenclosures.com.au
1300 440 453
™
Table of contents
Other Backyard Cat Enclosures Pet Care Product manuals
Popular Pet Care Product manuals by other brands

Dogtra
Dogtra 280NCP Tlatinum Series owner's manual

Nonin
Nonin LifeSense Vet LS1-10R Operator's manual

Sureguard
Sureguard ssScat Mat User instructions

K&H
K&H Travel Bike Backpack for Pet Assembly instructions

Petrainer
Petrainer PET910 Operation manual

Martin Sellier
Martin Sellier Dynavet Zone Protector manual