manuals.online logo
Brands
  1. Home
  2. •
  3. Brands
  4. •
  5. Bakfiets
  6. •
  7. Bicycle
  8. •
  9. Bakfiets Q-2 User manual

Bakfiets Q-2 User manual

Bakfiets
Q-2
Three wheel cargo bike assembly manual
1
2
3
4
5
6
7
8
9
10
11
12
13
14
15
16
17
18
19
20
21
23
24
1.Handle bar & grip 2. gear shift 3. brake lever 4.box 5.corner iron
6. front reflector
7.Front frame(bottom border)8.front wheel 9.front brake 10.fender
11.Bottom spacing pole 12.rear frame13.chain cover & chain
14.chainwheel and crank 15. Pedal
16.Rear wheel 17.rear fender 18. rear reflector 19.seat post lock 20.seat
post 21.saddle
22.Rubber band 23.carrier 24.LED light
1Connecting front frame and rear frame
front frame hole and put the bearing
Figure 1
Figure 2
Bottom spacing pole
Rear frame
damper
M8
&spacer
Front frame
(
bottom border
)
bearing
(7025)
bearing
(7024)
M18
cap nut
&
spacer
M8 cap nut & spacer
First let rear frame front axle insert to the
(
Note: Daub butter where Bearing
between them.
assembled).
After adjusting the postion,srew
the nut for fixing.
Assemble the damper on the two
sides of the frame as shown in
Figure 2.
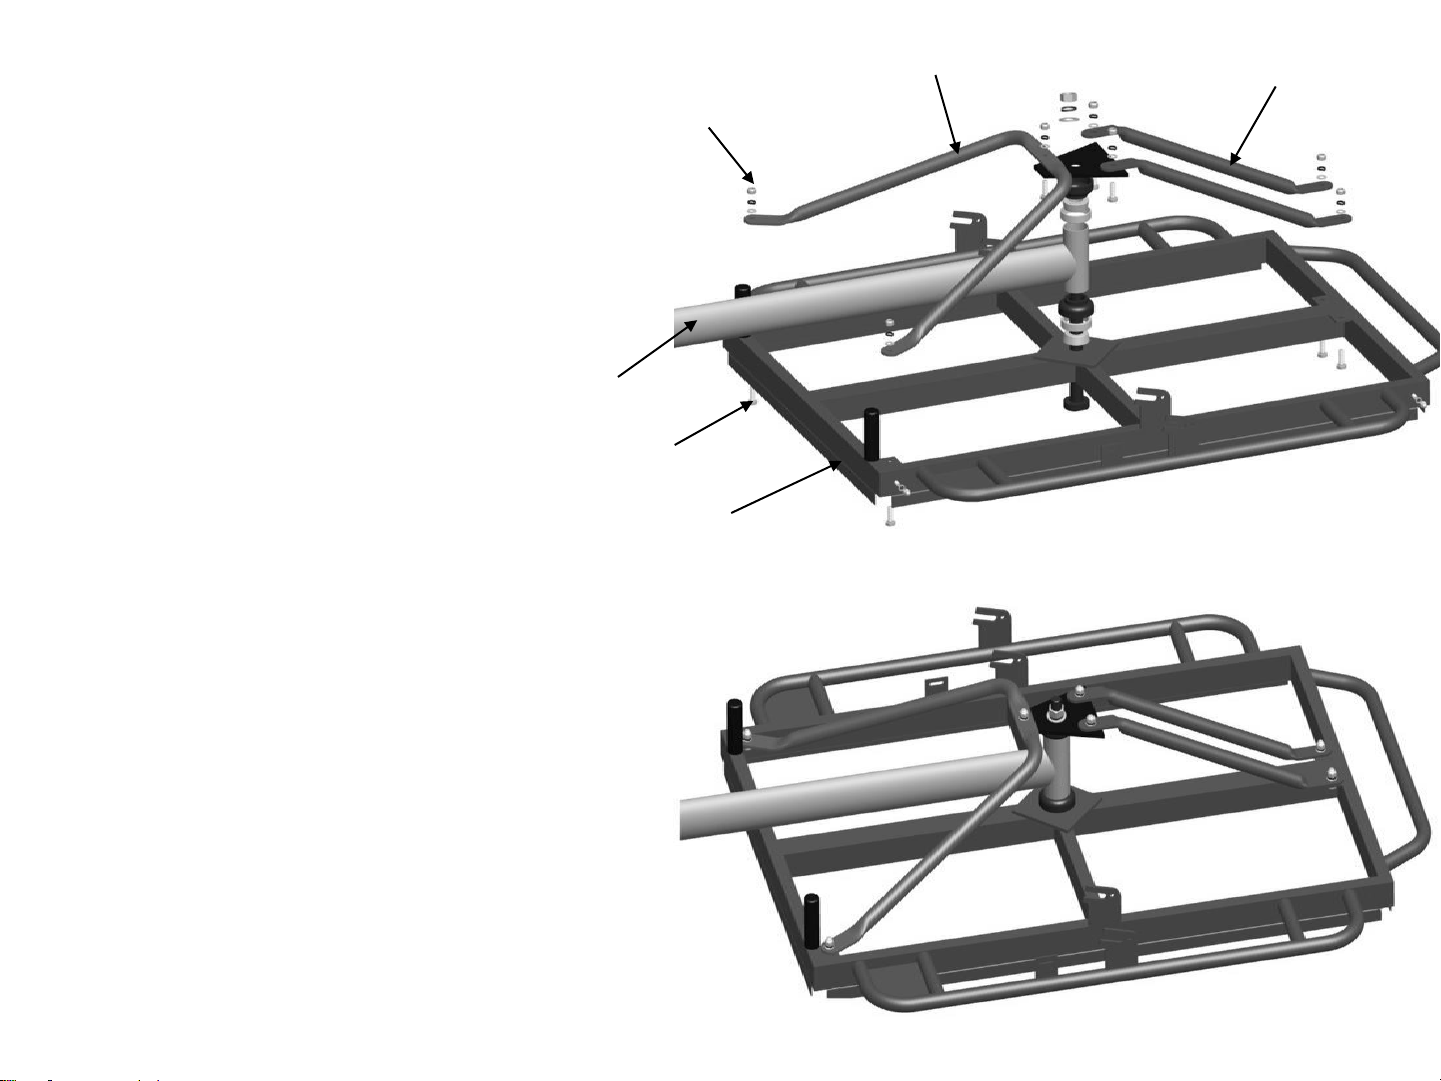
Second version,show in figure 3
and figure 4
Space all the parts as shown in
figure 3, and lock it; Note: keep the
knighthead and bottom border on
the same
level 。Rear frame
M8 bolt
Bottom
border
Figure 3
Figure 4
Bolt &spacer
knighthead
Knighthead
Figure 5
Figure 6
Figure 7
Figure 4 and Figure 5 the
wheel sets can be ignore.
nut
Safety
hook
Disc brake
bolt
spacer
Fender clip
2
.Assemble the wheel sets ,if use disc brake
Assemble the fenders on the front frame as shown in
Figure 3 and fix the fender clip.
Put the front wheels on the two sides of front
frame(bottom border) and use the safety hook and lock
nut for fixing.
Assemble the disc brake on the brake fixing plate and
lock it with screws and spacer as shown in Figure 4.
(
Figure 5
is finished.
)
Note
:
Disc brake spacer can be chosen use or not use
according to the distance between disc brake disc and
disc brake plate.
Brake disc & hub
b.When use the roller brake
Assemble the fenders on bottom border as shown in Figure 3 and fix the fender
clip. And then attach the roller brake onto the wheel hub with lock nut for fixing.
Put the front wheels on the two sides of front frame(bottom border) and fixing the
roller brake end at fixing space. Adjust the brake and lock it with brake lock nut.
C . Assemble the imitated roller brake
Fender
wheel
Roller brake
Roller brake fixing space
Lock nut
Brake lock nut
Adjust part
Figure 8
Bottom
border
Assemble the fenders on bottom border as shown in Figure5 and fix the fender
clip. And then attach the imitated roller brake onto the wheel hub with lock nut for
fixingn as shown in figure 9. Put the front wheels on the two sides of front
frame(bottom border) and fixing the imitated roller brake end at fixing space. Adjust
the brake and lock it with brake lock nut.
Imitated roller Figure 9
brake
Brake
fixing clip
fender
Brake lock nut
Bottome border
D . Assemble the V brake
Assemble the fenders on bottom border as shown in Figure5 and fix the fender
clip. Attach the V brake onto the V brake seat and lock it with V brake fixing
bolt, adjust the brake cable and fixing it.
Figure 10
e. Assemble drum brake
Wheel set
Bottom border
V
brake
V
brake fixing
bolt
V brake seat
Assemble the fenders on bottom border as shown in Figure 5 and fix the
fender clip. Put the two front wheel onto both sides of bottom border and
fix end of drum brake on the drum brake fixing space, lock it with the lock
nut and safety hook. Adjust the brake cable and lock it shown in figure 11
Wheel with drum brake
Figure 11
3.Assemble the box
Drum brake
fixing space
Bottom border
Safety hook
Lock nut
Assemble the front box onto the front frame (bottom border) as shown in
Figure 12 and Figure 9 with screw fixing. Fixing the safety belt and front
reflector on the box
4.Assemble handlebar
Normally use two kinds of handlebar according to customer’s request.
Figure 12
Figure 13
Figure
14
One bench
Two
benches
Angle
iron
Cap nut
Bolt spacer
Safety belt
Safety belt
Front
reflector
U- type handle bar assembly
Assembly the handle bar as below shown
in figure 6 and figure 7, adjust the height
and lock it.
If use below handlebar
Assembly the handle bar as below shown in figure 6 and figure 7, adjust the
height and lock it.
Figure 15
box
Gear shift
Brake lever
Brake lever
Brake cable
Gear cable
Handle bar
4.Saddle assembly
As shown in figure 10,Insert the seat post
into the saddle and lock it, and then put
another side of seat post insert into frame
seat tube and fixing the seat post lock.
Figure 16
Figure 17
Brake lever
Brake cable
Gear cable
Gear shift
Cap nut and
spacer
bolt
Handle bar
(Note:Safety line must be under the seat
post lock. )
图
18
saddle
Seat post
seat post lock
Frame seat tube

Other Bakfiets Bicycle manuals

Bakfiets Q-3 User manual

Bakfiets

Bakfiets Q-3 User manual

Bakfiets Q-4 T-BOX User manual

Bakfiets

Bakfiets Q-4 T-BOX User manual

Popular Bicycle manuals by other brands

PROPAIN Dreckspatz Owner's manual & assembly instructions

PROPAIN

PROPAIN Dreckspatz Owner's manual & assembly instructions

Scott HIGH OCTANE FR owner's manual

Scott

Scott HIGH OCTANE FR owner's manual

Nexange MB-600 user guide

Nexange

Nexange MB-600 user guide

Tout Terrain bicycle user manual

Tout Terrain

Tout Terrain bicycle user manual

Radio Flyer 421 manual

Radio Flyer

Radio Flyer 421 manual

SmartTrike 607 manual

SmartTrike

SmartTrike 607 manual

MYATU 4143 user manual

MYATU

MYATU 4143 user manual

ISLABIKES elcons eJimi owner's manual

ISLABIKES

ISLABIKES elcons eJimi owner's manual

Trek 2023 FX+ Service manual

Trek

Trek 2023 FX+ Service manual

Pitster Pro XJ-E user manual

Pitster Pro

Pitster Pro XJ-E user manual

wayscral Everyway E-350 Original guide

wayscral

wayscral Everyway E-350 Original guide

Trek Lync Supplement manual

Trek

Trek Lync Supplement manual

URBANGLIDE M1 user manual

URBANGLIDE

URBANGLIDE M1 user manual

Agogs Tracer user guide

Agogs

Agogs Tracer user guide

TerraTrike GranTourismo Build Notes

TerraTrike

TerraTrike GranTourismo Build Notes

DAHON JACK - 2009 manual

DAHON

DAHON JACK - 2009 manual

Cervélo S5 2023 Assembly manual

Cervélo

Cervélo S5 2023 Assembly manual

Klever Y Gala 45 user manual

Klever

Klever Y Gala 45 user manual

manuals.online logo
manuals.online logoBrands
  • About & Mission
  • Contact us
  • Privacy Policy
  • Terms and Conditions

Copyright 2025 Manuals.Online. All Rights Reserved.