B&K CK1.1 Owner's manual

B&K Components, Ltd.
Programming Manual
CK1.1 Keypad
Single Gang Learning Keypad
REV A 1005
SBIMPLY ETTER!
BK&

GUIDE TOPROGRAMMING THE B&K CK1.1 KEYPAD
© 2005 B&K Components Ltd. All rights reserved.
The information in this manual is copyright protected. No part of this manual may be copied or reproduced in any
form without prior written consent from B&K Components,Ltd.
B&K Components Ltd. SHALL NOT BE LIABLE FOR OPERATIONAL,TECHNICAL OR EDITORIAL ERRORS/OMIS-
SIONS MADE INTHIS MANUAL.
The information in this manual may be subject to change without prior notice.
SIMPLY BETTER is a registered trademark of B&K Components,Ltd. All other brand or product names are trade-
marks or registered trademarks of their respective companies or organizations.
B&K Components,Ltd.sells its products through authorized dealers.Buying from an authorized B&K Components,
Ltd.dealer insures that you have a FACTORYWARRANTY on your B&K Components, Ltd.product.A warranty on
B&K Components,Ltd. products is NOTVALID if the products have been purchased from an unauthorized dealer or
an E-tailer or if the factory serial number has been removed, defaced or replaced in any way.
B & K Components, Ltd.
2100 Old Union Road
Buffalo, New York 14227
1.800.543.5252 In NY: 716.656.0026
Fax: 716.656.1291
E-mail: [email protected]
www.bkcomp.com
SBIMPLY ETTER!
BK&

BEFORE YOU START 1
ReadThis First! 1
You Need a Personal ComputerWith Serial Port 1
CloseALLApplicationsThat Use Serial Ports - Use B&KTask Manager! 1
You Need an RS-232 Connecting Cable &AdaptersAs Necessary 1
KeepYour Database Up to Date — USE LIVE UPDATE 1
CK1.1 Single Gang Keypad 2
ProgrammingTips and ideas 2
CK1.1 Programming Overview 3
Start with a New File,Existing File on PC or in an Installed Keypad 3
Use the Program Menu In Order 3
Determine Device Layout for the CK1.1 3
Use SAVEAS to Name and Save First! 4
Save or ExportYourWork 4
Download to Each Keypad 4
The ProgrammingWindow 5
The Menu Bar and the Menus 6
File Menu 6
Program Menu 6
Communications Menu 7
Help Menu 7
TheToolbar and Shortcut Buttons 7
The Simulator and the Hidden Hard Buttons 8
Navigating and Selecting Buttons 8
Button Capabilities and Flags 8
TreeView 9
Devices and Pages 9
The Edit and Label ButtonsWindow 10
The Edit and Label ButtonsToolbar 10
i
Table of Contents
SB
IMPLY ETTER!
BK
&
T
H
E
B
&
K
A
U
T
O
M
A
T
E
D
H
O
U
S
E

The DeleteWindow 11
Labels 11
Shortcuts - Copying Buttons 11
The Macro/FavoriteWindow 12
The MacroToolbar 12
Re-Ordering Macro Steps 12
Macro Details 12
Step 1 - Creating,Naming and Arranging Devices 13
Open the Create and Name DevicesWindow 13
Creating Devices 13
Using the IR Database 15
Discrete Codes andToggles 15
Selecting a Code Set from the Database 15
Hidden Codes in Keypad Database 17
ShortcuttingTo Hidden Codes and Other Device IR commands 17
Testing 18
Downloading toTEST Pre-Programmed IR Commands FromThe Database 18
Preparing the List of Buttons to be Learned 18
Using LCD Button Editor 19
Labeling and Deleting Buttons 19
CK1.2 LCD Button Editor 19
CK1.1 LCD Button Editor 20
Dragging and Dropping Buttons 21
Hiding Pages 21
MovingThrough Pages In Favorites 21
Shortcuts - Copying Existing Buttons 21
LearningTips 22
Learning IR Codes One at aTime 22
Learning a Batch of Buttons Efficiently 23
ii Table of Contents
SBIMPLY ETTER!
BK&
U
S
I
N
G
C
K
E
D
I
T
O
R
T
O
P
R
O
G
R
A
M

Download andTest All Learned Buttons 24
Copying and Pasting Devices 24
Importing and Exporting Devices 25
Importing Step by Step 25
Macro Programming 26
What is a Macro? 26
What Buttons Can Playback a Macro? 26
Discrete IR Codes vsToggle IR Codes 26
Toggle Commands create“Point & Pray” Macros 27
FindingWorkarounds forToggle Commands in Macros 27
Programming the Power On Macro 28
Programming a Power Off Macro 32
Programming Activity Macros on MAIN LCD “Device” Buttons 33
Programming FAVORITE Macros 34
Inserting Macros (Copying or Cloning a Macro) 35
Programming PunchThrough 36
Backlight OnTime 37
Downloading to CK1.1 or CK1.2 Keypad 38
Download Failures 39
Uploading from the Keypad to the PC 39
Push and Hold Macros 40
Push and Hold forActivity Macros andTap to Switch Devices 40
Two Functions on One LCD Button 40
Disabling the IR Sensor 40
Frequently Asked Questions: 41
Ways to conserve space,and get the most out of your CK1.1 Keypad! 42
Controlling the CK1.1Via RS-232 From the B&KCT Receiver or an Automation
System 43
RS--232 Overview 43
iii
Table of Contents
SB
IMPLY ETTER!
BK
&
T
H
E
B
&
K
A
U
T
O
M
A
T
E
D
H
O
U
S
E

Examples of RS-232 Macros 43
Purpose of Keypad ID Numbers 44
Displaying text on CK1.1 Keypad 44
ID# FF(255) is the Global Default 45
Resetting Keypad Unit ID 45
Sending MessagesTo A CK1.1Via RS-232 45
Need for Delay Between Messages 45
Enter Keypad ID# In Hexadecimal 46
Device Number Mapping 46
Button Number Mapping for CK1.1 46
INDEX 47
iv Table of Contents
SBIMPLY ETTER!
BK&
U
S
I
N
G
C
K
E
D
I
T
O
R
T
O
P
R
O
G
R
A
M

ReadThis First!
You Need a Personal ComputerWith Serial Port
CKEditor will run on any Pentium II or fasterWindows PC. Your PC should be equipped with an adequate amount
of RAM for the operating system you use. CKEditor is compatible with theWindows 98,ME,2000, XP and XP Pro
operating systems.It is not compatible withWindows 95 or previous versions of windows. Note that many modern
laptops do not come equipped with a serial port. If there is no serial port, purchase a USB to Serial adapter.
Although many manufacturers supply adapters or hubs for this purpose, we can vouch for the
operation of Belkin and Keyspan hubs and adapters.
CKEditor is installed via a self extracting installer file downloadable from www.bkcomp.com. You need a connection
to the internet to download the file or to update CKEditor.
Close ALL ApplicationsThat Use Serial Ports - Use B&KTask Manager!
Although you may be using an adapter with multiple serial ports (or your PC may
be equipped with more than one),don’t use more than one at a time.Doing so
will overtask many system’s resources and cause errors and problems. B&K’sTask
Manager will only open CKEditor after you have closed BKcSuite or SR10.1 Remote Editor (and vice versa).
However,you must manually close such programs as Hotsync for the Palm Pilot and LapLink if they are running (right
click on any icons in the windows task bar representing these programs and exit them).
You Need an RS-232 Connecting Cable &Adapters As Necessary
B&K include a pre-made cable suitable for connecting a Serial port to the CK1.1 keypad.However, if this is lost or
misplaced here is the pin configuration for a serial cable:
DB 9 DB25 Function Stereo 3.5mm Plug Connection
Pin 3 Pin 2 HostTransmit ToTip
Pin 2 Pin 3 Host Receive To Middle Ring
Pin 5 Pin 7 Host Ground To Base Ring
KeepYour Database Up to Date — USE LIVE UPDATE
CKEditor includes a vast library of IRcodes for hundreds of brands and models ofA/V components.This database is
constantly growing with the inclusion of new devices every month. Keep your software up to date by using the Live
Update feature. Rather than un-installing and re-installing the software,you download updates to the software from
the internet.Simply follow these steps:
1 Connect to the Internet normally.
2 Open CKEditor
3 From the Help Menu, select Live Update
4 In the Live Update window,click on Update Now.
5 Wait for the window to indicate the download is
completed.Close theWindow.
6 Close and re-open CKeditor. You do not need to restartWindows.
1
BeforeYou Start
SB
IMPLY ETTER!
BK
&
T
H
E
B
&
K
A
U
T
O
M
A
T
E
D
H
O
U
S
E

CK1.1 Single Gang Keypad
The CK1.1 single gang keypad is a versatile and user friendly solution for whole house or home theater integration.
The CK1.1 can operate as a stand alone keypad or can be combined to operate in conjunction with CK1.2 Keypads
in any system. Up to 20 IR commands or macros can be programmed onto the four‘main’ pages provided by the
CK1.1. Five‘hard’ buttons provide control for volume and power. This will allow for simple zone or source control
from any room in the house. Additionally the CK1.1 provides an IR sensor on the front panel that will pass IR com-
mands from a remote control in the zone. Status feedback will display on the bottom most text line on the keypad
LCD. This feedback can be triggered to show the zone’s current volume,source,tuner station, bass,treble and loud-
ness levels.
The back panel provides two RJ-45 connectors,one master input and one slave output. The back panel also provides
an IR output for local IRcontrol directly from the keypad.
Two faceplate covers are provided with each CK1.1 keypad,white and beige. A primed paintable faceplate is available
from B&K.
ProgrammingTips and ideas
Programming the CK1.1 Keypad is based around concept of programming the CK1.2 Keypad. Most of the func-
tions and features that are available to the CK1.2 are also available to the CK1.1,however there are some excep-
tions. The main idea that should be stressed is to use the CK1.2 keypad editor portion as a "virtual scratchpad", or a
"junction" for the CK1.1 Keypad. All macros,learned functions,and/or all device commands must be created/record-
ed on the CK1.2 Keypad simulator. The functions are then“dragged” over to the image of the CK1.1. The same idea
also applies to the .ccf browser, when importing learned pronto hex codes. When saving files,no distinction is made
between CK1.2 files and CK1.1 files (all files carry the .mxf extension). Be sure to label the saved files appropriately.
2Overview
U
S
I
N
G
C
K
E
D
I
T
O
R
T
O
P
R
O
G
R
A
M
FRONT PANEL REAR PANEL

CK1.1 Programming Overview
Start with a New File,Existing File on PC or in an Installed Keypad
To start from scratch on a new job,go to the File Menu,choose New from the File Menu and pick the type of tem-
plate you would like to use to program with. The B&K Default file has CT Receiver specific IRcommands pre-loaded
in.This is particularly useful for testing operation before any programming has begun.Typically,it is easiest to start
with an empty configuration. You can choose between a default CK1.1,default CK1.2 or Empty.
Load all devices onto the CK1.2 keypad simulator. For example, on the first "Main" page, create buttons for all
devices that you wish to control.This should include theA/V Receiver and/or any source gear to be controlled. All
devices or commands must be created on the CK1.2 simulator before being dragged over the CK1.1 simulator.
Program IR control for each device onto the CK1.2 simulator using the IR database/learning feature,etc. Learning
can be done through the CK1.1 or the CK1.2 IR eye. Create any macros you want displayed on the CK1.1 Keypad
on the CK1.2 simulator.
Finally,drag and drop commands/macros that you wish to display on the CK1.1. Keep in mind that there are a total
of 20 available “soft” buttons,and 5 “hard” buttons on the CK1.1 Keypad to program. Only drag and drop the most
important source control commands.
Use the Program Menu In Order
The Program Menu is your lifeline to a fast,easy programming experience.Simply start at
step one and work your way down the list. If you find yourself lost at any time, come
back to this menu to re-organize your thoughts.
Determine Device Layout for the CK1.1
Once the CK editor is installed,open the CKEditor and go to Program step #1,Create and Name Devices
(described in detail on the following pages).Create the names for the devices that will be used in the program. This
window is also known as the LCD button editor.
3
Type in SectionTitle
SBIMPLY ETTER!
BK&
T
H
E
B
&
K
A
U
T
O
M
A
T
E
D
H
O
U
S
E
Programming Overview
Source Devices Created
In this example, the devices
correspond to the sources
being used in the CT system.
This master file will be used as
a starting point for every key-
pad.In the empty device spots
you may insert devices for local
TV’s etc.
In this example, all source con-
trol has been assigned to the
first page. The B&K IR code
set ID has been assigned to the
second page.
Use SAVEAS to Name and Save First!
Utilize Save As to make a new file with a new file name. Use the concept of a template to save time in the on
future projects. A template file is simply a configuration file that you have preprogrammed to be used later on. All
files are saved with the file extension .mxf; all exported device files are saved with the extension .mxd. Be sure to
label your files appropriately. The CKEditor does not make any distinction between keypads or remotes.
Save or ExportYourWork
Archive and save your customer files. In addition,you can export devices as .mxd files. Programming systems with
similar components gets even faster when you don’t have to redo your work over and over. You have your own ideas
about what buttons should be labeled and how they should be arranged. You’ll save all of your work in a unique and
time saving way by exporting the device stand alone.That way, you can import just the device in any new configuration.
Download to Each Keypad
Each keypad needs to have its program downloaded to it separately. If programming multiple keypads in a daisy
chain,be sure to program the first keypad in the chain first,and then the second so on. Otherwise error messages
will appear on the keypad screen.
4Type in SectionTitle
SBIMPLY ETTER!
BK&
U
S
I
N
G
C
K
E
D
I
T
O
R
T
O
P
R
O
G
R
A
M
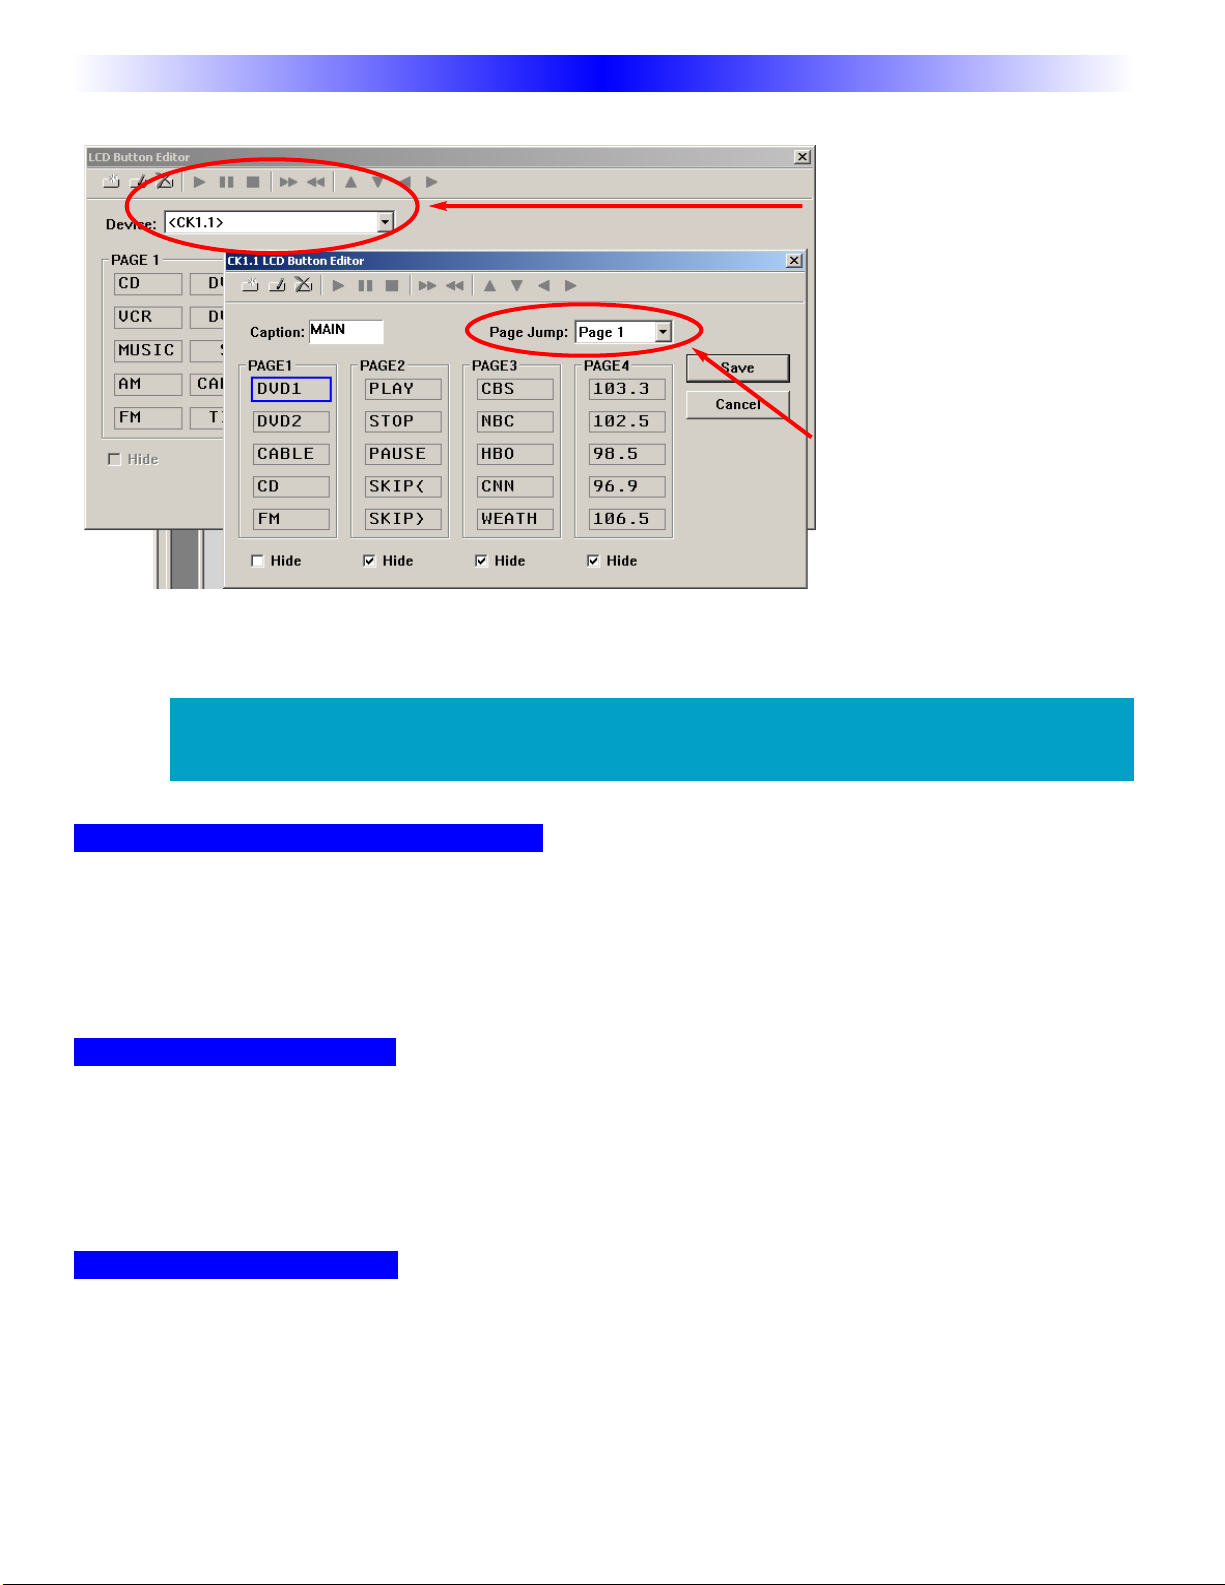
Programming Overview
Adding Control
By clicking the <CK1.1>
selection at the bottom of the
device drop down,you are
able to create buttons directly
onto the CK1.1
In this example, source but-
tons have been created for
the first page. Source buttons
have been created on the
remaining pages. Jump com-
mands can be added to any
button. The jump commands
will execute as the last step of
a macro or after a single hit IR command. Pages can be hidden while still allowing page jumps to bring you
to any page. Commands for each button must be dragged and dropped onto the CK1.1 Keypad simulator.
See next page.
As there is no concept of "Devices" in the CK1.1 keypad,all commands must be
placed on the one of the four main pages.

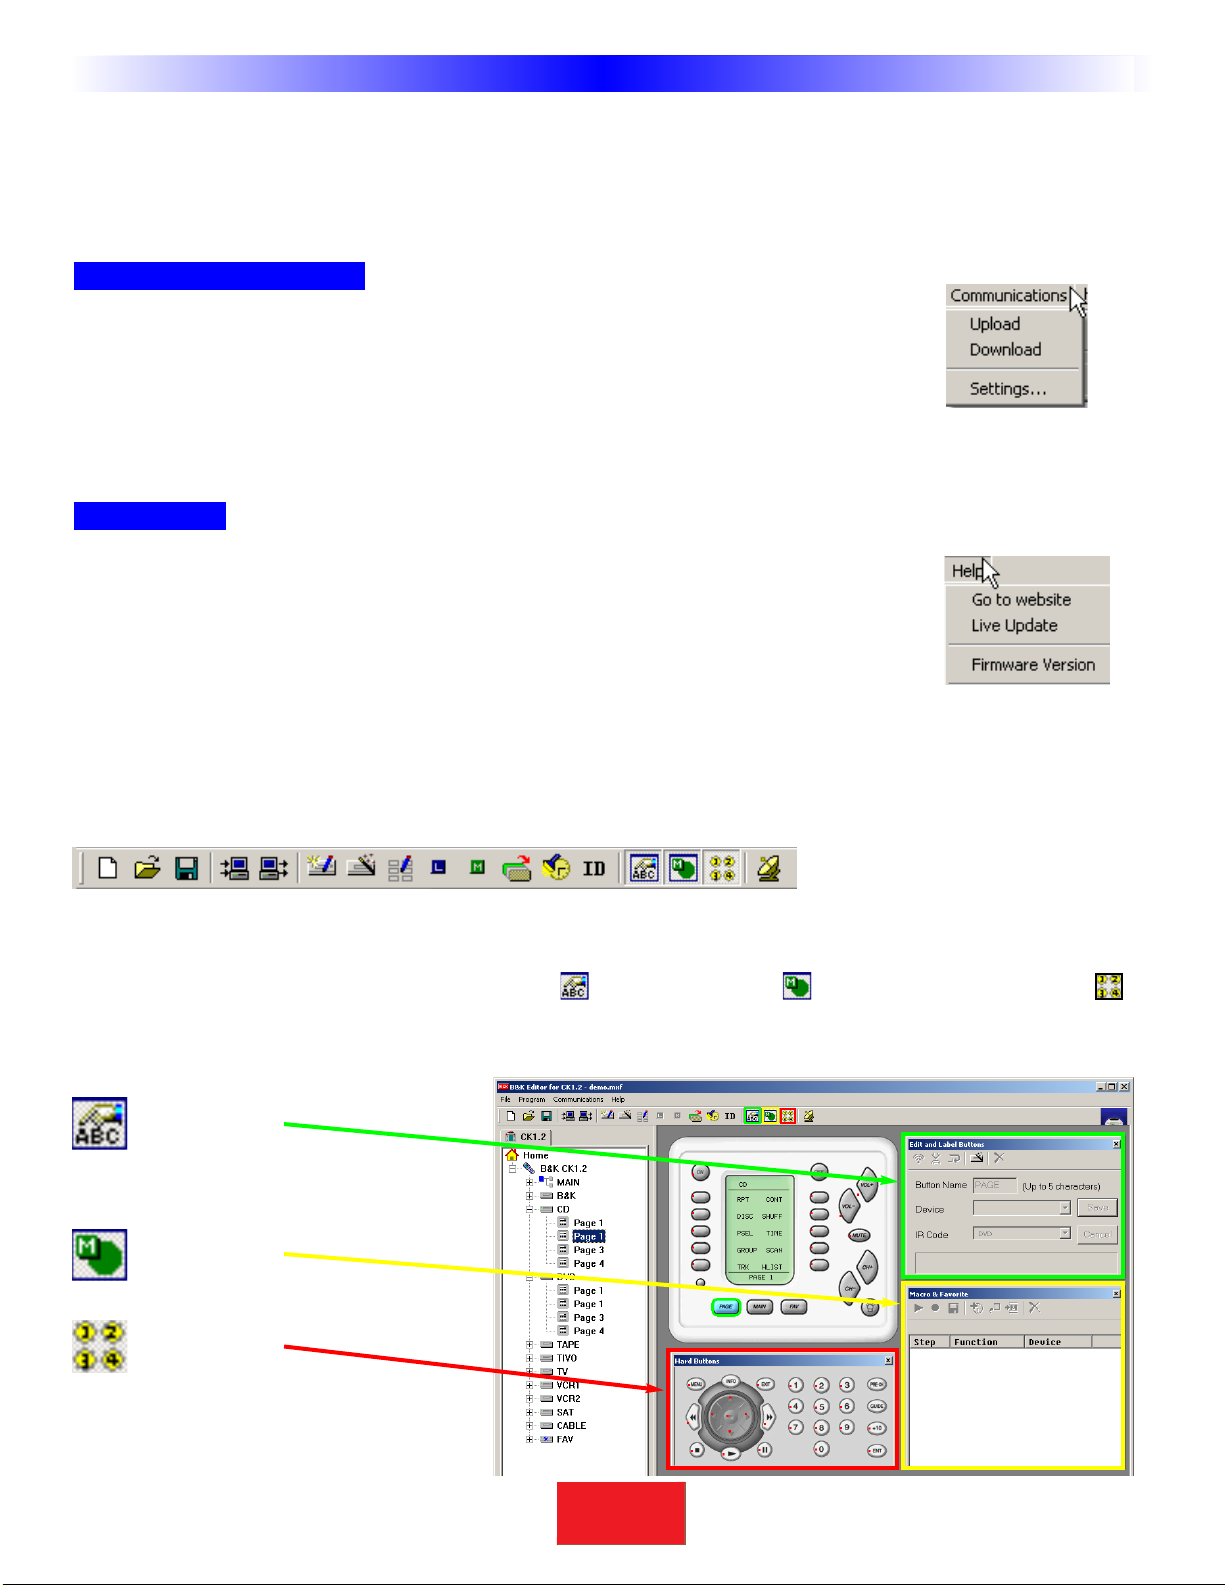
The ProgrammingWindow
Menus and Shortcut buttons for common tasks. The Program Menu activates each task in the correct order.
The simulated view of the CK1.1 Keypad configuration. This view allows the programmer to drag and drop
information onto the CK1.1 keypad. There is also a tab here for the CK1.2 drop down tree.
The CK1.2 Keypad Simulator is used to navigate,select a button to learn to, create shortcuts or edit or
record a macro. Commands, macros and learned information will be created here,then moved to the CK1.1
simulator.
Edit and Label Buttons window is used to label buttons and move IR commands via shortcuts.
The Macro and Favorite window is used to view and edit macros.
The Hard Button window displays“Phantom” buttons that are useful for storing commands to be utilized in
macros.
The important thing to remember as you program is that mostWindows conventions hold true in CKEditor. Explore
the program menus.Hover your mouse over most of the buttons and controls and a balloon will appear with a hint
as to purpose.Navigate around the program window and explore a little before you begin programming.
5
SBIMPLY ETTER!
BK&
T
H
E
B
&
K
A
U
T
O
M
A
T
E
D
H
O
U
S
E
Windows, Menus,Tools and Definitions
A
BCD
E
F
A
B
C
D
E
F
The Menu Bar and the Menus
Like allWindows programs, the menu bar reveals menus of commonly used tasks. Simply click on the menu title and
the menu appears.Move the mouse cursor over the menu choice you wish to select and click.
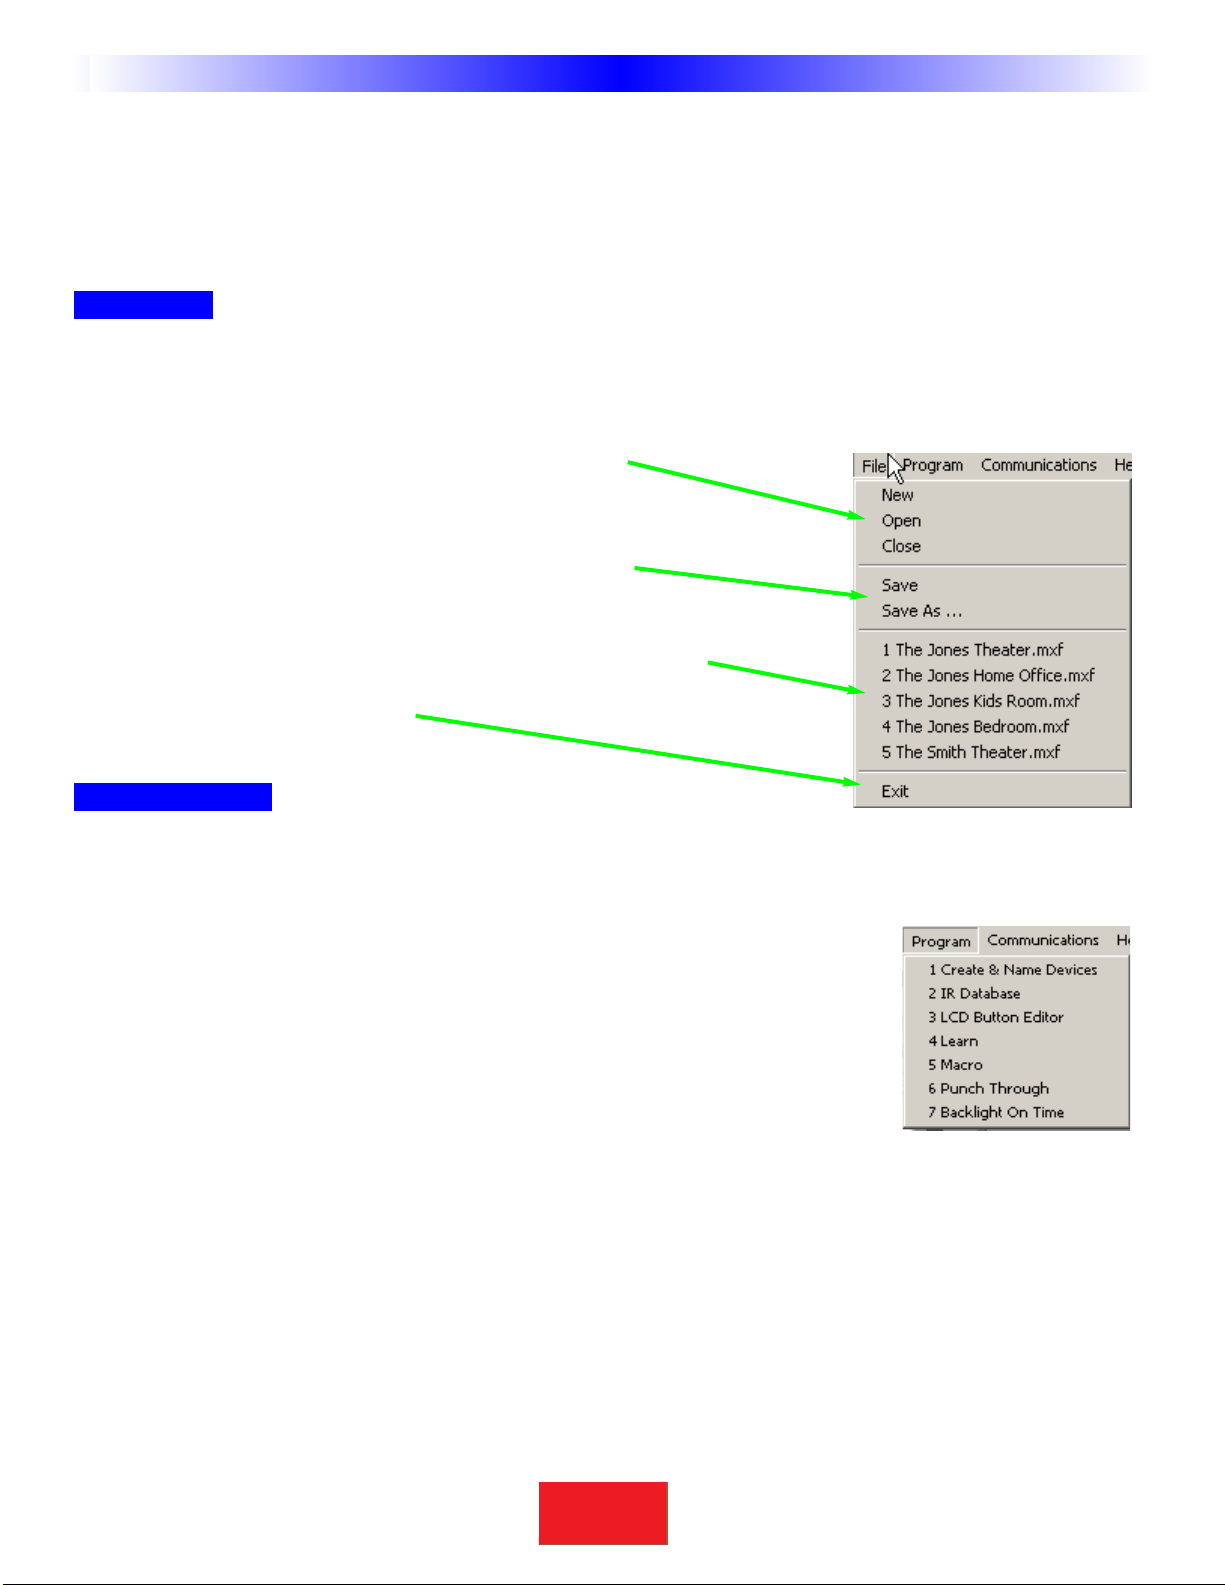
File Menu
Configurations for particular clients are saved as files on your PC.Thus the file menu enables you to open, save and
save copies of configurations.
New - Use this to start programming a file from scratch.
Open - Use this to open a file anywhere on your computer.
Close - Closes only the current file, not CKEditor.
Save - If you wish to save your work to the current file.
Save As - If you wish to save a new copy of the current file
with a new file name.
Recently opened files appear here for you to reopen with a click.
Exit -To exit CKEditor completely.
Program Menu
Many of the Program Menu steps will open a new window in front of the main window. Simply click on Cancel to
close these windows if you open them in the course of exploring CKEditor.
1. Create & Name Devices - Opens a new floating window for creating and
naming Devices. You’ll need a grouping of IR commands for each source that is going to be
controlled from the keypad. This is called a Device. With the Create & Name Devices win-
dow, you will be able to create,name,and rearrange device commands.
2. IR Database - Opens a new window to test and program IR code sets from the B&K
IR database.
3. LCD Button Editor - Opens a new window that allows you to arrange, label and program the LCD buttons for
MAIN pages,Device pages and Favorite pages.Device and Favorite pages are not supported on the CK1.1 Keypad.
4. Learn - Grayed out until you select a button. Once you have selected a button, selecting LEARN on the
Programming Menu activates the LEARNING function (which is a button on the Edit and Label buttons window) on
whatever button is currently selected.
5. Macro -This menu choice is grayed out until you select a button capable of being programmed with a macro
(Power On,Power Off or an LCD button only).Once you have selected a button, selecting Macro activates the
MACRO recorder.Now,use the CK1.2 Keypad Simulator to select each step of your macro. The recorded steps
appear in the Macro window.
6
SBIMPLY ETTER!
BK&
U
S
I
N
G
C
K
E
D
I
T
O
R
T
O
P
R
O
G
R
A
M
Windows, Menus,Tools and Definitions
7
SBIMPLY ETTER!
BK&
T
H
E
B
&
K
A
U
T
O
M
A
T
E
D
H
O
U
S
E
6. PunchThrough - Opens a floating window that enables you to program a button to“punch through” to
another device.Typically used to programVolume Up,Down and Mute to always operate the surround sound
receiver/preamp.
7. Backlight OnTime - Opens a new window for adjusting the amount of time the backlighting will stay on.
Communications Menu
Upload - Get the programming from a keypad and open it in CKEditor as a new file.Once it is
uploaded,you can save it,edit it and/or export the devices in it.
Download - Send the currently open file to the keypad.
Settings - Choose a different com port for the cable connecting the keypad to your computer.
Help Menu
Go to website - This will open your internet browser,connect to the internet and link you to
the B & K website for additional technical support and resources.
Live Update - Click on this after connecting to the Internet to download the newest version
of CKEditor.
FirmwareVersion - Connect your keypad to the PC and click on this to identify the firmware version of the key-
pad when asked to do so by technical support.
TheToolbar and Shortcut Buttons
Hover your mouse over the Shortcut buttons,you will see a popup flag displaying the function of the shortcut. Click
on the button to activate it. The most common functions of the menus are displayed on the toolbar, plus the two
icons for displaying the Edit & Label ButtonsWindow ,the MacroWindow and the Hard Buttons window .
When you click on these shortcut buttons you turn the corresponding windows display on and off.
Windows, Menus,Tools and Definitions
Edit and Label
Buttons
Macro &
Favorites
Hard Buttons
(Phantom)
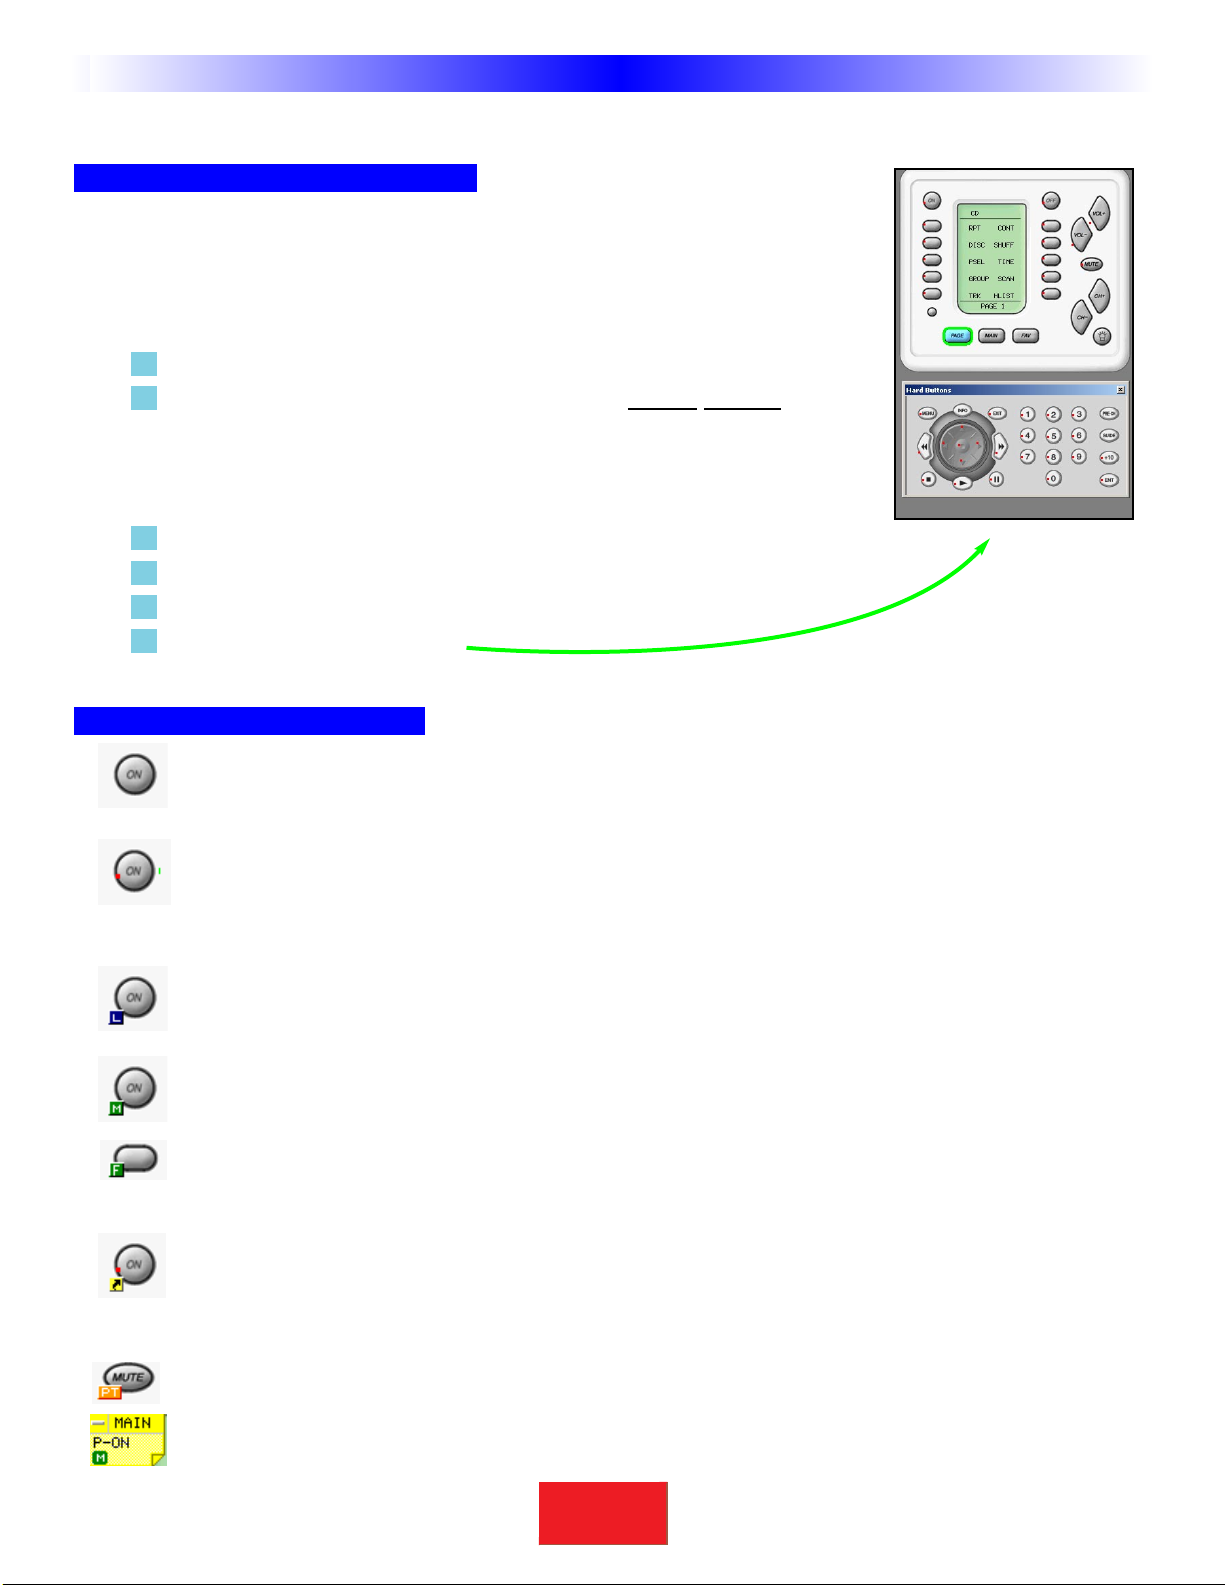
The Simulator and the Hidden Hard Buttons
Navigating and Selecting Buttons
This is the center of programming. Click on a button to SELECT it for programming.
When a button is SELECTED it has a green circle around it.Once a button is
SELECTED, you can use the Edit and Label ButtonsWindow or the MacroWindow
to program it.
1 When you want to switch to a new device, first, click on the MAIN button.
2 Choose the new device from the MAINMENU by double clicking on it.
On a real CK1.2 Keypad,the double click is not necessary.But within the
CKEditor you sometimes will want to program an LCD button on the MAIN
page and single clicking the button enables you to select it for editing or
macro programming.
3 Cycle through Pages 1 to 4 of any device by clicking on the PAGE button.
4 Navigate to the FAV device by clicking on the FAV button.
5 Hover your mouse over a button to see the drag and drop flag.
6 Click on a button to SELECT it.
Button Capabilities and Flags
A button with no flag will not do anything when pressed. It is empty and has no programming.
A red dot indicates that the button is programmed with an IR database code. An IR database code can be
tapped or pressed and held for a sustained burst. All buttons except the hard buttons within the MAIN
or FAV devices can be programmed with IR database codes (you cannot program the navigation buttons-
PAGE,MAIN or FAV either) .
An L flag indicates that the button is programmed with a learned IR code. A learned code can be tapped
or pressed and held for a sustained burst. All buttons can be programmed with learned codes (including
all MAIN buttons,hard and LCD) except the buttons on FAV pages and the navigation buttons themselves.
An M or F flag indicates that the button is programmed with a Macro (the F flag indicates the Macro is on
one of the Favorites pages).Only the LCD buttons buttons can be programmed with MACROS. Hard but-
tons cannot be programmed with MACROS directly (they can issue a macro, if you program the macro on
an LCD button and create a shortcut from the hard button to the LCD button). A macro with a single
step cannot be pressed and held for a sustained burst.The CK1.1 does not support macros on the hard
power ON or OFF buttons.
A black arrow on yellow indicates that the button is programmed with a shortcut to another button. A
shortcut programs the button to do whatever is programmed on the button the shortcut points to (thus
if a shortcut points to a learned or preprogrammed code,the button can be pressed and held for a sus-
tained burst;macros cannot be executed with a shortcut). FAV buttons cannot be programmed with
shortcuts.
A PT flag indicates that the button is programmed to “PunchThrough” to another device.
The drag and drop flag appears when you hover your mouse over a button. It will reveal the device and
the button label plus indicators for pre-programmed,learned,etc.
8
SBIMPLY ETTER!
BK&
U
S
I
N
G
C
K
E
D
I
T
O
R
T
O
P
R
O
G
R
A
M
Windows, Menus,Tools and Definitions
TreeView
Devices and Pages
TreeView controls what you see in the CK1.2 simulator. It serves as the quickest way to navigate (especially when
programming macros) and enables you to cut, copy and delete devices and/or pages via the right click context
menus.
A Page refers to a group of ten LCDbuttons,five on a CK1.1.This does not include hard buttons in the same device.
A Device is comprised of up to four pages of LCD buttons and one set of functions for the hard buttons. CK1.1
does not support devices.
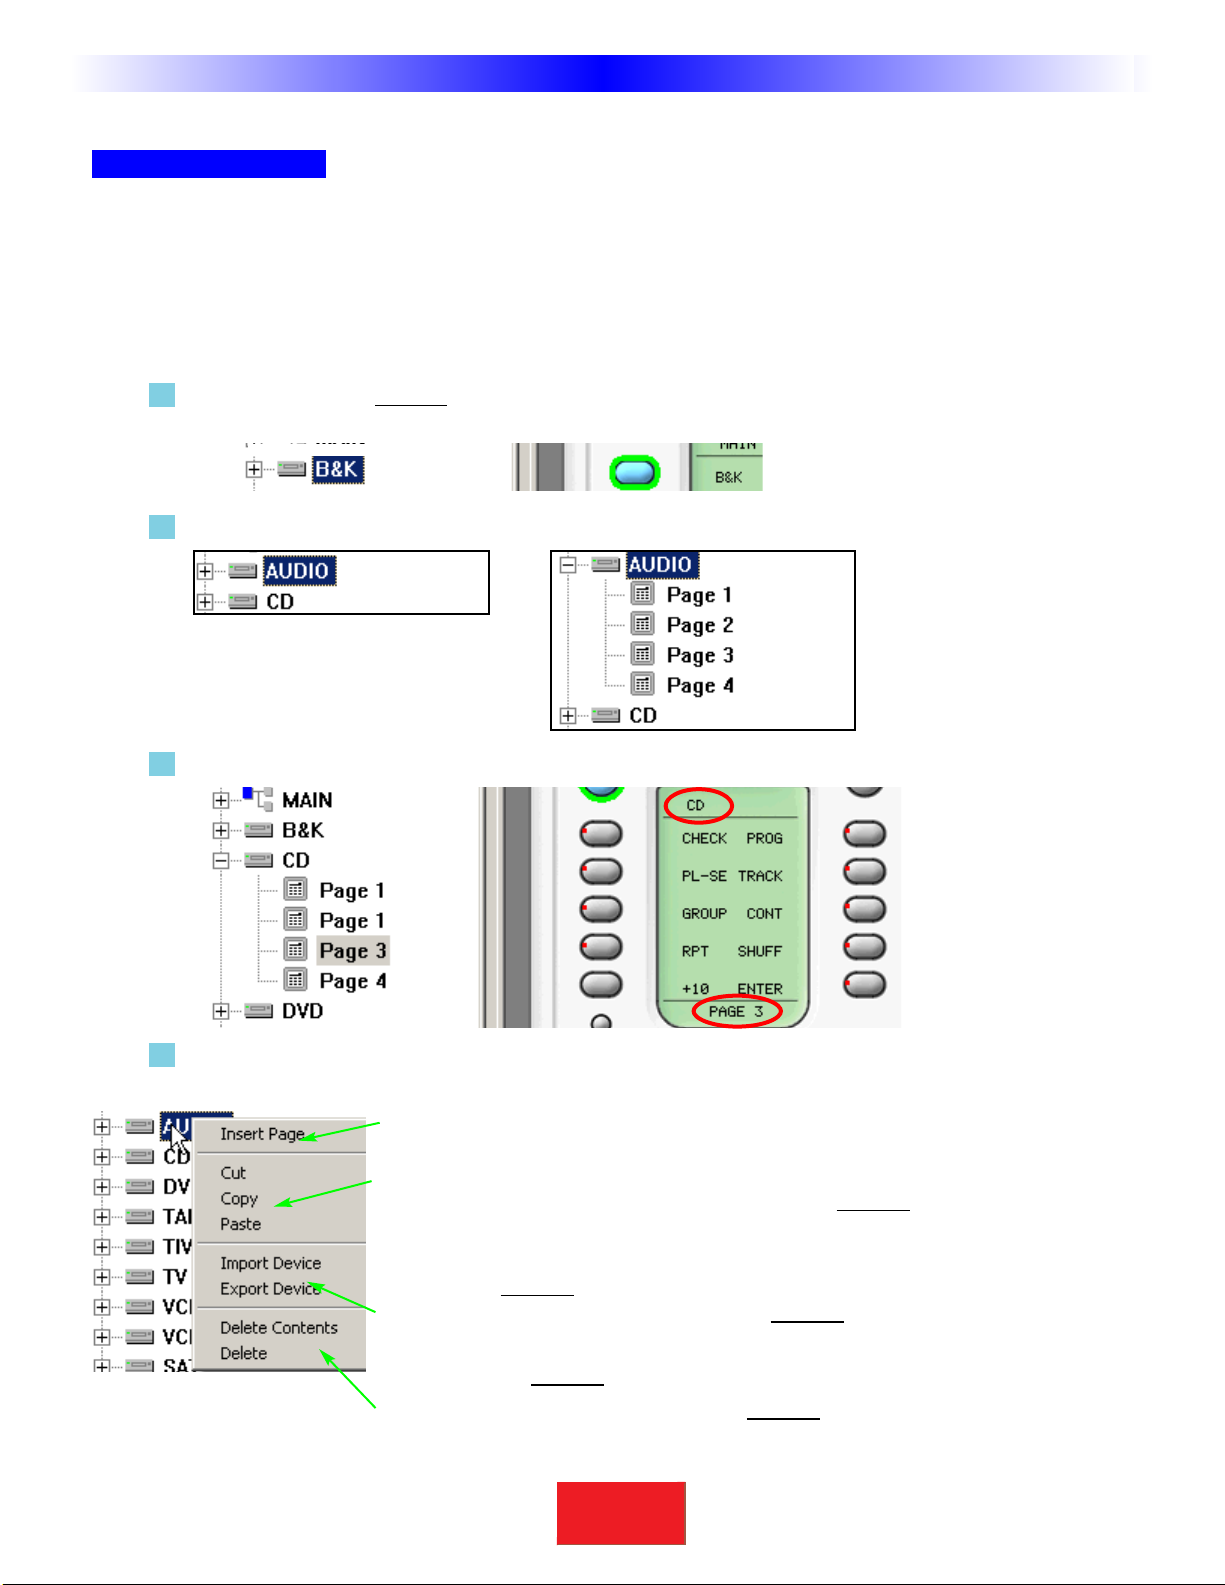
Click on a device to SELECT it (the highlighting indicates it is selected) and the corresponding MAIN LCD
button (the green circle indicates that a button is selected).
Double Click on a device to expand or collapse your view of its pages (or you can single click on the +/-).
A single click on a page inTreeView will change the SIMULATOR to the selected PAGE and DEVICE.
Right click on a device to reveal the Device Context Menu:
Insert Page will insert an additional page to the device (to a maximum of 4).
Cut will copy the entire device and when pasted will delete the original.
Copy will copy the entire device without changing the original.
Paste will paste the copied or cut device into the selected device,completely
replacing whatever previous programming you had.
Import Device will enable you to import a device you have previously exported,
replacing the selected device.
Export Device will allow you to save the selected device for future import.
Delete Contents will delete all labels and codes but not the pages of a device or
the name of the selected device.
Delete will delete everything about the selected device.
9
SBIMPLY ETTER!
BK&
T
H
E
B
&
K
A
U
T
O
M
A
T
E
D
H
O
U
S
E
Windows, Menus,Tools and Definitions
Collapsed Expanded
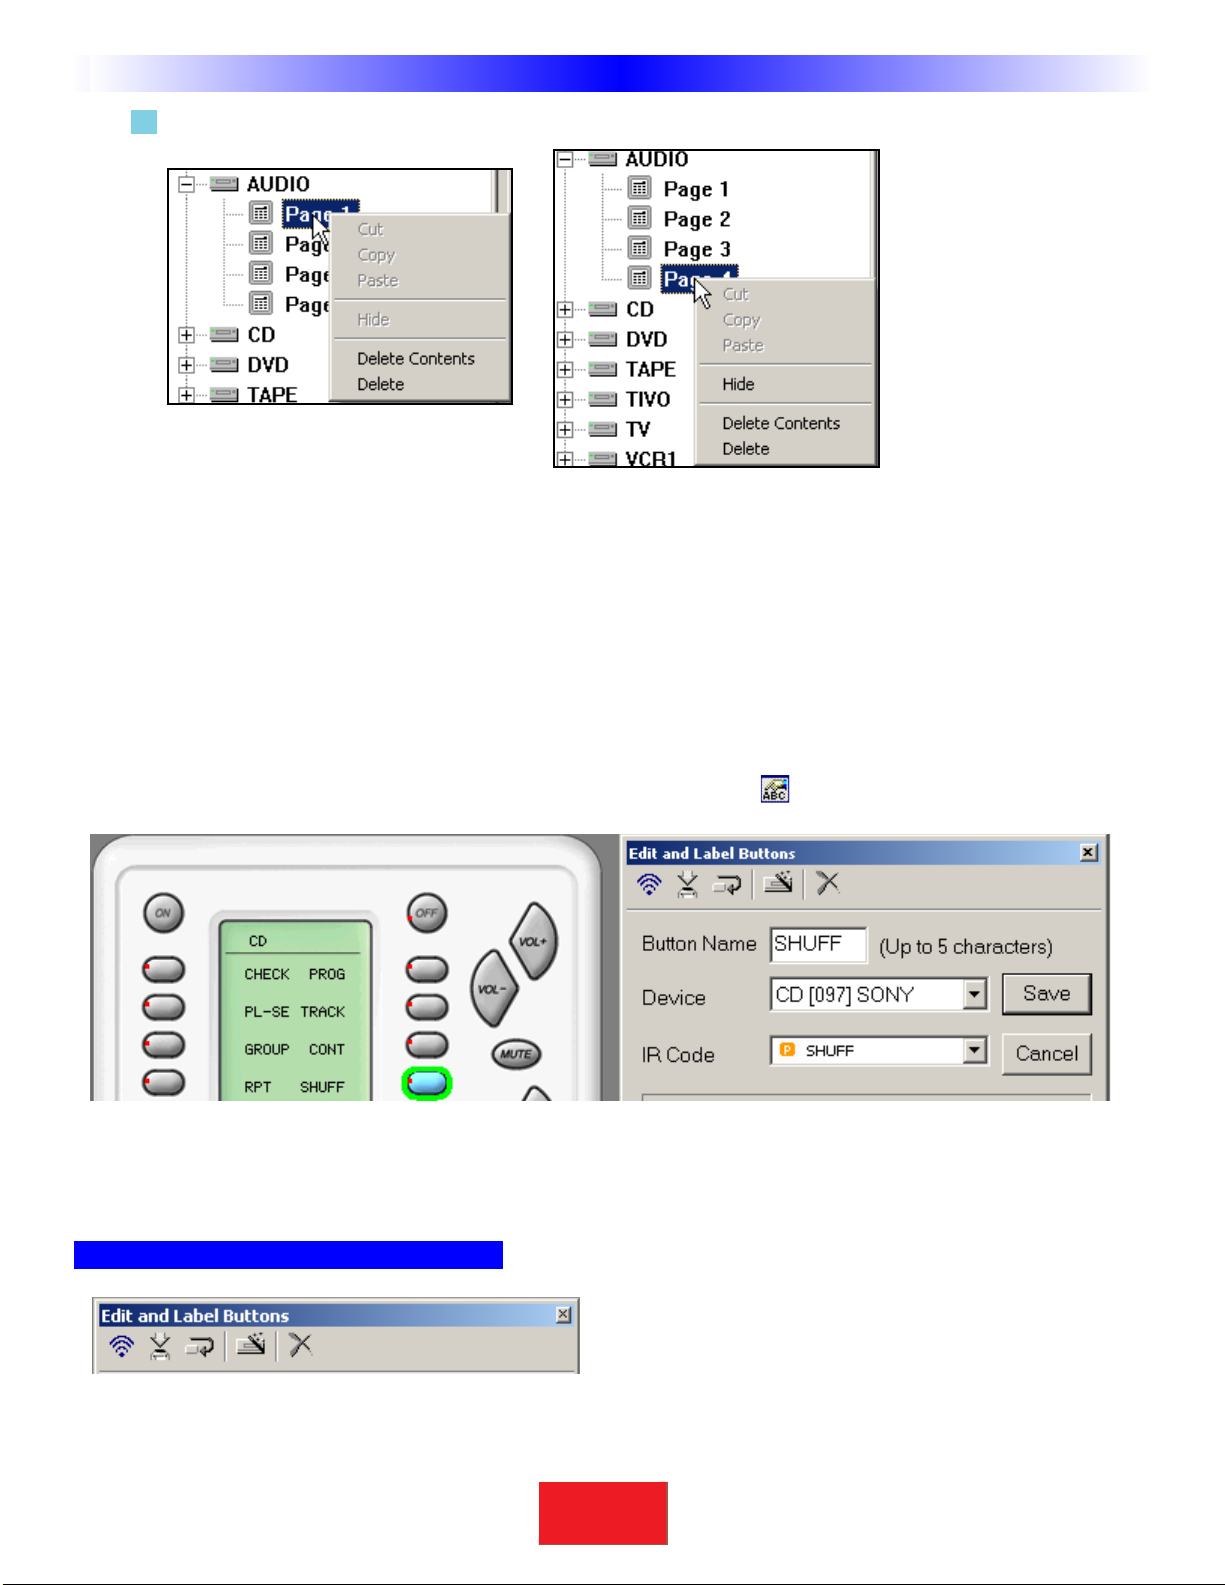
Right click on a page to reveal the Context Menu for pages:
You can delete the contents of a page, or delete the entire selected page.When you select the last page (4
of 4,3 of 3,2 of 2 or 1 of 1) you can HIDEa page. A page that is hidden can still be used to hold
commands that are used for macros.However, the end user will not be able to navigate to a HIDDEN page,
so he/she will never accidentally issue codes that you place there.
Cut,copy and paste are always grayed out, you cannot cut, copy and paste PAGES.
The Edit and Label ButtonsWindow
If the Edit and Label ButtonsWindow is closed,reopen it by clicking on the shortcut button on the toolbar.
Whenever you SELECTa button, the Edit and Label Buttons window displays the button name (editable),the Device
and the IRCode from the database. If you change the button name, the IR Code list box displays both the name you
created and the original database name for the code (in parenthesis).
The Edit and Label ButtonsToolbar
Like the main toolbar,the shortcut buttons will display a hint if you hover your mouse over them. A single click
activates their function.
10
SBIMPLY ETTER!
BK&
U
S
I
N
G
C
K
E
D
I
T
O
R
T
O
P
R
O
G
R
A
M
Windows, Menus,Tools and Definitions

TEST - For learned codes. Will only test pre-programmed codes if you have downloaded to the remote.
LEARN - Activates the learning mode if a CK1.2 or CK1.1 Keypad is connected to the PC (See p.22).
CONTINUE - When you are learning a number of IRcodes,use CONTINUE mode to automatically save and select
the next button of that device. This saves a tremendous amount of time. See the section on LEARNING on p.22.
IR DATABASE - Another way to open the IR Database window.
DELETE - Opens up the DELETEwindow,which enables you to selectively delete any part of a button’s
programming.
The DeleteWindow
Simply click on the function you want to delete.For example, you can
selectively delete just a MACRO,leaving the button to perform a
previously programmed learned IR command.
Or, you can delete all programming by selecting Button.
Labels
You can change the name of any button.When you change the name of a button,it not only affects how the button
appears in an LCDdisplay,it also changes how the button displays in the pull down Code list (although the original
name still appears beside the new label).
Shortcuts - Copying Buttons
You can create a SHORTCUT to another button by selecting it via the pull down lists under Device and IR Code.A
SHORTCUTis simply a duplicate of whatever is programmed in the button you select via the two pull down lists.
TIP - Make a hard button issue a macro by shortcutting to a macro on an LCD button
somewhere.
1 On the simulator, select the button you want
to program with a shortcut.
2 Select the DEVICE from the first pull down list.
3 Select the IR Code from the second list.
4 Click on the SAVE button in this window to
make the shortcut symbol appear.
11
SBIMPLY ETTER!
BK&
T
H
E
B
&
K
A
U
T
O
M
A
T
E
D
H
O
U
S
E
Windows, Menus,Tools and Definitions

The Macro/FavoriteWindow
As with all other commands on the CK1.1, an IR macro must be created on the CK1.2 Keypad sim-
ulator and then drag it to the desired position on the CK1.1 Keypad simulator. FAVORITE macros
cannot be dragged directly to the CK1.1 Keypad.
If the MacroWindow is closed, re-open it by clicking on the shortcut button on the toolbar.
The MacroToolbar
TEST You must select the first step you want played back first,then connect the keypad to the PC.
All steps after the selected step will play back, including any delays.
RECORD This starts and stops the recording of macro steps.
SAVE Any macro programming you do will be discarded unless you press the SAVEbutton.
DELAY Opens the Delay window so that you can specify a delay in between macro steps. If you
place a delay as the first step in a macro,the user has to hold down the button for
that much time before the macro will be issued. If the user does not hold down the
button for the specified delay,the macro is not issued.
JUMP Enables you to jump to any PAGE of any DEVICEat the end of a MACRO.
INSERT You must select the button you want the macro inserted in, click on the INSERTbutton, then
click on the button containing the macro you want copied. All of the macro steps are inserted
into the new button in one step.Make any changes you want to the new macro, it is independent
of the original (the original is not affected by any changes you make,nor is the copy affected
by changes you make in the original).
DELETE You must select the first step you want deleted first, then click on DELETE.
Re-Ordering Macro Steps
You can simply drag and drop steps to any order once they are programmed into the Macro and Favorite window.
Just click on if you want the changes you made SAVED.
Macro Details
The location (Device/Page/Name) of the button that will issue the macro when pressed.
A Macro Step indicates the type of step with an icon, the # of the
step, the function (name) of the step, and the Device it is actually
taken from.
12 Type in SectionTitle
SBIMPLY ETTER!
BK&
U
S
I
N
G
C
K
E
D
I
T
O
R
T
O
P
R
O
G
R
A
M
Windows, Menus,Tools and Definitions

Step 1 - Creating, Naming andArranging Devices
Before beginning, you should have powered up a CK1.1 or CK1.2, connected it to the serial port of your PC, closed
any other openWindows applications that use the serial port, opened CKEditor via the B&K Task bar, started a
new file,used Save As to save the file with a new name. Now you are ready to create new Devices for each of the
remote controls you intend to replace.
Open the Create and Name DevicesWindow
You can open the Create and Name Devices window by clicking on the first item of the Program Menu or by clicking
on theToolbar icon as shown here.
TIP - Hover the mouse over theToolbar buttons and a pop-up label identifies it!
Creating Devices
1Click on the position you would like to create a new device in.Type the new name and hit either the
ENTER or theTAB key on your keyboard, then type another name in.If you wish to leave a position blank,
simplyTAB past it.
2You must hit the SAVE button to create all the new devices in the order you selected.
3TreeView reveals the new devices you’ve created and the simulator shows the new MAINMENU LCD
button names.
13
Type in SectionTitle
SBIMPLY ETTER!
BK&
T
H
E
B
&
K
A
U
T
O
M
A
T
E
D
H
O
U
S
E
ProgrammingTutorial
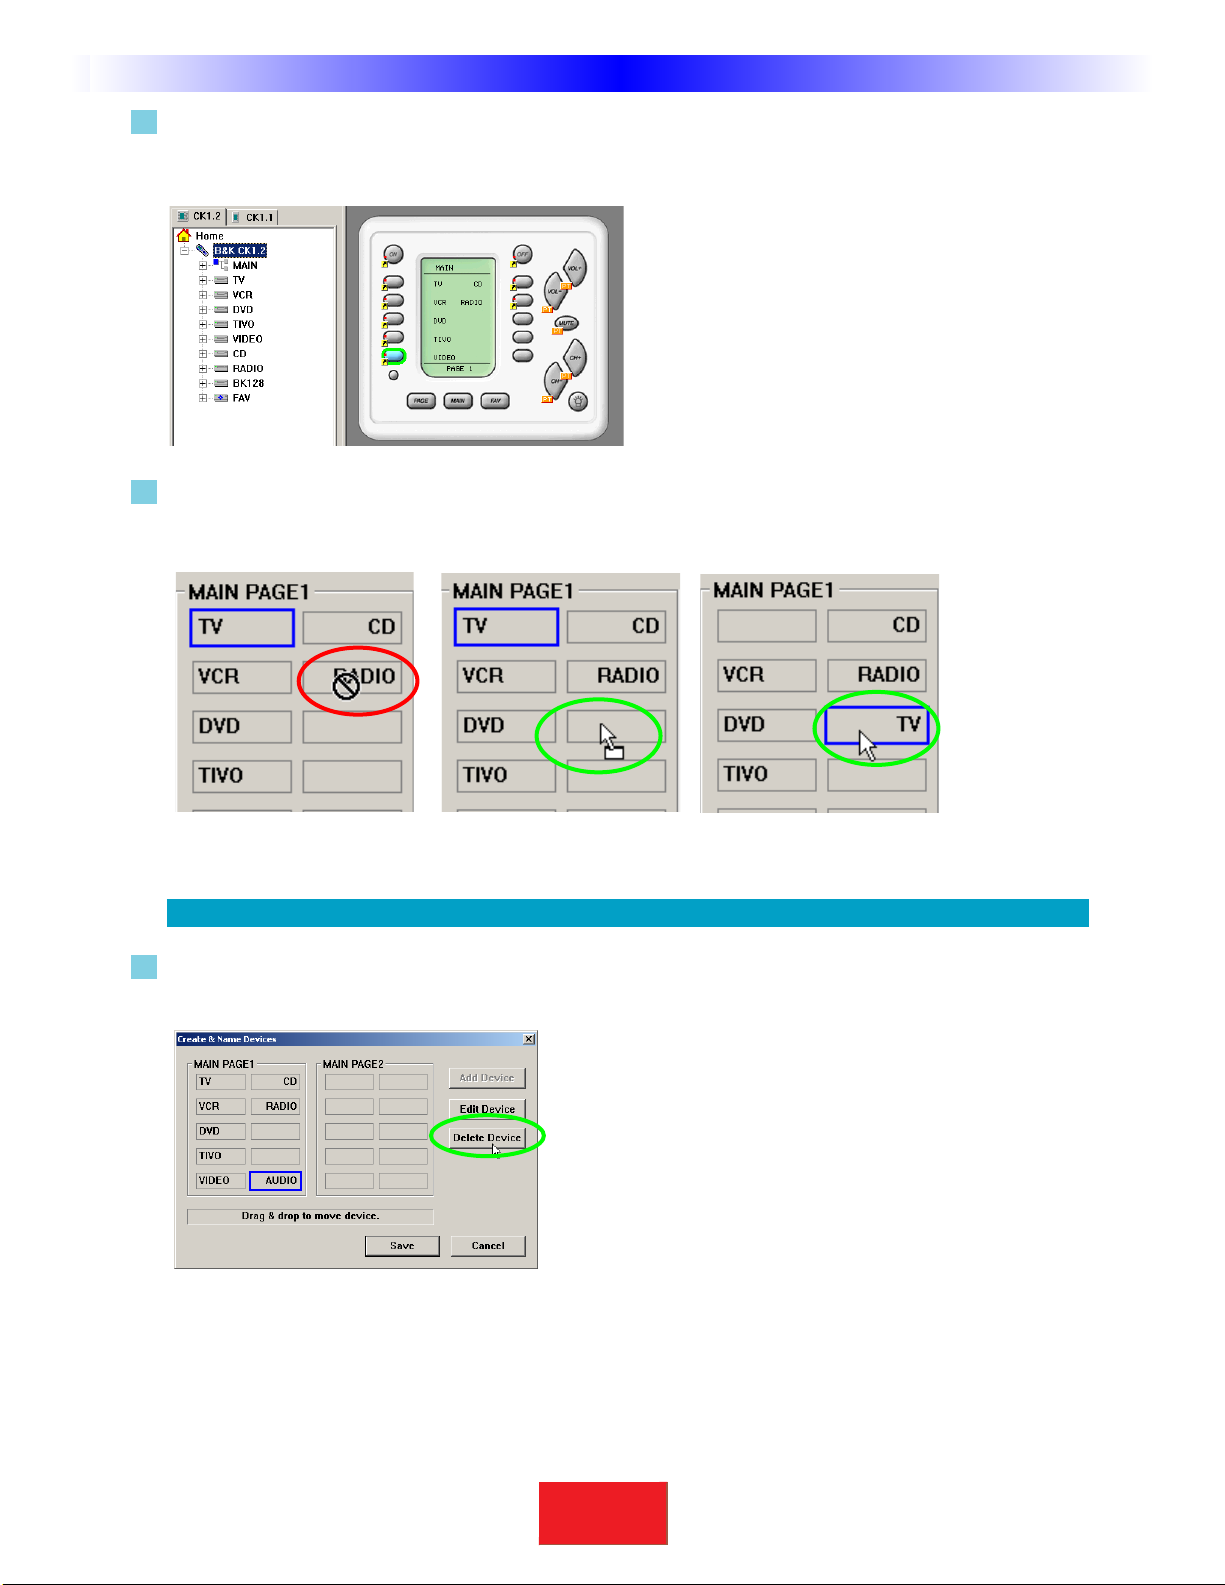
4 Try the simulator out now.If you click once a MAINMENU button, you’ll simply select the button, if you
click again you will jump-link to the device group.Once at the new device group,you can
touch the MAIN button to return to the MAINMENU,etc.
5Open the Create and Name Device window again,and experiment with rearranging devices by simply
dragging them to an empty location.Remember to match your CT Receiver source positions to the ones
you selected in BKcSuite’s Keypad Feedback settings.
TIP - When all positions are filled, you must delete one to do any rearranging of devices.
6To delete a device, simply select it by clicking on it once, then click on the DELETE key of your keyboard
or the Delete Device button.
14 Type in SectionTitle
SBIMPLY ETTER!
BK&
U
S
I
N
G
C
K
E
D
I
T
O
R
T
O
P
R
O
G
R
A
M
ProgrammingTutorial
BothTreeView,the CK1.1 and the
CK1.2 Keypad Simulator show newly
created devices.
In this example theTV device is dragged to the empty spot.The mouse
cursor changes to indicate you are dragging a device.When you
release the mouse,the device positions are swapped.
You cannot drag and drop to
an occupied space.
To delete a device,select it first,then click on the
Delete Device button.
Other manuals for CK1.1
2
Table of contents
Other B&K Keypad manuals


