Bang & Olufsen BeoCom 3 User manual

BeoCom 3
Guide


BeoCom 3
BeoCom 3 is well-suited for a
home office or small business
environment.
BeoCom 3 allows you to make
and receive calls on two lines, as
well as manage two concurrent
calls on the same line. Combine as
many as five calls into a single
conference call.
BeoCom 3 has a built-in
Phonebook to help you keep track
of your personal and business
numbers. It also supports the use
of Caller ID and Call Waiting, if
you have the appropriate
subscription with your phone
company.
BeoCom 3 also supports calls
using a headset or hands-free calls
– all with excellent sound quality.
You manage your calls using the
built-in display. The display
information guides you when you
want to make a call, answer a call
or adjust phone settings.
3

4Contents
Connect your BeoCom 3
6Placement and surroundings
– Technical data
6Connect BeoCom 3 to the phone line
and the mains
6Connect and use a headset
First-time setup of BeoCom 3
7Enter clock and area code settings
Start using BeoCom 3
8Keypad and display overview
– What do the individual keys represent?
9About the Extra key
9Status indication
25 Overview of menus and extra
functions
Daily use – make and answer calls
10 Make a call or answer a call
– make, answer and end calls – switch
between lines 1 and 2
10 Hands-free or headset calls
– answer and make a call without lifting
the handset; or with a connected headset
11 Edit a number while dialing
11 Turn the volume up or down during a
call
11 Mute a call
The built-in Phonebook
12 Store name and number in the
Phonebook after a call
– Enter a name when the number is
registered
12 Enter a new name and number in the
Phonebook
13 Search the Phonebook to make a call
13 Search alphabetically in the Phonebook
– Search from a first letter
13 Edit name and number in the
Phonebook
14 Delete name and number in the
Phonebook
14 Copy a name and number in the
Phonebook
Extension number – call and store
15 Call an extension number
15 Store numbers with extensions in the
Phonebook
Caller ID – use and editing
16 Using Caller ID
– See names and numbers of incoming
calls; make a call from a Caller ID entry
16 Delete calls from the Caller ID list –
delete the entire list
Redial – use and editing
18 Using the Redial list
– See names and numbers from outgoing
calls, make a call from the Redial list
18 Delete names and numbers from the
Redial list – delete the entire list
24 Store Redials from other phones
Switch between two calls
18 Calls on separate lines
– Place a call on hold – resume a call
19 Calls on the same line – Call Waiting

5
Conference calls
20 A 2-line conference call
20 Three-way call – conference call on
one line
Settings for your BeoCom 3
21 Volume, melody and settings for the
ringing signal
– Select the ringing signal volume, ringing
signal melody and timed settings, i.e.
when you would like the ringing signal to
shut itself off automatically
22 Set the time and date
22 Preset volume for conversations
– Choose the volume which suits you best
22 Display new calls
Advanced settings
23 Enter area code settings
23 Preset a flash time
24 Set the display contrast
24 Store calls from other phones
24 Preset a menu language
Overview of menu settings
25 Where to find a particular menu
Questions and answers
26 Does BeoCom 3 work during power
outages?
26 Is the Phonebook, Caller ID list or
Redial list deleted if the power fails or
the phone line is disconnected?
26 Why do the indicator lights flash?
26 How do I undo a step or exit a
function?
26 Why does the same number appear
twice in the Caller ID list?
26 What happens if I reject an incoming
call?
For your information…
27 Contact Bang & Olufsen

6
Place and connect the phone as
described to the right. In case of a
power failure, BeoCom 3 can be
used for outgoing calls on line 1.
BeoCom 3 supports the use of a
headset. You can switch between
handset, headset, and hands-free
use at any time.
Please note that BeoCom 3 can
only be expected to function in
country for which it was
manufactured, as transmission
systems, legal requirements for
approval and supplementary
services may vary from country to
country. The packaging states the
country for which your BeoCom 3
is manufactured. The national
identity letters can be found above
the bar code on the label.
If you require further instruction or
information about the connection
and use of BeoCom 3, please
contact your Bang & Olufsen retailer.
Connect your BeoCom 3
Placement
BeoCom 3 should not be placed in damp,
dusty or polluted surroundings and should
not be directly exposed to liquids or
sunlight.
BeoCom 3 is designed for use in dry, domestic
environments only, with temperatures of
50–104°F (10–40°C) and relative humidity of
15–95%.
Connection
To be able to use your BeoCom 3, you must
connect it to your telephone line (or lines)
and to the mains.
> If you have one phone line socket, connect
the phone plug directly to this socket. If you
have separate sockets for your phone lines,
please refer to the illustration enclosed with
the extra two-plug extension.
> Connect the adapter to the mains.
Connect and use a headset
Connect a headset to the socket on the
right side of the BeoCom 3 console.
Make a call using a headset
An optional headset can be purchased from
your Bang & Olufsen retailer.
Please clean your BeoCom 3 using a soft,
damp cloth with a few drops of mild
detergent added.
C
OK
P
h
o
n
e
b
o
o
k
C
a
l
l
e
r
I
D
R
e
d
i
a
l
M
e
n
u
Enter the phone number
Press to make a headset call
Press to end your call
0 –9
Headset
Headset
When you connect or disconnect a headset,
‘Headset connected’ or ‘Headset disconnected’
appears briefly in the BeoCom 3 display.

7
When you connect BeoCom 3 to
your telephone line and to the
mains, the display prompts you to
enter settings for the built-in
clock, as well as for the use of
area codes.
The clock settings include time,
date and year. Area code settings
provide you with the option of
including area codes when dialing
locally, as well as the capacity to
store up to ten area codes.
You only need to enter area code
settings once. Clock settings must
be re-entered if BeoCom 3 is
disconnected from the mains
temporarily.
Enter clock and area code settings
Settings for the built-in clock and for the
use of area codes appear in the ‘First time
setup’ menu. Both groups of settings can
be adjusted at any time. Please refer to
pages 22–23 for further information.
When you connect BeoCom 3 to the mains…
The ‘First time setup’ menu appears.
Options in the ‘Area codes’ menu
Your telephone company may or may not
require you to dial an area code when making
a local call. The area code requirements differ
from company to company. Select the options
listed below to match the requirements of your
telephone company.
‘Dial’… Options are Yes and No. Indicates
whether or not area codes must be dialed
for local calls.
‘Area code’… Allows you to enter up to ten
area codes.
If your phone company requires you to
dial…
– 1+area code+number for all calls… set ‘Dial’
to Yes and do not enter an area code for the
option ‘Area code’.
– area code+number for local calls… set ‘Dial’
to Yes. For ‘Area code’, you can enter up to
ten area codes that fall within your local
calling area.
– neither 1 nor area code for local calls… set
‘Dial’ to No and enter your own area code
for ‘Area code’.
Turn the wheel to select either
‘Clock’ or ‘Area codes’ settings
Press to be able to enter new
settings
Turn the wheel to select digits
in e.g. the time or date
Press OK to move on to the
next digit, or press C to go
back to a previous digit
To enter area codes, press the
digit keys
Press to store your entries
OK
OK
C
0 –9
OK
First-time setup of BeoCom 3
First time setup
Clock
Area codes

8
Apart from fulfilling its function as
an all-round phone, BeoCom 3
has many features.
In order to give you a quick
overview of how to use
BeoCom 3, the functions of the
specific keys are described here.
The display content is also
explained, as are the indicator
lights below the display.
For further information about
menu options, please refer to
page 25.
1DEF 3ABC 2
GHI 4MNO 6JKL 5
PQRS 7WXYZ 9TUV 8
0
Line 1
Mute Speaker Headset
Line 2 Extra Flash
C
OK
P
h
o
n
e
b
o
o
k
C
a
l
l
e
r
I
D
R
e
d
i
a
l
M
e
n
u
9:20AMSep. 19
0 –9
Digit keys for entering phone numbers.
Keys used in phone numbers, for
supplementary services etc.
Mute
Mutes and reconnects the microphone
during a call.
Speaker
Switches the hands-free function on and
off – enables you to make and answer a
call without lifting the handset.
Headset
Switches over to headset use.
Start using BeoCom 3

9
Indicator lights
The indicator lights above Lines 1 or 2 light up
when the lines are active, or flash to indicate
the status of a line.
Line 1 Line 2
Select which line to use – line 1 or 2.
Extra*
Display additional functions in defined situations.
Flash
Switch from an active call to another call on the
same line; make a call while another call is on
hold on the same line.
Turn the wheel to search the Phonebook, the
Caller ID and Redial lists or the phone’s menu
system; during a call, turn the wheel to adjust
the volume up or down.
OK
Press OK to accept or store entries, as well as to
confirm your choice of options shown in the
display.
Phonebook
Open the Phonebook.
Caller ID
Show the Caller ID list in the display.
Redial
Show the Redial list in the display.
Menu
Show the phone’s main menu in the display.
C (Clear)
Delete the most recent entry or cancel the last
key pressed. Press and hold the C key to leave
the menu system or an active function. C can
also be used to mute the ringing signal for an
incoming call.
*About the Extra key…
In certain situations, you can gain access to
additional functions. In these cases, a guide
tab is visible in the display, just above the Extra
key. Extra functions are available e.g. in the
Phonebook, in the Caller ID and Redial lists,
and in situations where you manage several
calls at the same time.
While you e.g. enter a name in the Phonebook
the Extra key allows you to:
> enter a number.
> insert national letters while you are typing a
name – see page 12 for further information
about national letters;
> escape or avoid storing an entry.
Status indication
When the phone is not in use, the indicator
lights above the keys Line 1 and 2 flash if…
– the phone rings. The indicator light flashes
red;
– a call has been placed on hold. The indicator
light flashes green;
– the ringing signal is disconnected – the
phone still registers calls, but does not ring.
The indicator light flashes red.
The indicator lights shine a steady green if…
– a line is in use by BeoCom 3.
The lights shine a steady red if…
– a line is in use by another phone connected
to the same line.
Line 1 Line 2 Extra Flash
2 new calls
9:20AMSep. 19
Linie 1 Line 2 Extra Flash
Jane Doe
David Johnson
John Smith
Patricia Miller Extra
The phone display shows the current status of
the phone and guides you through operations
and functions.
The guide tab shown in the display indicates
which line is in use, whether extra functions are
available and whether a conference call is active.

10
BeoCom 3 handles two phone
lines. Before you make a call, you
can choose which line to use –
line 1 or 2.
You can make and answer calls
using the handset, hands-free, or
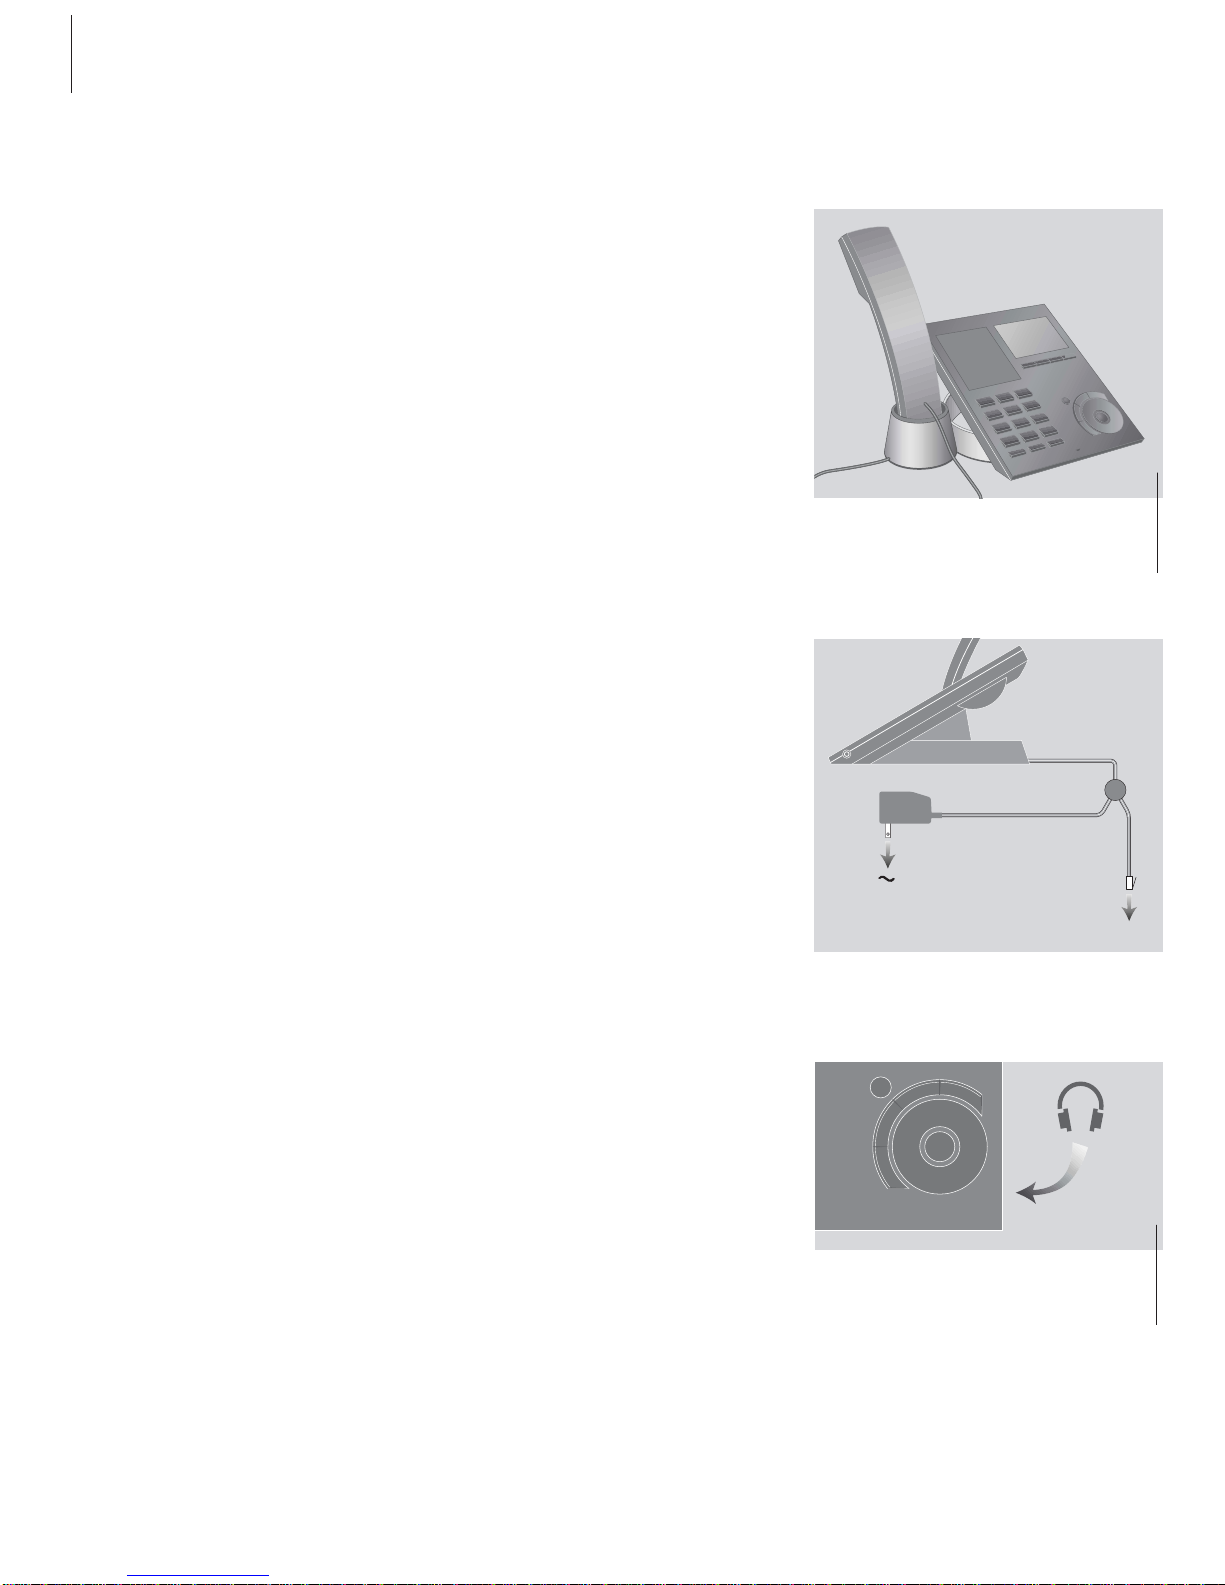
using an optional headset, which
is available from your Bang &
Olufsen retailer.
You can switch between these
three modes at any time by
pressing the speaker or headset
button on the console, or by
lifting the handset. The duration
of an active call is shown in the
display until the call is ended.
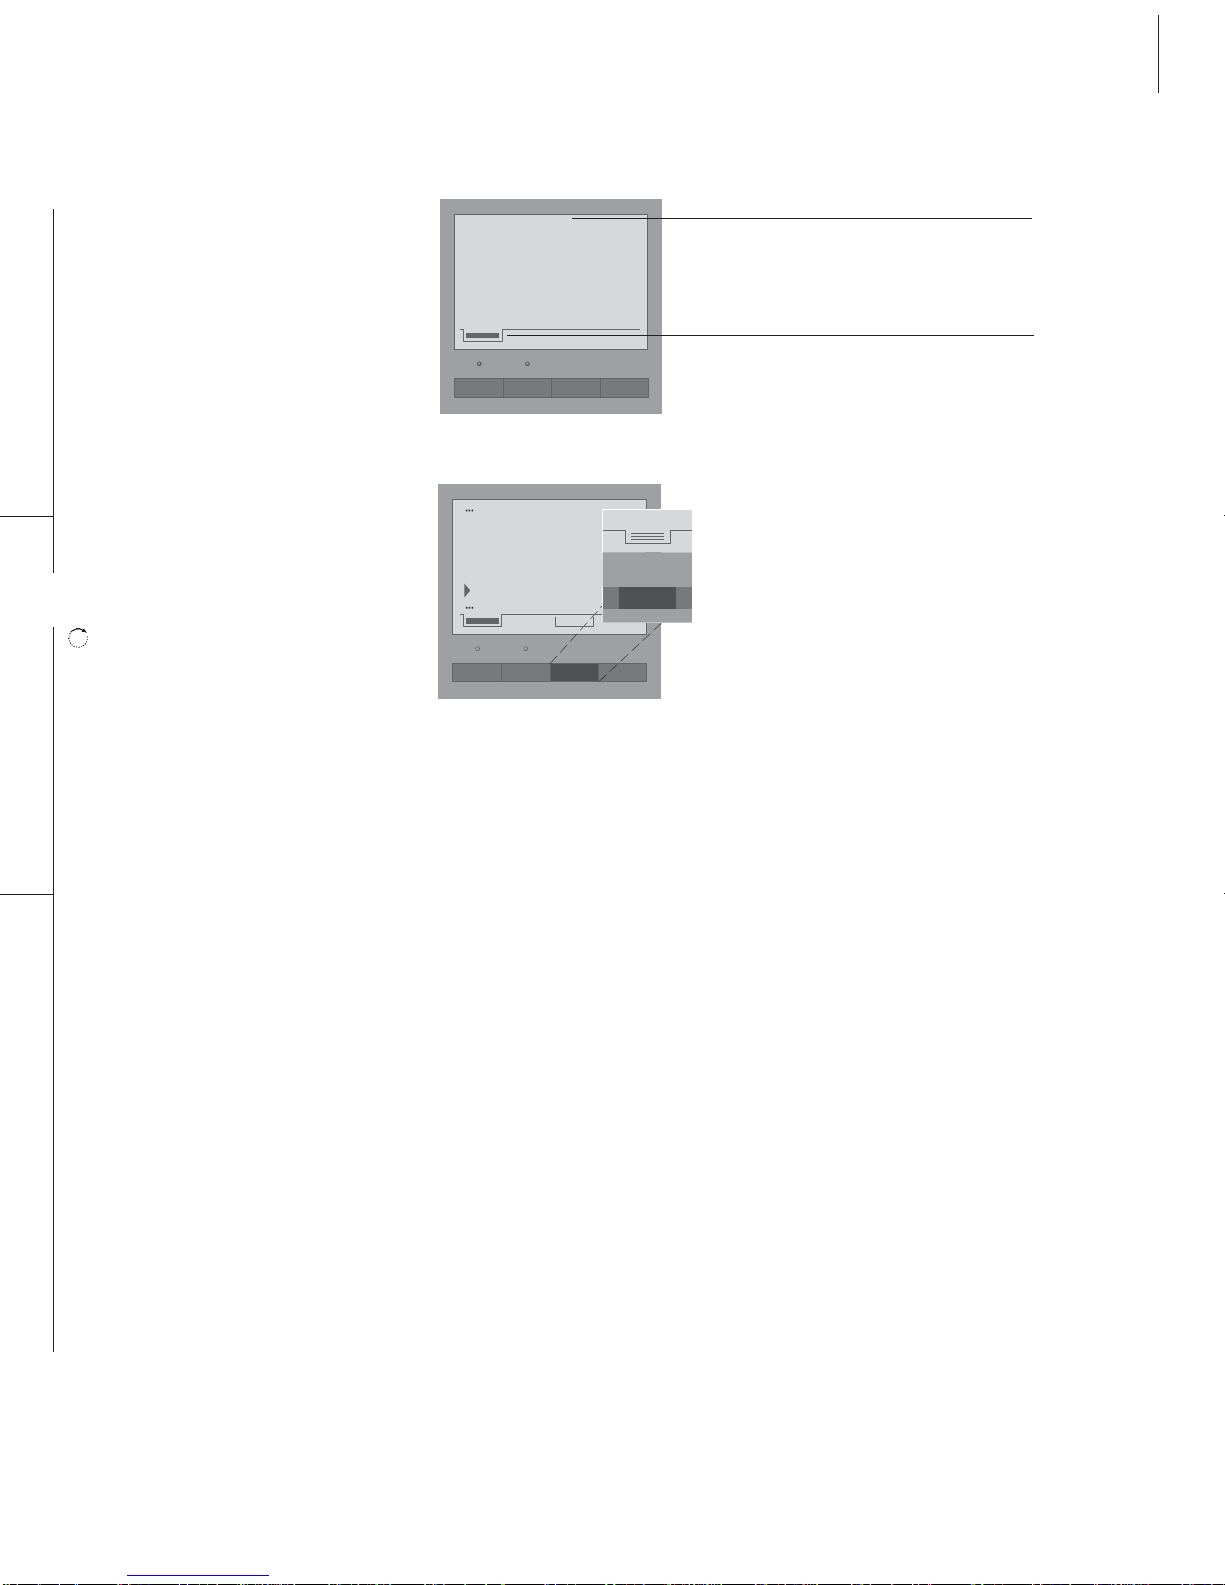
During your conversation, you can
adjust the volume by means of
the wheel. If you do not wish the
person on the phone to overhear
a conversation you are having
with a person in the room, you
can mute the call.
Make a call or answer a call
To make a call, enter the number and then
lift the handset. The number is dialed
when the handset is lifted. You can also lift
the handset first. The number is then
dialed as each digit is entered.
Making a call…
Answering calls…
Hands-free or headset calls
Make or answer a call without lifting the
handset, or make and answer calls using a
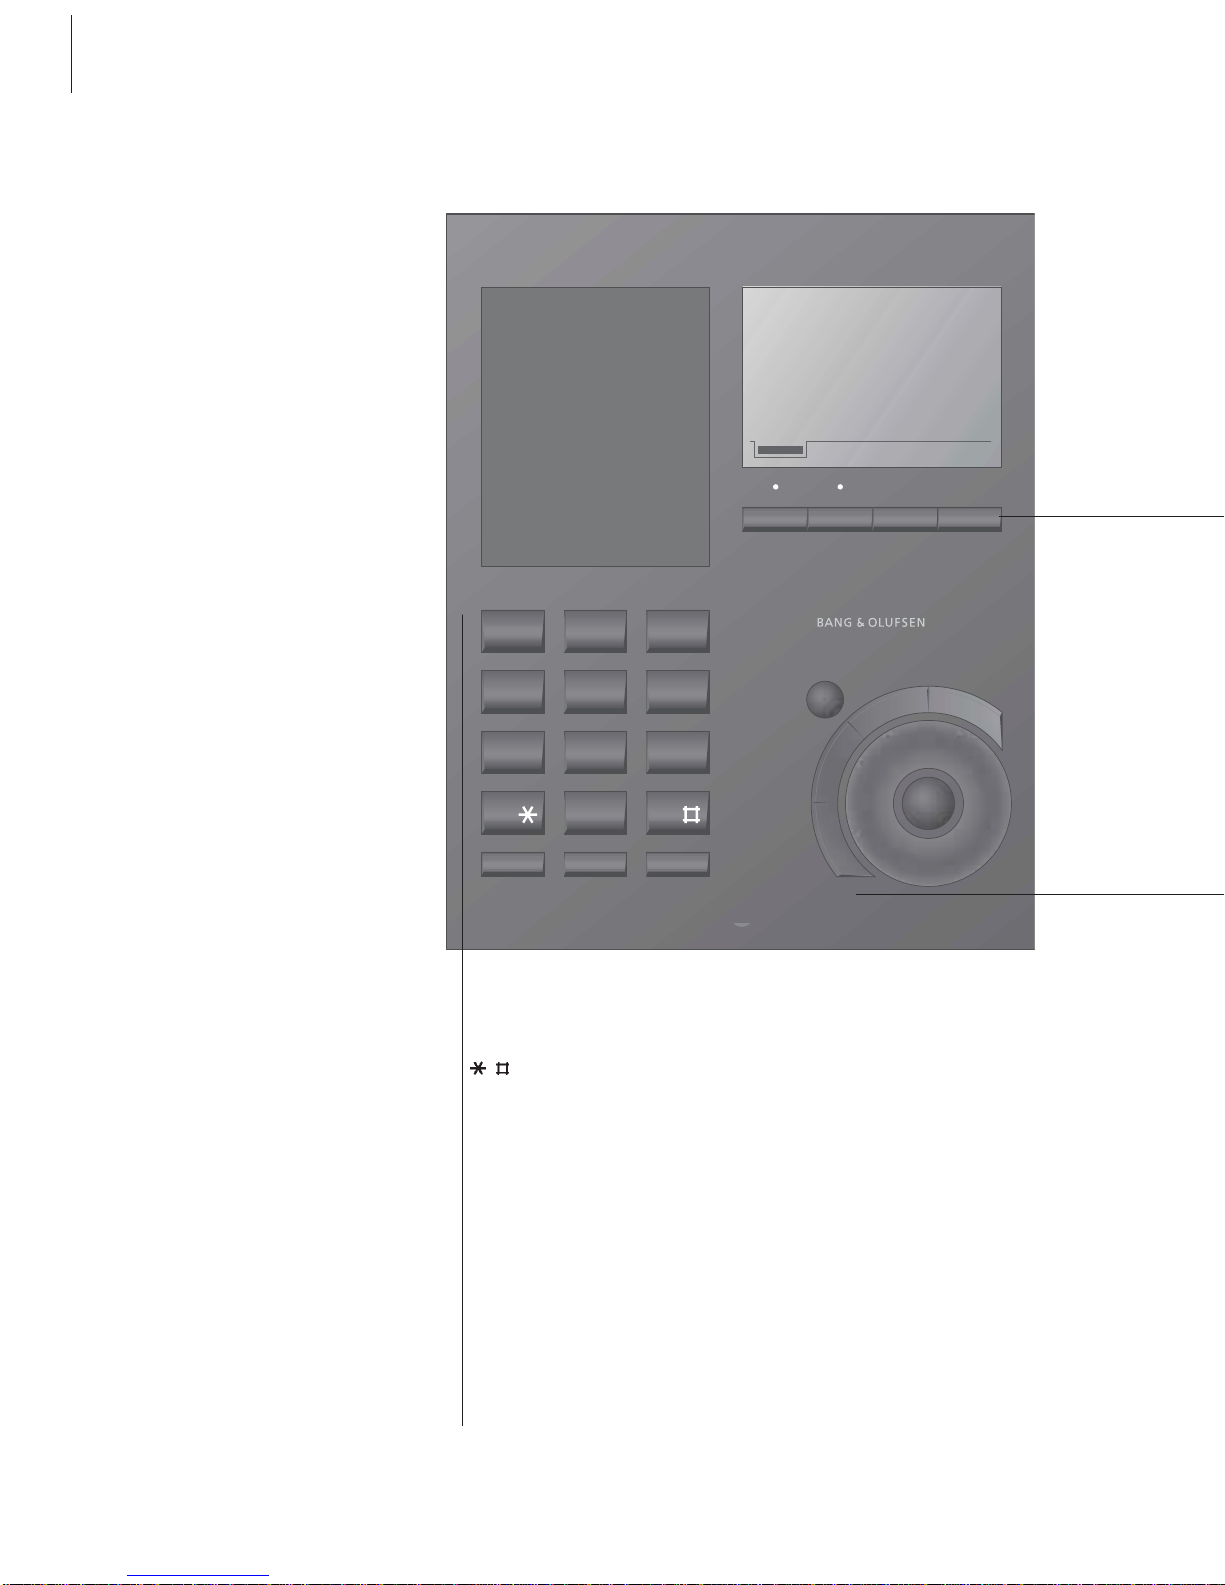
headset. See page 6 for further
information about connecting a headset.
Make or answer a call hands-free...
Make or answer a call with a headset...
To switch from handset to headset or
handsfree use, press and hold the Headset or
Speaker buttons on BeoCom 3 while you
place the handset in the cup. To change from
headset or hands-free to handset use, simply
lift the handset.
Daily use – make and answer calls
Press to choose an available
line
Enter the number
Lift the handset to make the call
Place the handset in the cup to
end the call
Lift the handset to answer calls
If you do not wish to receive a
call…
…press C to mute the ringer. If
you change your mind and the
caller has not hung up, you
can answer the call by lifting
the handset
Place the handset back into
the cup to end the call
Line 1
Line 2
0 –9
C
Enter the number
Press to make the call
Press to end the call
To answer calls hands-free…
Press to answer without lifting
the handset
Press to end the call
Enter the number
Press to make the call
Press to end the call
To answer calls with a headset…
Press to answer the call
Press to end the call
0 –9
Speaker
Speaker
Speaker
Speaker
0 –9
Headset
Headset
Headset
Headset

11
Edit a number
If you key in a wrong digit while entering
a number, you can delete one digit at a
time or delete the entire number and start
over.
When entering a number…
If you lift the handset first and then enter the
number, it is not possible to edit the number.
Turn the volume up or down
During a call, you can adjust the volume in
eight steps.
You can preset the volume for all telephone
conversations in the ‘Setup’ menu. Please refer
to page 22 for further information.
Mute a call
Mute the microphone if e.g. you need to
speak privately with someone in the same
room while another person is on the line.
When you mute the current call, the indicator
light flashes green to remind you that the call
is muted.
Volume
Volume
The microphone is muted
Jennifer Jones
847555 9380
Call time: 0:15
Turn the wheel to highlight a
digit you wish to delete
Delete the digit
Press and hold for
approximately 2 seconds to
delete the entire number
Edit the number or enter the
whole number again
C
C
0 –9
Press once to turn off
the microphone
Press again to turn the
microphone back on
Mute
Mute
Enter number
5559380
Turn the wheel to increase or
decrease the volume during a
call

12
The built-in Phonebook will
quickly become your personal
reference when you call family or
friends.
You can search the Phonebook in
different ways. Search through all
names or search alphabetically by
the first letter in an entry.
Naturally, you can also search
through numbers that have no
names attached to them.
Depending on the length of the
entries, the Phonebook can contain
approximately 200 names and
numbers. The entries are shown in
the display in alphabetical order.
You can easily add an entry to
your Phonebook immediately after
a call is ended.
Store a name and number after a
call
After a call, you are prompted to store in
the Phonebook the number and name of
the person with whom you have spoken.
Choose capital and lower-case letters, digits
and special letters from the list in the
display. An empty slot in the list indicates a
space, and is the symbol for storing.
After a call…
If you need a country-specific letter…
Enter a new name and number
When entering names and numbers, you
can use up to 25 letters in a name and up
to 48 digits in a number. There is one line
for a name and one for a number. The
number of available entries in the
Phonebook is dependent upon the length
of each entry; long entries limit this
number.
You can also enter the number first. When you
press OK to store the number, you gain direct
access to the naming function.
The built-in Phonebook
5551234
Call ended
Store in Phonebook?
Enter name
ABCDEFGHIJKLM
…
Press to store the number and
to be able to enter a name
Turn the wheel to select the
individual letters of the name
Press to store the chosen letter
Finish writing the name…
Turn the wheel until
appears and press OK to store
name and number
OK
OK
OK
Press the Extra key
Turn the wheel to select
’National letter’ and press OK
Turn the wheel to select the
desired letter and press OK
Extra
OK
OK
Press to view the main menu
Press to open the Phonebook
menu
Press to select ’Create new
entry’
Turn the wheel to select letters
for the name
Press to store the chosen letter
Finish writing the name…
Turn the wheel until
appears and press OK to store
the name
Enter the number
Press to store the name and
number
Menu
OK
OK
OK
OK
0 –9
OK

13
Search through all names in the
Phonebook
When the phone is not in use, you can
search directly from the entire list of names
in the Phonebook. If you are making a call
and wish to look for a number or a name in
the Phonebook, press the Phonebook key
first.
When BeoCom 3 is not in use…
Search the Phonebook during a call...
Search from first letter
To search through entries in the
Phonebook by their first letter, start by
selecting a letter. You can then view all
names beginning with that letter. If you
want access to the entire Phonebook, or to
names beginning with another letter, press
the Phonebook key again.
In the list of letters and digits at the bottom of
the display, only the relevant first letters are
shown – letters under which names are stored.
If you wish to search through numbers that are
not named, select ? from the list.
Edit a name or number
You can edit both names and numbers in
the Phonebook using the ’Edit entry’
menu.
Phonebook
Search letter: B
AZABDFGHJKM
Phonebook
John Smith
5551234
Edit entry?
Turn the wheel to search the
entire Phonebook
Press to select a name
Lift the handset to make the call
Press to open the Phonebook
Press to be able to search
through all the names in the
Phonebook
Turn the wheel to search
through all names
Press to select a name
OK
Phonebook
OK
OK
Press to open the Phonebook
menu
Turn the wheel to select a
letter
Press to search through names
which begin with the chosen
first letter
Turn the wheel to search
through the names
Press to select the name
Lift the handset to make the call
Phonebook
OK
OK
Press to view the main menu
Press to open the Phonebook
menu
Turn the wheel to select ’Edit
entry’ and press OK
Turn the wheel to select the
first letter for the name and
press OK
Turn the wheel to select a name
and number and press OK
Press to be able to edit
Enter digits via the number
keys. Press C to delete digits
Press Extra to edit the name –
use the wheel and the OK key
to select ’Edit name’
Press C to delete letters – use
the wheel and the OK key to
choose new letters for the
name
Finish editing the name…
Turn the wheel until
appears and press OK
Menu
OK
OK
OK
OK
OK
0 –9
C
Extra
OK
C
OK
OK
Jane Doe
David Johnson
John Smith
Patricia Miller

14
Delete a name and number
You can delete names and numbers in the
Phonebook using the ’Delete entry’ menu.
Copy a name or number
If you have a number or a name which
only needs slight alterations, copy the
name and number and edit it.
Phonebook
John Smith
5551234
Copy entry?
Press to view the main menu
Press to open the Phonebook
menu
Turn the wheel to select
’Delete entry’ and press OK
Turn the wheel to select the
first letter for the name and
number and press OK
Turn the wheel to select a
name and number and press
OK
Press to delete a name and
number
Menu
OK
OK
OK
OK
OK
Press to view the main menu
Press to open the Phonebook
menu
Turn the wheel to select
’Copy entry’ and press OK
Turn the wheel to select the
first letter for the name and
number and press OK
Turn the wheel to select a
name and number and press
OK
Press to copy name and
number
Press C to delete letters – use
the wheel and the OK key to
choose new letters for the
name
Turn the wheel until
appears and press OK
Menu
OK
OK
OK
OK
OK
C
OK
OK
Phonebook
John Smith
5551234
Delete entry?
>> The built-in Phonebook
NOTE! If you have opened the Phonebook,
the easiest way to edit, copy or delete an
entry is to press the Extra key and select the
appropriate function.

15
If you call a number with the
intent of contacting an extension
number, there is often a pause of
a particular length before the call
can be put through from the main
switchboard to the extension
number.
You can store the number, pause
and extension in the BeoCom 3
Phonebook. You can then make
future calls directly to the
extension number.
You can choose a pause length
between one and nine seconds.
You can also choose a full-stop
pause. In this case, the extension
is entered when you press the OK
button.
If you call an extension number
manually, the main number, pause
and extension are stored in the
Redial list as a single entry. Please
refer to Redial – use and editing
for more information about the
Redial list.
Call an extension number
If you call a number with an extension, you
should await connection before entering the
extension number. You can, however, insert
a pause between the main number and the
extension, and the complete number is
stored in the Redial list for future use.
When dialing manually …
Store numbers with extensions
Store the main number, the pause and the
extension number as a single entry in the
Phonebook. You can then call the number
directly from the Phonebook.
Store in the Phonebook…
Call from the Phonebook…
9:20AMSep. 19
John Smith
555 1234-124
Continue?
Enter the main number
Press to be able to insert a
pause
Turn the wheel to select a
pause length
Press to store the pause
Enter the extension number
Lift the handset to make the
call
If you have set pause to
‘Wait’…
…press to end a full-stop
pause
The complete number,
including the pause and the
extension, is now stored in the
Redial list
0 –9
Extra
OK
0 –9
OK
Enter the main number
Insert a pause as described to
the left
Enter the extension number
Press twice to store the entire
number as well as the pause in
the Phonebook
Use the wheel and the OK key
to assign a name to the
number
Turn the wheel until
appears and press OK
Press Phonebook
Turn the wheel to select the
number in the Phonebook and
press OK
Lift the handset to make the
call
If you have set the pause
length to Wait, press OK to
send the extension number,
otherwise, BeoCom 3 will send
the extension number
automatically when the preset
amount of time has passed
0 –9
0 –9
OK
OK
OK
OK
Phonebook
OK
OK
Extension number – call and store

16
The latest 24 phone numbers you
have received calls from are stored
in the Caller ID list. Numbers are
only stored once in the list, even if
you have received several calls
from the same number.
The display shows how many
unanswered calls you have
received.
If you bring up the Caller ID list in
the display, you will find
information about which line took
the call, who called, the number
of calls received and the time the
last call was received. You can
then make a call directly from the
Caller ID list.
Using Caller ID
When you view the Caller ID list, the most
recent call appears at the top of the list.
While the list is shown in the display, you
have access to Extra functions which allow
you to e.g. delete Caller ID calls, edit a
name and number, and store an entry in
the Phonebook.
Make a call from the Caller ID list…
Store a Caller ID in the Phonebook...
Delete calls in the Caller ID list
When you bring up the Caller ID list in the
display, you can then delete a specific call
or the entire list directly.
Delete a specific Caller ID call…
To delete the entire list…
Press to view the Caller ID list
Turn the wheel to select name
and number
If you wish to access Caller ID
information, press OK,
otherwise…
…lift the handset to make the
call
Press to view the Caller ID list
Turn the wheel to select name
and number
Press to gain access to
additional functions
Turn the wheel to select
’Store in Phonebook’ and press
OK
Caller ID
OK
Caller ID
Ekstra
OK
Press to view the Caller ID list
Turn the wheel to select name
and number and press OK
Press to gain access to
additional functions
Turn the wheel to select
’Delete entry?’
Press to delete the selected
Caller ID call
Press to view the Caller ID list
Press Extra and turn the wheel
to select ’Delete the list?’ and
press OK
Turn the wheel until ‘Yes’ is
highlighted
Press to delete the entire list
Caller ID
OK
Extra
OK
Caller ID
Extra
OK
OK
Caller ID – use and editing
NOTE! If Caller ID information is not available, the
display shows:
’Private call’ – for calls from anonymous numbers;
’Unavailable’ – when Caller ID is not possible for
technical reasons.
You must have a subscription to Caller ID for the
function to be available.

17
The 24 phone numbers you have
called most recently are stored in
the Redial list. Numbers are only
stored once in the list, even if
several calls have been made to
one number.
When the Redial list is brought up
in the display, you will find
information about which line the
last call was made from, who the
last call was made to, the duration
of the call and when the call was
made. You can then make a call
directly from the Redial list.
For information about storing
Redials from another phone,
please refer to Advanced settings.
Using the Redial list
When the Redial list is shown in the
display, your latest call appears at the top
of the list. While the list is shown, you
have access to Extra functions. You can
delete a Redial entry, edit a name and
number and store an entry in the
Phonebook.
To make a call from the Redial list…
Store Redials in the Phonebook…
Delete calls in the Redial list
While the Redial list is shown in the
display, you can delete a specific Redial
entry or the entire list.
Delete a specific Redial entry…
To delete the entire list…
Redial – use and editing
Press to view the Redial list
Turn the wheel to select name
and number
If you wish to gain access to
Redial information, press OK,
otherwise…
…lift the handset to make the
call
Press to view the Redial list
Turn the wheel to select name
and number
Press to gain access to
additional functions
Turn the wheel to select ’Store
in Phonebook’ and press
OK
Redial
OK
Redial
Extra
OK
Press to view the Redial list
Turn the wheel to select name
and number and press OK
Press to access additional
functions
Turn the wheel to select
’Delete entry?’
Press to delete the selected
Redial entry
Press to view the Redial list
Press Extra, turn the wheel to
select ’Delete the list?’ and
press OK
Turn the wheel until ‘Yes’ is
highlighted
Press to delete the entire list
Redial
OK
Extra
OK
Redial
Extra
OK
OK

18
BeoCom 3 makes it possible for
you to handle simultaneous calls,
whether the calls are on separate
lines or on the same line.
Use the line keys to switch back
and forth between calls on the
two lines. The indicator lights
show the status of both lines.
There is no need to press a
separate ‘Hold’ button, as
switching from one line to
another automatically places the
non-active call on hold.
If, for example, you have an active
call on line 1, and you receive an
incoming call on the same line,
you can place the first call on hold
and answer the new call. Please
note, however, that placing a call
on hold in this manner requires
that you have a subscription to
the basic Call Waiting service with
your phone company.
Calls on separate lines
You switch between calls on lines 1 and 2
by pressing the Line 1 or Line 2 keys. The
guide tabs in the display and the indicator
lights show which line is active and
whether or not a call on the other line is
placed on hold.
You have an active call on line 1 and an
incoming call on line 2…
The indicator light for line 1 shines steadily
green to show that the line is active, and the
indicator light for line 2 flashes red to indicate
an incoming, unanswered call.
> Press Line 2 to answer the incoming call on
line 2. The duration of the new call is shown
in the display. The indicator light for line 1
flashes green to indicate a call on hold, and
the indicator light for line 2 shines a steady
green to indicate an active call.
> Press Line 1 to return to line 1.
Line 2 is then on hold.
> If, instead, you wish to end the call on line 1
before answering the incoming call on line 2,
press the cup once, and then press Line 2 to
return to the call on line 2.
If you are using BeoCom 3 hands-free or with a
headset, you can also press 'Speaker' or
'Headset' respectively to end one call before
selecting the call on the other line.
Switch between 2 calls
Allen Anderson
1847 5551234
Call time: 6:34
1:24PMAug. 12
Jennifer Jones
1847 5554321
Incoming call
Jennifer Jones
1847 5554321
Call time: 0:30
1:40PMAug. 12
Allen Anderson
1847 5551234
Call time: 7:45
1:41PMAug. 12

19
Calls on the same line - Call
Waiting
Use the Flash button to place a call on
hold while you answer an incoming call,
or to switch between two calls.
You have an active call and an incoming
call is registered on the same line…
The number and name of the incoming call
appear in the display.
> Press OK or the Flash button to place the
active call on hold and answer the incoming
call.
> Press the Flash button to switch back and
forth between the two calls.
You can also end the active call and answer
an incoming call on the same line by pressing
and holding the handset cup for a couple of
seconds. The active call is then ended and the
incoming call becomes active.
Allen Anderson
1847 5551234
Jennifer Jones
1847 5554321
1:24PMAug. 12

20
BeoCom 3 makes it possible for
you to include multiple calls in a
conference call.
You can combine calls on line 1
and line 2 to a conference call,
and you can combine calls on the
same line to a conference call as
well. However, to combine calls
on the same line, you must have a
subscription to your phone
company’s Three-Way Call service
for that line.
A three-way call on one line can
be combined with a single active
call on the other line for a
fourway conference call. Three-
way calls on both line 1 and line 2
can also be combined to a five-
way conference call.
If you choose to make a
three-way call part of a larger
conference call, please note that
you must initiate all the calls in
the three-way call.
A 2-line conference call
When you have simultaneous calls on both
line 1 and line 2, you can connect the calls
and establish a conference call.
You have simultaneous calls on both lines…
You can also create a conference call by
pressing the Line 1 and Line 2 buttons
simultaneously. All parties on both lines are
then included in the conference call.
Please note that external parties in a conference
call will hear each other only faintly if they are
located far from the telephone exchange. This
network problem can be reduced by subscribing
to the Three-Way Call service with your
telephone company.
Three-way call – conference call
on one line
When you establish a three-way call, the
first call made can be an incoming or
outgoing call, but you must initiate the
second call yourself. Please contact your
phone company for more information
about the Three-Way Call service.
You have a call on e.g. Line 1…
> Press the Flash button to place the active call
on hold and start a new call.
> Place a call to the third party in your
threeway call.
> When the third party answers the call, press
Flash again to start a conference call.
> To end the conference call, press Flash a third
time. The third party is disconnected and you
can continue the original call.
> Place the phone in the cup to end the call
completely.
Conference calls
Allen Anderson
18475551234
Jennifer Jones
18475554321
11:21AMAug. 21
Extra
OK
Press to be able to connect the
calls
Press to include the selected
calls in a conference
Place the handset in the cup to
end all calls, or press the line
buttons to return callers to
separate lines. You can then
continue or end calls as you
choose
Other manuals for BeoCom 3
1
Table of contents
Other Bang & Olufsen Telephone manuals

Bang & Olufsen
Bang & Olufsen BeoCom 3 User manual

Bang & Olufsen
Bang & Olufsen BEOLINE User manual

Bang & Olufsen
Bang & Olufsen BeoCom 4 User manual

Bang & Olufsen
Bang & Olufsen BeoCom 1401 User manual

Bang & Olufsen
Bang & Olufsen BeoCom 4 User manual

Bang & Olufsen
Bang & Olufsen BeoCom 2500 User manual

Bang & Olufsen
Bang & Olufsen BeoCom User manual

Bang & Olufsen
Bang & Olufsen BeoCom 1401 User manual

Bang & Olufsen
Bang & Olufsen BeoCom 2500 User manual

Bang & Olufsen
Bang & Olufsen BeoCom 1 User manual