bankSA EFTPOS Now User manual

EFTPOS Now.
A Quick Reference Guide to help you
get started with your terminal.


3
This simple guide gives you all the basic steps to set up and use
your terminal to start accepting payments.
Getting Started.
How to turn on your terminal.
Hold the Power button down for approximately 3 seconds until the terminal turns on.
Terminal layout.
USB-C
charging port
Contactless
card reader
Paper
compartment door
Power/Accessibility
mode button
Headphone jack
Magnetic stripe
reader
Navigation bar
Volume buttons
Chip card
reader
Status bar

4
Navigation icons and keys.
Bluetooth enabled
Bluetooth enabled,
connected to base
Aeroplane mode
Mobile signal
Wi-Fi
SIM Card
Battery level
Battery charging
Status icons
Warning/Attention
Important information
App launcher
Torch
Auto rotate
Edit
Settings
Download/Update
in progress
Notication icons
Quick settings icons
Add reference
Collapse
Expand
More options
Menu
Back
Home/Payment app
Recent apps
Navigation keys
Important: You can return to the payment screen at any time by pressing the Back
and/or Home keys.

5
How to load a paper roll.
1Open the paper roll compartment by holding the terminal base securely and lifting
the sides of the paper compartment door upwards and back.
2Place a paper roll in the compartment. Ensure that the paper end is feeding under the roll
and towards the terminal screen, as shown above.
3Hold the paper and then close the compartment door until it clicks securely back
into position.
Important: The paper roll is thermal-sensitive and will only print on one side.
How to activate your terminal.
If your terminal has been installed by a technician, it will already be activated ready for use.
If your terminal has been sent to you (via satchel), you’ll need to activate it before you can use it.
Please call the Merchant Helpdesk to activate your terminal.
1300 130 190 (available 24 hours a day, 7 days a week).
Terminal Communication.
Wi-Fi.
Wi-Fi can be set up from the Status Bar at the top of the touch screen or through
the Android Settings.
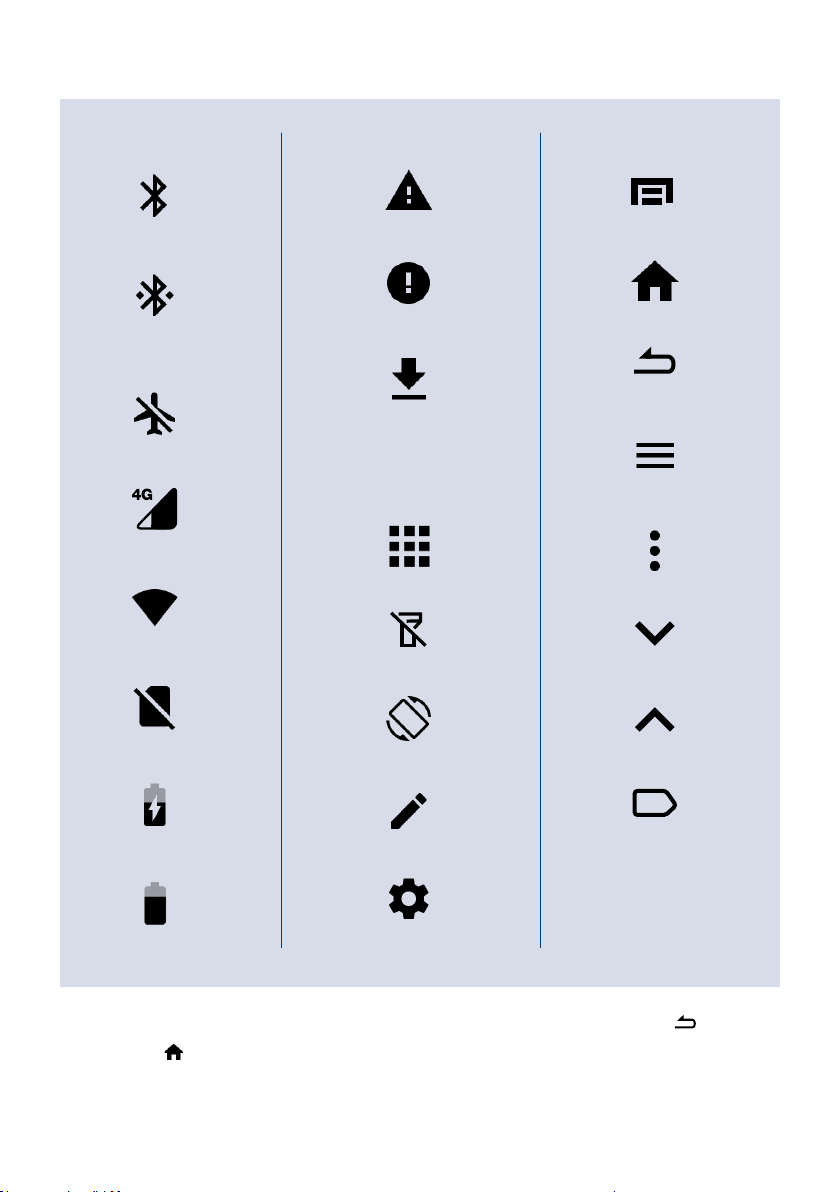
To access the Wi-Fi settings from the Status Bar
1Swipe down from the top of the screen to view the status icons.
2Press and hold the Wi-Fi icon . The Wi-Fi settings will open.
3Turn Wi-Fi On and select the relevant network from the available Wi-Fi networks.
4Enter the network password and select CONNECT.

6
Processing a Transaction.
Purchases.
Insert Swipe Tap
1From the amount-entry screen, use the touch screen to enter the purchase amount,
e.g., $25 = 2500.
2Select Purchase.
3The cardholder may tap, insert, or swipe their card; or tap their payment-enabled
smart device.
4If the cardholder has inserted or swiped their card, they will be prompted to select
their account type.
5The cardholder will be required to enter their PIN or sign (if required)
to complete the transaction.
6If a signature is required, the cardholder must sign using their nger directly
on the touch screen.
7Select Yes, Approve to conrm that the signature matches the signature on the back
of the card; or select No to cancel the transaction.
8Keep the merchant copy of the receipt for your records.
9The terminal will prompt for a customer copy of the receipt to be printed or emailed.
Important: Always check the receipt to conrm the transaction has been approved before
completing the transaction. Retain your copy of the terminal receipts for a minimum
of 18 months.

7
Refunds.
1From the amount-entry screen, use the touch screen to enter the refund amount,
e.g., $25 = 2500.
2Select Other.
3Select Refund.
4Enter the Manager passcode.
5Select Card or Mobile.
6The cardholder may tap, insert, or swipe their card; or tap their payment-enabled
smart device.
7If the cardholder has inserted or swiped their card, they will be prompted to select
their account type.
8The cardholder will be required to enter their PIN and/or sign (if required) to complete
the transaction.
9If a signature is required, the cardholder must sign using their nger directly
on the touch screen.
Select Yes, Approve to conrm that the signature matches the signature on the back
of the card; or select No to cancel the transaction.
11 Keep the merchant copy of the receipt for your records.
12 The terminal will prompt for a customer copy of the receipt to be printed or emailed.
Important: Always check the receipt to conrm the transaction has been approved before
completing the transaction. Retain your copy of the terminal receipts for a minimum
of 18 months.

8
Settlement Totals.
Settlement is the process that’s completed so you can be paid for your transactions.
Auto settlement.
The terminal will automatically settle every day at your nominated auto settlement time.
A default auto settlement time will be assigned if you haven’t chosen an auto settlement time.
The terminal must be turned on to complete an auto settlement. If your terminal can’t complete
an auto settlement, we’ll conduct the settlement on your behalf.
If you wish to change your auto settlement time, contact the Merchant Helpdesk.
Manual settlement.
You may perform a manual settlement at any time throughout the day – before the auto
settlement occurs. However, settlements can’t be processed between 9:30 pm and 11:00 pm
(Sydney time).
1Select the menu icon located at the top left of the amount-entry screen.
2Select Settings.
3Select Account.
4Select Settlement.
5Select Settle Now, this will trigger the manual settlement..
6The settlement report will be displayed on the screen and printed.
Important: You can only perform a settlement once a day, before 9:30 pm (Sydney time).
A settlement done after 11:00 pm will be processed as a settlement for the next day.

9
Settlement history.
1Select the menu icon located at the top left of the amount-entry screen.
2Select Reports.
3Select Settlement History.
4Select the required date.
5The requested settlement will be displayed on the screen. Select Print, if required.
Settlement enquiry.
1Select the menu icon located at the top left of the amount-entry screen.
2Select Reports.
3Select Settlement Enquiry.
4The current settlement totals (since your last settlement) will be displayed on the screen.
Select Print, if required.

10
Transaction Reports.
Reprint receipt.
You can search, view, reprint or email receipts for transactions processed in the past 14 days.
A transaction may also be referred to as an Order.
1Select the menu icon located at the top left of the amount-entry screen.
2Select Transaction History.
3The Transaction History will be displayed and organised by transaction date and time.
4You can scroll up and down the screen to locate the required transaction.
5Select the required transaction.
6Select Receipt.
7Select Merchant Copy, Customer Copy or Email Receipt.
Transaction history.
You can view or print a history of your transactions for the past 14 days.
1Select the menu icon located at the top left of the amount-entry screen.
2Select Transaction History.
3The Transaction History will be displayed and organised by transaction date and time.
4You can scroll up and down the screen to locate the required date.
5Select the printer icon next to the required date to view an expanded transaction history
for that day.
6Select Print if required.

11
Transaction search.
You can search transactions using advanced search options.
1Select the menu icon located at the top left of the amount-entry screen.
2Select Search Transactions.
There are 3 ways a search can be performed.
1Search bar
• Enter the last 4 digits of the card, or the full STAN in the search bar.
STAN is a six-digit ID number found on the receipt.
• All transactions that meet the search criteria will be displayed.
• Select the required transaction.
• Select Receipt.
• Select Merchant Copy, Customer Copy or Email Receipt.
2Card search
• Select the card icon in the search bar.
• Tap, insert or swipe the card to start the search.
• Select the required transaction.
• Select Receipt.
• Select Merchant Copy, Customer Copy or Email Receipt.
3Advanced search
• Select Advanced Search.
• Search criteria includes amount, date range or transaction type and more.
• Use the onscreen keypad to enter the values.
• Press the green arrow to move to the next eld.
• Press the green tick to nish entering the search criteria.
• Select Search.
• Select the required transaction.
• Select Receipt.
• Select Merchant Copy, Customer Copy or Email Receipt.

12
Passcodes.
Your terminal has the ability to limit and protect transactions and functionality such as refund,
MOTO (Mail Order and Telephone Order), settlements and more, by using passcodes.
The passcode levels available are Manager and Cashier.
Change your passcodes.
Use this process if you need to change your Manager passcode or change or reset your
Cashier passcode.
Important: The current Manager passcode is required to change both the Manager passcode
and the Cashier passcode.
1Select the menu icon located at the top left of the amount-entry screen.
2Select Settings.
3Select Security.
4Enter the current Manager passcode and press Enter.
5Select Passcode management.
6Select Manager or Cashier.
7Enter the Manager passcode and press Enter.
8Enter the new Manager or Cashier passcode and press Enter.
9Re-enter the new Manager or Cashier passcode and press Enter.

13
Reset your manager passcode.
Use this process if you’ve forgotten your Manager passcode.
1Select the menu icon located at the top left of the amount-entry screen.
2Select Settings.
3Select Security.
4Select the More options icon at the top right of the screen.
5Select Switch to Admin.
6Contact the Merchant Helpdesk to get the current Admin passcode.
7Enter the Admin Passcode and press Enter.
8Enter the new Manager passcode and press Enter.
9Re-enter the new Manager passcode and press Enter.

14
Troubleshooting.
Hardware Faults Action
Blank Screen –
the terminal isn’t
turning on.
1. Ensure that the battery charge state is not below the critically
low level. The terminal will not work if there is insucient
charge remaining in the battery.
2. Connect the terminal to a power source for at least 5 minutes.
3. Hold the power button down for approximately 3 seconds
until the terminal turns on.
4. If the problem persists, call the Merchant Helpdesk.
The touch screen
isn’t responding.
1. Turn o the terminal for 10 seconds.
2. Turn the terminal on again.
3. Retry the transaction.
4. If the problem persists, call the Merchant Helpdesk.
Paper jam or
printing errors.
1. Remove the paper roll from the compartment to check that
there’s no paper caught.
2. If the existing paper roll is damaged in any way, replace it with
a new roll.
3. Paper rolls are thermal-sensitive and will only print on one
side. Make sure the paper roll is loaded correctly.
4. Check that the paper compartment door is closed securely.
5. If the problem persists, call the Merchant Helpdesk.

Any questions? Just ask.
Merchant Support Centre
and Order Stationery Online
banksa.com.au/merchantsupport
Merchant Helpdesk
Service, Sales and Support, Terminal Diculties, Stationery Orders.
1300 130 190 (available 24 hours a day, 7 days a week).
Handy hint: Have your Merchant and Terminal numbers ready
so we can assist you promptly.
banksa.com.au/eftposnow
Credit Card Authorisation
1300 301 831

© 2022 BankSA – A Division of Westpac Banking Corporation ABN 33 007 457 141 AFSL and Australian credit licence 233714
WBCBSAEFTQRG202 0122
Table of contents
Other bankSA Touch Terminal manuals