Battery Controller BC SMART 400 User manual
BATTERY CHARGER 03.024.31 SMART 400 / 03.024.32 SMART 1000
The new SMART battery charger has a double charging mode CAR/BIKE for car and motorcycle batteries, AGM Start/Stop program (specifically designed
for the battery maintenance on veichles with Start&Stop system) and Power Supply program for battery replacement. 03.024.31 SMART 400 and 03.024.32
SMART 1000 are also equipped with an automatic temperature compensation system: an integrated sensor measures the room temperature and adjusts
the executed algorithm to maximize the charging performance under every condition. 03.024.31 SMART 400 and 03.024.32 SMART 1000 are internally
controlled by a microprocessor, which monitors in real time the battery parameters and executes automatically the following 8 charging cycles.
Phase 1 - Initialization: the device checks if one or more cells are shorted, to verify that the battery is in a proper condition to be recovered/recharged.
Phase 2 - Recovery: if the battery is deep discharged (starting from 1.25V), the device tries to recover it, taking it back to a higher voltage, necessary for the
execution of the following step.
Phase 3 - Soft Charge: if the battery is in significantly discharged, the device provides a light pulsing current to the battery, to overcome the critical phase.
Phase 4 - Bulk Charge: during this phase, the device provides full current to the battery, recovering about 85-90% of the battery capacity.
Phase 5 - Desulfation / Absorption: during this phase the device provides a "controlled overcharge" to recover the remaining 15-20% of the battery
capacity, through the desulfation/recovery of the lead-acid cells (for low or medium sulfation).
Phase 6 - Battery Analysis: the device stops providing current to the battery for a short time, in order to verify whether the battery is able to retain the
charge received during the previous phases. This test is periodically repeated during the maintenance.
Phase 7 - Maintenance: the device keeps your battery in the best charge conditions for very long periods when your vehicle is left unused, without any
possible drawback (battery overcharge/overheating, electrolyte loss...).
Phase 8 - Equalization: every 30 days during long term maintenance, the device executes an equalization charge in order to balance the battery lead-acid
cells, avoiding electrolyte stratification within the cells.
03.024.31 SMART 400 & 03.024.32 SMART 1000 - FEATURES
- Four programs: "BIKE MODE" to charge motorcycle batteries, "CAR MODE" to charge car batteries, "AGM START/STOP" to charge the batteries of
vehicles with start&stop system, "POWER SUPPLY" to safeguard the data storage of the devices onboard while replacing the battery.
- Couple of green/red LED diodes to indicate the charging cycle executed and any error.
- Green LED diode (CHARGE): it shows the current charging cycle (Charge, Desulfation, Maintenance...);
- Red LED diode (ERROR): it notifies any occurring problem (polarity inverted, short circuit, battery not connected...).
For further information on the LED diodes, please refer to "Working Mode" section.
- Real time monitoring of the main battery parameters during every charging cycle.
- Battery Overcharge Protection, which triggers in case the microprocessor detects a voltage level higher than a given fixed threshold: no risk of bubble
production for all batteries (lead-acid traditional, MF, VRLA, Gel, AGM).
-
4-LEDs bar indicating the charging level (50%, 65%, 80%, 100%) or the executed charging program (Bike Mode, Car Mode, AGM Start/Stop, Power Supply).
Upon conclusion of every cycle, the device switches automatically to the next one, without any external intervention: THE CHARGER CAN BE LEFT ALWAYS
CONNECTED TO THE BATTERY WHEN THE VEHICLE IS LEFT UNUSED. The battery charger has been designed, manufactured and tested according to the
current norms in force in the European Union in order to comply with all the requirements for electronic equipments (i.e. device safety, electromagnetic
compatibility, etc). Please read carefully this manual and follow all its recommendations before using and installing the device.
DIRECTIONS
This device has to be used according to the working conditions it has been designed for. Any other use is to be considered either dangerous or improper. Do
not use the device for NiCd, NiMH, Li-Ion or non-rechargeable batteries. The manufacturer is completely exonerated from whatever responsibility for
possible damages due to either wrong or improper use of the device. It is important to remember that the following basic usage principles have to be
considered whenever using the device:
- Do not touch the device with wet hands (or wet feet).
- Do not touch the device barefoot.
- Do not expose the device to the atmospheric agents (rain, water, saltiness...).
Please verify that the input and output cables are in good conditions before using the device. If the input cable is damaged, do not use the device: ask the
dealer for repair or replacement. Before executing any cleaning/maintenance operation on the device, please check the device is not connected to the
power outlet. In case the device does not work properly, do not attempt to repair it; please ask your local dealer for support. Any attempt to open unduly
the device shall cause the withdrawal of the warranty.
SAFETY
The battery charger is not intended for use by children or persons with reduced physical, mental or sensory capabilities, or lack of enough experience and
knowledge to understand the instructions on this manual, except in the presence of a responsible person who can ensure the safe use of the device. Keep
out of reach of children and ensure that they can not play with it. The device is designed and manufactured in accordance with the norms and regulations in
force in the European Union and provided with the following set of active guard mechanisms:
1. Protection from battery polarity inversion.
2. Protection from output lines short circuit (even for an indefinite time).
3. Over-temperature protection: the current supplied to the battery gets limited in case of device overheating.
In order to prevent any accident, please respect the following guidelines:
1. Always wear protective goggles when operating in proximity of the battery.
2. Do not try to recharge a frozen battery.
3. During the charge of a battery, avoid generating flames or sparks in its proximity since it might produce explosive gases. If the battery is out of the vehicle,
place it in a well ventilated area.
4. Do not put the battery charger device on top of the battery during its charge.
5. Batteries contain a corrosive electrolyte. In case the battery electrolyte gets in touch either with your skin or with your eyes, rinse them immediately and
abundantly with fresh water and ask for a doctor.
6. The charger is specifically designed to provide a long-term maintenance in order to prevent the slow self-discharge of the battery. If the device does not
complete the Bulk Charge phase after a time-out period that is about three times the one indicated in this manual (see "Performance" table), disconnect
it manually. One of the following problems might have been occurred: the battery is definitely worn out; there are electronic devices connected to the
battery (alarm, radio, on board computer...) that drain too much current.
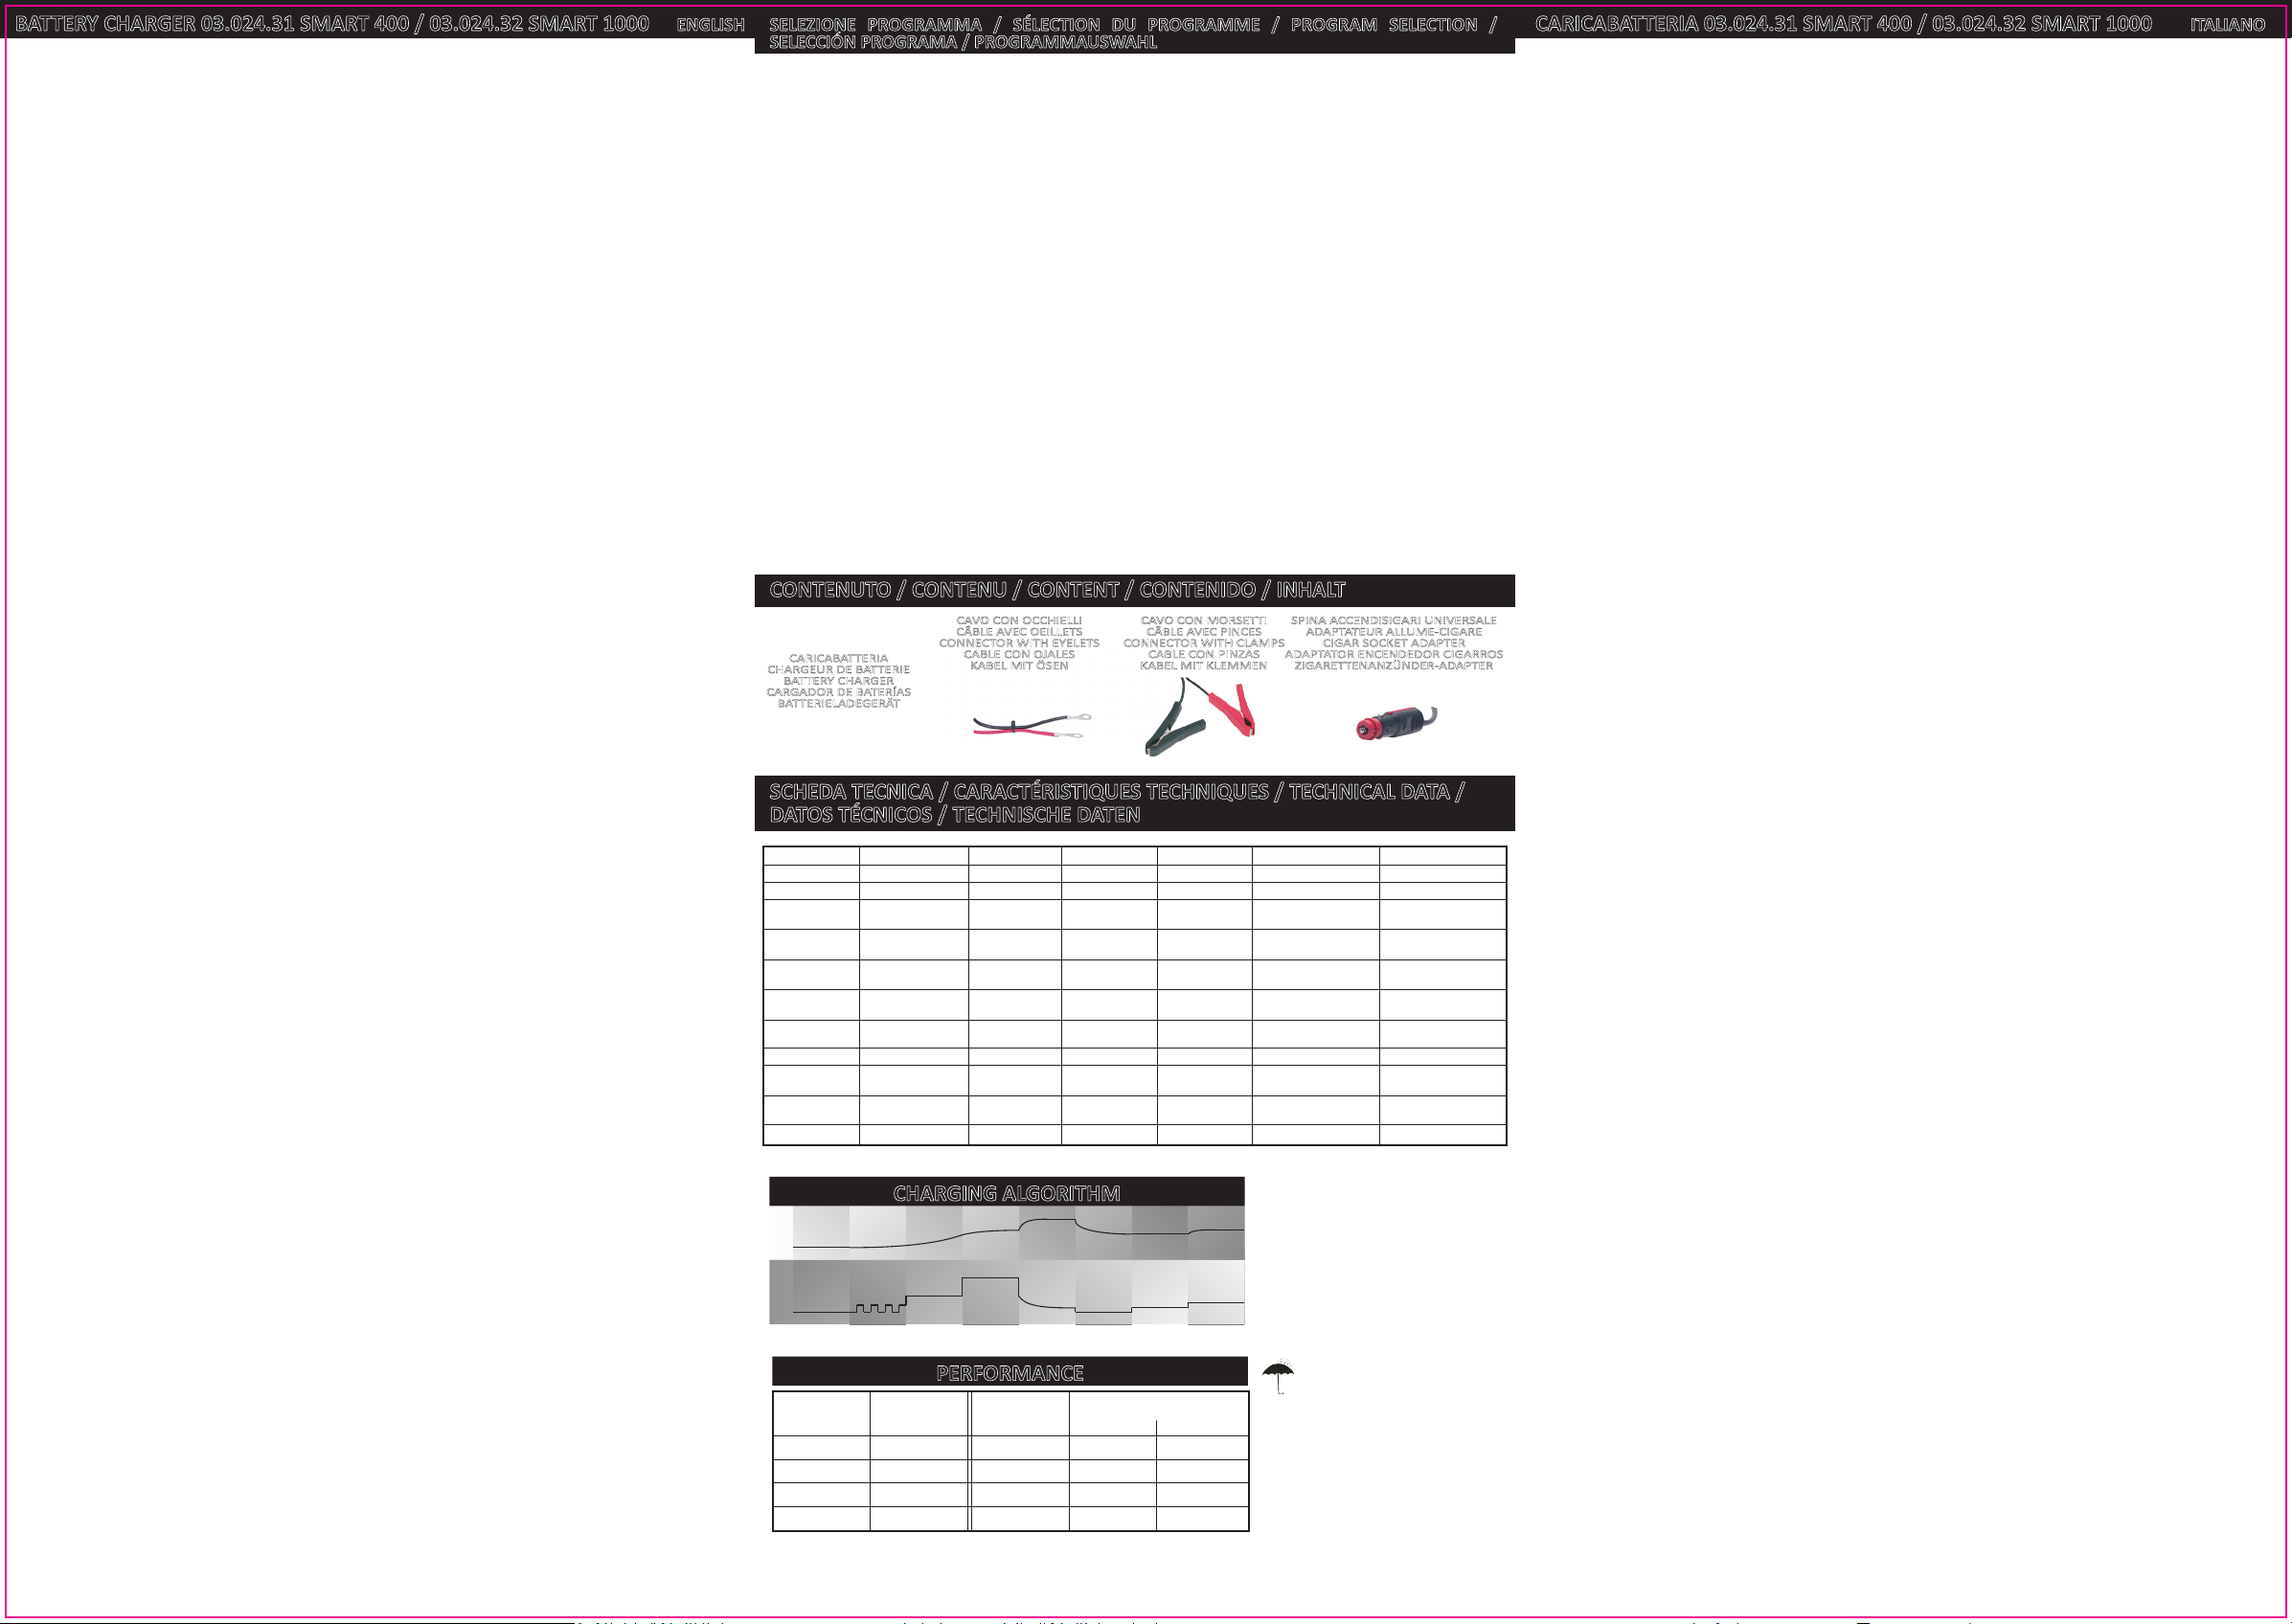
CONTENT OF THE PACKAGE
1. 03.024.31 SMART 400 or 03.024.32 SMART 1000 battery charger, with supply cable and battery connection cable directly coming out of the battery
charger, consisting of two high insulation grade red and black wires (length: 2 meters).
2. Waterproof battery connector with eyelets, to be connected to the battery + saver cap.
3. Battery connector with clamps.
4. Battery connector with 12V cigar socket adapter.
BATTERY CONNECTOR WITH EYELETS INSTALLATION PROCEDURE
When charging a battery in a vehicle, it is advisable to install the battery connector with eyelets, which allows to perform the following procedure just once.
The user is kindly requested to execute the installation with maximum care (see "Directions" and "Safety" sections). If necessary, please entrust qualified
personnel with the execution of the steps reported here below:
- Connect the eyelets to the battery: the black wire to the (-) negative battery terminal, the red wire to the (+) positive battery terminal.
- Fix the connector in a stable and easy-to-reach place on board (for example, under the saddle).
BATTERY CONNECTOR WITH CLAMPS INSTALLATION PROCEDURE
If the battery is out of the vehicle, just connect the black clamp to the (-) negative battery terminal and the red clamp to the (+) positive battery terminal. If
charging the battery in a vehicle, connect first to the battery terminal not connected to the chassis (usually the positive one, red clamp to the + battery
pole), and then connect the other clamp to the chassis, far from the battery and the fuel line. After using the device, disconnect in reverse sequence.
BATTERY CHARGER CONNECTION PROCEDURE
- Remove the connector saver cap from the cable with eyelets and connect the charger to the cable. Otherwise, connect the charger to the battery through the
clamps (see previous section) or the cigar socket adapter. The red LED (ERROR) turns on, showing that the device is not connected to the power outlet.
- Connect the device to the power outlet. The red LED diode (ERROR) will turn off. The green LED diode (CHARGE) will turn on, blinking or with fixed light
according to the cycle executed (for further information, please refer to "Working Mode" section.
MODE SELECTION - BIKE MODE, CAR MODE, AGM START&STOP MODE, POWER SUPPLY
To select the product's working mode, please follow the instructions on the back of this handbook.
LED BAR - VOLTMETER AND MODE INDICATOR
The LED bar on the battery charger indicates the charging level reached by the battery (50, 65, 80, 100%), according to the number of LED diodes on. If the
battery state of charge is below 50%, the first LED (yellow - 50%) blinks. Moreover, when the device is connected to the power outlet and not to the battery,
the LED bar indicates the selected charging program.
WORKING MODE - BATTERY CHARGER (BIKE MODE, CAR MODE, AGM START&STOP MODE)
During normal operation, after the initialization, the device indicates the executed charging cycles by the green LED (CHARGE), as follows:
- Green LED diode slowly blinking and 50% yellow LED diode (on the LED voltmeter) blinking as well: Recovery and Soft Charge cycles (phases 2 and 3).
- Green LED diode slowly blinking: Bulk Charge cycle (phase 4).
- Green LED diode quickly blinking: Desulfation cycle (phase 5) or Equalization cycle (phase 8) executed.
- Green LED diode on (fixed light): Maintenance cycle (phase 7) executed.
- Red LED diode (ERROR) off.
For more details about the charging steps, please refer to the "Charging Algorithm" section on this manual.
Possible occurring anomalies are indicated by the device as follows:
- Red LED diode on (ERROR): it means the input power is missing or the device is not connected to the power outlet.
- Red LED diode slowly blinking: the battery is not connected.
- Red LED diode swiftly blinking: polarity inversion or short circuit.
- Green LED diode (CHARGE) + Red LED diode (ERROR) alternatively blinking: the Battery Analysis (phase 6) failed. The battery is not able to retain the
charge received, it may be necessary to substitute it.
In case of wrong installation or functioning, please disconnect the device following the procedure reported in the "Disconnection Procedure" section.
WORKING MODE - POWER SUPPLY FOR BATTERY REPLACEMENT
- Connect the device to the socket and select the "Power Supply" mode, following the procedure described on the back of the handbook.
- Connect the device to the positive and negative poles of the vehicle by the clamps provided. Then disconnect the battery to be replaced and install the
new battery. After connecting the battery to the vehicle, disconnect the battery charger.
BATTERY CHARGER DISCONNECTION PROCEDURE
Please follow the following steps to disconnect the battery charger from the battery:
- Disconnect the battery charger from the power outlet.
- Disconnect the battery charger from the cable with eyelets and put the saver cap on cable connector. Otherwise, disconnect the clamps from the battery
or the cigar socket adapter from the cigar socket.
- Put the battery charger back in its box to minimise its exposure to atmospheric agents.
BATTERY TYPES
The battery chargers 03.024.31 SMART 400 and 03.024.32 SMART 1000 are specifically designed for the maintenance of all 12V lead-acid batteries on the market
(wet, Gel, MF, AGM, VRLA, etc). Please refer to the "Technical Data" for indications about the battery capacity range to which your battery charger is addressed.
MAINTENANCE
In order to ensure a regular functioning, it is suggested to periodically check the correct and stable connection of the eyelets to the battery and to remove
dust and oil from the battery poles with a metallic brush. Please read the "Safety" section before. The device has been specifically designed to be
maintenance-free. Please remove possible dust which may get accumulated on the cover of the device using a delicate detergent to avoid damaging the
stickers. In case any item of the kit does not work correctly, please contact your local dealer asking for item repairing or substitution. Any attempt to open
the device shall imply the warranty becomes no longer valid.
WARRANTY
A 36 months warranty to covers the device malfunction or failure due to improper assembly/manufacturing or breakage of any internal component. Parts,
whose deterioration is because of the usage, are not covered by the warranty. Any repairing right under manufacturer's warranty decays in case of: improper use
of the device; unduly opening of the device; repairing performed by unauthorised personnel. This warranty is limited to the original buyer of the device and it
can not be transferred to third parties. This warranty excludes implicit forms of warranty, including possible damages due to the usage of the battery charger:
Spin s.r.l. is exonerated from any damage to either persons or goods due to the usage of its products. The transportation expenses to return the defective device
are to be paid by the purchaser.
ENGLISH ITALIANO
CARICABATTERIA 03.024.31 SMART 400 / 03.024.32 SMART 1000
Il nuovo caricabatteria SMARTèdotato di doppia modalitàdi carica CAR/BIKE per batterie auto e moto, programma AGM Start/Stop (specificamente
studiato per la manutenzione delle batterie in uso sui veicoli con sistema Start&Stop) e programma Power Supply per la sostituzione della batteria. Il
caricabatteria è inoltre dotato di un sistema di compensazione automatica della temperatura: un sensore integrato misura la temperatura ambiente e
adatta l'algoritmo eseguito per ottimizzare le performance di carica in ogni condizione. I modelli 03.024.31 SMART 400 e 03.024.32 SMART 1000 sono
internamente controllati da microprocessore che monitora in tempo reale lo stato della batteria ed esegue automaticamente i seguenti 8 cicli di carica.
Fase 1 - Inizializzazione: verifica che una o più celle non siano in corto circuito e che quindi la batteria sia in condizione di essere ricaricata/recuperata.
Fase 2 - Recupero: se la batteria è in condizioni di scarica estrema (a partire da 1,25V), il dispositivo tenta un recupero, per riportarla a tensioni piùelevate
compatibili con la fase successiva.
Fase 3 - Carica Leggera: se la batteria èsignificativamente scarica, il dispositivo eroga una corrente leggera ad impulsi alla batteria, per superare la fase critica.
Fase 4 - Carica Principale: durante questa fase il caricabatteria eroga piena corrente alla batteria, la quale può recuperare fino all'85-90% della sua capacità.
Fase 5 - Desolfatazione / Assorbimento: in questa fase viene fornita alla batteria una "sovraccarica controllata" in grado di ripristinare il rimanente 10-15%
della capacità della batteria, mediante la desolfatazione/recupero delle celle piombo-acido (per livelli di solfatazione lieve o media).
Fase 6 - Analisi Batteria: il dispositivo interrompe per qualche decina di minuti l'erogazione di corrente e verifica che la batteria sia in grado di conservare la
carica ricevuta durante i precedenti cicli di ricarica. Il test viene periodicamente ripetuto ad intervalli regolari.
Fase 7 - Mantenimento: grazie ad un circuito elettronico appositamente progettato, il dispositivo mantiene la carica della batteria nei periodi di inutilizzo,
senza surriscaldamento, sovraccarica e perdita d'acqua/elettrolita.
Fase 8 - Equalizzazione: durante il mantenimento di lungo periodo, il dispositivo ogni 30 giorni esegue una carica di equalizzazione per riequilibrare le celle
della batteria, evitando fenomeni di stratificazione dell'elettrolita.
03.024.31 SMART 400 E 03.024.32 SMART 1000 - CARATTERISTICHE
- Quattro programmi: "BIKE MODE" per ricarica batterie moto, "CAR MODE" per ricarica batterie auto, "AGM START/STOP" per la ricarica di batterie di
veicoli dotati di sistema start & stop, "POWER SUPPLY" per salvaguardare le memorie dei dispositivi di bordo durante la sostituzione della batteria.
- Coppia di LED verde/rosso per indicazione della fase di carica e di eventuali errori (per dettagli si veda il paragrafo "Modalità di Funzionamento").
- LED verde (CHARGE): ciclo in esecuzione (Carica, Desolfatazione, Mantenimento...);
- LED rosso (ERROR): problema di diagnostica rilevato (inversione poli, corto circuito, batteria non collegata...).
-
Barra a 4 LED che indica il livello di carica raggiunto (50%, 65%, 80%, 100%) o il programma di carica in uso (Bike Mode, Car Mode, AGM Start/Stop, Power Supply).
- Monitoraggio in tempo reale dei parametri di batteria durante tutti i cicli di carica.
- Protezione sovraccarica batteria: scatta quando il microprocessore rileva una tensione superiore ad una predeterminata soglia; nessun rischio di
formazione di bolle per tutte le batterie in commercio (anche MF e Gel).
Al termine di ogni ciclo, il dispositivo commuta automaticamente passando alla fase successiva, senza alcun intervento esterno: SI CONSIGLIA DI LASCIARE
IL CARICABATTERIA SEMPRE COLLEGATO ALLA BATTERIA NEI PERIODI DI INUTILIZZO DEL VEICOLO. I prodotti sono costruiti e collaudati secondo le
normative vigenti per rispettare tutti i requisiti di sicurezza e compatibilità elettromagnetica. Si prega di leggere attentamente il presente manuale e di
attenersi alle istruzioni prima di utilizzare il dispositivo.
AVVERTENZE
Questo apparecchio dovrà destinarsi solo all’uso per cui èstato espressamente progettato. Ogni altro uso èda considerarsi improprio e quindi pericoloso.
Non utilizzare il dispositivo per ricaricare batterie NiCd, NiMH, Li-Ion o batterie non ricaricabili. Il costruttore è del tutto esonerato da responsabilità per
eventuali danni causati da usi impropri, erronei o irragionevoli. L’uso di ogni apparecchio elettrico richiede l’osservanza di regole fondamentali, tra cui:
- Non toccare l’apparecchio con mani o piedi bagnati o umidi.
- Non usare l’apparecchio a piedi nudi.
- Non esporre l’apparecchio ad agenti atmosferici (pioggia, acqua, salsedine...).
Verificare l'integrità dei cavi del caricabatteria prima dell'uso. Se il cavo di alimentazione risulta danneggiato, non utilizzare il prodotto ma richiederne la
sostituzione o riparazione al vostro rivenditore di zona. Prima di effettuare qualsiasi operazione di pulizia o manutenzione, scollegare l’apparecchio dalla
rete di alimentazione. In caso di presunto cattivo funzionamento, astenersi da ogni tentativo di riparazione/manutenzione e rivolgersi al rivenditore presso
cui avete acquistato il prodotto. Qualsiasi tentativo di manomissione della scatola di alimentazione comporterà la decadenza della garanzia.
SICUREZZA
il caricabatteria non èdestinato all'uso da parte di bambini o di adulti con capacità fisiche, sensoriali o mentali ridotte, o con mancanza di esperienza e
conoscenza sufficienti a comprendere le istruzioni del presente manuale, salvo in presenza di una persona responsabile che possa assicurare un uso sicuro
del dispositivo. Tenere il prodotto fuori della portata di bambini e assicurarsi che non possano giocare con l'apparecchio. Il dispositivoècostruito nel
rispetto delle vigenti normative di sicurezza ed è in grado di fornire all'operatore la seguente serie di protezioni attive in fase di installazione e di utilizzo:
1. Protezione contro inversione dei poli di batteria.
2. Protezione contro corto circuito (anche permanente).
3. Protezione contro surriscaldamento: la corrente erogata è automaticamente limitata in caso di eccessivo riscaldamento del dispositivo.
Per prevenire ogni incidente, attenersi alle seguenti norme di condotta:
1. Indossare occhiali protettivi durante le operazioni in prossimità della batteria.
2. Non ricaricare una batteria congelata o danneggiata.
3. Durante il mantenimento, una batteria non sigillata puòemettere gas esplosivi: evitare di produrre fiamme e scintille in sua prossimità e se la batteria è
scollegata dal veicolo posizionarla in un'area ben ventilata.
4. Non posizionare mai il dispositivo sopra la batteria.
5. L’acido delle batterie è corrosivo. Se viene a contatto con la pelle o gli occhi, sciacquare subito ed abbondantemente con acqua e rivolgersi ad un medico.
6. Il caricabatteria è progettato per svolgere una carica di mantenimento di lungo periodo e prevenire l’autoscarica della batteria. Se dopo un tempo triplo
rispetto a quello indicato nella tabella "Performance" sul presente manuale il caricabatteria non ha ancora ultimato la fase di carica principale, si proceda
a scollegarlo manualmente. Èpossibile che vi sia un problema di questo tipo: la batteria ècompletamente consumata; in caso di significativo
assorbimento di corrente da parte di dispositivi elettronici collegati, è possibile che si verifichi un incremento dei tempi di ricarica.
CONTENUTO DEL KIT
1. Caricabatteria 03.024.31 SMART 400 o 03.024.32 SMART 1000, da cui si dipartono il cavo di alimentazione ed il cavo di collegamento alla batteria,
costituito da una coppia di fili rosso/nero ad alto isolamento (lunghezza: 2 metri).
2. Cavo di collegamento alla batteria con occhielli per il collegamento del dispositivo alla batteria, con relativo cappuccio protettivo.
3. Cavo di collegamento alla batteria con morsetti.
4. Cavo di collegamento alla batteria con adattatore per presa accendisigari 12V.
INSTALLAZIONE DEL CAVO DI COLLEGAMENTO ALLA BATTERIA CON OCCHIELLI
Se si ricarica una batteria installata a bordo di un veicolo, è consigliabile installare il cavo di collegamento con occhielli, che permette di eseguire la seguente
procedura solo la prima volta. Si consiglia di procedere con la massima cautela (vedi sezioni "Avvertenze" e "Sicurezza") nel collegare il cavo alla batteria e di
demandare, se necessario, l'esecuzione delle operazioni qui di seguito elencate a personale qualificato:
- Collegare gli occhielli ai morsetti della batteria: il filo nero al morsetto - (polo negativo) ed il filo rosso al morsetto + (polo positivo).
- Fissare il connettore in modo stabile ed in posizione comoda da raggiungere (es: sotto la sella).
INSTALLAZIONE DEL CAVO DI COLLEGAMENTO ALLA BATTERIA CON MORSETTI
Se la batteria è disconnessa dal veicolo, collegare il morsetto nero al polo negativo (-) ed il morsetto rosso al polo positivo (+). Se la batteria è installata sul
veicolo, collegare prima il terminale di batteria non collegato al telaio (solitamente il positivo, morsetto rosso al polo + della batteria), e quindi collegare
l'altro morsetto al telaio, distante dalla batteria e dalla linea del carburante. Al termine dell'utilizzo del dispositivo, scollegare in sequenza contraria.
COLLEGAMENTO DEL CARICABATTERIA
- Rimuovere il cappuccio di protezione del cavo con occhielli e collegare il cavo in uscita del caricabatteria al cavo con occhielli. In alternativa, collegare il
caricabatteria alla batteria attraverso i morsetti isolati (vedi paragrafo precedente) o l'adattatore accendisigari. il LED rosso (ERROR) del caricabatteria si
accende, ad indicare che il dispositivo non è collegato alla rete elettrica.
- Collegare il dispositivo alla presa di rete. Il diodo LED rosso (ERROR) si dovrà spegnere. Il diodo LED verde (CHARGE) si dovrà attivare (per maggiori dettagli,
si veda il paragrafo "Modalità di Funzionamento").
SELEZIONE PROGRAMMA - BIKE MODE, CAR MODE, AGM START&STOP MODE, POWER SUPPLY
Per selezionare la modalità di funzionamento del prodotto, seguire le istruzioni riportate sul retro del manuale.
BARRA LED - VOLTMETRO E INDICATORE MODALITÀ ATTIVA
La barra LED del caricabatteria mostra il livello di carica raggiunto dalla batteria (50, 65, 80, 100%), a seconda del numero di diodi LED accesi. Se il livello di
carica è inferiore al 50%, il primo LED (giallo - 50%) lampeggia. Inoltre, quando il dispositivo è collegato alla presa di corrente e non alla batteria la barra LED
indica il programma di carica selezionato.
MODALITÀ DI FUNZIONAMENTO - CARICABATTERIA (BIKE MODE, CAR MODE, AGM START&STOP MODE)
In caso di normale funzionamento, dopo l'inizializzazione, il dispositivo segnala i cicli di carica in esecuzione attraverso il LED verde (CHARGE), come segue:
- Il LED verde lampeggia lentamente e il LED giallo 50% del voltmetro lampeggia: cicli di Recupero e Carica Leggera (fasi 2 e 3).
- Il LED verde lampeggia lentamente: ciclo di Carica Principale (fase 4).
- Il LED verde lampeggia velocemente: ciclo di Desolfatazione (fase 5) o ciclo di Equalizzazione (fase 8).
- Il LED verde è acceso fisso: ciclo di Mantenimento (fase 7).
- Il LED rosso (ERROR) rimane spento.
Per maggiori dettagli sui cicli di ricarica, si veda la sezione "Algoritmo di carica" sul presente manuale.
Il dispositivo segnala eventuali anomalie nel seguente modo:
- LED rosso (ERROR) acceso fisso: indica che l'alimentazione di rete non è presente o il prodotto è scollegato dalla presa di corrente.
- LED rosso (ERROR) lampeggiante lentamente: batteria non collegata.
- LED rosso (ERROR) lampeggiante velocemente: batteria invertita/corto circuito.
- Il LED verde (CHARGE) e il LED rosso (ERROR) lampeggiano alternativamente: l'Analisi Batteria (fase 6) ha dato esito negativo. La batteria non èin grado di
conservare la carica, può essere necessario sostituirla.
In caso di errore di installazione e/o di funzionamento, scollegare il caricabatteria come riportato nel paragrafo "Scollegamento del caricabatteria".
MODALITÀ DI FUNZIONAMENTO - POWER SUPPLY PER SOSTITUZIONE BATTERIA
- Collegare il dispositivo alla presa di corrente e selezionare la modalità "Power Supply", seguendo la procedura descritta sul retro del manuale.
- Collegare il dispositivo al polo positivo e negativo del veicolo tramite i morsetti in dotazione. Procedere quindi a scollegare la batteria da sostituire e a
installare la nuova batteria. Una volta collegata la batteria al veicolo, scollegare il caricabatteria.
SCOLLEGAMENTO DEL CARICABATTERIA
Prima di mettere in moto il veicolo, si consiglia di scollegare il caricabatteria come segue:
- Scollegare il caricabatteria dalla presa di corrente.
- Scollegare il caricabatteria dal cavo con occhielli e ripristinare il cappuccio di protezione sul connettore del cavo con occhielli. In alternativa, scollegare le
pinze dai terminali della batteria o l'adattatore accendisigari dalla presa 12V.
- Riporre il caricabatteria nella scatola originale, per minimizzare l'esposizione ad agenti atmosferici.
TIPI DI BATTERIE
03.024.31 SMART 400 e 03.024.32 SMART 1000 sono progettati per la manutenzione di tutte le batterie piombo-acido 12V (tradizionali, Gel, MF, AGM,
VRLA, Ca/Ca...),
grazie ad un algoritmo di carica universale. Per indicazioni sulla capacitàdelle batterie da ricaricare, fare riferimento alla "Scheda Tecnica" sul
presente manuale.
MANUTENZIONE
Per assicurare un funzionamento ottimale, si consiglia di controllare periodicamente il corretto fissaggio degli occhielli alla batteria e di rimuovere eventuali
incrostazioni in prossimità dei poli con una spazzola metallica. Si prega di leggere il paragrafo "Sicurezza" prima di eseguire l'operazione. Il caricabatteria è
progettato per non richiedere alcuna manutenzione: si consiglia di rimuovere la polvere depositata sull'alimentatore utilizzando eventualmente un
detergente delicato, in modo da non rovinarne l'adesivo. In caso di malfunzionamento di qualsiasi componente del kit, si contatti il rivenditore per la
riparazione. In caso di tentativo di apertura dell'alimentatore la garanzia diventerà inapplicabile.
GARANZIA
Il prodotto è coperto da una garanzia di 36 mesi a copertura dei propri prodotti per guasti o malfunzionamenti imputabili ai materiali o alla fabbricazione. Si
considerano comunque escluse da garanzia le parti il cui deterioramento è imputabile all'uso. Ogni diritto di riparazione in garanzia decade in caso di uso
improprio o di manomissioni di alcun genere o di riparazione effettuata da un tecnico non autorizzato. La presente garanzia è limitata all'acquirente
originale: non ètrasferibile a soggetti terzi. La presente garanzia esclude forme di garanzia implicite, incluse garanzie per danni recati in conseguenza
dell'uso del dispositivo: Spin s.r.l. si ritiene esonerata da qualsiasi danno recato a persone o cose dall'impiego dei propri prodotti. I costi di trasporto per la
restituzione del dispositivo difettoso sono a carico dell'acquirente.
12345678
VOLTAGE
(Volt)
CURRENT
(Amp)
CHARGING ALGORITHM
IP44 - WEATHERPROOF
INDICATO PER USO ESTERNO
CONVIENT AUX UTILISATIONS EN EXTÉRIEUR
SUITABLE FOR OUTDOOR USE
ADECUADO PARA USO EN EXTERIORES
GEEIGNET FÜR DEN AUßENBEREICH
SELEZIONE PROGRAMMA / SÉLECTION DU PROGRAMME / PROGRAM SELECTION /
SELECCIÓN PROGRAMA / PROGRAMMAUSWAHL
SELEZIONE PROGRAMMA - BIKE MODE / CAR MODE / AGM START&STOP MODE / POWER SUPPLY
Una volta collegato il caricabatteria alla presa di corrente, un LED mostrerà la modalitàdi carica attiva. Per cambiare la modalitàdi carica, si prega di seguire
la procedura sottoindicata:
- Con il caricabatteria disconnesso dalla presa di corrente e dalla batteria, collegare le pinze al caricabatteria e mettere a contatto la pinza rossa e la pinza
nera (creando un corto circuito permanente).
- Collegare il caricabatteria alla presa di corrente, sempre tenendo le pinze in corto circuito. Ogni volta che il dispositivo viene scollegato e ricollegato alla
presa di corrente, il programma di carica cambia e viene indicato dal LED corrispondente. Si raccomanda di non utilizzare mai le modalità"Car" o "AGM
Start&Stop" per batterie con capacità inferiore a quella indicata nella scheda tecnica.
- Scollegare il caricabatteria dalla presa di corrente e separare le pinze. La modalità di carica sarà tenuta in memoria finché non si ripeta questa procedura.
SÉLECTION DU PROGRAMME - BIKE MODE / CAR MODE / AGM START&STOP MODE / POWER SUPPLY
Une fois que vous avez connecté le chargeur de batterie à la prise de courant une LED vous indiquera le mode de charge active. Pour changer le mode de
charge, s'il vous plaît suivez cette procédure :
- Avec le chargeur débranché de la prise électrique et la batterie, connectez le câble avec pinces au chargeur et mettre en contact la pince rouge avec la
pince noire (en créant un court-circuit permanent).
- Connectez le chargeur à la prise de courant, toujours avec les pinces en court-circuit. Chaque fois que l'appareil est déconnecté et reconnecté à
l'alimentation électrique, le programme de charge va changer et il sera affiché par la LED correspondante. Ne jamais utiliser le "Car Mode" ou le "AGM
Start&Stop Mode" pour charger des batteries avec une capacité inférieure à celle indiquée dans les caractéristiques techniques.
- Débranchez l'appareil de la prise de courant et séparez les pinces. Le mode de charge sélectionné sera conservé en mémoire jusqu'àce que vous répétez
cette procédure.
PROGRAM SELECTION - BIKE MODE / CAR MODE / AGM START&STOP MODE / POWER SUPPLY
Once you connected the battery charger to the power outlet, a LED will show you the active charging mode. To change the charging mode, please follow
this procedure:
- With the device disconnected from the battery and from the power outlet, connect the clamps to the device and put the red and the black clamps
together (creating a permanent short circuit).
- Connect the device to the power outlet. The active charging mode will change and it will be displayed by the correspondent LED. We recommend not to
use the "Car Mode" or "AGM Start&Stop Mode" for charging batteries with a capacity lower than the one indicated in the technical data.
- Disconnect the device from the power outlet and separate the clamps. The selected charging mode will be kept in memory until you repeat this procedure.
SELECCIÓN DEL PROGRAMA - BIKE MODE / CAR MODE / AGM START&STOP MODE / POWER SUPPLY
Una vez que ha conectado el cargador a la toma de corriente, un LED le mostrará el modo de carga activo. Para cambiar el modo de carga, siga este
procedimiento:
- Manteniendo el dispositivo desconectado de la batería y de la toma de corriente, conecte las pinzas al dispositivo y ponga en contacto la pinza roja y la
pinza negra (creando un cortocircuito permanente).
- Conecte el dispositivo a la toma de corriente. El modo de carga activo cambiaráy serámostrado por el LED correspondiente. Se recomienda no utilizar el
modo Car o el modo AGM Start&Stop" para cargar baterías que tienen una capacidad inferior a la indicada en los datos técnicos.
El programa de carga seleccionado se mantiene en memoria para usos futuros.
PROGRAMMAUSWAHL - BIKE MODE / CAR MODE / AGM START&STOP MODE / POWER SUPPLY
Sobald Sie das Ladegerät an die Netzsteckdose anschließen, wird eine LED Ihnen das aktive Aufladungsprogramm zeigen. Um das Programm zu ändern,
folgen Sie bitte diesem Verfahren:
- Halten Sie das Gerät von der Batterie und vom Stromnetz getrennt und verbinden Sie die Klemmen am Gerät. Setzen Sie die rote Klemme in Kontakt mit
dem schwarzen Klemme (Schaffung eines permanenten Kurzschluss).
-
Schließen Sie das Gerät an die Steckdose. Das aktive Programm wird ändern, und es wird durch die entsprechende LED angezeigt werden. Es wird empfohlen,
niemals das "Car Mode" oder "AGM Start&Stop Mode" zum Laden einer Batterie mit niedrigere Kapazität als in Technische Daten angegeben zu benutzen.
- Trennen Sie das Gerät vom Stromnetz und trennen Sie die rote und schwarze Klemmen. Das ausgewählte Programm wird im Speicher gehalten werden, bis
Sie dieses Verfahren wiederholen.
CONTENUTO / CONTENU / CONTENT / CONTENIDO / INHALT
SCHEDA TECNICA / CARACTÉRISTIQUES TECHNIQUES / TECHNICAL DATA /
DATOS TÉCNICOS / TECHNISCHE DATEN
DISTRIBUTORE / DEALER
Spin s.r.l.
Via Casalecchio n° 35/G
47924 Rimini (RN) - ITALY
PRODUIT
Tension CA
Tension de charge
Courant
de charge
Protection
inversion polarité
Protection
court-circuit
Protection
surcharge
Protection
surchauffe
Algorithme de charge
Types des
batteries
Capacité
des batteries
Température ambiante
03.024.31 SMART 400
220÷240V ac, 50-60Hz
13.8V/14.4V - nom. 12V
1 A max (BIKE MODE)
4 A max (CAR/AGM MODE)
X
X
X
X
Automatic 8 cycles
12 V Lead-Acid (Gel, Wet,
MF, AGM, VRLA, Ca/Ca...)
3 - 60 Ah (BIKE MODE)
15 - 150 Ah (CAR/AGM MODE)
-20°C - +50°C
MODELLO
Tensione Ingresso
Tensione Carica
Corrente
Carica
Protezione
inversione polarità
Protezione
corto circuito
Protezione
sovraccarica
Protezione
surriscaldamento
Algoritmo di ricarica
Tipi di
batterie
Capacità
batterie
Temperatura oper.
03.024.32 SMART 1000
220÷240V ac, 50-60Hz
13.8V/14.4V - nom. 12V
1 A max (BIKE MODE)
10 A max (CAR/AGM MODE)
X
X
X
X
Automatic 8 cycles
12 V Lead-Acid (Gel, Wet,
MF, AGM, VRLA, Ca/Ca...)
3 - 60 Ah (BIKE MODE)
40 - 200 Ah (CAR/AGM MODE)
-20°C - +50°C
PRODUKT
Eingangsspannung
Ausgangsspannung
Lade-
Strom
Schutz
Vorzeichenumkehr
Schutz
Kurzschluss
Schutz
Überladung
Schutz
Überhitzung
Ladealgorithmus
Batterie-
Typen
Batterie-
Kapazität
Betriebstemperatur
MODELO
Tensión CA
Tensión de carga
Corriente
de carga
Protección
polaridad invertida
Protección
cortocircuito
Protección
sobrecarga
Protección
sobrecalentamiento
Algoritmo de carga
Tipos de
baterías
Capacidad
batería
Temperatura func.
MODEL
Input Voltage
Output Voltage
Charging
Current
Battery Poles
Protection
Short Circuit
Protection
Overcharge
Protection
Overheating
Protection
Charging Algorithm
Battery
Types
Battery
Capacity
Oper. Temperature
Battery
Capacity
(Ah)
3
10
20
40
Recharging
Time
BIKE MODE (h)*
< 2
< 7
< 22
< 48
Recharging Time
CAR/AGM MODE (h)*
PERFORMANCE
Battery
Capacity
(Ah)
15
40
60
100
SMART 400
< 5
< 15
< 20
< 30
* Bulk Charge Duration (Phase 4)
SMART 1000
< 3
< 6
< 9
< 15
SPINA ACCENDISIGARI UNIVERSALE
ADAPTATEUR ALLUME-CIGARE
CIGAR SOCKET ADAPTER
ADAPTATOR ENCENDEDOR CIGARROS
ZIGARETTENANZÜNDER-ADAPTER
CAVO CON MORSETTI
CÂBLE AVEC PINCES
CONNECTOR WITH CLAMPS
CABLE CON PINZAS
KABEL MIT KLEMMEN
CAVO CON OCCHIELLI
CÂBLE AVEC OEILLETS
CONNECTOR WITH EYELETS
CABLE CON OJALES
KABEL MIT ÖSEN
CARICABATTERIA
CHARGEUR DE BATTERIE
BATTERY CHARGER
CARGADOR DE BATERÍAS
BATTERIELADEGERÄT

LADEGERÄT 03.024.31 SMART 400 / 03.024.32 SMART 1000
Das neue Ladegerät SMART verfügt über zwei verschiedene Aufladungsprogramme (CAR/BIKE) für Auto- und Motorrad-Batterien, AGM Start&Stop-
Programm (speziell für die Wartung der Batterien auf Fahrzeuge mit Start-Stopp-System entwickelt) und Stromversorgungs-programm (Power Supply) für den
Batteriewechsel. 03.024.31 SMART 400 und 03.024.32 SMART 1000 werden auch mit einer automatischen Temperaturkompensation ausgestattet: ein
integrierter Sensor misst die Raumtemperatur und regelt den ausgeführten Ladealgorithmus, um die Ladeleistung unter allen Bedingungen zu maximieren.
Das Ladegerät wird von einem Microprozessor kontrolliert, um in Realzeit die Batterielage zu überwachen und automatisch die folgende 8 Ladungszyklen
durchzuführen.
Phase 1 - Initialisierung: es wird überprüft, ob eine oder mehrere Zellen kurzgeschlossen sind, bzw. ob sich die Batterie in einem korrekten Zustand befindet
und wieder aufgeladen werden kann.
Phase 2 - Erholung: das Gerät versucht, tiefentladene Batterie (Spannung ab 1,25V) wiederzubeleben, um die Batterie auf eine höhere Spannung zu nehmen.
Phase 3 - Leichtlade: wenn die Batterie entladen ist, liefert das Gerät einen leichten pulsierenden Strom an die Batterie, um die kritische Phase zu überwunden.
Phase 4 - Hauptlade: das Batterieladegerät liefert vollen Strom an die Batterie, die während dieser Phase bis zu 85-90% ihrer Kapazität wiedererlangen kann.
Phase 5 - Desulfatierung: in dieser Phase wird eine „kontrollierte Überladung“ an die Batterie geliefert, die in der Lage ist die restlichen 10-15% der
Batteriekapazität wieder herzustellen, mit einer Erholung/Entschwefelung der Pb-Säure Zellen (für eine mittel- oder niedrige Desulfatierung).
Phase 6 - Analyse der Batterie: das Gerät stoppt die Lieferung von Strom an die Batterie für eine kurze Zeit, um zu überprüfen, ob die Batterie die Ladung
erhalten kann. Dieser Test wird während der Erhaltung wiederholt.
Phase 7 - Erhaltung: dank einer eigens dafür vorgesehenen elektronischen Schaltung wird die Batterieladung auch über lange Stillstandszeiten aufrecht
erhalten, ohne Wasserverlust, Überhitzungs- und Überladungsphänomene.
Phase 8 - Ausgleich: jede 30 Tage während der Erhaltung, führt das Gerät einen Ausgleich-Lade, um die Ladung zwischen den Akku Blei-Säure-Zellen
auszugleichen und die Schichtung des Elektrolyts in den Batteriezellen zu vermeiden.
03.024.31 SMART 400 UND 03.024.32 SMART 1000 - EIGENSCHAFTEN
-
Vier Programme: "CAR MODE" für Autobatterien, "BIKE MODE" für Motorradbatterien, "AGM START/STOP" für die Aufladung von Batterien auf
Kraftfahrzeuge mit Start-Stopp-System, "POWER SUPPLY" um den Datenspeicher der Geräten an Bord während dem Austausch der Batterie zu schützen.
- Grün/Rot Ladeleuchten, um die Ladungsphase ausgeführt und alle Fehler anzuzeigen.
- Grüne Leuchtdiode (CHARGE): sie zeigt die laufende Ladungsphase (Aufladung, Desulfatierung, Erhaltung...) an;
- Rote Leuchtdiode (ERROR): sie zeigt alle Fehler (Batterie nicht verbunden, Kurzschluss oder Vorzeichenumkehr...) an
- LED-Leiste mit 4 Leuchdioden, die den Batterieladezustand (50%, 65%, 80%, 100%) oder das ausgeführten Ladeprogramm (Bike Mode, Car Mode, AGM
Start/Stop, Power Supply) zeigen.
- Echtzeit Überwachung der wichtigsten Batterie-Parameter während jedes Ladezyklus.
- Schutz vor Batterieüberladung: keine Risiken von Blasenbildung in allen erhältlichen Batterien (insbesondere für versiegelte und Gelbatterien).
Bei Abschluss jedes Zyklus, schaltet das Gerät automatisch auf den nächsten, ohne Intervention von außen: WIR SCHLAGEN VOR, DAS LADEGERÄT IMMER
MIT DER BATTERIE VERBUNDEN ZU LASSEN. Die Produkte wurden entwickelt, hergestellt und geprüft gemäß den aktuellen europäischen Normen, um alle
Anforderungen für elektronische Geräte zu entsprechen (Gerät Sicherheit, elektromagnetische Verträglichkeit...). Bitte lesen Sie diese Anleitung sorgfältig
und befolgen Sie alle die Empfehlungen, bevor Sie das Gerät installieren und benutzen.
WARNUNG
Das Gerät muss für den Zweck verwendet werden, für den es entworfen wurde. Jede andere Anwendung ist unzweckgemäß und kann deshalb gefährlich
werden. Verwenden Sie nicht das Gerät zum Laden von NiCd, NiMH, Lithium-Batterien oder von nicht wiederaufladbaren Batterien. Der Hersteller ist
vollkommen von jeder Verantwortung für eventuelle Schäden befreit, die durch den falschen und/oder unzweckmäßigen Gebrauch verursacht werden. Es
ist wichtig daran zu erinnern, dass sich derjenige, der die Geräte verwendet sich an folgende Grundregeln halten muss:
- Das Ladegerät darf nicht mit feuchten oder nassen Körperteilen berührt werden.
- Das Ladegerät darf nicht barfuß verwendet werden.
- Stellen Sie das Gerät atmosphärischen Agenten (Regen, Wasser...) nicht aus.
Überprüfen Sie die Integrität der Kabel vor der Verwendung. Wenn das Netzkabel beschädigt ist, verwenden Sie nicht das Produkt sondern erfordern Sie
Ersatz oder Reparatur an Ihres Fachgeschäft. Trennen Sie das Gerät von der Steckdose, bevor sie es reinigen oder pflegen. Unterlassen Sie alle
eigenhändigen Reparaturen und Wartungen. Wenden Sie sich bei mutmaßlichen Funktionsstörungen an das nächste Fachgeschäft. Jede eigenhändige
Veränderung des Gerätes führt zum Verfall der Garantie.
SICHERHEITSHINWEISE
Das Ladegerät ist nicht dafür bestimmt, durch Personen (einschließlich Kinder) mit eingeschränkten physischen, sensorischen oder geistigen Fähigkeiten oder
mangels Erfahrung und/oder mangels Wissen benutzt zu werden, es sei denn, sie werden durch eine für ihre Sicherheit zuständige Person beaufsichtigt oder
erhielten von ihr Anweisungen, wie das Gerät zu benutzen ist. Kinder sollten beaufsichtigt werden, um sicherzustellen, dass sie nicht mit dem Gerät spielen.
Das Ladegerät wurde unter Beachtung der gängigen Sicherheitsnormen gebaut und es ist in der Lage, folgende Sicherheiten zu garantieren:
1. Schutz gegen Vorzeichenumkehr/Invertierung.
2. Schutz gegen Kurzschluss.
3. Schutz gegen Überhitzung: der Strom wird automatisch reduziert, sobald sich die Batterie überhitzt.
Um Unfälle zu vermeiden ist es wichtig, sich bei der Pflege der Batterie an die folgenden Verhaltensanweisungen zu halten:
1. Bei Anschluss bzw. Trennung der Batterie ist eine Schutzbrille zu tragen.
2. Laden Sie keine gefrorene Batterie auf.
3. Während der Erhaltungsphase könnte die Batterie explosive Gase entweichen. Vermeiden Sie daher offene Flammen und Funkenbildung in ihrer Nähe.
4. Stellen Sie das Ladegerät während des Ladens und der Erhaltung nie auf die Batterie.
5. Die Batteriesäure ist ätzend. Falls die Säure mit Haut oder Augen in Kontakt kommt, ist der betreffende Bereich unverzüglich mit reichlich Wasser zu
spülen. Wenden Sie dann sofort an einen Arzt.
6. Das Ladergerät wurde entworfen, um eine langfristige Erhaltung der Batterie zu gewährleisten und das langsame Selbstentladung der Batterie zu
verhindern. Falls das Gerät die Hauptlade nicht bewältigt nach einer Periode, die etwa dreimal den Zetiraum angegeben ist (siehen Sie bitte die Tabelle
„Performance“), trennen Sie das Gerät manuell. Eines des folgended Probleme könnte auftreten: der Akku ist definitiv abgenutzt, oder es gibt
elektronische Geräte mit der Batterie verbunden (Bordcomputer, Radio, usw.), die zuviel Strom verbrauchen.
VERPACKUNGSINHALT
1. Ladegerät 03.024.31 SMART 400 oder 03.024.32 SMART 1000, mit Stromzuführungskabel und Batterieverbindungskabel (Hochisolierungskabel
rot/schwarz, Standardlänge: 2 Meter).
2. Verlängerungsbatteriekabel mit Ösen für die Verbindung zwischen dem Ladegerät und der Batterie + eine dazugehörige Schutzkappe.
3. Batteriekabel mit Klemmen.
4. 12V-Adapter für Zigarettenanzünderbuchse.
INSTALLATION DES BATTERIEVERBINDUGSKABEL MIT ÖSEN
Wenn Sie eine Batterie in einem Fahrzeug installiert aufladen, ist es ratsam, das Anschlusskabel mit Ösen zu benutzen, mit denen Sie das folgende Verfahren
nur das erste Mal durchführen können. Sie sollten bei der Installation extrem vorsichtig sein (lesen die bitte Abschnitte „Warnung“und
„Sicherheitshinweise“). Sollte das ihre Fragen nicht beantworten können, fragen Sie qualifiziertes Personal:
- Verbinden Sie die Ösen an die Batterie: das schwarze Kabel mit der Klemme am negativen Pol (-) und das rote Kabel mit der Klemme am positiven Pol (+).
- Befestigen Sie den Stecker in einen bequemen Platz an Bord (z. B. unter dem Sattel).
INSTALLATION DES BATTERIEVERBINDUGSKABEL MIT KLEMMEN
Wenn die Batterie vom Fahrzeug getrennt wird, verbinden Sie die schwarze Klemme an den Minuspol (-) und die rote Klemme an den Pluspol (+). Wenn die
Batterie in einem Fahrzeug installiert ist, verbinden Sie die Batterieklemmen nicht mit dem Chassis verbunden (normalerweise das positiv, rote Klemme an
den Pluspol), und dann verbinden Sie die andere Klemme mit dem Kraftfahrzeugrahmen, weit weg von der Batterie und von der Kraftstoffleitung. Am Ende
der Benutzung, trennen Sie das Gerät in umgekehrter Reihenfolge.
VERBINDUNG DES LADEGERÄTS
- Entfernen Sie die Schutzkappe des Batterieverbindungskabels mit Ösen und verbinden Sie das Ladegerät mit dem Kabel. Andernfalls, verbinden Sie das
Ladegerät an die Batterie durch die isolierte Klemmen (siehe vorherigen Abschnitt) oder den Adapter für Zigarettenanzünderbuchse. Die rote Leuchtdiode
(ERROR) wird anschalten: das heißt, dass das Gerät nicht an das Stromnetz angeschlossen ist.
- Verbinden Sie das Gerät mit dem Stromnetz. Die rote Leuchtdiode (ERROR) wird ausschalten. Die grüne Leuchtdiode (CHARGE) wird anschalten, blinkend
oder konstant leuchend nach dem Zyklus ausgeführt (für weitere Information, lesen Sie bitte die „Betrieb“ Sektion).
AUSWAHL DES PROGRAMMS - BIKE MODE, CAR MODE, AGM START&STOP MODE, POWER SUPPLY
Um das Ladeprogramm auszuwählen, folgen Sie bitte den Anweisungen auf der Rückseite des Handbuchs.
LED LEISTE - VOLTMETER UND ANZEIGE DES LADEPROGRAMMS
Die LED-Leiste auf das Ladegerät zeigt den Batterieladezustand (50, 65, 80, 100%), nach der Anzahl von beleuchteten Leuchtdioden. Wenn der Ladezustand
niedriger als 50% ist, wird die erste Leuchtdiode (gelb - 50%) blinken. Darüber hinaus, wenn das Gerät nur mit der Netzsteckdose und nicht mit der Batterie
verbunden ist, zeigt die LED-Leiste das ausgewählte Ladeprogramm.
BETRIEB - BATTERIELADEGERÄT (BIKE MODE, CAR MODE, AGM START&STOP MODE)
Im Fall vom normalen Betrieb mit der grünen Leuchtdiode (CHARGE) an, tauchen folgenden Anzeigen auf:
- Die grüne Leuchtdiode blickt langsam und die gelbe Leuchtdiode des Voltmeters (50%) blickt schnell: rholung/Leichtlade im Betrieb (Phasen 2 und 3).
- Die grüne Leuchtdiode blickt langsam: Aufladung im Betrieb (Phase 4).
- Die grüne Leuchtdiode blickt schnell: Desulfatierung im Betrieb (Phase 5).
- Die grüne Leuchtdiode ist ständig an: Erhaltung im Betrieb (Phase 7).
- Die rote Leuchtdiode ist aus.
Für weitere Informationen über die Ladungszyklen, lesen Sie bitte die „Ladealgorithmus“ Sektion.
Eventuell könnte das Gerät bei Fehlfunktionen folgende Meldungen zeigen:al
- Die rote Leuchtdiode ist ständig an: das Gerät ist an die Netzsteckdose nicht verbunden.
- Die rote Leuchtdiode blickt langsam: die Batterie ist nicht korrekt verbunden.
- Die rote Leuchtdiode blickt schnell: Kurzschluss oder Vorzeichenumkehr.
- Grüne Leuchtdiode + rote Leuchtdiode blicken alternativ: die Batterie-Analyse (phase 6) ergab ein negatives Ergebnis. Die Batterie ist nicht in der Lage, die
Ladung zu erhalten. Es könnte erforderlich sein, sie zu ersetzen.
Sollten Fehler bei Installation und/oder Funktionen auftreten, bitte trennen Sie das Ladegerät (lesen Sie bitte die Sektion „Unterbrechung des Ladegeräts“).
BETRIEB - POWER SUPPLY/STROMVERSORGUNG FÜR BATTERIEAUSTAUSCH
- Schließen Sie das Gerät an die Netzsteckdose und wählen Sie das Programm "Power Supply", wie auf der Rückseite des Handbuchs beschrieben.
- Schließen Sie das Gerät an den Plus- und Minuspol des Fahrzeugs durch die vorgesehenen Klemmen. Dann trennen Sie die alte Batterie und installieren Sie
die neue Batterie. Nach dem Anschluss der Batterie an das Fahrzeug, trennen Sie das Ladegerät aus der Batterie.
TRENNEN DES LADEGERÄTS
Bevor Sie das Fahrzeug anlassen empfehlen wir, das Batterieladegerät wie im Folgenden beschrieben zu trennen:
- Trennen Sie das Batterieladegerät von der Netzsteckdose.
- Trennen Sie das Batterieladegerät von dem Batterieverbindungskabel mit Ösen und stülpen Sie wieder die Schutzkappe über den Stecker. Andernfalls,
trennen Sie die Klemmen von der Batterie oder den 12-Adapter von der 12V-Steckdose.
- Packen Sie das Batterieladegerät in die dafür vorgesehene Verpackung, damit es vor Witterungseinflüssen geschützt ist.
BATTERIETYPEN
Die Ladegeräte 03.024.31 SMART 400 und 03.024.32 SMART 1000 sind für die Wartung aller erhältlichen 12V Blei-Säure-Batterien entworfen (Nassbatterien,
MF-, AGM-, VRLA- und GEL-Batterien). Lesen Sie bitte die Tabelle „Technische Daten“ für Hinweise über die Batteriekapazität, mit der Ihr Ladegerät geeignet ist.
WARTUNG
Um ein regelgemäßiges Funktionieren zu gewährleisten, wird es vorgeschlagen, periodisch die korrekte und stabile Verbindung der Ösen an der Batterie zu
kontrollieren und Staub/Öl von der Batterie-Pole mot einem metallischen Bürste herauszunehmenn. Bitte lesen Sie die Sicherheitshinweise bevor. Das
Batterieladegerät ist so konstruiert, dass es keine Wartung benötigt: wir empfehlen nur den Staub auf dem Speiser zu entfernen und eventuell ein verträgliches
Reinigungsmittel zu verwenden, damit sich Kleber nicht auflöst. Sollte das Gerät nicht ordnungemäß funktionieren, dann können Sie ihre Garantie bei ihrem
Händler einlösen. Machen Sie sich bewusst, dass Sie ihren Garantieanspruch verlieren, sollten Sie den Speiser öffnen.
GARANTIE
Das Produkt wird durch ein 36-Monats-Garantie für das Material und die Herstellung des Gerätes abgedeckt. Es wird keinerlei Garantie auf Verschleißteile
gewährt. Jedes Reparaturrecht entfällt, wenn ein Schaden durch einen unangemessen Gebrauch oder das Aufbrechen des Gehäuses entsteht oder eine
Reparatur durch einen unautorisierten Techniker durchgeführt wird. Die vorliegende Garantie ist nicht übertragbar und an den direkten Käufer gebunden. Bei
unsachgemäßem Gebrauch wird keinerlei Garantie für Schäden an Sachgegenständen und Personen gewährt. Die Versandkosten, die für beschädigte Geräte,
die eingeschickt werden, anfallen, trägt der Käufer.
CARGADOR 03.024.31 SMART 400 / 03.024.32 SMART 1000
El nuevo cargador de batería SMART tiene dos programas de carga CAR/BIKE para las baterías de coches y motocicletas, un programa AGM Start/Stop
(especialmente diseñado para el mantenimiento de las baterías de vehículos con sistema Start&Stop) y un programa Power Supply para la sustitución de la
batería. 03.024.31 SMART 400 e 03.024.32 SMART 1000 están equipados también de un sistema automático de compensación de la temperatura: un
sensor integrado mide la temperatura ambiente y ajusta el algoritmo que se está ejecutando para optimizar el rendimiento de la carga bajo cualquier
condición. El cargador de batería es controlado internamente por un microprocesador que monitoriza el estado de carga de la batería en tiempo real y
ejecuta automáticamente los 8 ciclos de carga que siguen:
Paso 1 - Inicialización: el dispositivo controla que las células no están en corto circuito y que la batería puede ser recargada/recuperada.
Paso 2 - Recuperación: si la batería está extremadamente descargada (a partir de una tensión de 1,25V), el dispositivo intenta recuperarla, llevándola a un
voltaje más alto, compatible con el paso siguiente.
Paso 3 - Carga Ligera: si la batería está bastante descargada, el dispositivo emite una corriente ligera y pulsante a la batería para superar esta fase crítica.
Paso 4 - Carga Principal: durante esta fase, el cargador suministra corriente máxima a la batería, que puede recuperar así hasta el 85-90% de su capacidad.
Paso 5 - Desulfatación / Absorción: en este paso se suministra a la batería una "sobrecarga controlada" que permite de recuperar el restante 15-20% de
capacidad de la batería, a través de la desulfatación de las células plomo-ácido (en caso de niveles moderados de sulfatación).
Paso 6 - Análisis de la batería: el dispositivo se detiene durante unos minutos, para verificar que la batería es capaz de mantener la carga recibida durante
los ciclos anteriores de carga. Esta prueba se repite a intervalos regulares durante la fase de mantenimiento.
Paso 7 - Mantenimiento: gracias a un circuito electrónico específicamente diseñado, el cargador mantiene la batería en las mejores condiciones de carga
durante largos periodos, cuando el vehículo no se utiliza, sin ningún tipo de inconveniente (sobrecarga, sobrecalentamiento, pérdida de agua/electrolito...).
Paso 8 - Nivelación: cada 30 días durante el mantenimiento a largo plazo, el dispositivo ejecuta una carga de nivelación a fin de equilibrar las células de la
batería de plomo-ácido, evitando la estratificación del electrolito.
03.024.31 SMART 400 E 03.024.32 SMART 1000 - CARACTERÍSTICAS
- Cuatro programas: "BIKE MODE" para la carga de baterías motos, "CAR MODE" para la carga de baterías coche, "AGM START/STOP" para la carga de las
baterías de vehículos con sistema Start&Stop, "POWER SUPPLY" para guardar las memorias de los dispositivos abordo cuando se sustituye la batería.
- Dos diodos LED verde/rojo para indicar el ciclo de carga en curso y cualquier error:
- el diodo LED verde (CHARGE) indica el ciclo de carga ejecutado (carga, mantenimiento...);
- el diodo LED rojo (ERROR) comunica cualquier problema (inversión de polaridad, cortocircuito, batería desconectada...).
- Barra con 4 diodos LED que indica el nivel de carga alcanzado (50%, 65%, 80%, 100%) o el programa de carga que se está utilizando (Bike Mode, Car Mode,
AGM Start/Stop, Power Supply).
- Verificación en tiempo real de los parámetros de batería durante todas las fases de carga.
- Protección contra la sobrecarga, que se activa cuando el microprocesador detecta un voltaje por encima de un umbral predeterminado: no hay riesgo de
formación de burbujas para ningún tipo de batería, en particular para baterías selladas y de gel.
Después de cada ciclo, el dispositivo pasa automáticamente al siguiente paso sin ninguna intervención externa: SE RECOMIENDA DEJAR EL CARGADOR
SIEMPRE CONECTADO A LA BATERÍA CUANDO NO SE UTILIZA EL VEHÍCULO. Los productos son fabricados según la normativa vigente para satisfacer todas
las necesidas de seguridad y compatibilidad electromagnética. Por favor, lea atentamente este manual y siga todas las instrucciones antes de usar y instalar
el dispositivo.
ADVERTENCIAS
Este dispositivo debe ser utilizado sólo para el uso para el cual fue específicamente diseñado. Cualquier otro uso se considera impropio y por lo tanto
peligroso. No utilice el dispositivo para cargar baterías NiCd, NiMH, Li-Ion o baterías no recargables. El fabricante es totalmente exonerado de
responsabilidad por daños causados por el empleo incorrecto, erróneo o irrazonable. Es importante recordar que el uso de cualquier aparato eléctrico
requiere el cumplimiento de algunas normas básicas:
- No toque el dispositivo con las manos o los pies mojados o húmedos.
- No utilice el cargador descalzo.
- No deje el aparato expuesto a los agentes atmosféricos (lluvia, heladas, sol...).
Compruebe la integridad de los cables del cargador antes de su uso. Si el cable eléctrico está dañado, no utilice el producto, pero requiere el reemplazo o la
reparación a su distribuidor. Antes de cualquier operación de limpieza o mantenimiento, desconecte el aparato de la red eléctrica. En caso de sospecha de
mal funcionamiento, por favor, se abstenga de cualquier intento de reparación; póngase en contacto con su tienda local. Cualquier manipulación del
producto por parte de personal no autorizado anulará automáticamente la garantía.
SEGURIDAD
El cargador no debe ser utilizado por niños o personas con capacidades físicas, sensoriales o mentales disminuidas, ni con falta de experiencia o
conocimientos suficientes para leer y comprender este manual, a menos que estén bajo la supervisión de una persona responsable que compruebe que
puedan manejarlo con seguridad. Conserve y use el cargador apartado del alcance de niños, y cerciórese de que los niños no puedan jugar con él. El
dispositivo es fabricado en cumplimiento de las normas de seguridad vigentes y con las siguientes protecciónes activas durante la instalación y el uso:
1. Protección contra inversión de polaridad de la batería.
2. Protección contra cortocircuito (también indefinidamente).
3. Protección contra sobrecalentamiento: la corriente de salida se limita automáticamente en caso de excesivo calentamiento del dispositivo.
Para evitar cualquier accidente, las siguientes reglas de conducta deben estar en permanente observancia en el mantenimiento de las baterías:
1. Siempre use gafas de protección durante las operaciones de mantenimiento cerca de la batería.
2. Nunca cargue una batería congelada.
3. Durante la carga y el mantenimiento, una batería puede emitir gases explosivos: evite llamas y chispas en sus proximidades.
4. Nunca coloque el dispositivo encima de la batería durante la carga.
5.
El ácido de la batería es corrosivo. Si entra en contacto con la piel o los ojos, lavar inmediatamente con abundante cantidad de agua y buscar atención médica.
6. El producto está diseñado para mantener la batería a largo plazo para prevenir la auto-descarga de la batería. Si el cargador no completa la Carga Principal
dentro de un plazo de tres veces mayor que lo indicado en este manual ("Performance"), por favor proceda a desconectarlo manualmente. Es posible que
se haya producido uno de los siguientes problemas: la batería está completamente agotada; en caso de excesivo consumo de energía por los dispositivos
electrónicos conectados a la batería, se puede experimentar un aumento de los tiempos de recarga.
CONTENIDO DEL PAQUETE
1. Cargador de batería 03.024.31 SMART 400 u 03.024.32 SMART 1000, con dos cables incorporados: el cable de alimentación y el cable de conexión a la
batería que consiste en dos cable rojo/negro de alto aislamiento (longitud: 2 metros).
2. Cable de conexión a la batería con ojales, para la conexión del cargador a la batería, con tapa de protección.
3. Cable de conexión a la batería con pinzas.
4. Adaptador 12V para toma de mechero.
INSTALACIÓN DEL CABLE DE CONEXIÓN CON OJALES
Si usted carga una batería instalada en un vehículo, se recomienda instalar el cable de conexión con ojales, que le permite ejecutar el siguiente
procedimiento sólo la primera vez. Se aconseja proceder con precaución (ver secciónes "Advertencias" y "Seguridad") para conectar el cable a la batería. Si
fuese necesario, se aconseja delegar la ejecución de las siguientes operaciones a un personal cualificado:
- Conecte los ojales a la batería: el cable negro debe estar conectado al terminal - (negativo) y el cable rojo al terminal + (positivo).
- Asegure el conector en un lugar conveniente (por ejemplo, debajo del asiento de la moto).
INSTALACIÓN DEL CABLE DE CONEXIÓN CON PINZAS
Si la batería está desconectada del vehículo, conecte la pinza negro al terminal negativo (-) y la pinza roja al terminal positivo (+). Si la batería está instalada
en el vehículo, conecte el terminal de la batería que no está conectado al chasis (generalmente lo positivo, pinza roja al terminal + de la batería) y luego
conecte la otra pinza al chasis, lejos de la batería y de la línea de combustible. Al final de la utilización del dispositivo, desconecte el orden inverso.
PROCEDIMIENTO DE CONEXIÓN
- Quite la tapa de protección del cable con ojales y conecte el cargador al cable. Alternativamente, conecte el cargador a la batería a través de las pinzas
(véase la sección anterior) o del adaptador 12V. El LED rojo (ERROR) se enciende, para indicar que el cargador está desconectado de la red eléctrica.
- Conecte el dispositivo a la toma de corriente. El diodo LED rojo se apaga. El diodo LED verde se activa (para detalles, consulte "Modo de funcionamiento").
SELECCIÓN DEL PROGRAMA - BIKE MODE, CAR MODE, AGM START&STOP, POWER SUPPLY
Para seleccionar el modo de funcionamiento del producto, siguan las instrucciones al reverso del manual
BARRA LED - VOLTÍMETRO E INDICADOR DEL MODO EJECUTADO
La barra con diodos LED del cargador indica el nivel de carga alcanzado por la batería (50, 65, 80, 100%), según el número de diodos LED encendidos.
Si el
estado de carga es menos de 50%, el primer LED (amarillo - 50%) parpadea.
Además
, cuando el cargador está conectado a la toma de corriente y
desconectado de la
batería, la barra LED indica el programa de carga seleccionado.
MODO DE FUNCIONAMIENTO - CARGADOR DE BATERÍA (BIKE MODE, CAR MODE, AGM START&STOP MODE)
En caso de condiciones normales de funcionamiento, el dispositivo señala los pasos de carga ejecutados a través del LED verde (CHARGE), de la siguiente manera:
- El LED verde parpadea lentamente y el LED amarillo 50% del voltímetro parpadea rápidamente: ciclos de Recuperación y Carga Ligera (pasos 2, 3).
- El LED verde parpadea lentamente: ciclo de Carga Principal (paso 4)
- El LED verde parpadea rápidamente: ciclo de Desulfatación (paso 5).
- LED verde constantemente encendido: ciclo de Mantenimiento (paso 7).
- EL LED rojo (ERROR) está apagado.
Para más detalles sobre los pasos de carga, por favor consulte la sección "Algoritmo de carga".
El dispositivo indica cualquier anomalía de la siguiente manera:
- LED rojo (ERROR) constantemente encendido: falta de alimentación, el cargador está desconectado de la red eléctrica.
- El LED rojo parpadea lentamente: la batería no es conectada.
- El LED rojo parpadea rápidamente: inversión de polaridad o cortocircuito.
- El LED verde (CHARGE) y el LED rojo (ERROR) parpadean alternativamente: el Análisis de la batería (paso 6) ha detectado que la batería no puede
mantener la carga. Podría ser necesario sustituirla.
En caso de error de instalación y/o de funcionamiento, proceder a desconectar el cargador como descrito en la sección "Desconectar el cargador".
MODO DE FUNCIONAMIENTO - FUENTE DE ALIMENTACIÓN (POWER SUPPLY) PARA LA SUSTITUCIÓN DE LA BATERÍA
- Conecten el dispositivo a la toma de corriente y luego seleccionen el modo "Power Supply", siguiendo el procedimiento describido al reverso del manual.
- Conecten el dispositivo a los polos positivo y negativo del vehículo a través de las pinzas de las que el cargador está equipado. Luego disconecten la batería
para sustituir e instalen la nueva batería. Una vez conectada la batería al vehículo, disconecten el cargador.
DESCONECTAR EL CARGADOR
Antes de arrancar el vehículo, se recomienda desconectar el cargador de la siguiente manera:
- Desconecte el cargador de la red de alimentación.
- Desconecte el cargador del cable con ojales y vuelva a colocar la tapa de protección sobre el conector del cable con ojales. Alternativamente, deconecte las
pinzas de la batería o el adaptador 12V de la toma de mechero.
- Vuelva a colocar el cargador en su embalaje original, para minimizar la exposición a los agentes atmosféricos.
TIPOS DE BATERÍAS
Los cargadores SMART 03.024.31 SMART 400 y 03.024.32 SMART 1000 están diseñados para el mantenimiento de todas las baterías de 12V de plomo-ácido
disponibles en el mercado (tradicionales, de gel, MF, AGM, VRLA, etc). Para instrucciones sobre la capacidad de las baterías, por favor consulte la sección
"Datos Técnicos" de este manual.
MANTENIMIENTO
Para asegurar un rendimiento óptimo, le recomendamos que revise periódicamente la correcta conexión de los ojales a la batería y que elimine cualquier
depósito cerca de los polos de la batería con un cepillo de alambre. Por favor, consulte la sección "Seguridad" antes de ejecutar la operación. El cargador
está diseñado para no requerir mantenimiento. Le recomendamos de quitar el polvo del cargador con un detergente suave, para no arruinar la etiqueta. En
caso de mal funcionamiento de cualquier componente del kit, póngase en contacto con el distribuidor para su reparación. Cualquier intento de abrir el
producto anulará automáticamente la garantía.
GARANTÍA
El producto está cubierto por una garantía de 36 meses para fallas o mal funcionamiento debidos a materiales o mano de obra. Esta garantía no cubre las
partes cuyo deterioro es atribuible al uso. Cada derecho de reparación en garantía queda anulado por el mal uso, la manipulación de cualquier tipo o la
reparación por un técnico no autorizado. Esta garantía limitada es extendida solamente al comprador original: no es transferible a terceros. Esta garantía
excluye las formas de las garantías implícitas, incluidas las garantías por daños y perjuicios ocasionados como consecuencia de la utílización del dispositivo:
Spin s.r.l. está exenta de cualquier responsabilidad por cualquier daño causado a personas o bienes por el uso de sus productos. Los gastos de envío para la
devolución del producto defectuoso están al cargo del comprador.
ESPAÑOL
DEUTSCH
CHARGEUR 03.024.31 SMART 400 / 03.024.32 SMART 1000
Le nouveau chargeur SMART est équipé de deux programmes de charge CAR/BIKE pour les batteries de voiture et moto, un programme AGM Start/Stop
(spécifiquement conçu pour l'entretien des batteries des véhicules avec système Start&Stop) et un programme Power Supply pour le remplacement de la
batterie. 03.024.31 SMART 400 et 03.024.32 SMART 1000 sont équipés aussi d'un système de compensation automatique de la température: un senseur
intégré mesure la température ambiante et ajuste l'algorithme en fonction pour optimiser la performance de charge en chaque condition. Le chargeur
est contrôlé pour un microprocesseur qui surveille l'état de la batterie en temps réel et exécute automatiquement les 8 cycles suivantes.
Phase 1 - Initialisation : le dispositif contrôle que les cellules ne sont pas court-circuités et que la batterie peut être rechargée/récupérée.
Phase 2 - Récupération : si la batterie est extrêmement déchargée (àpartir d'une tension de 1,25 V), l'appareil tente de la récupérer, a fin de l'amener àdes
tensions plus élevées, compatibles avec la phase suivante.
Phase 3 - Charge Douce : si la batterie est très déchargée, le dispositif fournit un doux courant pulsé, jusqu'à surmonter cette phase critique.
Phase 4 - Charge Principale : pendant cette phase, le chargeur fournit un courant maximal à la batterie, qui récupère environ 85-90% de sa capacité.
Phase 5 - Désulfatation / Absorption : le chargeur fournit à la batterie une "surcharge contrôlée" que permet de récupérer le restant 15-20% de capacité de
la batterie, à travers la désulfatation des cellules au plomb-acide (en cas de niveaux moyens/bas de sulfatation).
Phase 6 - Analyse de la batterie : l'appareil s'arrête pendant quelques minutes, pour vérifier que la batterie est capable de retenir la charge reçue pendant
les phases précédentes. L'essai est répété à intervalles réguliers pendant la phase d’entretien.
Phase 7 - Entretien : grâce à un circuit électronique spécialement conçu, le chargeur maintient la batterie dans les meilleures conditions de charge, pendant
longtemps, quand le véhicule ne s’utilise pas, sans aucun inconvénient (surchauffe, surcharge, perte d'eau/électrolyte...).
Phase 8 - Égalisation : pendant l'entretien, chaque 30 jours, le chargeur effectue une charge d'égalisation pour équilibrer les cellules au plomb-acide de la
batterie, évitant ainsi la stratification de l'électrolyte.
03.024.31 SMART 400 ET 03.024.32 SMART 1000 - CARACTÉRISTIQUES
-
Catre programmes : "BIKE MODE" pour la charge des batteries moto, "CAR MODE" pour la charge des batteries voitures, "AGM START&STOP" pour la charge
de véhicules équipés de système start&stop, "POWER SUPPLY" pour protéger la mémoire des dispositifs à bord pendant le remplacement de la batterie.
- 2 LEDs (vert/rouge) - ils indiquent la phase de charge exécutée et les erreurs.
- LED Vert (CHARGE) : la phase de charge exécutée (Charge, Desulfatation, Entretien...) ;
- LED Rouge (ERROR) : les erreurs de fonctionnement (inversions de polarité, court circuit...).
- Barre avec 4 LEDs qu'indique le niveau de charge (50%, 65%, 80%, 100%) ou le programme de charge qu'est utilisé(Bike Mode, Car Mode, AGM
Start&Stop, Power Supply).
- Contrôle des paramètres de la batterie en temps réel pendant tous les cycles de charge.
- Protection contre la surcharge, qui s'active quand le microprocesseur détecte une tension supérieure à un seuil prédéterminé : aucun risque de formation
de bulles pour tous les types de batterie (traditionnelles au plomb-acide, MF, VRLA, Gel, AGM).
Àla fin de chaque cycle, l'appareil passe automatiquement à l'étape suivante sans aucune intervention extérieure : VOUS POUVEZ LAISSER LE CHARGEUR
TOUJOURS BRANCHÉ À LA BATTERIE QUAND NE S’UTILISE PAS LE VÉHICULE. Les produits ont été conçus, fabriqués et évalués selon les normes actuelles dans
la UE pour se conformer à toutes les normes et les dispositions pour l'équipement électronique (sécurité, compatibilité électromagnétique...). Lisez s'il vous
plaît scrupuleusement ce mode d’emploi et suivez toutes ses recommandations avant d'utiliser et d'installer l'appareil.
DIRECTIVES GÉNÉRALES
Cet appareil est destiné pour être utiliséselon les conditions de travail auxquelles il a été conçu. Autre sorte d'utilisation doit être considérée dangereuse ou
impropre. Ne pas utiliser l'appareil pour batteries NiCd, NiMH, au lithium ou des piles non rechargeables. Le producteur est complètement disculpéde
n'importe quelle responsabilité pour les dommages possibles en raison de l’utilisation à d’autres fins ou impropre de l'appareil. En utilisant l'appareil les
principes d'usage fondamentaux suivants doivent être considérés :
- Ne touchez pas l'appareil avec les mains mouillées (ou les pieds mouillés).
- Ne touchez pas l'appareil aux pieds nus.
- N'exposez pas l'appareil aux agents atmosphériques (pluie, eau, salinité...).
S'il vous plaît vérifiez que les câbles d'entrée et de sortie sont dans de bonnes conditions avant d'utiliser l'appareil. Si le câble est endommagé, ne pas
utiliser l'appareil : demander àvotre revendeur pour réparation ou remplacement. Avant d'exécuter n'importe quelle opération de nettoyage/entretien sur
l'appareil, vérifiez s'il vous plaît que l'appareil n'est pas branché à la prise murale. Dans le cas oùl'appareil ne travaille pas correctement, n'essayez pas de le
réparer; demandezàvotre revendeur local. Les tentatives d'ouvrir l'appareil et le fait de confier l'appareil à réparer à des tiers provoquent l’annulation de la
garantie.
SÉCURITÉ
Le chargeur n'est pas destiné à être utilisépar des personnes (y compris les enfants) ayant des handicaps physiques, sensoriels ou mentaux, ou un manque
d'expérience, à moins qu'ils n'aient été informés de la manière d'utiliser l'appareil par une personne responsable de leur sécurité. Conserver hors de la
portée des enfants et assurez-vous qu'ils ne peuvent pas jouer avec le produit. L'appareil conçu et fabriquée conformément aux normes actuelles dans la
Union Européenne, et il incorpore les suivantes dispositifs de protection :
1. Protection contre les inversions de polarité.
2. Protection contre les court-circuits.
3. Protection contre la surchauffe: le courant fourni à la batterie est limité en cas de très haute température.
Pour prévenir toutes éventuels accidents, respectez s'il vous plaît les directives suivantes pour la manipulation des batteries :
1. Portez des lunettes de sécurité en opérant en proximité de la batterie.
2. Ne jamais mettre en charge une batterie gelée.
3. Une batterie en charge pourrait émettre des gaz explosifs. Évitez flammes ou étincelles en proximité de la batterie pendant la charge et l'entretien.
4. Ne jamais installer le chargeur sur la batterie pendant la charge.
5. L’acide contenu dans les batteries est hautement corrosif. En cas de contact avec les yeux ou la peau, rincez immédiatement avec beaucoup d’eau et
contactez aussitôt un docteur.
6. Le produit est conçu pour l'entretien de la batterie à long terme, pour empêcher l'autodécharge de la batterie. Après un délai de trois fois supérieur au
temps de charge indiquédans ce manuel (tableu "Performance"), si le chargeur ne termine pas la phase de Charge Principale, passezàle déconnecter
manuellement. Il est possible qu'il y ait un des problèmes suivants: la batterie est complètement déchargée; en cas de consommation de courant
excessive par les appareils électroniques connectés à la batterie, c'est possible que le temps de charge augmente.
CONTENU DU PACKAGE
1. Chargeur 03.024.31 SMART 400 ou 03.024.32 SMART 1000, que incorpore l'alimentation secteur 220V et le câble pour la connexion à la batterie, qui se
compose de deux câbles isolées (rouge et noir) de haute qualité que terminant avec un connecteur femme (longueur: 2 mètres).
2. Câble de batterie avec des cosses annulaires pour la connexion à les bornes de la batterie + bouchon de protection imperméable.
3. Câble de batterie avec des pinces.
4. Adaptateur pour prise 12V allume-cigare.
INSTALLATION DU CÂBLE AVEC OEILLETS
Lorsque vous chargez une batterie dans un véhicule, il est conseillé d'installer le connecteur de la batterie avec des oeillets, ce qui permet d'effectuer la
procédure suivante une seule fois. L'utilisateur est gentiment demandéd'exécuter l'installation avec le plus grande soin (lisez les Directives Générales et la
sections Sécurité). Au besoin, confiez s'il vous plaît le personnel autorisé avec l'exécution des pas suivantes :
- Branchez les cosses annulaires aux bornes de la batterie, le câble rouge à la borne positive (+) et le câble noir à la borne négative (-) de la batterie.
- Placez le conncecteur du câble dans un endroit facile à atteindre, par exemple sous la selle.
INSTALLATION DU CÂBLE AVEC PINCES
Si la batterie est hors du véhicule, il suffit de connecter la pince noir àla borne (-) négative et la pince rouge àla borne (+) positive de la batterie. Lorsque vous
chargez une batterie dans un véhicule, brancher premier àla borne qui n'est pas reliée au châssis (généralement le positive, pince rouge àla borne positive),
et puis connecter l'autre pince au châssis, loin de la batterie et de la conduite de carburant. Après avoir utilisél'appareil, debrancher dans l'ordre inverse.
BRANCHEMENT DU CHARGEUR
- Enlevez le bouchon protecteur du connecteur et raccordez le chargeur à le câble avec oeillets. En alternative, branchez le chargeur à la batterie par les
pinces ou l'adaptateur allume-cigare. Le diode LED rouge (ERROR) s'allume, pour signaler que l'appareil n'est pas connecté au réseau électrique.
- Connectez l'appareil à la prise de courant. Le diode LED rouge (ERROR) doit maintenant être éteint. Le diode LED vert (CHARGE) s'allume (pour plus
d'informations, lisez s'il vous plaît la section "Fonctionnement".
SÉLECTION DU PROGRAMME
Pour selectioner le mode de fonctionnement du produit, vuillez suivre les instructions au dos du manuel.
BARRE LED - VOLTMÈTRE ET INDICATEUR DU MODE
La barre LED du chargeur indique le niveau de charge de la batterie (50, 65, 80, 100%), selon le nombre de LEDs allumés. Si le niveau de charge est
inférieure à 50%, le première LED (jaune - 50%) clignote. En plus, lorsque le chargeur est connecté à la prise de courant mais déconnecté de la batterie, la
barre LED indique le programme de charge sélectionné.
FONCTIONNEMENT - CHARGEUR DE BATTERIE (BIKE MODE, CAR MODE, AGM START&STOP MODE)
En cas du fonctionnement régulier, l'appareil indique les cycles de charge en cours d'exécution par le LED vert (CHARGE) comme suit:
- LED vert clignotant lentement et LED jaune 50% du voltmètre clignotant rapidement: cycles de Récupération et Charge Ligére (phases 2, 3).
- LED vert clignotant lentement: cycle de Charge Principal (phase 4).
- LED vert clignotant rapidement: cycle de Désulfatation (phase 5) ou cycle de Égalisation.
- LED vert (CHARGE) toujours allumé : cycle d'Entretien (phase 7).
- LED rouge (ERROR) éteint.
Pour plus d'informations sur les cycles de charge, lisez s'il vous plaît la section "Algorithme de charge".
Tous les éventuelles anomalies sont signalées par l'appareil comme suit :
- LED rouge (ERROR) toujours allumé : l'appareil n’est pas branché à la prise de courant.
- LED rouge (ERROR) clignotant lentement : la batterie n’est pas branché.
- LED rouge (ERROR) clignotant rapidement : polarité inversée ou court-circuit.
- LED vert (CHARGE) + LED rouge (ERROR) clignotantes alternativement : la phase 6 (Analyse de la Batterie) a échoué. La batterie n'est pas capable de
maintenir la charge, vous mai nécessité de la remplacer.
En cas d'érreur d'installation et/ou de fonctionnement, débranchez le chargeur comme décrit dans la section "Débrancher le chargeur".
FONCTIONNEMENT - ALIMENTATION (POWER SUPPLY) POUR LE REMPLACEMENT DE LA BATTERIE
- Connectez l'appareil à la prise de courant et sélectionnez le mode "Power Supply", selon la procédure décri au dos du manuel.
- Connectez l'appareil aux pôles positif et négatif du véhicule par les pinces de que le chargeur est équipé. Déconnectez la batterie pour remplacer et
installez la nouvelle batterie. Aprés connecter la batterie au véhicule, déconnectez le chargeur.
DÉBRANCHEMENT DU CHARGEUR
Avant de démarrer le véhicule, débrancher le chargeur comme suit :
- Débranchez le chargeur de la prise de courant.
- Débranchez le chargeur du câble avec oeillets et replacez le capuchon de protection sur le connecteur du câble avec oeillets. Alternativement, débranchez
les pinces de les bornes de la batterie ou l'adaptateur allume-cigare de la prise 12V.
- Remettez le chargeur dans sa boîte originale pour minimiser son exposition aux agents atmosphériques.
TYPES DE BATTERIE
Les chargeurs 03.024.31 SMART 400 et 03.024.32 SMART 1000 sont spécifiquement conçus pour la charge et l'entretien de toutes les batteries au plomb-acide
de 12V sur le marché (humides, MF, VRLA, AGM, Gel...). Pour en savoir plus sur la capacité des batteries, référez-vous à la section "Caractéristiques Techniques"
de ce manuel.
ENTRETIEN
Pour garantir une fonctionnalité optimale, nous vous recommandons de vérifier périodiquement la connexion des oeillets à la batterie et de nettoyer les
poles avec une brosse métallique. Lisez s'il vous plaît la section "Sécurité" avant d'effectuer cette opération. L'appareil a été spécifiquement conçu pour ne
pas requérir aucune entretien. Nous recommandons de nettoyer le chargeur avec un produit de nettoyage doux pour éviter d'endommager l'étiquette. Si le
chargeur ou n'importe quel accessoire ne travaille pas correctement, contactez s'il vous plaît votre revendeur local pour la réparation / le remplacement. Le
démontage du chargeur n'est pas autorisé et provoque l’annulation de la garantie.
GARANTIE
Le produit est couvert par une garantie de 36 mois pour les défauts de fabrication et de matériaux. La garantie ne couvre pas les parties détériorées à cause de
l'usage régulier. Les usages impropres du chargeur, les tentatives de ouvrir l’appareil et la réparation exécuté par personnel non autorisé causent l’annulation
de la garantie. La garantie est limitée à l'acheteur initial de l'appareil, il ne peut pas être transféré à tiers. Le fabricant exclut toute garantie implicite, en incluant
des dommages indirectes en raison de l'usage de l'appareil: Spin s.r.l. est disculpéde n'importe quel dommage aux personnes ou aux marchandises en raison
de l'usage de ses produits. Les dépenses de transport pour restituer l'appareil doivent être payés par l'acheteur.
FRANÇAIS
This manual suits for next models
3
Other Battery Controller Batteries Charger manuals

Battery Controller
Battery Controller BC LITHIUM 7000 User manual

Battery Controller
Battery Controller BC PRO 4S User manual

Battery Controller
Battery Controller BC EASY 3 User manual

Battery Controller
Battery Controller BC 3500 EVO User manual

Battery Controller
Battery Controller BC BOOSTER K2000 PRO User manual

Battery Controller
Battery Controller BC BOOSTER K10000 PRO User manual

Battery Controller
Battery Controller BC LITHIUM MV User manual

Battery Controller
Battery Controller BC K612 User manual


