Baumalight DPH530 User manual

DPH530 And DPH735 Tree Saw
OPERATOR’S MANUAL
Issue Date: February 2021

TABLE OF CONTENTS
1 INTRODUCTION ����������������������������������������������������������������������������������������������������������������������������������� 1
1�1 Overview���������������������������������������������������������������������������������������������������������������������������������������� 1
1�2 Intended Use And Foreseeable Misuse�������������������������������������������������������������������������������������� 1
2 SAFETY�������������������������������������������������������������������������������������������������������������������������������������������������� 2
2�1 Safety Alert Symbol And Safety Words�������������������������������������������������������������������������������������� 2
2�2 Operational Hazards��������������������������������������������������������������������������������������������������������������������� 2
Prepare For Emergencies ������������������������������������������������������������������������������������������������������������ 3
Replace Safety Signs ������������������������������������������������������������������������������������������������������������������� 3
Do Not Allow Riders ��������������������������������������������������������������������������������������������������������������������� 4
Lower Operating Speed ��������������������������������������������������������������������������������������������������������������� 4
Avoid Rollover ������������������������������������������������������������������������������������������������������������������������������ 4
Detach Tree Saw Safely���������������������������������������������������������������������������������������������������������������� 4
Avoid Powerlines & Underground Utilities �������������������������������������������������������������������������������� 4
Hazards From Modifying Equipment ������������������������������������������������������������������������������������������ 5
2�3 Maintenance Hazards������������������������������������������������������������������������������������������������������������������� 5
3 SAFETY DECALS ��������������������������������������������������������������������������������������������������������������������������������� 6
3�1 DPH530 ������������������������������������������������������������������������������������������������������������������������������������������ 6
3�2 DPH735 ������������������������������������������������������������������������������������������������������������������������������������������ 8
4 OPERATION ���������������������������������������������������������������������������������������������������������������������������������������� 10
4�1 Preparation For Use ������������������������������������������������������������������������������������������������������������������� 10
4�2 Driveline Dimension ������������������������������������������������������������������������������������������������������������������� 10
4�3 Pre-Operation�������������������������������������������������������������������������������������������������������������������������������11
4�4 Machine Components �����������������������������������������������������������������������������������������������������������������11
4�5 Attach Tree Saw �������������������������������������������������������������������������������������������������������������������������� 12
4�6 Detach Tree Saw ������������������������������������������������������������������������������������������������������������������������� 12
4�7 Transporting�������������������������������������������������������������������������������������������������������������������������������� 12
4�8 Carbide Teeth Break-In��������������������������������������������������������������������������������������������������������������� 13
4�9 First Time User Tips ������������������������������������������������������������������������������������������������������������������� 13
4�10 Field Operation ������������������������������������������������������������������������������������������������������������������������� 14
5 SERVICE AND MAINTENANCE�������������������������������������������������������������������������������������������������������� 16
5�1 Maintenance�������������������������������������������������������������������������������������������������������������������������������� 16
5�2 Inspections���������������������������������������������������������������������������������������������������������������������������������� 16
5�3 Rotate Cutting Teeth - DPH530�������������������������������������������������������������������������������������������������� 17
5�4 Replace Cutting Teeth - DPH530 ����������������������������������������������������������������������������������������������� 17
5�5 Rotate Cutting Teeth - DPH735�������������������������������������������������������������������������������������������������� 18
5�6 Replace Cutting Teeth - DPH735 ����������������������������������������������������������������������������������������������� 18
5�7 Check Gearbox Oil Level ����������������������������������������������������������������������������������������������������������� 19
6 TROUBLESHOOTING ������������������������������������������������������������������������������������������������������������������������ 20
7 STORAGE�������������������������������������������������������������������������������������������������������������������������������������������� 20
7�1 Storing Tree Saw ������������������������������������������������������������������������������������������������������������������������ 20
7�2 Remove Tree Saw From Storage����������������������������������������������������������������������������������������������� 20
8 WARRANTY����������������������������������������������������������������������������������������������������������������������������������������� 21
ii

1 INTRODUCTION
Congratulations on your choice of a Baumalight
Tree Saw to complement your pruning, trimming
and clearing operation. This equipment has been
designed and manufactured to meet the needs
of a discriminating buyer for efcient clearing of
brush, shrubs and trees.
The cutting blade is powered by the PTO on your
tractor.
Safe, efcient and trouble free operation of your
tree saw requires that you and anyone else who will
be operating or maintaining the tree saw, read and
understand the Safety, Operation, Maintenance
and Troubleshooting information contained within
the Operator’s Manual.
This manual covers the Baumalight DPH Tree
Saw. Use the Table of Contents as a guide to
locate required information.
Keep this manual handy for frequent reference
and to pass on to new operators or owners. Call
your Baumalight dealer, distributor or the factory
if you need assistance, information or additional
copies of the manuals.
When this machine is worn out and no longer in
use, it should be returned to the retailer or other
source for recycling.
OPERATOR ORIENTATION - The directions left,
right, front and rear, as mentioned throughout this
manual, are as seen from the operator’s seat and
facing in the direction of travel.
1�1 Overview
The Baumalight Tree Saw is designed to be used
by experienced operators, trained in the safe
operation of a tractor and trained in the hazards
related to using the tree saw and the safe use of
the tree saw for the intended purpose.
Operators will require personal protective
equipment to reduce the risk from some hazards
that cannot be completely eliminated or controlled
by the design of the tool.
Care is required to ensure that the tree saw will
not come across metallic objects, stones or other
materials.
Tree saw is not designed for use in hazardous
atmospheres where there is a risk of re or
explosion due to ammable gases or vapors. Use
in hazardous, explosive atmospheres is prohibited.
Serious injury or death of the operator or bystanders
may be caused if the tree saw is misused. Misuse
may also cause damage to the machine carrying
the implement.
1�2 Intended Use And Foreseeable
Misuse
1

2 SAFETY
You must read, understand and follow the
instructions given by the operating unit
manufacturers, as well as the instructions in this
manual.
The safety information in this manual is denoted
by the safety alert symbol:
^
This symbol means ATTENTION! BECOME
ALERT! YOUR SAFETY IS INVOLVED!
The level of risk is indicated by the following signal
words:
^^ DANGER
DANGER - Indicates a hazardous
situation, which, if not avoided, WILL
result in death or serious injury�
^ WARNING
WARNING - Indicates a hazardous
situation, which, if not avoided, could
result in death or serious injury�
^ CAUTION
CAUTION - Indicates a hazardous
situation, which, if not avoided, could
result in minor or moderate injury�
NOTICE
NOTICE - Indicates a situation that could
result in damage to the equipment or
other property�
2�1 Safety Alert Symbol And Safety
Words
2�2 Operational Hazards
^ WARNING
Prevent serious injury or death�
Read and understand this manual before
operating the tree saw�
Always stop engine and remove key
before leaving operators seat�
Never allow anyone near the tree saw
during operation�
Travel at a safe speed�
^ WARNING
Prevent serious injury or death from
moving parts�
Moving parts can crush and dismember�
Do not operate without guards and
shields in place�
Disconnect and lock out power source
before adjusting or servicing�
^ WARNING
Use tree saw only for the designed
applications�
Any other use may result in personal
injury, damage to equipment and may
void the warranty�
2

^ WARNING
Prevent serious injury or death�
Verify tree saw is attached to tractor
before operation or transport�
^ WARNING
Protect from ying debris.
Wear proper safety glasses, goggles,
or a face shield to protect from ying
debris�
Carefully read all safety messages in this manual
and on equipment safety signs. Keep safety signs
in good condition and replace missing or damaged
safety signs.
New equipment components and repair parts must
include the current safety decal.
Learn how to properly operate equipment.
NEVER operate or work around this equipment
without proper instruction, while fatigued or under
the inuence of alcohol, prescription or non-
prescription medication or if feeling ill.
Keep your equipment in proper working condition.
Know the regulations and laws that apply to you
and your industry. This manual is not to replace
any regulations or laws. Additional information
may be found at: www.asae.org or www.osha.gov.
If you do not understand any part of this manual,
contact Baumalight at 866-820-5603.
^ WARNING
Crush hazard�
Only cut trees 10 ft (3048 mm) for
DPH530 or 12 ft (3658 mm) for DPH735
or less in height�
Taller trees may fall on operator when
cut�
Prepare For Emergencies
• Be prepared in case of emergencies.
• Keep a re extinguisher and rst aid kit close
to the machine.
• Keep emergency phone numbers close to your
phone.
• Know your address so emergency services
can locate you if an emergency arises.
Replace Safety Signs
• Replace missing or damaged safety signs.
• Safety signs are identied in Section 3 of this
manual.
• Replacement safety signs are available from
your Baumalight dealer.
3

Do Not Allow Riders
• NEVER lift or carry anyone on the tree saw.
• NEVER use tree saw as a work platform.
• NEVER allow passengers on the tree saw.
Lower Operating Speed
• Keep tree saw low and move at slow speeds
on rough or uneven terrain.
Avoid Rollover
The equipment may rollover, resulting in death or
serious injury. To help prevent rollover:
• Travel at a slow speed.
• Avoid sharp turns & sudden movement on
slopes.
• Carry tree saw close to the ground.
• Avoid holes, ditches and other obstructions
which may cause equipment to rollover.
• Use caution when operating on slopes and do
not operate on excessively steep slopes.
• Do not exceed load capacity of equipment.
Detach Tree Saw Safely
Detach tree saw on a rm and level surface. Tree
saw may fall over if detached on sloping or soft
surface. Be sure people, livestock and pets are
clear of machinery.
See your tractor Operator’s Manual.
Avoid Powerlines & Underground
Utilities
^^ DANGER
Prevent electrocution�
Death or serious injury can result if
equipment comes near or contacts
power lines�
Electrocution can occur without direct
contact�
DO NOT leave the operator’s seat if any part of the
equipment contacts electric lines or cables.
Raised Attachment
^ WARNING
Crushing hazard�
Raised, unsupported tree saw can fall,
resulting in death or serious injury�
Never enter the area under a raised tree
saw�
A raised tree saw can lower unexpectedly, resulting
in death or serious injury.
NEVER enter area under a raised tree saw.
Lower tree saw to ground, engage tractor parking
brake, shut off engine and remove key before
servicing.
4

Avoid Loud Noise
^ WARNING
Prolonged exposure to loud noise can
cause impairment or loss of hearing�
Wear a suitable hearing protective
device such as earmuffs or earplugs
to protect against objectionable or
uncomfortable loud noises�
Hazards From Modifying Equipment
Do not make any alterations to your tree saw.
Altering the equipment may cause unsafe
conditions and may void the manufacturer’s
warranty.
Avoid Wood Dust Inhalation
^ WARNING
Wear an approved respirator (N95 Type
as a minimum)�
Follow local, state and federal
regulations�
The health effects from exposure to wood dust
are due to chemicals in the wood or chemical
substances in the wood created by bacteria, fungi,
or molds.
2�3 Maintenance Hazards
Before servicing, park machine on a rm and
level surface, set tractor parking brake, remove
key and place a “Do Not Operate” tag on control
panel. Read and understand this manual. If you
do not understand any part of the manual, contact
Baumalight at 866-820-5603.
Always wear face and/or eye protection, safety
shoes, and other protective equipment appropriate
for the job.
Do not make unauthorized modications. Contact
Baumalight at 866-820-5603 before you weld, cut/
drill holes, or make any other modications.
Always use Baumalight replacement parts.
^ WARNING
Entanglement hazard�
Keep clear of moving components�
Wear proper protective equipment
appropriate for the job�
^ WARNING
Crushing hazard�
Before performing inspections, service
or maintenance:
Park machine on rm, level surface.
Engage parking brake�
Turn engine off and remove key�
Place “Do Not Operate” tag on control
panel�
5
3 SAFETY DECALS
The two and four panel safety decals are pictorial
and have a yellow background. The panel with a
triangle indicates the potential hazard. The panel
without a triangle indicates how to avoid the
hazard.
If any of the decals are missing, are damaged, or
if you do not understand the decal, please contact
your dealer.
3�1 DPH530
B
C
E
B
A
D
E
A. D005262 ^WARNING - P65 warning
information.
WARNING: This product can expose you to chemicals
including 1,3-Butadiene and lead, which are known to the state of
California to cause cancer and birth defects or other reproductive
harm. For more information go to www.P65Warnings.ca.gov.
D005262
B. D005223 ^WARNING - Rotating blade hazard.
Keep back 75m while machine is operating.
Wait for blade to stop before approaching
machine.
D005223
75 M
6

C. D005125 ^WARNING - Read and understand
safety signs on the machine and operating
instructions in this manual before operating
machine.
D005125
D. D005224 ^WARNING - Rotating driveline.
Entanglement hazard. Keep away from
driveline while it is rotating.
D005224
E. D005572 ^WARNING - Crush hazard. Tree
maximum height limit.
MAX
10 FT
D005572
7
3�2 DPH735
B
C
D
F
E
E
A
B
E
A. D005262 ^WARNING - P65 warning
information.
WARNING: This product can expose you to chemicals
including 1,3-Butadiene and lead, which are known to the state of
California to cause cancer and birth defects or other reproductive
harm. For more information go to www.P65Warnings.ca.gov.
D005262
B. D005223 ^WARNING - Rotating blade hazard.
Keep back 75m while machine is operating.
Wait for blade to stop before approaching
machine.
D005223
75 M
8

C. D005125 ^WARNING - Read and understand
safety signs on the machine and operating
instructions in this manual before operating
machine.
D005125
D. D005224 ^WARNING - Rotating driveline.
Entanglement hazard. Keep away from
driveline while it is rotating.
D005224
E. D005590 ^WARNING - Crush hazard. Tree
maximum height limit.
MAX
12 FT
D005590
F. D005517 ^WARNING - Remove key before
servicing.
D005517
9

^Keep away from work area.
^ Always wear protective equipment appropriate
for the job.
^Do not operate, work on or around this machine
while under the influence of alcohol, drugs or if
feeling ill.
^Keep clear of moving machinery at all times.
^Stop tractor engine before leaving operators
area.
^It is your responsibility to operate this equipment
safely. You must be familiar with the equipment
and all safety practices before use.
^ Do not allow untrained or unqualied people to
operate this equipment.
Although the tree saw has been carefully inspected
and checked prior to shipment from manufacturer,
it is recommended that the unit be thoroughly
inspected.
Check all bolts for tightness and remove all
shipping tags, bags, skids, and blocking.
Review and understand this manual and operating
unit manual.
Remove any masking materials afxed during
painting. Inspect the tractor and any accessory
equipment to verify that nameplates and all safety
warning, caution signs and decals provided with
the equipment are in place and clearly visible.
Visually inspect the unit before each start up.
Check for loose or missing parts and any damage
that may have occurred during moving or shipping.
Review all tractor pre-start instructions, and be
sure that all recommended steps and procedures
have been followed.
Note: Always keep the weight of the machine in
mind. Never position body in line of impact.
4 OPERATION
4�1 Preparation For Use 4�2 Driveline Dimension
It is very important that the driveline be free to
telescope, but not to bottom out when going
through its working range. If the driveline bottoms
out, the bearings on both the machine and tractor
PTO shaft will be overloaded and fail in a short
time.
1. To determine the proper length of the driveline,
follow this procedure:
a. Clear the area of all bystanders.
b. Attach tree saw to tractor (see section 4.5)
but do not attach driveline.
c. Raise tree saw until the input shaft is level
with tractor PTO shaft.
d. Measure dimension between locking
grooves on tractor PTO shaft and machine
input shaft.
e. Measure the same dimensions on the
compressed driveline.
f. If compressed driveline dimension exceeds
the machine dimension, driveline will have
to be cut.
2. When cutting the driveline, follow this
procedure:
a. Subtract machine dimension (A) from
uncut driveline dimension (B) or (B-A). This
dimension determines how much too long
the driveline is.
b. Add another 1 in. (25 mm) to the dimension
to be sure it doesn’t bottom out, to determine
(C) the cut off dimension.
c. Cut dimension (C) from both ends. Cut
both plastic tubes and metal cores.
d. Remove burrs from edges that were cut.
e. Assemble the two ends of the shaft.
f. Make sure shaft can telescope freely. If it
does not, separate the two parts and inspect
for burrs or cuttings on shaft ends. Be sure
10

it telescopes freely before installing.
4�3 Pre-Operation
Verify that tree saw is properly attached to tractor.
Verify PTO shaft and shaft cover properly
connected.
Verify all guards, doors and covers are installed
and secured.
Verify cutting teeth are in good condition and are
tight.
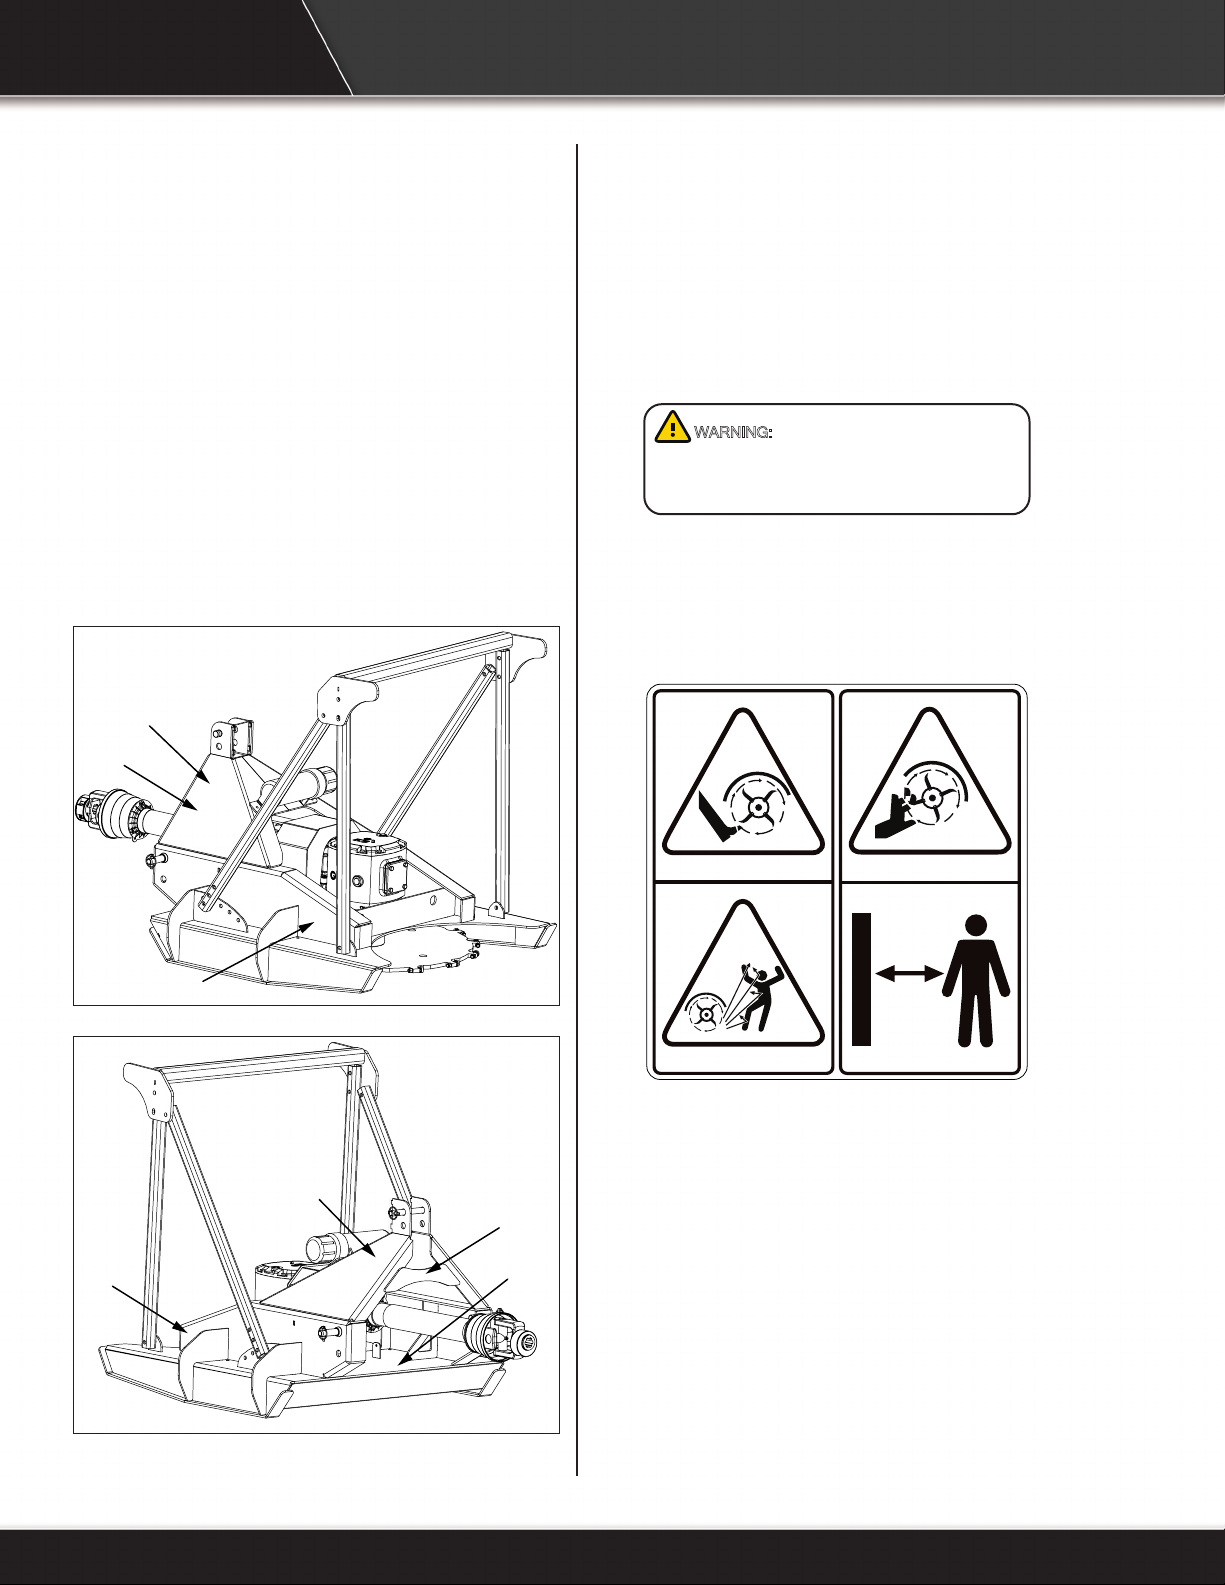
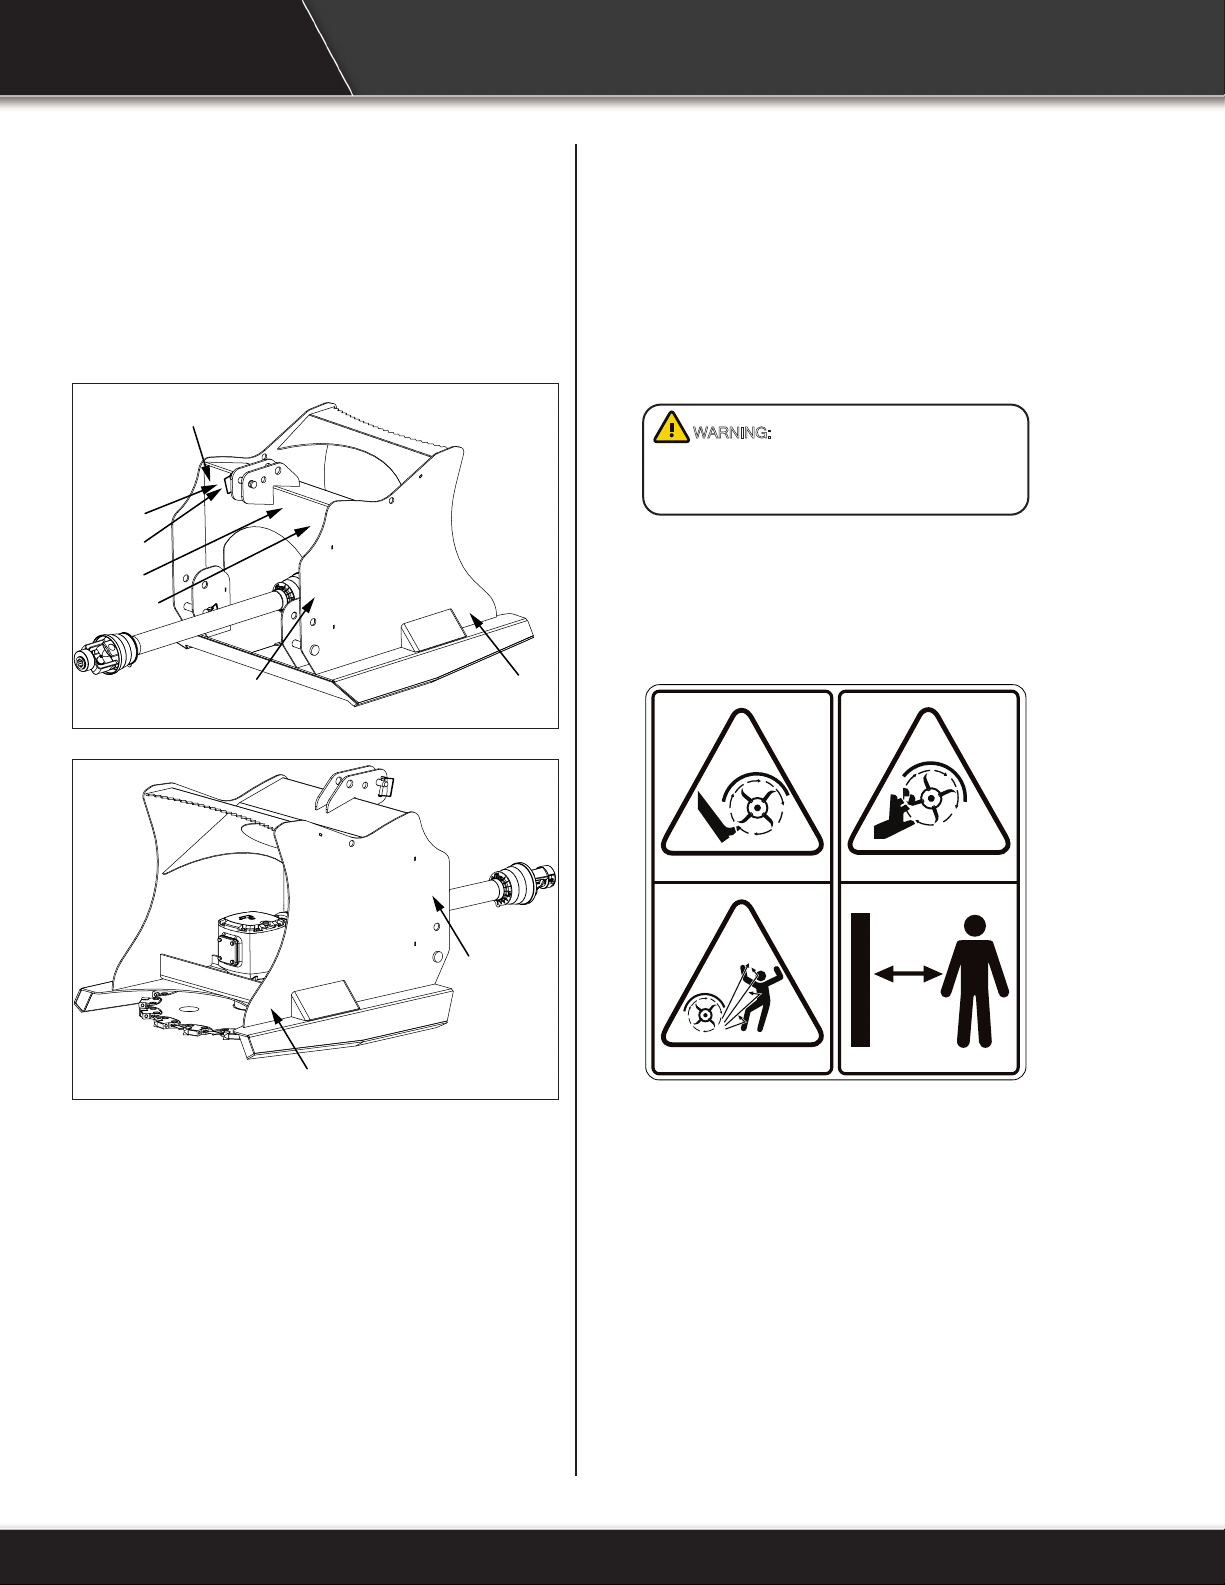
Dashed line indicates item hidden from view unless
cover is removed.
A. Driveline
B. 3-Point Top Link
C. Operators Manual Storage Tube
D. Push Bar
E. Gear Box
F. Cutting Blade
G. Cutting Teeth
H. Blade Guard
I. 3-Point Lift Pins
ABC
D
E
F
G
I
H
4�4 Machine Components
11

4�5 Attach Tree Saw
^ WARNING
To prevent injury or machine damage
put transmission in “Park” and check
the full range of hitch for interference,
binding or PTO separation�
Never position yourself between tractor
and brush mulcher�
Only experienced and properly trained
operator’s should operate the tractor
and brush mulcher�
1. Back up tractor to tree saw with hitch points
approximately in alignment.
2. Engage tractor park brake and/or place
transmission in “Park”.
3. Shut off engine and remove key.
4. Attach lower links to mulcher and retain using
linch pins. To avoid machine damage, verify
linch pins are locked on lower links.
5. Align top link with hole in top of frame and
retain with pin and linch pin. Verify linch pin is
locked on pin.
6. Pull PTO collar back toward the tree saw. Align
splines on tractor PTO shaft and drive line by
rotating driveline. Push driveline onto PTO
shaft until it snaps into place.
7. Pull back on driveline to make sure it is locked
on shaft.
8. Attach safety shield chain.
9. Adjust top link so that tree saw lower frame is
vertical to the ground.
4�6 Detach Tree Saw
^ WARNING
Prevent serious injury or death caused
by unexpected movement:
1� Park tractor on a level surface�
2� Engage tractor park brake�
3� Disengage PTO�
4� Shut off engine and remove key�
1. Park tractor on a level surface.
2. Lower tree saw to the ground.
3. Shut off engine and remove key.
4. Disconnect drive line safety chain.
5. Support drive line with your hand and pull collar
back toward mulcher and slide off shaft.
6. Remove linch pin and pin on top link.
7. Place top link in storage position.
8. Remove linch pins and pins from both lower
links.
1. Verify all reectors and Slow Moving Vehicle
(SMV) sign are visible.
2. Raise tree saw slightly off ground.
3. Verify pto is disengaged.
4. Travel at a reasonable and safe speed.
^ WARNING
Prevent injury from rotating blade�
Disengage pto before transporting tree
saw�
4�7 Transporting
12

During the rst few hours of use, avoid hitting
stones as much as possible to allow the carbide
teeth to wear slightly. This can be done by keeping
the cutting wheel above ground level. Brand new
carbide tips are razor sharp and can chip and
shatter easily when they hit hard objects. Once
the razor sharpness has worn away, the tips do
not chip as easily. Observing these precautions
will extend the life of the carbide teeth and reduce
operating expenses.
The teeth bolts must be retightened every ten
minutes for the rst hour of use on a new tree saw.
4�8 Carbide Teeth Break-In
First, operate all functions in a clear area with
throttle at low idle to get a good feel for the controls
before you actually move into any brush/trees.
Run throttle at half speed for rst time users.
Move the tree saw slowly until you have a better
feel how much the unit can take.
If the slip clutch does activate, allow clutch to cool
to normal temperature before resuming operation.
A hot clutch will never grip.
The machine is equipped with a front push bar to
push brush or small trees over. This will allow the
tree saw teeth to contact the lower portion of the
brush and the blade to cut it off.
Each operator must experiment to nd a technique
that works for them in their application.
^ WARNING
Always turn off tractor and disengage
pto before getting approaching the
blade�
^ WARNING
Wear an approved respirator (N95 Type
as a minimum)�
Follow local, state and federal
regulations�
The health effects from exposure to
wood dust are due to chemicals in the
wood or chemical substances in the
wood created by bacteria, fungi, or
molds�
4�9 First Time User Tips
13

4�10 Field Operation
^ WARNING
Prevent serious injury or death�
1� Park machine on rm, level surface.
2� Engage parking brake�
3� Disengage pto�
4� Shut off engine and remove key�
^ WARNING
Prevent serious injury or death�
Never operate tree saw when other
people are in the vicinity�
Debris can be thrown from cutting area�
Keep all shields in place�
Keep away from moving parts�
^ WARNING
Clean machine thoroughly before
service or maintenance procedures�
The health effects from exposure to
wood dust are due to chemicals in the
wood or chemical substances in the
wood created by bacteria, fungi, or
molds�
1. Attach tree saw to tractor. See Attach Tree
Saw in this section.
2. Set engine speed to low/medium speed and
engage PTO.
3. Slowly increase engine speed to high idle.
Verify tree saw is operating smoothly.
Position tree saw as needed to obtain the
closest cut to trunk or ground.
^ WARNING
Crush hazard�
Only cut trees 10 ft (3048 mm) for
DPH530 or 12 ft (3658 mm) for DPH735
or less in height�
Taller trees may fall on operator when
cut�
MAX
10 FT
D005572
MAX
12 FT
D005590
DPH530 DPH735
14

4. Operate tractor to move tree saw blade into
brush, shrubs or tree.
5. If blade stalls, stop movement, move tree saw
away from brush, trees or shrubs and allow
blade to regain speed. Slow ground speed to
prevent further stalling.
^ WARNING
Moving parts can crush and cut�
Keep clear of moving components�
Lockout operating unit before clearing
jams�
^ WARNING
Never approach tree saw before blade
has come to a complete stop�
8. When cutting is completed, disengage PTO
and allow blade to stop.
9. Lower tree saw to ground and stop tractor
engine.
15

5 SERVICE And MAINTENANCE
5�1 Maintenance
Maintenance Chart
General Inspection Inspect the unit for any buildup of contamination
(dirt, stones, etc.).
Daily.
Cutting Teeth The teeth bolts must be retightened every ten
minutes for the rst hour of use on a new tree
saw.
First hour of use.
Cutting Teeth Check and replace one at a time as necessary.
With daily use expect to replace 4 to 6 teeth per
day. See Replace Cutting Teeth in this section.
Every 4 hours.
Gearbox Oil Check gear box oil level. Use synthetic 90W
gear oil.
Every 200 hours.
5�2 Inspections
^ WARNING
Prevent serious injury or death�
1� Park machine on rm, level surface.
2� Engage parking brake�
3� Disengage pto�
4� Shut off engine and remove key�
^ WARNING
Clean machine thoroughly before
service or maintenance procedures�
The health effects from exposure to
wood dust are due to chemicals in the
wood or chemical substances in the
wood created by bacteria, fungi, or
molds�
Inspect the unit for any buildup of contamination
(dirt, stones, etc.).
Check cutting teeth every 4 hours of use. Replace
cutting teeth as needed. Unit will cut faster and
remaining teeth will last longer if broken teeth are
replaced.
Inspect hydraulic hoses for damage and wear.
16

5�3 Rotate Cutting Teeth - DPH530
Check cutting teeth every 4 hours of use. Keep
cutting teeth in good condition. Unit will cut faster
and remaining teeth will last longer if broken or
worn teeth are replaced.
Each tooth can be rotated two times from its
original position before replacement is necessary.
1. Park tree saw on a level surface.
2. Lower blade to the ground.
3. Shut off engine and lockout engine controls.
4. Inspect teeth for wear on outside edge. Once
outside edge is worn, rotate tooth so a new
edge is on outside (cutting) edge.
5. Loosen locknut (A) on tooth (B) and rotate
tooth 1/3 turn. Flat shoulder on tooth will t
against shoulder (C) on tooth holder.
6. Tighten locknut (A) to 65 lb/
ft (88 Nm) of torque.
A
B
C
Note: Parts breakdown can be found on
Baumalight’s website. www.baumalight.com
5�4 Replace Cutting Teeth - DPH530
1. Park tree saw on a level surface.
2. Lower blade to the ground.
3. Shut off engine and lockout engine controls.
4. Inspect cutting teeth (B) for damage and wear.
Replace individual teeth as needed.
5. Remove locknut (A) and tooth (B). Install new
tooth. Flat shoulder on tooth will t against
shoulder (C) on tooth holder.
6. Install locknut. Tighten locknut (A) to 65 lb/ft
(88 Nm) of torque.
A
B
C
Note: Parts breakdown can be found on
Baumalight’s website. www.baumalight.com
17

Check cutting teeth every 4 hours of use. Keep
cutting teeth in good condition. Unit will cut faster
and remaining teeth will last longer if broken or
worn teeth are replaced.
Each tooth can be rotated one time from its original
position before replacement is necessary.
1. Park tree saw on a level surface.
2. Lower blade to the ground.
3. Shut off engine and lockout engine controls.
4. Inspect teeth for wear on outside edge. Once
outside cutting edge is worn, rotate tooth 180°
so the new edge is on outside.
5. Remove nut (A) and socket head screw (B) on
tooth (C) and rotate tooth 180°. Flat shoulder
on tooth will t against shoulder (D) on tooth
holder.
6. Install tooth, socket head screw and nut.
Tighten nut (A) to 65 lb/ft (88 Nm) of torque.
A
B
C
D
Note: Parts breakdown can be found on
Baumalight’s website. www.baumalight.com
5�5 Rotate Cutting Teeth - DPH735
1. Park tree saw on a level surface.
2. Lower blade to the ground.
3. Shut off engine and lockout engine controls.
4. Remove nut (A) and socket head screw (B) on
tooth (C). Flat shoulder on tooth will t against
shoulder (D) on tooth holder.
5. Install tooth, socket head screw and not.
Tighten nut (A) to 65 lb/ft (88 Nm) of torque.
A
B
C
D
Note: Parts breakdown can be found on
Baumalight’s website. www.baumalight.com
5�6 Replace Cutting Teeth - DPH735
18
This manual suits for next models
1
Table of contents
Other Baumalight Saw manuals


Popular Saw manuals by other brands


Parkside
Parkside PKS 1500 A2 Operating and Safety Instructions, Translation of Original Operating Manual

Magnum Industrial
Magnum Industrial MI-91350 operating manual

Triton
Triton T12 Operating/safety instructions

Evolution
Evolution Fury 5-S Faq

Black & Decker
Black & Decker KS890E user manual

AEG Powertools
AEG Powertools TS 250 K Original instructions


