Bausch Datacom Vega 56 PC2 User manual

Vega 56 PC2 Users manual
07/06/1999 Bausch Datacom
1
Bausch Datacom nv/sa
Vega 56 PC2
Internal ISA-Voice/Fax Modem
Dual Standard V.90/K56Flex
Vega 56 PC2 Users manual
07/06/1999 Bausch Datacom
2
Users Manual

Vega 56 PC2 Users manual
07/06/1999 Bausch Datacom
3
Users Manual
1. Introduction
1.1 Modem caracteristics
2. Modem installation
3. Software installation
3.1 Windows 95/98 Driver Installation Procedure
3.1.1. Internal modem with Plug and Play setting enabled
3.1.1.1 If you have Windows 95 a
3.1.1.2 If you have Windows 95 b (or OSR2)
3.1.1.3 If you have Windows 98
3.1.2 Internal Modem with “Plug and Play” setting disabled
3.2 Modem Diagnostic in Windows 95/98
3.4 Installing Modem Drivers in Windows NT4.0
4. Trouble Shooting
Vega 56 PC2 Users manual
07/06/1999 Bausch Datacom
4
Appendix 1 Command Summary
Appendix 2 S-Register Summary
Appendix 3 Result Codes Summary

Vega 56 PC2 Users manual
07/06/1999 Bausch Datacom
5
1Introduction
You have chosen the Bausch Vega 56 PC2 modem to open the world of data
communication for your computer. By using this modems' advanced technology
and built-in quality, you can confidently communicate across town, across the
country, or even around the world via a fast 56.000 bps V.90 or K56Flex
connection to the Internet.
1.1 Modem caracteristics
Line Data Rate 56K/54K/52K/50K/48K/46K/44K/42K/40K/38K/36K/34K/*
33.6K/31.2K/28.8K/26.4K/24K/21.6K/19.2K/14.4K/12K/9.6K/
7.2K /14.8K/2.4K/1.2K/300/75bps
Modem Protocol ITU-T V.90, K56Flex, ITU-T V.34bis/ V.34/ V.32bis/
V.32/V.23/V.22bis/ V.22/ V.21
Voice Full-duplex speaker phone (optional)
Audio span (optional)
ASVD (optional)
Fax Compatibility 14400 bps send/receive, G3 compatible
Software Compatibility AT Command set compatible
Fax Command EIA Class 1 command compatible
Error Correction MNP 2-4 and V.42
Data Compression MNP 5 and V.42bis
Data Format
Serial, Binary, Asynchronous 7 or 8 data bits, odd, even or no
parity one or two binary serial synchronous stop bit, totally 10
bits length
DTE to Modem Data Rate
MAX. 115200bps
Operation Dial-Up
Data Interface ISA Bus compatible
Dialing Touch Tone
Audio Monitoring Mini speaker with programmable volume control
Line Interface RJ-11 modular jack
Vega 56 PC2 Users manual
07/06/1999 Bausch Datacom
6
2. Modem installation
?? See next page for internal modem jumper settings.
?? Remove the computer case and insert the modem card into a spare 16-bit
ISA expansion slot.
?? Close the case.
?? Insert the supplied phone cord into the line jack on the rear of the modem,
and the phone plug into the wall socket.
?? Proceed to Software installation.

Vega 56 PC2 Users manual
07/06/1999 Bausch Datacom
7
Vega 56 PC2 Users manual
07/06/1999 Bausch Datacom
8
Vega 56 PC2 Users manual
07/06/1999 Bausch Datacom
9
3. Software installation
3.1 Windows 95/98 Driver Installation Procedure
3.1.1 Internal modem with Plug and Play setting enabled
Turn on your computer and allow the system to boot to Windows 95. The modem
should be auto-detected by Windows 95/98 Plug and Play.
3.1.1.1 If you have Windows 95 a
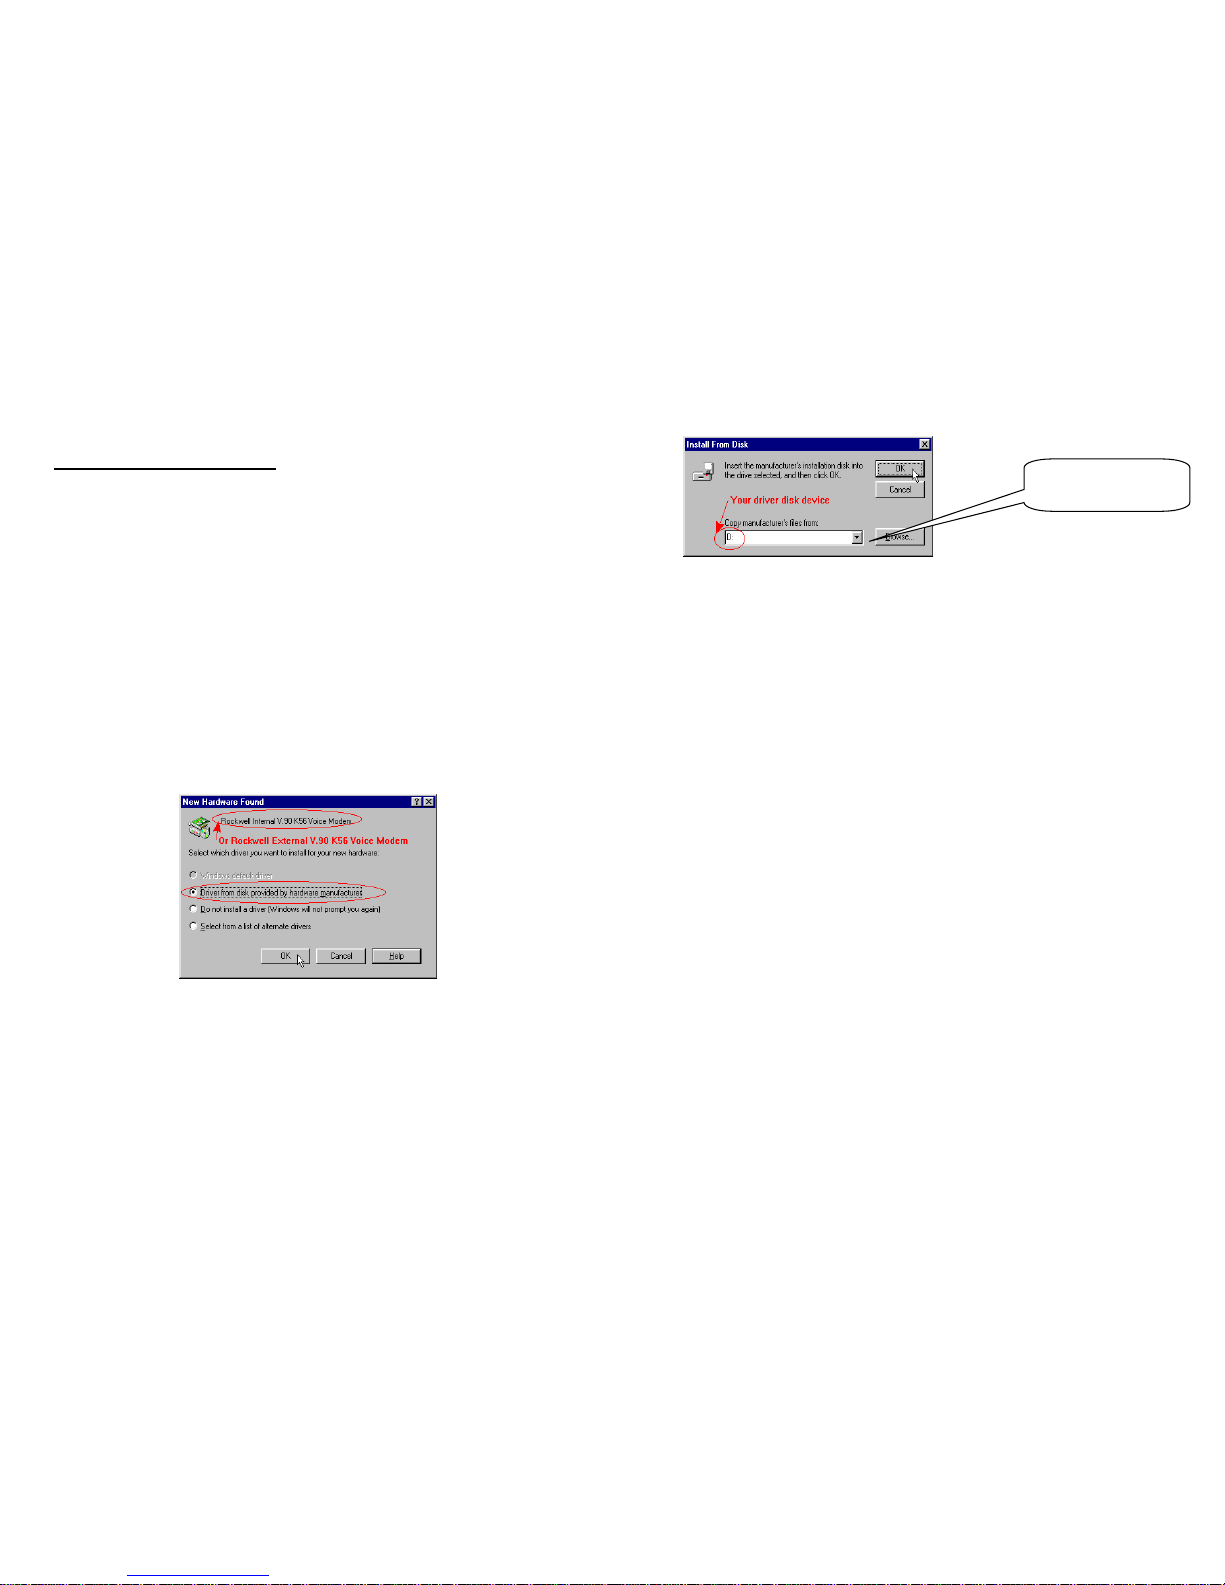
(1) Insert the driver disk supplied with the modem into the Floppy or CD-ROM
drive and choose Driver from disk provided by hardware manufacturer.
Then click OK.
(2) Use Browse to select or fill in the drive letter of the Floppy or CD-ROM drive
(for example: A:\or D:\) and click OK.
Vega 56 PC2 Users manual
07/06/1999 Bausch Datacom
10
If you install from the
floppy, type “
A:
\
”
Vega 56 PC2 Users manual
07/06/1999 Bausch Datacom
11
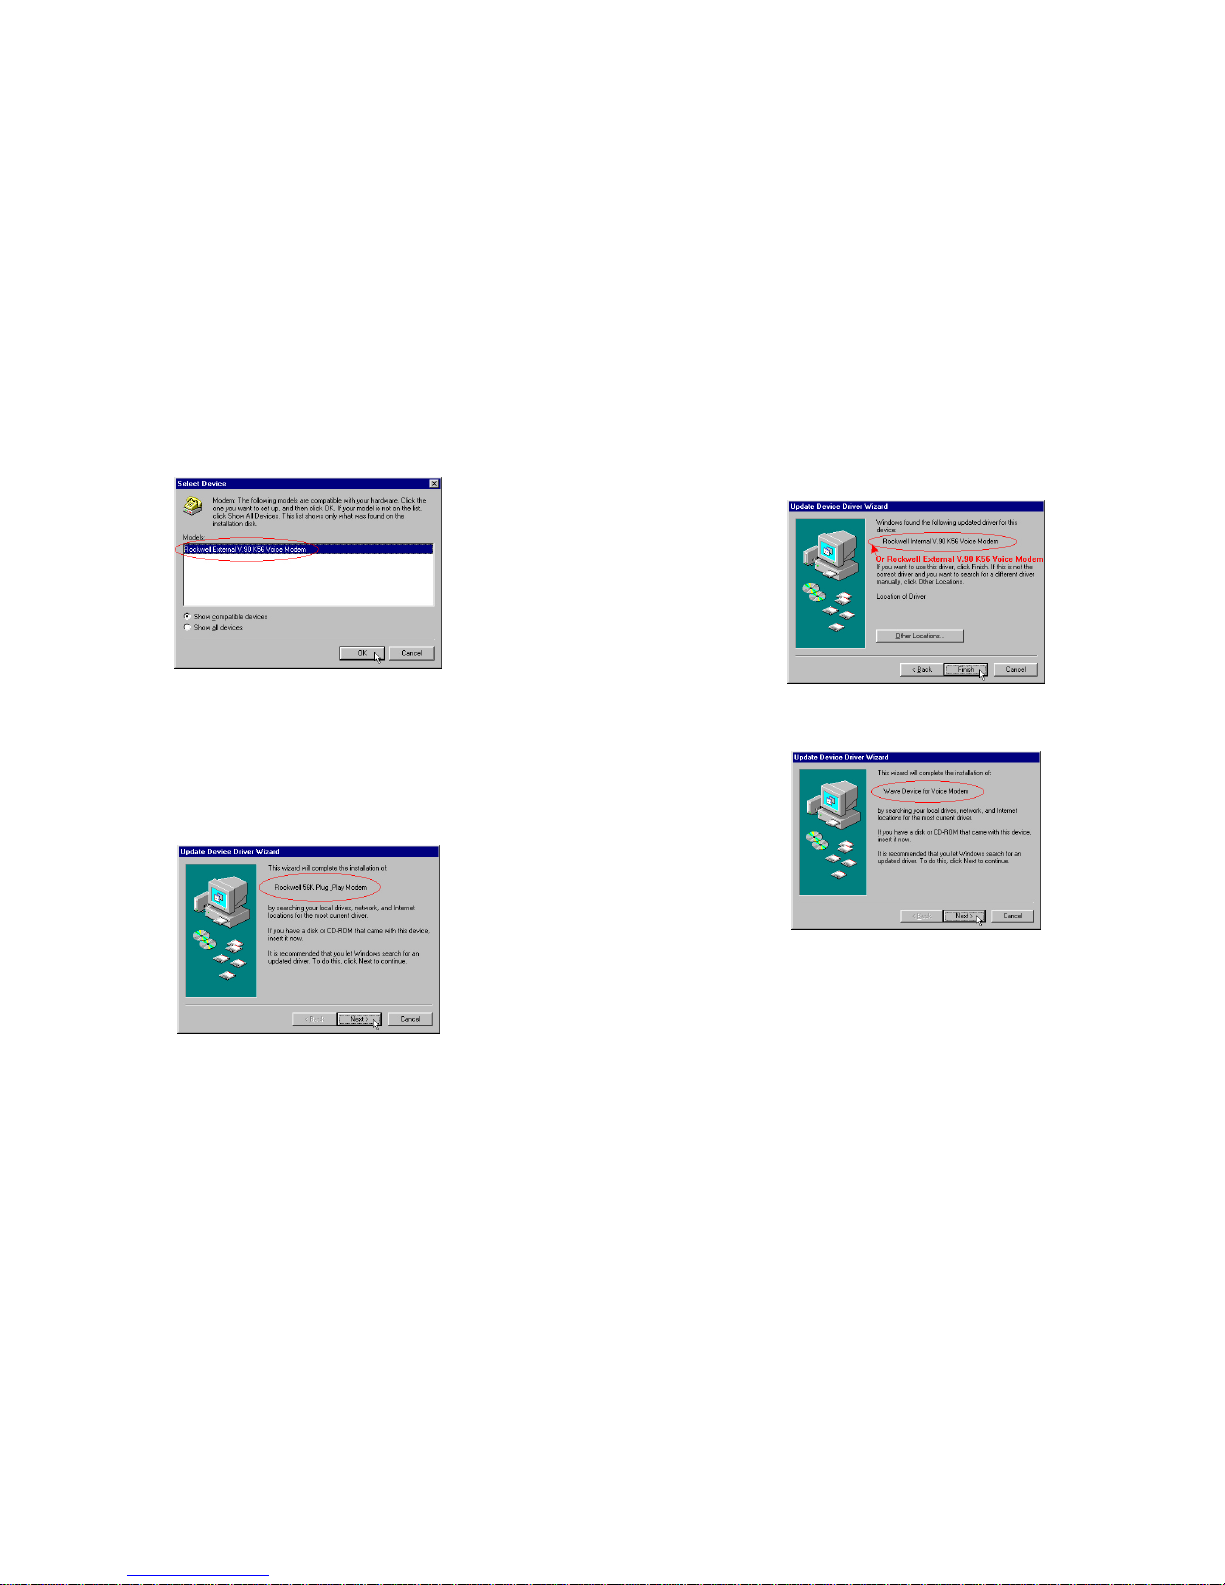
(3) Select ‘Vega 56 PC2 internal’ and click OK.
3.1.1.2 If you have Windows 95 b (or OSR2)
(1) Click Next.
Vega 56 PC2 Users manual
07/06/1999 Bausch Datacom
12
(2) Windows will find the updated driver ‘Vega 56 PC2 internal’. Then click
Finish.
(3) Click Next.

Vega 56 PC2 Users manual
07/06/1999 Bausch Datacom
13
3.1.1.3 If you have Windows 98
(1) Click Next.
(2) Click Search for the best driver… Then click Next.
(3) Select Floppy disk drives or CD-ROM drive and click Next.
Vega 56 PC2 Users manual
07/06/1999 Bausch Datacom
14
(4) Windows will find the ‘Vega 56 PC2 internal’. Then click Next.
(5) Click Finish.
If you install from the
floppy, select

Vega 56 PC2 Users manual
07/06/1999 Bausch Datacom
15
Vega 56 PC2 Users manual
07/06/1999 Bausch Datacom
16
3.1.2. Internal Modem with “Plug and Play” setting disabled
A special procedure must be followed to install a Non Plug and Play internal
modem. Please check the Hardware installation to setup the jumpers for non
Plug and Play. If you want to set the modem in COM2/IRQ3, please disable the
BIOS of Serial port 2.
(1) Go to Start > Settings > Control Panel and double-click on the Add New
Hardware icon.

Vega 56 PC2 Users manual
07/06/1999 Bausch Datacom
17
(2)Click Next.
(3)Select Yes [Recommended] and click Next.
(4)Click Next.
Vega 56 PC2 Users manual
07/06/1999 Bausch Datacom
18
(5) Windows will take several minutes to detect the new hardware. When the
progress is finished, click Details to check the new hardware.
(6)Check to see if Windows detected the Communication Port. Click Finish.

Vega 56 PC2 Users manual
07/06/1999 Bausch Datacom
19
Vega 56 PC2 Users manual
07/06/1999 Bausch Datacom
20
(7) Go to Control Panel and double-click on the Modems icon.
(8)Select Don’t detect my modem; I will select it from a list and click Next.

Vega 56 PC2 Users manual
07/06/1999 Bausch Datacom
21
(9)Select Have Disk.
(10) Use Browse to select or fill in the drive letter of the floppy or CD-ROM drive
(for example: A:\or D:\). Then click OK.
(11) Select Manufacturer: ‘Bausch Datacom’ and Model: ‘Vega 56 PC2 internal’,
then click Next.
If you install from the
floppy, type “
A:
\
”
Vega 56 PC2 Users manual
07/06/1999 Bausch Datacom
22
(12) Select the correct Communication Port and click Next.
(13) Windows will show: Your modem has been set up successfully. Click
Finish.

Vega 56 PC2 Users manual
07/06/1999 Bausch Datacom
23
Vega 56 PC2 Users manual
07/06/1999 Bausch Datacom
24
(14) You will see the ‘Vega 56 PC2 internal’ in the list. Click OK.
When the Installation is complete, proceed to setup the dial-up networking and
communication software.

Vega 56 PC2 Users manual
07/06/1999 Bausch Datacom
25
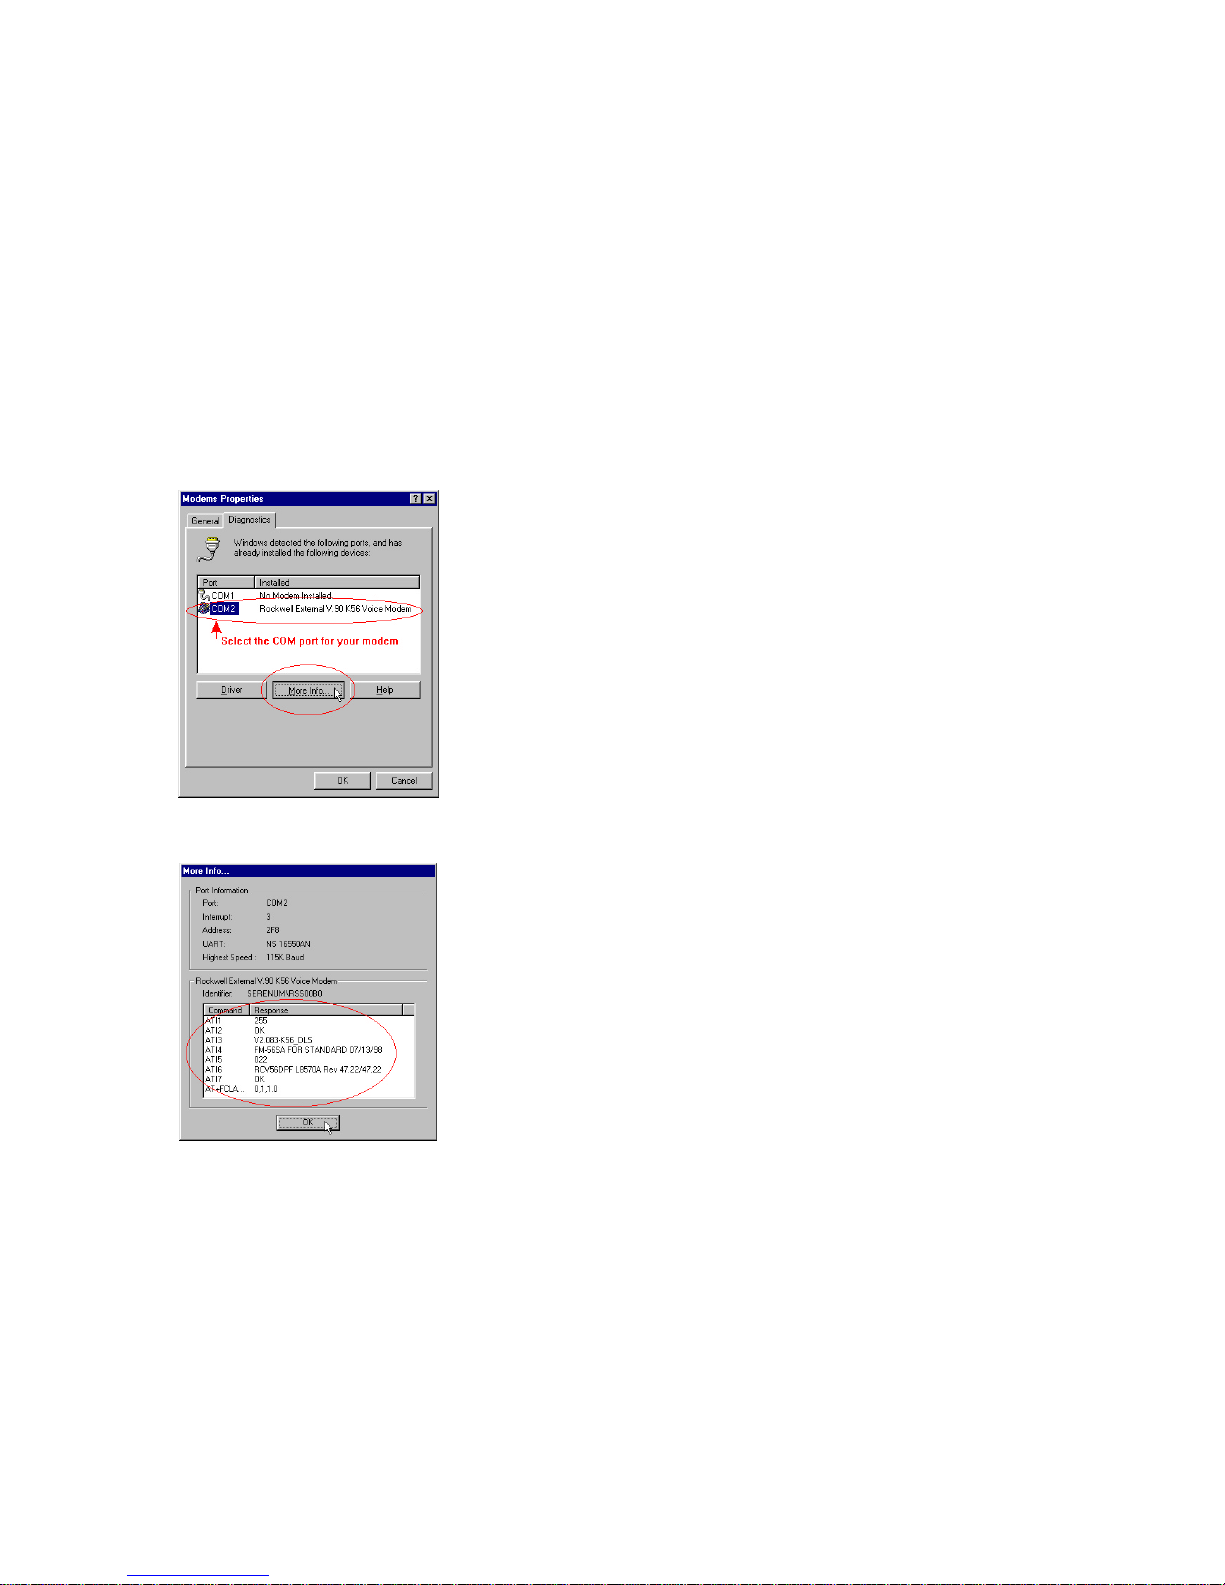
3.2 Modem Diagnostic in Windows 95/98
(1) Go to Start > Settings > Control Panel and double-click on the Modems
icon.
(2)Test the modem by clicking on the Diagnostics tab.
Vega 56 PC2 Users manual
07/06/1999 Bausch Datacom
26
Vega 56 PC2 Users manual
07/06/1999 Bausch Datacom
27
(3)Click on the COM port (for example: COM2 or COM3 ) used by your modem.
Then click on the More Information button.
(4)If, after communicating with the modem, theAT-Command screen appears
and responds with OK, the modem works properly.
Vega 56 PC2 Users manual
07/06/1999 Bausch Datacom
28

Vega 56 PC2 Users manual
07/06/1999 Bausch Datacom
29
3.3 Installing Modem Drivers in Windows NT4.0
Windows NT 4.0 does not support Plug and Play cards. You have to disable
Plug and Play and select a free COM port. Please check Hardware installation
for the jumpers setup for non Plug and Play. If you want to set the modem in
COM2/IRQ3, disable the BIOS of Serial port 2.
(1) Go to Start > Settings > Control Panel. Double-click on the Ports icon .
(2)Click Add.
Vega 56 PC2 Users manual
07/06/1999 Bausch Datacom
30

Vega 56 PC2 Users manual
07/06/1999 Bausch Datacom
31
(3) Setup the COM port, I/O port and IRQ for your internal modem. Click OK.
If you configure the modem for COM 2 (for example), disable the Serial Port
2in the BIOS of the motherboard.
(3)Click on the Restart Now button to restart your Computer.
(4)Go to Start > Settings > Control Panel and double-click on the Modems icon.
Vega 56 PC2 Users manual
07/06/1999 Bausch Datacom
32
(5)Select Don’t detect my modem; I will select it from a list and click Next.
(6)Click Have Disk.

Vega 56 PC2 Users manual
07/06/1999 Bausch Datacom
33
Vega 56 PC2 Users manual
07/06/1999 Bausch Datacom
34
(7)Use Browse or fill in the drive letter of the floppy or CD-ROM drive (for
example A:\or D:\) and click OK.
(8) Select Manufacturer:‘Bausch Datacom’ and Model: ‘Vega 56 PC2 internal’.
Click next.
(10) Select the correct COM port and click Next.
If you install from the
floppy, type “
A:
\
”

Vega 56 PC2 Users manual
07/06/1999 Bausch Datacom
35
Vega 56 PC2 Users manual
07/06/1999 Bausch Datacom
36
(6) Click Finish.
(7) ‘Vega 56 PC2 internal’ will appear in the list. Click Close.

Vega 56 PC2 Users manual
07/06/1999 Bausch Datacom
37
(8) Click Yes to configure the Dial-up Networking.
(14) Click Add.
(15) Select ‘Vega 56 PC2 internal’ and click OK.
(9) Click Configure.
Vega 56 PC2 Users manual
07/06/1999 Bausch Datacom
38
Vega 56 PC2 Users manual
07/06/1999 Bausch Datacom
39
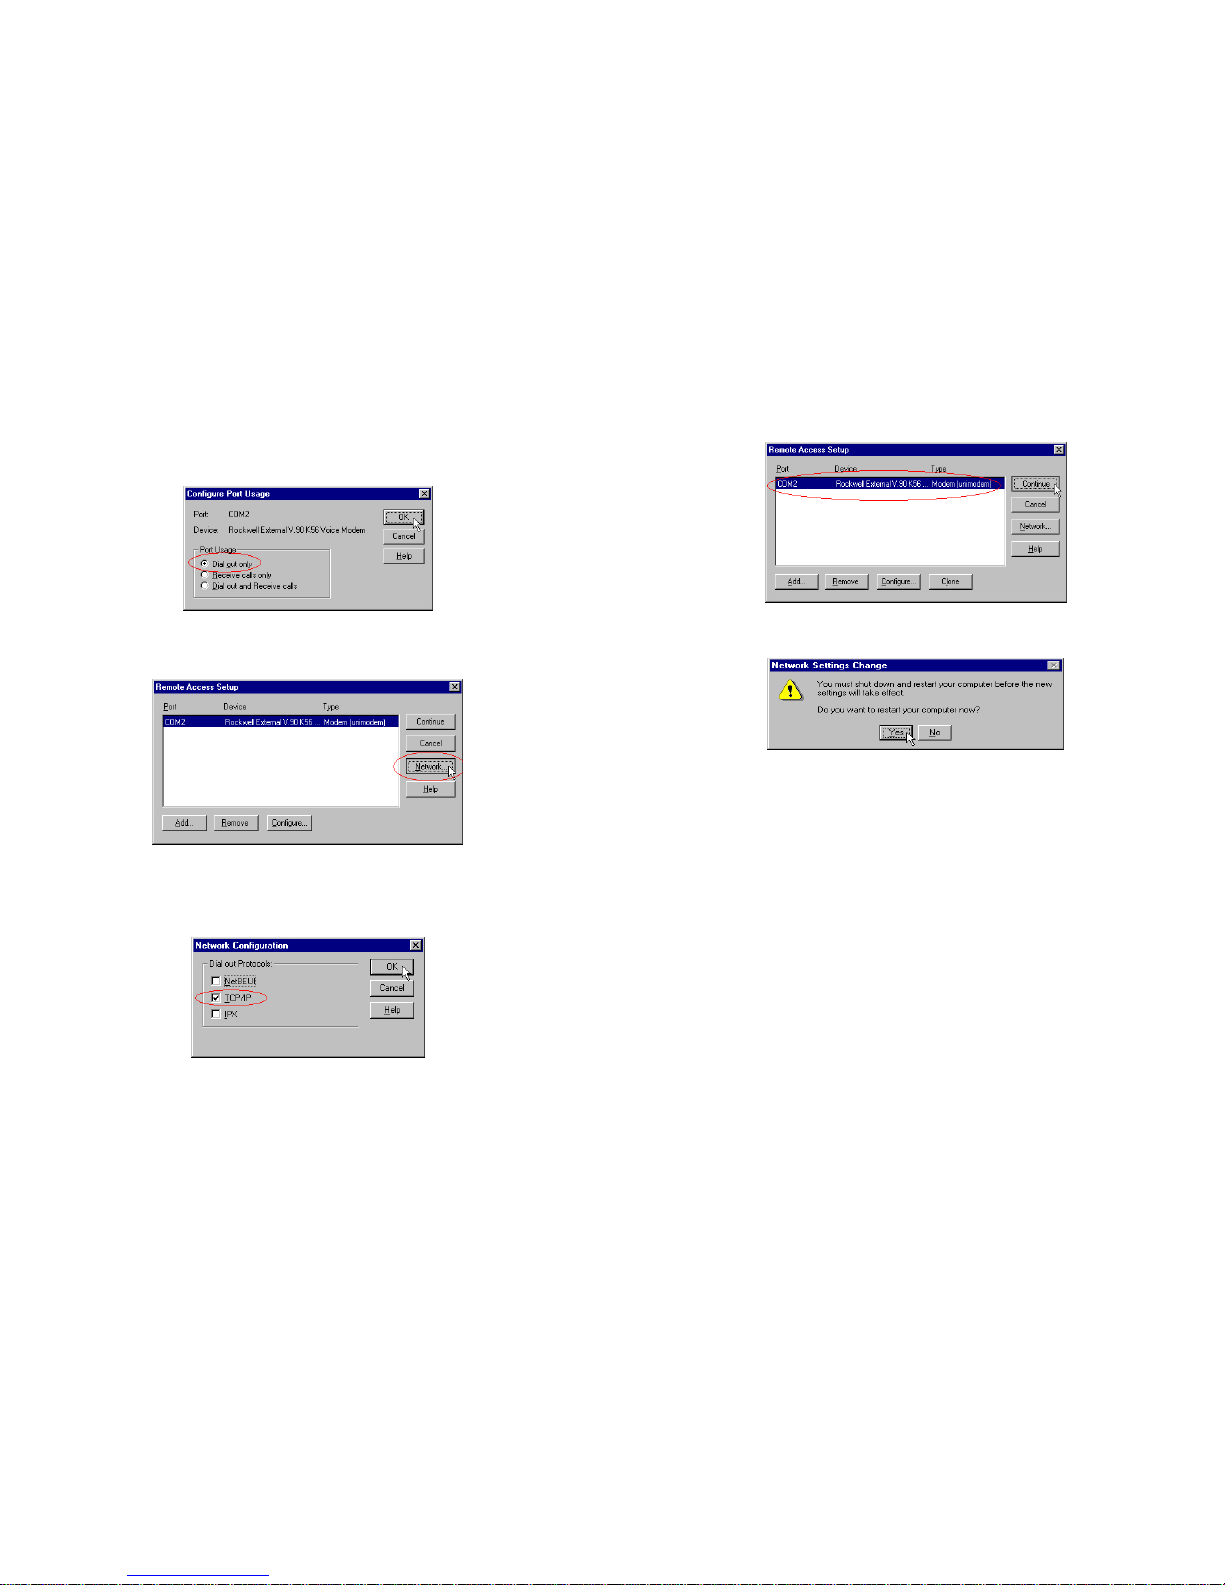
(10)Select Dial out only (or an other option) and click OK.
(11)Click on the Network button.
(12)Select TCP/IP and click OK.
(13)Click Continue.
Vega 56 PC2 Users manual
07/06/1999 Bausch Datacom
40
(14)Click Yes to restart your computer.
Your Vega 56 PC2 modem and the RAS service is now installed. In order to
make an Internet connection you have to configure dial-up networking.
Table of contents
Other Bausch Datacom Modem manuals

Bausch Datacom
Bausch Datacom InduBox GSM M4 Instruction sheet

Bausch Datacom
Bausch Datacom DinBox RTU M4 User manual

Bausch Datacom
Bausch Datacom DinBox GSM M4 User manual

Bausch Datacom
Bausch Datacom Proxima ISDN Lite User manual

Bausch Datacom
Bausch Datacom DinBox User manual

Bausch Datacom
Bausch Datacom DinBox PSTN User manual

Bausch Datacom
Bausch Datacom InduBox PSTN III Instruction sheet


