Becker A2DIY-BKR User manual

Courtesy of: DiscountCarStereo.com
Serving the internet community since 1995
A2DIY-BKR
(newest version)
QUICK START BLUETOOTH INSTALLATION GUIDE FOR BECKER AUX READY RADIOS

PRODUCT SAFETY & DISCLAIMER
READ ALL INSTRUCTIONS CAREFULLY BEFORE INSTALLING, FAILURE TO DO SO MAY CAUSE
PERSONAL INJURY OR DAMAGE TO PRODUCT AND/OR PROPERTY
•This installation guide is provided as a GENERAL installation guide, some vehicles vary and
may require additional steps. We do not accept responsibility for third party labor charges
or modifications. Exercise due-diligence when installing this product.
•We do not accept any responsibility for vehicle damage or personal injury resulting from
the installation of this product.
•Careless installation and operation can result in equipment damage.
Requirement
Becker AUX Ready Radio
Introduction:
Many European vehicle owners wanting to keep their cars as original possible
(including Becker radio) will be pleased to find this DIY kit. Our A2DIY-BKR
module allows these proud owners to link up their Smartphones for Bluetooth
Hands-Free, music streaming and AUX input. The included media button
(remote) allows users to change tracks, accept/reject phone calls, and adjust
device volume while keeping eyes on the road as you drive. The A2DIY-BKR
works only on Becker radios with an AUX Menu Option. CD changer (if present)
must be disconnected. To retain CD Changer, purchase our A2DIY-BKRCD.
An optional Smart USB charging kit is available to keep devices fully charged,
Keep the radio and car you love while enjoying Bluetooth features only
available on newer cars. For more details, see Frequently Asked question
and comparison chart at the end of this guide.
Warning: Most Becker radios are coded and will not operate without the code.
Do not proceed with step 4 if radio code is unavailable otherwise radio will not
operate upon reconnection.
Installation:
Remove radio from dashboard to gain access to the connectors. Special
removal tools (See Fig. 1) are required to remove applicable Becker radios
(except PCM1)
Fig. 1
Radio removal Tools
1. Slide tools into slots on radio. (Straight edge facing away). Withdraw
radio by pulling outwards. To release keys simply press retaining
springs. See Fig. 2.
For a more detailed radio removal process, click here.
Fig. 2

2. Disconnect blue, green plug and yellow plug (if present) from radio
(See Fig. 3) by pressing release tabs on yellow and blue plugs.
Fig. 3
Radio connectors
3. Connect installation harness blue plug (See Fig. 4) into chamber C-3
vacated in step 2.
Note: Yellow plug (if present) must be reconnected. Blue and Green
plugs remain disconnected.
Fig. 4
Audio plug
Warning: In order to retain Ferrari cluster display; (See Fig. 4a) optional ISO8-
HAR harness (See Fig. 4b) is required and must be purchased alongside this
module. T-harness not required for Ferrari vehicles without cluster display.
Click here to purchase T-harness.
Vehicles without cluster display do not require the T-harness.
Fig. 4a
Fig. 4b
4. Disconnect 8-pin black plug from radio (See Fig. 3) by pressing the release
tab. Once removed, mate with harness 8-pin connector seen in Fig. 5
5. Connect harness 8-pin black plug to radio chamber Avacated in step 4.

Fig. 5
harness
7. Connect supplied 3.5mm cable (See Fig. 6) to Module “AUX” jack (See
Fig. 9). Route other end to dash or wherever auxiliary device will
reside (within 3 ft.)
Fig. 6
3 ft. Aux cable
8. Install microphone to visor or headliner using included visor clip (See
Fig. 8).
Fig. 7
Microphone on 10ft. cable
Fig. 8
Microphone visor clip
9. Route microphones down side pillar, under dash and into radio cavity.
10. Connect microphone plug to module “MIC” jack (See Fig. 9)
11. Ensure microphone plug is fully inserted.
Fig. 9

Optional charging kit
Purchase optional USB “Fast charge” kit to charge devices while on the road.
Should you decide to add it, we suggest 2 mounting options:
A. Flush to dash/panel requires drilling a ¾” hole in the dash
B. Flush with Support bracket (use this option to mount USB terminal
wherever your installation demands without drilling)
Flush to Dash or Panel (requires drilling)
1. Drill a ¾” hole in dash or panel using a step drill bit or equivalent (See
Fig. 10)
Fig. 10
Step drill bit
2. Insert USB male terminal through ¾” hole created in step 1 and
connect to USB female port (See Fig. 12)
Fig. 11
USB cable with bracket
Fig. 12
3. Snap USB head (See Fig. 13) until flush with mounting surface (See Fig.
14)
Fig. 13
USB head
Fig. 14
Flush mounted to dash
4. Tuck and secure any extra wire from moving parts and test operation
(See Enabling the AUX section below)

A. USB Bracket (No drilling)
1. Locate flat surface at location of choice within 3.2 ft. of radio and
mount USB support bracket (See Fig. 15) to surface using
adhesive/tape or screws.
Fig. 15
mounting bracket
2. Repeat steps 2 from “Flush to Dash or Panel” instructions.
Tuck and secure any extra wire away from moving parts and test operation (
See
Bluetooth Pairing and operation below)
Notes:
1. If playback is distorted or low, adjust volume level on Bluetooth device.
2. On incoming calls, ring tone also plays on car speakers
3. Bluetooth range is approximately 30 ft. ensure device is within range
4. Streaming has priority.
5. *Wireless remote does not control AUX device or radio functions. Use
aux device built-in controls as customary.
Media button
Pairing Bluetooth media button: Ensure Bluetooth is enabled on your
device (e.g., Smartphone/Tablet etc.)
Press and hold pause/play button (See Fig. 16) until Blue LED flashes
Scan smartphone for available devices and select BT009 from list. (Blue LED
turns off).
Fig. 16
Installation:
Attach button to steering wheel (includes holder) or dashboard using included
double sided tape –your choice!

Operation:
Once paired with smartphone/Tablet, users may perform the following functions
on iOS devices with Bluetooth 3.0 and later or Android 4.0 or later.
Media button functions are NOT applicable to the C5 radio.
Charging:
Media button built-in rechargeable 200mAH battery may last up to 10 days. Use
supplied USB cable to charge. Red LED indicates charging; Full charge is reached
after 2 hours at which time LED turns off.
Bluetooth pairing
Pairing varies among devices but basic steps are the same. This process is done
upon initial install and will not have to be repeated.
1. Turn ignition and radio “ON”
LED inside module peephole will flash rapidly (pairing mode)
2. On A2DP device: go to
Bluetooth Settings
3. Select
Bluetooth
and enable it
4. Tap
Scan for devices
.
5. Wait for Bluetooth device name (See below) to appear and tap it.
Once
paired confirmation tone is heard on car speakers
Noteworthy: On Androids it may be possible to change device name to
something of your own liking. This may not be possible on newer iOS devices.

Enabling AUX mode on Becker radios
One important step in this process is enabling AUX function within radio menu.
Most Becker radios are pre-programmed to recognize a CD changer connection
and because of that you must perform the following steps to change setting to
“AUX” otherwise Bluetooth playback is impaired.
Enabling AUX Menu function
Radios with TP button: (i.e. CDR-220)
1. Turn radio "ON"
2. Press and hold the "TP" button for about 8 seconds until Becker 1 is
displayed.
3. Turn the Tuning Knob until AUX OFF is displayed.
4. Press either button located directly under the Arrows on the display to
change the present setting from OFF to ON.
Turn radio OFF.
5. Turn Radio back ON, press “S” (Source) button to enter AUX Mode. This
is the mode to use whenever you want to listen to the device connected
to the adapter.
Radios with ☼button: (i.e. BE6104)
1. Turn Radio “ON”
2. Press and hold the ☼button for about 8 seconds.
3. Select AUX “ON/OFF”option.
4. Press either button located directly under the Arrows on the display to
change the setting to ON.
5. Turn radio OFF.
6. Turn Radio back ON press the “☼”button until “AUX”is displayed.
Others with ☼button (i.e. BE4602)
1. Turn radio ON.
2. Press and hold the ☼button for 8 seconds, until Becker 1 is displayed.
3. Turn the Tuning Knob until AUX OFF is displayed.
4. Press either button located directly under the Arrows on the display to
change the present setting from OFF to ON
5. Turn Radio back “ON” Press “CD” button to enter AUX Mode
Radios with 3 Function buttons (i.e. BE4527)
1. Turn radio ON.
2. Press and hold Function button #2 (center) for more than 4 seconds.
3. The accompanying menu appears on the display.
4. Press the multifunction button located directly under “AUX” on the
display to change the present setting from OFF to ON.
5. The Setting is stored automatically.

Nav Traffic Radios
1. Press the "Radio" button to enter Radio mode.
2. Press the "Navi" and "F10" simultaneously
3. Press "Next" until the AUX input, Changer Res screen
4. Press AUX to enable/disable.
Becker 4775 (Land Rover Traffic Pro)
1. With radio "ON" press and hold the Tone button until sub-menu appears
2. Press “AUX” soft-key until the screen displays “AUX Mode on”.
3. Press the Tone button to exit the menu.
4. To enter "AUX" mode, press the "CD" button and select the "AUX" soft-
key.
Sound 5 (BE7077 Sprinter Van)
1. Turn radio ON.
2. Press the
dp
repeatedly until EXT menu appear.
3. Turn Rotary control knob clockwise and select EXT AUX.
4. Press the CD button repeatedly until “AUX” is displayed
Cascade Pro (i.e. BE6112, BE7941)
To activate the External Device mode
1. Turn radio ON.
2. Press the information button
3. Turn the rotary control/push (OK) button counterclockwise until
System Settings appears at the top right of the display
4. Press the rotary control/push (OK) button
5. Turn the rotary control /push (OK) button to select External Device
6. Confirm selection by pressing the rotary control/push (OK) button
7. Select “AUX” from list and turn it “ON”.
8. Exit menu
9. To listen to the “AUX” device, press the MEDIA button
10. Turn the rotary control /push (OK) button to “AUX” and press the
rotary control/push (OK) button
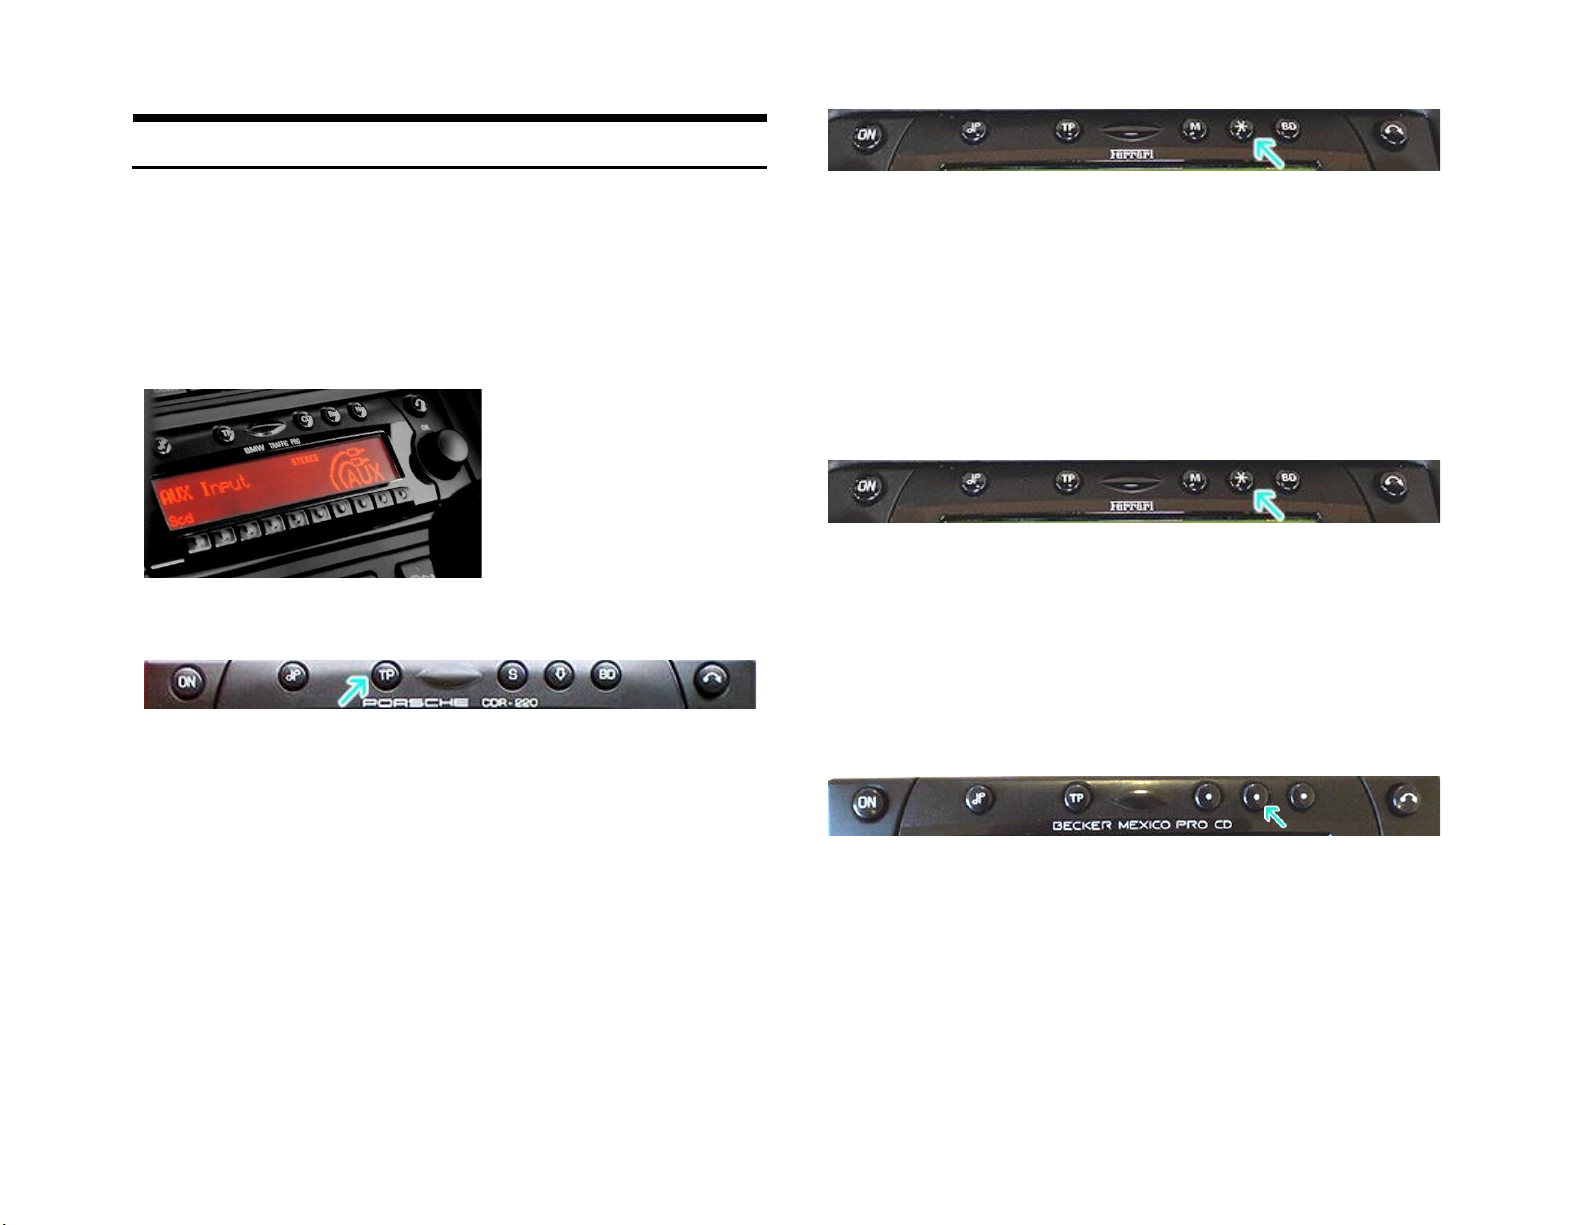
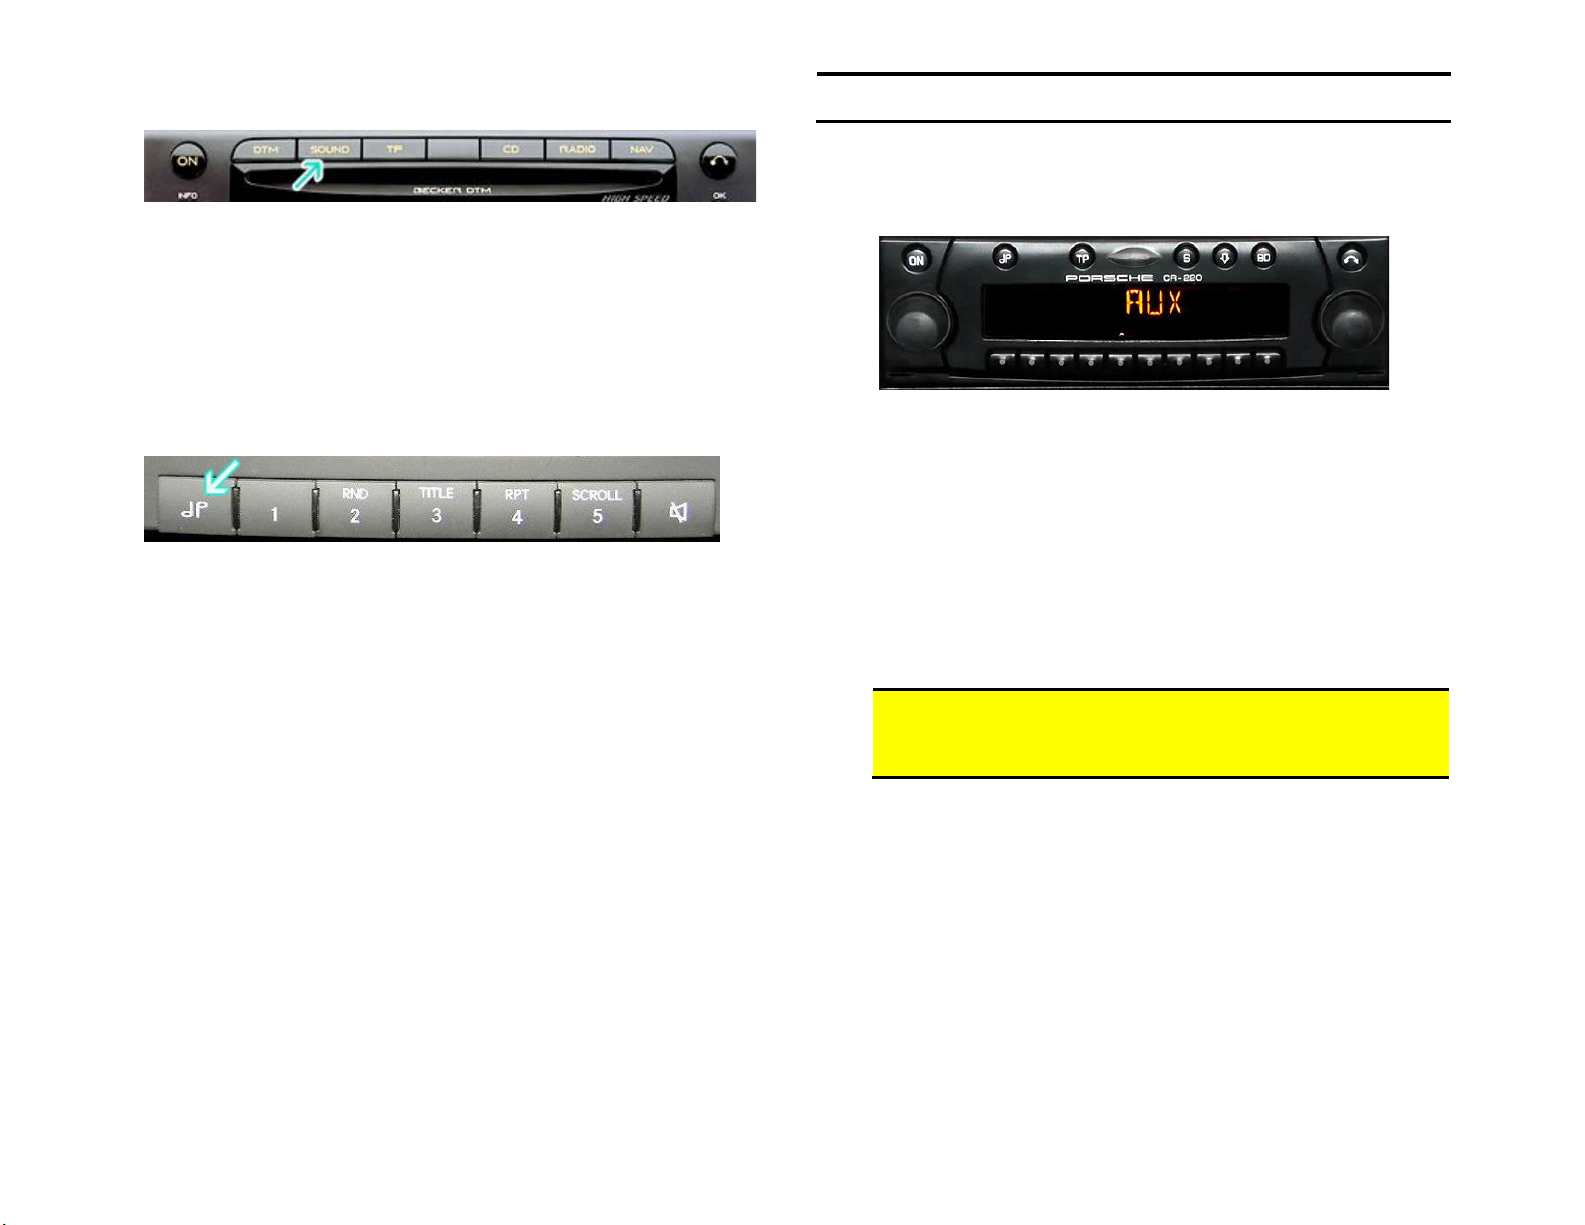
Becker BE7801 Infotainment (Ferrari, Maserati)
1. Press the TP button for more than 2 seconds
2. Press multifunction button “AUX”
3. Select Ext audio source
4. press right control knob to select “ON”
5. The setting is store automatically

Becker DTM /High speed (i.e. BE-7892, BE7910)
1. Press Sound button for more than 2 seconds
2. Press multifunction button “AUX”
3. Select Aux Mode on
4. The setting is stored automatically
In CD Operation, the multifunction button AUX must be pressed to select
AUX operation
Mercedes Sound 5
1. Press Mode button (indicated by arrow) repeatedly until AUX is
displayed.
Operation:
1. Turn ignition to ACC and radio “ON”
2. Press radio button combination to enter AUX mode
3. Launch smartphone music streaming application
4. Use media button to change tracks, adjust device volume, pause etc.
5. Place phone test call.
6. Adjust call volume with media button, steering wheel controls or radio
volume knob.
7. To end call press media button, Pause/Play
8. To listen to AUX device, press media button Pause/Play.
9. If correct operation is confirmed go ahead and reinstall radio.
Warning: Playlist and Track selection is *NOT* possible using Becker
radio button. Use audio device built-in controls and display or media
button to access and control audio files and applications.
Notes: if no auxiliary device is connected, press media button play/stop to
pause streaming media.

Comparison chart
FEATURES
A2DMP-BKR
A2D-
BKR
BT45-BKR
A2DIY-BKR
A2DIY-BKRCD
Changer
retention
X
X
X
X
✓
3.5mm AUX input
X
X
X
✓
X
USB charging
X
X
X
**
**
Mute function
X
*
✓
*
*
Hands-Free calls
X
×
✓
✓
✓
Music streaming
✓
✓
✓
✓
✓
Remote control
**
**
✓
✓
✓
Plug-n-play
✓
✓
✓
✓
✓
Text display
X
X
X
X
X
* Radio must be in “AUX” Mode
** Optional
Frequent ask questions
1. What’s the difference between A2D-BKR and A2DIY-BKR?
The A2D-BKR supports music streaming only, the A2DIY-BKR supports music
streaming, Hands-Free calling, auxiliary input (3.5mm jack)
2. Does the A2DIY-BKR work on all Becker radios?
NO; Becker radios with “AUX” menu option are supported. Enter radio
menu to verify radio has this option. (Becker CR210, CDR210, PCM2+ for
example do not have this option and therefore not compatible)
3. Is there an adapter for Becker radios that do not have “AUX” menu?
YES; Purchase our A2DMP-BKR
4. Can I control Smartphone from radio buttons?
NO; you must continue to use smartphone built-in controls and display, VR
or included media button.
5. Can I pair more than one device to the A2DIY-BKR?
YES; but only one connection can be active at a time.
6. Can I connect and play USB flash drive to optional USB port?
NO; USB port is for charging only. No playback or synching
7. I’m experiencing noise with engine on. What do you recommend?
If experiencing engine noise or whine, we recommend adding a noise filter
to the power supply lines. Our NF3A is available, however user can
purchase and install filter of choice.
8. I’ve installed according to guide, and able to turn radio on, but module
does not show up on smartphone. What must I do?
Ensure ignition key is in ACC or ON positions. This ensure module is
powered and ready to pair.
Disclaimer
• This product has no affiliation with Porsche, BMW, Mercedes, Maserati, Landrover, Becker etc.
• We’re not liable for misuse of this product.
•We recommend professional installation.
Email [email protected]
© 1995-Oct-21 Discount Car Stereo, Inc. All rights reserved. Information in this document is
subject to change without notice. Other products and companies referred to herein are
trademarks or registered trademarks of their respective companies or mark holders.
Other manuals for A2DIY-BKR
1
Table of contents
Other Becker Car Receiver manuals

Becker
Becker 780 User manual

Becker
Becker Audio 30 USA 3309 User manual

Becker
Becker A2D-BKR User manual

Becker
Becker Audio 30 ECE Typ 3300 User manual

Becker
Becker Mexico 7948 User manual

Becker
Becker BT-BKRMT User manual

Becker
Becker MEXICO User manual

Becker
Becker BT45-BKR User manual

Becker
Becker 1480 User manual

Becker
Becker BLU-BKR23 Instruction Manual