Becker BLU-BKR2 User manual

Courtesy of:DiscountCarStereo.com
Picture for illustration purposes only
Bluetooth Audio Streaming
Installation Guide for Becker Radios with AUX feature
Revised: June 12, 2015

Introduction:
Thanks to the BLU-BKR2 Kit you can keep the radio and car you
love while enjoying Bluetooth features only available on new cars
With Bluetooth Technology and your Smartphone’s built in
Advanced Audio Distribution Profile (A2DP), you can stream music
from the compatible Phone into the Bec er Radio. This clean
solution leaves no wires on or around the dash. Simply pair up the
Bluetooth device to the adapter hidden behind the dash set the
Radio to “AUX” mode to enjoy the cleanest audio playbac
without any wires or complicated setup.
Installation:
Warning! Although not critical, we recommend disconnecting the car
battery. Keep in mind that most Becker radios are coded and will not
operate without the code. Radio code must be available for radio to
operate upon reconnection.
1. Remove radio from the dashboard to gain access to the
connectors.
2. Removal tools (not included) are required to remove
these Bec er radios. (See Fig. 1)
Fig 1
Radio Removal Tools
3. To remove radio, slide both tools into the slots on radio to
the second detent position. Withdraw radio by pulling
outwards.
4. Disconnect the blue, green and yellow iso plugs (C1, C-2
and C-3) from Radio connector (See Fig. 2
)
Note. Depending on options, these slots may be empty. Factory CD
Changer (if present) is connected to C-2 and C- slots and must be
disconnected (both blue AND green plugs). Factory amplifier (if present)
is connected to C-1 slot and must be reconnected.
Fig 2
Radio Connectors
5. Connect blue plug from the Adapter harness (See Fig. 3)
to slot labelled C-3 on Radio. Do not reconnect Green plug
(if present)
Fig 3
Audio harness
6. Connect both Male RCA plugs from Audio harness to
Audio output on Main Module (See Fig. 4)
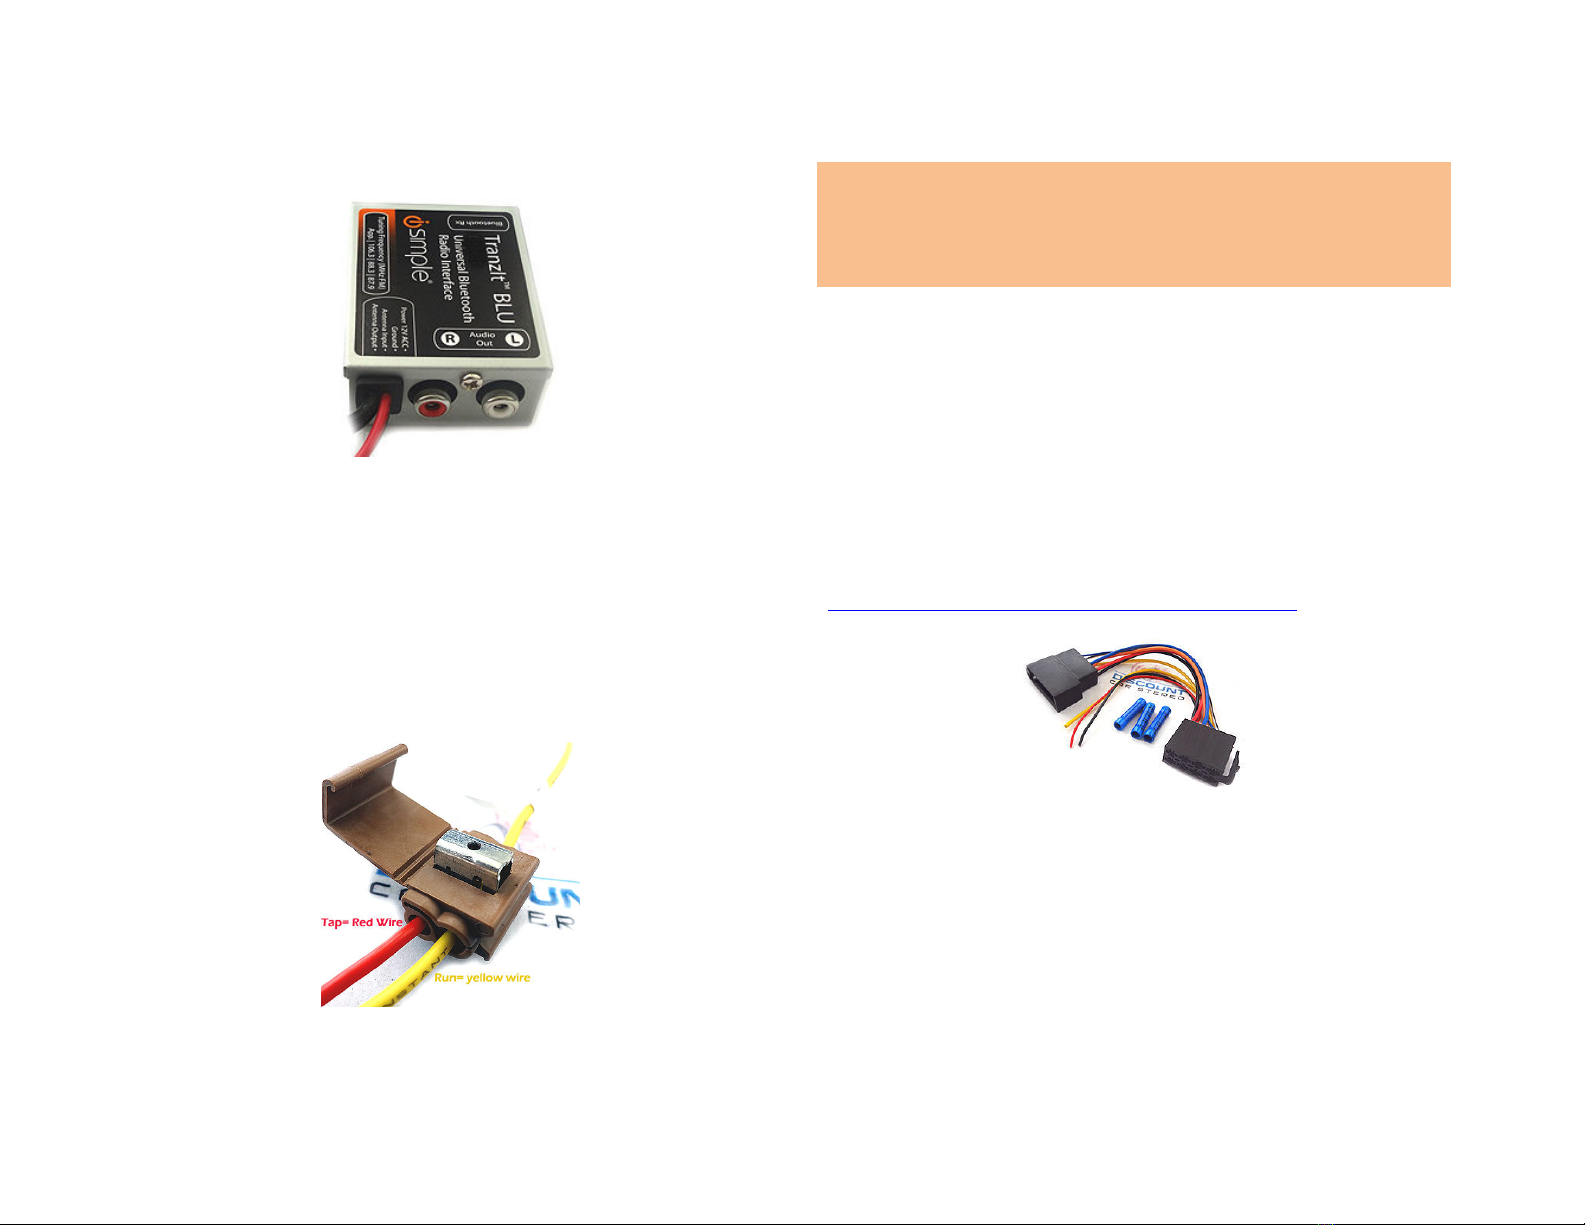
Fig 4
Main Module
7. Switched +12V and Ground sources are required to power
the Main Module. Use the included Tap connectors (See
Fig.5) to mate the Module Red wire with the vehicles 12V
ignition wire @ PIN 7 on plug “A” as seen in Fig. 2.
Repeat the process for the Blac (Ground) wire and mate
with the Ground wire @ PIN 8 on the same plug.
Fig 5
T902 connection example
Note
:
The Antenna connections on Main Module are not used in this
application. Simply bundle with the module and secure away from any
moving parts. The toggle switch is required in the absence of Google or
Apple app. Download the respective apps to phone and use them
instead of the switch to turn the device on/off, set to auto etc.
Optional power supply harnesses
these harnesses provide the Main Module with power and ground
from both Bec er and Panasonic (CDR-30) radios. (T-taps are not
required).
The applicable harness will arrive pre-wired to the Main Module
for a quic plug-n-play connection. Simply ma e a selection from
the drop-down menu on the product page.
http://www.discountcarstereo.com/PAH-1784.html
Fig 6
Optional Power harness
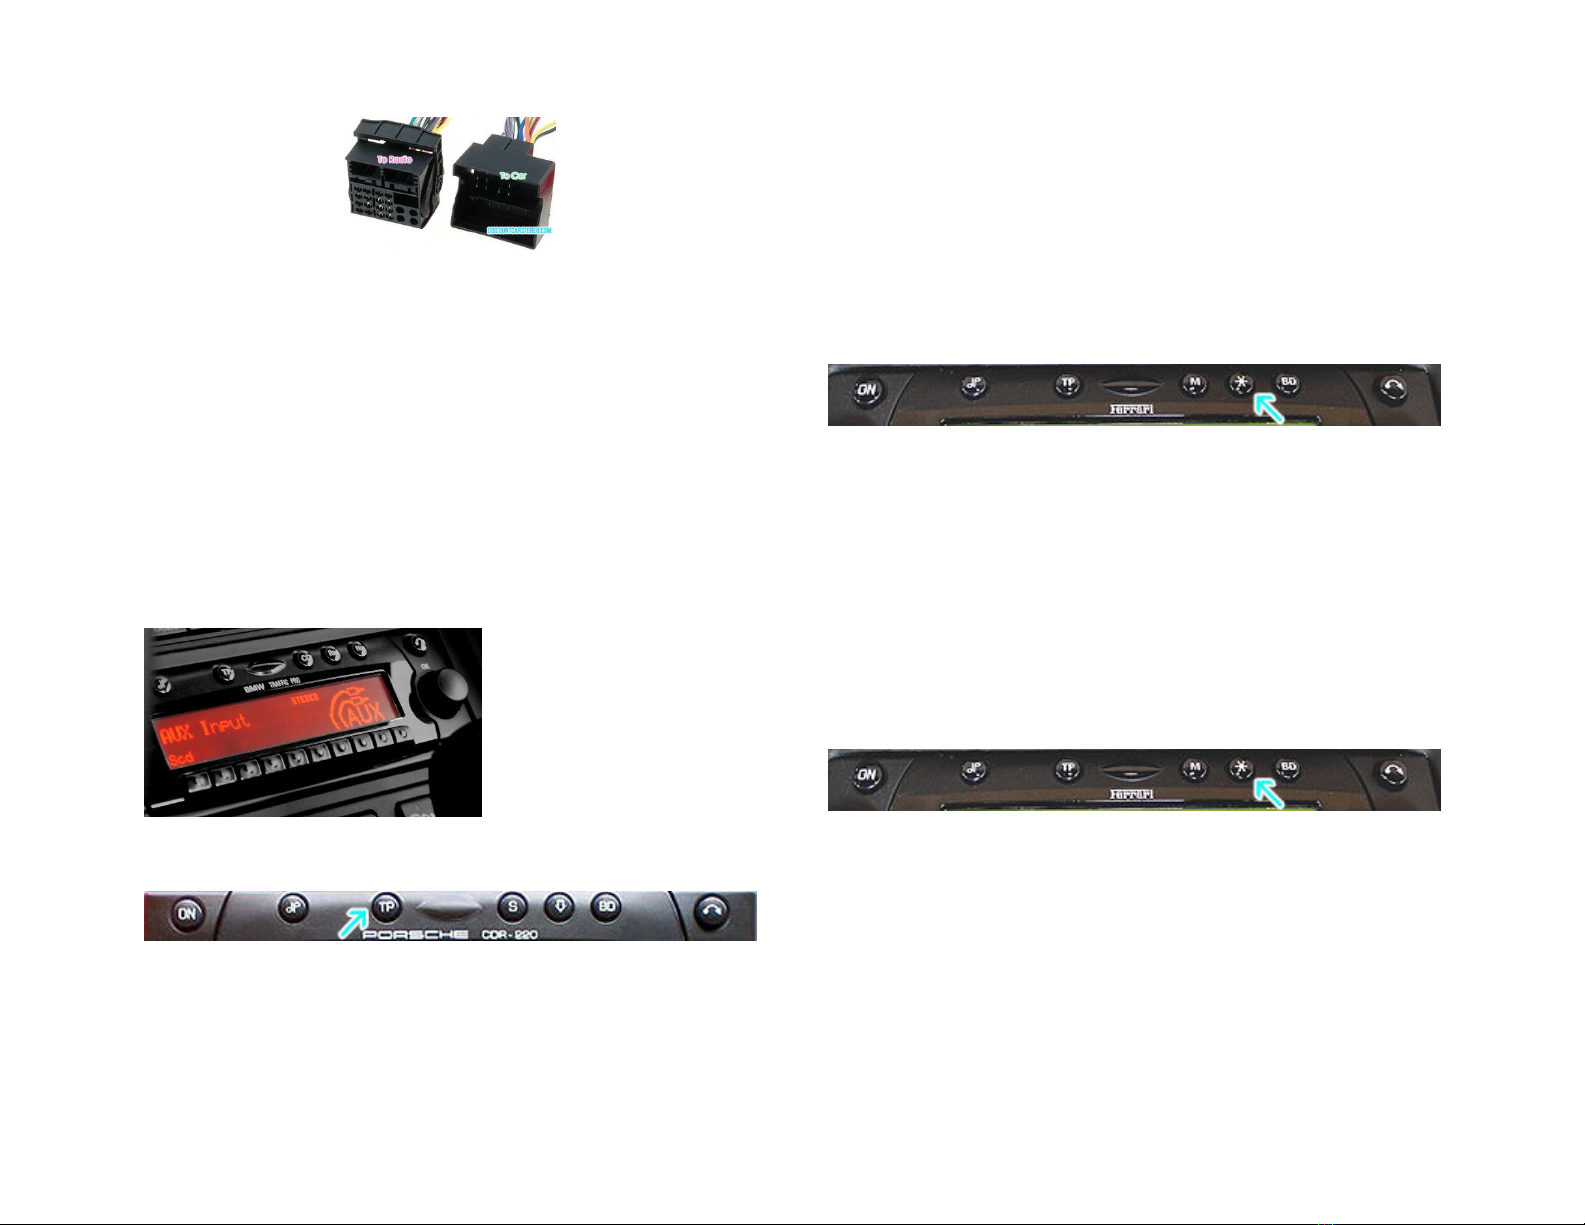
Fig. 7
Optional power harness for CDR 0
Operation:
One of the most important steps in this process is to enable the
AUX function within the Bec er radio menu. Most Bec er radios
are pre-programmed to recognize a CD Changer connection and
because of that you must perform the following steps and change
that setting from CD Changer to “AUX” otherwise the adapter
will not perform as intended.
Enabling the A X function
Radios with TP button: (i.e. CDR-220)
1. Turn radio "ON"
2. Press and hold the "TP" button for about 8 seconds until
Bec er 1 is displayed.
3. Turn the Tuning Knob until AUX OFF is displayed.
4. Press either button located directly under the Arrows on
the display to change the present setting from OFF to ON.
Turn radio OFF.
5. Turn Radio bac “ON” Press “S” button to enter AUX
Mode. This is the mode to use whenever you want to
listen to the Audio device.
Radios with ☼ button: (i.e. BE6104)
1. Turn Radio “ON”
2. Press and hold the ☼ button for about 8 seconds.
3. Select AUX “ON/OFF” option.
4. Press either button located directly under the Arrows on
the display to change the setting to ON.
5. Turn radio OFF.
6. Turn Radio bac ON press the “☼” button until “AUX” is
displayed.
Other Radios with ☼button (i.e. BE4602)
1. Turn radio ON.
2. Press and hold the ☼ button for 8 seconds, until Bec er 1
is displayed.
3. Turn the Tuning Knob until AUX OFF is displayed.
4. Press either button located directly under the Arrows on
the display to change the present setting from OFF to ON
5. Turn Radio bac “ON” Press “CD” button to enter AUX
Mode

Radios with 3 Function buttons (i.e. BE4527)
1. Turn radio ON.
2. Press and hold Function button #2 (center) for more than
4 seconds.
3. The accompanying menu appears on the display.
4. Press the multifunction button located directly under
“AUX” on the display to change the present setting from
OFF to ON.
5. The Setting is stored automatically.
Nav Traffic Radios
1. Press the "Radio" button to enter Radio mode.
2. Press the "Navi" and "F10" simultaneously
3. Press "Next" until the AUX input, Changer Res screen
4. Press AUX to enable/disable.
Becker 4775 (LandRover) & Other Traffic Pro
1. With the Radio "ON" press and hold the Tone button until
the sub-menu comes up.
2. Press the soft- ey labeled “Aux” until the screen displays
“AUX Mode on”.
3. Press the Tone button to exit the menu.
4. To enter "AUX" mode, press the "CD" button and select
the "AUX" soft- ey.
Sound 5 (BE7077 Sprinter Van)
1. Turn radio ON.
2. Press the dp repeatedly until EXT menu appear.
3. Turn Rotary control nob cloc wise and select EXT AUX.
4. Press the CD button repeatedly until “AUX” is displayed
Cascade Pro (i.e. BE7941)
To activate the External Device mode
1. Turn radio ON.
2. Press the information button
3. Turn the rotary control/push (OK) button
countercloc wise until System Settings appears at the top
right of the display
4. Press the rotary control/push (OK) button
5. Turn the rotary control /push (OK) button to select
External Device
6. Confirm selection by pressing the rotary control/push (OK)
button
7. Select “AUX” from list and turn it “ON”.
8. Exit menu
9. To listen to the “AUX” device, press the MEDIA button
10. Turn the rotary control /push (OK) button to “AUX” and
press the rotary control/push (OK) button

Becker BE7801 Infotainment (Ferrari, Maserati)
1. Press the TP button for more than 2 seconds
2. Press multifunction button “AUX”
3. Select Ext audio source
4. press the right control nob to select “ON”
5. The setting is store automatically
Becker DTM /High speed (i.e. BE-7892, BE7910)
1. Press the Sound button for more than 2 seconds
2. Press multifunction button “AUX”
3. Select Aux Mode on
4. The setting is stored automatically
In CD Operation, the multifunction button AUX must be
pressed to select AUX operation
Bluetooth Pairing and Connection
This process is required the first time you use the BLU-BKR2.
After initial pairing, the BLU-BKR2 will automatically reconnect
with the paired phone upon entering the vehicle.
1. Turn the vehicle ignition to “ON”.
2. Access your Smartphone Bluetooth menu settings, and
search for new devices.
3. Select the device called “TranzIt BLU HF”. Choose
“Connect”
For specific instructions or in case of difficulty, please see
“Troubleshooting” on page 3 of manual included with kit.
Don’t forget that radio must be in “A X” Mode when using the
BL -BKR2.
For additional setting download the Free TranzIt BLU iSimple App
to your phone.
Test Operation
1. Set the radio to “AUX”
2. Initiate playbac or stream music on audio device.
3. Audio playbac should be heard on car spea ers
4. Adjust volume using the radio buttons
5. If successful go ahead and Reinstall the Radio
Congratulations, you’ve just updated your vehicle to support new
technology while preserving the original radio and dash
components.
Enjoy!
Disclaimer
• This product has no affiliation with Porsche, Becker or Apple
• There are no warranties expressed or implied by purchase of this
product
• We’re not liable for misuse of this product.
Call 804-717 5717 or email [email protected]
© 1995-15 Discount Car Stereo, Inc. ll rights reserved. Information in this document
is subject to change without notice. Other products and companies referred to herein
are trademarks or registered trademarks of their respective companies or mark
holders.
Table of contents
Other Becker Radio manuals


