Beflexx BF1000-120 User manual
The powerful and most compact central vacuum solution for
your caravan, motorhome, boat, truck and much more!
BEFLEXX BF1000-120
TO THE OWNER:
Read the owners manual #6062 thoroughly to ensure
the most efcient use of your BEFLEXX®system.
THIS APPLIANCE IS FOR RV USE.
PLUG AND PLAY
MANUAL

Please be sure this users installation manual
is left with the power unit or customer when
installation is completed.
SOLD BY ________________________________
DATE OF PURCHASE _______________________
PLACE OF PURCHASE _______________________
SERIAL NUMBER __________________________
RECORD THIS INFORMATION FOR
FUTURE REFERENCES
Operating & Maintenance Instruction Manual
BEFLEXX BF1000-120
CONTENTS
Important Safeguards 3How To Use 6
Grounding Instructions 4Accessories 7
General Information 4Warranty 8
Installation 5
2

3
IMPORTANT SAFEGUARDS
When using an electronic appliance, basic safety precautions should always be followed, including those listed below.
READ ALL INSTRUCTIONS BEFORE USING THIS CENTRAL VACUUM SYSTEM.
WARNING
!
To reduce the risk of re, electirc shock or injury:
• This vacuum cleaner is intended for dry pick up only. Do not use on wet surfaces or pick up any liquids, hot
debris, or any ammable items that would cause harm to the vacuum cleaner.
• Do not pull or carry by cord, use cord as a handle, close door on cord, or pull cord around sharp edges or
corners. Do not run appliance over cord. Keep cord away from heated surfaces.
• Do not allow vacuum to be used as a toy. Close supervision is necessary when this vacuum is used by
or near children.
• Use this vacuum only for its intended use as described in this manual. (Use of attachments not
recommended by manufacturer may cause re, electric shock, injury or damage to system components.)
• Mount unit at least 8 inches from the oor, celling and corner sidewall too insure adequate
ventilation for motor.
• Never operate this vacuum if it has a damaged cord or plug, if it is not working properly, or if it has been
dropped or damaged. Return to authorized dealer/distributor for repair.
• Never disconnect plug by pulling cord. To disconnect from outlet grasp the plug, not the cord.
• Do not put any object into openings. Do not use with any opening blocked. Keep free of dust, lint, hair
and anything that may reduce air ow/suction. Lack of air ow will cause the motor to overheat.
• This vacuum cleaner creates suction. Keep hair, face, ngers, all body parts and loose clothing away
from any openings.
• Connect to a proper grounded outlet only. See grounding instructions.
• Never operate without dust bag and/or lter in place.
• Turn off all controls before unplugging. Unplug from outlet before servicing.
• Never handle plug, cord or power unit with wet hands.
• Use extra care when cleaning on stairs.
• Do not locate the power unit in a high temperature area or where it is inaccessible.
• Do not use extension cords or outlets with inadequate current carry capacity.
• Do not pick up anything that is burning or smoking, such as cigarettes, matches or hot ashes.
• Do not use on wet surfaces.
• Do not vacuum drywall dust or baking our as it may cause damage to your vacuum.
• This appliance is not intended for use by persons, (including children), with reduced physical, sensory, or
mental capabilities, or lack of experience and knowledge, unless they have been given supervision or
instruction concerning use of the appliance by a person responsible for their safety.
• The machine must not be used if it is faulty.
• Unplug electrical appliances before vacuuming them.
• Do not pick up ammable or combustible liquids such as gasoline, or use in areas where they
may be present.
• Make sure to connect the vacuum to a fused electrical network on board of your RV.
• When expected not to use the vacuum for a couple days make sure to unplug the power cord.
SAVE THESE INSTRUCTIONS
4
GROUNDING INSTRUCTIONS
This vacuum must be grounded (earthed). If it should malfunction or breakdown, grounding provided a path of least
resistance for electric current to reduce the risk of electric shock. This vacuum is equipped with a cord having an
equipment-grounding conductor and grounding plug. The plug must be inserted into an appropriate outlet that is properly
installed and grounded in accordance with all local codes and ordinances.
BEFLEXX BF1000-120
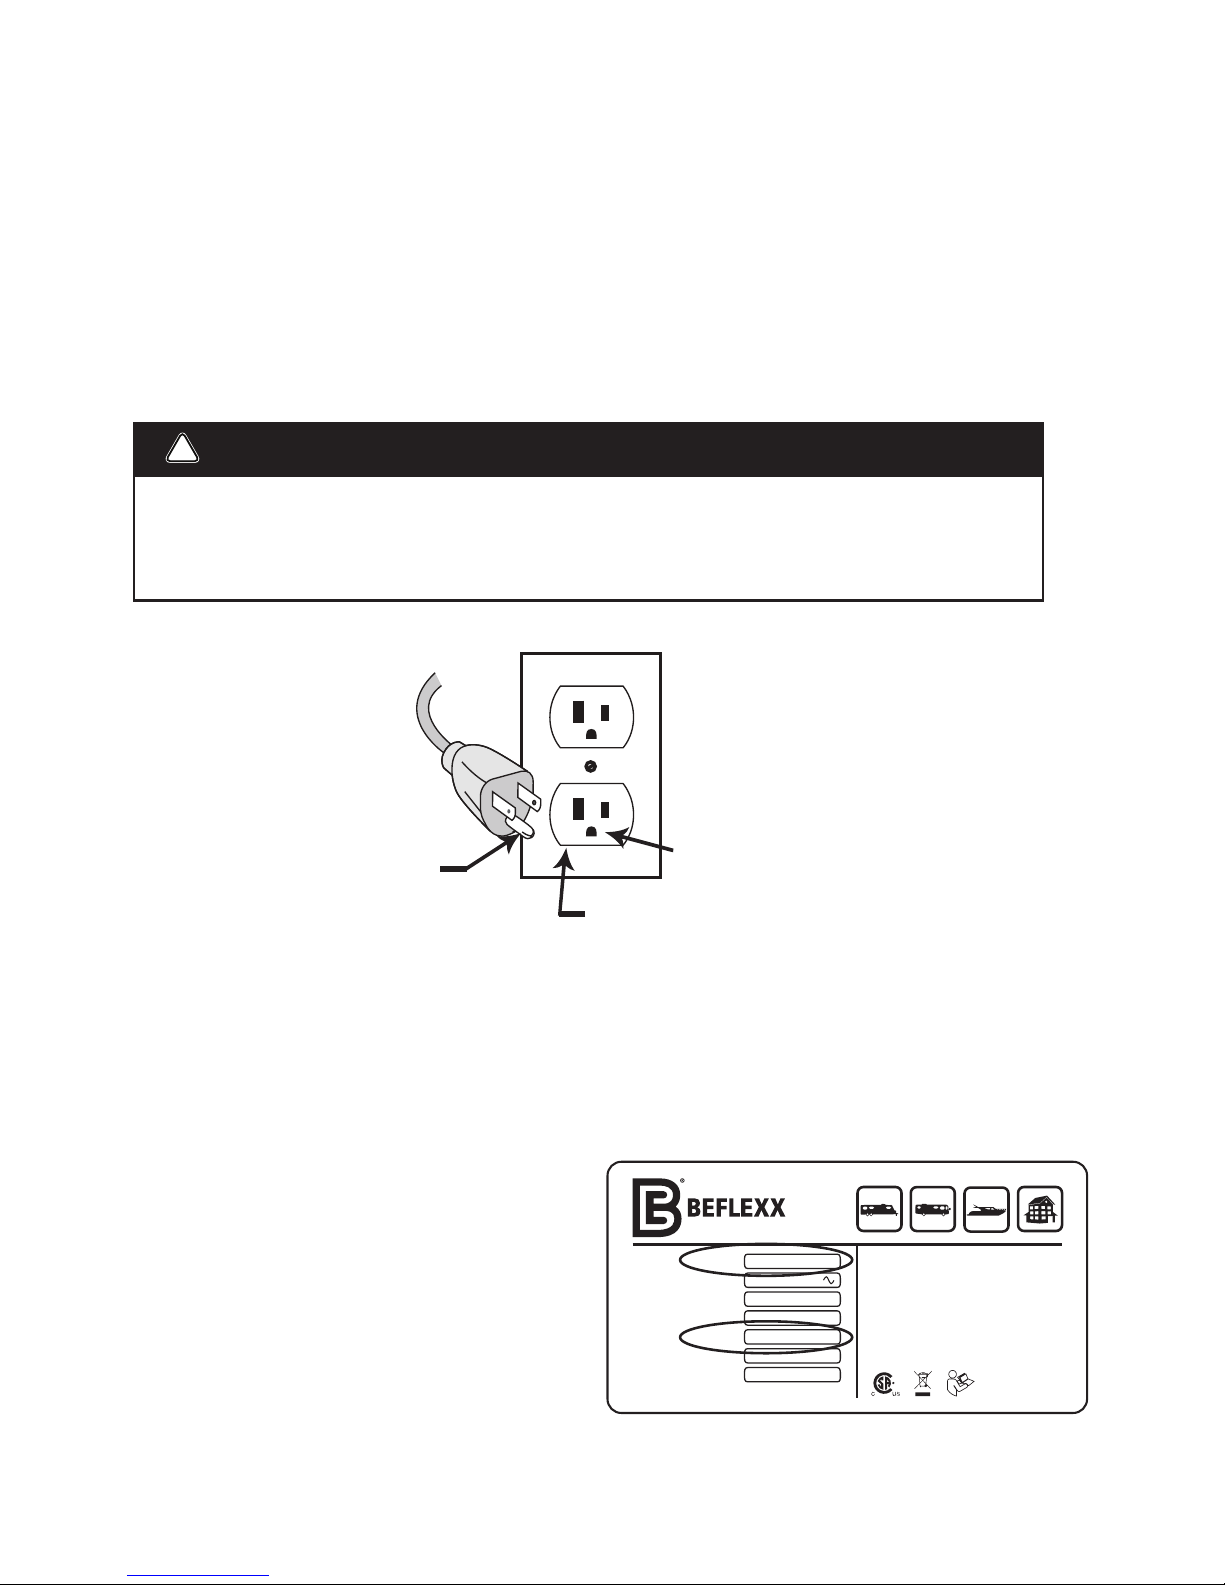
This vacuum is for use on a circuit having a nominal rating at 110/120 volts and is provided with a specic cord and plug
to permit connection to a proper electrical circuit. Make sure the vacuum is connected to an outlet having the same
conguration as the plug. No adaptor should be used with this vacuum. Refer to Figure 1.
GENERAL INFORMATION
The BEFLEXX BF1000-120 central vacuum system is designed for dry pick up of household dirt and dust and is not intended
to pick up liquids. Avoid picking up hard or sharp objects with this vacuum to prevent damages or clogs to hoses.
WARNING: THIS CENTRAL VACUUM SYSTEM IS INTENDED FOR HOUSEHOLD (RV) USE ONLY.
Service Information
The instructions in this manual serve as a guide to routine
maintenance. For additional information, contact your local
authorized dealer/distributor.
Rating Plate
The model and serial number are indicated on the rating
plate located on top of vacuum. For prompt and complete
service information, always refer to these numbers when
inquiring about service. Refer to Figure 2.
Model:
Voltage:
Current:
Freq:
Serial No:
Listed:
Master Contract No:
Household Use Only - Usage Domestique Seulement
WARNING: TO REDUCE THE RISK OF ELECTRIC SHOCK OR
FIRE – DO NOT USE ON WET SURFACES.
POUR RÉDUIRE LES DANGERS DE FEU, D’ÉLECTROCUTION OU
DE BLESSURE – N’UTILISER PAS SUR DES SURFACES MOILLÉES.
CAUTION: MOUNT UNIT AT LEAST 8 INCHES FROM FLOOR,
CEILING AND CORNER SIDEWALL TO INSURE ADEQUATE
VENTILATION FOR MOTOR.
ASSURER UN DÉGAGEMENT D’AU MOINS 8 INCHES ENTRE LES
PAROIS LATÉRALES ET LE PLANCHER OU LE PLAFOND POUR
ASSURER UNE VENTILATION ADÉQUATE POUR LE MOTREUR.
Beexx BV, De Scheper 254, 5688 HP Oirschot, The Netherlands MADE IN HOLLAND
BF1000 -120
110 -120 Volts
8.3A
60Hz
11401000001
70002167
259178
Figure 2.
Improper connection of the equipment grounding conductor can result in a risk of electric shock. Check with
a qualied electrician or service person if you are in doubt as to whether the outlet is properly grounded. Do not
modify the plug provided with the appliance - if the plug will not t the electrical outlet, have a proper outlet
installed by a qualied electrician.
WARNING
!
110/120 volts Grounded Outlet
Grounding Pin
Grounded Pin Receptacle
North American Outlet
Figure 1.
1
2
3
INSTALLATION
Installation of Power Unit
INSTALLATION
Installation of Power Unit
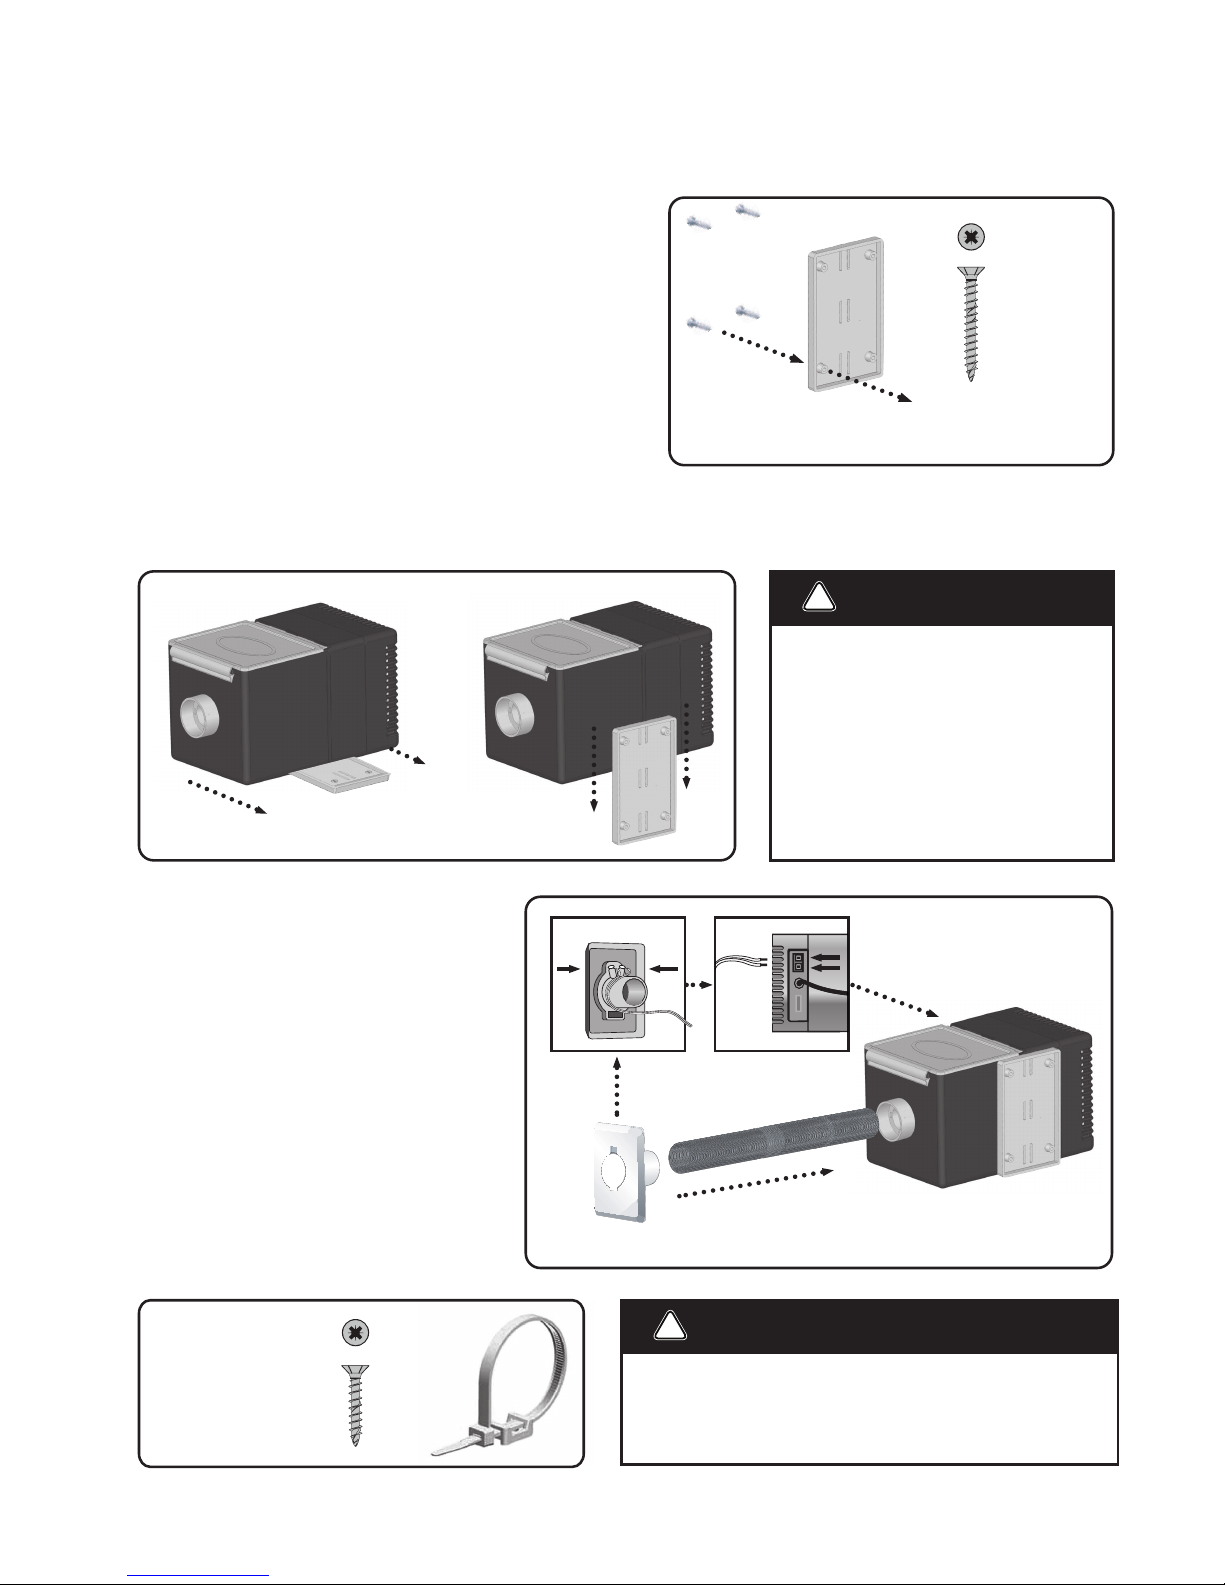
Power Unit Location
The power unit sits or hangs on the mounting bracket which is
screwed to the oor or wall.The power unit must be mounted
within 40” (100 cm) of an electrical outlet. When mounted
vertical the bottom screws of the mounting bracket should be
about 12” (31 cm) up from the oor. Mount unit at least 8” (20 cm)
from the ceiling and corner sidewall to insure adequate ventilation
for motor. Be sure your RV agrees with the voltage on the
Rating Plate.
TIP: To cover with the vacuum hose as much area as possible, choose a wall
or surface that is centrally located and within 40” (100 cm) of an electrical outlet.
4x
Srew Mounting
Bracket
Figure 1.
• Do not block exhaust. Lack of
ventilation will cause the motor
to overheat.
• Do not locate power unit in a high
temperature area.
• Do not mount power unit upside down.
(orange cover pointing down)
WARNING
!
Install Power Unit
Once the bracket is mounted, you can now bring the power unit in
place. Be sure the power unit will be located at least 8” (20 cm) from the ceiling and any adjacent walls. The exhaust should
never be obstructed. Check to be sure you will be able to occasionally remove the top cover, replace the dust bag or motor lter
and inspect the power unit. Refer to Figure 2.
Figure 2.
Floor mount Wall mount
Install Inlet Valve
Strip the low-voltage wires. Connect the wires
to the wall inlet valve (refer to Figure 3). Connect
the other end of the wires to the spring-loaded
connectors on top of the power unit.
Plugging the hose into an inlet valve completes a
low-voltage electrical circuit which activates the
power unit. To turn off the vacuum, unplug the
hose from the inlet.
Install Intake
Flexible tube is provided to connect power unit
with inlet valve. Cut the tube to desired length.
Do not glue the connection to the power unit in
case you wish to remove at a future date.
Inlet valve
Figure 3.
TIP: Usa a hollow drill of 2,4” (60 mm) in diameter to install the inlet valve.
Fixate provided exible
tube and low-voltage
wire to wall using
supplied strap mounts
and cable ties.
3x
Srew Strap
Mount
• Make sure to connect the vacuum to a fused electrical
network on board of your RV.
• When expected not to use the vacuum for a couple days
make sure to unplug the power cord.
WARNING
!
5
Table of contents
Popular Central Vacuum System manuals by other brands


Disan
Disan DS SUPER COMPACT 1,5 Instructions for use

Rehau
Rehau VACUCLEAN 2000 Fitting instructions

TECNOPLUS
TECNOPLUS Sistem-Air revo block professional Technical manual

TECNOPLUS
TECNOPLUS Sistem-Air Industrial Clean Basic Technical manual

NuTone
NuTone CV353 Specifications

Broan
Broan BQ2 Installation and user guide