1110
7. As the unit begins to heat and cooking pot pressure builds, the “0” graphic on the display
will begin to spin.
8. When temperature and pressure have been achieved, the “0” graphic will stop spinning and
thetime will begin to count down until “00:00” (00 minutes) is shown.
9. When cook time reaches “00:00” 5 audible beeps can be heard; “bb” will be displayed to indicate
the unit has advanced to a 4 hour WARM cycle.
10. To avoid over-cooking rice, immediately press the WARM/CANCEL button. A series of 4 dashes
(- - - - ) will be displayed to indicate the Digital Pressure Cooker is OFF.
11. IMPORTANT: Use the Quick Steam Release following the detailed instructions described in
thePRESSURE COOK section of this instruction manual.
WARNING: Use caution when opening lid. Steam escapes as soon as the lid is opened.
Never place your face or hands over the Digital Pressure Cooker when removing the lid.
Always use oven mitts when handling the hot cooking pot.
12. Unplug the cord from the outlet.
NOTE: After cooking rice, some rice cooking liquid may pool under the lid at the top of the unit
around the cooking pot. This is normal. Use a paper towel or kitchen cloth to clean after every use.
Use a small brush or cotton swab if necessary.
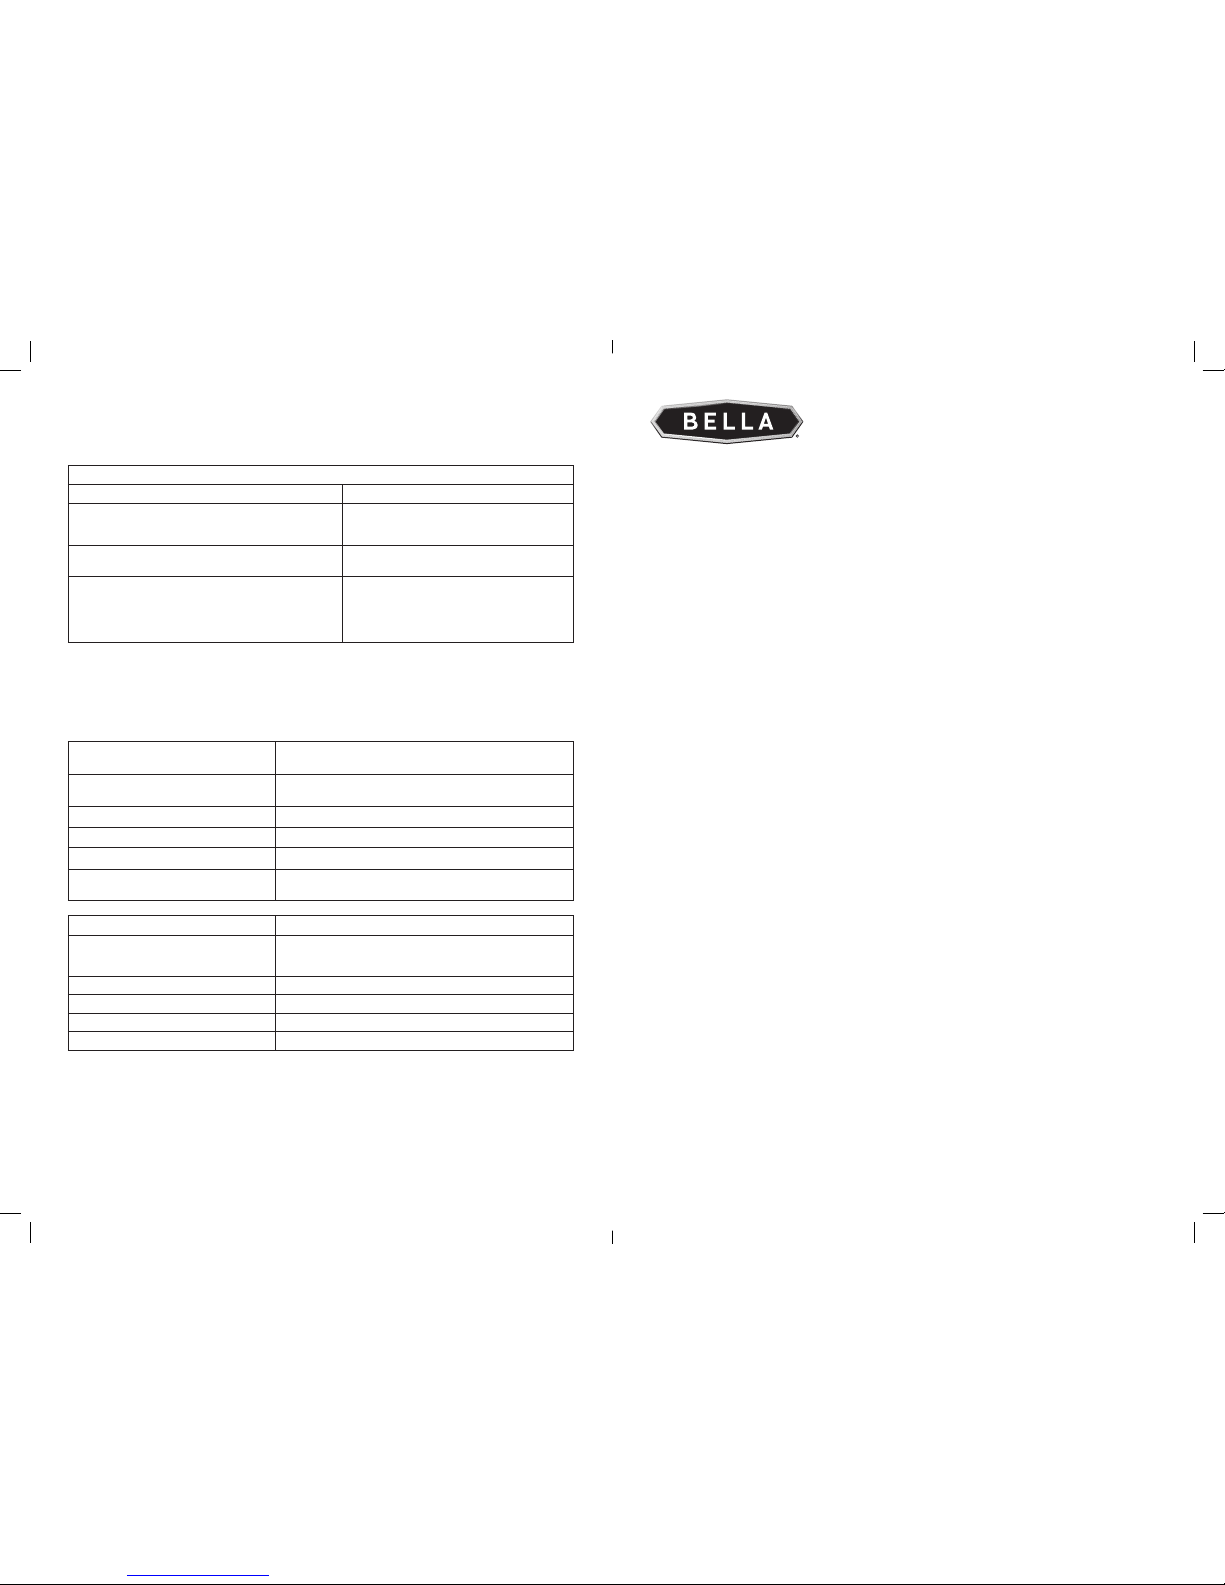
Rice Cooking Chart
IMPORTANT: Add one tablespoon of oil (vegetable, olive, sesame) to reduce excess foaming.
NOTE: Use Rice Measuring Cup (provided) to measure both rice and water.
RAW WHITE RICE
(cups)
WATER
(cups)
RAW BROWN RICE
(cups)
WATER
(cups)
2 3 2 3-1/4
3 4-1/2 3 4-3/4
4 6 4 6-1/4
5 7-1/2 5 7-3/4
6 9 6 9-1/4
7 10-1/2 7 10-3/4
*Actual cooking times may vary depending on the age of the grain and personal preference.
• STEAM FUNCTION
Preparing Vegetables for Steam
• Peel vegetables when appropriate, or scrub them well. Keep in mind that hard vegetables such as
potatoes and beets hold their shape better when the peel is left intact.
• Vegetables may be cooked whole or chopped into pieces. The larger the piece, the longer it will take
to cook.
• Vegetables with the same cooking time may be cooked together.
• Since quick-cooking vegetables like zucchini, asparagus and broccoli may easily be overcooked, it is
best to steam rather than pressure-cook.
Basic Vegetable Steaming
1. Place the removable cooking pot into the base. Arrange food in a non-metal, heat-resistant plastic
or bamboo steaming rack or basket (NOT INCLUDED) and use basket handles to lower food into
the removable cooking pot.
NOTE: You may add more food on top of and around basket, but do not exceed the 2/3 MAX line on
the cooking pot.
2. Pour 1-1/2 cups water or steaming liquid into the removable cooking pot.
3. Following detailed instructions previously described for PRESSURE COOK, assemble lid, close and
lock lid.
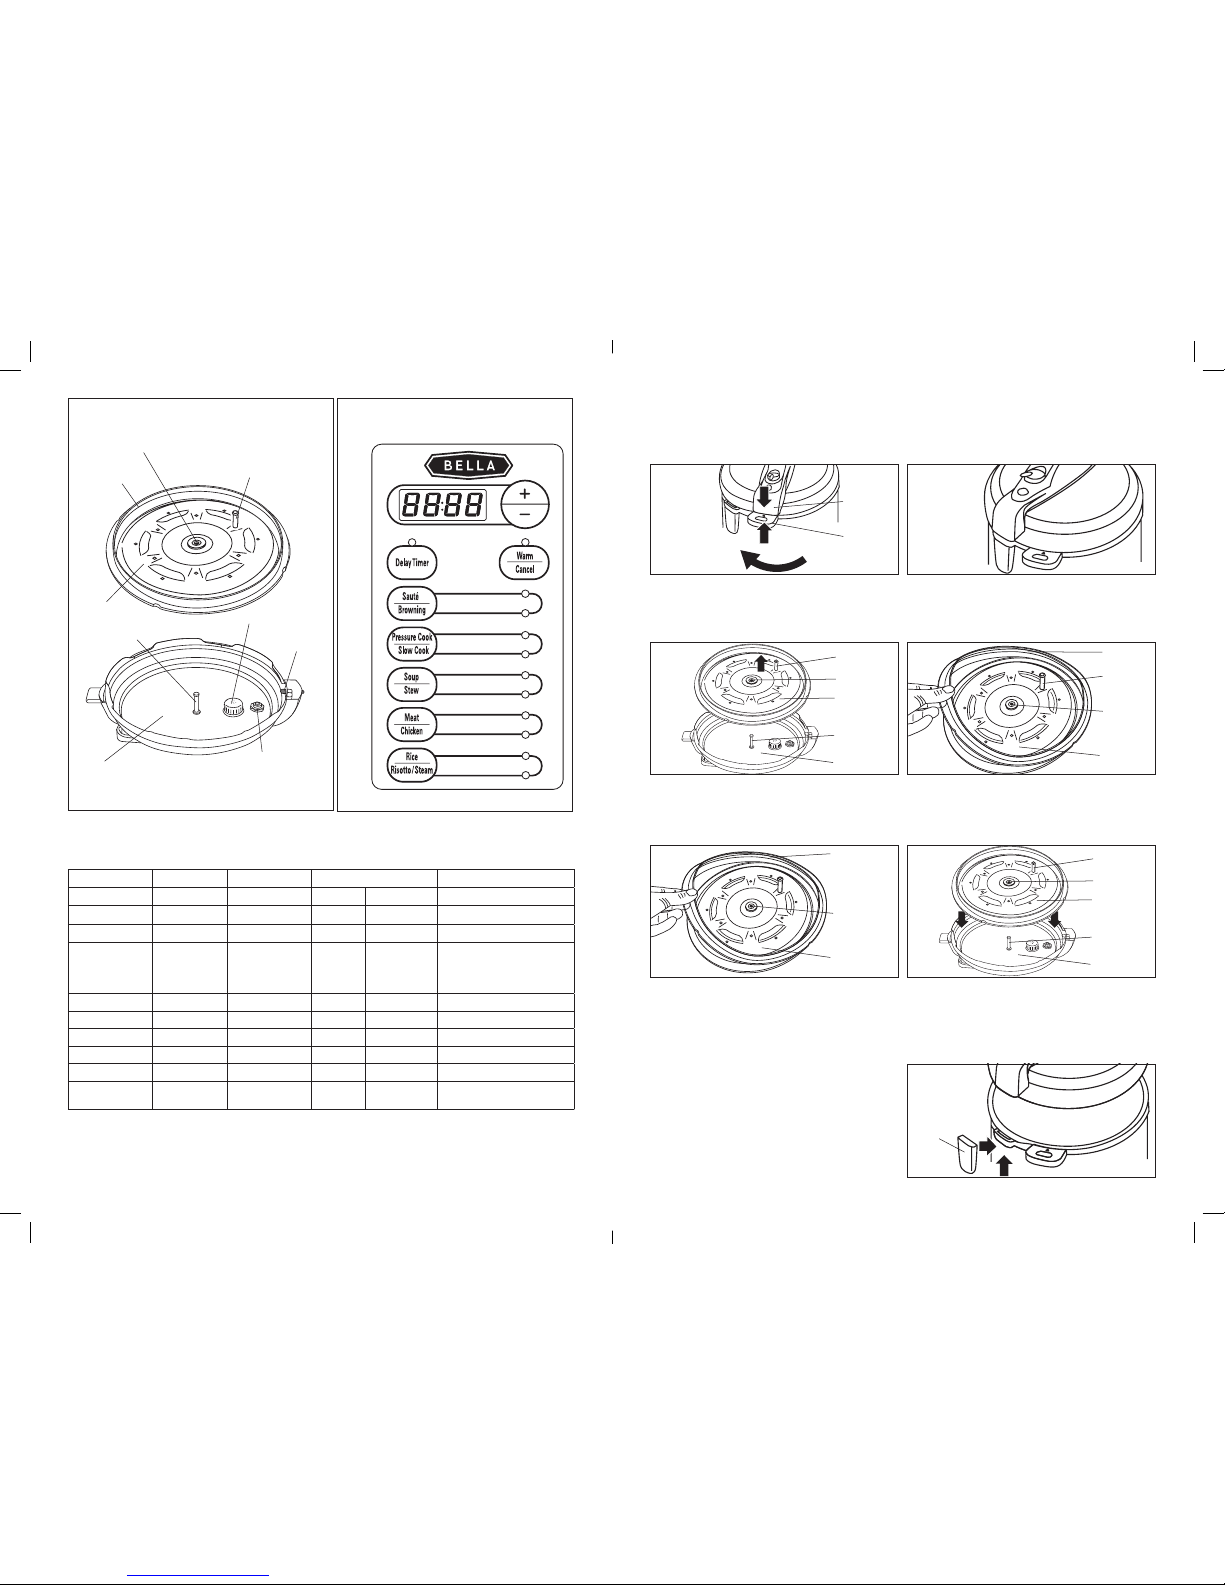
4. Turn the pressure release valve to the PRESSURE position. (See Figure 13.)
IMPORTANT: If the pressure release valve is not closed (in the PRESSURE position), the Digital
Pressure Cooker will not build pressure.
5. Plug the cord into a 120V AC electrical wall outlet. A series of 4 dashes (- - - - ) will be displayed.
6. Press the desired RICE/RISOTTO/STEAM button twice until the corresponding light indicates the
STEAM setting. The default time of 00:25 (25 minutes) will be displayed.
NOTE: If a recipe calls for a time that is not the default cook time, cooking times may be easily modied.
7. While ashing, the default time can be changed by pressing the “+” and “-“ buttons to manually
change the time from 5 minutes (00:05) to 99 minutes (01:39).
9. When temperature and pressure have been achieved, the “0” graphic will stop spinning and the
time will begin to count down until “00:00” (00 minutes) is shown.
10. When cook time reaches “00:00” 5 audible beeps can be heard; “bb” will be displayed to indicate
the unit has advanced to a 4 hour WARM cycle, during which the steam will be released naturally
and then the Digital Pressure Cooker will turn itself OFF.
CAUTION: WHEN COOKING UNDER PRESSURE, THE LID CANNOT BE OPENED ONCE PRESSURE
IS REACHED. DO NOT TRY TO FORCE THE LID OPEN.
CAUTION: Keep hands and face clear of the pressure release valve when the appliance is in
operation. Hot steam and water may be emitted during use.
NOTE: Press the WARM/CANCEL button to turn the Digital Pressure Cooker OFF at any time.
Aseries of 4 dashes (- - - - ) will be displayed.
• SLOW COOK
Slow cooking occurs at temperatures just around boiling. The Slow Cooker can cook for up to 12 hours,
much like a covered pot on the stove top.
1. Place food to be cooked into the removable cooking pot.
IMPORTANT: Do not ll the removable cooking pot higher than the MAX 2/3 line inside the cooking
pot when cooking vegetables or whole pieces of meat.
CAUTION: Never operate the Digital Pressure Cooker when the cooking pot is empty.
IMPORTANT: Do not cook with food content below the minimum marking on the cooking pot.
2. Following detailed instructions previously described for PRESSURE COOK, assemble lid, close and
lock lid.
3. Turn the pressure release valve to the RELEASE position.
4. Plug the cord into a 120V AC electrical wall outlet. A series of 4 dashes (- - - - ) will be displayed.
5. Press the PRESSURE COOK/SLOW button twice until the corresponding light indicates
SLOWCOOK.
The default time of 04:00 (4 hours) will ash.
6. While ashing, the default time can be changed by pressing the “+” and “-“ buttons.
MaximumSLOW COOK time is 12:00 (12 hours).
7. When temperature is reached, the time will begin to count down until “00:00” (00 minutes) is shown.
8. When cook time reaches “00:00” 5 audible beeps can be heard; “bb” will be displayed to indicate
the unit has advanced to a 4 hour WARM cycle after which the unit will then turn itself OFF.
IMPORTANT: When using SLOW COOK function, you may remove the lid to check on food,
stir contents, add food or liquids during cooking. The unit will begin to beep, and “E0” will be
displayeduntil the lid is replaced and locked.
• RICE FUNCTION
WARNING: Do not use your Digital Pressure Cooker to cook instant rice.
A 180 ml. (3/4 cup) rice measuring cup is included with your Digital Pressure Cooker. Up to 7 rice
measuring cups (6-3/4 cups) of uncooked white rice may be pressure cooked in the 8 Qt. Digital Pressure
Cooker. Many varieties of rice can be used including: basmati, wild rice, black rice, Arborio, risotto, brown,
long and short grains. For estimated times and rice to water/cooking liquid quantities, please refer to the
RICE COOKING CHART that follows.
1. Using the rice measuring cup, add leveled cups of raw rice to the cooking pot. Rice may be rinsed or
not, depending on your preference.
2. When pressure cooking white, long grain rice, use the ratio: 2 cups raw rice to 3 cups water, or use
1-1/2 times more water than raw rice. For example, for 9 rice measuring cups of raw rice, add 13-1/2
rice measuring cups of water. Water volume may be adjusted to taste on subsequent rice cooking.
IMPORTANT: Add one tablespoon of oil (vegetable, olive, sesame) to reduce excess foaming.
IMPORTANT: When pressure cooking wild rice, add 25% to 50% more water to cook thoroughly.
Follow package instructions.
3. Following detailed instructions previously described for PRESSURE COOK, assemble lid,
close and lock lid.
4. Plug the cord into a 120V AC electrical wall outlet. A series of 4 dashes (- - - - ) will be displayed.
5. Press the RICE button once; RICE light will illuminate. The default time of 00:20 (20 minutes)
will be displayed.
NOTE: If a recipe calls for a time that is not the default cook time, cooking times may be easily modied.
6. While ashing, the default time can be changed by pressing the “+” and “-“ buttons to manually
change the time from 5 minutes (00:05) to 99 minutes (01:39).
SO-313533_14595_BELLA_8qt Pressure cooker_BJ's_IM_R5.indd 10-11 2016-07-29 11:13 AM