Bellelli B-FIX User manual

1
B-FIX
IT. Seggiolino per Bicicletta - Fissaggio Anteriore
EN. Baby Seat for Bicycle - Front Mounting
FR. Porte Bébé pour Bicyclette - Fixation Frontale
DE. Kindersitz - Befestigung Vorn
ES. Portabebé para Bicicletas - Fijación Frontal
PL. Dzieciecy Fotelik Rowerowy - Mocowanie z Przodu
max 15
kg
max 33 lbs
38-4 0 mm
1.50”-1.57”
50-6 0 mm
1.96”-2.36”
45-5 0 mm
1.77”-1.96”
45-5 0 mm
1.77”-1.96”
40-4 5 mm
1.57”-1.77”
33-37 mm
1.30”-1.45”
28-32 mm
1.10”-1.26”

2
17
16
15
14
20
19
18 21
22
23
24
25
1
7 8 96
4 52 3
10 11 12 13
A
26

3
4
3/2
12
8
9
C1
4
2
8
9
C5
4
3/2
8
9
C3
28-32 mm
1.10”-1.26”
38-40 mm
1.50”-1.57
”
50-60 mm
1.96”-2.36”
45-50 mm
1.77”-1.96”
B
4
11
2
8
9
C4
11
4
3/2
8
9
C2
33-37 mm
1.30”-1.45”
45-50 mm
1.77”-1.96”
40-45 mm
1.57”-1.77”
max
110 mm
4.33”

4
D
G
I
F
E
H
L

5
1
2
M
1
2
N
O P Q
R S
T U

6
V Z
30°
washing
instructions
B-FIX

7
08
14
20
20
26
32
B-FIX
IT
EN
FR
DE
ES
PL
03IS

8
SEGGIOLINO ANTERIORE B-FIX - IT
Congratulazioni e grazie per aver acquistato il nuovo seggiolino bici. Se desiderate informazioni su
altri prodotti Bellelli, consultate la nostra pagina web www.bellelli.com.
Le presenti istruzioni valgono esclusivamente per i seggiolini anteriori Bellelli.
Prima del montaggio e dell’uso, leggere attentamente le rispettive istruzioni. Non montare il
seggiolino seguendo semplicemente le illustrazioni in copertina.
Conservare le istruzioni per un’eventuale consultazione futura.
AVVERTENZE
ATTENZIONE: Il seggiolino è stato progettato esclusivamente per il trasporto di un bambino. Non
appesantire il seggiolino con ulteriori carichi. Gli eventuali carichi da trasportare devono essere
posizionati sul retro della bicicletta, utilizzando altri supporti, ad esempio un portapacchi posteriore.
ATTENZIONE: E’ proibita qualunque modica al seggiolino ed ai suoi supporti. Il produttore o il
commerciante declinano ogni responsabilità per eventuali danni derivanti da modiche.
ATTENZIONE: La manovrabilità della bicicletta può essere inuenzata in modo signicativo dalla
presenza di un bimbo sul seggiolino, soprattutto per quanto riguarda l’equilibrio, la sterzata e la
frenata.
ATTENZIONE: Non lasciare mai la bicicletta incustodita con un bambino sul seggiolino.
ATTENZIONE: Non utilizzare mai il seggiolino nel caso una qualunque delle sue componenti e/o di
quelle della bicicletta siano difettose o mancanti. Contattare il produttore o rivenditore per procurarsi
eventuali pezzi di ricambio. A seguito di incidenti, sostituire il seggiolino in ogni sua parte, sebbene
non mostri danni evidenti.
INFORMAZIONI GENERALI SUL MONTAGGIO
Il seggiolino anteriore per bambini deve essere collocato tra il guidatore e il manubrio.
Installare il seggiolino nella direzione di marcia.
Il ssaggio si adatta a telai a sezione rotonda nonché ad una varietà di telai a sezione ovale.
Leggere attentamente il paragrafo “Montaggio del supporto”.
Il seggiolino è dotato di un sistema di montaggio a forcella di supporto.
Utilizzare il seggiolino per biciclette 26 “- 28”, che supportano carichi supplementari da almeno 18 kg
(39.7 lb). Consultare il manuale della bicicletta o il proprio rivenditore di ducia.
Allacciare sempre la cintura di sicurezza al bambino e le cinghie dei poggiapiedi. Vericare
accuratamente e regolarmente che il bambino sia adeguatamente assicurato al seggiolino. Leggere
attentamente il paragrafo “Mettere a sedere il bambino sul seggiolino”.
Montare il seggiolino inclinandolo all’indietro. Inclinarlo leggermente verso il retro, per trattenere
meglio il bambino.
Dopo il montaggio del seggiolino, controllare periodicamente la bicicletta, prestando particolare
attenzione agli pneumatici, ai freni e ai fanali.
INFORMAZIONI GENERALI SULL’UTILIZZO
Prima di utilizzare il prodotto, informarsi sul codice stradale del paese in cui verrà utilizzato.
Il seggiolino anteriore per biciclette è adatto per bambini con un peso massimo di 15 kg (33lb). Non
utilizzare il seggiolino qualora il peso del bambino superi quello consentito.
IT IT

9
Vericare periodicamente che il peso del bambino non superi tale limite.
Utilizzarlo solo per bambini in grado di stare seduti da soli e senza aiuto per un periodo di tempo
prolungato (dall’età di 9 mesi circa).
Non utilizzarlo su moto, scooter, motorini, biciclette da corsa e biciclette dotate di sospensioni.
Non utilizzare il seggiolino su biciclette elettriche. L’uso del seggiolino è consentito sulle biciclette a
pedalata assistita (Pedelec).
Vericare che nessun arto o nessun indumento del bambino o del guidatore restino impigliati nelle
parti mobili della bicicletta o del seggiolino (ad esempio nei freni o nei raggi della ruota o nelle molle
della sella). Controllare che il bambino non possa inlare le dita fra le molle della sella. Usare un
coprisella o una sella provvista di molle interne. Controllare quest’aspetto man mano che il bambino
cresce.
Vericare che il bambino non riesca ad inlare né le dita né i piedi nei raggi della ruota.
Vericare che il bambino non riesca a raggiungere componenti taglienti o appuntite (ad esempio cavi
slacciati dei freni).
Vericare che il bambino sia vestito adeguatamente con indumenti più pesanti di quelli del guidatore
e sia convenientemente protetto in caso di pioggia.
Fate indossare al bambino un casco omologato di misura adeguata (in alcuni paesi l’uso del casco è
obbligatorio; consultare il codice stradale del paese in cui verrà utilizzato).
Non trasportare mai due bambini contemporaneamente.
Il guidatore della bicicletta deve avere almeno 16 anni.
Allacciare tutte le cinture, anche se non si trasporta nessun bambino.
Vericare che le cinture non urtino le ruote o le altre parti mobili della bicicletta, sia che il bambino sia
a bordo sia che non lo sia.
Vericare sempre, prima di mettere a sedere il bambino sul seggiolino che quest’ultimo non scotti
(ciò può vericarsi per esempio se il seggiolino è stato esposto alla luce solare diretta).
Smontare il seggiolino dalla bicicletta ogniqualvolta lo si deve trasportare attaccato all’esterno di
un veicolo (es. sul tettuccio di un automobile, su un rimorchio o sul retro di una roulotte/camper). Il
usso d’aria potrebbero danneggiare il seggiolino o gli attacchi alla bicicletta causando un incidente.
ATTENZIONE: La manovrabilità del manubrio può essere limitata a causa del seggiolino. Sostituire il
manubrio quando l’angolo di sterzo diventa inferiore ai 45° su ogni lato a causa del seggiolino.
MONTAGGIO DEL SEGGIOLINO
ATTENZIONE: Non eseguire le operazioni di montaggio quando il bambino è seduto sul seggiolino.
Normalmente la boccola (13) non è necessaria per il montaggio del supporto di ssaggio del
seggiolino anteriore alla bicicletta. Tuttavia è consigliabile conservarla per un uso successivo del
supporto durante il montaggio del seggiolino Bellelli sul retro della bicicletta. Per questa modalità di
montaggio seguire le istruzioni fornite con il seggiolino posteriore.
Togliere il portapacchi o il cestino dalla bicicletta, se essi intralciano il montaggio del seggiolino.
Montaggio del supporto
Individuare sulla bicicletta il punto di ssaggio del supporto.
Consultare le gure C1, C2, C3, C4, C5 ed identicare le componenti necessarie per il montaggio
del supporto (Fig. A).
Inserire le guarnizioni (4) nelle due viti di ferro (2 o 3). La scelta della coppia di viti corretta nonché
IT IT

10
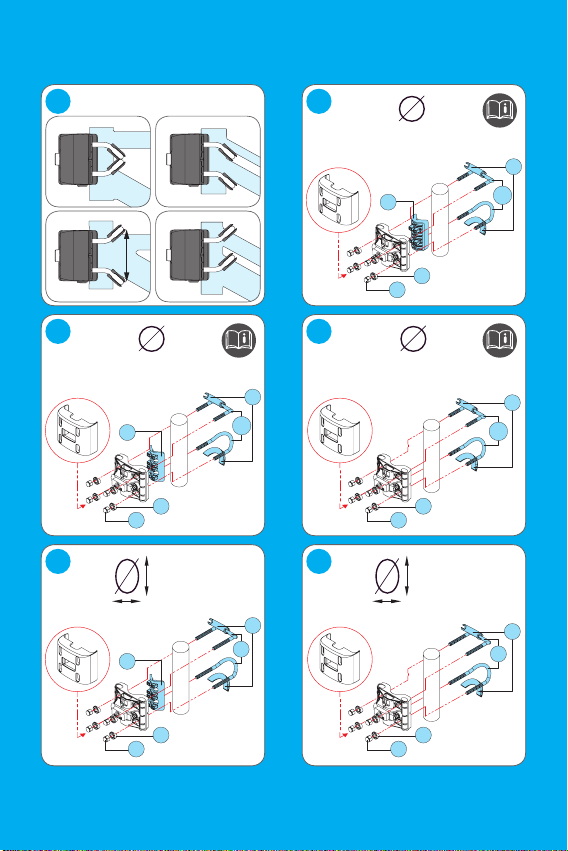
dei componenti adatti dipende dal telaio della bicicletta, come mostrato nelle gure C1, C2, C3,
C4, C5. Conservare le coppie di viti ed i componenti inutilizzati per una possibile installazione degli
attacchi. Non fare confusione tra le due coppie di viti.
Entrambe le coppie possono essere avvitate in quattro diverse combinazioni (Fig. B). Scegliere la
combinazione adatta per il telaio della bicicletta sulla quale va montato il supporto.
Le combinazioni illustrate nelle gure C1, C2, C3 sono equivalenti. La scelta appropriata di tali
combinazioni dipende esclusivamente dalla forma e dalle dimensioni del telaio.
NOTA: La procedura corretta di montaggio prevede che i dadi, dopo essere stati avvitati, circondino
completamente il loro letto, in altre parole che non vi siano spazi all’interno dei dadi. Se ciò non
avviene, il supporto non è correttamente avvitato. Inoltre le viti, dopo il ssaggio del supporto e
l’inserimento della copertura, devono sporgere solo limitatamente (vedi g. E).
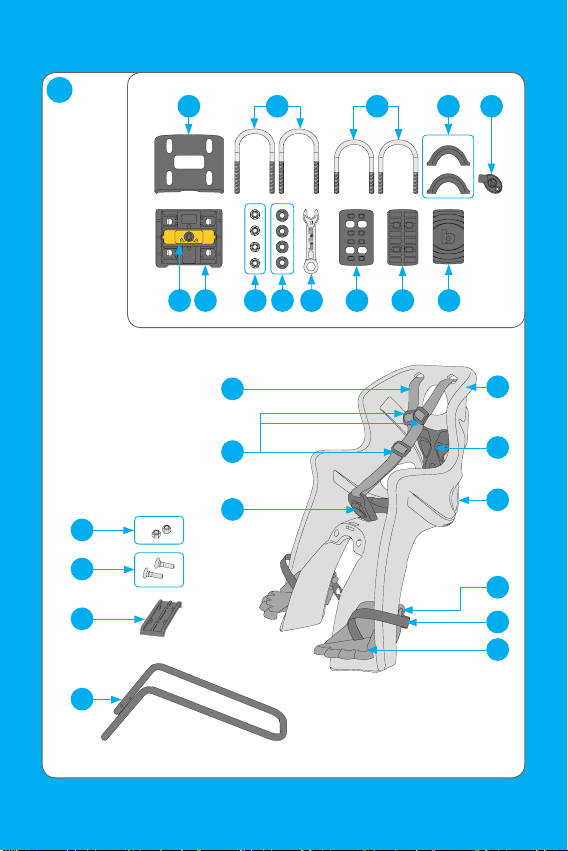
Posizionare il supporto (7) sul telaio della bicicletta, facendo attenzione a che le due aperture, che
serviranno per il successivo inserimento della forcella di sostegno, siano rivolte verso l’alto.
ATTENZIONE: Non montare il supporto sull’asta del manubrio.
ATTENZIONE: Mettere il supporto in direzione di marcia (pulsante giallo, orientato verso il lato
anteriore della bicicletta).
Stringere leggermente i dadi in modo uniforme (Fig. D). Il supporto deve poter ruotare liberamente
attorno all’asta, per quanto compatibile con la forma del telaio. L’avvitamento denitivo avviene dopo
aver stabilito la corretta posizione del seggiolino (come descritto nel paragrafo seguente “Montaggio
del seggiolino sulla bicicletta”).
ATTENZIONE: Vericare che il supporto non intralci i cavi dei freni e la leva del cambio.
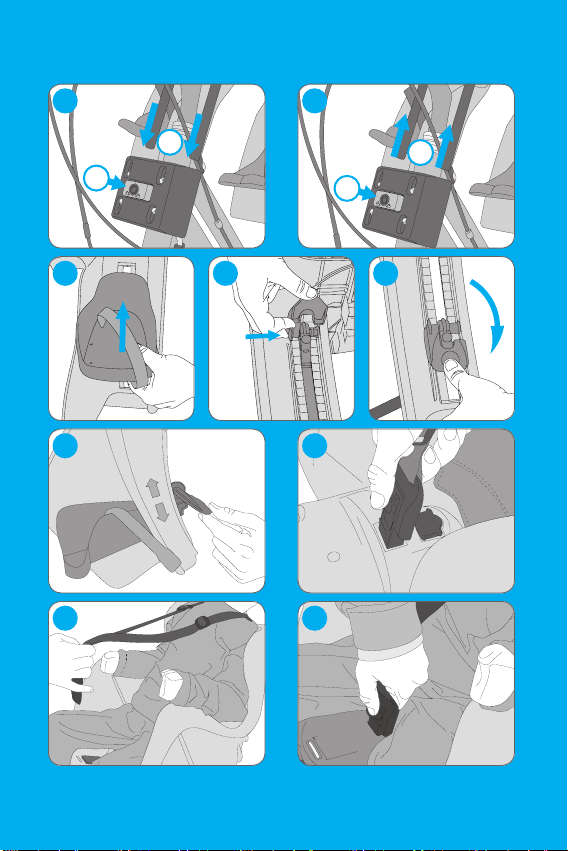
Sistema di sicurezza/antifurto
Il supporto è dotato di un sistema di sicurezza/ antifurto che può essere attivato con l’aiuto di una
chiave (5) in dotazione.
Se il sistema si trova in posizione di chiusura, non è possibile inserire o disinserire la forcella di
sostegno del seggiolino nel supporto.
Se il sistema si trova in posizione di apertura, è possibile inserire o disinserire la forcella di sostegno
del seggiolino nel supporto.
Per passare dalla posizione di apertura a quella di chiusura, inlare la chiave nella serratura (Fig. F)
e ruotarla di un quarto di giro in senso orario.
Per passare dalla posizione di chiusura a quella di apertura, inlare la chiave nella serratura (Fig. F)
e ruotarla di un quarto di giro in senso antiorario.
Montaggio della forcella di sostegno sul seggiolino
Capovolgere il seggiolino.
Posizionare la forcella di sostegno (17) sotto il seggiolino(Fig. G).
Inlare le viti (15) nel seggiolino (Fig. H).
Posizionare la piastra base di ssaggio (16) sotto il seggiolino(Fig. I).
Stringere i dadi (14), per ssare la forcella di sostegno (Fig. L).
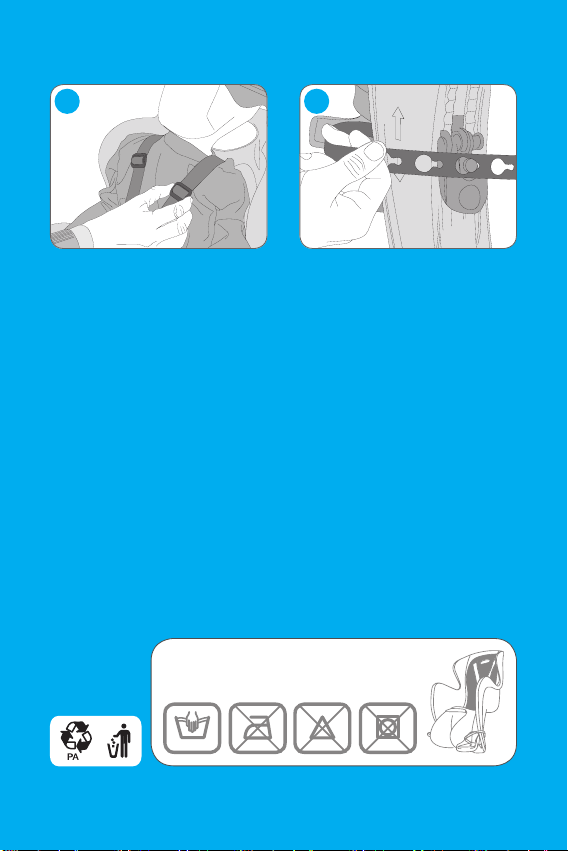
ATTENZIONE: Controllare periodicamente la tenuta dei dadi, visto che possono allentarsi durante
l’uso.
IT IT

11
Montaggio del seggiolino sulla bicicletta
Accertarsi che il blocco del supporto si trovi in posizione di “apertura”.
Premere il pulsante giallo (6) ed inserire la forcella di sostegno (17) nelle aperture situate sul lato
superiore del supporto (Fig. M).
ATTENZIONE: Accertarsi che dopo l’avvenuto inserimento, il pulsante giallo (6) sia scattato. Se non
è così, la forcella (17) non è stata correttamente inserita. Ripetere la procedura.
Allineare il seggiolino secondo l’asse della bicicletta.
Vericare che il seggiolino non intralci i pedali, i freni, la leva del cambio e altre parti mobili della
bicicletta.
Lasciare spazio libero sufciente per far sedere comodamente il bambino sul seggiolino e farlo
scendere agevolmente.
Il bambino deve disporre di spazio sufciente per le gambe.
Il guidatore deve disporre di spazio sufciente per pedalare e sterzare.
Controllare che quando si pedala, le ginocchia non battano contro il seggiolino durante il tragitto.
Vericare che il manubrio della bicicletta non rimanga incastrato nel seggiolino durante la manovra
di sterzata.
Stringere a fondo i dadi (8) del supporto dopo aver stabilito la posizione migliore del seggiolino.
ATTENZIONE: Vericare che i dadi, una volta stretti, circondino completamente il loro letto (Fig. E).
Se ciò non avviene, il supporto non è correttamente avvitato.
Fissare la copertura (1), spingendola contro il lato anteriore del supporto in modo da farla scattare
sui lati del supporto in cui sono collocati i rispettivi dispositivi di blocco. Accertarsi che la rientranza
rettangolare del coperchio sia rivolta verso l’alto. Un clic fa capire che il ssaggio è avvenuto in modo
corretto.
La scelta corretta dei componenti, in particolare delle viti di ferro, garantisce che queste non
sporgano dalla copertura. Chiudere il blocco del supporto, girando la chiave nella posizione di
“chiusura”(Fig. F).
ATTENZIONE: Controllare periodicamente la tenuta delle viti, visto che possono allentarsi durante
l’uso.
Smontaggio del seggiolino dalla bicicletta
Mettere il sistema di sicurezza/antifurto nella posizione di apertura.
Tenere premuto il pulsante (6) sul supporto (17) e tirare il seggiolino verso l’alto (Fig. N).
Installazione dei poggiapiedi
Prendere il poggiapiedi (25) del piede sinistro (simbolo L, stampato sul retro).
Inserirlo nella fenditura verticale della gamba sinistra.
Spingerlo completamente in alto (Fig. O).
Prendere la leva di bloccaggio del poggiapiedi (23) sinistro (simbolo L, stampato sul retro).
Inserire la leva di bloccaggio nell’apertura posteriore del poggiapiedi. Inserirlo dall’ esterno e
spingerlo completamente indietro (Fig. P).
Chiudere la leva di bloccaggio spingendola verso il basso no a che non si sente un clic (Fig. Q).
Ripetere le stesse procedure per il poggiapiedi destro (simbolo R).
USO E REGOLAZIONI DEL SEGGIOLINO
Regolazione dei poggiapiedi
IT IT

12
Prima di utilizzare il seggiolino, controllare che i piedi del bambino siano completamente appoggiati
sui poggiapiedi (25).
ATTENZIONE: Non eseguire le regolazioni dei poggiapiedi quando il bambino è seduto sul
seggiolino.
Ruotare la leva di bloccaggio sull’apertura posteriore del poggiapiedi verso l’alto (Fig. R).
Regolare il poggiapiedi (25) verso l’alto o verso il basso no a raggiungere la posizione desiderata.
Spingere la leva verso il basso per bloccare il poggiapiedi in tale posizione. Un clic fa capire che il
blocco della leva è avvenuto in modo corretto.
Controllo nale
ATTENZIONE: Non eseguire il controllo nale quando il bambino è seduto sul seggiolino.
Condurre la bicicletta per mano per alcuni metri per controllare che nessuna parte mobile urti il
seggiolino, che nessuna cintura si trovi vicino alle ruote e che freni e pedali siano ancora in buono
stato.
Vericare che il sistema di ssaggio sia opportunamente ssato al telaio e che il seggiolino sia
correttamente agganciato al sistema di ssaggio.
Mettere a sedere il bambino sul seggiolino
Premere il pulsante della bbia centrale (20) no a che un clic fa capire che il dente si è sganciato
(Fig. S). Tirare la bbia verso l’alto per slarla.
Mettere a sedere il bambino sul seggiolino.
Far passare la cintura ai lati della testa del bambino (Fig. T).
Introdurre la bbia centrale nell’apertura (Fig. U). Spingere completamente la bbia nell’apertura, no
a che non si sente un clic.
Regolare la bretella della cintura (19), per far aderire meglio le cinture al corpo del bambino (Fig. V).
Posizionare i piedi del bambino sui poggiapiedi.
Chiudere le cinghie (23), agganciandole al perno sul retro del poggiapiedi (Fig. Z).
Far scendere il bambino dal seggiolino
Allentare le cinghie che tengono fermi i piedi.
Premere il pulsante della bbia centrale (20) no a che un clic fa capire che il dente si è sganciato.
Tirare la bbia verso l’alto per slarla.
Far passare la cintura sopra la testa del bambino.
MANUTENZIONE
Pulire periodicamente il seggiolino con acqua e sapone. Non utilizzare detergenti aggressivi.
GARANZIA
Le condizioni di garanzia possono essere consultate sul sito web dedicato.
IT IT

13
RICICLO
1. PP
2. Ferro
3. Ferro
4. PP
5. PP
6. PE
7. PA
8. Ferro
9. PA
10. Ferro
11. PP
12. PP
13. PA
14. Ferro
15. Ferro
16. PA
17. Ferro
18. PP
19. PA
20. PC + ABS
21. PP
22. Poliestere
23. PP
24. PE
25. PP
26. PVC
IT IT

14
B-FIX FRONT SEAT - EN
Congratulations and thank you for the purchase of your new bicycle seat. If you would like informa-
tion about other Bellelli products, visit our website: www.bellelli.com.
These instructions apply only for Bellelli front seats.
Read the installation and operating instructions carefully before you install the seat and use it. Do not
mount the seat by following only the pictures on the cover.
Keep the manual for possible, future reference.
NOTES
WARNING: The seat is designed exclusively for transporting a child. Do not add any other loads to
the seat. Any additional loads must be attached on to the back of the bicycle by using other supports,
such as a rear luggage carrier.
WARNING: Any change to the seat or its mounting support is prohibited. The manufacturer and the
retailer are not responsible for possible damages due to changes.
WARNING: The manoeuvrability of the bicycle may vary signicantly with a child in the seat, in
particular regarding balance, steering and braking.
WARNING: Never leave the bike parked and unattended with a child in the seat unattended.
WARNING: Never use the seat if any part of the seat or of the bicycle is broken or missing. Contact
the manufacturer or dealer to purchase necessary spare parts for the seat. Replace the seat after
any accident even if it has no visible damage.
GENERAL INFORMATION ABOUT ASSEMBLY
The bicycle front seat for children is to be mounted between driver and handlebars.
Install the seat facing the direction of travel.
The mounting support is suitable for a frames with a round cross section as well as a variety of frame
with an oval cross section. Carefully read the section “Mounting support installation ”.
The seat is equipped with a mounting system with support fork.
Use the seat for 26 “-28” bikes in order to withstand the additional loads of at least 18 kg (39.7 lb).
Consult the user’s manual of the bicycle or your dealer.
Always attach the child’s straps and the foot straps. Check carefully and regularly that the child is
properly secured in the seat. Carefully read the section “Placing the child in the seat ‘.
Do not mount the seat leaning forward. Tilt it slightly backwards, to better hold the child.
With the seat mounted, check your bike regularly and pay attention particularly to the tires, brakes
and lights.
GENERAL INFORMATION ABOUT USAGE
Before using the product check over the highway code of the country in which it is being used.
The bicycle front seat is suitable for children with a maximum weight of 15 kg (33lb). Do not use the
seat if the weight of the child is more than the approved amount.
Regularly check that the weight of the child does not exceed this limit.
For use only with children who are able to sit for a long time alone and without help (as of roughly 9
months old).
Do not use the seat on motorcycles, scooters, mopeds, racing bikes and bikes with suspension.
EN EN

15
Do not use the seat on electric bicycles. The seat may be used on Pedelecs.
Check that the limbs and clothes of the child or that of the driver cannot be caught in the moving
parts of the bicycle or in the seat (e.g. in the brakes or the spokes of the wheel). Use a saddle cover
or a saddle with internal springs. Check this regularly with the child’s growth.
Check that the child cannot stick ngers nor feet in the wheel spokes.
Check that the child cannot reach any sharp or pointed parts (e.g. frayed brake cables)
Check that the child is dressed sufciently and warmer than the driver is and appropriately protected
in the case of rain.
Have children wear a safety-approved helmet of an appropriate size (in some countries wearing a
helmet is a requirement, consult the highway code of the country where you use the seat).
Never carry two children at the same time.
The cyclist must be at least 16 years old.
Attach all the straps, even if you are not carrying a child.
Check that the straps cannot reach the wheels or other moving parts of the bicycle, both with and
without the kid on the bicycle.
Always check before placing the child in the seat, that the seat is not too hot (this can happen, for
example, when the seat has been exposed to direct sunlight).
Take the seat off the bike when transporting it on the outside of a vehicle (e.g. on the roof of a car, on
a trailer or on the back of the RV). The air ow could damage the seat or break the fasteners of the
seat on the bike thus causing an accident.
WARNING: The manoeuvrability of the handlebars can be hindered by the child seat. Replace the
handlebars, if the child seat reduces the steering angle on each side to below 45 °.
ASSEMBLING THE SEAT
WARNING: Do not perform installation operations with the child in the seat.
Normally, the bracket (13) is not necessary for mounting the support to fasten the bicycle front seat.
Nevertheless, it is recommended to keep the bracket in order to mount the support of the Bellelli seat
at a later date. For this type of installation follow the manual that comes with the rear seat.
Remove the luggage carrier or the basket of a bicycle they obstruct the installation of the seat.
Mounting Support Installation
Locate the area where the mounting support is attached to the bicycle.
See gures C1, C2, C3, C4, C5 and familiarize yourself with the components which are necessary
for mounting the support (g. A).
Insert the gaskets (4) into the two iron screws (2 or 3). The choice of the correct pair of screws, as
well as the appropriate components, depends on the bicycle frame, as shown in gures C1, C2, C3,
C4, C5. Keep the other pair of screws and the unused components for possible later conguration of
the attachment. Do not confuse the screws of the two pairs.
The screws can be xed according to four different combinations (g. B). Select the suitable combi-
nation for the bicycle frame on which the support is mounted.
The congurations shown in gures C1, C2, C3 are equivalent. The right choice of this only depends
on the shape and the dimensions of the bike frame.
REMARK: Correct installation foresees that the nuts completely wrap the screw thread after their
fastening, i.e. There must be no space inside the nut. If this is not the case, the mounting support is
EN EN

16
not properly attached. Furthermore, after tightening and covering the mounting support, the screws
may only emerge slightly (see g. E).
Position the mounting support (7) on the bicycle frame and make sure that the two openings which
are meant for the support fork are placed upwards.
WARNING: Do not attach the mounting support to the handlebar.
WARNING: Align the mounting support in the direction of travel (yellow button aligned towards the
front part of the bicycle).
Screw the nuts slightly and evenly on (g. D). The mounting support must be able to rotate freely
around the bar, in so far as it is consistent with the shape of the bike frame. The denitive xing takes
place after the correct position for the seat is set (as is shown in the following section “Assembly of
the seat on the bike”).
WARNING: Check that the mounting support does not interfere with the break and gear shift cables.
Safety System / Theft Protechtion
The mounting support is equipped with a security system/theft protection, which can be operated
with a key (5) that is operates with the equipment.
If the system is in the closed position, it is not possible to insert the support fork of the seat in the
bracket or pull them out.
If the system is in the open position, it is possible to insert the support fork of the seat in the bracket
and pull them out.
To move from the open to the closed position: Insert the key into the lock (g. F) and rotate one
quarter turn clockwise.
To move from the closed to the open position: Insert the key into the lock (g. F) and rotate a quarter
turn counter clockwise.
Mounting the Support Fork on the Seat
Place the seat on the head.
Position the support fork (17) under the seat (g. G).
Place the screws (15) into the seat (g. H).
Position the xing plate (16) under the seat (g. I).
Tighten the nuts (14) to fasten the support fork (g. L).
WARNING: Periodically check the tightening of the nuts. These can come loose during use.
Assembling the Seat on the Bike
Be sure that the mounting support lock is in the “open” position.
Press the yellow button (6) and place the support fork (17) into the holes on the upper part of the
mounting support (g. M).
WARNING: After successful insertion, make sure that the yellow button (6) is latched. If it is not
latched, the support fork (17) is not correctly inserted: Repeat the process.
Align the seat along the bike’s axis.
Check that the seat does not interfere with the pedals, brakes, gears and any other moving parts of
the bicycle.
Leave enough space to be able to place the child in and remove it from the seat.
EN EN

17
The child must have enough leg room while riding.
The cyclist must have enough space to comfortably drive and steer.
Make sure that the knee does not hit against the seat while riding.
Make sure that the handlebars do not jam in the seat while steering.
Tighten the nuts (8) on the mounting support, once you have determined the best location for the
seat.
WARNING: Check to make sure that tightened nuts completely cover the threads (g. E). If this is
not the case, the mounting support is not properly attached.
Attach the cover (1) by pushing against the front of the mounting support so that it locks into place
on the sides of the mounting support where the corresponding notches are located. For a correctly
positioned cover, make sure that the rectangular indentation is directed upward. A click shows a
successful mounting.
The correct choice of the components, in particular the screws ensures that the they do not emerge
from the cover. Lock the mounting support by turning the key to the “closed” position (Fig. F).
WARNING: Check the tightening of the screw regularly. These can come loose during use.
Removing the Seat from the Bike
Place the security system / Burglar in the open position.
Press and hold the button (6) on the mounting support (17) and pull the seat upwards (g. N).
Installing the Footrests
Take the left footrest (25) (L symbol printed on the back).
Insert it into the vertical slot of the left leg strap.
Push it all the way up (g. O).
Take the catch lever (23) of the left footrest (L symbol printed on the back).
Insert the catch lever into the hole on the backside of the footrest. insert it from the outside and push
it all the way through to the back (g. P).
Close the locking lever by pushing it down until you hear a click (g. Q).
Repeat the same operations for the right footrest (symbol R).
USE AND ADJUSTMENT OF THE SEAT
Adjusting the footrests
Prior to the use of the seat, check that the child’s feet rest fully on the supports (25).
WARNING: Do not install the footrests with the child in the seat.
Turn the catch lever on the rear of the footrest upwards (g. R).
Adjust the footrest (25) upwards or downwards until you reach the desired position.
Push the lever downwards to lock it. A click indicates that the lever is correctly locked in.
Final Inspection
WARNING: Do not conduct the nal inspection with the child in the seat.
Push the bike for a few meters by hand, making sure that no moving parts touch the seat, no protru-
ding straps are close to the wheels and brakes and that pedals are still in good condition.
EN EN

18
Check that the fastening system is adequately attached to the bicycle frame and the seat is correctly
hooked in the fastening system.
Placing the child in the seat
Press the button of the middle buckle (20) until you hear a click indicating that the sprocket is
unhooked (g. S). Pull the buckle upwards to take it off.
Place the child in the seat.
Push the straps through on the side of the child’s head (g. T).
Place the middle buckle through the opening (Fig. U). Slide the buckle through the opening until you
hear a click.
Adjust the loops (19) on the strap, so that it rests better on the body of the child (g. V).
Place the feet of the child on the footrests.
Close the straps (23) by attaching them on the pins on the back of the footrests (g. Z).
Removing the child from the seat
Loosen the straps holding the feet.
Press the button of the middle buckle (20) until you hear a click indicating that the sprocket is
unhooked.
Pull the buckle upwards to take it off.
Pull the straps over the child’s head.
MAINTENANCE
Wash the seat regularly with soap and water. Do not use aggressive detergents.
GUARANTEE
The warranty terms can be found on the warranty web page.
RECYCLING
1. PP
2nd Iron
3. Iron
4. PP
5. PP
6. PE
7. PA
8. Iron
9. PA
10. Iron
11. PP
12. PP
13. PA
14. Eisen
15. Iron
16. PA
EN EN

19
17. Iron
18. PP
19. PA
20. PC + ABS
21. PP
22. Polyester
23. PP
24. PE
25. PP
26. PVC
EN EN

20
SIÈGE AVANT B-FIX - FR
Nous vous félicitons et vous remercions de tout cœur pour avoir acheté le nouveau siège avant pour
vélos. Si vous souhaitez en savoir plus sur d’autres produits Bellelli, veuillez consulter notre page
web www.bellelli.com.
Cette notice n’est valable que pour les sièges avant Bellelli.
Avant l’assemblage et l’utilisation, lisez attentivement les notices pertinentes. Ne montez pas le
siège en vous basant tout simplement sur les illustrations de couverture.
Gardez cette notice pour toute référence ultérieure.
AVERTISSEMENTS
ATTENTION : Ce siège a été conçu exclusivement pour le transport des enfants. Évitez d’alourdir ce
siège avec des charges supplémentaires. Le cas échéant, toutes les charges à transporter doivent
être xées à l’arrière de la bicyclette, en utilisant d’autres supports, tels qu’un porte-bagages arrière.
ATTENTION : il est interdit d’effectuer toute modication du siège enfant et de ses supports. Le
fabricant ou le revendeur déclinent toute responsabilité en cas de dommage découlant de toute
modication abusive.
ATTENTION : La manoeuvrabilité du vélo peut être considérablement affectée par la présence d’un
enfant dans le siège, en particulier en ce qui concerne l’équilibre, la direction et le freinage.
ATTENTION : Ne laissez jamais votre vélo sans surveillance avec un enfant assis dans son siège.
ATTENTION : N’utilisez jamais le siège si l’un de ses composants et / ou ceux de votre vélo sont
défectueux ou manquants. Le cas échéant, contactez le fabricant ou le revendeur pour obtenir des
pièces de rechange. Suite à un accident, remplacez le siège dans son ensemble, même si aucun
dommage ne semble être évident.
INFORMATIONS GÉNÉRALES SUR LE MONTAGE
Le siège avant pour enfants doit être placé entre le conducteur et le guidon.
Installez le siège enfant dans le sens de marche.
Le système de xation convient aux cadres avec une section transversale ronde, ainsi qu’à une
variété de cadres de section transversale ovale. Lisez attentivement le paragraphe “Montage du
support”.
Le siège enfant est équipé d’un système de montage avec fourche de support.
Utilisez le siège pour les vélos 26 “- 28”, en mesure de supporter des charges supplémentaires d’au
moins 18 kg (39,7 lb). Consultez la notice qui accompagne votre vélo ou votre revendeur.
Attachez toujours la ceinture de sécurité pour l’enfant et les sangles des repose-pieds. Vériez
soigneusement et régulièrement vérier que votre enfant est bien attaché dans son siège. Lisez
attentivement le paragraphe “Faire assoir l’enfant dans son siège.”
Ne montez pas le siège en l’inclinant vers l’avant. Inclinez légèrement vers l’arrière, pour mieux
soutenir l’enfant.
Après avoir installé le siège de vélo, vériez votre vélo régulièrement, en accordant une attention
particulière aux pneus, les freins et les feux.
INFORMATIONS GÉNÉRALES SUR L’UTILISATION
Avant d’utiliser le produit, veuillez vous renseigner sur le code de la route du pays où il sera utilisé.
FR FR
Table of contents
Languages:
Other Bellelli Bicycle Accessories manuals