Bellelli B-FIX RELAX User manual

1
B-FIX
RELAX
max 22 kg
max 48,5lbs
IT. Seggiolino Reclinabile per Bicicletta- Sistema di montaggio al telaio
EN. Reclining Child Seat for Bicycle - Frame Mounting System
FR. Siège Enfant Inclinable Pour Vélo - Fixation au Cadre
DE. Fahrradkindersitz - Für Rahmenmontage Mit Verstellbarer Rückenlehne
ES. Portabebé Reclinable para Bicicletas - Fijación al Cuadro
PL. Odchylany Fotelik Rowerowy - System Montazu do Ramy
INCLUDED

2
1
7 8 96
4 52 3
10 11 12 13
A
16
15
19
18
17 20
21
22
23
14
24
25
B1 B4B3B2
26
27

3
12
13
8
9
3
11
13
8
9
3
C1 C2
8
9
4
11
2
8
9
4
2
C5 C6
11
8
9
4
3
8
9
4
3
C3 C4
28-30 mm
1.10”-1.18”
35-40 mm
1.37”-1.57”
45-50 mm
1.77”-1.96”
40-45 mm
1.57”-1.77”
31-34 mm
1.22”-1.33”
41-45 mm
1.61”-1.77”
50-60 mm
1.96”-2.36”
45-50 mm
1.77”-1.96”

4
D
G H
1
2
I
11
2
L
F
M
E

5
V Z
R
S
Q
TU
PN O

6
ONLY FOR TIGER SEAT
P/TIGER
2
11

7
X
ONLY FOR TIGER SEAT
<10 cm (4”)
warning

8
RELAX
30°
washing
instructions

9
10
16
22
28
34
40
RELAX
IT
EN
FR
DE
ES
PL
03IS

10
B-FIX RELAX -IT
Congratulazioni e grazie per aver acquistato il nuovo seggiolino bici. Se desiderate informazioni su
altri prodotti Bellelli, consultate la nostra pagina web www.bellelli.com.
Le presenti istruzioni valgono esclusivamente per i seggiolini posteriori Bellelli.
Prima del montaggio e dell’uso, leggere attentamente le rispettive istruzioni. Non montare il
seggiolino seguendo semplicemente le illustrazioni in copertina.
Conservare le istruzioni per un’eventuale consultazione futura.
AVVERTENZE
ATTENZIONE: Il seggiolino è stato progettato esclusivamente per il trasporto di un bambino. Non
appesantire il seggiolino con ulteriori carichi. Gli eventuali carichi da trasportare devono essere
posizionati sulla parte anteriore della bicicletta, utilizzando altri supporti, ad esempio un portapacchi
anteriore.
ATTENZIONE: E’ proibita qualunque modica al seggiolino ed ai suoi supporti. Il produttore o il
commerciante declinano ogni responsabilità per eventuali danni derivanti da modiche.
ATTENZIONE: La manovrabilità della bicicletta può essere inuenzata in modo signicativo dalla
presenza di un bimbo sul seggiolino, soprattutto per quanto riguarda l’equilibrio, la sterzata e la
frenata.
ATTENZIONE: Non lasciare mai la bicicletta incustodita con un bambino sul seggiolino.
ATTENZIONE: Non utilizzare mai il seggiolino nel caso una qualunque delle sue componenti e/o di
quelle della bicicletta siano difettose o mancanti. Contattare il produttore o rivenditore per procurarsi
eventuali pezzi di ricambio. A seguito di incidenti, sostituire il seggiolino in ogni sua parte, sebbene
non mostri danni evidenti.
INFORMAZIONI GENERALI SUL MONTAGGIO
Il seggiolino posteriore per bambini va montato dietro al guidatore.
Installare il seggiolino nella direzione di marcia.
Il ssaggio si adatta a telai a sezione rotonda nonché ad una varietà di telai a sezione ovale.
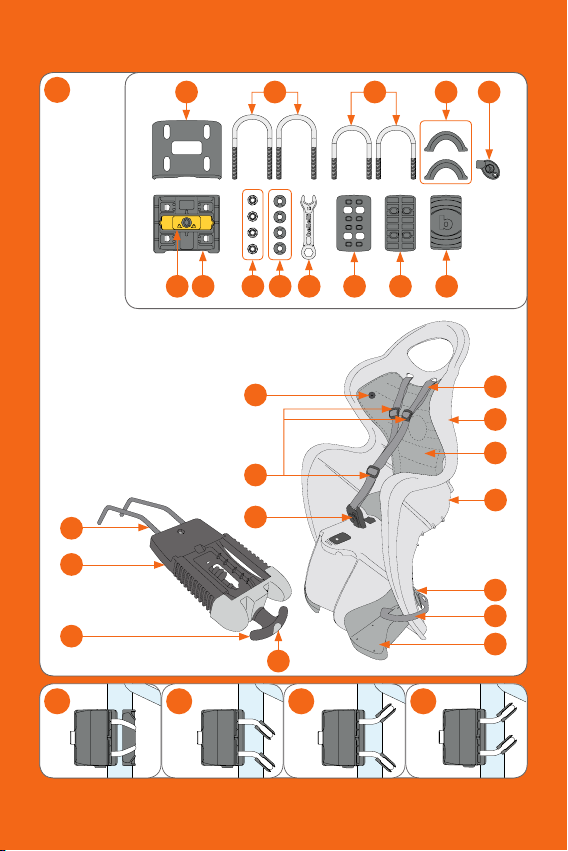
Leggere attentamente il paragrafo “Montaggio del supporto”.
Il seggiolino è dotato di un sistema di montaggio tramite forcella di supporto e slitta, inserita alla base
del seggiolino per regolarne l’inclinazione.
Utilizzare il seggiolino per biciclette 26 “- 28”, che supportano carichi supplementari da almeno 27 kg
(59,5 lb). Consultare il manuale della bicicletta o il proprio rivenditore di ducia.
Allacciare sempre la cintura di sicurezza al bambino e le cinghie dei poggiapiedi. Vericare
accuratamente che il bambino sia adeguatamente assicurato al seggiolino. Leggere attentamente il
paragrafo “Mettere a sedere il bambino sul seggiolino”.
Montare il seggiolino inclinandolo all’indietro. Inclinarlo leggermente verso il retro, per trattenere
meglio il bambino.
Dopo il montaggio del seggiolino, controllare periodicamente la bicicletta, prestando particolare
attenzione ai pneumatici, ai freni e ai fanali.
INFORMAZIONI GENERALI SULL’UTILIZZO
Prima di utilizzare il prodotto, informarsi sul codice stradale del paese in cui verrà utilizzato.
IT IT

11
Il seggiolino posteriore per bambini per biciclette deve essere installato dietro il guidatore ed è adatto
per bambini con un peso massimo di 22 kg (48,5 lb).
Vericare periodicamente che il peso del bambino non superi tale limite.
Da utilizzare solo per bambini (di età compresa tra 1 e 7 anni circa) in grado di stare seduti da soli e
senza aiuto per un periodo di tempo prolungato.
Utilizzare il seggiolino per biciclette 26 “- 28” che supportano carichi supplementari da almeno 27 kg
(59,5 lb). Consultare il manuale della bicicletta o il proprio rivenditore di ducia.
Vericare che la distanza tra il simbolo del baricentro stampato sui lati esterni del seggiolino e l’asse
della ruota posteriore sia inferiore ai 10 cm. Pericolo di ribaltamento.
Per la Germania vale, a differenza degli altri paesi, il seguente requisito:
Il seggiolino per bambini deve essere ssato in modo tale che i 2/3 della sua profondità o il
baricentro del seggiolino siano collocati tra l’asse della ruota posteriore e quello della ruota anteriore.
Non utilizzarlo su moto, scooter, motorini, biciclette da corsa e biciclette dotate di sospensioni.
Non utilizzare il seggiolino su biciclette elettriche. L’uso del seggiolino è consentito sulle biciclette a
pedalata assistita (Pedelec).
Vericare che nessun arto o nessun indumento del bambino o del guidatore restino impigliati nelle
parti mobili della bicicletta o del seggiolino (ad esempio nei freni). Usare un coprisella o una sella
provvista di molle interne. Controllare quest’aspetto man mano che il bambino cresce.
Vericare che il bambino non riesca ad inlare né le dita né i piedi nei raggi della ruota. Usare una
sella imbottita o una sella provvista di molle interne.
Vericare che il bambino non riesca ad inlare né le dita né i piedi nei raggi della ruota. Si consiglia
l’utilizzo di un parafango.
Vericare che il bambino non riesca a raggiungere componenti taglienti o appuntite (ad esempio cavi
slacciati dei freni).
Vericare che il bambino sia vestito adeguatamente con indumenti più pesanti di quelli del guidatore
e sia convenientemente protetto in caso di pioggia.
Fate indossare al bambino un casco omologato di misura adeguata (in alcuni paesi l’ uso del casco è
obbligatorio; consultare il codice stradale del paese in cui verrà utilizzato).
Non trasportare mai due bambini contemporaneamente.
Il guidatore della bicicletta deve avere almeno 16 anni.
Allacciare tutte le cinture, anche se non si trasporta nessun bambino.
Vericare che le cinture non urtino le ruote o le altre parti mobili della bicicletta, sia che il bambino sia
a bordo sia che non lo sia.
Vericare sempre, prima di mettere a sedere il bambino sul seggiolino che quest’ultimo non scotti
(ciò può vericarsi per esempio se il seggiolino è stato esposto alla luce solare diretta).
Smontare il seggiolino dalla bicicletta ogniqualvolta lo si deve trasportare attaccato all’esterno di un
veicolo (sul tettuccio di un automobile, su un rimorchio o sul retro di una roulotte/camper). Il usso
d’aria potrebbe danneggiare il seggiolino o gli attacchi alla bicicletta causando un incidente.
MONTAGGIO DEL SEGGIOLINO
ATTENZIONE: Non eseguire le operazioni di montaggio quando il bambino è seduto sul seggiolino.
Togliere il portapacchi posteriore dalla bicicletta, se esso intralcia il montaggio del seggiolino.
Montaggio del blocchetto di supporto
Individuare sul telaio della bicicletta la posizione più adatta per il ssaggio del supporto (7).
IT IT

12
Osservare le gure C1, C2, C3, C4, C5 e C6 ed identicare le componenti necessarie per il
montaggio del supporto in base al tipo di telaio. Conservare i componenti inutilizzati per una
possibile modica della congurazione.
Entrambe le coppie di viti (2, 3) in ferro possono essere regolate in quattro diverse posizioni (Fig.
B1, B2, B3, B4). Scegliere la combinazione corretta in base al telaio e non fare confusione tra le due
coppie di viti. Le combinazioni delle gure B2, B3 e B4 sono equivalenti.
Inserire in questo caso le due guarnizioni (4) sulle viti (2 o 3 secondo le dimensioni e la forma del
telaio), evitando di utilizzare la staffa grande ad archetto (13).
NOTA: La procedura corretta di montaggio prevede che i dadi, dopo essere stati avvitati, circondino
completamente il loro letto, in altre parole che non vi siano spazi all’interno dei dadi. Se ciò non
avviene, il supporto non è correttamente avvitato. Inoltre le viti, dopo il ssaggio del supporto e
l’inserimento della copertura, devono sporgere solo limitatamente (vedi g. E).
Posizionare il supporto (7) sul telaio della bicicletta, facendo attenzione che le due aperture, che
serviranno per il successivo inserimento della forcella di sostegno, siano rivolte verso l’alto.
ATTENZIONE: Non montare il supporto sull’asta della sella.
ATTENZIONE: Mettere il supporto in direzione di marcia (pulsante giallo, orientato verso il lato
anteriore della bicicletta).
Stringere leggermente i dadi in modo uniforme (Fig. D). Il supporto deve scivolare liberamente lungo
l’asta. L’avvitamento denitivo avviene dopo aver stabilito la corretta posizione del seggiolino (come
descritto nel paragrafo seguente “Montaggio del seggiolino sulla bicicletta”).
ATTENZIONE: Vericare che il supporto non intralci i cavi dei freni e la leva del cambio.
Sistema di sicurezza/antifurto
Il supporto è dotato di un sistema di sicurezza/ antifurto che può essere attivato con l’aiuto di una
chiave (5) in dotazione. Se il sistema si trova in posizione di chiusura, non è possibile inserire o
disinserire la forcella di sostegno del seggiolino nel supporto. Se il sistema si trova in posizione di
apertura, è possibile inserire o disinserire la forcella di sostegno del seggiolino nel supporto.
Per passare dalla posizione di apertura a quella di chiusura, inlare la chiave nella serratura (Fig. F)
e ruotarla di un quarto di giro in senso orario.
Per passare dalla posizione di chiusura a quella di apertura, inlare la chiave nella serratura (Fig. F)
e ruotarla di un quarto di giro in senso antiorario.
Montaggio della forcella di sostegno sul seggiolino
Capovolgere il seggiolino.
Prendere la base (15), in cui è già inserita la forcella di supporto (14) orientandola verso le guide
della slitta già presente sul seggiolino (Fig. G).
Spingere la slitta verso il basso, così il primo dente sulla cremagliera presente sulla slitta scatterà
nella base. Ruotare la manopola in senso orario (Fig. H).
Montaggio del seggiolino sulla bicicletta
Accertarsi che il blocco del supporto si trovi in posizione di “apertura”.
Tenere premuto il pulsante giallo (6) sul supporto ed inserire la forcella di sostegno (14) nelle
aperture situate sul lato superiore del supporto (Fig. I).
ATTENZIONE: Accertarsi che dopo l’avvenuto inserimento, il pulsante giallo (6) sia scattato. Se non
IT IT

13
è così, la forcella (14) non è stata inserita correttamente. Ripetere la procedura.
Allineare il seggiolino secondo l’asse della bicicletta.
Vericare che il seggiolino non intralci i pedali, i freni, la leva del cambio e altre parti mobili della
bicicletta. Lasciare al bambino spazio sufciente per le gambe.
ATTENZIONE: Se il seggiolino urta la ruota o i pedali della bicicletta, regolare il punto di ssaggio del
supporto (consultare il paragrafo precedente “Montaggio del supporto”).
Stringere a fondo i dadi (8) del supporto dopo aver stabilito la posizione migliore del seggiolino.
ATTENZIONE: Vericare che i dadi, una volta stretti, circondino completamente il loro letto (Fig. E).
Se ciò non avviene, il supporto non è correttamente avvitato.
Fissare la copertura (1), spingendola contro il lato anteriore del supporto in modo da farla scattare
sui lati del supporto in cui sono collocati i rispettivi dispositivi di blocco. Accertarsi che la rientranza
rettangolare del coperchio sia rivolta verso l’alto. Un clic fa capire che il ssaggio è avvenuto in modo
corretto.
La scelta corretta dei componenti, in particolare delle viti di ferro, garantisce che queste non
sporgano dalla copertura. Chiudere il blocco del supporto, girando la chiave nella posizione di
“chiusura”(Fig. F).
ATTENZIONE: Controllare periodicamente la tenuta delle viti, visto che possono allentarsi durante
l’uso.
Smontaggio del seggiolino dalla bicicletta
Mettere il sistema di sicurezza/antifurto nella posizione di apertura.
Tenere premuto il pulsante giallo (6) sul supporto e tirare il seggiolino verso l’alto (Fig. L).
Installazione dei poggiapiedi
Prendere il poggiapiedi (25) del piede sinistro (simbolo L, stampato sul retro).
Inserirlo nella fenditura verticale della gamba sinistra. Spingerlo completamente in alto (Fig. M).
Prendere la leva di bloccaggio del poggiapiedi (23) sinistro (simbolo L, stampato sul retro).
Inserire la leva di bloccaggio nell’apertura posteriore del poggiapiedi. Inserirlo dall’ esterno e
spingerlo completamente indietro (Fig. N).
Chiudere la leva di bloccaggio spingendola verso il basso no a che non si sente un clic (Fig. O).
Ripetere le stesse procedure per il poggiapiedi destro (simbolo R).
USO E REGOLAZIONI DEL SEGGIOLINO
Prima dell’ uso del seggiolino, vericare che la posizione delle cinture di sicurezza e dei poggiapiedi
corrispondano alle misure del bambino.
ATTENZIONE: eseguire le operazioni di regolazione della cintura di sicurezza e dei poggiapiedi
quando il bambino non è seduto sul seggiolino.
Le cinture devono trovarsi in una posizione leggermente sopra le spalle del bambino.
I piedi del bambino devono essere completamente appoggiati sui poggiapiedi.
Regolazione delle cinture di sicurezza
Per regolare la cintura passando da una posizione all’altra:
- Prendere la bbia in plastica dietro lo schienale del seggiolino e tirare la cintura (20) e la bbia
dall’apertura dello schienale.
IT IT

14
- Far passare la cintura (20) e la bbia attraverso l’apertura dello schienale no all’altezza desiderata
(Fig. P);
- Ripetere l’ identico procedimento per l’altra cintura.
NOTA: Per quanto riguarda il seggiolino TIGER fare riferimento alla gura P/TIGER.
Regolazione dei poggiapiedi
Ruotare la leva di bloccaggio sull’apertura posteriore del poggiapiedi verso l’alto (Fig.Q).
Regolare il poggiapiedi (25) verso l’alto o verso il basso no a raggiungere la posizione desiderata.
Chiudere la leva di bloccaggio spingendola verso il basso no a che non si sente un clic.
Regolazioni dell’inclinazione del seggiolino
Ruotare la maniglia (16) della slitta (15), per modicare l’inclinazione del seggiolino (Fig. R).
Controllo nale
ATTENZIONE: Non eseguire il controllo nale quando il bambino è seduto sul seggiolino.
Condurre la bicicletta per mano per alcuni metri per controllare che nessuna parte mobile urti il
seggiolino, che non vi siano cinghie sporgenti vicino alle ruote e che i freni ed i pedali siano ancora
in buono stato.
Vericare che il sistema di ssaggio sia opportunamente ssato al telaio e che il seggiolino sia
correttamente agganciato al sistema di ssaggio.
Mettere a sedere il bambino sul seggiolino
Premere il pulsante della bbia centrale (19) no a che un clic fa capire che il dente si è sganciato
(Fig. S). Tirare la bbia verso l’alto per slarla.
Mettere a sedere il bambino sul seggiolino.
Far passare la cintura ai lati della testa del bambino (Fig. T).
Introdurre la bbia centrale nell’apertura (Fig. U). Spingere completamente la bbia nell’apertura, no
a che non si sente un clic.
Regolare la bretella della cintura (18), per far aderire meglio le cinture al corpo del bambino (Fig. V).
Posizionare i piedi del bambino sui poggiapiedi.
Chiudere la cinghia (24), agganciandola al perno sul retro del poggiapiedi (Fig. Z).
Far scendere il bambino dal seggiolino
Allentare le cinghie che tengono fermi i piedi. Premere il pulsante della bbia centrale (19) no a che
un clic fa capire che il dente si è sganciato.
Tirare la bbia verso l’alto per slarla. Far passare la cintura sopra la testa del bambino.
MANUTENZIONE
Pulire periodicamente il seggiolino con acqua e sapone. Non utilizzare detergenti aggressivi.
GARANZIA
Le condizioni di garanzia possono essere consultate sul sito web www.bellelli.com.
IT IT

15
RICICLO
1. PP
2. Ferro
3. Ferro
4. PA
5. PP
6. PE
7. PA
8. Ferro
9. PA
10. Ferro
11. PA
12. PA
13. PA
14. Ferro
15. PA
16. PA
17. PA
18. PA
19. PC + ABS
20. PP
21. PP
22. Polyester
23. PP
24. PE
25. PP
26. PP
27. PVC
IT IT

16
B-FIX RELAX - EN
Congratulations and thank you for the purchase of your new bicycle seat. If you would like
information about other Bellelli products, visit our website: www.bellelli.com.
These instructions apply only for Bellelli rear seats.
Read the installation and operating instructions carefully before you install the seat and use it. Do not
mount the seat by following only the pictures on the cover.
Keep the manual for possible, future reference.
NOTES
WARNING: The seat is designed exclusively for transporting a child. Do not add any other loads to
the seat. Any additional loads must be carried on the front of the bicycle by using other holders, such
as a front luggage carrier.
WARNING: Any change to the seat and its brackets is prohibited. The manufacturer and the retailer
are not responsible for possible damages due to changes.
WARNING: The manoeuvrability of the bicycle may vary signicantly with a child in the seat, in
particular regarding balance, steering and braking.
WARNING: Never leave the bike parked and unattended with a child in the seat unattended.
WARNING: Never use the seat if any part of the seat or of the bicycle is broken or missing. Contact
the manufacturer or dealer to purchase necessary spare parts for the seat. Replace the seat after
any accident even if it has no visible damage.
GENERAL INFORMATION ABOUT ASSEMBLY
The rear bicycle seat for children is to be mounted behind the driver.
Install the seat facing the direction of travel.
The bracket is suitable for a frames with a round cross section as well as a variety of frame with an
oval cross section. Carefully read the section “Mounting Support Installation”.
The seat is equipped with a mounting system with support fork and slides, which are inserted on the
base of the seat to regulate the inclination.
Use the seat for 26 “-28” bikes in order to withstand the additional loads of at least 27 kg (59.5 lb).
Consult the user’s manual of the bicycle or your dealer.
Always attach the child’s seatbelt and the foot straps. Check carefully and regularly that the child is
properly secured in the seat. Carefully read the section “Placing the child in the seat ‘.
Do not mount the seat leaning forward. Tilt it slightly backwards, to better hold the child.
With the seat mounted, check your bike regularly and pay attention particularly to the tires, brakes
and lights.
GENERAL INFORMATION ABOUT USAGE
Before using the product check over the highway code of the country in which it is being used.
The rear bicycle seat for children has to be installed behind the cyclist and it is suitable for children
with a maximum weight of 22kg (48.5 lb).
Regularly check that the weight of the child does not exceed this limit.
For use only with children who are able to sit for long periods of time alone and unaided
(approximately 1-7 years).
EN EN

17
Use the seat for 26 “-28” bikes in order to withstand the additional loads of at least 27 kg (59.5 lb).
Consult the user’s manual of the bicycle or your dealer.
Check that the distance between the central symbol, which is printed on the outside of the seat, and
the axle of the rear wheel is less than 10 cm. Risk of falling over.
For Germany, the following requirements applies:
The child seat must be secured such that 2/3 of its depth or the majority of the seat is located
between the axle of the rear wheel and the front wheel.
Do not use the seat on motorcycles, scooters, mopeds, racing bikes and bikes with suspension.
Do not use the seat on electric bicycles. The seat may be used on Pedelecs.
Check that the limbs and clothes of the child or that of the driver cannot be caught in the moving
parts of the bicycle or in the seat (e.g. in the brakes). Use a saddle cover or a saddle with internal
springs. Check this regularly with the child’s growth.
Check that the child cannot stick ngers nor feet in the wheel spokes. Use a saddle cover or a
saddle with internal springs.
Check that the child cannot stick ngers nor feet in the wheel spokes. The use of a fender is
advisable.
Check that the child cannot reach any sharp or pointed parts (e.g. frayed brake cables)
Check that the child is dressed sufciently and warmer than the driver is and appropriately protected
in the case of rain.
Have children wear a safety-approved helmet of an appropriate size (in some countries wearing a
helmet is a requirement, consult the highway code of the country where you use the seat).
Never carry two children at the same time.
The cyclist must be at least 16 years old.
Attach all the straps, even if you are not carrying a child.
Check that the straps cannot reach the wheels or other moving parts of the bicycle, both with and
without the kid on the bicycle.
Always check before placing the child in the seat, that the seat is not too hot (this can happen, for
example, when the seat has been exposed to direct sunlight).
Take the seat off the bike when transporting it on the outside of a vehicle (e.g. on the roof of a car, on
a trailer or on the back of the RV). The air ow could damage the seat or break the fasteners of the
seat on the bike thus causing an accident.
ASSEMBLING THE SEAT
WARNING: Do not perform installation operations with the child in the seat.
Remove rack on the rear of the bicycle if it does interferes with the installation of the seat.
Mounting the Support Block
Find the most suitable position for the installation of the mounting support (7) to the bicycle frame.
Look at the gures C1, C2, C3, C4, C5, C6 and nd the parts for mounting the support based on the
frame type. Keep the unsed parts to be used for future installation.
The two iron screws (2, 3) can be aligned in four different positions (g. B1, B2, B3, B4). Choose the
proper combination according to the frame and do not mix up the iron screws of the two pairs.
The congurations gures B2, B3, B4 are equivalent.
In this case, place the the two seals (4) on the screws (2 or 3 depending on the size and shape of
EN EN

18
the frame) and do not use the large bracket (13).
REMARK: Correct installation foresees that the nuts completely wrap the screw thread after their
fastening, i.e. There must be no space inside the nut. If this is not the case, the mounting support is
not properly attached. Furthermore, after tightening and covering the mounting support, the screws
may only emerge slightly (see g. E).
Position the mounting support (7) on the bicycle frame and make sure that the two openings which
are meant for the support fork are placed upwards.
WARNING: Do not t the mounting support on the tube of the saddle.
WARNING: Align the mouting support in the direction of travel (yellow button aligned towards the
front part of the bicycle).
Screw the nuts slightly and evenly on (g. D). The mounting support can slide freely along the rod.
The denitive xing takes place after the correct position has been determined for the seat (as
explained in the following section “ Mounting the Seat on the Bicycle”).
WARNING: Check that the mounting support does not interfere with the brake and the gear shift .
Safety System / Burglar
The mounting support is equipped with a security system/theft protection, which can be operated
with a key (5) that is operated with the equipment.
If the system is in the closed position, it is not possible to insert the support fork of the seat in the
bracket or pull them out.
If the system is in the open position, it is possible to insert the support fork of the seat in the bracket
and pull them out.
To move from the open to the closed position: Insert the key into the lock (g. F) and rotate one
quarter turn clockwise.
To move from the closed to the open position: Insert the key into the lock (g. F) and rotate a quarter
turn counter clockwise.
Mounting the Support Fork on the Seat
Overturn the bicycle seat.
Take the base (15) of the already inserted support fork (14), and align it using the slide present on
the seat (Fig. G).
Push the slide down so that the rst sprocket of the steering rack, which is located in the slide, snaps
into the base.
Turn the handle clockwise (Fig. H).
Mounting the Seat on the Bicycle
Be sure that the mounting support lock is in the “open” position.
Press and hold the yellow button (6) on the mounting support and place the support fork (17) into the
holes on the upper part of the mounting support (g. M).
WARNING: After successful insertion, make sure that the yellow button (6) is latched. If it does not
latch, the support fork (14) is not correctly inserted: Repeat the process.
Align the seat along the bike’s axle.
Check that the seat does not interfere with the pedals, brakes, gears and any other moving parts of
the bicycle.
EN EN

19
Leave enough legroom for the child.
WARNING: If the seat touches the wheel or interferes with the bike pedals, reposition the mounting
support (see the previous section “Mounting Support Installation’).
Tighten the nuts (8) on the mounting support, once you have determined the best location for the
seat.
WARNING: Check to make sure that tightened nuts completely cover the threads (g. E). If this is not
the case, the mounting support is not properly attached.
Attach the cover (1) by pushing against the front of the mounting support so that it locks into place
on the sides of the mounting support where the corresponding notches are located. For a correctly
positioned cover, make sure that the rectangular indentation is directed upward. A click shows a
successful mounting.
The correct choice of the components, in particular the screws ensures that the they do not emerge
from the cover. Lock the mounting support by turning the key to the “closed” position (Fig. F).
WARNING: Check the tightening of the screw regularly. These can come loose during use.
Removing the Seat from the Bike
Place the security system / Burglar in the open position.
Press and hold the button (6) on the mounting support and pull the seat upwards (g. L).
Installing the Footrests
Take the left footrest (25) (L symbol printed on the back).
Insert it into the vertical slot of the left leg strap.
Push it all the way up (g. M).
Take the catch lever (23) of the left footrest (L symbol printed on the back).
Insert the catch lever into the hole on the backside of the footrest. Insert it from the outside and push
it all the way through to the back (g. N).
Close the locking lever by pushing it down until you hear a click (g. O).
Repeat the same operations for the right footrest (symbol R).
USE AND ADJUSTMENT OF THE SEAT
Before using the seat, check that the position of the safety straps and the footrests correspond to
your child’s size.
WARNING: Do not congure the safety straps and the footrests with your child in the seat.
The straps must be located in a position just above the child’s shoulders.
The feet of the child must fully rest on the footrests.
Adjusting the Safety Straps
To adjust the straps from one location to the other:
- take the plastic buckle located behind the backrest of the seat and pull the belt (20) and buckle
from the opening of the backrest;
- insert the belt and buckle through the hole of the backrest to the desired height (g. P);
- repeat the same operation for the other belt.
REMARK: Refer to the gure P/TIGER for the TIGER seat.
EN EN

20
Adjusting the footrests
Turn the catch lever on the rear of the footrest upwards (g. Q).
Adjust the footrest (25) upwards or downwards until you reach the desired position.
Close the locking lever by pushing it down until you hear a click.
Adjusting the Angle of the Seat
Turn the handle (16) of the slide (15), to change the inclination of the seat (g. R).
Final Inspection
WARNING: Do not conduct the nal inspection with the child in the seat.
Push the bike for a few meters by hand, making sure that no moving parts touch the seat, no
protruding straps are close to the wheels and brakes and that pedals are still in good condition.
Check that the fastening system is adequately attached to the bicycle frame and the seat is correctly
hooked in the fastening system.
Placing the child in the seat
Press the button of the middle buckle (20) until you hear a click indicating that the sprocket is
unhooked (g. S). Pull the buckle upwards to take it off.
Place the child in the seat.
Push the straps through on the side of the child’s head (g. T).
Place the middle buckle through the opening (Fig. U). Slide the buckle through the opening until you
hear a click.
Adjust the loops (18) on the strap, so that it rests better on the body of the child (g. V).
Place the feet of the child on the footrests.
Close the straps (23) by attaching them on the pins on the back of the footrests (g. Z).
Removing the child from the seat
Loosen the straps holding the feet.
Press the button of the middle buckle (20) until you hear a click indicating that the sprocket is
unhooked.
Pull the buckle upwards to take it off.
Pull the straps over the child’s head.
MAINTENANCE
Wash the seat regularly with soap and water. Do not use aggressive detergents.
GUARANTEE
The warranty terms can be found on the warranty web page.
RECYCLING
1. PP
2nd Iron
3. Iron
4. PA
EN EN
Table of contents
Languages:
Other Bellelli Bicycle Accessories manuals