Paese dove vi trovate.
Attenzione: non posizionare il seggiolino sui
sedili anteriori se c’è l’airbag attivo.
Attenzione: non interporre nulla fra seggiolino e
sedile.
Attenzione: non posizionare il seggiolino su
sedili girevoli o orientati in senso contrario alla
direzione di marcia del veicolo.
Installazione del seggiolino con isofix
e gamba di supporto
Attenzione: il seggiolino può essere installato
con sistema isofix solo nelle posizioni indicate
nel manuale d’uso dell’autovettura. Prima
dell’installazione, consultare il manuale d’uso
dell’autovettura per verificare la compatibilità dei
vari sedili con la taglia e gli ancoraggi del proprio
dispositivo di ritenuta.
Attenzione: accertarsi, prima dell’installazione,
che la vostra auto sia compatibile con il sistema
isofix. Consultare il paragrafo “elenco degli
autoveicoli compatibili”.
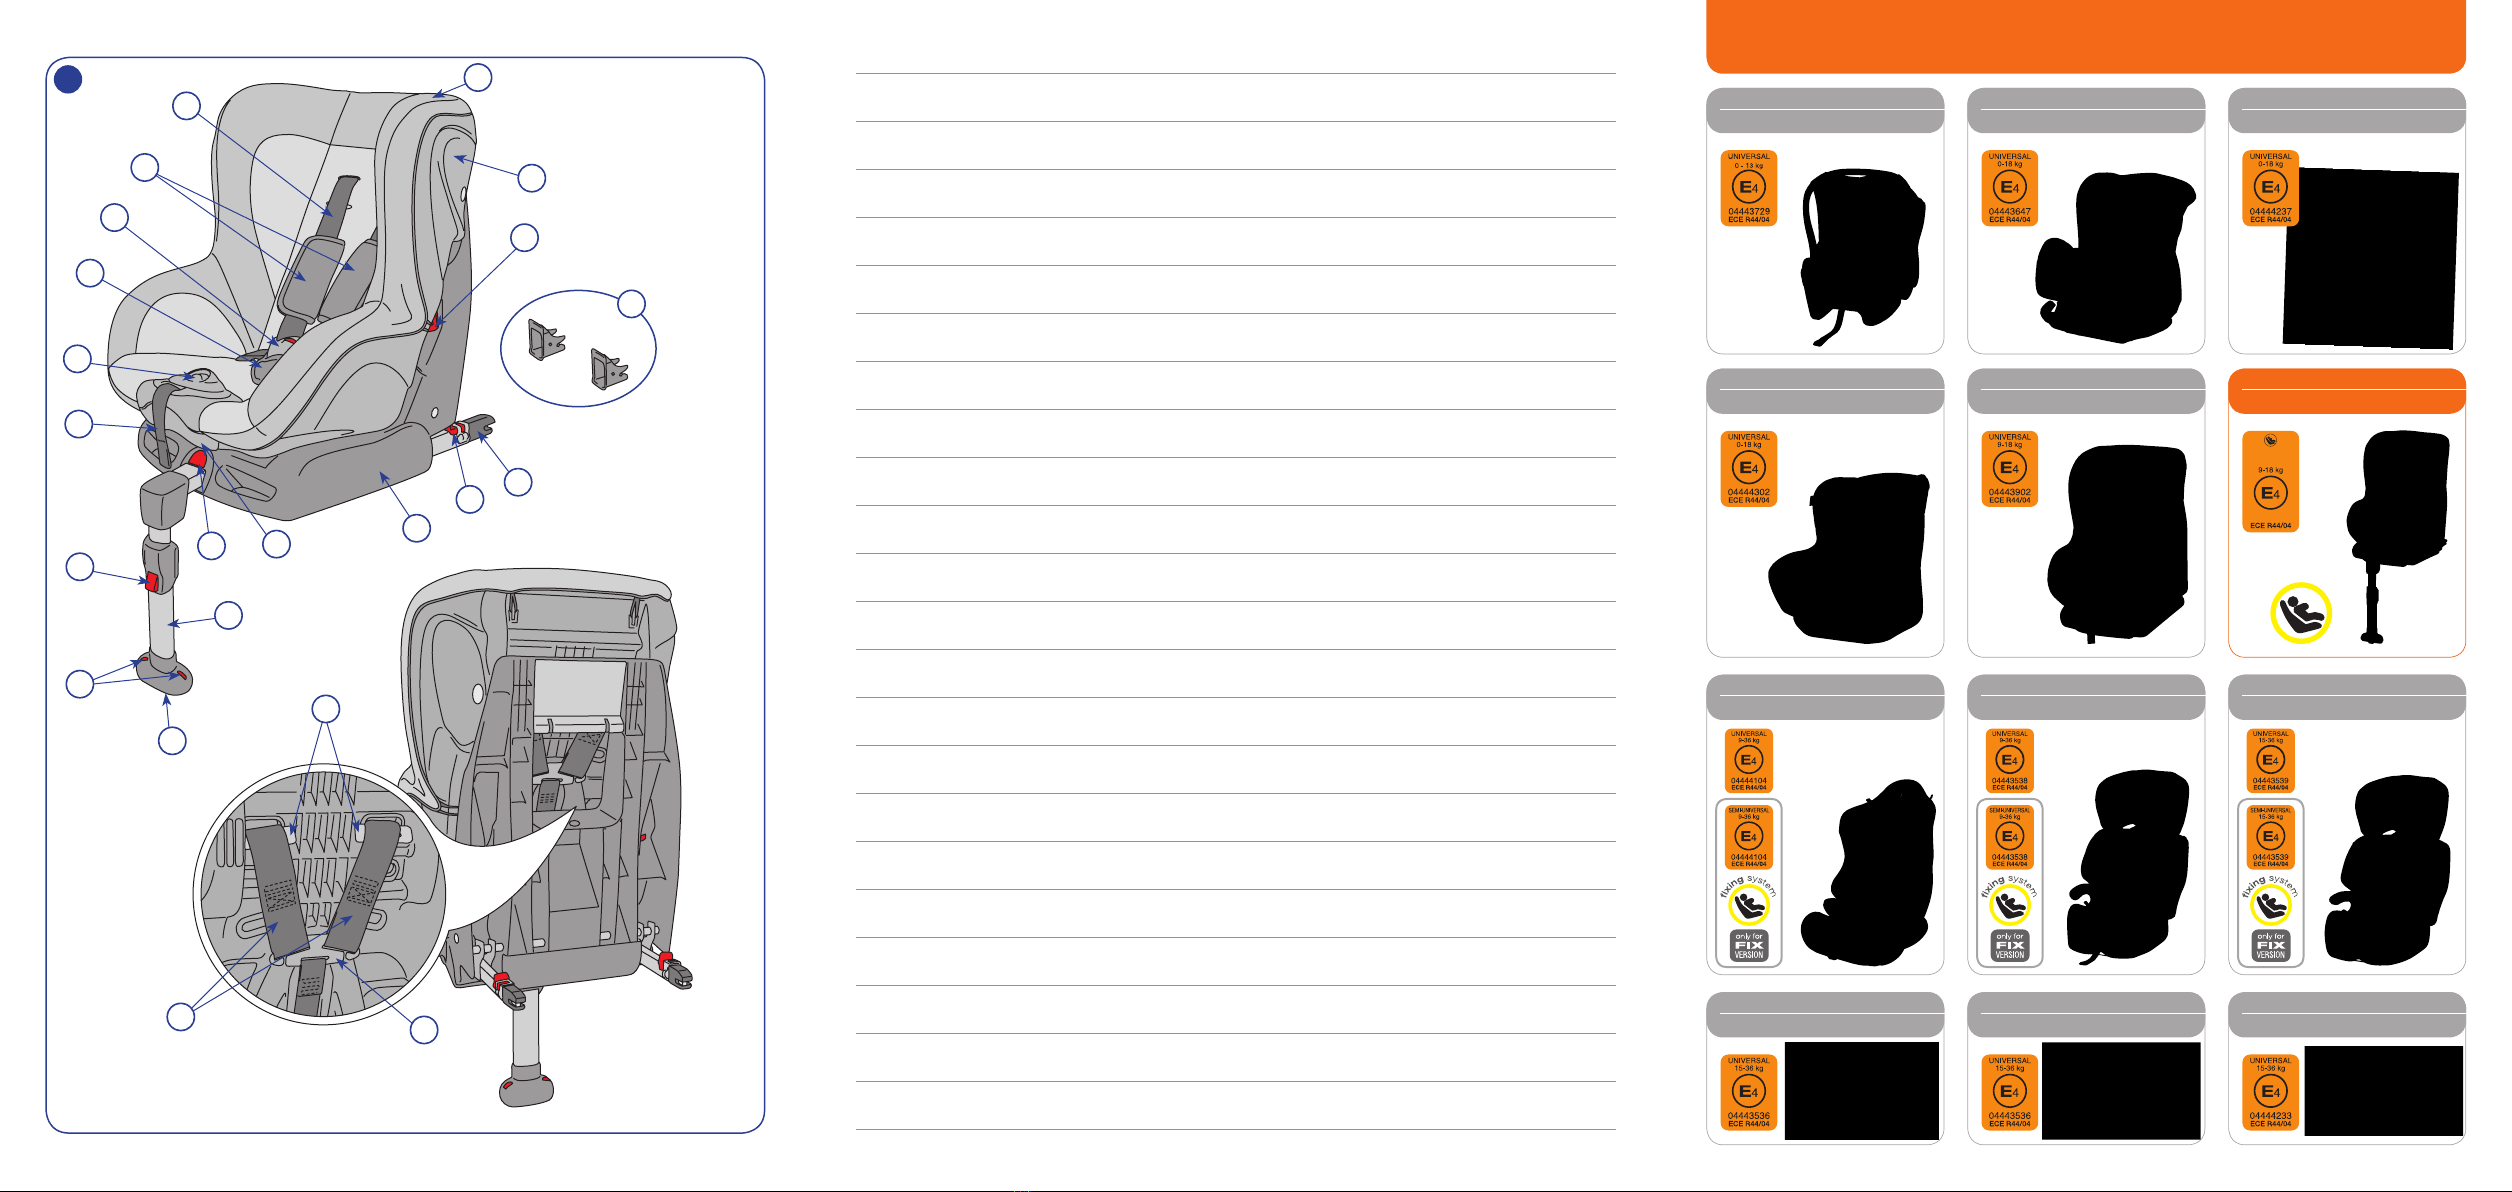
Montaggio
Posizionareleprotezionideisediliincorrispondenza
degli ancoraggi isofix. Le protezioni facilitano il
montaggio e proteggono i sedili (fig. 10).
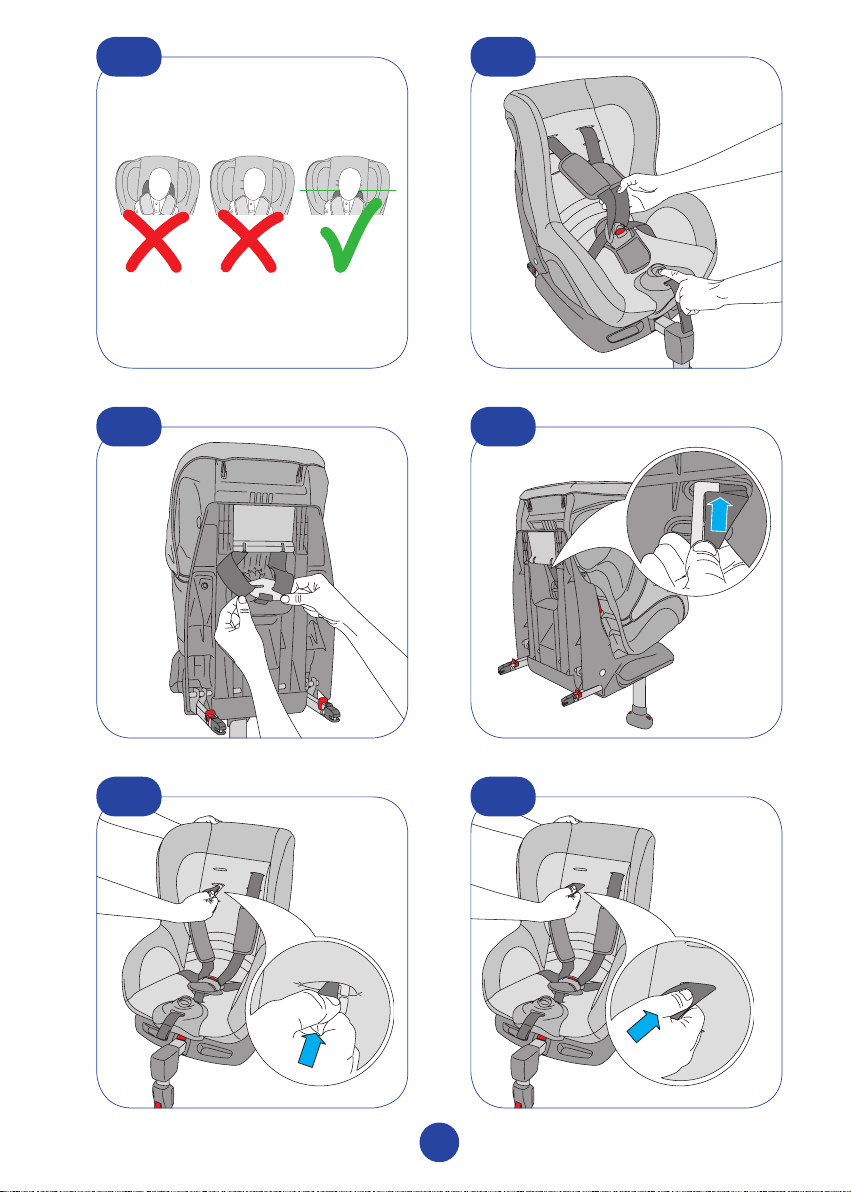
Ruotare la gamba di supporto (C) in avanti per
aprirla completamente (fig. 11).
Premereil pulsante (B) espingerecompletamente
il sistema isofix all’indietro per estrarre
completamente i connettori isofix (Q) (fig. 12).
Assicurarsi che gli indicatori sulle leve (R) siano
di colore rosso. Se non lo fossero, azionare la
leve (R) come in figura (13) fino a far scattare
gli indicatori.
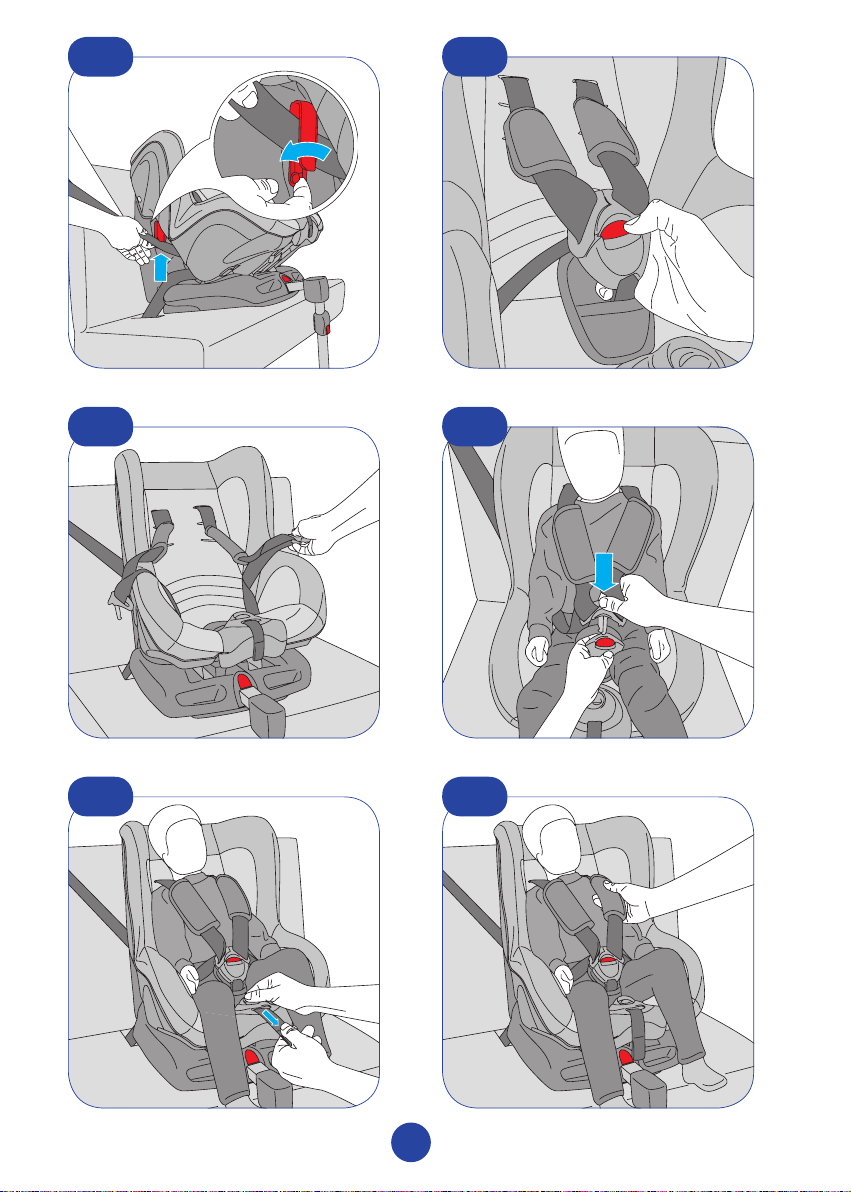
Posizionare il seggiolino sul sedile dell’auto.
Inserire i connettori (Q) nelle due protezioni.
Spingere all’indietro il seggiolino per far
scattare i due connettori isofix sugli ancoraggi
nella macchina (fig. 14). Si devono sentire
distintamente due scatti.
Attenzione: accertarsi che gli indicatori sulle
leve (R) siano di colore verde. Se non lo sono,
il seggiolino non è agganciato correttamente.
Ripetere l’operazione di aggancio.
Premere il pulsante (B) e spostare leggermente
il seggiolino verso il sedile (fig. 15).
Spingere all’indietro il seggiolino fino a farlo ben
aderire allo schienale dell’automobile.
Attenzione: controllare ancora una volta che
il fissaggio sia corretto provando a tirare e
muovere il seggiolino.
Regolazione della gamba di supporto
Premere il pulsante (F) e regolare la lunghezza
della gamba (C) fino a toccare il pavimento
dell’auto. (fig. 16).
Per regolare la lunghezza in modo corretto,
accertarsi che il piede di appoggio (E) tocchi
il pavimento dell’auto ed il seggiolino sia
appoggiato sul sedile.
Assicurarsi che l’indicatore (D) sia di colore
verde.
Assicurarsi che la gamba sia ben fissata, cioè
che non sia possibile cambiarne la lunghezza
senza premere il pulsante (E).
Smontare il seggiolino
Tirare in avanti la leva (R) per scollegare i
connettori isofix. Quando i connettori non
sono più agganciati, gli indicatori sulle leve (R)
diventano di colore rosso.
Allontanare il seggiolino dal sedile.
Si consiglia di riportare la gamba di supporto
nella sua posizione più corta premendo il
pulsante (F) e spingendo verso l’altro la gamba
(C). Ruotare la gamba di supporto sotto il
seggiolino per ridurne al minimo l’ingombro.
Installazione del seggiolino con la
cintura di sicurezza dell’auto
Se la vostra auto non è provvista di punti di
ancoraggio isofix compatibili, è possibile fissare
il seggiolino con la cintura di sicurezza dell’auto,
utilizzando la gamba di supporto. Consultare il
paragrafo “elenco degli autoveicoli compatibili”.
Come installare il seggiolino in auto
Attenzione: se il seggiolino viene installato con la
cintura dell’auto, non posizionare il seggiolino su
un sedile dotato di una cintura solo orizzontale.
Posizionare il seggiolino sul sedile dell’auto in
modo che appoggi completamente alla seduta
ed allo schienale (fig. 17).
Attenzione: i punti di passaggio delle cinture
di sicurezza sono identificati in rosso. Non
far passare le cinture di sicurezza dell’auto in
posizioni diverse da quelle indicate.
Reclinare completamente il seggiolino per
agevolare il passaggio delle cinture di sicurezza.
Far passare la cintura addominale dell’auto fra
la base (S) ed il seggiolino (N) (fig. 18).
Agganciare la cintura di sicurezza dell’auto (fig.
19).
Abbassare la linguetta del fermacinghia (P)
posto nella parte posteriore della scocca; far
8
IT