Benassi MC 3300 User manual
REVERSIBLE TWO-WHEEL TRACTOR
MC 3300 MC 4300 SERIES
Operation and Maintenance Manual

OPERATION AND MAINTENANCE MANUAL
Page 2 of 22
Contents
General details _________________________________________________________________________________ 3
Introduction ____________________________________________________________________________________ 3
Information about the guarantee____________________________________________________________________ 3
Training_______________________________________________________________________________________ 4
Key of symbols _________________________________________________________________________________ 4
Read immediately: ______________________________________________________________________________ 5
Operation _____________________________________________________________________________________ 5
Unsafe practice_________________________________________________________________________________ 5
Machine description _____________________________________________________________________________ 6
Specifications and performance ____________________________________________________________________ 6
Implements ____________________________________________________________________________________ 7
Remark on attaching implements_________________________________________________________________ 7
Description of controls____________________________________________________________________________ 8
Version of the machine with cutters _________________________________________________________________ 9
Adjusting the tilling depth _______________________________________________________________________ 9
Reverse of the machine_____________________________________________________________________ 10
Positions and controls of levers_______________________________________________________________ 11
Working procedure _____________________________________________________________________________ 11
Adjustements_____________________________________________________________________________ 12
Starting the machine _______________________________________________________________________ 14
Operating the machine __________________________________________________________________________ 15
General warnings while working ___________________________________________________________________ 15
Filling and emptying the fuel tank __________________________________________________________________ 15
Switching the machine off ________________________________________________________________________ 16
Storage of the machine__________________________________________________________________________ 16
Residual Risk _________________________________________________________________________________ 17
Maintenance __________________________________________________________________________________ 18
General guidelines ___________________________________________________________________________ 18
Engine ____________________________________________________________________________________ 18
Gear: checking the oil level ____________________________________________________________________ 18
Gear: changing the oil ________________________________________________________________________ 19
Greasing power takeoff _______________________________________________________________________ 19
Periodical operations _________________________________________________________________________ 19
Cleaning _____________________________________________________________________________________ 20
General guidelines ___________________________________________________________________________ 20
Disassembly __________________________________________________________________________________ 21
CE Mark _____________________________________________________________________________________ 21
Air noise and vibrations produced by the machine _____________________________________________________ 22
Index of pictures
Picture 1 – General view__________________________________________________________________________ 6
Picture 2 – Attaching implements ___________________________________________________________________ 7
Picture 3 - Description of controls ___________________________________________________________________ 8
Picture 4 – Machine: version with cutters _____________________________________________________________ 9
Figura 5 – Adjusting the tilling depth_________________________________________________________________ 9
Picture 6 - Reverse of the machine_________________________________________________________________ 10
Picture 7 – Positions and controls of levers___________________________________________________________ 11
Picture 8 - Adjustment of the height of the handle______________________________________________________ 12
Picture 9 - Handle side adjustment _________________________________________________________________ 12
Picture 10 – Locking the differential ________________________________________________________________ 12
Picture 11 – Adjusting wheels with flange____________________________________________________________ 13
Picture 12 - Taking off the wheels spacers ___________________________________________________________ 13
Picture 13 – Switching the engine off _______________________________________________________________ 16
Picture 14 – Gear oil level________________________________________________________________________ 18
Picture 15 – Changing gear oil ____________________________________________________________________ 19
Picture 16 - Greasing takeoff______________________________________________________________________ 19
Picture 17 - Plate with CE Mark ________________________________________Errore. Il segnalibro non è definito.
Index of tables
Table 1 – Information and Training __________________________________________________________________ 4
Table 2 – Specifications and performance ____________________________________________________________ 6
Table 3 - Noiseness and vibrations_________________________________________________________________ 22

OPERATION AND MAINTENANCE MANUAL
Page 3 of 22
General details
Producing firm: BENASSI SpA
Via Lampedusa, 1
Tel. 0039 051 820534 Fax 0039 051 6826164
e-mail: export@benassispa.it
www.benassispa.it
This manual has been written by the Industrial Engineer Mr CIAVAGLIA Sergio
Global Service Italia Srl - 63029 Servigliano (ITALIA)
Introduction
Dear Customer,
this manual has been written thanks to the considerable experience we have acquired so far. Its purpose is
to help you in operating the machine properly during all the phases of its life.
The manual should be kept with the machine, in a safe place, accessible to all those who need to consult it.
Those who have not read, understood and learned the instructions of this manual must not operate
the machine.
Should the manual be lost or spoiled, please ask your retailer for a copy, giving him all the relevant
information about the machine
The manual and the declaration of conformity should always be kept with the machine, both when it
is sold and when it is hired, and until the hire ceases.
Information about the guarantee
We remind you that, before using this REVERSIBLE TWO-WHEEL TRACTOR, all those who will drive
it must be informed about the conditions of use and cautioned against unsafe practice. This manual
contains all such information, and through it you can obtain the best performance of the machine.
We have actually found that many of the troubles that have been reported should be mainly ascribed to the
operator’s inattention or to wrong maintenance and/or adjustments.
As a consequence, we cannot accept claims for compensation for damage caused by wrong
handlings or for loss of liabilities due to the impossibility to work when the machine is broken.
All the electrical and mechanical parts that undergo normal wear and tear are not covered by
guarantee.
DURATION OF THE GUARANTEE
The guarantee has a maximum duration of 24 months.
For mechanical parts, the guarantee only covers spare parts; it does not cover the labour nor the travelling
expenses connected to assembly.
If any faulty parts have to be repaired, they should be sent to us carriage paid. We will repair and ship them
carriage forward.
When ordering spare parts, always give the following details:
Model Number
Year of production
Model Number
The instructions, the pictures and the information contained in this manual are a technical and
reserved property of the producing firm and cannot be reproduced with any means, neither in whole nor in
part.

OPERATION AND MAINTENANCE MANUAL
Page 4 of 22
Training
If this REVERSIBLE TWO-WHEEL TRACTOR is used in a firm, we remind you that, before using it, all
those who will drive it must be informed about the conditions of use and cautioned against unsafe
practice. This manual contains all such information, and through it you can obtain the best
performance of the machine.
For a non-professional use, the retailer must train the user.
Any Information and Training should be written down in this table.
Topic Trainer Worker Date
Table 1 – Information and Training
Key of symbols
To allow you better understand this manual, we will explain here some terms and symbols:
THE COLOURS OF THE REMARKS HAVE THE FOLLOWING MEANINGS:
BLUE ALWAYS
RED NEVER
ORANGE DANGER
Benassi Spa, as the firm producing the REVERSIBLE TWO-WHEEL TRACTOR,
disclaims any responsibility for any damage that can be ascribed to an improper
use, to inattention or to the breach of safety regulations. It also disclaims any
responsibility for any damage that may occur during the transport, unpacking and
handling of the machine.
OPERATOR
QUALIFIED
TECHNICIAN
Person w
ho has the task to set
up, operate, adjust,
deal with
normal maintenance of and
clean the machine.
Person trained and qualified to solve problems with adjustment and operatio
n of the
machine, and to manage extraordinary maintenance or to repair the machine when
a
particular knowledge of the machine, of its functioning, of safety regulations and of technical
procedures is required.
Remark to be read carefully
Please read the manual before
doing anything Presence of a
danger
Something you should never do Something you should always do

OPERATION AND MAINTENANCE MANUAL
Page 5 of 22
Read immediately:
READ THE OPERATION MANUALS (MACHINE AND ENGINE)
IF THE REVERSIBLE TWO-WHEEL TRACTOR IS USED IN A FIRM, WE REMIND YOU TO HAND
IN A COPY OF THE MANUALS TO THE MAINTENANCE MANAGER. THE MAINTENANCE MANAGER
MUST HAND IN AN ABSTRACT OF THE MANUALS TO THE WORKER IN CHARGE OF THE MACHINE,
SPECIFYING THE INFORMATION ABOUT HIS TASKS.
Operation
The REVERSIBLE TWO-WHEEL TRACTOR MC3300 – MC4300 SERIES, hereinafter called machine, is
designed to be used in agriculture, farming and flower-growing.
It is a self-propelled machine with a single axle. It can work in a variety of settings, according to the
attachments used, such as:
⇒Working the ground (using hoe-shaped cutters);
⇒Mowing the grass (using a sickle bar);
⇒Transporting small volumes (using a trailer);
⇒Other uses (using ploughs, lawn mowers, snow throwers, etc.).
The machine has an internal-combustion engine.
Manuals provided by the producer explain how to change attachments.
For the machine to run, a worker is needed to control it continuously.
Unsafe practice
FOR THE RETAILER: only qualified staff should deal with all the
operations needed to set up the machine. Such procedures must follow
the instructions contained in the SETTING UP MANUAL.
Should the user make modifications to the machine, he is required
to remove the CE mark.
Everything that this manual does not treat explicitly is to be considered
forbidden.
The machine must not be used if there is danger of fire and/or explosion.
It is forbidden to drive the machine on roads.
BEFORE:
⇒HANDLING THE MACHINE;
⇒USING THE MACHINE;
⇒ADJUSTING;
⇒CLEANING;
⇒OPERATIONS OF MAINTENANCE
WARNING

OPERATION AND MAINTENANCE MANUAL
Page 6 of 22
Machine description
The two-wheel tractor is build on a metal frame where the other parts are fixed: the engine, the gear, the axle
and the steering handle, as you can see from the picture:
Picture 1 – General view
Specifications and performance
Operation Daytime
Max mass (according to the model) 90-120 kg
Size
Max forward/backward speed
Max pressure pneumatic tyres (agricultural
tread)
Min steering diameter
See tecnhical tables
Engine specifications See engine manual
Table 2 – Specifications and performance
TILLING VERSION MOWING VERSION
Attachment:
cutters with
protective case
Bonnet
EngineSteering handle
Self-winding
starter rope
Wheels
Clutch and motor-stop controls
Differential
lock controls
Hand
throttle
control Gear levers control
OPERATION AND MAINTENANCE MANUAL
Page 7 of 22
Implements
The machine can be operated as well with the following implements:
SICKLE BAR, PLOUGH, MOWER, SNOW THROWER, TRAILER, SHREDDER, REVERSIBLE PLOUGH,
LEVELLING BLADE, ROTARY SWEEPER.
For other implements, please get in touch with the producing firm.
To attach and use the different implements, refer to the specific manual.
Remark on attaching implements
When attaching implements, you should follow the following instructions.
operation to be performed while the machine is switched off and well stable;
operation to be performed only by trained and informed staff;
only use implements compatible with the machine and following the instruction
provided by the producing firm;
Picture 2 – Attaching implements
put the safety plate of
the implement under the
rocker arm, on the internal
side of the lever Plate
Rocker
arm
Centring rings
Tighten the screws
with a proper spanner,
gradually and alternating
the screws.
Danger of bruis
ing
and
manual load handling
If the implement
is too heavy, you should
perform the operations in two or using
adequate means, and following the proper
instructions
N.B.: The trailer must be
attached in a particular place
(shown in the picture above),
different from the power
takeoff
attach the implement
properly, being careful that the
centring rings join together
Point for
attachment

OPERATION AND MAINTENANCE MANUAL
Page 8 of 22
Description of controls
Functions of warning lights
Picture 3 - Description of controls
Lever to lock
differential
Motor-stop
lever
Button to lock clutch
lever and motor-stop
lever
Handle height
adjustment lever
Ignition key (for
those models who
have it)
Lever to
engage/disengage
power takeoff
Gear lever
Speed direction
lever (reverser)
Hand throttle
control
Button to lock
differential lever
Warning lights
Clutch lever
Neutral
position (0)
ALTERNATOR
OILALTERNATOR
OPERATION AND MAINTENANCE MANUAL
Page 9 of 22
LARGHEZZA (mm)
280
370
460
570
VOLPINO
360
480
630
760
CASTORO
CUTTER WIDTH (mm)
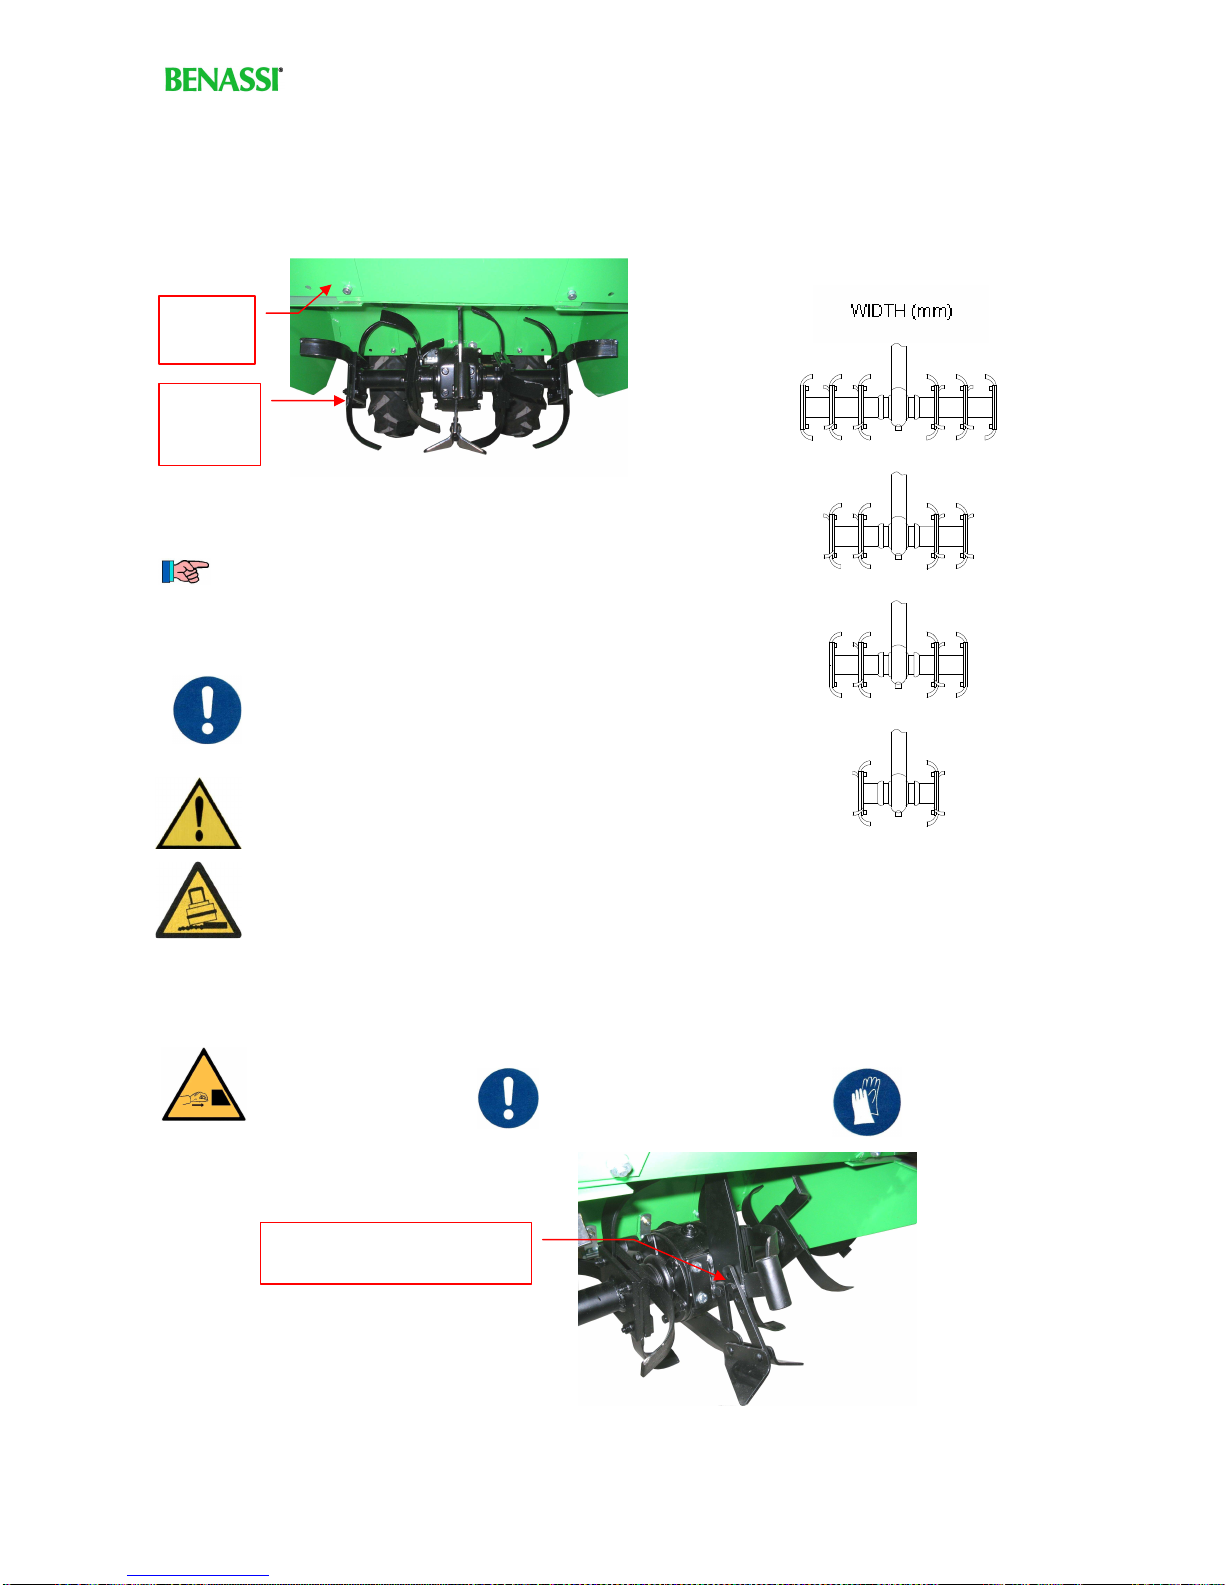
Version of the machine with cutters
In this version the machine has cutters to till the soil. The external parts of the cutters and of the protective
case can be disassembled, so you can vary the width of the machine.
The widths you can obtain are as follows.
Picture 4 – Machine: version with cutters
To assemble the implements, consult the manuals
provided by the producing firm.
Adjusting the tilling depth
The hoe-shaped cutters have a device to adjust the depth of tilling of the soil.
Figura 5 – Adjusting the tilling depth
Protecti
ve case
Hoe-
shaped
cutters
Tilling depth adjuster
OPERATIONS TO
PERFORM WHEN THE
MACHINE IS TURNED
OFF AND STABLE
DANGR OF
BRUISING AND
CRUSHING
WEAR PROPER
GLOVES
WHATEVER WIDTH YOU DESIRE, THE
CUTTERS
MUST BE SET SYMMETRICALLY
WITH THE AXE OF THE MACHINE.
DANGER OF OVERTURNING AND OF
INSTABILITY: IF THE CUTTERS ARE NOT
ASSEMBLED SY
MMETRICALLY, THE
MACHINE IS UNSTABLE, DANGEROUS
AND CAN OVERTURN.

OPERATION AND MAINTENANCE MANUAL
Page 10 of 22
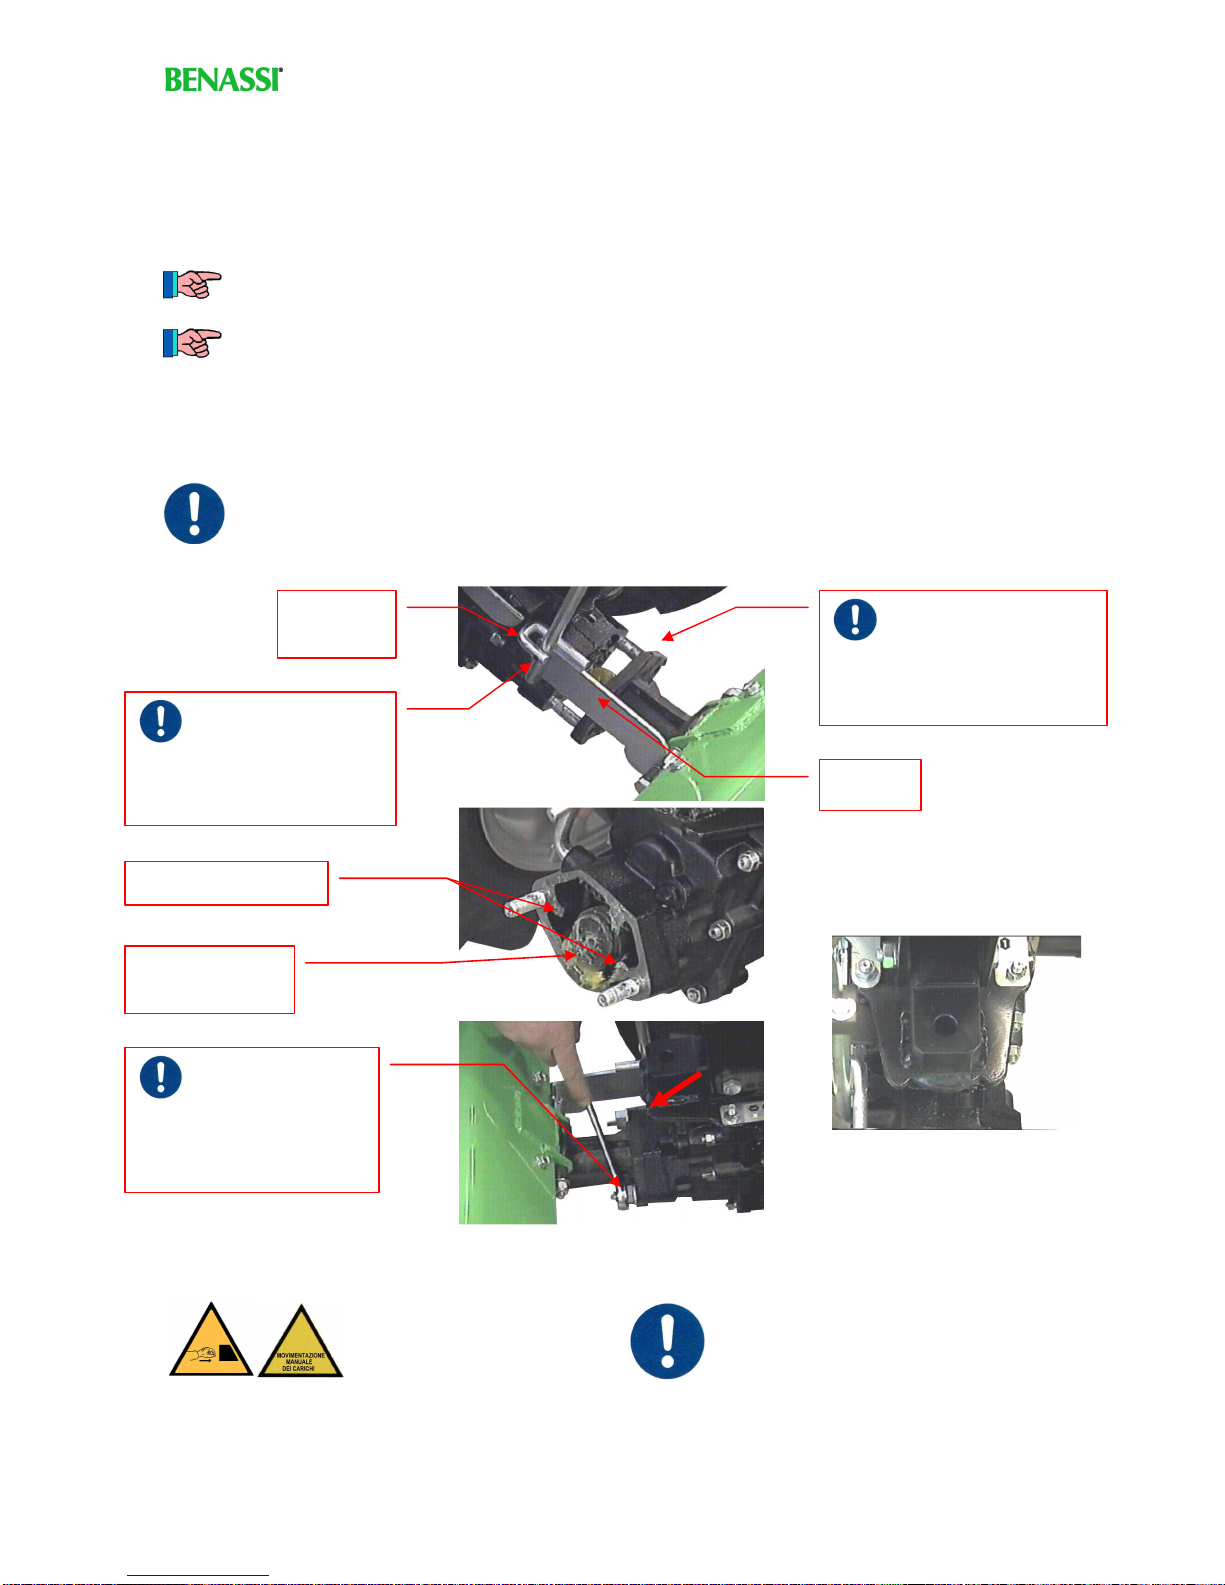
Reverse of the machine
In order to attach different implements, the machine can be reversed by turning the handle 180 degrees, as it
is described in this page.
During these operation:
Before reversing the handle, you need to take away the levers that control the speed direction and the power
takeoff.
Picture 6 - Reverse of the machine
OPERATION TO PERFORM
WHEN THE MACHINE IS
TURNED OFF
DANGER OF
BRUISING AND
CRUSHING
4 – Raise completely the
lever that locks the side
adjustment of the steering
handle
1 – Take the split pins
from the levers
5 – Unlock the lever and with the
other hand rotate the steering
handle
FOR THE REVERSE, THE
HANDLE SHOULD ONLY BE
TURNED CLOCKWISE
TO GET IT TO ITS NORMAL
POSITION, ONLY
COUNTERCLOCKWISE
2 – Pull the levers out of their
places
3 – Take the levers out of the loops
6 – take the handle to the opposite
side, above the engine
7 – lock the handle by
lowering the lever
8 – put the levers back into the
loops, then in their place and
finally lock them with the split
pins
WARNING!!
In the reversed position the levers need to be inverted, so the controls as well
are
inverted.
You should refer to the paragraph “Positions and controls of levers”.
To perform maintenance of the engine in the reversed position, you need to turn the
handle to one side, otherwise the bonnet of the engine cannot be opened.

OPERATION AND MAINTENANCE MANUAL
Page 11 of 22
Positions and controls of levers
The position of motion lever and the effect obtained by using them depend on the configuration of the
machine (normal or reversed). The pictures below show the two different situations.
Picture 7 – Positions and controls of levers
Working procedure
When working on sloped surfaces, you should drive the tractor parallel with
the slope and not uphill nor downhill. Be very careful while changing direction.
Power takeoff lever
Power takeoff can be engaged only
with forward speed.
To engage takeoff, engage clutch and then
push the lever towards the machine.
To disengage it, pull the lever towards you.
Speed direction lever
To drive forward, engage clutch and then push
lever towards the machine. To drive
backwards, pull the lever towards you.
Before driving backwards, power
takeoff ought to be disengaged.
Speed lever
To engage gears, engage clutch and move the
lever until it stops on the number of the speed
you want, which is written on the gear.
Power takeoff lever
To engage power takeoff lever, engage clutch
and then pull the lever towards you.
To disengage it, push the lever towards the
machine.
Speed direction lever
To drive forward, engage clutch and then push
lever towards the machine. To drive
backwards, pull the lever towards you.
Speed lever
To engage gears, engage clutch and move the
lever until it stops on the number of the speed
you want, which is written on the gear.
In reverse position, 4
th
speed cannot
be used.

OPERATION AND MAINTENANCE MANUAL
Page 12 of 22
Adjustements
The machine can be adjusted in some ways, which are shown as follows.
During these operations:
You can adjust the height of the handle, in order to get a comfortable position, according to the features of
the operator.
Picture 8 - Adjustment of the height of the handle
The handle can also be adjusted to the side. This allows the operator to avoid walking on the soil that has
been just tilled, or to avoid a furrow, etc.. You can perform this adjustment with the machine both in normal
configuration and in reversed configuration.
Picture 9 - Handle side adjustment
Besides, in the version with differential (mechanical system to split the torque), it is possible to lock the
differential, so you can split the torque evenly to both wheels.
Picture 10 – Locking the differential
Handle
height
adjustment
lever
To adjust in height, keep
on pressing the lever
and with your other hand
move the handle to find
the position you want.
Once you have found
the right position, loose
the adjustment lever
Lever of lock
of handle side
adjustment
To adjust the handle to the
side, raise the lever and
with your other hand move
the handle to find the
position you want, then
loose the lever.
Grip the
lever of lock
of
differential
While gripping the lever, push
the button on the side, then
loose the lever while keeping
on pushing the button
You can unlock by gripping the lever
completely.
OPERATION TO PERFORM
WHEN THE MACHINE IS
SWITCHED OFF
DANGER OF
BRUISING AND
CRUSHING
OPERATION AND MAINTENANCE MANUAL
Page 13 of 22
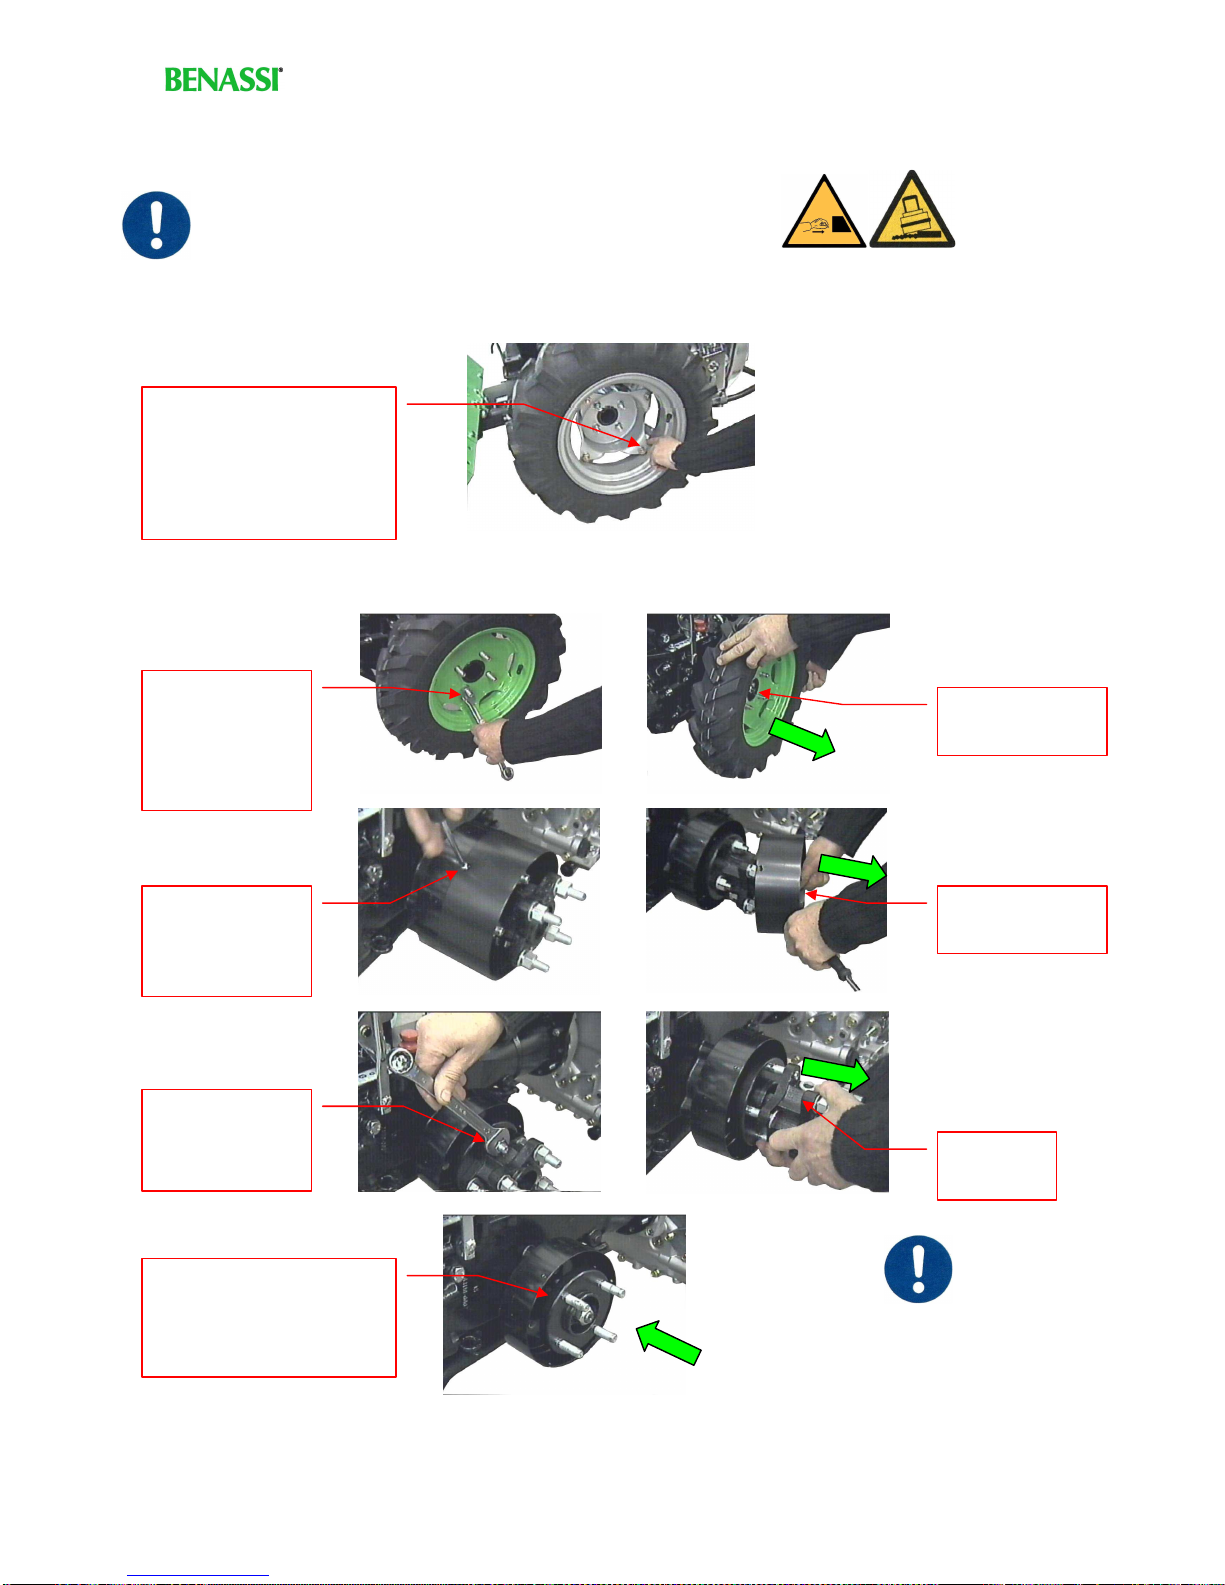
In some versions of the machine, you can adjust the track of the wheels, for example to pass more easily
through narrow places.
You can modify the track of the wheels by inverting the wheels: take off the wheels, then assemble them
again placing outside the internal face and vice versa
Besides, you can adjust the wheels in the following ways as well:
Picture 11 – Adjusting wheels with flange
Picture 12 - Taking off the wheels spacers
ONLY TRAINED AND
INFORMED STAFF SHOULD PERMORM THESE
OPERATIONS. TURN OFF THE MACHINE AND SET IT ON A FIRM
BEARING IN ORDER TO RAISE THE WHEELS FROM THE GROUND.
DANGER OF
BRUISING AND
OVERTURNING
Loosen the
screws of the
wheels with a
suitable spanner
(one wheel at a
time)
Take the wheel
out of the hub
Adjust the position of the
flange in order to place the
wheel more to the inside
or to the outside (only
versions with adjustable
rims)
Loosen the
screws on the
side with a
screwdriver
Take out the
spacer case
Loosen the
screws of the
spacer with a
suitable spanner
Take out
the spacer
Assemble the wheel
directly on the axle,
without spacer nor case
After adjusting
the machine, all the
screws should be well tightened and
the implements stable.
Make sure that the machine is
configured symmetrically and is
perfectly stable.

OPERATION AND MAINTENANCE MANUAL
Page 14 of 22
Starting the machine
To start the machine, follow these instructions:
BEFORE STARTING THE MACHINE, MAKE SURE THAT:
- VENTILATION IS ENOUGH (YOU SHOULD GO OUTSIDE);
- ALL THE CONTROL LEVERS ARE DISENGAGED; THE SPEED LEVER MUST
BE SET ON NEUTRAL POSITION (0);
-THE FUEL TANK IS FULL ENOUGH.
FINALLY, OPEN THE FUEL TAP
1 – With your left hand, press
the red lever (motor-stop)
2 – With you left hand, while
keeping on pressing the red lever,
grip the clutch lever
3 – While keeping the two
levers, with your right hand
press the button on the side
4 – Now, loose the levers while
keeping on pressing the button
5 – Open the throttle fully
6 – Standing in front of the
machine, grip the self-winding
rope
7 – Pull the rope strongly: the
engine will start
In this way the gear is
disengaged from the engine
and the machine can be
started
6’ – Turn the key: a warning light will light up.
Then turn the key again and loose it when
the engine is running.
If the machine has manual starting,
with self-winding rope (see the
engine operating and maintenance
manual):
If the machine has ignition (see the
engine operating and maintenance
manual):
You can unlock by gripping the
clutch lever completely.
DANGER OF
BRUISING AND
CRUSHING

OPERATION AND MAINTENANCE MANUAL
Page 15 of 22
Operating the machine
Once you have chosen one of the working configurations (normal or reversed) and made the adjustments
you need (always respecting what is written in the relevant section of this manual), the machine is ready for
use.
Push the machine from storage to the place where you will start it;
Start the engine, following the instructions and warnings of the relevant section;
Once the engine is running, choose the driving direction and engage the speed you prefer;
If the operation needs it, engage the power takeoff;
Pull the clutch lever until the clutch lever lock button is released, always keeping up the motor stop
lever;
Disengage the clutch;
If the motor stop lever is lowered, the machine can move; otherwise, it remains still;
Ad just the throttle control according to the power required.
General warnings while working
While operating the machine you must:
Familiarise yourself with the controls and with how the machine moves;
Start the machine in a ventilated area, better if outdoors;
Operate the machine with good light (better if with daylight);
Check the working area and clear it of debris (sticks, stones, wires, etc.).
Wear suitable clothes and shoes; a mask as well could be needed on dusty grounds;
The operator has to walk behind the machine: maintain a suitable pace (walk, do not run) and
be careful not to stumble, especially when going backwards;
Work in conditions of stability: drive the machine parallel with the slope, trying to avoid steep
slopes, manoeuvre carefully and use caution while changing direction;
Change working direction if exhaust fumes go towards the operator;
While pushing the machine: be careful of balance, keep the implements lifted from the ground
and avoid moving the machine for too long distances or when it could require an excessive
effort.
When you are operating the machine, remember the following prohibitions:
It is severely forbidden to tamper with safety devices (as the motor stop lever), since it could
jeopardize their functioning and result in personal injuries;
Never allow children and untrained people operate the machine;
Never operate the machine near children and pets;
Never put hands or feet near the cutters or other implements of the machine when the engine
is running;
Never work on steep slopes;
Never operate the machine without the protective case;
Never operate the machine if the safety devices have been removed or are broken, faulty or
not working;
Never lift or transport the machine while the engine is running;
Never store the machine indoors if the fuel tank is not empty;
Never wear scarves, ties, loose clothing, rings, bracelets and any other such item (straps,
strings, etc.) that could get caught while working.
Filling and emptying the fuel tank
Pleas follow the instruction of the manual provided by the producer of the engine to fill and empty the
fuel tank.
DANGER
INFLAMMABLE
MATERIALS
D
ANGER
GAS AND
VAPOUR
INHALATION
Never handle fuel indoors or with poor ventilation;
Never handle fuel if the machine is
running or the
engine is still hot;
Never smoke;
Avoid fuel spillage;
Never
start the engine if some fuel has incidentally
spilled: clean the dirty parts with adequate means;
When working on steep slopes, ne
ver overfill tank, in
order to prevent fuel spillage.

OPERATION AND MAINTENANCE MANUAL
Page 16 of 22
Switching the machine off
When you want to switch the machine off, follow these instructions:
Disengage the power takeoff and set the gear on neutral position.
Finally, close the fuel tap (for more details, consult the manual provided by the producer of the engine)
Picture 13 – Switching the engine off
Storage of the machine
When you want to put the machine to storage, you should remember the following instructions:
When choosing the place where to store the machine during the periods when it is not used, you
should bear in mind its size, mass and static load. Moreover, the floor should be flat.
Take the throttle
control to the
minimum of its
stroke
.
In the versions with ignition,
remember to turn the key to
the stop position, in order to
avoid that the battery goes flat.
Loose the motor-
stop lever: the
machine will switch
off.
Neve
r leave the machine with some fuel in the tank;
Let the engine cool before leaving the machine indoors;
Leave the machine far from inflammable materials and from sources of fire;
Leave the machine clean;
OPERATION AND MAINTENANCE MANUAL
Page 17 of 22
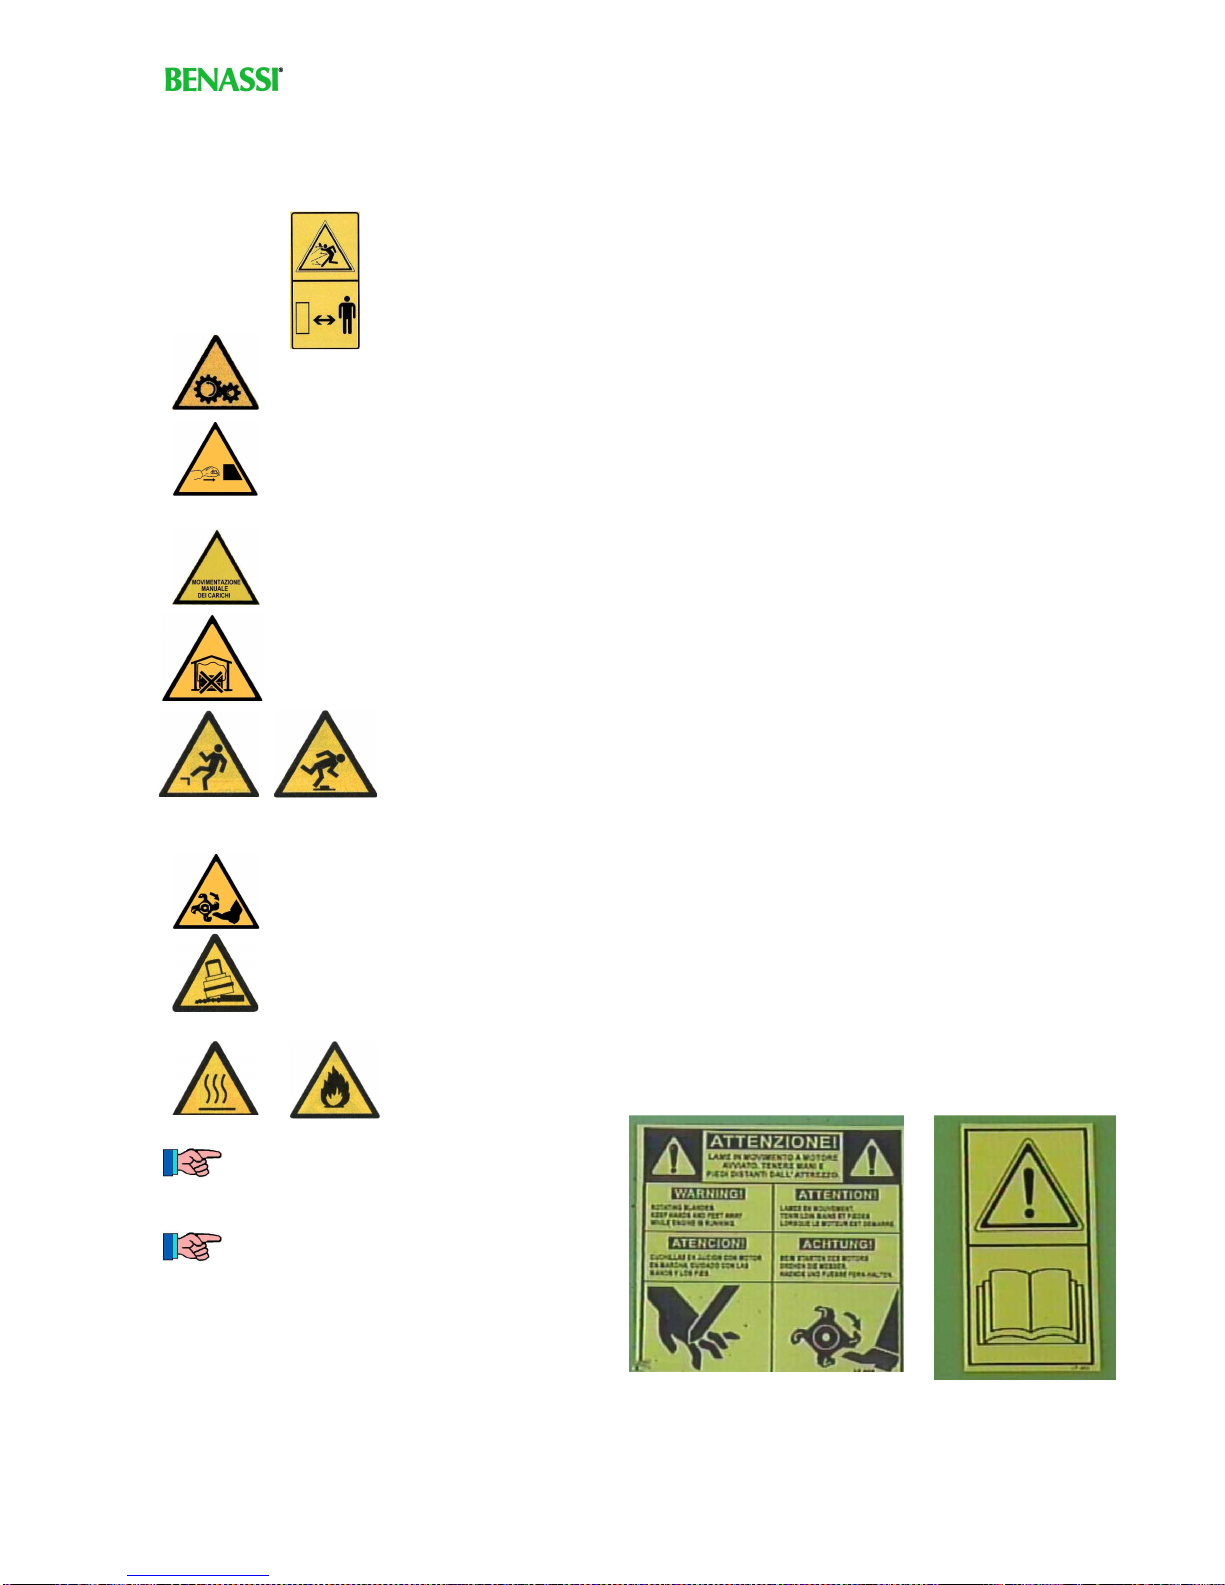
Residual Risk
The machine, even when you use caution, has some residual risks for the operator:
DANGER OF THROWING MATERIALS AGAINST PERSONS, ANIMALS,
OBJETS. RESPECT AND MAKE OTHERS RESPECT THE SAFETY DISTANCE
DANGER: MOVING IMPLEMENTS
DANGER OF BRUISING AGAINST THE IMPLEMENTS OF THE MACHINE
THE CUTTERS CAN CAUSE INJURY TO HANDS WHEN THEY ARE WORKING OR
DURING OPERATIONS OF MAINTENANCE
MANUAL LOAD HANDLING WHILE (DIS)ASSEMBLING THE IMPLEMENTSO OF THE
MACHINE
DANGER OF FUEL VAPOURS AND EXHAUST GAS; NEVER OPERATE INDOORS
DANGER TO FALL OR STUMBLE WHILE OPERATING
DANGER FOR FEET BECAUSE OF CUTTERS
DANGER OF OVERTURNING ON UNEVEN SURFACES, STEEP SLOPES OR WHILE
PERFORMING ADJUSTMENTS TO THE MACHINE
DANGER OF BURNING OR FIRE BECAUSE OF HOT SURFACES
EVERY DANGER IS STRESSED BY
SPECIFIC LABELS.
PROMPTLY REPLACE SPOILED
LABELS. IF NECESSARY, ASK THE
PRODUCING FIRM.

OPERATION AND MAINTENANCE MANUAL
Page 18 of 22
Maintenance
General guidelines
Warning: only trained and informed staff should perform the maintenance operations described in
this manual.
Warning: only the producing firm or the retailer of the machine should perform specific maintenance
operations.
While performing maintenance operations, the machine should be in a stable position.
Never neglect maintenance: the life and the efficiency of the machine also depend on how it is
maintained.
Never repair the machine temporarily; always do it properly and permanently.
During those maintenance operations in which the operator may touch chemical substances, please notice
the following warnings:
We remind to those who operate the machine that when using chemical substances you should
follow the instructions shown on the safety tables, which must be provided by the producer of the
substance. Please follow the instructions shown on the packing.
Engine
For the details related to maintenance operations of the engine, please consult the
manual provided by the firm producing the engine, handed in with the machine.
Gear: checking the oil level
The machine must be switched off and placed on a flat surface.
Every 100 working hours, check the oil level through the specific gauge.
Picture 14 – Gear oil level
If the oil is down the minimum level, you need to check for spillage, then fill up the oil, using proper tools and
methods.
Plug with
level gauge Hole for
filling up
Danger of bruising
Danger: chemical substances
and hot surfaces
Use
suitable
gloves and
clothes
Danger: hot surfaces
Operations to be performed by
trained and informed staff,
when the machine is cold and
not running
OPERATION AND MAINTENANCE MANUAL
Page 19 of 22
Gear: changing the oil
The machine must be switched off and placed on a flat surface.
After the first 50 working hours, change the gear oil. Then change it every 300 working hours.
Empty the gear by taking off the plug shown in the picture. Collect the oil in a proper container. To fill up, put
the plug in its place and tighten. Then, pour oil through the hole with proper tools and methods.
Picture 15 – Changing gear oil
Waste oil should be disposed of according to law.
TO FILL UP, USE 90 W OIL
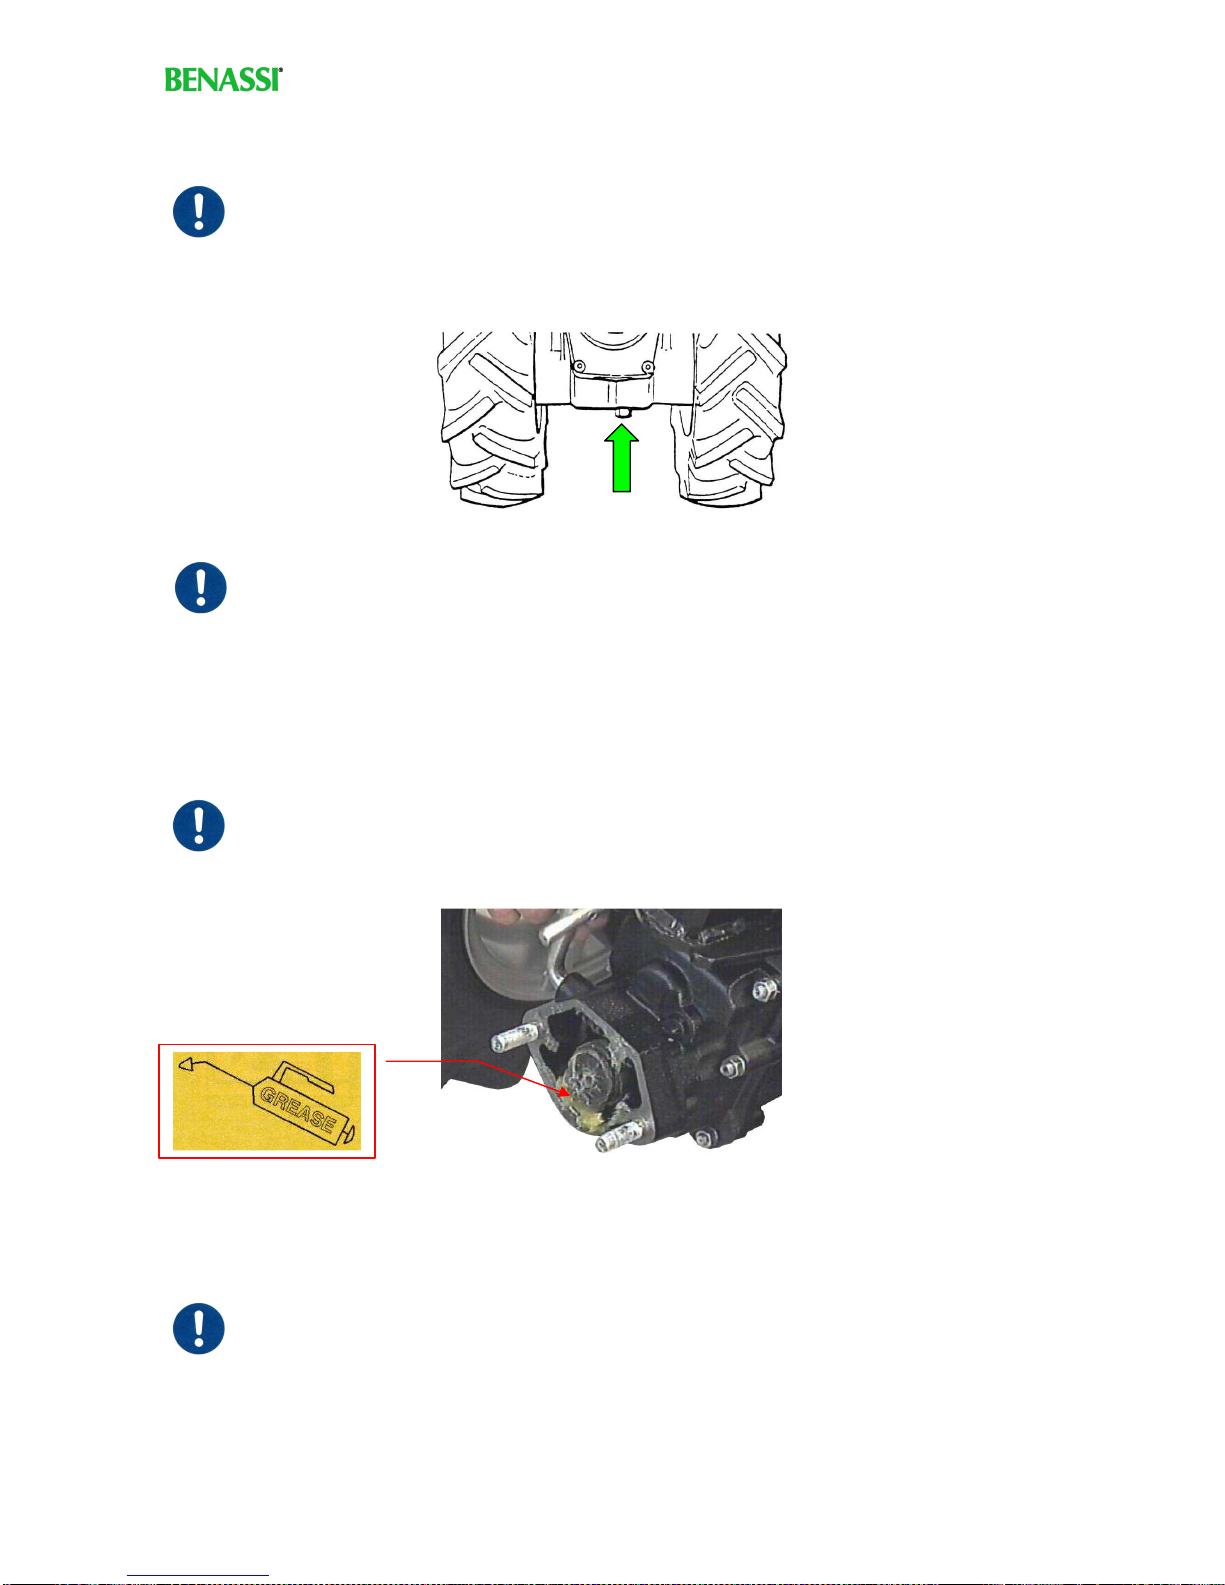
Greasing power takeoff
The machine must be switched off and placed on a flat surface.
Grease the power takeoff every 8 working hours and whenever attaching a new implement.
Picture 16 - Greasing takeoff
Periodical operations
The machine must be switched off and placed on a flat surface.
Periodically, check if screws, nuts, bolts, split pins etc. are well tightened.

OPERATION AND MAINTENANCE MANUAL
Page 20 of 22
Cleaning
General guidelines
Cleaning is ordinary maintenance. With ordinary maintenance we mean scheduled operation of basic
maintenance that do not generally require special qualifications, authorizations or tools.
To clean the machine, switch it off, let it cool and place it in a stable position.
Clean the machine:
⇒every day after every time you operate it. The life and the efficiency of the machine
also depend on how it is maintained.
⇒while operating it, if necessary.
The machine uses dangerous substances (fuel); to clean its parts, follow the instruction of the manual
provided by the firm producing the engine.
The machine does not have, as far as its functions allows it, sharp corners or rough surfaces that can cause
injuries.
WARNING
You should clean the working surfaces or other parts of the machine with proper tools, methods and
products, wearing protective garments, and respecting the environment.
To clean dust, earth, weed, etc, off the implements, wheels or other parts, use proper tools and methods (for
example a pressure washer). Remember to clean the machine only when it is not running.
If using a pressure washer, be careful not to hit delicate parts of the machine
(electrical parts, engine, etc.), or persons, animals and things nearby. Follow the
instructions of the relevant manual.
When cleaning with compressed air, only use dry compressed air.
We recommend the operator to wear a mask to protect the respiratory tract, a pair of glasses to protect the
eyes and suitable clothes.
While using compressed air, the operator should make sure that there are no people nearby.
We remind to those who operate the machine that when using chemical substances you should
follow the instructions shown on the safety tables, which must be provided by the producer of the
substance. Please follow the instructions shown on the packing.
To clean the engine, please consult the manual provided by the firm producing the
engine, handed in with the machine.
DANGER OF DAMAGING
THE MACHINE
NEVER USE JETS OF W
ATER TO
CLEAN THE ENGINE
FOLLOW THE INSTRUCTION OF
THE ENGINE MANUAL
This manual suits for next models
1
Table of contents
Other Benassi Tiller manuals

Benassi
Benassi BL 45 Manual

Benassi
Benassi BL301H User manual

Benassi
Benassi BL 10 Manual

Benassi
Benassi BL30 User guide

Benassi
Benassi BL304 Quick guide

Benassi
Benassi MC 2300 REVERSO Instructions for use

Benassi
Benassi BL 105 User guide

Benassi
Benassi BL 300 User guide

Benassi
Benassi BL 10 Series Manual

Benassi
Benassi BL 4000 User manual


