BenQ VC3202 User manual

VC3202 LCD TV
User Manual

i
ENGLISH
Contents
User Manual ................................................................... 1
1. Please read these instructions............................................ 2
2. Package contents ............................................................... 2
3. Select and check your TV installed location ....................... 3
4. Connect the antenna cable ................................................. 4
5. Connect the power cable .................................................... 4
6. Activate the remote control ................................................. 5
7. Watch the TV channels....................................................... 5
Getting to know your TV ......................................................... 7
Introduction......................................................................................... 7
Input options ....................................................................................... 7
Analog TV source input..................................................................................... 7
Composite Video (AV)/S-Video source input..................................................... 7
Component video input ..................................................................................... 7
Other Graphic input........................................................................................... 7
Front View/Control Panel.................................................................... 8
Rear View ........................................................................................... 9
Getting to know the remote control................................................... 11
Using your remote control..................................................... 13
Power on and off...............................................................................13
Power on the TV.............................................................................................. 13
Put the TV to off mode .................................................................................... 13
Switch inputs .................................................................................... 13
Adjust the audio settings ..................................................................13
Adjust the volume............................................................................................ 13
Mute Setting .................................................................................................... 13
Select TV/Video sound mode.......................................................................... 13
Change Channels ............................................................................. 14
Select channels directly................................................................................... 14
Change channels sequentially ........................................................................ 14
Return to the previous selected channel......................................................... 14
Select a picture mode....................................................................... 14
Freeze image on screen................................................................... 14
Use the sleep timer........................................................................... 14
Display information for current input source ..................................... 14
Adjusting aspect ratio ....................................................................... 15
Connect to an Audio/Video ................................................... 16
Connect to a Composite Video input ................................................ 16
Connect to a S-Video input............................................................... 17

ii
ENGLISH
Connect to a Component Video input............................................... 17
Connect to a PC-Dub input............................................................... 18
Connect to a HDMI input .................................................................. 18
Connect to a PC DVI input ...............................................................19
Connect to a DVI input (Video devices)............................................ 19
Connect to a Stereo audio Output .................................................... 20
On-Screen Display (OSD) menu........................................... 21
OSD menu structure......................................................................... 21
Navigate the OSD menu................................................................... 22
Picture menu .................................................................................... 23
Sound menu ..................................................................................... 24
System menu.................................................................................... 25
PC menu........................................................................................... 26
Channel menu .................................................................................. 27
Manual search................................................................................................. 28
JPEG menu ...................................................................................... 29
MP3 menu ........................................................................................ 30
DRIVE menu..................................................................................... 31
Reference ............................................................................. 32
Copyright .......................................................................................... 32
Disclaimer......................................................................................... 32
Battery safety notice ......................................................................... 32
Dimension......................................................................................... 33
Specifications ................................................................................... 34
Supported DVI input signal modes ................................................... 35
Supported PC input signal modes .................................................... 35
Supported HDMI input signal modes................................................ 35
Supported Component Video input signal modes ............................ 36
Troubleshooting ................................................................................ 37
TV Problems.................................................................................................... 37
Antenna problems ........................................................................................... 38
Claim for RoHS Compliance............................................................. 38

1
ENGLISH
VC3202 LCD TV
User Manual
Welcome

2
ENGLISH
1. Please read these instructions
Thank you for purchasing this BenQ LCD TV. This TV is a state-of-the-art flat LCD
TV and will provide you with years of wonderful visual experience. Please take a few
minutes to closely read these quick start instructions before installing and using the TV.
What's in the User Manual?
The User Manual, details the features and functions provided by your TV
and remote control, shows you how to connect your TV to other devices, and
provides its product specifications and troubleshooting information for your
further assistance. The part also guides you through how to customise the TV
settings best suit for you and to your viewing environment, helping you to gain
the best viewing experience from your TV.
2. Package contents
Unpack the package and check that all the following items are included:
TV (x1)
Guarantee card (x1)
Quick Start
Guide (x1)
User Manual (x1)
Guarantee
card
Quick Start
Guide
User
Manual
Remote control
(
x1
)
Power Cable (x1) AA Battery (x2)
ᑩᑻᅮ㶎ϱx3
Optional components: support frame, base fix screws and base.
The actual items come with your TV, such as the power cable, may look different from
that illustrated depending on where the TV was purchased.
If you find any item missing or damaged, contact your dealer immediately for help.
Please keep the product documentation in a safe place for future reference.
This TV should be handled with care to avoid damaging it, as well as the safty of
yourself and anyone around it. Here are some advices on how to handle the packaging:
Recycle the cardboard carton.•
Keep the plastic bags away from young children and babies.•
Keep the packaging for possible future transporting of the TV.•
Make sure there is no accessary left in the packaging materials before discard the•
packaging.
On the LCD screen, there is a very thin protective layer of glass. Such layer is so fragile
that can be easily scratched and cracked. The liquid crystal substrate is also liable to
damage under excessive force or extreme temperatures. Please handle with care.

3
ENGLISH
3. Select and check your TV installed location
To prevent potential damage and to increase the lifespan of the TV, please install and
operate the TV by following rules:
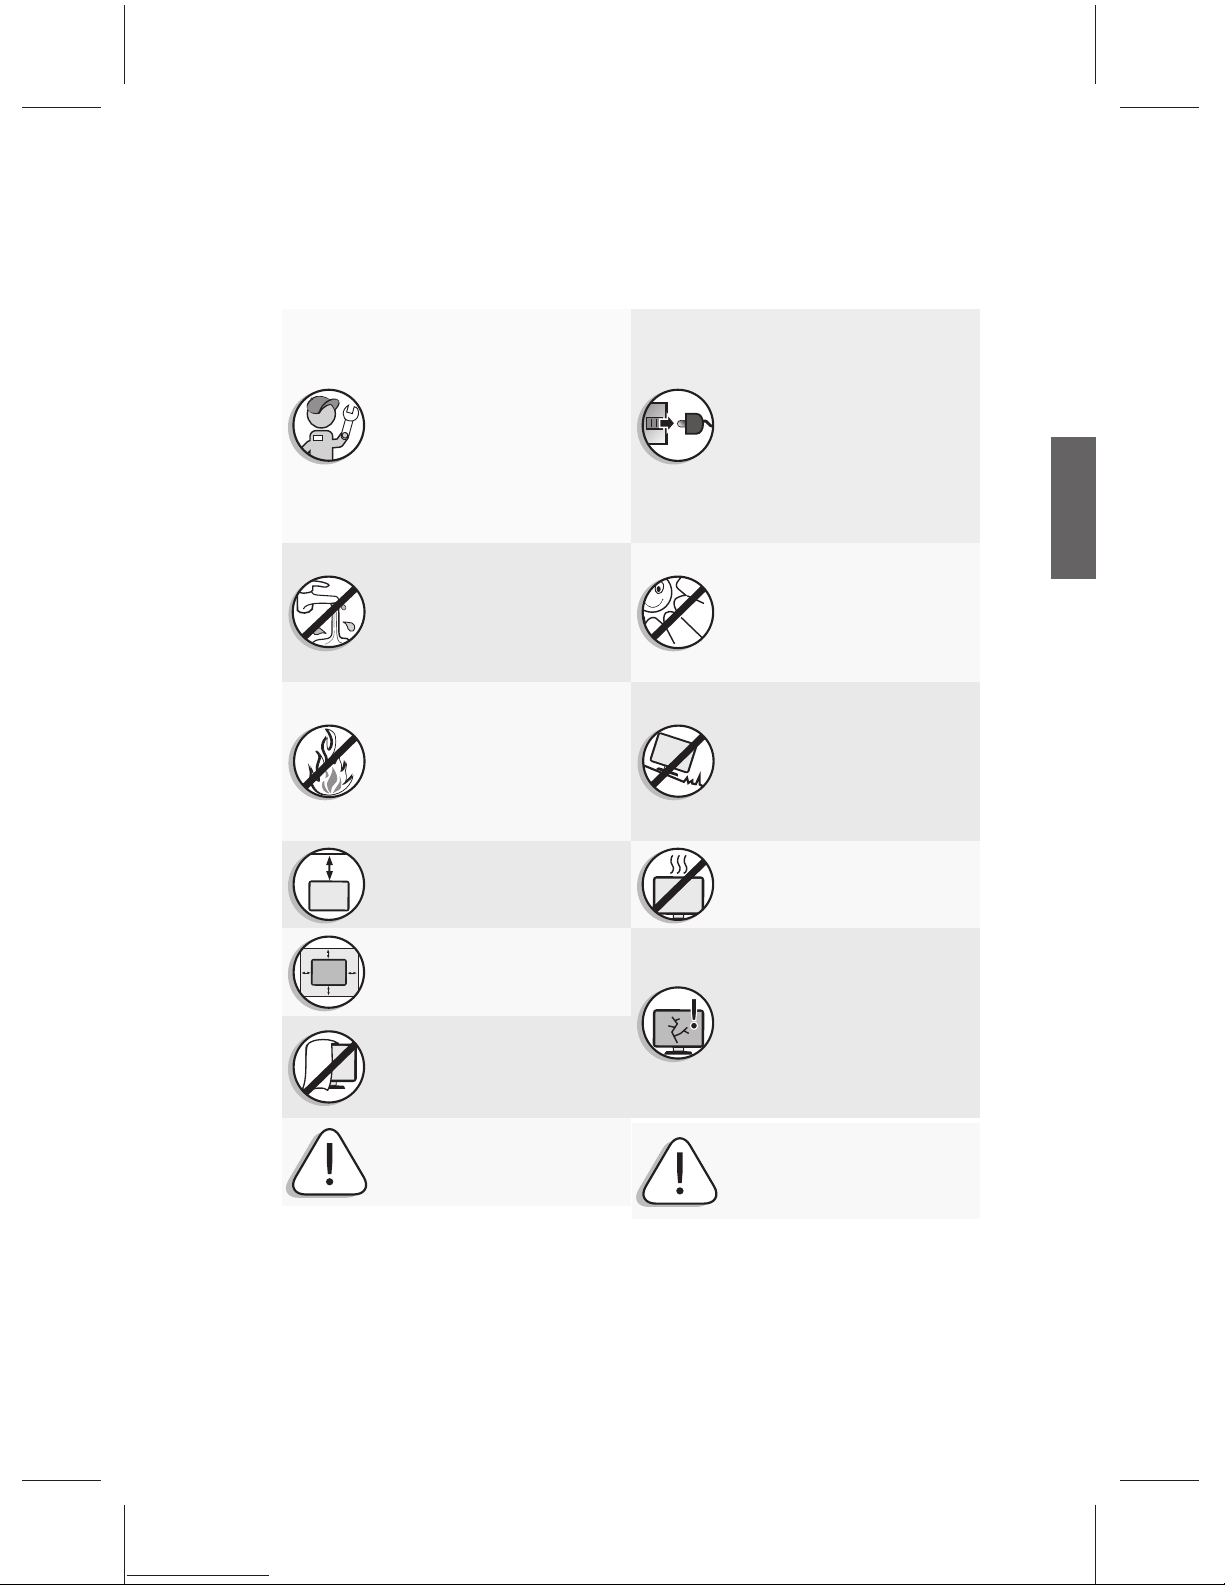
Please use the power cable that
comes with the screen. Improper
use may result in electric shock
and fire.
If wall mounting, have a qualified
and experienced technician
mount it safely. Use only a
recommended wall bracket
(optional accessory) for this TV
and ensure that the bracket is
securely screw fixed to the wall
structure, and not just the wall
render, lining or cladding. Do not
just glue the bracket to the wall.
Ensure the bracket is level
horizontally.
This TV has no power switch.
When installing the TV,
incorporate a readily accessible
disconnect device in the fixed
wiring, or connect the power cord
to socket-outlet which must be
provided near the TV and easily
accessible. If a fault should occur
during operation of the unit,
operate the disconnect device to
switch the power supply off, or
disconnect the power cord.
Do NOT place the TV near water,
like a spa or pool, or in a position
which will allow the splashing or
spraying of water onto the
display, like in front of an open
window where rain water may
enter.
Do NOT place the TV in direct
sun or where direct sun or spot
lighting will shine onto the TV, as
the heat may damage the TV and
the bright light will make viewing
the TV more difficult than
necessary.
Do NOT place the TV near or
above sources of heat, such as
radiators, heaters, fuel stoves and
other heat-generating items
(including audio amplifiers).
Otherwise heat may cause
damages to the outer casing as
well as the components inside.
Do NOT place the TV on an
uneven, sloping or unstable
surface (such as a trolley) where it
may fall and cause damage to
itself or others. Have a qualified
technician secure the TV where it
is placed in case there is an
earthquake.
If wall mounting, allow
appropriate space on top for
attaching the TV to the wall
bracket.
Do NOT place the TV in an
enclosed place without allowing
for ventilation.
If recessed into a wall opening,
you must leave appropriate free
space both top and bottom for
mounting and removing the TV.
All Liquid Crystal Display (LCD)
screens have a very thin protective
layer of glass which is liable to
marking or scratching, and
cracking if struck or pressured.
The liquid crystal substrate is also
liable to damage under excessive
force or extreme temperatures.
Please handle with care.
Do NOT cover or block the vents
and openings while the TV is
switched on, as the heat may
accumulate inside the TV and
result in danger.
Observe all warnings and
cautions as labelled on the TV.

4
ENGLISH
4. Connect the antenna cable
Connect the TV antenna cable from your TV antenna system or Cable TV (CATV) to the
TV IN on the back of your TV. Check and make sure that the cable connections are
firmly in place.
Poor signal receiption by the antenna will result in poor picture and/or sound quality on•
your TV. To get the best quality picture and sound, an outdoor TV antenna system that
is properly aligned will be required. Please consult with an antenna specialist for the
requirement.
This TV has a built-in analog TV tuner, which allows the connection from a traditional•
analog TV antenna system. To receive digital TV programs, you will need to connect your
TV to an external digital TV tuner (decoder), or a digital set top box (STB).
5. Connect the power cable
1. Take out the power cable from the packaging, plug one end of the cable into the AC
POWER IN on the back of the TV (as shown below).
2. Connect the other end into an appropriate wall power outlet, and switch on the outlet (if
required). This will put the TV into off mode with the power indicator at button right of
the screen lights in orange.
The power cable and the outlet shown above may appear different to yours depending on•
your region.
Only use a power cable designed for your region. Never use a power cable damaged or•
frayed. Never change the plug head of your power cable. Be aware of overload when
using extension cords or multiple outlet power boards.
There are no user serviceable parts in this TV. Never unscrew or remove any covers from•
it.
The supplied power cord is suitable for use with 100-240V AC power only.•
The type of power cord plug and jack illustrated may differ from the type used in your•
region.
Only use an appropriate power cord for your region. Never use a power cord which•
appears damaged or frayed, or change the plug type on the power cord.
Be aware of the total loading when using extension cords or multiple outlet power boards.•
This TV has no power switch. When installing the TV, incorporate a readily accessible•
disconnect device in the fixed wiring, or connect the power cord to socket-outlet which
must be provided near the TV and easily accessible. If a fault should occur during
operation of the unit, operate the disconnect device to switch the power supply off, or
disconnect the power cord.
Warning: This TV has been engineered and manufactured with the highest priority on safety,•
however, improper handling or use can result in potential electrical shock or fire hazard.
This TV has been engineered and manufactured with the highest priority on safety, however,•
IMPROPER HANDLING OR USE CAN RESULT IN POTENTIAL ELECTRICAL SHOCK OR
FIRE HAZARD. Please handle this TV with care. If damaged, turn off the power and unplug
the power cord from the TV. Transport the TV to your nearest BenQ authorized service
centre for repair.
There are no user serviceable parts in this TV. Never unscrew or remove any covers. There•
are dangerous voltages inside. Turn off the power and unplug the power cord before moving
the TV.

5
ENGLISH
6. Activate the remote control
Test your remote control
Press the power button (as shown in Fig left ). This shall turn
on the TV with the power indicator lights up in green. If succeed,
proceed to "7. Watch the TV channels" in Page 5.
If fail, first check the power is available or not (The power
indicator should lights in orange).Second try to turn on the
TV by pressing the power button on the TV. If the TV turns
on, the problem should be on the remote control. In this case,
please check the batteries and replace them with new ones if
necessary.
Press the power button on the TV or remote control once
again. This shall turn off and put the TV back to off mode with
the power indicator turn into orange.
7. Watch the TV channels
After tunning and saving the TV channels, you can watch the TV channels by following:
Press the 频道• or 频道 button (as highlighted in Fig. left ) on the remote control,
or the CH - (Channel) or CH + (Channel) button on the TV to select the channel you
want to watch.
Also can enter the channel number to select the channel directly. In this case you will•
use the ten-keys on your remote control to enter the number. For example, just press
8 to select channel 8.
If want to enter a double-digit channel number, first press the Channel Entry button-/--,•
then press the corresponding ten-keys buttons, For example, to select channel 28,
press the Channel Entry button-/-- and then 2, 8.
The remote controll also provide you a shortcut to return to the previous channel. Just•
press the 返回 button (as highlighted in Fig. left ), and the channel will be switched to
the previous one.
Press the 音量+ or 音量- button on the remote control, or the VOL - or VOL + button•
on the TV to adjust the volume. In this case, a volume indicator will be shown on the
screen.
For more informaion about this TV and its setup, please refer to this User manual.
This LCD TV has been designed to provide high resolution display.To obtain the best display
quality, connecting to a digital signal source is recommended. In this case, you shall set the
output resoultion of the source to match your TV resolution, and select a proper aspect ratio,
such as "4:3" or "Panorama" when you are watching traditional (analog) programs. For
more detaild information regarding the aspect ratio and how to set it, please refer to the
second part of this manual.

6
ENGLISH
Care and cleaning information
Always turn off and disconnect the TV from the mains power before cleaning.•
Do NOT use cream, liquid, aerosol or spray cleaners. Use only a slightly damp well•
wrung-out (drip-free) and lint-free, clean soft cloth and lightly wipe the TV.
If necessary, use a pH-neutral liquid dish-washing detergent diluted with water on a•
separate clean lint-free cloth to remove oil or grease marks. Wipe over again with a
clean dry lint-free cloth to remove any smear marks.
Under close examination and in certain circumstances, you may notice that a few•
non-active pixels appear on the screen as a fixed point of color. Please note that this
does not affect the performance of your product as it is usually not visible at normal
viewing distances.
If the TV is not going to be used for an extended period of time (like when you are•
going away for holidays), it should be switched off and unplugged from the wall outlet.
You should also consider removing the batteries from the remote control (as they may
leak).
LCD (Liquid Crystal Display) screens, like plasma (PDP) and conventional CRT•
(Cathode Ray Tube) screens, are also susceptible to 'screen burn-in' or 'image
retention' which can be found on the screen as visible fixed lines and shades and
can't be removed. To avoid such permanent damage to the screen, please take the
following preventive measures when using your TV:
(1) Avoid displaying still images (like On-Screen Display menus, TV station logos,
fixed/inactive text or icons) for more than two hours.
(2) Change the aspect ratio from time to time. Fill the entire screen with the image
and eliminate the black bars whenever possible. Avoid displaying images in
4:3 aspect ratio over a long period of time, otherwise there may be visible burn
marks on the screen as two vertical lines.
(3) Turn on the ECO Mode function when displaying PC input image (see "ECO
Mode" on page 25).
(4) This TV is designed for home use only. Do not use it as a commercial display in
public areas.
Please note that the product warranty does not cover any screen damages that result
from the failure to take the measures above.

7
ENGLISH
Getting to know your TV
Introduction
The User Manual, we will describe how to customise the TV settings so that you can gain the
best viewing experience possible according to your preferences and viewing environment.
we also detail here the features and functions of the TV and the remote control, show you
how to connect to other devices, and provide the product specifications and troubleshooting
information.
This LCD TV is a state-of-the-art flat wide-screen digital display device. It has a built-in analog
TV tuner that can display the standard resolution analog television (TV or ATV), the cable
television (CATV), and the radio frequency (RF) modulated video by connected these to its
coaxial TV tuner input socket.
The high quality wide-screen display can be obtained by connecting to high definition digital
video sources, such as High Definition TV (HDTV) and High Definition DVD (HDVD), but
traditional analog video sources.
Input options
This TV can be connected to many kinds of TV, Video and Graphic sources, and allows you to
switch to any available source at any time. You can press the signal 信号源 button on the remote
control to switch and choose the signal inputs in a circular way, or press the INPUT button on the
TV to display the signal input interface, and then use the CH-/CH+ and INPUT buttons to switch
and select the signal input.
There are many ports on the TV for analog TV, Video, and Graphic inputs:
Analog TV source input: Coaxial analog TV(PAL)input x 1.•
Video source input: S-Video input x 1, Composite Video(AV) input x 1.•
Graphic source input: Component Video (YPbPr) input x 1, HDMI x 2 and D-Sub input x 1.•
You can just connect your necessary TV, Video, and Graphic sources to your TV, and no need to
connect all available sources.
Analog TV source input
You can connect an external VHF or UHF TV antenna, if available, to the TV antenna input using
an appropriate TV coaxial cable. Instead, If you have and prefere cable TV, you can connect your
cable TV decoder box to the TV antenna input using an appropriate TV coaxial cable. In both
cases, just select the "TV" as your input source to watch analog TV programs. For more details,
see "4. Connect the antenna cable" on page 4, and "Switch inputs" on page 13.
Composite Video (AV)/S-Video source input
You can connect external analog video devices (such as VCR, VCD or DVD player) to the
Composite Video (AV) or S-Video input on the TV, and select Video 1, Video 2, or S-Video as
the signal input to watch the analog video. For more details, see "Connect to a Composite Video
input" on page 16, "Connect to a S-Video input" on page 17, and "Switch inputs" on page 13. You
should connect your video devices to the composite video input to gain the best resolution image
if such device support such connection.
Component video input
You can connect the component video device such as the Digital TV (DTV) tuner to the
Composite Video input on the TV and select "Component" input to watch the program provided.
For more details, see "Connect to a Component Video input" on page 17 and "Switch inputs" on
page 13.
Other Graphic input
You can connect a PC video card graphic source, such as a RGB (D-Sub) video output, to your
TV. If the external device connected supports HDMI output, you can also connect it to the HDMI
input on the TV, and then select "PC" or "HDMI 1, HDMI 2" input to watch the video. For more
details, see"Connect to a PC D-sub input" on page 18, or "Connect to a PC DVI input" on page
18 . "Connect to a HDMI input" on page 18, and "Switch inputs" on page 13.

8
ENGLISH
Front View/Control Panel
CH
1
2
3
4
5
6
7
8
No. Name Fuction
1Power indicator/
Remote control
receiver
• The power indicator will light in green when the TV is
turned on and light in orange when in the off mode.
• Receive the remote control signal.
2VOL+
Volume Up Button
Increase the volume of the speaker, or adjust the value of an
item highlighted in OSD menu.
3VOL- Volume Down
Button
Decrease the volume of the speaker, or adjust the value of an
item highlighted in OSD menu.
4CH+ Previous
Channel Button
Increase the channel number by one when the source is
TV input, or select a control item in the OSD menu. Search
available signal inputs circularly.
5CH- Next Channel
Button
Decrease the channel number by one when the source is
TV input, or select a control item in the OSD menu. Search
available signal inputs circularly.
6MENU Button Open or close the OSD menu.
7INPUT Button Press to select an input source.
8POWER Button Power on or put the TV into off mode.

9
ENGLISH
Rear View
HDMI 2
MEDIA
USB
RF IN AV IN 2
AUDIO
R IN2 L
HDMI 1PC IN
AUDIO
OUT
S/AV
IN 1
COMPO-
NENT IN
AUDIOINRL
VIDEOIN
Pr Pb Y
S-VIDEOIN
AUDIOINRL
HDMI(DVI) IN
RGBPC IN
PC
AUDIOIN
(DVI)
AUDIOINRL
AUDIOOUTRL
HDMI 1PC IN
AUDIO
OUT
S/AV
IN 1
COMPO-
NENT IN
AUDIO INRL
VIDEO IN
Pr Pb Y
S-VIDEO IN
AUDIO INRL
HDMI (DVI) IN
RGB PC IN
PC
AUDIO IN
(DVI)
AUDIO INRL
AUDIO OUTRL
12
13
14
15
5
7
9
10
16
2
1
3
4
6
8
11
No. Name Fuction
1AC POWER IN Connect to a AC power source.See "5. Connect the power
cable" on page 4.
2HDMI 1 (DVI) IN 1 Connect to the HDMI digital audio/video output or DVI
digital video output on digital video devices.See "Connect
to a HDMI input" on page 18 or "Connect to a DVI input"
(PC/ VIDEO) on page 19.
3AUDIO IN DVI L/R Connect to the audio output of DVI. See "Connect to a
PC Input" on page 18 and "Connect to a DVI input" (PC/
VIDEO) on page 19.
4PC AUDIO IN Connect to the audio output of PC. See "Connect to a PC
Input" on page 18.
5RGB PC IN Connect to the RGB video (D-sub) output of PCs. See
"Connect to a PC Input" on page 18.
6YPbPr AUDIO IN L/R Connect to the left /right audio channel output (for
component video output) of video devices . See "Connect
to a component video input" on page 17.

10
ENGLISH
No. Name Fuction
7YPbPr Connect to Component video (YPbPr) output of the video
device See "Connect to a component video input" on page
17.
8AV/SV AUDIO IN 1 L/
R
Connect to the left /right audio channel output (for
compositive video or S-video output) of video devices.
See "Connect to a composite video input" on page 16 and
"Connect to a S-Video input" on page 17.
9S-VIDEO IN Connect to the S-Video output of video devices.
See"Connect to a S-Video input" on page 17.
10 AV 1 Connect to the Compositive video (AV) output of video
devices. See "Connect to a composite video input" on page
16.
11 AUDIO OUT L/R Connect to the audio input of audio devices. See"Connect
to a stereo audio output"on page 20.
12 HDMI IN 2 Connect to the HDMI digital audio/video output or DVI
digital video output on digital video devices.See "Connect
to a HDMI input" on page 18 or "Connect to a DVI input"
(PC/ VIDEO) on page 19.
13 Media USB Support only MP3 and JPEG. Formats.
14 AV 2 Connect to the Compositive video (AV) output of video
devices. See "Connect to a composite video input" on page
16.
15 AV/AUDIO IN 2 L/R Connect to the audio output of the Left/Right Channel that
corresponds to the Composite Video output of the external
video device. See "Connect to a composite video input" on
page 16.
16 RF IN Connect to the outdoor TV antenna or the CATV signal
cable. See"Connect the antenna cable" on page 3.

11
ENGLISH
Getting to know the remote control
1. 电源
Press to power the TV on or put it to off
mode. See "Power off on and off" on page
13.
2. Channel selection
Press these buttons to select the channel
you want to watch. See "Select channels
directly" on page 14.
3. -/-- Channel Number
Press this first to key in 2-digit channel
number. See "Select channels directly" on
page 14.
4. 菜单
Press once to display the OSD menu.
5. / /</> and 确认
When the OSD (On-Screen Display) menu
is open:
‧Press / to select settings.
‧Press</> to adjust the value of a selected
option. Press 确认 button to confirm your
selection. See "Navigate the OSD menu"
on page 22.
6. 退出
Press this button to go back to the previous
menu or leave the menu.
7. 频道 /
Press these buttons to sequentially
change channels.See "Change channels
sequentially" on page 14.
8. 声音模式
Press to toggle among available TV sound
modes ( may vary from your TV sound
system). See "Select TV/Video sound
mode"on page 13.
9. 图像模式
Press to select a preset picture mode. See
"Select a picture mode" on page 14.
10. SRS
Not available.
11. 睡眠
Press to set the automatic shut-down timer.
See "Use the sleep timer" on page 14.
12. Play USB audio/video files
Press these buttons to play USB audio/
video files: 上一首, 停止, 播放/暂停, 下一首.
(Support only MP3 and JPEG. formats)
1
2
3
4
6
5
7
8
9
10
11
12

12
ENGLISH
13. 静音
Press once to mute the sound output.
Press again to restore the sound output.
See "Mute setting" on page 13.
14. 返回
Press this button to toggle between the
current channel and the previous one. See
"Return to the previous selected channel"
on page 14.
15. 信号源
Press to select an input source.
16. 显示
Press to display the information about
current input. See "Display information for
current input source " on page 14.
17. 音量 +/-
Press these buttons to raise or lower the
volume level. See "Adjust the volume" on
page 13.
18. 缩放
Press to adjust the aspect ratio of your
screen image. See "Adjust the aspect ratio"
on page 15.
19. 静止
Press once to stop the screen at the
current image, and press again to resume
the screen playing. See "Freeze image on
screen" on page 14.
20. HDMI
Press this button to use the HDMI mode.
21. 丽音
Not available.
13
14
15
16
17
18
19
21
20

13
ENGLISH
Using your remote control
Power on and off
Make sure that the TV power cable has been plugged into a wall power outlet, and the
outlet has been switched on (if there is a switch).
Power on the TV
When TV is plugged into a outlet, the power indicator will light up orange, which
indicates the TV is in off mode. Press 电源 once on the remote control, and the TV
will turn on with the power indicator light turning into blue.
Put the TV to off mode
Press 电源 again on the remote control, and the TV will enter into the off mode with
the power indicator light turning into orange.
Switch inputs
1. Turn on all connected equipments or devices before selecting an input.
2. Press the 信号源 button on the remote control to display signal input interface (as
shown below).
9,'(2
9,'(2
69,'(2
<3E3U
+'0,
+'0,
86%
3&
79
3. Continue to press the 信号源 button to circulate the signal input, or press the / and
确认 buttons to select the signal source.
Adjust the audio settings
Adjust the volume
Press VOL + on the TV, or 音量+ on the remote control to raise the volume. An•
volume bar will be shown on your screen and increased in its length as you raise the
volume.
Press VOL - on the TV, or 音量- on the remote control to lower the volume. An•
volume bar will be shown on your screen and decreased in its length as you lower the
volume.
Mute Setting
Press 静音 once on the remote control to turn off the audio temporarily. Press 静音
again, or press 音量+/音量- to restore the audio output.
Select TV/Video sound mode
When watching TV, you can press the Sound Mode button on the remote control to•
switch to "Standard", "User", "Movie" or "Music" modes.
The available options will be depend on what your local TV system or your Video input
provides.

14
ENGLISH
Change Channels
Select channels directly
To select a single-digit program number, press the corresponding channel selection•
button. For example, to select program 8, press 8.
To select a double-digit program number, press -/-- first, make sure there is a "_ _"•
shown, and then enter the channel number using the channel selection buttons. For
example, to select 2, 8.
Change channels sequentially
Press / on the remote control, or CH + or CH - on the TV to sequentially navigate
through all available channels.
Return to the previous selected channel
button on the remote control allows you to quickly switch between the current selected
channel and the previous one.
Select a picture mode
Press the 图像模式 button on your remote control allows you to select a picture mode
from following options according to your need:
Mode Description
Dynamic Suitable for brighter environments. The contrast of the TV display will
be adjusted to higher level for better view.
Standard Suitable for environments with normal lighting condition.
User Personal Your own customised picture mode.
Cinema Suitable for darker environments. The contrast of the TV display will
be adjusted to lower level for better view.
Freeze image on screen
Press the 静止 button on the remote control to freeze the image on the screen. And
press it again to undo.
This function allows you to stop the screen at the current image. However the current•
video will keep running at the background, and the screen will resume playing from the
video signal received at the moment you cancel the funtion, not from the freezed image.
In order to avoid possible "image retention" or "screen burn-in" on the LCD screen, it is•
recommended that you change the aspect ratio from time to time, and not to display a still
image for more than two hours.
Use the sleep timer
1. Press the 睡眠 button to turn on the automatic shut-down timer.
2. Press the button again to set the time. The time can be 15 to 120 minutes.
When it comes to the preset time, the TV will enter the off mode automatically if you
want the TV to enter the off mode automatically at the preset time.
Display information for current input source
Press 显示 button on the remote control to display the information for the current input.
The information displayed will vary with the type of current selected input.

15
ENGLISH
Adjusting aspect ratio
The TV can resize and reshape an image to suit your requirements. The visual result
depends upon the setting your have chosen, and the original aspect ratio of the input
image. Press "缩放" button on the remote control to cycle through the aspect ratios.
The table below shows the resultant images in relation to the input image when different
aspects are selected:
Aspect
ratio Description and usage
Aspect ratio of input video
image
4:3 16:9
4:3
Resizes the image to 4:3 aspect
proportions. Recommended for use
when viewing video sources which
are already in 4:3 aspect such as
analog TV and PC video input.
(Not
recommended)
16:9
Stretches a 4:3 image to 16:9 aspect
proportions. Recommended for use
when viewing video sources which
are already in 16:9 aspect such as
digital TV and most widescreen
DVDs.
Zoom
Resizes a 4:3 image to 16:9 aspect
proportions, and trims off the top
and bottom strips. Recommended
for use when viewing 4:3 aspect
video presenting compressed 16:9
aspect images in a 4:3 aspect frame
in a so-called letterbox format (black
strips along the top and bottom).
(Not
recommended)
Panorama
Stretches a 4:3 image to the width of
a 16:9 aspect image proportions.
recommended for use in filling the
screen with a 4:3 aspect image.
(Not
recommended)
You can choose an aspect ratio independently for each input source.•
Available aspect ratio options are dependent on the type of input signal being selected.•
When viewing PC input (via D-Sub or DVI), only "16:9" and "4:3" are available for
selection.
If the input video signal is in letter box format, select "Zoom" to obtain a wider viewable•
area.
In order to avoid possible "image retention" or "screen burn-in" on the LCD screen of your•
TV, it is recommended that you change the aspect ratio from time to time, and prevent the
TV from displaying a static image for a prolonged period of time.

16
ENGLISH
Connect to an Audio/Video
Here are some tips before starting:
Before connecting any devices, please turn off all equipments, including your TV.•
Make sure the type and position of each output, and then decide the best way to•
connect them to your TV. Any mistake in connecting them will deteriorate the image
quality.
Make sure all plugging heads and connectors are firmly fixed.•
Connect to a Composite Video input
Connect the composite video output jacks on your device to the AV, AV/SV AUDIO IN L/
R input jacks using a composite video cable (not provided). The cable comes with three
plugs, which are yellow, for video, white, for left audio channel, and red, for right audio
channel. Make sure you insert each plug into its corresponding jack by its color.
If you want to watch the Composite Video input, press the 信号源 button on the remote
control and then press / button, or repeatedly press the 信号源 button to select Video
1 or Video 2 as the input, and then press 确认 button on the remote control to confirm.
HDMI 2
MEDIA
USB
RF IN AV IN 2
AUDIO
R IN2 L
HDMI 1PC IN
AUDIO
OUT
S/AV
IN 1
COMPO-
NENT IN
AUDIO INRL
VIDEO IN
Pr Pb Y
S-VIDEO IN
AUDIO INRL
HDMI (DVI) IN
RGB PC IN
PC
AUDIO IN
(DVI)
AUDIO INRL
AUDIO OUTRL
Composite video cable
VCD
RF IN
V
AV/SV
AUDIO
IN
L
R
AV/SV
AUDIO
IN
L
R
AV
AV
Composite video source is considered the most common signal input source in the market,
and provides the lowest image quality among other sources, such as S-video and component
video .There are still many devices only provide composite video output, such as VCD
players, analog video recorders and game players.

17
ENGLISH
Connect to a S-Video input
1. Connect the S-Video output jack on your output equipment to the S-VIDEO jack on
your TV using an S-Video cable (not provided). Pay attention to the pins in the plugs
when inserting so to keep the pins from bending.
2. Connect the S-Video audio output jack of the output equipment to the AV/SV AUDIO
IN L/R input jacks using a suitable audio cable (or a composite video cable. In this
case, The yellow plug will not be used).
If you want to watch the S-Video input, press the 信号源 button on the remote control
and then press / button, or repeatedly press the 信号源 button to select S-Video as
the input, and then press 确认 button on the remote control to confirm.
HDMI 1PC IN
AUDIO
OUT
S/AV
IN 1
COMPO-
NENT IN
AUDIO INRL
VIDEO IN
Pr Pb Y
S-VIDEO IN
AUDIO INRL
HDMI (DVI) IN
RGB PC IN
PC
AUDIO IN
(DVI)
AUDIO INRL
AUDIO OUTRL
AUDIO
OU
T
S/AV
IN 1
C
O
N
V
IDEO IN
Audio cable
S-Video cable
S-VIDEO
AV/SV
AUDIO
IN
L
R
DVD player
There is no need to connect to both the composite video and S-Video jacks on one
same video device, just connect one of them. For better image quality, S-Video jacks is
recommended.
Connect to a Component Video input
1. Connect the component video output jacks on your output equipment to the Y, Pb
and Pr jacks on your TV using a component video cable (not provided). Ensure that
the colors of the plugs and jacks match.
2. Connect the audio output jack on the output equipment to the YPbPr AUDIO IN L/
R input jacks using a suitable audio cable (or a composite video cable. In this case.
The yellow plug will not be used).
If you want to watch the Component Video input, press the 信号源 button on the remote
control and then press / button, or repeatedly press the 信号源 button to select
YPbPr as the input, and then press 确认 button on the remote control to confirm.
HDMI 1PC IN
AUDIO
OUT
S/AV
IN 1
COMPO-
NENT IN
AUDIO INRL
Pr Pb Y
AUDIO INRL
HDMI (DVI) IN
RGB PC IN
PC
AUDIO IN
(DVI)
AUDIO INRL
AUDIO OUTRL
Audio cable
DVD player
Component video cable
YPbPr
AUDIO
IN
L
R
Pb
Pr Y
AUDIO
O
U
T
S/AV
I
N
1
COM
NEN
DVD
p
l
A Component video source provides the best image quality among other analog sources.
Please make sure you connect the jacks by colors correctly. Any mistake in connecting them
will deteriorate the image quality.
Table of contents
Other BenQ LCD TV manuals