BenQ VM2221 User manual

VM2221
Color LCD TV
Quick Start Guide/
User Manual

English
Table of Contents i
Table of Contents
Section1:QuickStartGuide................................ 1
1. Please read these instructions .............................. 2
What's in the Quick Start Guide? ............................................ 2
What's in the User Manual?..................................................... 2
2. Package contents................................................. 2
3. Select and prepare the installation location ......... 3
4. Installing the Base ............................................... 4
5. Adjust the viewing angle .................................... 5
6. Connect the antenna cable .................................. 5
7. Connect the power cable ..................................... 6
8. Activate the remote control ................................ 7
Installing batteries.................................................................... 7
Battery safety notice................................................................ 7
Using the remote control ........................................................ 8
9. Initialize your TV ................................................. 9
10.View the TV programs ....................................... 9
Care and cleaning information ................................. 10
What's next?............................................................ 10
Section2:UserGuide.............................................. 11
Getting to know your display .................................. 12
Front view .............................................................................. 12
Control panel( Right Side/Left Side) ......................................... 12
Rear view ............................................................................... 14
Getting to know the remote control ........................ 16
Using the remote control ......................................................... 18
Adjusting sound settinge ......................................................... 18
Changing channels ................................................................. 19
Adjusting aspect ratio ............................................................. 20
Using the Teletext function....................................................... 21
Connecting video and audio signals ......................... 22
Input options .......................................................................... 22
Connecting the Composite Video input ................................... 22
Connecting the SCART input .................................................. 23
Connecting the Component Video input ................................. 23
Connecting the S-Video input ................................................. 24
Connecting the PC input ......................................................... 24
Connecting the DVI input......................................................... 25

English
ii Table of Contents
Connecting the HDMI input .................................................... 25
Connecting the stereo audio output ........................................ 26
Connecting the headset audio output ..................................... 26
OSD (On-Screen Display) menu............................... 27
OSD structure.......................................................... 27
Navigating the OSD menu ....................................... 28
Operations in the OSD menu ........................................................ 28
SOUND menu ......................................................... 29
PICTURE menu ........................................................ 30
TIME menu.............................................................. 32
OPTION menu......................................................... 33
LOCK menu............................................................. 34
CHANNEL menu ...................................................... 32
Connecting CI(Common Interface) card................... 36
Reference................................................................. 37
Disclaimer............................................................ 37
Copyright ............................................................ 37
Dimensions ......................................................... 37
Specifications .......................................................... 38
Supported PC (D-Sub/DVI) input signal resolutions.. 39
Supported Component Video input signal resolutions
.. 39
Supported HDMI input signal resolutions ................. 40
Setting up appropriate output resolution on PC ............................ 40
Troubleshooting ....................................................... 41

English
VM2221 LCD TV
Section 1: Quick Start Guide
Welcome

English
2 Section 1: Quick Start Guide
1. Please read these instructions
Congratulations. You have a state-of-the-art at widescreen digital LCD TV which
should provide you with years of viewing pleasure. Please take a few minutes to read
these quick start instructions through before installing and using the TV.
What's in the Quick Start Guide?
Section 1 contains the Quick Start Guide which provides you with enough information
to setup the TV. This is section 1.
What's in the User Manual?
Section 2 contains the User Manual which details the features and functions of the
TV, and provides product specications and troubleshooting information for your
further assistance. The User Manual also describes how to customise the TV settings
so that you can gain the best viewing experience possible to suit your preferences
and viewing environment.
2. Package contents
Unpack the TV and check that all the following items are included:
The type of power cable supplied may differ from that illustrated, dependant upon your
region of purchase.
If any item is missing or damaged, contact your place of purchase immediately and
notify them of the discrepancy. Please keep the product documentation in a safe
place for later reference.
Dispose of packaging wisely:
•Thecardboardcartoncanberecycled.
•Donotleaveplasticbagswithinreachofyoungchildrenorbabies
•Checkthatyouhaven'tleftanaccessoryinsidethepackaging,beforeddiscarding.
For the primary safety of yourself and others, this TV should be handled with care to
avoiddamagetoitortopersonswhichcomeintocontactwithit.
All LCD screens have a very thin protective layer of glass which is liable to marking
or scratching, and cracking if struck or pressured. The liquid crystal substrate is also
liable to damage under excessive force or extreme temperatures. Please handle with
care.
LCDTV(x1) Powercord(x1) Composite
Videocable(x1)
Audio
cable(x1)
AAA
battery(x2)
Quick Start Guide/
UserManual(x1)
Remote
control(x1)
FREEZESUBTITLE GUIDE
SLEEPP.SIZE
VOL. CH.
INFO
INPUT
MENU
EXIT
S.MODE P.MODE
Warranty(x1)
Component
cable(x1)

English
Section 1: Quick Start Guide 3
3. Select and prepare the installation location
In order to prevent potential dangers and prolong the service life of the TV, please
observe the following points when installing, operating and cleaning the TV.
Do NOT place the display on an
uneven, sloping or unstable surface
where it may fall and cause damage
to itself or others.
Do NOT place the display near
water, like a spa or pool, or in
a position which will allow the
splashing or spraying of water onto
the display, like in front of
an open window where rain water
may enter.
Do NOT place the display near
or above sources of heat, such
as radiators,heaters, fuel stoves
and other heat-generating items
(including audio ampliers).
Otherwise heat may cause damages
to the outer casing as well as the
components inside.
Do NOT place the display in direct
sun or where direct sun or spot
lighting will shine onto the display,
as the heat may damage the display
and the bright light will make viewing
the display more difcult than
necessary.
Do NOT cover or block the vents and
openings while the display is switched
on, as the heat may accumulate
inside the display and result in danger.
Do NOT place the display in an
enclosed place without allowing
for ventilation. If wall mounting,
allow appropriate space on top for
attaching the display to the wall
bracket.
If wall mounting, have a suitable
qualied and experienced
tradesperson mount it safely. Ensure
that the mounting bracket (optional
accessory) is securely screw xed to
the wall structure, and not just the
wall render, lining
or cladding. Do not glue the bracket
to the wall. Use only a recommended
display wall bracket for this model
display. Ensure the bracket is level
horizontally. The dimensions of the
display are detailed in "Dimensions"
on page 37.

English
4 Section 1: Quick Start Guide
4. Installing the Base
Important safety notes
Please pay attention to the following before installing:
For safety reasons, it is recommended that the installation be carried out
by at least two adult persons.
The LCD panel of the display is extremely fragile and subject to damages
easily. Avoid touching the LCD panel when installing or moving the display,
and take precautions not be let any objects come into contact with the
panel. It is recommended that you use a soft, clean and lint-free towel to
protect the display when installing.
Pay attention to the stability of the location where the display will be
placed.
Follow the instructions below to install the TV stand:
Open the box, and make sure all necessary parts are in the box. The package
contains:
1. Cover an even stable surface with a soft cloth. Place the LCD TV unit
facedownon the cloth. Fit the stand onto the bottom of the LCD TV unit as
shown:
LCDTV
Stand
2. Then push until stand into the LCD TV’s stand socket

English
Section 1: Quick Start Guide 5
6. Connect the antenna cable
Connect a TV antenna cable y-lead from your TV antenna system or Cable TV(CATV)
to the TV input on the TV. Check to make sure that the cable connection is rmly in
place.
A poor quality TV signal will produce a poor picture and/or sound on your TV. For
high quality picture and sound ,you will need a hig quality TV signal.
Depending upon your location, for best TV signal reception, you should have a
properly aligned outdoor TV antenna system. If need be, consult a professional
antenna specialist.
This TV has a built-in analog TV tuner, which requires the TV antenna cable
connection to an external TV antenna system. If you wish to make use of the
digital LCD screen to view digital TV, you should connect an external digital TV
tuner(decoder) set to box(STB) to the TV.
5. Adjust the viewing angle
This display is equipped with a adjustable base. If necessary, turn the display screen
to an appropriate angle (maximum 15 degrees up and down) for more comfortable
viewing.
VHF/UHF IN

English
6 Section 1: Quick Start Guide
7. Connect the power cable
1. Locate the power cable from the packaging, and plug the appropriate end into
the AC IN socket on the rear of the TV (as illustrated below).
2. Connect the other end into an appropriate wall power outlet, and ip the main
power switch on the TV to the ON ( I ) position. The TV will enter standby
mode and the power indicator (on the front lower right) will light up red.
The type of power cable plug and socket illustrated may differ from the type used in
your region.
Onlyuseanappropriatepowercableforyourregion.Neveruseapowercablewhich
appearsdamagedorfrayed.Neverchangetheplugtypeonapowercable.Be
awareoftotalloadingwhenusingextensioncordsormultipleoutletpowerboards.
WARNING:
This TV has been engineered and manufactured with the highest priority on safety,
however,IMPROPERHANDLINGORUSECANRESULTINPOTENTIALELECTRICAL
SHOCKORFIREHAZARD.PleasehandlethisTVwithcare.Ifdamaged,turnoffthe
power and unplug the power cable from the TV. Transport the TV to your nearest
BenQauthorisedservicecentreforrepair.
English
Section 1: Quick Start Guide 7
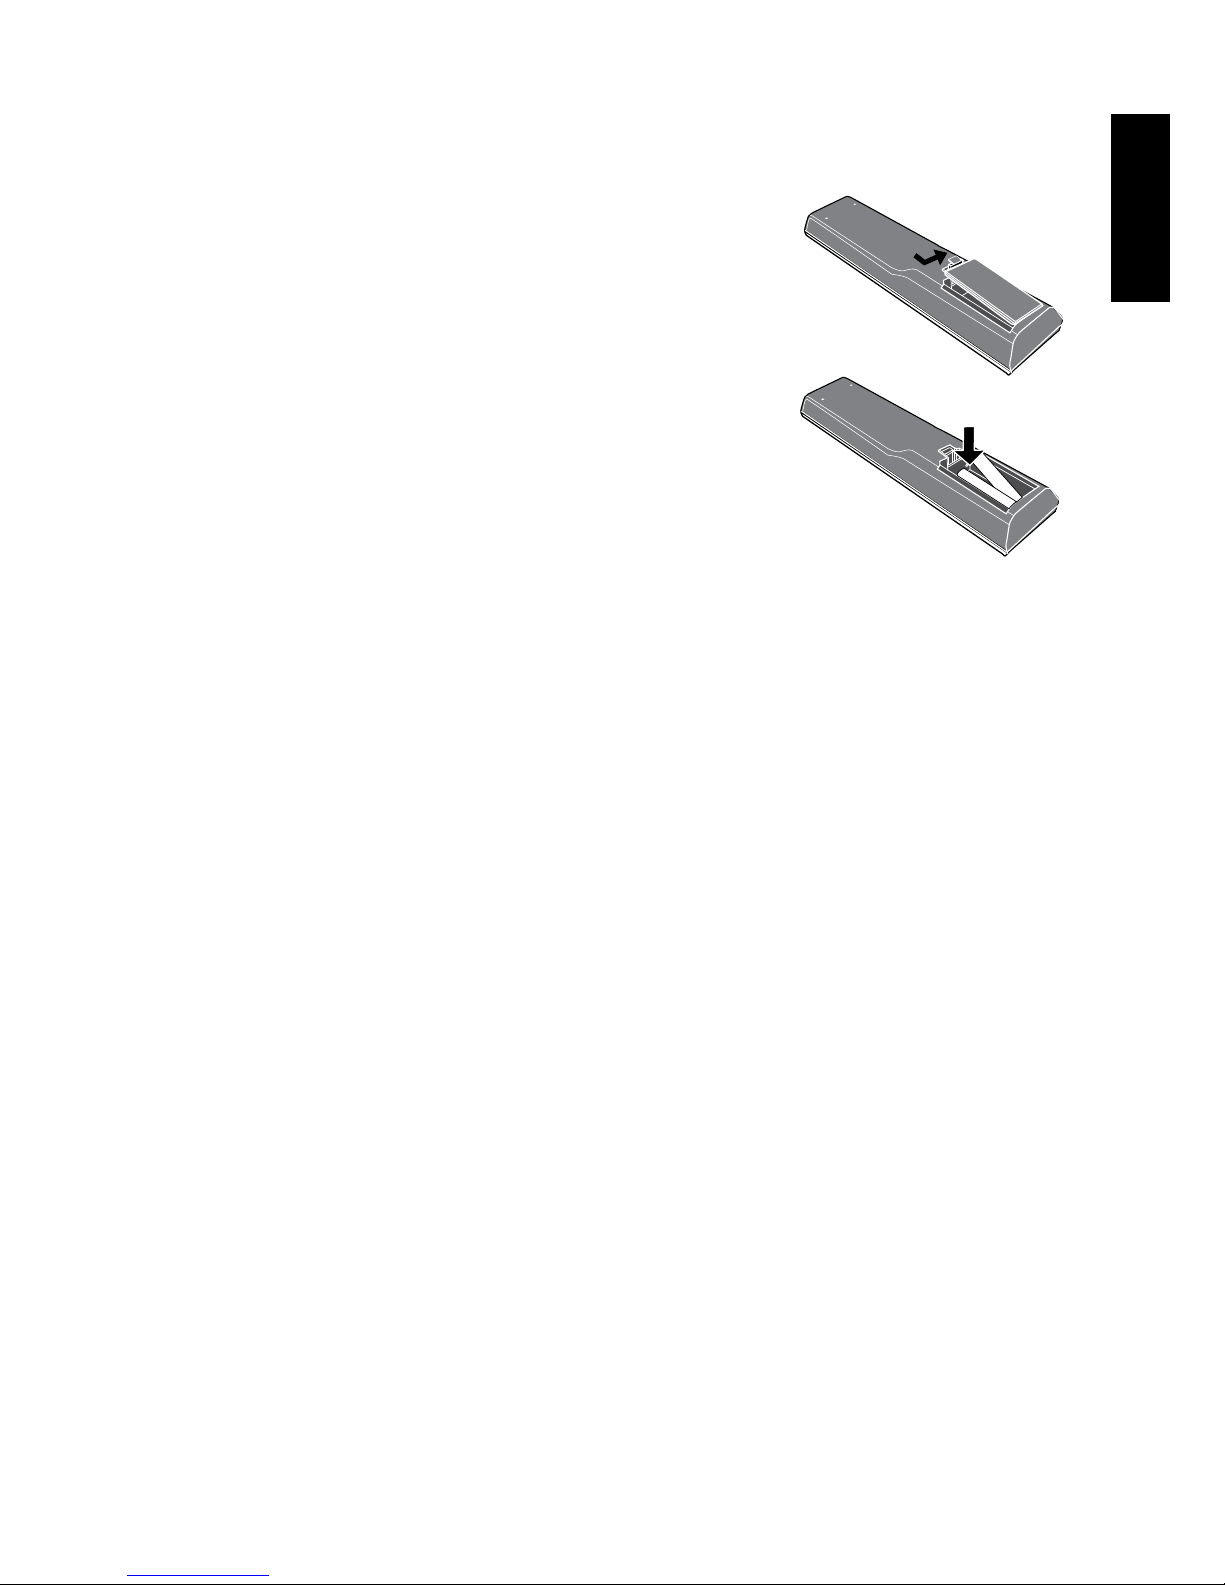
8. Activate the remote control
Installing batteries
1. Turn the remote control to reveal its back side,
and open the lid of the battery compartment.
2. Insert the batteries (supplied) ensuring that the
positive and negative marked battery terminals
match the (+) and (-) marks in the battery
compartment. Note that these batteries are
provided for your convenience so that you can
operate the display straight away. You should
replace them as soon as possible.
3. Ret the lid of the battery compartment.
Battery safety notice
The use of the wrong type of batteries may cause chemical leaks and/or
explosion. Please note the following:
Always ensure that the batteries are inserted with the positive and negative
terminals in the correct direction as shown in the battery compartment.
Different types of batteries have different characteristics. Do not mix
different types.
Do not mix old and new batteries. Mixing old and new batteries will shorten
battery life and/or cause chemical leaks from the old batteries.
When batteries fail to function, replace them immediately.
Chemicals which leak from batteries may cause skin irritation. If any
chemical matter seeps out of the batteries, wipe it up immediately using a
dry cloth.
Due to varying storage conditions, the battery life for the batteries included
with your TV may be shortened. Replace them within 3 months or as soon
as you can after initial use.
Other manuals for VM2221
1
Table of contents
Other BenQ LCD TV manuals


