Bentel Security ASD30 User manual

Rilevatore di fumo wireless ASD30
Istruzioni di installazione ed uso
Leggere queste istruzioni prima dell'installazione e dell'uso dell'ASD30
Introduzione
L'ASD30 è un rilevatore di fumo fotoelettrico wireless con un rilevatore termovelocimetrico, ed un
avvisatore acustico piezolettrico incorporato.
Dispositivi compatibili
Questo rilevatore di fumo è compatibile con i Bentel ricevitori wireless: VECTOR/RX8, VRX32-433
e VRX32-433EN.
Funzionamento
Approssimativamente ogni 7-8 secondi, l'unità verifica la presenza di una condizione di allarme
fumo o temperatura. Durante questa sequenza, l'unità esegue anche un'auto-diagnosi, e verifica
manomissioni e anomalie. Durante il funzionamento normale il LED verde lampeggia ogni 12
secondi e l'avvisatore acustico non suona.
Allarme fumo
Il rilevatore di fumo va in allarme quando il livello del segnale supera la soglia di "allarme" e si ripri-
stina automaticamente quando il livello del segnale scende al di sotto della soglia di "ripristino".
Durante un allarme, il LED lampeggia ogni secondo e l'avvisatore acustico suona la sequenza di
evacuazione.
Tacitazione allarme
Questo rilevatore di fumo è dotato di una funzione di tacitazione dell'allarme resettabile auto-
maticamente. Quando il rilevatore è in allarme, premendo il pulsante Test/Tacitazione/Reset si taci-
terà la segnalazione acustica dell'allarme e si trasmetterà un evento di ripristino dell'allarme alla
centrale. Il LED lampeggerà ogni 8 secondi (fino a 10 minuti) per indicare che l'allarme è stato taci-
tato.
Il lampeggio del LED si ferma quando l'unità ritorna al funzionamento normale. La funzione di taci-
tazione allarme diminuisce la sensibilità all'allarme fumo per la durata di 8 minuti.
La tacitazione dell'allarme non disabilita l'allarme fumo ma riduce la sua sensibilità verso il fumo.
Dopo il periodo di tacitazione, l'allarme fumo riprende automaticamente il suo funzionamento nor-
male. Se il fumo intorno all'unità è denso abbastanza da suggerire una situazione potenzialmente
pericolosa,esso resterà in allarme, o potrà ritornare rapidamente allo stato di allarme.
Guasto rilevatore
Quando il rilevatore ha un guasto generale, il LED giallo lampeggia una volta ogni 4 secondi e c'è
un cinguettio ogni 48 secondi. Dopo 12 ore, la centrale visualizzerà un messaggio di perdita della
supervisione.
Nota: L'avvisatore acustico e il LED potrebbero non essere sincronizzati.
Stato LED Avvisatore acustico
Normale Lampeggio verde ogni 12 secondi Disabilitato
Allarme
temperatura Lampeggio rosso ogni secondo ANSI S3.41 temporale 3
Test
temperatura Lampeggio rosso ogni secondo ANSI S3.41 temporale 3
Allarme fumo Lampeggio rosso ogni secondo
ANSI S3.41 temporale 3
(premere il pulsante per tacitare per 5-10
minuti)
Test fumo Lampeggio rosso ogni secondo ANSI S3.41 temporale 3

Stato LED Avvisatore acustico
(premere il pulsante per tacitare per 5-10
minuti)
Test allarme Lampeggio rosso ogni secondo ANSI S3.41 temporale 3
Guasto
rilevatore Lampeggio giallo ogni 4 secondi Un cinguettio ogni 48 secondi
Batteria
scarica Lampeggio giallo ogni 12 secondi Un cinguettio ogni 48 secondi (premere il
pulsante per tacitare per 12 ore)
Rilevatore
sporco Lampeggio giallo ogni 8 secondi Un cinguettio ogni 48 secondi
Accensione Sequenza di lampeggio rosso,
giallo, verde
Un cinguettio alla fine della sequenza di
accensione
Manomissione Sequenza di lampeggio rosso,
giallo,verde ogni 12 secondi Disabilitato
Tabella 1: Indicazioni di stato e del rilevatore
Funzione rilevatore sporco
Quando il rilevatore è contaminato, il LED giallo lampeggia una volta ogni 8 secondi e c'è un cin-
guettio ogni 48 secondi. Fare riferimento alla sezione MANUTENZIONE per la pulizia del rilevatore.
Dopo 12 ore, la centrale visualizzerà messaggio di perdita della supervisione.
Allarme temperatura
Il rilevatore andrà in allarme temperatura se c'è un rapido aumento della temperatura in un breve
periodo di tempo. Durante un allarme, il LED lampeggia 1 volta al secondo e l'avvisatore acustico
suona la sequenza di evacuazione.
Manomissione
La rimozione del rilevatore dalla base di montaggio genera una trasmissione di "manomissione".
La condizione di manomissione viene ripristinata dopo che il rilevatore sarà rimontato sulla base.
Trasmissioni wireless
Un messaggio di supervisione viene trasmesso alla centrale ad intervalli di 12 minuti. Se il segnale
non viene ricevuto la centrale stabilisce che il rilevatore è mancante. Il rilevatore trasmette quanto
segue:
lAllarme / Ripristino allarme - (allarme temperatura o fumo). Trasmesso al momento
dell'evento.
lManomissione / Ripristino manomissione - (interruttore antimanomissione attivato) ripristino
trasmesso con un ritardo fino a 10 secondi.
lBatteria scarica - (tensione batteria sotto la soglia). Tensione batteria testata e trasmessa al
momento di una supervisione o altre trasmissioni.
lAnomalia - (anomalia rilevatore o limite compensazione sensore raggiunto). Le anomalie
sono trasmesse nel momento in cui si verificano.
Batterie
Nota: Le batterie devono essere sostituite solo da persone qualificate.
3 batterie AAA alimentano il sistema di allarme temperatura e fumo wireless. Utilizzate Duracell Pro-
cell MN2400 per il rivelatore ASD30. La durata prevista delle batterie in normali condizioni d'uso è
di tre anni. Il rilevatore controlla regolarmente lo stato della batteria. Se viene rilevata una batteria
scarica, il trasmettitore invia un messaggio di batteria scarica alla centrale, che visualizza l'ID del rile-
vatore con la batteria scarica. Inoltre, il LED giallo del rilevatore lampeggerà ogni 12 secondi.
L'avvisatore acustico del rilevatore cinguetterà ogni 48 secondi (il LED giallo continua a lam-
peggiare) fino a quando le batterie non vengono sostituite. Premendo il pulsante si taciterà il cin-
guettio per 12 ore, se non esiste nessun'altra condizione di anomalia. Le batterie devono essere
sostituite quando inizia il cinguettio. Sostituirle con batterie nuove.
Installazione e sostituzione delle batterie
Per sostituire le batterie:
1. Rimuovere il rilevatore dalla sua base di montaggio ruotandolo in senso antiorario. Rimuo-
vere con attenzione le batterie sollevando l'estremità “+” usando un cacciavite a testa piatta e
smaltire secondo le normative locali.
2. Per assicurare la corretta sequenza di spegnimento,attendere almeno 20 secondi prima di
installare le batterie nuove.
3. Installare 3 batterie AAA nuove (disponibili da un rivenditore Duracell o Energizer locale) nel
vano batteria. Installare le batterie inserendo prima l'estremità “-”, poi premere l'estremità “+”
verso il basso. Se le batterie sono inserite in modo errato, rimuoverle sollevandole

dall'estremità “+” e reinserirle correttamente.
4. Reinstallare il rilevatore sulla sua base di montaggio ruotando il rilevatore in senso orario
fino a quando le tacche di accoppiamento non si allineano.
5. Dopo la sequenza di accensione, il LED verde lampeggia una volta ogni 12 secondi per indi-
care il funzionamento normale. Se le batterie non sono installate correttamente, il rilevatore
non funzionerà e le batterie si possono danneggiare. Se il rilevatore non si accende, con-
trollare che le batterie siano installate correttamente e completamente cariche.
6. Testare il rilevatore (come descritto di seguito).
L'ESPOSIZIONE COSTANTE A TEMPERATURE ALTE O BASSE O UMIDITÀ ELEVATA PUÒ
RIDURRE LA VITA DELLE BATTERIE.
Guida all’installazione
Il rilevatore di fumo wireless ASD30 deve essere installato e usato in un ambiente con un grado di
inquinamento massimo pari a 2, con categoria di sovratensione II, in luoghi non pericolosi e solo
all'interno. Questo dispositivo è concepito per essere installato solo da PERSONE QUALIFICATE
(persone qualificate sono coloro che hanno una formazione ed esperienza tecnica appropriata,
necessaria a conoscere i rischi a cui una persona può essere esposta nell'espletamento di
un'attività e delle misure per ridurre i rischi per tale persona o altre persone).
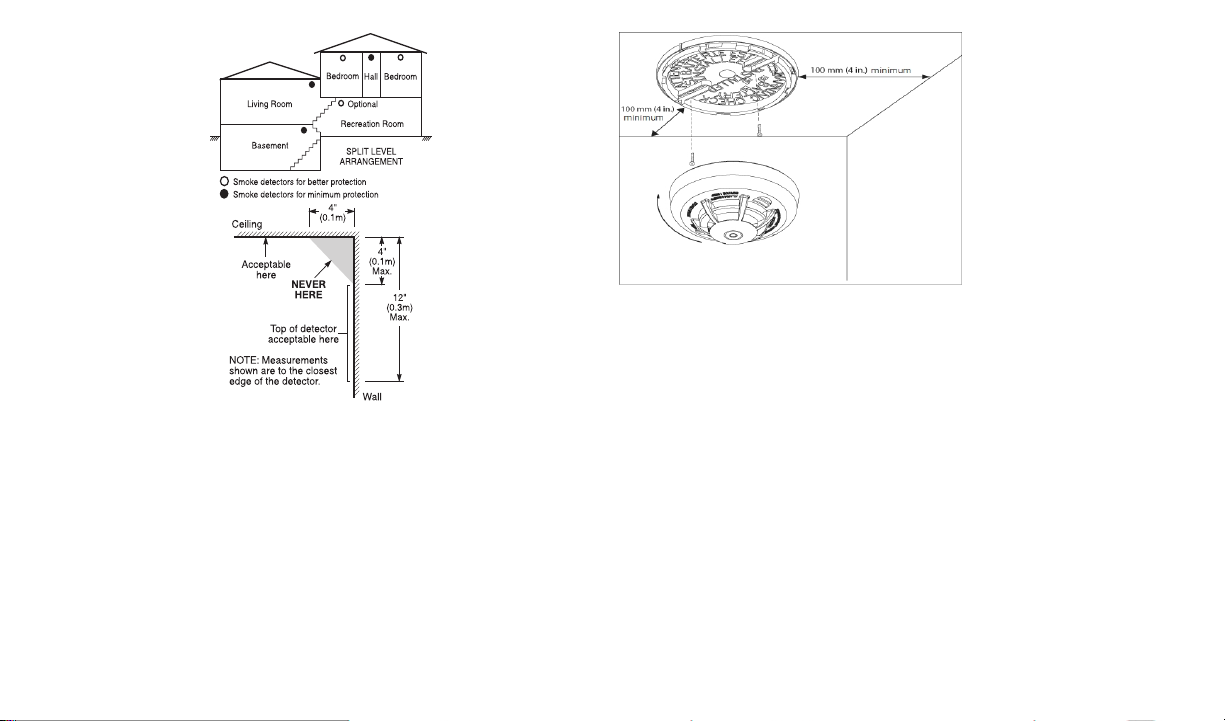
1. Posizionamento del rilevatore di fumo
La ricerca ha mostrato che tutti gli incendi in casa generano fumo in modo maggiore o minore.
Esperimenti con incendi tipici in casa indicano che le quantità rilevabili di fumo nella maggior parte
dei casi precede livelli rilevabili di calore. Per questi motivi, i rilevatori di fumo dovrebbero essere
installati davanti ad di ogni zona in cui si dorme e su ogni livello dell'abitazione.
Le informazioni seguenti sono solo una guida generale e si raccomanda di consultare i codici e le
normative antincendio locali quando si posizionano e installano rilevatori di fumo. Si raccomanda
di installare ulteriori rilevatori di fumo oltre quelli richiesti per una protezione minima. Aree aggiun-
tive che dovrebbero essere protette includono: seminterrati; camere da letto, soprattutto dove dor-
mono fumatori; cucine; locali caldaia e di servizio; e qualsiasi corridoio non protetto dai rivelatori
necessari. Su soffitti lisci, i rilevatori possono essere distanziati di 9,1m come regola generale. Una
diversa spaziatura può essere necessaria in base all'altezza del soffitto, alla circolazione dell'aria,
alla presenza di travi, a soffitti non isolati ecc. Consultare gli standard nazionali appropriati per le
raccomandazioni sull'installazione.
lNon posizionare i rilevatori di fumo in cima a soffitti a spiovente o a doppio spiovente; lo spazio
di aria morta in queste posizioni può impedire all'unità di rilevare il fumo.
lEvitare aree con flusso d'aria turbolento, come in prossimità di porte, ventole o finestre. Il
rapido movimento dell'aria intorno al rilevatore può impedire al fumo di entrare nell'unità.
lNon posizionare i rilevatori in aree ad alta umidità.
lNon posizionare i rilevatori in aree in cui la temperatura sale oltre 38ºC o scende sotto 5ºC.
Dove richiesto da altre normative, codici o standard applicabili per un tipo specifico di utilizzo, i rile-
vatori di fumo in configurazione singola e multipla devono essere installati come segue:
1. In tutte le camere da letto e nelle stanze degli ospiti.
2. Davanti a ciascuna zona in cui si dorme dell'unità abitativa, entro 6,4 m da ogni porta di
accesso alla stanza in cui si dorme, con la distanza misurata lungo il percorso.
3. Ad ogni livello di un'unità abitativa, inclusi gli scantinati.
4. Ad ogni livello di una residenza assistenziale e centro di cura (struttura piccola), inclusi gli
scantinati ed esclusi gli spazi tecnici e i sottotetti non abitabili.
5. Nella zona soggiorno di una suite per ospiti.
6. Nella zona soggiorno di una residenza assistenziale e centro di cura (struttura piccola).

Figure 1
Figura 3
Figura 3a
10cm
10cm
30cm
2. Montaggio base posteriore rilevatore di fumo
Nota: Questi dispositivi di allarme devono essere installati da un ingegnere/tecnico competente.
Questo dispositivo non dovrebbe essere usato con una protezione esterna.
Una volta trovata la posizione idonea, montare la base posteriore del rilevatore. Installare la base
posteriore a soffitto o a parete (se lo permettono i regolamenti locali) usando i fori per le viti
necessari. Usare le due viti e i tasselli forniti. Manovrare la piastra in modo che le viti siano al di
sotto delle asole di fissaggio e fissarla.
3. Montaggio
Appoggiare il rilevatore alla base allineandolo alla stessa (la tacca di allineamento del rilevatore
dovrebbe essere leggermente disallineata dalla linguetta di rilascio antimanomissione della base
di montaggio), quindi ruotare il rilevatore in senso orario fino a quando non si blocca in posizione.
4. Test unità
Nota: La centrale di vigilanza (se usata) dovrebbe essere informata prima che il test abbia inizio.
Ciò previene un falso allarme e una risposta non necessaria della centrale di vigilanza.
Avviare il test premendo il pulsante di test per 5 secondi almeno. L'attivazione dell'allarme è indi-
cata dal LED lampeggiante,dall'avvisatore acustico e dalla trasmissione del segnale di allarme alla
centrale. Il rilevatore torna al funzionamento normale quando il pulsante di testè viene rilasciato.
Nota: Aspettare almeno 20 secondi dopo l'accensione e dopo il test, il ripristino delle attivazioni per
allarme o la manomissione. Non usare il pulsante di test quando è presente del fumo.
Nota: Montaggio base posteriore rilevatore di Avviando il test, il rivelatore non andrà in allarme se
è in uno degli stati seguenti.
lAntimanomissione (rilevatore non installato sulla base di montaggio)
lProblema di compensazione
lAltre anomalie interne che potrebbero impedire un allarme fumo o temperatura

5. Registrazione del dispositivo
Il numero di serie a 6 cifre posto sul retro del rilevatore di fumo deve essere registrato sulla centrale
di allarme durante la Programmazione Installatore. Fare riferimento al Manuale di installazione del
ricevitore per maggiori dettagli. Per il test di posizionamento rimuovere il rilevatore dalla base poste-
riore (manomissione) per 1 secondo quindi riposizionarlo. Attendere almeno 30 secondi per il risul-
tato del test prima di attivarlo nuovamente.
Istruzioni per l'uso
Sicurezza antincendio in casa
Gran parte degli incendi si verificano nelle abitazioni e per ridurre questo pericolo si raccomanda
di effettuare una verifica della sicurezza antincendio della casa e lo sviluppo di un piano di fuga per
la famiglia.
Verifica della sicurezza antincendio della casa
1. Tutte le apparecchiature elettriche e le prese sono in condizioni di sicurezza? Controllare
che non ci siano cavi elettrici sfilacciati, impianti di illuminazione sovraccarichi, ecc. In caso di
dubbi in merito alla condizione delle apparecchiature elettriche o degli utilizzatori domestici,
far effettuare una valutazione professionale.
2. Tutti i liquidi infiammabili sono conservati in modo sicuro in contenitori chiusi e in aree fre-
sche e ben ventilate? Evitare di pulire il rilevatore con liquidi infiammabili.
3. Tutti i materiali pericolosi (ad es.fiammiferi) sono fuori dalla portata dei bambini?
4. Forni e bruciatori a legno sono installati correttamente, puliti e ben funzionanti? In caso di
dubbio, far effettuare una valutazione professionale.
Piano di fuga per la famiglia
Spesso c'è pochissimo tempo tra la rilevazione di un incendio ed il momento in cui diventa mortale.
Per questo motivo è molto importante sviluppare e provare un piano di fuga per la famiglia.
lOgni componente della famiglia deve partecipare al piano di fuga.
lStudiare i possibili percorsi di fuga da ogni punto della casa. Poiché molti incendi si verificano
di notte,particolare attenzione deve essere posta ai percorsi di fuga nelle aree in cui si dorme.
lÈ essenziale che la fuga da una camera da letto sia possibile senza aprire la porta interna.
Quando si creano i piani di evacuazione, considerare quanto segue:
lAssicurarsi che le porte e le finestre che si aprono verso l'interno possano essere aperte con
facilità. Assicurarsi che non vi siano chiusure verniciate e che i meccanismi di bloccaggio fun-
zionino correttamente.
lSe aprire o utilizzare l'uscita è troppo difficile per i bambini, gli anziani o i portatori di handicap,
è necessario sviluppare piani di fuga appositi per queste persone. Questo piano prevede la
certezza che coloro che devono eseguire la fuga possano sentire immediatamente il segnale
di allarme antincendio.
lSe l'uscita è sopra il livello del suolo, deve essere prevista una scala o una fune antincendio
autorizzata, nonché la formazione per il suo uso.
lLe uscite a livello del suolo devono essere tenute libere. Assicurarsi di rimuovere la neve dalle
porte di patio esterni in inverno e che le apparecchiature o gli arredi esterni non ostruiscano le
uscite.
lLa famiglia deve avere un punto di ritrovo predeterminato in cui tutti possono ritrovarsi; ad es.
dall'altro lato della strada o presso l'abitazione di un vicino.
lUna volta che tutti sono usciti dalla casa,chiamare i Vigili del Fuoco.
lUn buon piano garantisce una fuga rapida. Non investigare o tentare di spegnere l'incendio, e
non tentare di mettere in salvo oggetti o beni di valore in quanto ciò richiede tempo. Una volta
fuori, non rientrare nell'abitazione; attendere i Vigili del Fuoco.
lRealizzare un piano e provarlo di frequente in modo che in caso di emergenza tutti sanno cosa
fare. Rivedere il piano se le condizioni cambiano; ad es., se ci sono più o meno componenti
della famiglia in casa o se vengono apportate modifiche alla casa.
lAssicurarsi che il sistema di allarme antincendio sia funzionante attraverso dei testsettimanali.
Se non si è sicuri in merito al funzionamento del sistema, contattare il proprio installatore o
rivenditore del rilevatore di fumo.
lBentel raccomanda di contattare i Vigili del Fuoco e richiedere ulteriori informazioni sulla sicu-
rezza antincendio delle abitazioni e sui piani di fuga. Se disponibile, far condurre al respon-
sabile della prevenzione antincendio locale un'ispezione della sicurezza antincendio in loco.
Test del proprio rilevatore di fumo
Seguire la procedura di test descritta qui o contattare il rivenditore o installatore del proprio rile-
vatore di fumo per le istruzioni di test. Bentel raccomanda di testare l'intero sistema di allarme
almeno una volta a settimana per verificare il funzionamento di tutte le funzioni del sistema.
Test unità rilevatore di fumo
Avviare il test premendo il pulsante di test per 5 secondi (min.), l'avvisatore acustico emette un clic
durante questo tempo. Premere il pulsante fino a quanto l'allarme dell'unità non suona: un allarme
deve essere inviato alla centrale. Quando il pulsante viene rilasciato, l'allarme cessa. Se ciò non
avviene, assicurarsi che le batterie siano del tipo corretto, in buone condizioni e installate cor-
rettamente.
Dopo il completamento del test funzionale del rilevatore di fumo,verificare il corretto funzionamento
della camera di rilevamento dell'unità. Per testare la camera di rilevamento, muovere uno stoppino
o bastoncino acceso fuori l'unità fino a quando una quantità consistente di fumo non entra nella

camera di rilevamento o l'unità non va in allarme. Se il rilevatore di fumo non funziona cor-
rettamente, contattare l'installatore o il rivenditore del proprio rilevatore di fumo per assistenza.
Manutenzione a cura dell'utente
Il rilevatore di fumo è progettato per richiedere manutenzione minima. Se il contenitore diventa pol-
veroso, pulire con un aspirapolvere con una spazzola piccola. Se il contenitore è ingrassato, pulirlo
con cura con un panno morbido leggermente imbevuto con acqua e sapone.
Non smontare mai il rilevatore di fumo; non ci sono parti riparabili dall'utente all'interno
dell'unità. È possibile solo rimuovere ilrilevatore dalla base posteriore per sostituire le batterie
se non provveduto da un installatore.Quando si sostituiscono le batterie, seguire le indicazioni
specificate nelle Istruzioni di installazione.
Non verniciare l'unità. La vernice può impedire al fumo di entrare nell'unità. Se si sta pia-
nificando il rinnovo o riverniciatura, contattare il proprio installatore e chiedere che l'unità sia
temporaneamente rimossa fino a quando il lavoro non è completo.
Se l'unità si trova in un'area in cui è esposta ad alti livelli di polvere o insetti e ciò causa falsi
allarme, può richiedere assistenza; contattare il proprio l'installatore o rivenditore del rilevatore di
fumo.
Specifiche
lDiametro: 125 mm
lAltezza: 63 mm
lPeso (batteria inclusa): 243 g
lColore: Bianco
lSpaziatura:21,3 m
lSensibilità allarme (soglia) : conforme a EN14604
lSegnale udibile (ANSI Temporale 3): 85dBA min. in allarme
lSequenza temporale di evacuazione
lTemperatura di esercizio:0°C a 55°C (32°F a 131°F)
lIntervallo di funzionamento per il rilevatore di temperatura: 32ºF-100ºF (0º-37.8ºC)
lUmidità massima: 93% RH, senza condensa
lBatterie approvate per ASD30: 3 Duracell Procell MN2400 di tipo AAA
lFrequenza trasmissione supervisore: ad intervalli di 12 min.
lRilevazione batteria scarica: quando restano 14 giorni di autonomia

EULA
IMPORTANTE - LEGGERE ATTENTAMENTE: Il software DSC acquistato con o senza Prodotti e Componenti è protetto
da copyright o acquistato secondo i termini di licenza di seguito riportati:
IlContratto diLicenza con l’Utente finale (“EULA”)è un contratto legale fra l’Utente (la società, singolo o entità, che ha acquisito il
software e qualsiasihardware correlato) e la DigitalSecurityControls, divisione della Tyco SafetyProductsCanada Ltd. (“DSC”),il
produttore deisistemiintegratidisicurezza e sviluppatore delsoftware e diqualsiasiprodotto o componente correlati
(“HARDWARE”)acquistatidall’Utente. Se ilprodotto software DSC ("PRODOTTOSOFTWARE"o "SOFTWARE") è stato concepito
peressere accluso all'HARDWARE, e NOTè accluso a nuovo HARDWARE,l'Utente non può utilizzare, copiare o installare il
PRODOTTOSOFTWARE. IlPRODOTTOSOFTWAREinclude ilsoftware delcomputer e glieventualisupporti, materialistampatie
documentazione "online"o elettronica associati. Qualsiasisoftware fornito con ilPRODOTTO SOFTWAREe associato a un Con-
tratto diLicenza separato è concesso in licenza all’Utente conformemente aiterminidelsuddetto Contratto. Installando, copiando,
scaricando, archiviando, accedendo a o altrimentiutilizzando ilPRODOTTOSOFTWARE, l'Utente accetta incondizionatamente di
essere vincolato dalle condizionidelpresente Contratto diLicenza, anche se questo Contratto diLicenza è da considerarsicome
modifica diqualsiasiprecedente accordo o contratto. Qualora l'Utente non accettiiterminidelpresente Contratto diLicenza, la DSC
non concederà la licenza per ilPRODOTTOSOFTWARE, impedendone così l'utilizzo da parte dell'Utente.
LICENZA PER IL PRODOTTO SOFTWARE
IlPRODOTTOSOFTWAREè protetto da leggie da trattatiinternazionalisulcopyright, oltre che da altre leggie trattatisulla proprietà
intellettuale. IlPRODOTTOSOFTWAREviene concesso in licenza, non venduto.
CONCESSIONEDI LICENZAIlpresente EULAconcede all'Utente iseguentidiritti:
Installazione e utilizzo Software -Per ognilicenza acquisita, l'Utente può avere una sola copia delPRODOTTOSOFTWARE
installato.
Memorizzazione/Uso in rete -L'Utente non può installare, accedere a, visualizzare, eseguire, condividere e utilizzare il
PRODOTTOSOFTWAREin concomitanza su e da altricomputer,incluse stazionidilavoro, terminalie altro dispositivo elettronico digi-
tale ("Dispositivo"). In altre parole, se l'Utente dispone divarie stazionidilavoro, dovrà acquisire una licenza perciascuna stazione di
lavoro su cuiilSOFTWAREviene utilizzato.
Copia di backup -L'Utente può creare copie dibackup delPRODOTTOSOFTWARE, ma può possedere solo una copia per
licenza installata in qualsiasimomento. L'Utente può utilizzare la copia dibackup solo perl'archiviazione. Ad eccezione diquanto
espressamente stabilito nelpresente Contratto diLicenza, l'Utente non può altrimenticopiare ilPRODOTTOSOFTWARE,inclusii
materialistampatiacclusialSOFTWARE.
DESCRIZIONEDI ALTRI DIRITTI E RESTRIZIONI
Restrizioni sulla decodificazione, decompilazione e disassemblaggio -L'Utente non può decodificare, decompilare o
disassembalre ilPRODOTTOSOFTWARE,salvo quanto espressamente consentito dalla legge applicabile, nonostante tale limi-
tazione. L’Utente non può effettuare cambiamentio modifiche alSoftware senza l’autorizzazione scritta diun funzionario della
DSC. L’Utente non può eliminare qualsiasinota relativa a proprietà, marchio o etichetta dalProdotto Software. L'Utente deve adot-
tare misure ragionevoliper garantire la conformità aiterminie alle condizionidelpresente Contratto diLicenza.
Separazione dei Componenti -IlPRODOTTO SOFTWAREè concesso in licenza quale singolo prodotto. Le sue particomponenti
non possono essere separate perl'utilizzo su più diun'unità HARDWARE.
Singolo PRODOTTO INTEGRATO -Se l'Utente ha acquisito questo SOFTWAREcon HARDWARE, allora ilPRODOTTO
SOFTWAREè concesso in licenza con l'HARDWAREcome singolo prodotto integrato. In questo caso, ilPRODOTTO SOFTWARE
può essere utilizzato solo con l'HARDWAREsecondo quanto è stabilito nelpresente Contratto diLicenza.
Locazione -L'Utente non può concedere in locazione, in leasing o in prestito ilPRODOTTO SOFTWARE. L'Utente non può ren-
derlo disponibile ad altrio riportarlo su un servero sito Web.
Trasferimento del Prodotto Software - L'Utente può trasferire tuttiisuoidiritticoncessidalpresente Contratto diLicenza solo
come parte diuna vendita permanente o trasferimento dell'HARDWARE,a condizione che non trattenga alcuna copia, che tra-
sferisca tutto ilPRODOTTOSOFTWARE(comprese tutte le particomponenti, isupporti,imaterialistampati,qualsiasiaggiornamento
e ilpresente Contratto diLicenza) e che ildestinatario accettiiterminidelpresente Contratto diLicenza. Se ilPRODOTTO
SOFTWAREè un aggiornamento, qualsiasitrasferimento deve comprendere anche tutte le versioniprecedentidelPRODOTTO
SOFTWARE.
Risoluzione -La DSC può risolvere ilpresente Contratto diLicenza, senza per questo pregiudicare altrisuoidiritti, se l'Utente non si
attiene aiterminie alle condizionidelpresente Contratto diLicenza. In talcaso, l'Utente è tenuto a distruggere tutte le copie del
PRODOTTOSOFTWAREe tutte le sue particomponenti.
Marchi di fabbrica Ilpresente Contratto diLicenza non concede all'Utente dirittiin relazione a qualsiasimarchio difabbrica o diser-
vizidella DSCo deisuoifornitori.
3. COPYRIGHT. Iltitolo e idirittidiproprietà intellettuale relativialPRODOTTO SOFTWARE(compresi, ma non limitatamente a, qual-
siasiimmagine, fotografia e testo integratinlPRODOTTOSOFTWARE), imaterialistampatiacclusie qualsiasicopia delPRODOTTO
SOFTWAREsono diproprietà diDSC o deisuoifornitori. L’Utente non può copiare imaterialistampatiacclusialPRODOTTO
SOFTWARE. Iltitolo e idirittidiproprietà intellettuale relativiaicontenuti,a cuiè possibile accedere attraverso l'utilizzo del
PRODOTTOSOFTWARE, sono proprietà delrelativo proprietario deicontenutie possono essere protettida copyright applicabile e
da altre leggie trattatisulla proprietà intellettuale. Ilpresente Contratto diLicenza non concede all'Utente idirittiper l'utilizzo ditali
contenuti.Tuttiidirittinon espressamente concessidalpresente Contratto diLicenza sono riservatialla DSCe aisuoifornitori.
LIMITAZIONI DI ESPORTAZIONE-L’Utente accetta dinon esportare o riesportare ilPRODOTTO SOFTWAREin altripaesi, per-
sone o entità soggette a restrizioniall’esportazione previste dalCanada.
DIRITTO APPLICABILE-Ilpresente Contratto diLicenza delsoftware è disciplinato dalle leggidella Provincia dell'Ontario, Canada.
ARBITRATO- Tutte le controversie che dovessero insorgere in relazione alpresente Contratto saranno risolte mediante arbitrato
finale o vincolante second ilRegolamento arbitrale. Le partiaccettano divincolarsialla decisione dell'arbitro. Le partiaccettano divin-
colarsialla decisione dell’arbitro. La sede dell’arbitrato sarà Toronto, Canada, e la lingua l’inglese.
LIMITI DI GARANZIA
ESCLUSIONE DI GARANZIA -LADSC FORNISCEIL SOFTWARE“SENZAGARANZIEACCESSORIE”OSSIASENZAGARANZIA
DI ALCUNETIPO. LADSC NON GARANTISCECHEIL SOFTWARE SODDISFERÀI REQUISITI DELL'UTENTEOCHE IL
FUNZIONAMENTO DEL SOFTWARESARÀININTERROTTO OPRIVODI ERRORI.
CAMBIAMENTI DELL’AMBIENTE OPERATIVO -La DSCnon sarà responsabile perproblemicausatida modifiche delle carat-
teristiche operative dell’HARDWAREo per problemilegatiall’interazione delPRODOTTOSOFTWAREcon SOFTWAREo con
PRODOTTI HARDWAREche non sono diproprietà diDSC.
LIMITAZIONE DI RESPONSABILITÀ; LA GARANZIA RIMANDA ALL’ALLOCAZIONE DEI RISCHI - IN QUALSIASI
CIRCOSTANZA, SEQUALSIASI STATUTO COMPORTAGARANZIEO CONDIZIONI NON ESPRESSE NEL PRESENTE
CONTRATTO DI LICENZA, LARESPONSABILITÀCOMPLESSIVADELLADSC IN BASEALLEDISPOSIZIONI DEL PRESENTE
CONTRATTO DI LICENZASARÀLIMITATAALL’AMMONATREEFFETTIVAMENTE PAGATO DALL’UTENTEPER LA LICENZA
D’USODEL PRODOTTO SOFTWAREPIÙ CINQUEDOLLARI CANADESI (CAD$5,00). POICHÈALCUNE GIURISDIZIONI NON
AMMETTONO L'ESCLUSIONE OLA LIMITAZIONEDI RESPONSABILITÀ PER DANNI CONSEQUENZIALI O INCIDENTALI, LA
LIMITAZIONEDI CUI SOPRAPOTREBBENON TROVAREAPPLICAZIOENEI CONFRONTI DELL'UTENTE.
ESCLUSIONE DI GARANZIE -LA PRESENTEGARANZIACONTIENEL’INTERAGARANZIA ESOSTITUIRÀ OGNI ALTRA
GARANZIA, ESPRESSAO IMPLICITA(COMPRESETUTTELE GARANZIE IMPLICITEDI COMMERCIABILITÀ OIDONEITÀPER
SCOPI PARTICOLARI), ETUTTI GLI ALTRI OBBLIGHI O RESPONSABILITÀ DAPARTE DELLADSC. LADSC NON FORNISCE
ALTREGARANZIE. LA DSC NON SI ASSUMEULTERIORI RESPONSABILITÀNÉ AUTORIZZATERZI AD AGIREPER CONTO SUO
PER MODIFICAREOCAMBIARELA PRESENTE GRANZIA, NÉAD ASSUMERSI ALCUNAULTERIOREGARANZIAO
RESPONSABILITÀIN SUAVECERELATIVAMENTEA QUESTO PRODOTTO SOFTWARE.
RIMEDIO ESCLUSIVO E LIMITAZIONE DELLA GARANZIA -IN NESSUN CASO LADSC SARÀRESPONSABILE NEI
CONFRONTI DI TERZI PER ALCUN DANNO SPECIALE, INCIDENTALE, CONSEQUENZIALEO INDIRETTOBASATOSU
VIOLAZIONEDI GARANZIEPRODOTTI, INADEMPIENZA CONTRATTUALE, NEGLIGENZA, RESPONSABILITÀ
INCONDIZIONATAO QUALSIASI ALTRATEORIALEGALE. TALI DANNI INCLUDONO, MANON MANON SONO LIMITATI A,
PERDITADI PROFITTI, PERDITA DEL PRODOTTO SOFTWAREO DI QUALSIASI ATTREZZATURAACCLUSA, COSTODEL
CAPITALE, COSTO ATTREZZATURESOSTITUTIVE, MEZZI O SERVIZI, TEMPI DI FERMO, TEMPODEGLI ACQUIRENTI,
RIVENDICAZIONI DI TERZI, CLIENTI INCLUSI, EDANNEGGIAMENTI ALLAPROPRIETÀ.

DSC consiglia ditestare regolarmente l'intero sistema. Tuttavia, nonostante le frequentiverifiche, è possibile che questo
PRODOTTOSOFTWAREnon funzionicome previsto a causa di, ma non limitatamente a, manomissione indebita o mal-
funzionamento elettrico.
Informazioni sul riciclaggio
BENTEL SECURITY consiglia ai clienti di smaltire i dispositivi usati (centrali, rilevatori, sirene, acces-
sori elettronici, ecc.) nel rispetto dell'ambiente. Metodi potenziali comprendono il riutilizzo di parti o
di prodotti interi e il riciclaggio di prodotti, componenti e/o materiali.
Direttiva Rifiuti di Apparecchiature Elettriche ed Elettroniche (RAEE -
WEEE)
Nell'Unione Europea, questa etichetta indica che questo prodotto NON deve essere smal-
tito insieme ai rifiuti domestici. Deve essere depositato in un impianto adeguato che sia in
grado di eseguire operazioni di recupero e riciclaggio. Per maggiori informazioni visitare:
www.bentelsecurity.com.
Il rilevatore di fumo ASD30 ha una durata di servizio raccomandata di 10 anni in condizioni di uti-
lizzo normali. Fare riferimento all'etichetta applicata sul dispositivo che indica l'anno di sostituzione
raccomandato. Per l'assistenza dell'unità o la sostituzione delle batterie, chiamare la propria
società di installazione che ha fornito il sistema di allarme.
DICHIARAZIONE DI CONFORMITÀ UE SEMPLIFICATA
Con la presente, Bentel Security dichiara che il tipo di apparecchiatura radio ASD30 è conforme
alla direttiva 2014/53/UE.
Il testo completo della dichiarazione di conformità UE è disponibile al seguente indirizzo Internet:
www.bentelsecurity.com/dc.html.
Punto unico di contatto Europeo: Bentel Security, Via Gabbiano 22, Z. I. S. Scolastica, 64013 Cor-
ropoli (TE), ITALY
0359 EN14604: 2005/AC:2008
DSC, Toronto, Canada Dispositivo rilevatore di fumo
2016
0359-CPR-00627

Introduction
The ASD30 is a wireless photoelectric smoke detector with a rate of rise heat detector and an
internal piezoelectric alarm.
Compatible Devices
This smoke detector is compatible with the following Bentel Wireless Control Panels and Wireless
Receivers: VECTOR/RX8, VRX32-433 e VRX32-433EN.
Operation
Approximately every 7 to 8 seconds the unit tests for a smoke or heat alarm condition. During this
sequence the unit also performs self diagnostics, and checks for tampers and faults. During normal
operation the green LED will flash every 12 seconds and the sounder will not sound.
Smoke Alarm
The smoke detector will go into alarm when the signal level exceeds the “alarm” threshold and auto-
matically restore when the signal level falls below the alarm “restore” threshold. During an alarm
the LED will flash 1/second and the sounder will sound the evacuation temporal pattern.
Alarm Silencing
This smoke alarm is provided with an automatically resettable alarm silencing feature. When the
sensor is in alarm, by pressing the Test/Silence/Reset button it will silence the local annunciation of
the alarm and transmit an alarm restoral event to the control panel. The LED will flash every 8
seconds (for up to 10 minutes) to indicate the alarm has been silenced.
The flashing LED will stop when the unit returns to normal operation. The alarm silence feature has
a fixed time setting that desensitizes the smoke alarm for 8 minutes.
Alarm silencing does not disable the smoke alarm but rather reduces its smoke sensitivity. Fol-
lowing the silenced period the smoke alarm restores automatically to its intended operation. If
smoke around the unit is dense enough to suggest a potentially dangerous situation, it will stay in
alarm, or may return to the alarm state quickly.
Detector Trouble
When the detector has a general fault, the yellow LED blinks once every four seconds and there is
a chirp every 48 seconds.After 12 hours, the panel will display a loss of supervision message.
NOTE: The sounder and LED are notsynchronised.
Status LEDs Sounder
Normal Green flash every 12 seconds Off
Heat Alarm Red flash every second ANSI S3.41 temporal 3
Heat Test Red flash every second ANSI S3.41 temporal 3
Smoke
Alarm Red flash every second ANSI S3.41 temporal 3
(press button to hush for 5-10 minutes)
Smoke Test Red flash every second ANSI S3.41 temporal 3
(press button to hush for 5-10 minutes)
ASD30 Wireless Smoke Detector
Installation and Operating Instructions
Read this instruction sheet thoroughly before installation and use of the ASD30

Status LEDs Sounder
Test Alarm Red flash every second ANSI S3.41 temporal 3
Detector
Trouble Yellow flash every 4 seconds One chirp every 48 seconds
Low Battery Yellow flash every 12 seconds One chirp every 48 seconds (press button to
hush for 12 hours)
Detector
Dirty Yellow flash every 8 seconds One chirp every 48 seconds
Power-up Red, yellow, green, flash sequence One chirp after power-up sequence
Tamper Red, yellow, green flash sequence
every 12 seconds Off
Table 1: Detector and Status Indication
Detector Dirty Feature
When the detector has been contaminated, the yellow LED blinks once every 8 seconds and there
is a chirp every 48 seconds. Refer to the MAINTENANCE section for cleaning the detector. After 12
hours, the panel will display a loss of supervision message.
Heat Alarm
The detector will go into heat alarm if there is a rapid increase in the temperature over a short
period of time. During an alarm the LED will flash 1/second and the sounder will sound the evac-
uation temporal pattern.
Tamper
The removal of the detector from the mounting plate initiates a “tamper” transmission. The tamper
condition is restored after the detector is mounted on the plate.
Wireless Transmissions
A supervisory message is transmitted to the control panel at 12-minute intervals. If the signal is not
received the control panel determines that the detector is missing. The detector transmits the fol-
lowing:
lAlarm /Alarm Restore - (heat or smoke alarm). Transmitted at time of occurrence.
lTamper / Tamper Restore - (tamper switch activated) 10 second maximum delay on restore
before transmission.
lLow Battery - (battery voltage falls below threshold). Battery voltage is tested & transmitted at
the time of supervisory or other transmissions.
lTrouble - (detector fault or sensor compensation limit reached). Troubles are transmitted at the
time of occurrence.
Batteries
NOTE: The batteries must be replaced by service persons only.
The wireless smoke and heat alarm is powered by 3 AAA batteries. Use Duracell Procell MN2400
for the ASD30. Expected battery life is 3 years under typical use. The detector regularly checks for a
low battery. If a low battery is detected, the transmitter sends a low battery message to the control
panel, which displays the detector's ID at low battery. In addition, the yellow LED of the detector will
blink every 12 seconds. The detector's sounder will chirp every 48 seconds (yellow LEDcontinues
to blink) until the batteries are replaced. Pressing the hush button will silence the chirps for 12
hours, if no other trouble conditions exist. The batteries should be replaced when the chirps begin.
Replace the batteries with new ones.
Battery Installation and Replacement
To replace batteries:
1. Remove the detector from its mounting base by twisting the detector counterclockwise. Care-
fully remove batteries by lifting from the “+” end using a flathead screwdriver and dispose of
them according to local regulations.
2. To ensure a proper power-down sequence, wait a minimum of20 seconds before installing
new batteries.
3. Install 3 new AAA batteries (available from a local Duracell or Energizer dealer) in the battery
compartment. Install the batteries byinserting the “-” end first, then pushing the “+” end down.
If the batteries are incorrectly inserted, remove them carefully by lifting them out from the “+”

end and correctly re-inserting them.
4. Re-install the detector on itsmounting base by turning the detector clockwise until the mating
marks align.
5. After the power-up sequence, the green LED should blink once every 12 seconds to indicate
normal operation. If the batteries are not installed correctly, the detector will not operate and
the batteries may be damaged. If the detector does not power up, checkthat the batteries are
installed correctly and fully charged.
6. Test the detector (as described later).
Installation Instructions
The ASD30 series wireless smoke detector shall be installed and used within an environment that
provides the pollution degree max 2 and overvoltages category II in non-hazardous locations,
indoor only. The equipment is designed to be installed by SERVICE PERSONS only; (SERVICE
PERSON is defined as a person having the appropriate technical training and experience neces-
sary to be aware of hazards to which that person may be exposed in performing a taskand of meas-
ures to minimize the risks to that person or other persons).
1. Smoke Detector Placement
Research has shown that all hostile fires in homes generate smoke to a greater or lesser extent.
Experiments with typical fires in homes indicate that detectable quantities of smoke precede detect-
able levels of heat in most cases. For these reasons, smoke alarms should be installed outside of
each sleeping area and on each storey ofthe home.
The following information is for general guidance only and it is recommended that local fire codes
and regulations be consulted when locating and installing smoke alarms. It is recommended that
additional smoke alarms beyond those required for minimum protection be installed. Additional
areas that should be protected include: the basement; bedrooms, especially where smokers sleep;
dining rooms; furnace and utility rooms; and any hallways not protected by the required units. On
smooth ceilings, detectors may be spaced 9.1m (30 feet) apart as a guide. Other spacing may be
required depending on ceiling height, air movement, the presence of joists, uninsulated ceilings,
etc. Consult appropriate national standards for installation recommendations.
lDo not locate smoke detectors atthe top of peaked or gabled ceilings;the dead air space in
these locations may prevent the unit from detecting smoke.
lAvoid areas with turbulent air flow,such as near doors,fans or windows. Rapid air movement
around the detector may prevent smoke from entering the unit.
lDo not locate detectors in areas of high humidity.
lDo not locate detectors in areas where the temperature rises above 38ºC(100ºF) or falls below
5ºC (41ºF).
Where required by applicable laws, codes, or standards for a specific type of occupancy, approved
single- and multiple-station smoke alarmsshall be installed as follows:
1. In all sleeping rooms and guest rooms.
2. Outside of each separate dwelling unit sleeping area, within 6.4 m (21 ft) of any door to a
sleeping room, the distance measured along a path of travel.
3. On every level of a dwelling unit, including basements.
4. On every level of a residential board and care occupancy (small facility), including basements
and excluding crawl spacesand unfinished attics.
5. In the living area(s) of a guest suite.
6. In the living area(s) of a residential board and care occupancy (small facility).
2. Mount Smoke Detector Backplate
NOTE: These alarm devices should only be installed by a competent engineer / technician.
This device should not be used with a guard.
Once a suitable location is found, mount the detector backplate. Install the mounting base on the
ceiling or on the wall (if local ordinances permit) using screw locations as required. Use the two
screws and anchors provided. Maneuver the base so the screws are at the elbow of the screw slots
and secure.
3. Mounting
Fit the detector inside the base by aligning it over the base (detector's alignment notch should be
slightly offset from the mounting base tamper release tab) then turn the detector clockwise until it
clicks in place.
4. Test Unit
NOTE: The central monitoring station (if used) should be notified prior to the test being generated.
This will prevent a false alarm and an unnecessary response from the central monitoring station.
Initiate test by pressing the test button for 5 seconds minimum. Alarm activation is indicated by the
flashing LED, the sounder, and transmission of the alarm signal to the control panel. The detector
restores to normal when the test button is released.
NOTE: Allow a minimum of 20 seconds after power up and , after test, alarm or tamper restore activ-
ations. Do not use test button when smoke is present.
NOTE: If the detector is in one of the following states when a test is initiated; it will not enter an alarm
state.
lTamper (detector not installed on mounting plate)
lCompensation Trouble
lOther internal faults that could prevent a smoke or heat alarm
5. Device Enrollment
The 6-digit serial number located on the back of the smoke detector housing must be enrolled into
the alarm control panel via Installer programming. Refer to the receiver Installation Manual for

details. For placement tests remove detector from backplate for one second (tamper) then reattach.
Wait at least 30 seconds for test result before activating again.
Owner's Instructions
Fire Safety In The Home
Most fires occur in the home, and to minimize this danger, it is recommended that a household fire
safety audit be conducted and a family escape plan be developed.
Household Fire Safety Audit
1. Are all electrical appliances and outlets in safe condition? Check for frayed cords, overloaded
lighting circuits, etc. If you are uncertain about the condition of your electrical appliances or
household service, have a professional evaluation.
2. Are all flammable liquids safely stored in closed containers,and in a cool and well ventilated
area? Cleaning the unit with flammable liquids should be avoided.
3. Are hazardous materials (eg., matches) out of the reach of children?
4. Are furnaces and wood burning appliancesproperly installed, clean, and in good working
order? If in doubt, have a professional evaluation.
Family Escape Planning
There is often very little time between the detection of a fire and the time it becomes deadly.
Because of this, it is very important that a family escape plan be developed and rehearsed.
lEvery family member should participate in the escape plan.
lStudy the possible escape routes from each location within the house. Since many fires occur at
night,special attention should be given to the escape routesfrom sleeping quarters.
lIt is essential that escape from a bedroom be possible without opening the interior door. Con-
sider the following when making your escape plans:
lEnsure that doors and windows that open to the outside are easily opened. Ensure that they
are not painted shut and that the locking mechanisms operate smoothly.
lIf opening or using the exit is too difficult for children, the elderly or handicapped, plans for their
rescue should be developed. This plan includes making sure that those who are to perform the
rescue can promptly hear the fire warning signal.
lIf the exit is above the ground level, an approved fire ladder or rope should be provided, as well
as training in its use.
lExits on the ground level should be kept clear. Be sure to remove snow from exterior patio
doors in the winter and that outdoor furniture or equipment does not block exits.
lThe family should have a predetermined assembly point where everyone can be accounted for;
for example, across the street or at a neighbor’s house.
lOnce everyone is out ofthe house,call the Fire Department.
lA good plan emphasizes a quick escape. Do not investigate first or attempt to fight the fire, and
do not attempt to rescue belongings or valuables as this takes up time. Once outside, do not re-
enter the house; wait for the Fire Department.
lWrite the plan down and rehearse it frequently so that should an emergency ever arise, every-
one will know what to do. Revise the plan as conditions change; for example, when there are
more or fewer family members in the home or if there are changes to the house.
lMake sure your fire warning system is operational by conducting weekly tests. If you are unsure
about system operation, contact your smoke detector installer or dealer.
lBentel recommends that you contact your local Fire Department and requestfurther information
on home fire safety and escape planning. If available, have your local fire prevention officer con-
duct an in-house fire safety inspection.
Testing Your Smoke Detector
Follow the test procedure described here or contact your smoke detector dealer or installer for
testing instructions. Bentel recommends that you test the entire alarm system at least once a
week to verify the operation of all system functions.
Smoke Detector Unit Test
Initiate test by pressing the test button for 5 seconds (min.), the sounder makes clicking noises dur-
ing this time. Press the button until the unit alarm sounds, an alarm should be sent to the control
panel. When the button is released, the alarm should cease. If this does not occur, ensure batteries
are the correcttype, in good condition and are installed correctly.
Upon completing the functional testing of the smoke detector, check the unit’s sensing chamber to
ensure proper operation. To test the sensing chamber, wave a lit cotton wick or punk stick around
the outside of the unit until a generous amount of smoke enters the sensing chamber or the unit
alarms. If the smoke detector does not function properly,call your smoke detector installer or dealer
for service.
Owner’s Maintenance
The smoke detector is designed to require minimum maintenance. If the case becomes dusty,
vacuum with a small brush attachment. If the case is greasy, wipe the case gently with a soft cloth
slightly dampened with soapy water.
Never disassemble the smoke detector; there are no user serviceable parts inside the unit.
You may only remove detector from backplate to replace batteries if not serviced by installer.
When replacing the batteries, follow the instructions specified within the Installation Instruc-
tions.

Never paint the unit. Paint may prevent smoke from entering the unit. If you are planning renov-
ations or repainting, contact your installer and ask that the unit be temporarily removed until
work is complete.
If the unit is located in an area where it is exposed to high levels of dust or insects and causes false
alarms, it may require service; contact your smoke detector installer or dealer.
Specifications
lDiameter: 5 in (125 mm)
lHeight: 2.5 in (63 mm)
lWeight (including battery): 8.75 oz (243 g)
lColor: White
lSpacing rating:70 ft (21.3 m)
lAlarm Sensitivity (threshold): complies with EN14604
lAudible Signal (ANSI Temporal 3): 85dBA min. in alarm
lEvacuation Temporal Pattern
lOperating Temperature:0°C to 55°C(32°F to 131°F)
lOperating Temperature with Heat Detector: 32ºF-100ºF (0º-37.8ºC)
lHumidity: 93% RH, non-condensing
lApproved Batteries for ASD30: 3 AAA Duracell Procell MN2400
lSupervisory Transmission Frequency : 12 minute intervals
lLow Battery Detection: Low battery 14 days remaining

EULA
IMPORTANT - READ CAREFULLY: DSC Software purchased with or without Products and Components is copyrighted
and is purchased under the following license terms:
ThisEnd-User License Agreement (“EULA”)isa legalagreement between You (the company, individualorentitywho acquired the
Software and any related Hardware)and DigitalSecurityControls, a division of Tyco SafetyProductsCanada Ltd. (“DSC”), the man-
ufacturer of the integrated security systemsand the developerof the software and any related productsorcomponents
(“HARDWARE”)which You acquired. If the DSC software product (“SOFTWARE PRODUCT” or“SOFTWARE”)isintended to be
accompanied by HARDWARE, and isNOT accompanied bynew HARDWARE, You may not use, copy or installthe SOFTWARE
PRODUCT. The SOFTWAREPRODUCT includescomputer software, and may include associated media, printed materials, and
“online”or electronicdocumentation. Anysoftware provided along with the SOFTWAREPRODUCT that isassociated with a sep-
arate end-userlicense agreement islicensed to You underthe termsof that license agreement. Byinstalling, copying, downloading,
storing, accessing orotherwise using the SOFTWAREPRODUCT, You agree unconditionallyto be bound bythe termsof this
EULA,even if thisEULAisdeemed to be a modification of any previous arrangement orcontract. If You do not agree to the termsof
thisEULA,DSC isunwilling to license the SOFTWAREPRODUCT to You, and You have no right to use it.
SOFTWARE PRODUCT LICENSE
The SOFTWARE PRODUCT isprotected by copyright laws and internationalcopyright treaties, as wellasotherintellectualproperty
laws and treaties. The SOFTWAREPRODUCT islicensed, not sold.
GRANT OF LICENSE This EULA grants You the following rights:
Software Installation and Use -For each license You acquire, You mayhave onlyone copyof the SOFTWARE PRODUCT
installed.
Storage/Network Use - The SOFTWAREPRODUCT maynot be installed, accessed, displayed, run, shared orused concurrently
on or fromdifferent computers, including a workstation, terminalor other digitalelectronic device (“Device”). In otherwords, if You
have severalworkstations,You willhave to acquire a license foreach workstation where the SOFTWAREwillbe used.
Backup Copy -You maymake back-up copiesof the SOFTWARE PRODUCT, but You mayonlyhave one copyper license
installed at any given time. You may use the back-up copy solelyforarchivalpurposes. Except asexpressly provided in thisEULA,
You maynot otherwise make copiesof the SOFTWAREPRODUCT, including the printed materialsaccompanying the SOFTWARE.
DESCRIPTION OF OTHER RIGHTS AND LIMITATIONS
Limitations on Reverse Engineering, Decompilation and Disassembly - You may not reverse engineer, decompile, or dis-
assemble the SOFTWAREPRODUCT, except and onlyto the extent that such activityisexpresslypermitted byapplicable law not-
withstanding thislimitation. You may not make any changesormodifications to the Software, without the written permission of an
officerof DSC. You maynot remove anyproprietarynotices, marksorlabelsfromthe Software Product. You shallinstitute reas-
onable measuresto ensure compliance with the termsand conditionsof thisEULA.
Separation of Components -The SOFTWARE PRODUCT is licensed as a single product. Its component parts may not be sep-
arated for use on more than one HARDWAREunit.
Single INTEGRATED PRODUCT -If You acquired thisSOFTWAREwith HARDWARE, then the SOFTWAREPRODUCT is
licensed with the HARDWAREasa single integrated product. In thiscase, the SOFTWAREPRODUCT mayonlybe used with the
HARDWARE as set forth in thisEULA.
Rental -You may not rent, lease or lend the SOFTWARE PRODUCT. You may not make it available to othersor post it on a server or
web site.
Software Product Transfer -You may transferallof Your rights under this EULA onlyas part of a permanent sale or transferof the
HARDWARE, provided You retain no copies, You transferallof the SOFTWARE PRODUCT (including allcomponent parts, the
media and printed materials, anyupgrades and thisEULA), and provided the recipient agreesto the termsof thisEULA. If the
SOFTWAREPRODUCT isan upgrade, any transfer must also include allprior versionsof the SOFTWARE PRODUCT.
Termination -Without prejudice to anyotherrights, DSC mayterminate thisEULAif You failto complywith the termsand conditions
of thisEULA. In such event, You must destroyallcopies of the SOFTWARE PRODUCT and allof its component parts.
Trademarks -ThisEULA does not grant You anyrightsin connection with anytrademarksorservice marksof DSC oritssuppliers.
COPYRIGHT - Alltitle and intellectual property rights in and to the SOFTWARE PRODUCT (including but not limited to any images,
photographs, and text incorporated into the SOFTWAREPRODUCT), the accompanying printed materials, and anycopiesof the
SOFTWAREPRODUCT, are owned by DSC oritssuppliers. You may not copythe printed materialsaccompanying the SOFTWARE
PRODUCT. Alltitle and intellectualpropertyrightsin and to the content which maybe accessed through use of the SOFTWARE
PRODUCT are the property of the respective content owner and maybe protected by applicable copyright or otherintellectualprop-
erty lawsand treaties. ThisEULAgrants You no rightsto use such content. Allrightsnot expressly granted under thisEULAare
reserved byDSC and itssuppliers.
EXPORT RESTRICTIONS-You agree that You willnot export or re-export the SOFTWAREPRODUCT to any country, person, or
entitysubject to Canadian export restrictions.
CHOICE OF LAW- This Software License Agreement isgoverned bythe lawsof the Province of Ontario, Canada.
ARBITRATION -Alldisputes arising in connection with thisAgreement shallbe determined byfinaland binding arbitration in accord-
ance with the Arbitration Act, and the partiesagree to be bound bythe arbitrator’sdecision. The place of arbitration shallbe
Toronto, Canada, and the language of the arbitration shallbe English.
LIMITED WARRANTY
NO WARRANTY -DSC PROVIDESTHESOFTWARE“ASIS”WITHOUT WARRANTY. DSC DOESNOT WARRANT THATTHE
SOFTWAREWILL MEET YOUR REQUIREMENTS OR THAT OPERATION OF THE SOFTWARE WILL BEUNINTERRUPTED OR
ERROR-FREE.
CHANGES IN OPERATING ENVIRONMENT -DSC shallnot be responsible for problemscaused by changes in the operating
characteristicsof the HARDWARE, or for problemsin the interaction of the SOFTWAREPRODUCT with non-DSC-SOFTWARE or
HARDWAREPRODUCTS.
LIMITATION OF LIABILITY; WARRANTY REFLECTS ALLOCATION OF RISK -IN ANY EVENT, IF ANY STATUTE IMPLIES
WARRANTIESOR CONDITIONS NOT STATED IN THIS LICENSEAGREEMENT, DSC’SENTIRE LIABILITY UNDER ANY
PROVISION OF THIS LICENSEAGREEMENT SHALL BE LIMITED TO THE GREATER OF THE AMOUNT ACTUALLYPAID BYYOU
TO LICENSETHE SOFTWARE PRODUCT AND FIVECANADIAN DOLLARS (CAD$5.00). BECAUSESOMEJURISDICTIONS DO
NOT ALLOWTHEEXCLUSION OR LIMITATION OF LIABILITYFOR CONSEQUENTIAL OR INCIDENTAL DAMAGES, THEABOVE
LIMITATION MAY NOT APPLY TO YOU.
DISCLAIMER OF WARRANTIES -THIS WARRANTY CONTAINS THE ENTIRE WARRANTY AND SHALL BEIN LIEU OF ANY
AND ALL OTHER WARRANTIES, WHETHER EXPRESSED OR IMPLIED (INCLUDINGALL IMPLIED WARRANTIESOF
MERCHANTABILITYOR FITNESSFOR APARTICULAR PURPOSE)AND OF ALL OTHER OBLIGATIONSOR LIABILITIESON THE
PART OFDSC. DSC MAKESNO OTHER WARRANTIES.DSC NEITHER ASSUMESNOR AUTHORIZESANYOTHER PERSON
PURPORTINGTO ACT ON ITS BEHALF TO MODIFYOR TO CHANGETHISWARRANTY, NOR TO ASSUMEFOR IT ANYOTHER
WARRANTY OR LIABILITY CONCERNING THIS SOFTWARE PRODUCT.
EXCLUSIVE REMEDY AND LIMITATION OF WARRANTY -UNDER NO CIRCUMSTANCESSHALL DSC BELIABLEFOR ANY
SPECIAL, INCIDENTAL, CONSEQUENTIAL OR INDIRECT DAMAGESBASED UPON BREACH OF WARRANTY, BREACH OF
CONTRACT, NEGLIGENCE, STRICT LIABILITY, OR ANYOTHER LEGAL THEORY. SUCH DAMAGESINCLUDE, BUT ARE NOT
LIMITED TO, LOSSOF PROFITS, LOSSOF THE SOFTWARE PRODUCT OR ANY ASSOCIATED EQUIPMENT, COST OF CAPITAL,
COST OF SUBSTITUTEOR REPLACEMENT EQUIPMENT, FACILITIESOR SERVICES, DOWN TIME, PURCHASERS TIME, THE
CLAIMSOF THIRD PARTIES, INCL UDING CUSTOMERS, AND INJURY TO PROPERTY.
DSC recommendsthat the entire systembe completelytested on a regular basis. However, despite frequent testing, and due to,
but not limited to, criminaltampering or electricaldisruption, it is possible forthisSOFTWARE PRODUCT to failto performas expec-
ted.

Recycling information
BENTEL SECURITY recommends that customers dispose of their used equipments (panels, detect-
ors, sirens and other devices) in an environmentally sound manner. Potential methods include
reuse of parts or whole products and recycling of products, components,and/or materials.
Waste Electrical and Electronic Equipment (WEEE) Directive
In the European Union, this label indicates that this product should NOT be disposed of with
household waste. It should be deposited at an appropriate facility to enable recovery and
recycling. For specific information see: www.bentelsecurity.com.
The smoke alarm ASD30 has a recommended service life of 10 years under normal use. Please
refer to the label applied to the device indicating the recommended replacement year. For servicing
the unit or replacement batteries, please call the installation company that provided the alarm sys-
tem.
SIMPLIFIED EU DECLARATION OF CONFORMITY
Hereby, Tyco Safety Products Canada Ltd declares that the radio equipment type is in compliance
with Directive 2014/53/EU. The full text of the EU declarations of conformity for the models men-
tioned below are available at the following internet addresses:
www.bentelsecurity.com/dc.html.
European single point of contact: Bentel Security, Via Gabbiano 22, Z. I. S. Scolastica, 64013 Cor-
ropoli (TE), ITALY
0359 EN14604: 2005/AC:2008
DSC, Toronto, Canada Smoke Alarm Device
2016
0359-CPR-00627

Introduction
Le détecteur ASD30 est un détecteur de fumée photoélectrique sans fil disposant d’une consigne
de température fixe, d’une fonction de détection d’élévation de la température et d’une alarme par
capteur piézoélectrique interne.
REMARQUE: Le détecteur de chaleur basé sur l’élévation de la température n’a pas été examiné
par cULus.
Dispositifs compatibles
Ce détecteur de fumée est compatible avec les centrales et les récepteurs sans fil Bentel suivants:
VECTOR/RX8, VRX32-433 e VRX32-433EN.
Fonctionnement
L’appareil effectue une détection de fumée ou d’élévation de la chaleur toutes les 7 à 8secondes.
Au cours de cette opération, l’appareil effectue aussi un autodiagnostic et contrôle la présence de
pannes et de sabotage. Lors d’un fonctionnement normal, le voyant vert clignote toutes les
12secondes et l’avertisseur reste silencieux.
Alarme de détection de fumée
Le détecteur de fumée déclenchera une alarme lorsque le niveau de signal dépasse le seuil
«d’alarme» et se rétablira automatiquement lorsque le niveau de signal tombe en-dessous du
seuil de «rétablissement» d’alarme. Lors de l’alarme, le voyant clignotera 1fois par seconde et
l’avertisseur émettra la séquence temporelle d’évacuation.
Mise sous silence de l’alarme
Ce détecteur de fumée est doté d’une fonction de mise sous silence de l’alarme qui se réinitialise
de façon automatique. Quand le détecteur est en alarme, une pression sur le bouton Test/Si-
lence/Réinitialisation mettra sous silence l’annonce locale de l’alarme et transmettra un événement
de rétablissement d’alarme à la centrale. Le voyant lumineux clignotera toutes les 8 secondes (pen-
dant 10 minutes max.) pour indiquer que l’alarme est mise sous silence.
Le clignotement du voyant s’arrête quand l’unité retourne en fonctionnement normal. La fonction
de mise sous silence de l’alarme a une durée fixe qui désensibilise le détecteur de fumée pendant
8 minutes.
La mise sous silence de l’alarme ne désactive pas le détecteur mais réduit plutôt sa sensibilité de
détection. À la suite de la mise sous silence, le détecteur de fumée revient automatiquement au
fonctionnement prévu. Si la fumée autour du détecteur estsuffisammentdense pour supposer une
situation de danger potentiel, il reste en alarme, ou éventuellement revient rapidement à l’état
d’alarme.
Panne du détecteur
Lorsque le détecteur rencontre une panne générale, le voyant jaune clignote une fois toutes les
quatre secondes et l’avertisseur émettra une compression d’impulsions (gazouillement) toutes les
48secondes.Après 12heures,la centrale affichera une perte de message de supervision.
REMARQUE: L'avertisseur sonore et voyant ne sont pas synchronisés.
État Voyants lumineux Avertisseur
Normal Clignotement du voyant vert toutes
les 12secondes Éteint
Alarme de Clignotementdu voyantrouge À 3temps ANSI S3.41
Détecteur de fumée sans fil ASD30
Instructions d’installation et d’utilisation
Lisez soigneusement ce feuillet d’instructions avant l’installation et l’utilisation des détecteur de fumée sans fil ASD30

État Voyants lumineux Avertisseur
détection de
chaleur toutes les secondes.
Test de détection
de chaleur
Clignotementdu voyantrouge
toutes les secondes. À 3temps ANSI S3.41
Alarme de
détection de
fumée
Clignotementdu voyantrouge
toutes les secondes.
À 3temps ANSI S3.41
(appuyer sur le bouton pour mettre sous
silence pendant 5 à 10minutes)
Test de détection
de fumée
Clignotementdu voyantrouge
toutes les secondes.
À 3temps ANSI S3.41
(appuyer sur le bouton pour mettre sous
silence pendant 5 à 10minutes)
Test de l’alarme Clignotementdu voyantrouge
toutes les secondes. À 3temps ANSI S3.41
Panne du
détecteur
Clignotementdu voyantjaune
toutes les 4secondes
Une compression d’impulsions toutes les
48secondes
Batterie faible Clignotementdu voyantjaune
toutes les 12secondes
Une compression d’impulsions toutes les
48secondes (appuyer sur le bouton pour
mettre sous silence pendant 12heures)
Souillure du
détecteur
Clignotementdu voyantjaune
toutes les 8secondes
Une compression d’impulsions toutes les
48secondes
Mise en route Séquence de clignotement du
voyant rouge, jaune, vert
Une compression d’impulsions à la fin de
la séquence de mise en route
Contact anti-
sabotage
Séquence de clignotementdu
voyant rouge, jaune, verttoutes les
12secondes
Éteint
Tableau 1: Indicateur de détection et d’état
Fonction de souillure du détecteur
Lorsque le détecteur est souillé, le voyant jaune clignote une fois toutes les 8secondes et
l’avertisseur émettra une compression d’impulsions toutes les 48secondes. Consultez le
paragraphe sur la maintenance pour nettoyer le détecteur. Après 12heures, la centrale affichera
une perte de message de supervision.
Alarme de détection de chaleur
Le détecteur passera en alarme si une rapide élévation de la température est détectée sur une
courte période. Lors de l’alarme, le voyant clignotera 1fois par seconde et l’avertisseur émettra la
séquence temporelle d’évacuation.
Contact anti-sabotage
Le retrait du détecteur de la plaque de montage démarre une transmission de «sabotage». L’état
de sabotage estrestauré une fois le détecteur remonté sur la plaque.
Transmissions sans fil
Un message de supervision est transmis vers la centrale à intervalles de 12minutes Si le signal
n’est pas reçu, la centrale considèrera le détecteur manquant. Le détecteur transmet les évé-
nements suivants:
lAlarme/fin d’alarme - (alarme de détection de chaleur ou de fumée). Envoyé à chaque fois
qu’ils se produisent.
lSabotage/fin de sabotage - (contactanti-sabotage activé) délai de 10secondes au maximum
au rétablissement avant transmission.
lBatterie faible - (la tension de batterie estinférieure au seuil). La tension de la batterie esttes-
tée et transmise au moment des transmissions de supervision ou autres.
lProblème - (panne du détecteur ou limite de compensation du détecteur atteinte).Les pro-
blèmes sont transmis au moment qu’ils se produisent (un problème par intervalle de super-
vision).
Batteries
REMARQUE: Les batteries doivent être remplacées uniquement par des personnes qualifiées.
Les détecteurs de fumée et de chaleur sans fil sont alimentés par 3 piles AAA. Utilisez les piles
Duracell Procell MN2400 pour les ASD30. La durée de vie des piles est estimée à 3 ans en fonc-
tionnement normal. Le détecteur contrôle régulièrement si la tension des batteries est faible. Si un
problème de batterie est détecté, un message de batterie faible est envoyé à la centrale qui affi-
chera l’identifiant du détecteur avec une batterie faible. En plus, le voyant jaune du détecteur se
mettra à clignoter toutes les 12secondes. L’avertisseur du détecteur émettra une compression
d’impulsions toutes les 48secondes (le voyant jaune continuera de clignoter) tant que les batteries
ne sont pas remplacées. Un appui sur le bouton de mise sous silence suspendra l’émission de la
compression d’impulsions pendant 12heures, si aucun autre problème n’existe. Les batteries

doivent être remplacées quand l’émission d’une compression d’impulsions commence. Remplacez
les batteries par des neuves.
Installation et remplacement des batteries
Pour remplacer les batteries:
1. Retirez le détecteur du socle de montage en le tournant le détecteur dans le sens anti-
horaire. Retirez avec soin les batteries en les soulevant à l’aide d’un tournevis plat leur extré-
mité «+» et mettez-les au rebut en respectant la règlementation locale.
2. Pour garantir une bonne séquence de mise à l’arrêt, attendez environ 20secondes avant
d’installer les batteries.
3. Installez 3nouvelles piles AAA (disponible auprès d’un revendeur local Duracell ou Ener-
gizer) dans le compartiment des batteries.Installez les piles en insérant en premier
l’extrémité «-», puis en insérant l’extrémité «+». Si les batteries ne sont pas correctement
insérées, veuillez les retirer avec soin en soulevant leur extrémité «+», puis les réinsérer cor-
rectement.
1. Remontez le détecteur sur son socle de fixation en le tournant dans le sens horaire tant que
les marques correspondantes ne sont pas alignées.
2. Après la séquence de mise en route, le voyant vert clignotera une fois toutes les 12secondes
pour indiquer le bon fonctionnement du détecteur. Si les batteries ne sont pas installées cor-
rectement, le détecteur ne fonctionnera pas et les batteries peuvent s’endommager. Si le
détecteur ne démarre pas, vérifiez que les batteries sont bien installées et complètement
chargées.
3. Testez le détecteur (comme décrit plus loin).
UNE EXPOSITION PROLONGÉE À DES TEMPÉRATURES ÉLEVÉES OU BASSES OU À
L’HUMIDITÉ PEUT RÉDUIRE L’AUTONOMIE DES BATTERIES.
Instructions d’installation
Les détecteurs de fumée de la série ASD30 doivent être installés et utilisés dans un environnement
d’un degré 2 de pollution au maximum et de catégorie II contre les surtensions, dans des
EMPLACEMENTS PRIVÉS DE DANGER. L’équipement doit être installé uniquement par des
AGENTS DE SERVICE (un AGENT DE SERVICE est une personne qui a reçu une formation tech-
nique adéquate et qui a l’expérience nécessaire des risques encourus lors de l’installation et de
l’utilisation de cet équipement pour réduire les risques pour soi ou pour les autres personnes).
1. Positionnement du détecteur de fumée
Des recherches montrent que tous les incendies dangereux, dans les habitations,produisent de la
fumée en plusou moins grande quantité.L'expérience avecdes incendies habituels, dans leshabi-
tations, indique que des quantités mesurables de fumée précèdent des niveaux détectables de cha-
leur dans la plupart des cas. Pour ces raisons, des détecteurs de fumée doivent être installés à
l'extérieur de chaque chambre à coucher et à chaque étage de l'habitation.
Les informations suivantes sont d'ordre général et il est recommandé de consulter les régle-
mentations et les codes de prévention d'incendie locaux lors de l'installation et du positionnement
de détecteurs de fumée. Il est recommandé d'installer un nombre de détecteurs de fumée sup-
plémentaires supérieur à celui exigé pour une protection minimale. D'autres zones qui doivent être
protégées sont: le sous-sol, les chambres à coucher et en particulier celles où les fumeurs
dorment, les salles à manger, les chaufferies et les buanderies ainsi que tous les couloirs non pro-
tégés par les appareils nécessaires. Sur les plafonds lisses, les détecteurs doivent être séparés de
9,1m (30pieds) comme référence. Un espace différent peut être requis selon la hauteur du pla-
fond, la circulation d'air, la présence de poutrelles, l'absence d'isolant, etc. Pour des recom-
mandations sur l'installation, consultez la norme NFPA 72, Code d'Alarme d'Incendie National,
CAN/ULC-S553-02 ou d'autres normesnationales en vigueur.
lNe positionnez pas les détecteurs au sommetde plafondsen pointe ou à doubles pentes;
l'espace d'air mort à ces endroits peut empêcher le détecteur de fumée de fonctionner.
lÉvitez les endroits soumis à des turbulences d'air comme près de portes, ventilateurs ou
fenêtres. Une circulation rapide de l'air, autour du détecteur, peut empêcher la fumée d'entrer
dans l'appareil.
lNe placez pas les détecteurs dans des endroits extrêmement humides.

lNe placez pas les détecteurs à des endroits où la température peut s'élever au-delà de 38°C
(100°F) ou s'abaisser en-dessous de 5C (41°F).
lAux États-Unis, les détecteurs de fumée doivent toujours être installés conformément au Cha-
pitre 29de la norme NFPA 72, Code d'Alarme d'Incendie National: 29.5.1.1.
Quand il est exigé par d'autres lois, codes ou normes d'un type particulier d'établissement en
vigueur, les alarmes de station de détection de fumée simple ou multiple doivent être installées de
la façon suivante:
1. Dans toutes les chambres à coucher et chambres d'hôtes.
2. À l'extérieur de chacune des différentes zones de sommeil de l'unité d'habitation, à 6,4 m (21
pieds) de toute porte d'une chambre à coucher, avec la distance mesurée le long du trajet de
circulation.
3. À chaque étage de l'unité d'habitation, y compris les sous-sols.
4. À chaque étage d'un foyer résidentiel ou d'un établissement de soins (petit bâtiment),y com-
pris les sous-sols à l'exclusion des vides sanitaires et des greniers non aménagés.
5. Dans le ou les salons d'une suite d'invités.
6. Dans le ou les salons d'un foyer résidentiel ou d'un établissement de soins (petit bâtiment).
REMARQUE: en Australie, l’appareil ne doit pas être installé dans des endroits où la tem-
pérature ambiante normale estinférieure à 5°C ou supérieure à 45°C.
Chambre à
coucher Chambre à
coucher
Chambre à
coucher
Salle de
séjour
Cuisine
Figure 1
Figure 2
Chambre
à coucher
Chambre
à coucher
Chambre
à coucher
Salle
de séjour
Cuisine
Salle à
manger
Salle de
jeux
Figure 3
Chambre à
coucher Chambre à
coucher
Sous-sol
Salle à
manger
Salle de
séjour
Figure 3A
Corridor
Salle de jeux
Optionnel
Maison à deux niveaux
Avertisseurs de fumée pour une protection minimum
Avertisseurs de fumée pour une meilleure protection
Chambre à
coucher
Chambre à
coucher
Salle de
séjour
Sous-sol
Figure 4
Plafond
4 po.
0,1 m
4 po.
0,1 m
min.
12 po.
0,3 m
max.
Le détecteur peut
être installé à
l’intérieur de cette zone
Emplacement
acceptable
Jamais dans
cette zone
Mur de
côté
NOTE:La circonférence
du détecteur ne doit
pas dépasser les
limites indiquées
2. Plaque arrière d’un détecteur de fumée
REMARQUE: Ces dispositifs d’alarme doivent exclusivement être installés par un tech-
nicien/ingénieur compétent.
Cetappareil ne doit pas être utilisé avec un cache.
Une fois l’emplacement convenable trouvé, montez la plaque arrière du détecteur. Installez le socle
de fixation au plafond ou sur un mur (si les règlementslocaux le permettent) à l’aide du gabarit des
vis si nécessaire. Utilisez les deux vis et chevilles fournies. Ajustez le socle de sorte que les vis se
positionnent à l’extrémité de la fente des vis et serrez.
Table of contents
Languages:
Other Bentel Security Smoke Alarm manuals

Bentel Security
Bentel Security FC400PH User manual

Bentel Security
Bentel Security 601PH User manual

Bentel Security
Bentel Security ZT100P User manual

Bentel Security
Bentel Security FC400P User manual

Bentel Security
Bentel Security FireClass FC400P User manual

Bentel Security
Bentel Security RF-501t User manual

Bentel Security
Bentel Security RF 501t User manual


